Skip to content
DisclaimerTerms Of UseGDPR PolicyCookie Policy

Cooking Wells

  • Home
  • Drinks
  • Appetizers
  • Dinner
  • Dessert
  • About
  • Contact
  • Privacy Policy
DisclaimerTerms Of UseGDPR PolicyCookie Policy

Mia

- Ground beef or turkey - Canned black beans and corn - Diced tomatoes with green chilies - Taco seasoning and salsa - Tortilla chips and shredded cheddar cheese For this Easy Taco Casserole, you need just a few main ingredients. First, choose either ground beef or turkey. Both options work well and taste great. Next, grab a can of black beans and a can of corn. These add fiber and protein. You will also need a can of diced tomatoes with green chilies. This adds a nice kick to your dish. Taco seasoning is a must for that classic taco flavor. Don’t forget the salsa; it adds moisture and extra taste. Lastly, tortilla chips are key for crunch. You will crush them slightly for layering. Shredded cheddar cheese brings everything together with its meltiness. These ingredients create a tasty and comforting meal. - Sour cream - Fresh cilantro - Guacamole To make your casserole even better, consider garnishing it. Sour cream adds creaminess and coolness. Fresh cilantro gives a pop of color and flavor. Guacamole can also enhance the dish with its richness. These garnishes make your Easy Taco Casserole look and taste even more amazing. You can find the full recipe for this easy dish at the end of this article. 1. Preheat your oven to 350°F (175°C). This makes sure your casserole bakes evenly. 2. In a large skillet, cook the ground meat. Use medium heat and break it apart as it cooks. It should take about 5-7 minutes to brown. Drain any extra fat. 3. Mix in the seasonings. Stir in taco seasoning, black beans, corn, diced tomatoes, and salsa. Cook for another 3-5 minutes until it's hot and tasty. 1. Layer the tortilla chips. Grease a 9x13 inch baking dish. Start with half of the crushed tortilla chips at the bottom. 2. Add the meat mixture. Spoon half of the cooked meat over the chips. Sprinkle half of the shredded cheddar cheese on top. 3. Repeat the layers. Place the rest of the tortilla chips, meat mixture, and cheese on top. This creates a nice, thick casserole. 1. Bake it in the oven. Put your dish in the preheated oven for 20-25 minutes. The cheese should be melted and bubbly. 2. Let it cool. After baking, allow the casserole to cool for a few minutes before serving. This helps it set. Feel free to drizzle sour cream and sprinkle fresh cilantro on top for a finishing touch. You can find the Full Recipe at the top. Enjoy your meal! - How to perfectly brown ground meat: Start with a hot skillet. Add your ground meat without crowding the pan. Use a spatula to break it apart. Let it sit for a moment before stirring. This helps it brown well. Cook until no pink remains. - Best practices for layering ingredients: Use a greased baking dish for easy serving. Start with half of the crushed tortilla chips at the bottom. Add half of the meat mixture next, followed by half of the cheese. Repeat this step. Proper layering keeps all flavors mixed and prevents sogginess. - Presentation tips for serving: Serve directly from the baking dish for a casual feel. Use a large spoon to scoop out portions. Add fresh cilantro on top for a pop of color. You can also serve with sour cream and guacamole on the side to enhance the dish. - Pairing ideas (sides and drinks): Pair your casserole with a fresh salad or chips and salsa. A light beer or a fruity soda works well as a drink. These options balance the flavors and make the meal feel complete. - Overcooking or undercooking the casserole: Keep an eye on the timer. Bake until the cheese is melted and bubbly. If you overcook, the dish can dry out. If you undercook, the flavors won’t meld properly. - Choosing the wrong cheese types: Use a good melting cheese like cheddar. Avoid cheeses that do not melt well, like feta. This choice makes a big difference in your casserole’s texture and taste. {{image_2}} You can easily make this dish your own. For a vegetarian option, swap the meat for beans or lentils. Black beans work great and add protein. Lentils give a nice texture and flavor. Both options keep the dish filling and tasty. If you're gluten-free, use alternative chips. Look for corn chips or rice-based options. They still give that crunchy texture you want. You won’t miss out on flavor with these swaps. Want more kick? Add jalapeños to the mix. You can chop them finely and stir them in with the meat. If you like it spicier, use fresh or pickled jalapeños. They add a fun pop of heat. Experiment with cheese varieties too. Try pepper jack for a spicy twist. Or go for a blend of cheeses for rich flavor. Mixing cheeses can really elevate this dish. You can switch up the taco seasoning if you want. Use homemade seasoning for a unique taste. Simply mix chili powder, cumin, garlic powder, and onion powder. This way, you control the flavor. Incorporate seasonal vegetables for freshness. Bell peppers, zucchini, or corn are great choices. Just chop them up and mix them in with the meat. This adds color and nutrition, making your casserole even better. For the full recipe, check out the Taco Fiesta Casserole. To keep your Easy Taco Casserole fresh, use an airtight container. This helps lock in moisture. Store it in the fridge. It stays good for about 3 to 4 days. You can also cover the dish with plastic wrap or foil. Just make sure it’s tight. When reheating, the oven works best. Preheat it to 350°F (175°C). Place the casserole in an oven-safe dish. Cover it with foil for the first 15 minutes. This keeps it from drying out. After that, bake for another 10 to 15 minutes. You can also use a microwave. Heat in short bursts, stirring in between. This helps keep the texture nice. To revive those tasty flavors, add a bit of salsa or sour cream on top. This brings back the deliciousness! If you want to freeze your casserole, first let it cool completely. Cut it into portions for easy thawing. Wrap each piece tightly in plastic wrap, then put it in a freezer bag. Mark the date on the bag. It can stay in the freezer for up to 3 months. When you’re ready to eat, move it to the fridge overnight to thaw. After thawing, reheat it as mentioned above. This way, your casserole tastes just as good as fresh! For the full recipe, check the earlier section. Easy Taco Casserole lasts about 3 to 5 days in the fridge. Store it in an airtight container. Check for signs of spoilage like off smells or mold. If it smells funny or looks bad, throw it out. Yes, you can prepare the casserole ahead of time. Just make it the night before. Layer the ingredients, then cover and refrigerate. Bake it the next day. It’s almost as easy as the full recipe itself. You can serve many sides with this dish. Here are some ideas: - Spanish rice - Guacamole - Fresh salad - Refried beans - Corn on the cob These sides add fun flavors and make the meal more complete. Absolutely! You can swap ground beef for turkey or chicken. Each meat brings a different taste. You can even use plant-based options like lentils or beans. This makes the dish versatile and fun! Easy Taco Casserole combines simple ingredients and straightforward steps. You can use ground beef, black beans, and diced tomatoes. Layer it up with tortilla chips and cheese for a crowd-pleasing dish. Don't forget the optional garnishes like sour cream or guacamole for extra flavor. Remember to avoid common mistakes like overcooking and choosing the wrong cheese. Feel free to customize based on your tastes. This dish also stores well, making it perfect for leftovers. Enjoy creating your perfect taco experience!

Easy Taco Casserole Flavorful and Simple Dinner Dish

Looking for a quick and tasty dinner idea? Let me introduce you to my Easy Taco Casserole! This dish combines

To make tasty baked jalapeno poppers, you need a few key ingredients. Here’s what you will use: - 12 fresh jalapeños - 8 oz cream cheese, softened - 1 cup shredded sharp cheddar cheese - 1/2 cup breadcrumbs - 1/4 cup green onions, finely chopped - 2 cloves garlic, minced - 1 teaspoon smoked paprika - 1/2 teaspoon cumin - Salt and pepper to taste - Olive oil (for drizzling) These ingredients work together to create a creamy and spicy filling. The jalapeños bring the heat, while the cheeses provide a rich texture. You can add extra flavor to your poppers with a few optional spices. Here are some ideas: - Chili powder for more heat - Onion powder for depth - Fresh herbs like cilantro for a fresh twist Feel free to experiment! Adding spices can change the taste of the poppers. This lets you customize them to fit your own style. Having the right tools makes cooking easier. Here’s what you will need: - A sharp knife for cutting jalapeños - Mixing bowls for combining ingredients - A baking sheet lined with parchment paper - A spoon for filling the jalapeños These tools help you prepare your poppers quickly and efficiently. With everything ready, you will enjoy making this dish from start to finish. For more details, check out the Full Recipe. First, gather your fresh jalapeños. You need twelve firm ones for the best flavor. Cut each pepper in half lengthwise. Use a small spoon to remove the seeds and membranes inside. Be careful; the seeds can be spicy. I recommend wearing gloves during this step. This helps protect your hands from the heat. Next, grab a medium bowl. Add 8 ounces of softened cream cheese. Then, toss in 1 cup of shredded sharp cheddar cheese. Add 1/4 cup of finely chopped green onions and 2 minced garlic cloves. Sprinkle in 1 teaspoon of smoked paprika and 1/2 teaspoon of cumin. Season with salt and pepper. Mix everything together until it's smooth and creamy. This filling is the heart of your poppers, so make sure it's well blended. Now, it’s time to fill those jalapeño halves. Spoon the cheese mixture into each pepper, filling them generously. Don’t be shy; the more filling, the better! In a small bowl, mix 1/2 cup of breadcrumbs with a drizzle of olive oil. This will help the breadcrumbs crisp up in the oven. Sprinkle the breadcrumb mixture over the cheese-filled jalapeños. Place the stuffed jalapeños on a baking sheet lined with parchment paper. Preheat your oven to 375°F (190°C). Bake the poppers for 20-25 minutes. Look for them to turn golden brown and tender. Once they’re done, let them cool a bit on the baking sheet. Enjoy these tasty bites right away! For the full recipe, check back for more details on preparation and presentation. When picking jalapeños, look for firm ones. They should be bright green with smooth skin. Avoid any soft or wrinkled peppers. Fresh jalapeños have a strong smell. This means they are ripe and ready for your poppers. You can also check the stems; they should be green and fresh. If you like heat, choose smaller jalapeños. They tend to be spicier than larger ones. To make your poppers healthier, use low-fat cream cheese. This swap cuts calories but keeps the flavor. You can also add veggies like spinach or corn to the cheese mix. These add nutrition and taste. Use whole wheat breadcrumbs for added fiber. Drizzling a little olive oil helps the poppers crisp up without frying. Baking is a great way to enjoy the poppers without all the extra fat. For an eye-catching platter, arrange the poppers on a colorful dish. You can garnish them with chopped green onions. A dollop of sour cream or Greek yogurt adds creaminess. If you want a kick, serve with a side of salsa or ranch dressing. These dips balance the heat of the jalapeños. You can also pair the poppers with fresh veggies like carrot sticks and celery. This adds crunch and color to your spread. For the full recipe, check out the section above. {{image_2}} You can easily make these poppers vegetarian or vegan. For a vegetarian twist, use ricotta cheese or goat cheese. These cheeses add a creamy texture without meat. To make them vegan, substitute cream cheese with a plant-based version. You can also use nutritional yeast for a cheesy flavor. Add some black beans or corn for extra texture and taste. These swaps make the dish fun and tasty for everyone. The cheese you use can change the flavor a lot. I love mixing cheddar with pepper jack for a spicy kick. You could also try cream cheese with feta for a tangy twist. A blend of mozzarella and provolone gives a gooey texture. Experimenting with different cheeses makes each batch unique. You can find what you like best through some taste tests. Toppings can take your jalapeño poppers to the next level. Try adding bacon bits for a crunch and smoky flavor. A drizzle of sriracha or hot sauce gives it a nice kick. You can also sprinkle some chopped herbs like cilantro or parsley for freshness. For a sweet touch, a bit of honey or agave syrup on top can balance the spice. These small touches can make your poppers extra special. Don't forget to check out the Full Recipe for all the details! To keep your baked jalapeno poppers fresh, store them in an airtight container. Let them cool first. Place a layer of paper towel at the bottom of the container. This helps absorb extra moisture. You can keep them in the fridge for up to four days. If you want them to last longer, freezing is the best option. To reheat your baked jalapeno poppers, preheat your oven to 350°F (175°C). Place the poppers on a baking sheet. Cover them with foil to keep them moist. Bake for about 10-15 minutes. This method keeps them crispy and tasty. You can also use a microwave, but the oven is better for texture. You can freeze baked jalapeno poppers after they cool. Wrap each popper tightly in plastic wrap. Place them in a freezer bag or airtight container. They can stay frozen for up to three months. When you are ready to eat, thaw them in the fridge overnight. Then, follow the reheating instructions above. Enjoy your tasty treat later! For the full recipe, check the recipe section. Yes, baked jalapeno poppers can be spicy. Jalapeños have a mild to medium heat. If you want less heat, remove the seeds and membranes. This part of the pepper holds most of the spice. You can also choose milder peppers if you prefer. Yes, you can make baked jalapeno poppers ahead of time. Prepare them up to the baking step, then refrigerate. When ready to bake, just pop them in the oven. They will taste fresh and delicious. Many sauces go well with jalapeno poppers. Creamy ranch or blue cheese dip is a classic choice. You can also try salsa or guacamole for a fresh twist. For a bit of heat, serve with hot sauce or spicy aioli. These dips will enhance the fun and flavor of your poppers! Check out the full recipe for more ideas. You now have all you need to make baked jalapeno poppers. We covered essential ingredients and optional spices to enhance flavor. I shared step-by-step instructions for easy prep and baking. Tips for choosing jalapenos and making healthy versions will help you succeed. Plus, don't forget about variations to fit your taste. Store leftovers properly, and you can enjoy them later. Remember, poppers pair well with great dipping sauces for extra fun. Enjoy your cooking adventure!

Baked Jalapeno Poppers Tasty and Simple Recipe

If you love spicy snacks, Baked Jalapeno Poppers are a must-try! They’re easy to make and pack a punch of

- 3 medium apples (Fuji or Honeycrisp) - 1 teaspoon cinnamon - 1 tablespoon coconut sugar (optional) - Pinch of salt - Apple corer or sharp knife - Mandoline slicer (optional) - Baking sheets and parchment paper To make these healthy baked apple chips, you need just a few simple ingredients. I love using Fuji or Honeycrisp apples because they add a sweet flavor. You can also adjust the sweetness with coconut sugar, but it’s not a must. Cinnamon gives a warm spice that pairs perfectly with apples. A pinch of salt helps balance the flavors. For tools, an apple corer or a sharp knife is key for prepping the apples. A mandoline slicer makes slicing faster and ensures even pieces. Baking sheets lined with parchment paper help the chips bake evenly and prevent sticking. This simple recipe packs flavor and crunch. You can find the full recipe in the article above. Enjoy making these tasty snacks! - Preheat your oven to 225°F (110°C). - Line two baking sheets with parchment paper. - Wash the apples thoroughly, removing any dirt. - Core the apples using an apple corer or sharp knife. - Slice the apples very thinly, about 1/8 inch thick. A mandoline slicer makes this easier. - In a small bowl, mix together the cinnamon, coconut sugar, and a pinch of salt. - Arrange the apple slices in a single layer on the prepared baking sheets. - Lightly sprinkle the cinnamon mixture over the apple slices, covering them evenly. - Bake the apple slices in the preheated oven for 1 to 1.5 hours. Flip them halfway through. - Once done, remove the baking sheets from the oven. Let the chips cool completely on the sheets. They will get crisper as they cool. For the full recipe, check out the detailed instructions. Enjoy these tasty snacks! To get that perfect crunch, slice your apples thin. Aim for about 1/8 inch thick. If the slices are too thick, they will not crisp up well. A mandoline slicer can help you get even slices. Flipping the chips halfway through baking is also key. This helps them cook evenly and become crispy all over. You can make your apple chips even tastier by adding spices. Nutmeg and allspice add great flavors. Just a sprinkle can change the taste. You might also want to try adding a touch of vanilla extract. This gives a sweet aroma and deepens the flavor. When serving your baked apple chips, think about how to make them look fun. Place them in a colorful bowl or on a nice platter. You can also garnish them with a sprinkle of cinnamon or some chopped nuts. This adds a nice touch and makes them more appealing to share. {{image_2}} Choosing the right apple makes a big difference. I love using Fuji or Honeycrisp apples. They are sweet and crisp, perfect for baking. Tart apples like Granny Smith can also work well. They add a nice zing to your chips. Mixing sweet and tart apples can create a fun flavor balance. You can play with sweetness levels in your apple chips. If you like it sweeter, try adding coconut sugar or another sweetener. You could also use natural sweeteners like honey or maple syrup. These add a unique taste and keep the chips healthy. Remember, you can adjust the amount based on your preference. Want to make your apple chips even better? You can mix in dried fruits or nuts before baking. This adds extra texture and flavor. After baking, consider drizzling your chips with a little chocolate. It turns a simple snack into a special treat. You can have fun experimenting with different ingredients to find your favorite mix. Enjoy the full recipe to explore all these variations! To keep your apple chips fresh, use an airtight container. This helps prevent air from getting in. Store them at room temperature. Avoid placing them in sunny spots or near heat sources. A dark, cool place works best. If you have a lot, consider separating them in layers with parchment paper. This method stops them from sticking together. Your apple chips will stay fresh for about a week when stored properly. After this time, they may lose their crunch. Signs of staleness include a soft texture or lack of flavor. If you notice these signs, it’s time to re-crisp them or toss them out. If your apple chips become soft, don’t worry! You can easily bring back their crunch. Preheat your oven to 200°F (93°C). Spread the chips on a baking sheet in a single layer. Bake them for about 10 to 15 minutes. Keep an eye on them to avoid burning. Remove them when they feel crisp again. Enjoy your snacks fresh and crunchy! For the full recipe, check out the steps provided earlier. Yes, you can use many fruits! Here are some great options: - Pears: They get sweet and chewy. - Bananas: They turn crispy and have a nice flavor. - Sweet potatoes: They give a savory twist. - Mangoes: They add a tropical taste. Feel free to experiment with different fruits. Just slice them thinly, like apples, and follow the same steps. Each fruit brings its own unique taste and texture. Yes, baked apple chips are healthy. Here’s why: - Low in calories: They make a great snack without extra calories. - High in fiber: Apples have fiber that helps your digestion. - Packed with vitamins: Apples are rich in vitamin C and antioxidants. These chips are a smart choice for any snack time. They satisfy your sweet tooth without added sugars. You can easily make apple chips without sugar. Here are some tips: - Skip the sugar: Just use apples and spices like cinnamon. - Use ripe apples: They naturally taste sweeter when fresh. - Add a splash of lemon juice: This boosts flavor and keeps apples fresh. This way, you enjoy a healthy snack that is still tasty. You can adjust the spices to find your favorite mix. This blog post covered how to make tasty baked apple chips. You learned the right ingredients, tools, and steps for perfect chips. I shared tips for crispiness and flavor, plus variations to try. Remember to store your chips well for maximum freshness. Making these snacks is easy, fun, and healthy. You can enjoy them alone or with friends. Try out different apples and spices to find what you love. Happy baking!

Healthy Baked Apple Chips Simple and Tasty Snack

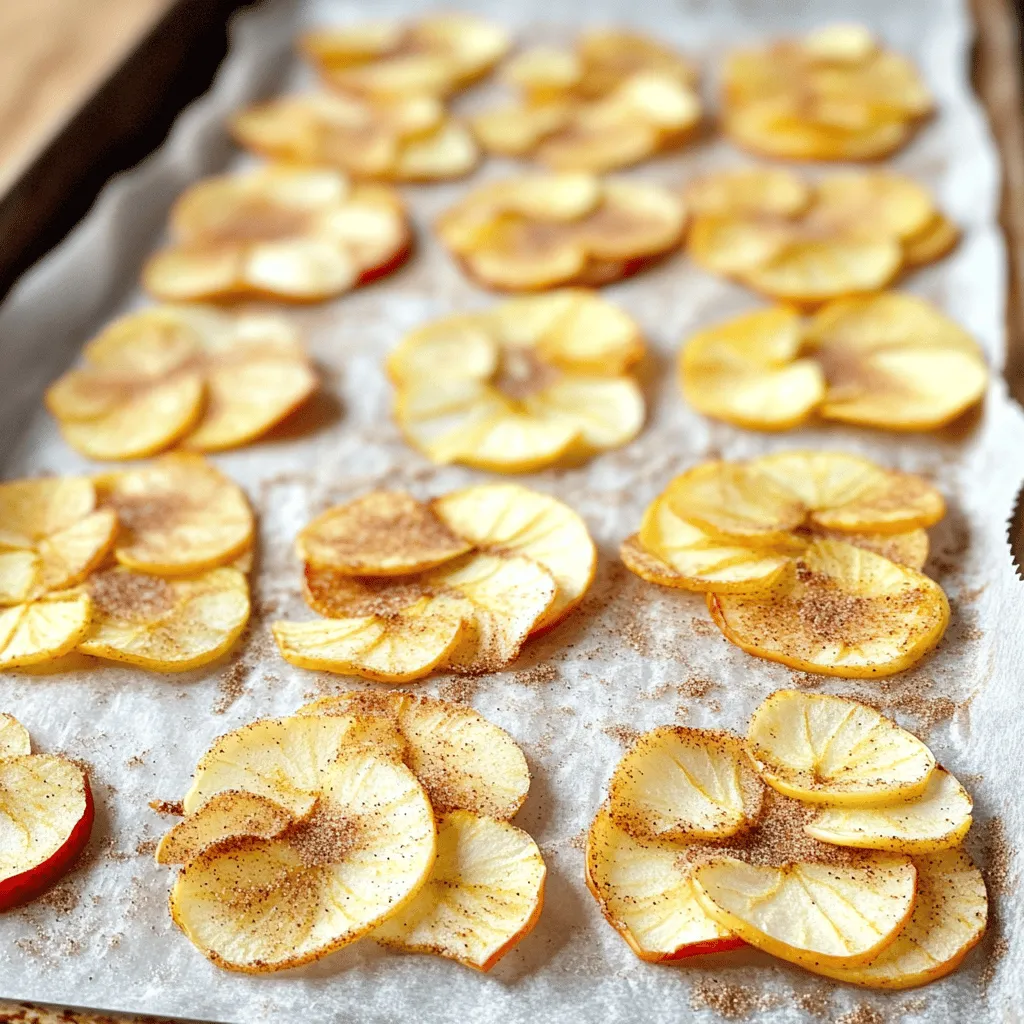
Looking for a quick and healthy snack? Try these tasty baked apple chips! They are easy to make and perfect

When I make Lemon Garlic Baked Cod, I focus on fresh and simple ingredients. Here is what you will need for this dish: - Cod Fillets - 4 cod fillets (about 6 oz each) - Marinade Components - 4 tablespoons olive oil - 3 cloves garlic, minced - 1 lemon, zest and juice - 1 teaspoon dried oregano - 1 teaspoon paprika - Salt and pepper, to taste - Garnishes and Serving Suggestions - Fresh parsley, chopped (for garnish) - Lemon wedges (for serving) These ingredients create a bright and flavorful meal. The cod fillets soak up the lemon and garlic, making each bite delicious. For the full recipe, check the previous section. Enjoy cooking! Preheating the Oven First, you must preheat your oven to 400°F (200°C). This helps cook the cod evenly and keeps it moist. Making the Marinade In a small bowl, whisk together these ingredients: - 4 tablespoons olive oil - 3 cloves garlic, minced - 1 lemon, zest and juice - 1 teaspoon dried oregano - 1 teaspoon paprika - Salt and pepper, to taste This marinade adds flavor and keeps the fish tender. Marinating the Cod Place your cod fillets in a baking dish. Pour the marinade over them, ensuring each fillet is well-coated. Let it marinate for 15 to 20 minutes while the oven heats up. This waiting time allows the fish to absorb all those delicious flavors. Setting the Baking Dish Once marinated, make sure the cod is in a single layer in your baking dish. This helps it cook evenly. Cooking Time and Temperature Put the baking dish in your preheated oven. Bake the cod for 12 to 15 minutes. The fish should be flaky and white when done. Determining Doneness To check if the cod is cooked, use a fork. If it flakes easily, it is ready. Avoid overcooking, as this can make the fish dry. Presentation Tips For a nice look, serve the cod on a bed of sautéed spinach or alongside roasted vegetables. Drizzle any leftover marinade from the baking dish over the cod for extra flavor. Recommended Side Dishes Pair your lemon garlic baked cod with a fresh salad or rice. These sides complement the dish well. Serving with Sauce You can serve the cod with lemon wedges on the side. This adds a zesty kick. Enjoy your meal! For the complete recipe, you can refer to the full recipe. - Ensuring Perfectly Flaky Fish To get flaky fish, bake it at 400°F (200°C). This high heat cooks the cod fast and keeps it moist. Use a fork to check if it flakes easily. If it does, it’s ready to eat. - Adjusting Cooking Time for Thickness The thickness of your cod fillets affects cooking time. Thinner fillets may need only 12 minutes. Thicker ones can take up to 15 minutes. Always check for doneness to avoid overcooking. - Using Fresh vs. Dried Ingredients Fresh ingredients often add more flavor. For example, fresh garlic has a stronger taste than dried. However, dried herbs like oregano last longer and are great when fresh ones are not available. - Adding Spices or Herbs Feel free to boost flavor by adding spices. A pinch of red pepper flakes can add heat. Fresh dill or thyme can give a unique twist to your dish. - Utilizing Citrus Variations While lemon is classic, you can use lime or orange for a different taste. Each citrus fruit brings its own zing, making your cod dish exciting. - Experimenting with Marinades Marinades are key to flavor. Try adding soy sauce or honey for a sweet-savory combo. Mixing flavors can create a dish that feels new each time you make it. For the complete recipe, check out [Full Recipe]. {{image_2}} What other fish can I use for this recipe? You can try other white fish like haddock or snapper. These fish have a mild flavor and cook well, just like cod. Salmon or tilapia also work great. Salmon adds a rich taste, while tilapia is light and flaky. What can I use instead of olive oil or garlic? If you want a different oil, avocado oil is a great choice. It’s healthy and has a nice flavor. For garlic, try shallots or garlic powder. They give a similar taste but with a twist. Are there gluten-free options? Yes! All the ingredients in this recipe are gluten-free. Just make sure any added condiments or spices are also gluten-free. You can enjoy this dish without worry. How can I cook this dish on the grill? To grill, preheat your grill to medium heat. Use a grill pan or foil to prevent the fish from falling through. Follow the same marinating steps and cook for about 6-8 minutes on each side. What if I want to use an air fryer? Preheat your air fryer to 375°F. Place the marinated cod in the basket and cook for 10-12 minutes. Check for doneness by seeing if the fish flakes easily. For the full recipe, check out the details above. For leftover Lemon Garlic Baked Cod, you want to keep it fresh. First, let the cod cool down. Then place it in an airtight container. This helps to keep its flavor and moisture. Store it in the fridge for up to three days. When you're ready to eat it, you can reheat it. The best way is to use the oven. Set it to 350°F (175°C). Place the cod in a baking dish and cover it with foil. Heat it for about 10 minutes. This keeps the fish moist and tasty. You can also freeze baked cod for later use. To freeze, let the cod cool completely. Wrap each fillet in plastic wrap tightly. Then, place them in a freezer bag. This helps prevent freezer burn. You can freeze cod for up to three months. When you want to eat it, you need to thaw it first. The best way is to place it in the fridge overnight. If you're in a hurry, you can use cold water. Just submerge the wrapped cod in cold water for about an hour. After thawing, reheat it as mentioned before. For the full recipe, refer to the section above! How long do I bake cod at 400°F? Bake cod for about 12 to 15 minutes. The fish should flake easily when done. Can I use frozen cod fillets? Yes, frozen cod works well. Just thaw them first for best results. What dishes pair well with Lemon Garlic Baked Cod? Serve it with sautéed spinach, roasted veggies, or a fresh salad. Rice or quinoa also make great sides. How do I know when cod is fully cooked? Cod is fully cooked when it flakes easily with a fork. It should also look opaque. Can I prepare the marinade in advance? Yes, you can make the marinade a day ahead. Just store it in the fridge until you need it. What wine goes best with cod? A crisp white wine like Sauvignon Blanc pairs nicely with cod. It enhances the lemon flavor. For the complete process, check the [Full Recipe]. To sum up, this guide walked you through baking cod perfectly. We covered ingredients, step-by-step instructions, and expert tips to ensure a tasty meal. There are variations to try, from different fish to cooking methods. I also shared how to store leftovers and answered FAQs to make cooking easier for you. By following this guide, you can enjoy a delicious cod dish anytime. Now, it's time to get cooking and taste the results!

Lemon Garlic Baked Cod Flavorful and Healthy Dish

Want to enjoy a dish that’s both delicious and good for you? Look no further than Lemon Garlic Baked Cod!

- 1 pre-made pie crust (or homemade, if you prefer) - 2 cups fresh spinach, chopped - 1 cup mushrooms, sliced - 1 medium onion, finely chopped To make a tasty quiche, you need a few key ingredients. The pie crust holds everything together. You can use a store-bought one or make your own if you feel adventurous. Fresh spinach gives the quiche a vibrant color and loads of nutrients. Sliced mushrooms add a rich, earthy taste. Lastly, finely chopped onion brings sweetness to the dish. - 3 large eggs - 1 cup heavy cream - 1 cup shredded cheese (such as Swiss or cheddar) - 1 teaspoon garlic powder - 1 teaspoon salt - ½ teaspoon black pepper - ½ teaspoon nutmeg (optional) Dairy is essential for a smooth quiche. Large eggs bind all the ingredients. Heavy cream adds a rich texture. Cheese melts beautifully and adds flavor. Garlic powder, salt, and black pepper enhance the taste. Nutmeg is optional, but it adds a warm note. - 2 tablespoons olive oil for sautéing You need olive oil for sautéing the vegetables. It helps to cook the onions and mushrooms until they are soft and tasty. This step builds flavor for the quiche. Remember, the cooking oil plays a vital role in the quiche's overall taste. For the full recipe, check out the link. 1. Preheat your oven to 375°F (190°C). This sets the right temperature for baking. 2. In a skillet, heat two tablespoons of olive oil over medium heat. Add one finely chopped onion and sauté until it becomes translucent, about 3-4 minutes. 1. Next, add one cup of sliced mushrooms to the skillet. Cook until the mushrooms brown and release their moisture, about 5-6 minutes. 2. Then, stir in two cups of chopped spinach. Cook until the spinach wilts, which takes about 2-3 minutes. Remove the skillet from heat and let it cool slightly. 1. In a separate mixing bowl, whisk together three large eggs and one cup of heavy cream. 2. Add in one teaspoon of garlic powder, one teaspoon of salt, and half a teaspoon of black pepper. If you like, add half a teaspoon of nutmeg for extra flavor. 3. Once the spinach mixture has cooled, mix it into the egg mixture. Finally, stir in one cup of shredded cheese, either Swiss or cheddar. 1. If you're using a pre-made pie crust, transfer it to a pie dish. Pour the filling into the crust, spreading it evenly. 2. Bake in the preheated oven for 35-40 minutes. The quiche is done when it is set and lightly golden on top. 3. After baking, allow the quiche to cool for about 10 minutes before slicing. This makes cutting easier and helps the flavors settle. For the full recipe, check the details above. Enjoy this delightful dish! To make the best quiche, cool your veggies before mixing them with the eggs. If they are warm, they can cook the eggs too fast. This can lead to a rubbery texture. I like to let them sit for about 10 minutes after cooking. Using a thermometer can also help you achieve perfect doneness. Bake until the center hits 160°F (71°C). This ensures your quiche is set but not dry. Garnish your quiche with fresh herbs for a pop of color and flavor. Parsley or chives work wonders. Just sprinkle them on top right before serving. For sides, I recommend mixed greens with a light vinaigrette. It adds freshness and balances the richness of the quiche. Other options include a simple tomato salad or roasted vegetables. Enjoy your meal to the fullest! {{image_2}} You can make this quiche even more fun by switching some ingredients. If you want, swap spinach with kale or any leafy green you like. They add a different taste and texture. You can also try different cheese types. Feta, goat cheese, or mozzarella can give a unique flavor. Don’t be afraid to get creative! If you need a gluten-free option, look for gluten-free crusts at the store. You can also make your own using almond flour or gluten-free oats. For those who want protein, add some cooked bacon or sausage. This makes the quiche heartier and more filling. With these changes, you’ll have a dish that fits everyone’s needs. Explore the Full Recipe for more details on making these variations! To store leftovers, place the quiche in an airtight container. Make sure it cools down first. This helps to keep it fresh. You can store it in the fridge for up to 3 days. When you want to enjoy it again, just take it out and reheat. You can freeze quiche for later use. Wrap it tightly in plastic wrap and then in aluminum foil. This helps protect it from freezer burn. It stays good for about 2-3 months in the freezer. To reheat, first, let it thaw overnight in the fridge. Preheat your oven to 350°F (175°C). Place the quiche on a baking sheet and heat for about 25 minutes. This way, it stays moist and tasty! What can I serve with Savory Spinach Mushroom Quiche? You can serve your quiche with a simple side salad. A mixed green salad with a light vinaigrette pairs well. Fresh herbs like parsley or chives can add a nice touch. Some people enjoy a slice of quiche with fruit or roasted vegetables. Can I make the quiche ahead of time? Yes, you can prepare the quiche a day before. Just bake it and let it cool. Store it in the fridge until you're ready to serve it. Reheat it in the oven for the best texture. How do I know when the quiche is done baking? Check the quiche around 35 minutes of baking. It should be set in the center and lightly golden on top. You can also insert a knife in the center; if it comes out clean, the quiche is done. What should I do if my quiche is soggy? If your quiche is soggy, it may have too much liquid. Make sure to drain the cooked spinach and mushrooms well. You can also bake it a bit longer to help firm it up. How to adjust cooking time for different ovens? Every oven is different. If your quiche is not cooking evenly, use an oven thermometer. If you feel it cooks too fast or slow, adjust the time by 5-10 minutes. Always check for doneness as you approach the cooking time. For the full recipe, see the earlier sections. Enjoy your cooking! Savory Spinach Mushroom Quiche is a delicious dish made with simple ingredients. You can easily prepare it by following the steps outlined in this post. Remember to cool your veggies and check for doneness to get perfect results. Feel free to customize with different greens or cheeses. Store leftovers properly for maximum freshness. This quiche makes a great meal for any time, and it’s easy to pair with fresh sides. Dive into the kitchen and enjoy your tasty creation!

Savory Spinach Mushroom Quiche Perfect for Family Meals

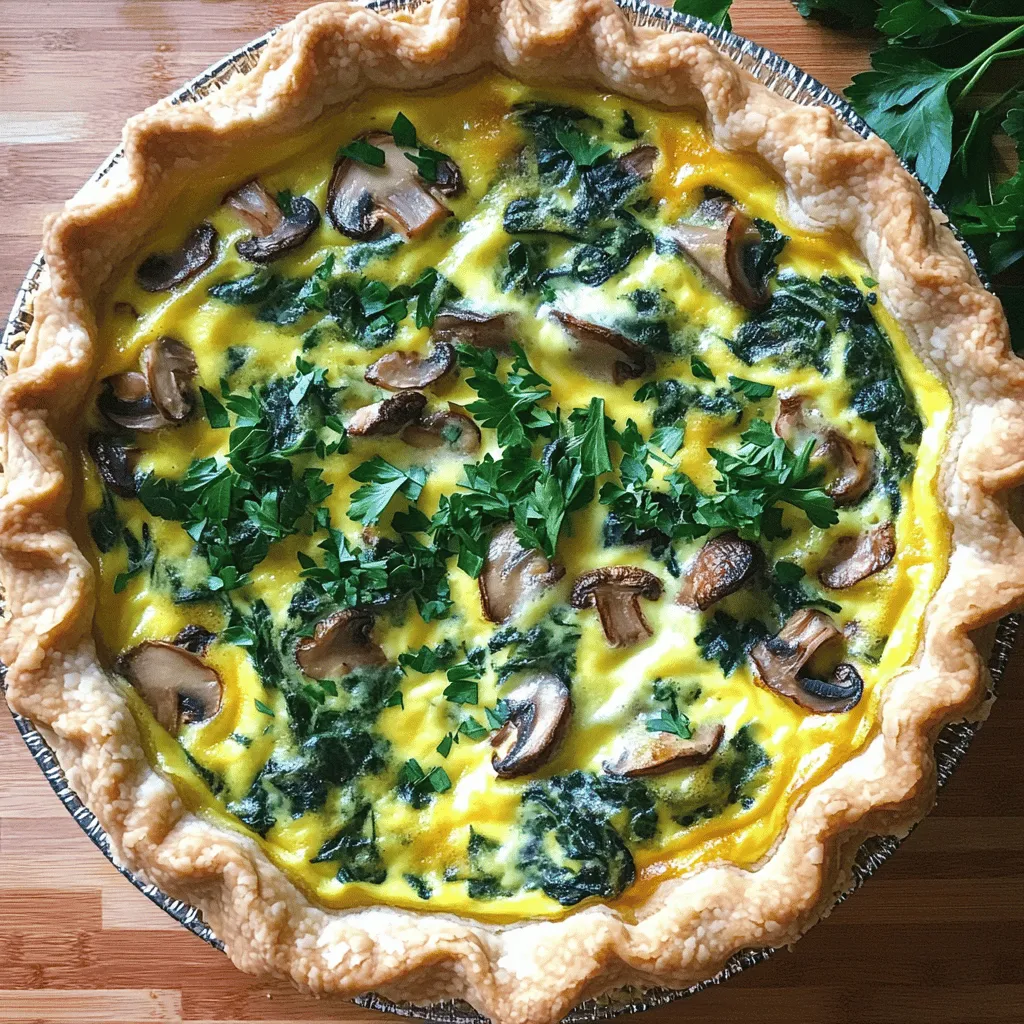
Looking for a dish that pleases everyone at the table? My Savory Spinach Mushroom Quiche is a hit for family

For this dish, I use simple, fresh items. They make the flavors pop. Here’s what you need: - 2 medium zucchinis, sliced into half-moons - 1 pint cherry tomatoes, halved - 3 cloves garlic, minced These vegetables offer great taste and nutrition. Zucchini is mild and tender when cooked. Cherry tomatoes burst with sweetness. The garlic adds depth to the dish. Seasonings enhance the natural flavors of the veggies. I like to keep it easy with these: - 3 tablespoons olive oil - 1 teaspoon dried oregano - 1 teaspoon balsamic vinegar - Salt and pepper to taste Olive oil helps the veggies roast nicely. It makes them golden and flavorful. Dried oregano brings a warm, earthy taste. Balsamic vinegar adds a tangy note that balances the sweetness of the tomatoes. Garnishes give your dish a fresh look and taste. Consider adding: - Fresh basil leaves for garnish Basil has a lovely aroma and flavor. It brightens the dish and makes it more appealing. You can sprinkle the leaves on top just before serving. For the full recipe, check out the Easy Roasted Zucchini and Tomatoes section. Start by washing the zucchinis and cherry tomatoes. Cut the zucchinis into half-moons. Halve the cherry tomatoes. Keep the sizes even for best cooking. In a large bowl, add the sliced zucchinis and halved tomatoes. Then, add minced garlic, olive oil, dried oregano, balsamic vinegar, salt, and pepper. Toss everything together. Make sure each piece gets coated well. This step adds flavor to your vegetables. Preheat your oven to 425°F (220°C). Spread the vegetable mix on a baking sheet in a single layer. This helps them roast evenly. Roast in the oven for 20-25 minutes. You want the zucchini tender and the tomatoes blistered. After roasting, let them cool slightly. Serve warm with fresh basil leaves on top. This dish is simple and tasty. For the full recipe, check the beginning of the article. When picking zucchini, look for young and firm ones. They should feel heavy for their size. Their skin should be shiny and free of blemishes. For tomatoes, choose bright and plump ones. Cherry tomatoes should have smooth skin. A good tomato smells sweet and fresh, which means it’s ripe. To get even cooking, cut your zucchini into similar sizes. Half-moons work well because they cook nicely. Spread the veggies out on the baking sheet. Avoid crowding them, as this can cause steaming instead of roasting. Give them space to caramelize and brown evenly. Set your oven to 425°F (220°C) for great roasting. This high heat helps the veggies brown nicely. If your oven has hot spots, rotate the pan halfway through. This simple step makes sure all sides get that lovely roasted flavor. Follow these tips, and you will enjoy tasty roasted veggies! For the full recipe, check out Easy Roasted Zucchini and Tomatoes. {{image_2}} You can make this dish even better by adding more veggies. Try bell peppers for a sweet crunch. Carrots add a nice color and taste. You can also mix in red onions for a savory kick. Just cut them to match the zucchini size. This helps them cook evenly. The more veggies, the more flavors you’ll enjoy. Want to make your dish pop? Add some spice! You can sprinkle red pepper flakes for heat. Italian seasoning works great, too. If you like a smoky flavor, try smoked paprika. You can even add a squeeze of lemon for brightness. Experiment with different spices to find your favorite mix. Turn this side dish into a full meal. Serve it with grilled chicken or fish for protein. You can also mix in cooked quinoa or rice for extra fiber. This makes it filling and nutritious. Add a sprinkle of cheese on top for richness. This easy roasted zucchini and tomatoes dish can be your go-to meal anytime. For the full recipe, check out the detailed steps above. To keep your roasted zucchini and tomatoes fresh, let them cool down first. Transfer the veggies to an airtight container. They will stay good in the fridge for about three days. Make sure to store them away from strong-smelling foods. This helps keep their taste intact. When you’re ready to enjoy leftovers, preheat your oven to 350°F (175°C). Spread the zucchini and tomatoes on a baking sheet. Heat for about 10-15 minutes, or until warm. This method keeps them tasty and helps revive their original texture. You can also use a microwave if you're in a hurry. Just heat for 1-2 minutes, but watch for sogginess. If you want to save them for later, freezing is a great option. First, let the veggies cool completely. Then, place them in a freezer-safe bag or container. Make sure to squeeze out as much air as possible to avoid freezer burn. They can last up to three months in the freezer. When you're ready to eat, thaw in the fridge overnight before reheating. For the full recipe, check back here. Yes, you can use other types of tomatoes. You might try roma tomatoes or vine-ripened tomatoes. Both options add great flavor. Just make sure to cut them into similar sizes. This helps them cook evenly with the zucchini. Roasted zucchini and tomatoes pair well with many dishes. You can serve them with grilled chicken or fish. They also go great with pasta or rice. For a lighter meal, enjoy them on a fresh salad. You could even use them as a tasty topping for toast. You’ll know the vegetables are done when they become tender. The zucchini should feel soft when pierced with a fork. The tomatoes should look blistered and slightly caramelized. This usually takes about 20-25 minutes at 425°F (220°C). Keep an eye on them to avoid burning. Yes! You can prep them ahead of time. Slice the zucchini and tomatoes and store them in the fridge. Just remember to coat them with oil and seasonings right before roasting. This keeps them fresh and flavorful. Store any leftovers in an airtight container. They’ll stay fresh in the fridge for up to three days. To keep the flavors intact, avoid reheating them in the microwave. Instead, warm them gently in the oven or on the stove. You can freeze roasted zucchini and tomatoes, but they may lose some texture. Allow them to cool completely before placing them in freezer bags. Remove as much air as possible to prevent freezer burn. They can last up to three months in the freezer. You can mix in other vegetables like bell peppers or onions. Adding spices like red pepper flakes gives extra heat. You can also sprinkle some cheese on top for a rich flavor. This recipe is very flexible, so feel free to get creative! For the full recipe, check out the Easy Roasted Zucchini and Tomatoes section. For a simple and tasty dish, roasted zucchini and tomatoes shine. We discussed the best ingredients, how to prepare them, and the steps to roast them perfectly. Remember to pick fresh veggies and use the right seasonings. Explore variations to keep things exciting. When storing leftovers, aim for great flavor whether reheating or freezing. With these tips, you can enjoy this dish anytime. Happy roasting!

Easy Roasted Zucchini and Tomatoes Flavorful Dish

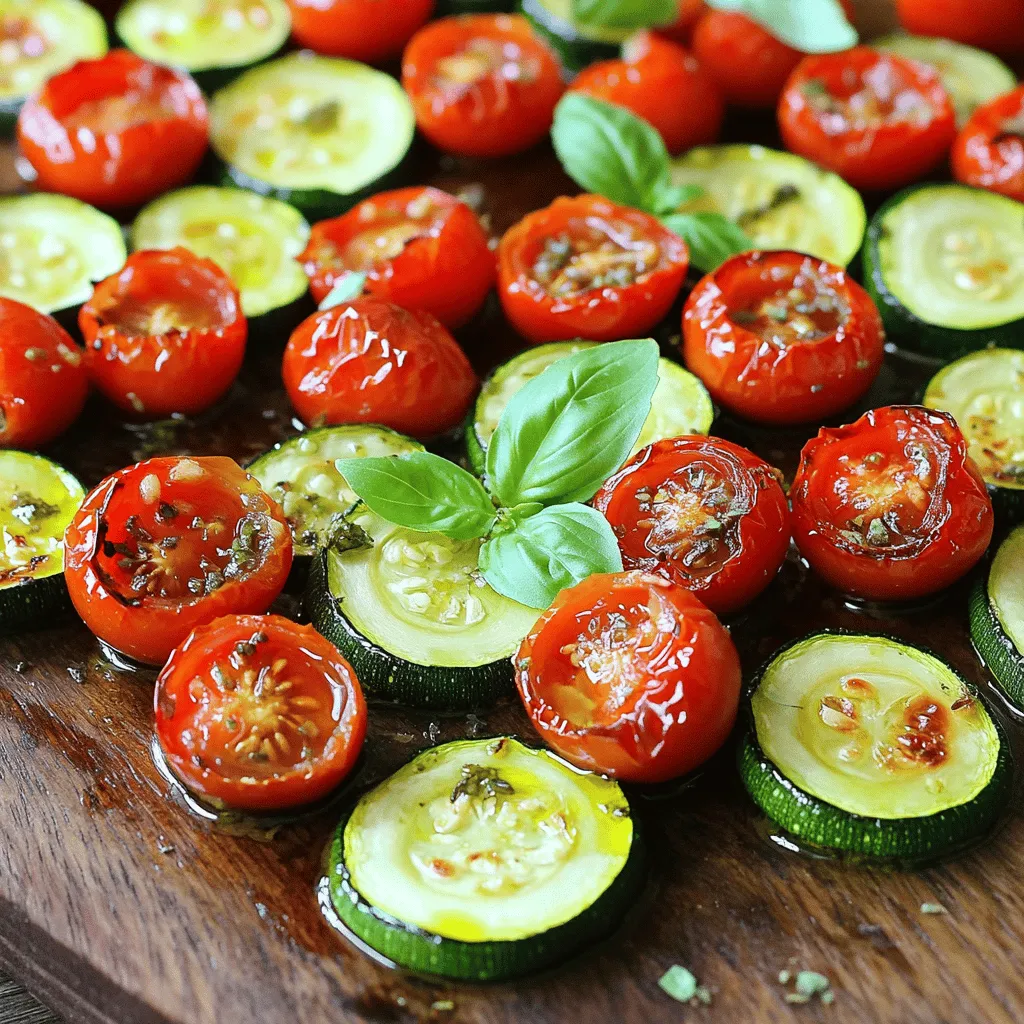
Are you ready to whip up a dish that’s simple, healthy, and bursting with flavor? My Easy Roasted Zucchini and

- 3 ripe bananas, mashed - 1/2 cup unsalted butter, melted - 3/4 cup brown sugar - 1/4 cup granulated sugar - 2 large eggs - 1 teaspoon vanilla extract - 1 teaspoon baking soda - 1/2 teaspoon baking powder - 1/2 teaspoon salt - 1 1/2 cups all-purpose flour - 1/2 cup cocoa powder - 1/2 cup chocolate chips (semi-sweet or dark) - 1/2 cup walnuts or pecans, chopped (optional) When making the best ever chocolate banana bread, choosing your ingredients is key. Ripe bananas bring sweetness and moisture. Their brown spots mean more flavor, so don’t shy away from them. Melted unsalted butter gives the bread a rich texture. Using a mix of brown and granulated sugar adds depth to the sweetness. Eggs help the bread rise and stay moist. Vanilla extract adds warmth to the flavor. Baking soda and baking powder work together to give your bread lift. Salt balances the sweetness, while all-purpose flour provides structure. Cocoa powder is what makes this bread chocolatey and rich. Chocolate chips add bursts of melted goodness. If you want a nutty crunch, add walnuts or pecans. If you have dietary needs, there are easy swaps. You can use applesauce instead of butter for a lighter option. For gluten-free bread, use almond flour or gluten-free flour blends. This allows everyone to enjoy this tasty treat, no matter their diet. For the full recipe, refer to the main article. First, set your oven to 350°F (175°C). This is the perfect heat for baking. Next, take a 9x5-inch loaf pan. Grease it well or line it with parchment paper. This helps the bread come out easily. In a large bowl, mash the ripe bananas until smooth. Then, add the melted butter. Stir these two together until they mix well. Next, add the brown sugar and granulated sugar. Mix until everything is combined. Now, crack in the eggs, one at a time. Mix after each egg. Finally, add the vanilla extract and stir until smooth. In another bowl, whisk together the dry ingredients. Combine the baking soda, baking powder, salt, flour, and cocoa powder. This mix gives your bread the rise and chocolate flavor it needs. Now, take the dry mix and gradually fold it into the wet mixture. Use a spatula to gently combine them. Be careful not to over-mix. This keeps your bread soft and light. Pour the batter into your prepared loaf pan. Smooth the top with a spatula. Bake in the oven for 60-65 minutes. To check if it's done, insert a toothpick in the center. It should come out clean. After baking, let the bread cool in the pan for about 10 minutes. Then, transfer it to a wire rack. Allow it to cool completely before slicing. This helps keep the texture just right. For the full recipe, check the previous section. Enjoy your baking! To make the best chocolate banana bread, avoid over-mixing the batter. Over-mixing can make your bread dense and tough. Mix just until you see no dry flour. This keeps the bread soft and moist. The ripeness of your bananas is key too. Use very ripe bananas. They should be brown and soft. This gives your bread a sweet, rich flavor. The more brown spots, the better the taste! To take your chocolate banana bread to the next level, add a pinch of cinnamon. This spice brings warmth and depth to the flavor. You can also try nutmeg for a different twist. Using various types of chocolate can also enhance taste. Semi-sweet chocolate chips work great. For a richer taste, use dark chocolate chips. If you love white chocolate, mix that in too. Each type adds its own special flavor! When serving your banana bread, plating matters. Slice it neatly and arrange the pieces on a pretty plate. You can dust the top with powdered sugar for a sweet touch. Toppings can make your bread even better. A dollop of whipped cream adds creaminess. A scoop of vanilla ice cream makes it a dessert treat. Fresh berries or sliced bananas on the side add color and taste. For the full recipe, check out the detailed instructions to make your own Best Ever Chocolate Banana Bread! {{image_2}} You can make your chocolate banana bread even better with fun mix-ins. Here are some ideas: - Nuts and dried fruits: Chopped walnuts or pecans add crunch. You can also use dried fruits like raisins or cranberries for a sweet touch. They give great flavor and texture. - Various chocolate types: Use semi-sweet, dark, or even white chocolate chips. Each type brings a unique taste. Mixing different types makes it exciting. Adding a twist to your recipe can surprise your taste buds. Try these ideas: - Use of coffee or espresso: A little coffee enhances the chocolate flavor. Just add a small amount to the wet mix. It brings out the richness. - Cinnamon or nutmeg additions: A dash of cinnamon or nutmeg can warm up the bread. These spices add depth and make it cozy. If you want to change things up, consider these formats: - Chocolate banana muffins: Bake the batter in muffin tins for easy serving. They are great for breakfast or snacks. - Mini loaf versions: Making mini loaves is fun. They bake faster and are perfect for sharing or gifts. Feel free to explore these variations to make your chocolate banana bread even more delightful! For the full recipe, check the main article. To store your chocolate banana bread at room temperature, wrap it well. Use plastic wrap or aluminum foil. Place it in an airtight container. This keeps the bread soft and moist. It lasts up to four days on your counter. Be sure to keep it away from heat and sunlight. For long-term storage, freezing is your best option. Slice the bread first for easy thawing. Wrap each slice in plastic wrap, then place in a freezer bag. Remove as much air as possible. Your chocolate banana bread can stay fresh in the freezer for up to three months. To thaw, leave it in the fridge overnight or at room temp for a few hours. To avoid spoilage, always use clean hands and tools. Make sure your bread is completely cool before wrapping. Check for any signs of mold before eating. If you notice a dry texture, try warming it slightly in the microwave. This helps restore some moisture. Enjoy every bite of your delicious chocolate banana bread! For the full recipe, check out the Best Ever Chocolate Banana Bread section. To make this banana bread vegan, you can swap out eggs and butter. - Egg substitution: Use 1/4 cup of unsweetened applesauce for each egg. - Butter substitution: Replace the butter with 1/2 cup of coconut oil or vegan butter. These swaps keep the bread moist and delicious. Yes, you can use frozen bananas. Just thaw them before mashing. - Tip: Drain any excess liquid after thawing. Frozen bananas work great in this recipe. They add extra sweetness and moisture. If your bread turns out too moist, adjust your baking time and ingredients. - Baking time: Try baking it a bit longer. Check every five minutes after the first hour. - Ingredient adjustment: Use a little less mashed banana or add more flour. These changes can help achieve the perfect texture. To check if your bread is done, use a toothpick. - Toothpick test: Insert a toothpick in the center. If it comes out clean, the bread is ready. If it has wet batter, bake for a few more minutes. This simple test ensures a great bake every time. You now have the tools to make a delicious chocolate banana bread. We covered the key ingredients, step-by-step instructions, and helpful tips to improve your baking. Remember to keep your bananas ripe and avoid over-mixing for best results. Try different mix-ins for fun twists. Store your bread right to keep it fresh. Enjoy your baking adventure, knowing you can adjust for dietary needs. Simple adjustments can make a big difference! Happy baking!

Best Ever Chocolate Banana Bread Recipe Delight

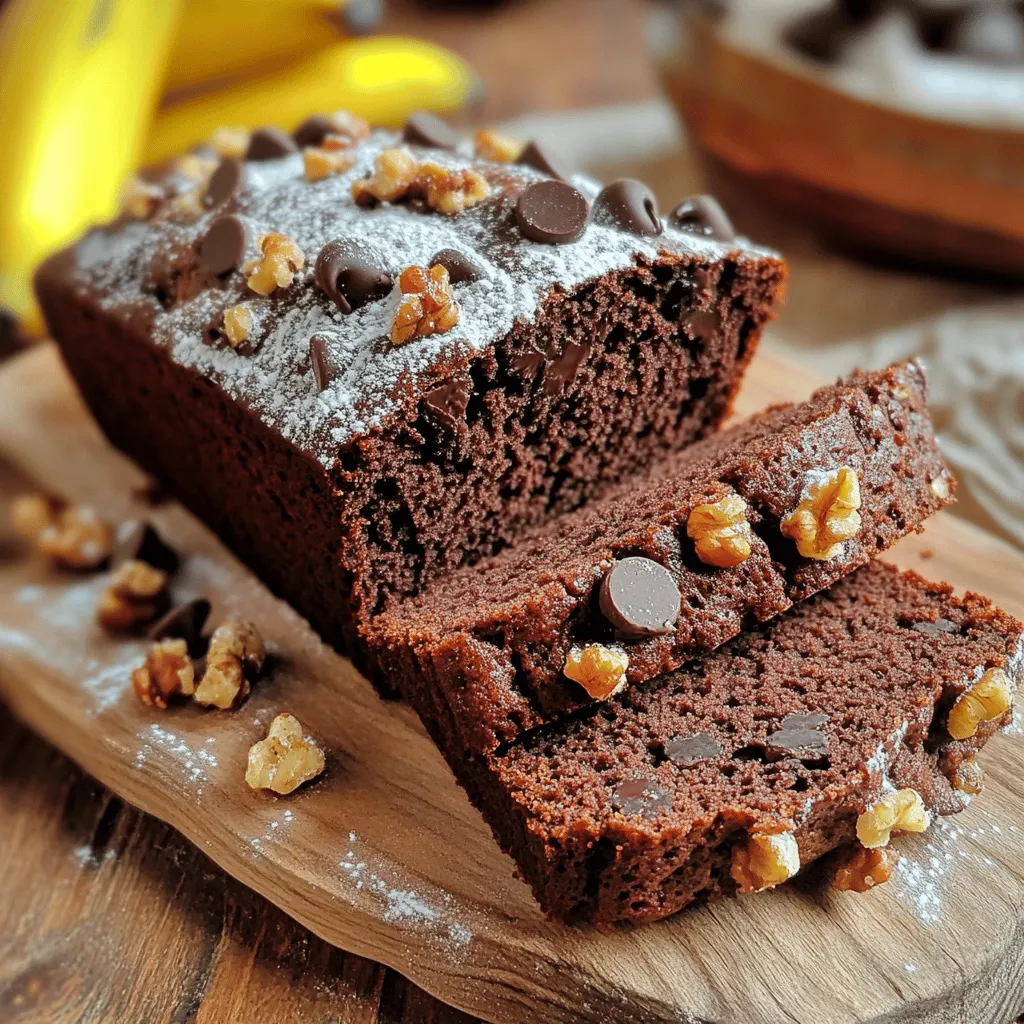
Craving a warm slice of chocolate banana bread? You’re in for a treat! This Best Ever Chocolate Banana Bread Recipe

- 2 pounds of Yukon Gold potatoes, peeled and diced - 1 cup green peas (fresh or frozen) - ½ cup sweet pickle relish Yukon Gold potatoes are my go-to choice for potato salad. They have a smooth texture and a nice flavor. You can use fresh or frozen green peas. They add a pop of color and sweetness. Sweet pickle relish gives the salad a nice tang and sweetness. - ½ cup mayonnaise - ¼ cup Greek yogurt - 1 tablespoon Dijon mustard For the dressing, I mix mayonnaise and Greek yogurt. This combo makes it creamy and a bit lighter. Dijon mustard adds a nice kick and depth to the flavor. - 1 tablespoon apple cider vinegar - 1 small red onion, finely chopped - 3 stalks celery, finely diced - ½ teaspoon garlic powder - Salt and pepper to taste Apple cider vinegar brightens the salad. Red onion adds a bit of crunch and sharpness. Celery gives it a nice crispness. I always sprinkle in garlic powder, salt, and pepper to enhance all the flavors. For the full recipe, check out the details on how to make this classic dish. Start by boiling the potatoes. Use a large pot and fill it with water. Add a pinch of salt. Bring the water to a boil. Once boiling, add the diced Yukon Gold potatoes. Cook them until they are fork-tender. This should take about 10 to 15 minutes. If you choose to add fresh peas, do so in the last 2 to 3 minutes of cooking. This helps keep them bright and fresh. If you use frozen peas, just thaw them separately. Once cooked, drain the potatoes and peas. Let them cool in a large bowl. Now, let’s make the dressing. In a separate bowl, combine these ingredients: mayonnaise, Greek yogurt, Dijon mustard, apple cider vinegar, garlic powder, salt, and pepper. Whisk everything together until it’s smooth. You want a creamy texture that coats well. Once the potatoes and peas have cooled, mix them with the dressing. Gently fold in the chopped red onion and diced celery. Make sure everything is well coated. Taste the salad and adjust the seasoning as needed. Add more salt or pepper if desired. Cover the bowl and refrigerate it for at least 1 hour. This waiting time lets the flavors meld together beautifully. When you are ready to serve, garnish the top with fresh dill for a special touch. Enjoy this classic potato salad with your favorite dishes! For the complete recipe, check out the Full Recipe. To make the best potato salad, cook your potatoes until they are fork-tender. This means they should be soft enough for a fork to pierce easily but not mushy. Boil the potatoes for about 10 to 15 minutes. Be sure to check them often. Once cooked, you want to cool down the potatoes quickly. To do this, drain them well and transfer them to a large bowl. Spread them out to let the heat escape. You can also place the bowl in an ice bath for faster cooling. This helps keep the potatoes firm and nice. You can change the dressing for your potato salad. If you want a lighter option, use yogurt instead of mayonnaise. Greek yogurt adds a creamy texture and tangy flavor. You can also mix in flavors like sour cream or even avocado for fun twists. Herbs and spices can give extra flavor to your salad. Fresh dill, chives, or parsley work great. A pinch of paprika or a squeeze of lemon juice can brighten the taste. Don’t be afraid to experiment! Potato salad pairs well with many dishes. It is great with grilled meats like burgers or chicken. You can also serve it at picnics, barbecues, or family gatherings. For presentation, use a large bowl and garnish with fresh dill on top. You can also serve it in individual cups for a fun touch. This makes it easy for guests to grab their own. For the full recipe, check out [Full Recipe]. {{image_2}} To make potato salad stand out today, you can swap some ingredients. Instead of classic mayonnaise, try using Greek yogurt for a creamy twist. You can also add spices like paprika or chili powder to give it some heat. Fresh herbs can brighten the dish. Some popular herbs include parsley and chives. Around the world, potato salad varies a lot! In Germany, they use vinegar and bacon for flavor. In Russia, they mix in peas and carrots for a colorful touch. Each version brings its own charm. If you want a gluten-free potato salad, you’re in luck! This dish is often naturally gluten-free. Just check your dressing for added gluten. For a vegan option, use plant-based mayo or avocado instead of eggs. You can also make a simple dressing with olive oil and lemon juice. Both options keep the salad light and fresh. Want to make your potato salad unique? Add fresh herbs like dill or basil for a burst of flavor. You can also toss in crunchy elements like pickles or nuts. For a fun twist, try adding apples or bacon bits. These add-ins keep your salad exciting and tasty. You can find the full recipe to explore these ideas further. To store potato salad, place it in an airtight container. This keeps it fresh and prevents odors from mixing. You can also cover the bowl tightly with plastic wrap. The shelf life in the refrigerator is about three to five days. Always check for off smells or colors before eating. Can you freeze potato salad? I don’t recommend it. Freezing can change the texture of the potatoes and dressing. If you must freeze it, use a freezer-safe container and leave space for expansion. Thaw it in the refrigerator overnight before using. Stir well after thawing to help blend the textures. The best method for reheating is to let it sit at room temperature. If you need to use the microwave, do so in short bursts. Stir in between to keep it even. This helps maintain texture and flavor. For a fresher taste, add a little extra dressing after reheating. Enjoy it as a side for your meals or at gatherings. To make potato salad creamy, you need the right mix of ingredients. Start with good mayonnaise. I like to blend it with Greek yogurt for a lighter touch. This mix gives a smooth and rich flavor. Add a splash of apple cider vinegar for tang. This helps balance the creaminess. Here are a few tips for the best texture: - Use Yukon Gold potatoes; they are creamy and tender. - Do not rush the cooking. Boil until fork-tender. - Let the potatoes cool before mixing. This keeps them from getting mushy. - Fold the dressing in gently. This keeps your salad light and fluffy. Yes, you can make potato salad a day ahead. This allows the flavors to blend well. It's a great option for meal prep too. Just keep it in the fridge in a sealed container. When you make it ahead: - Prepare the salad and chill for at least an hour. - If you use fresh peas, add them right before serving. - Stir in any extra salt or pepper before serving too. This helps keep the taste fresh. The best potatoes for potato salad are Yukon Gold. They have a buttery flavor and creamy texture. They hold their shape well after cooking. Here are other great options: - Red potatoes are waxy and also hold up well. - Fingerling potatoes have a unique shape and taste. - Avoid starchy potatoes like Russets as they can become mushy. You can check the [Full Recipe] for more details on making the perfect potato salad! In this post, we explored how to make a delicious potato salad. We covered essential ingredients, like Yukon Gold potatoes, green peas, and sweet pickle relish. We discussed a creamy dressing made with mayonnaise, Greek yogurt, and Dijon mustard. I shared step-by-step instructions, helpful tips, and variations for dietary needs and creative twists. You can store this salad easily and enjoy it later. With these insights, you can create a tasty dish that suits your taste and occasion. Enjoy making your perfect potato salad!

Classic Potato Salad Comforting and Tasty Dish

Are you ready to make the perfect Classic Potato Salad? This comforting dish is a summer cookout staple, but it’s

- Pasta (Spaghetti or Fettuccine) - Fresh Mushrooms (Cremini or Button) - Garlic and Aromatics To start, you need pasta. I love using spaghetti or fettuccine. Both types cook well and hold sauce nicely. Next, fresh mushrooms bring a rich, earthy taste. Cremini or button mushrooms are my go-to choices. They add great flavor and texture. Don’t forget garlic! It gives your dish a bold kick. Aromatics like onions can also enhance the taste. - Heavy Cream - Vegetable Broth - Grated Parmesan Cheese For that creamy texture, heavy cream is essential. It makes the sauce smooth and rich. Vegetable broth adds depth to the flavor. You can use homemade broth or store-bought. Grated Parmesan cheese is the final touch. It adds saltiness and umami, making the dish irresistible. - Dried Thyme - Salt and Pepper - Fresh Parsley Seasoning is key. I like to use dried thyme for its warm flavor. Salt and pepper enhance everything. Taste as you go to find the right balance. Finally, fresh parsley adds a pop of color and freshness. It makes your dish look gorgeous and taste bright. If you want the full recipe, check out the details above to create this comforting meal. - Preparing the Water: Start by filling a large pot with water. Add a good amount of salt. The salt helps flavor the pasta. Bring the water to a rolling boil. This is key for cooking pasta well. - Cooking Time and Method: Once the water boils, add 250g of spaghetti or fettuccine. Cook it according to the package instructions. Usually, this takes about 8 to 10 minutes. You want the pasta to be al dente, which means it should have a slight bite. When done, drain it and save a bit of the pasta water for later. - Ideal Skillet Temperature: Use a large skillet for this step. Heat 2 tablespoons of olive oil over medium heat. The oil should shimmer, which shows it’s hot enough. - Signs of Proper Cooking: Add 3 cloves of minced garlic to the skillet. Sauté for about 1 minute until it smells great. Then, add 300g of sliced mushrooms. Cook them for 5 to 7 minutes. They should become soft and golden brown. Stir them a few times for even cooking. - Combining Broth and Cream: Pour in 1 cup of vegetable broth. Bring it to a gentle simmer. Then, stir in 1 cup of heavy cream and 1 teaspoon of dried thyme. - Achieving the Right Consistency: Let this mixture simmer for 3 to 4 minutes. It should thicken slightly. If it gets too thick, add a splash of the reserved pasta water to adjust. The sauce should be creamy and luscious, ready to coat the pasta perfectly. Now that you have these steps, you can make a delicious creamy garlic mushroom pasta at home. For the full recipe, check out the instructions above! To get the sauce just right, you can adjust its thickness with pasta water. When you drain the pasta, save a bit of the water. If your sauce feels too thick, add a splash of this water. It helps loosen the sauce without losing flavor. Enhancing flavor with herbs can make a big difference. I love using dried thyme in this recipe. You can also try fresh herbs like basil or oregano. They add a fresh taste and aroma that brightens the dish. Achieving al dente texture is key for great pasta. Cook the spaghetti or fettuccine in salted boiling water. Follow the package instructions closely. This gives you that perfect firm bite. To prevent stickiness, stir the pasta while it cooks. After draining, toss it with a little olive oil. This keeps the pasta from clumping together when you mix it with the sauce. For accompaniments and pairings, think about a side salad or garlic bread. A crisp green salad balances the creamy pasta. Garlic bread is always a hit, adding extra flavor and texture. Presentation tips can elevate your dish. Serve the pasta in warm bowls. Sprinkle fresh parsley on top for a pop of color. Grate some extra Parmesan cheese for a fancy touch. This makes the dish not just tasty but also beautiful. For the complete recipe, check out the Full Recipe. {{image_2}} Adding Chicken or Shrimp You can add chicken or shrimp to make this dish heartier. Cook the protein first in the skillet. Use the same oil and garlic for flavor. Chicken thighs or shrimp work best. Cook until golden brown and then follow the creamy sauce steps. Vegetarian Options For a vegetarian twist, consider adding tofu or beans. Tofu absorbs flavors well. It adds protein without meat. Chickpeas are also tasty and filling. They add a nice texture to your meal. Utilizing Plant-Based Cream To make this dish vegan, swap heavy cream for plant-based cream. Almond, coconut, or cashew cream work great. They keep the dish rich and creamy. Adjust the amount based on your taste. Substitutions for Cheese For cheese lovers, use nutritional yeast instead of Parmesan. It adds a cheesy flavor without dairy. You can also try vegan cheese. Just make sure it melts well in the sauce. Experimenting with Wild Mushrooms Wild mushrooms can add unique flavors. Try shiitake, oyster, or portobello mushrooms. They bring a deep, earthy taste. Mix different types for a gourmet twist. Combining Varieties for Texture Combining mushrooms adds texture. Some mushrooms are soft, while others are meaty. This mix makes each bite exciting. You can use any blend you like, so have fun with it! For the full recipe, check out the Creamy Garlic Mushroom Pasta section. To store leftover creamy garlic mushroom pasta, cool it first. Place it in an airtight container. This helps keep the pasta fresh and tasty. Use glass or plastic containers with tight lids. They prevent air from getting in, which can spoil the food. If you want to freeze creamy garlic mushroom pasta, let it cool. Portion it into freezer-safe bags or containers. Squeeze out extra air before sealing. This helps avoid freezer burn. To thaw, place it in the fridge overnight. You can reheat it on the stove over low heat. Add a splash of water or broth to make it creamy again. In the fridge, your pasta lasts about 3 to 5 days. Check for signs of spoilage. If it smells off or looks moldy, toss it out. Always trust your nose and eyes. Keeping track of dates helps you enjoy your creamy garlic mushroom pasta safely. To make creamy garlic mushroom pasta gluten-free, choose gluten-free pasta. Many brands offer options like rice, quinoa, or chickpea pasta. Cook it just like regular pasta. Follow the package's instructions for the best results. The sauce works well with any pasta type, so enjoy your meal without worry! Yes, you can prepare this dish ahead of time. Cook the pasta and make the sauce separately. Store both in the fridge. When you're ready to eat, combine them in a skillet over medium heat. This keeps the pasta from getting soggy. You can also add a splash of broth to freshen it up. Experiment with herbs to enhance flavor! You can use fresh basil, oregano, or rosemary. Each herb adds a unique taste to the dish. Try mixing them for a new twist! Add them while cooking for the best flavor. Always taste and adjust as you go. In this blog post, we explored how to make a creamy garlic mushroom pasta. We covered essential ingredients, step-by-step cooking, tips for perfect sauce, variations, and storage advice. Each part plays a key role in your dish’s success. Remember, you can adjust flavors with herbs or try different mushrooms. Whether you add proteins or keep it vegetarian, there’s an option for everyone. Enjoy your cooking journey, and never hesitate to experiment with your ingredients!

Creamy Garlic Mushroom Pasta Delightful Comfort Food

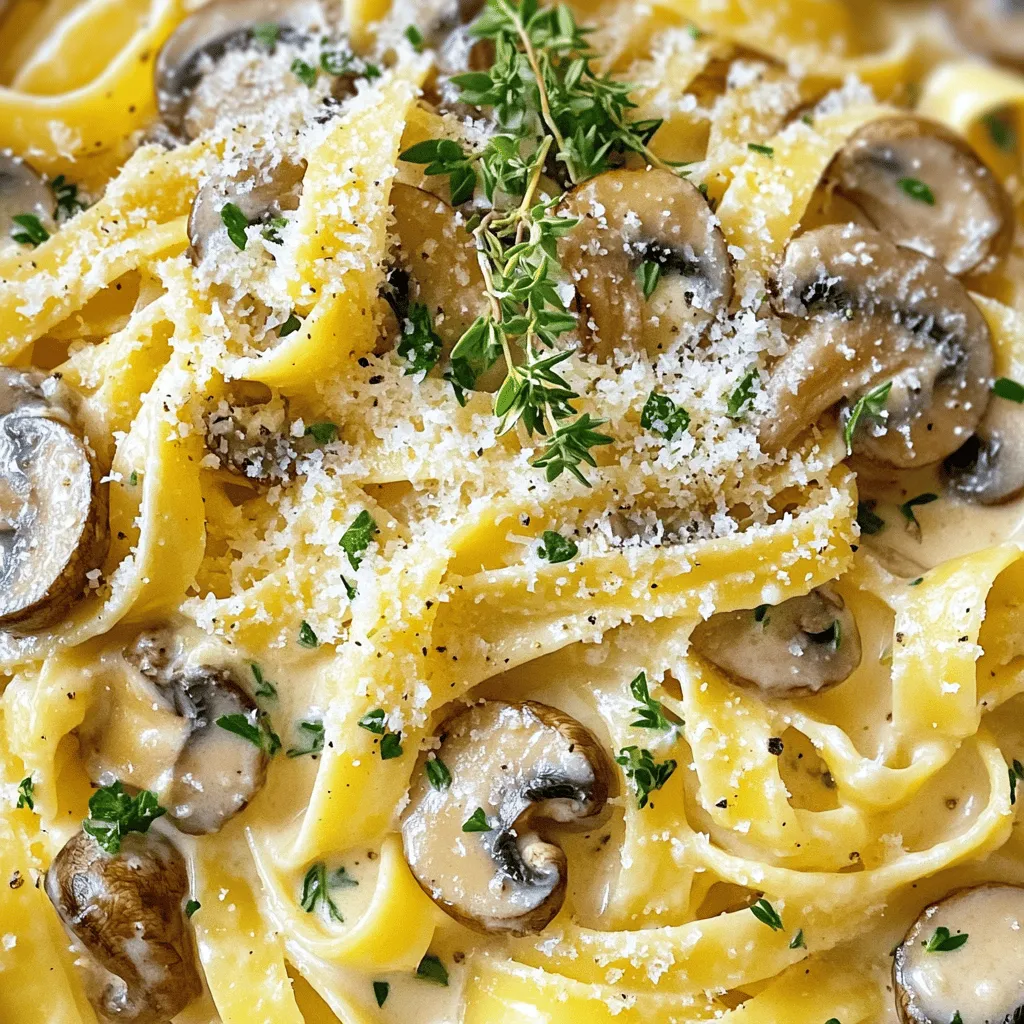
Are you craving a dish that’s both creamy and packed with flavor? Look no further than this Creamy Garlic Mushroom

- 1 pound fresh strawberries, washed and dried - 8 ounces semi-sweet chocolate chips - 1 tablespoon coconut oil (optional) - Sea salt or crushed nuts (optional toppings) When making chocolate-covered strawberries, you want to start with fresh, ripe strawberries. Choose berries that are firm and bright red. Wash them gently and dry them well. Moisture can stop the chocolate from sticking. For the chocolate, I prefer semi-sweet chocolate chips. They melt easily and taste great. If you want a shiny finish, add coconut oil. It helps create a smooth and glossy look. If you like, you can top your strawberries with sea salt or crushed nuts. This adds a nice crunch and flavor contrast. You can find the full recipe above. Enjoy crafting this simple yet delightful treat! Start with dry strawberries. Water can make the chocolate slide off. Use a paper towel to gently pat them dry. This step is key for a great dip. Choose ripe strawberries for the best taste. Look for bright red color and fresh green stems. Next, melt the chocolate. Use a microwave-safe bowl. Add chocolate chips and coconut oil if you want gloss. Heat it in 30-second bursts. Stir well between each burst. This helps prevent burning. Keep stirring until it’s smooth and creamy. Now, it's time to dip! Hold each strawberry by the stem. Dip it into the melted chocolate. Let the extra chocolate drip back into the bowl. Place the dipped strawberry on a lined baking sheet. If you want, sprinkle toppings like sea salt or crushed nuts right away. Finally, chill the strawberries. Put the baking sheet in the fridge for about 30 minutes. This helps the chocolate set well. You’ll know it’s set when it feels firm to the touch. Enjoy these delightful treats once they are ready! For a complete guide, check out the Full Recipe. To get that shiny look on your chocolate-covered strawberries, add a little coconut oil. It helps the chocolate shine and makes it look great. You only need one tablespoon. If you don’t have coconut oil, you can use vegetable oil or shortening. Just remember that less is more. Temperature is key when melting chocolate. You want it warm but not too hot. If it gets too hot, it can seize up. Seizing means the chocolate clumps and becomes hard. To avoid this, melt the chocolate slowly and stir often. This keeps it smooth and ready for dipping. How you serve your strawberries matters. Use a clean platter to show them off. You can arrange them in a circle or in rows. For garnish, sprinkle some sea salt or crushed nuts on top. It adds flavor and makes them look fancy. You can even use edible flowers for a pop of color. {{image_2}} You can switch up flavors by using different types of chocolate. Dark chocolate adds a rich taste. White chocolate offers a sweet, creamy flavor. Each type creates a unique treat. You can also infuse flavors into your chocolate. Try adding a drop of vanilla or a sprinkle of sea salt. These small changes can elevate your chocolate-covered strawberries. You can mix in citrus zest for a fresh twist, too. Experimenting with flavors keeps it fun! Seasonal toppings can make your strawberries even more special. For Valentine's Day, add red sprinkles for a festive look. For Halloween, use orange and black toppings. You can even match toppings to birthdays or holidays. Mixing fruits and nuts can create tasty combinations. Try adding chopped almonds or hazelnuts. You can also sprinkle crushed freeze-dried strawberries on top for a fruity crunch. This variety keeps the treat exciting and fresh. If you want to go dairy-free, there are great chocolate options. Look for vegan chocolate chips made from cacao and coconut. They melt well and taste amazing. This way, everyone can enjoy them! Plant-based toppings are also a great choice. You can use shredded coconut or chopped nuts. Fresh fruit like blueberries or raspberries works too. These toppings add color and flavor without dairy. Enjoy your chocolate-covered strawberries in a new, fun way! For the complete recipe, check out the Full Recipe! To store chocolate-covered strawberries, keep them in a single layer. Place them on a parchment-lined plate or a tray. Cover them lightly with plastic wrap. This helps keep dust away without trapping moisture. Avoid storing them in the fridge for too long. The moisture can make the strawberries soggy. Keep them in a cool, dry place instead. If you must refrigerate, use an airtight container. This will help reduce moisture exposure. Chocolate-covered strawberries last about 24 hours in the fridge. After this, they may lose their fresh taste and texture. Check them daily for freshness. Signs that strawberries are no longer fresh include: - A soft or mushy texture - A change in color, like dullness - An off smell or any signs of mold If you see any of these signs, it’s best to discard them. Enjoy your treats while they are at their best! You can use a bar of chocolate instead of chips. Simply chop the chocolate into small pieces. Place the pieces in a microwave-safe bowl and follow the same melting steps. Stir often to get a smooth texture. This method works well and gives you great results. Yes, white chocolate is a tasty option. It has a sweet and creamy flavor. Just melt it the same way as semi-sweet chocolate. Keep in mind that white chocolate can be thicker, so you may need to add a bit of coconut oil for a smoother dip. To avoid cracks, let the chocolate cool slightly before dipping. Make sure your strawberries are dry before you dip them. If the chocolate is too hot, it can crack as it cools. Chilling the dipped berries in the fridge also helps the chocolate set evenly. If your chocolate is thick, you can add a little coconut oil or vegetable oil. This will help thin it out. Stir in the oil slowly until you reach your desired consistency. You want it to be smooth and easy to dip. You can create tasty chocolate-covered strawberries with just a few simple steps. Start with fresh strawberries and melt chocolate. Dip and decorate them as you like. Use tips for shining and storage to ensure they last. You can even try fun flavor twists or vegan options. Remember, a little creativity goes a long way. Enjoy making these delicious treats!

Easy Chocolate Covered Strawberries Delightful Treat

Craving a sweet treat that’s simple and delicious? Look no further! Easy chocolate-covered strawberries are the perfect bite-sized delights for

Older posts
Newer posts
← Previous Page1 … Page18 Page19 Page20 … Page65 Next →

dsad

© 2025 Cooking Wells • Built with GeneratePress

Our Policies

  • Copyright Policy
  • Cookie Policy
  • GDPR Policy
  • Privacy Policy
  • Disclaimer
  • Terms Of Use

More Information

  • Home
  • About
  • Contact
  • Appetizers
  • Dessert
  • Dinner
  • Drinks
©2025, Cooking Wells About Back To Top