Skip to content
DisclaimerTerms Of UseGDPR PolicyCookie Policy

Cooking Wells

  • Home
  • Drinks
  • Appetizers
  • Dinner
  • Dessert
  • About
  • Contact
  • Privacy Policy
DisclaimerTerms Of UseGDPR PolicyCookie Policy

Mia

To make satisfying Sweet Potato and Black Bean Enchiladas, gather these ingredients. Each one adds to the flavor and texture of the dish. - 2 medium sweet potatoes, peeled and diced - 1 can (15 oz) black beans, drained and rinsed - 1 cup corn kernels (fresh or frozen) - 1 teaspoon cumin - 1 teaspoon chili powder - 1/2 teaspoon smoked paprika - 1/2 teaspoon garlic powder - Salt and pepper to taste - 8 corn tortillas - 2 cups enchilada sauce (red or green) - 1 cup shredded cheese (cheddar or Monterey Jack) - Fresh cilantro, for garnish - Lime wedges, for serving These ingredients create a hearty meal. Sweet potatoes offer natural sweetness. Black beans add protein and fiber. Corn brings a nice crunch. The spices, like cumin and chili powder, give it warmth and depth. When preparing, make sure to use ripe sweet potatoes. They should feel firm. Look for black beans that are cooked through. Drain and rinse them well. This helps remove excess sodium. Using corn tortillas is key. They are soft and roll easily. If you prefer, you can choose gluten-free tortillas. You can find the Full Recipe for more detailed instructions. Each step builds flavor, making your enchiladas truly special. Enjoy the fresh cilantro and lime, as they brighten up the dish! - Preheat the Oven to 375°F (190°C): Start by setting your oven to 375°F. This gives it time to heat up while you prepare the rest. - Cook the Sweet Potatoes (10-12 minutes): In a pot of boiling water, add the diced sweet potatoes. Cook them for about 10-12 minutes until they are soft. Drain them and let them cool for a moment. - Combine Ingredients in a Large Bowl: In a big bowl, mix the cooked sweet potatoes with black beans, corn, cumin, chili powder, smoked paprika, garlic powder, salt, and pepper. Stir everything until it’s well blended. - Spread Enchilada Sauce in Baking Dish: Take a 9x13 inch baking dish and pour about 1/2 cup of enchilada sauce on the bottom. This keeps the tortillas moist. - Roll and Arrange Tortillas: Grab a corn tortilla, scoop about 1/4 cup of the filling into it, and roll it tightly. Place the rolled tortilla seam-side down in the baking dish. Repeat this process until all tortillas are filled. - Cover and Bake for 20 minutes: Cover the dish with aluminum foil. Bake it in the preheated oven for 20 minutes to let the flavors blend. - Remove Foil and Bake for an Additional 10-15 minutes: After 20 minutes, take off the foil. Bake for another 10-15 minutes until the cheese on top is bubbly and golden. This step-by-step guide helps you create delicious Sweet Potato and Black Bean Enchiladas. Check out the Full Recipe for more details! - Ensuring the Sweet Potatoes are Tender Start by boiling the sweet potatoes. Cut them into small pieces. Cook them for 10 to 12 minutes. Check if they are soft by poking them with a fork. Tender sweet potatoes will mix well with black beans. - How to Roll Tortillas Without Breaking Heat the corn tortillas in a pan for a few seconds. This makes them warm and soft. As you roll, keep the filling toward one end. Tuck in the edges and roll tightly. A little practice makes it perfect! - Adding Fresh Herbs and Spices Fresh cilantro adds a nice touch. Chopped green onions can also boost flavor. You might add a pinch of cayenne for spice. Experiment with flavors to find what you love. - Suggested Cheese Alternatives Cheddar is a classic choice, but you can try others. Monterey Jack melts nicely. For a healthier option, use a vegan cheese. Choose what fits your taste best. - Pairing with Sides like Salad or Guacamole A fresh salad adds crunch and color. Guacamole complements the enchiladas well. Serve these sides to add balance to your meal. - Presentation Tips for Serving Lay the enchiladas on a nice plate. Drizzle extra sauce over them for a pop of color. Add a sprinkle of cilantro and lime wedges for a fresh look. These small details make your meal shine. For the full recipe, check out the Sweet Potato & Black Bean Enchiladas section. Enjoy creating a delicious dish! {{image_2}} You can change beans or veggies for a twist. Try pinto beans or kidney beans instead of black beans. Zucchini or bell peppers can also add color and taste. If you need gluten-free options, use corn tortillas made without wheat. They work well and hold the filling nicely. Do you like spice? Choose a spicy enchilada sauce for heat. If you prefer mild, go for a green sauce or a less spicy red sauce. You can also add toppings like creamy avocado or tangy sour cream. They enhance the flavor and add a rich texture. Want to save time? Use an Instant Pot or slow cooker. They allow for easy cooking and deeper flavors. If you're grilling, wrap the enchiladas in foil and place them on the grill. Baking works best but grilling adds a smoky taste. Experiment with both for fun! Check out the Full Recipe for more ideas and tips on making these tasty enchiladas! To store leftovers, let the enchiladas cool down first. Place them in an airtight container. They will stay fresh in the fridge for about three to five days. I recommend letting them cool for about 20 to 30 minutes before storing. This helps avoid condensation and keeps them from getting soggy. If you want to freeze enchiladas, wrap them tightly in plastic wrap. Place them in a freezer-safe bag or container. This keeps them fresh for up to three months. Be sure to label the bags with the date you freeze them. For best results, freeze them before baking. This way, you can bake them straight from the freezer. To reheat, preheat your oven to 375°F (190°C). Bake the frozen enchiladas covered for about 30-35 minutes. Remove the cover and bake for an additional 10-15 minutes. Stored enchiladas last in the fridge for about five days. In the freezer, they can last for three months. Be aware that the flavor may lessen over time. For the best taste, eat them within this time frame. If you notice a sour smell or mold, it’s best to toss them out. Always check for any changes in color or texture before eating. For the complete recipe, check out the Full Recipe. Can I make sweet potato and black bean enchiladas ahead of time? Yes, you can make these enchiladas ahead. Prepare them a day before. Keep them covered in the fridge. Bake them when you are ready to serve. They taste great even after a night in the fridge. What can I use instead of enchilada sauce? If you lack enchilada sauce, use salsa or tomato sauce. You can also blend diced tomatoes with spices. Both options provide similar flavors. Are these enchiladas vegan? Yes, these enchiladas are vegan. They contain no meat or dairy. Use a vegan cheese for a perfect touch. Can I substitute different tortillas for corn? Yes, you can use flour tortillas if you prefer. They work well in this recipe. Just make sure they are large enough to hold the filling. How can I make this recipe spicier? To spice things up, add more chili powder. You can also include jalapeños or hot sauce to the filling. Adjust according to your taste. How many servings does this recipe make? This recipe makes four servings. Each serving includes two enchiladas. You can easily double the recipe for more guests. What are good side dishes to serve with enchiladas? Pair your enchiladas with a simple salad or guacamole. Rice or beans also make great sides. These add freshness and flavor to your meal. For the full recipe, check the previous section. In this blog post, we covered how to make sweet potato and black bean enchiladas. You learned about the ingredients needed, step-by-step instructions, and tips for perfecting your dish. We explored variations and how to store leftovers. The key to great enchiladas is using fresh ingredients and following each step carefully. Enjoy experimenting with flavors and serving ideas to make this dish your own. Happy cooking!

Sweet Potato and Black Bean Enchiladas

Looking for a hearty dish that combines flavors, nutrition, and ease? These Sweet Potato and Black Bean Enchiladas are pure

To make tasty classic beef burgers, you need: - 1 lb ground beef (80/20 blend for juiciness) - 1 teaspoon salt - 1/2 teaspoon black pepper - 1 teaspoon garlic powder - 1 tablespoon Worcestershire sauce - 4 burger buns (your choice: sesame, brioche, etc.) - 1 cup lettuce leaves - 1 large tomato, sliced - 1/2 onion, thinly sliced - 1 cup cheddar cheese, sliced (optional) For a creamy garlic aioli, grab these items: - 1/2 cup mayonnaise - 2 cloves garlic, minced - 1 tablespoon lemon juice - Salt and pepper to taste You can make your burgers even better with these extras: - Sliced pickles - Avocado slices - Crispy bacon - Sautéed mushrooms - Different cheeses like Swiss or blue cheese These ingredients help you create a classic beef burger that shines. You can find the full recipe to guide you through the cooking process. Enjoy making these delicious burgers! To start, grab a small bowl. In this bowl, mix together 1/2 cup mayonnaise, 2 cloves minced garlic, and 1 tablespoon lemon juice. Add a pinch of salt and pepper to taste. Stir well until the mixture is smooth. Let it sit for a few minutes. This helps all the flavors blend together nicely. Next, take a large bowl. In it, combine 1 lb of ground beef, 1 teaspoon salt, 1/2 teaspoon black pepper, 1 teaspoon garlic powder, and 1 tablespoon Worcestershire sauce. Gently mix everything together. Be careful not to overwork the meat, as this can make the burgers tough. Once mixed, divide the beef into four equal parts. Shape each part into a patty, making a small dent in the center. This dent helps the patties cook evenly. Now it’s time to cook. Preheat your grill or skillet to medium-high heat. Place the patties on the grill and cook for 4-5 minutes on one side. Flip them over and cook for another 4 minutes. If you want cheese, add a slice on each patty in the last minute. While the patties cook, toast your burger buns on the grill or in a pan until they turn golden brown. Ready to assemble? Start by spreading a good amount of garlic aioli on the bottom half of each toasted bun. Layer on some lettuce, then the cooked beef patty. Top with sliced tomato and onion. Finally, place the top half of the bun on your creation. Your classic beef burger is now ready to enjoy! For the full recipe, refer to the main recipe section. To make juicy burgers, choose ground beef that has a good fat content. I suggest using an 80/20 blend. This means it has 80% meat and 20% fat. The fat adds flavor and keeps the burgers moist. Also, mix the beef gently with spices. Overworking it can make the patties tough. Both grilling and using a skillet can yield great burgers. Grilling adds a smoky taste. It’s also fun to cook outdoors. If you choose a skillet, use a cast iron one. It holds heat well and gives a nice sear. Cook the patties on medium-high heat for the best results. How you present your burgers can make them even more appealing. Serve them on a wooden board for a rustic look. Add a side of crispy fries in a small metal bucket. This creates a nice visual. You can also garnish with a sprig of parsley for a pop of color. For the full recipe, check out the details above. Enjoy your cooking! {{image_2}} You can make your burger unique with cheese and toppings. Cheese adds creaminess and flavor. Cheddar is a classic choice, but you can try Swiss, blue cheese, or even pepper jack. Each cheese brings its own taste. Toppings can change the game. Lettuce, tomato, and onion are staples. You can add pickles for crunch or bacon for richness. Avocado brings creaminess, while jalapeños add a kick. Let your taste guide you. Mix and match to find your favorite combo. Garlic aioli is delicious, but don’t stop there! You can make many aioli flavors. Try adding herbs like basil or cilantro for freshness. A touch of sriracha gives a nice heat. For a twist, mix in sun-dried tomatoes or roasted red peppers. You can also swap the mayonnaise. Plain Greek yogurt offers a tangy flavor and creaminess. This change makes the aioli lighter. Experimenting with flavors keeps your burgers exciting and fresh. If you want a healthier burger, choose leaner meat. Ground turkey or chicken work well. These options are lower in fat but still tasty. If you prefer beef, go for a leaner cut like sirloin. Whole-grain buns add fiber and nutrients. They also offer a nutty taste that pairs well with beef. Lettuce wraps serve as a great low-carb option. They keep your burger fresh and light. These variations let you craft a burger that suits your taste and health goals. Don’t forget to check out the Full Recipe for the classic version! Store leftover burgers in an airtight container. They stay fresh for up to three days in the fridge. If you want to keep them longer, freeze them. Wrap each burger tightly in plastic wrap, then place them in a freezer bag. This helps to prevent freezer burn. To reheat burgers, use the oven for best results. Preheat the oven to 350°F (175°C). Place the burgers on a baking sheet and cover them with foil. Heat for about 10-15 minutes until warm. You can also use the microwave, but this may make the buns soggy. Heat on medium for about 30 seconds. Check and repeat if needed. You can freeze uncooked patties for easy meals later. Shape the patties and place them on a baking sheet. Freeze them for about 30 minutes until firm. After that, transfer them to a freezer bag. For the garlic aioli, store it in a sealed container in the fridge. It can last up to a week. If you want to freeze it, use an ice cube tray to freeze portions, then transfer to a bag. This way, you can use just what you need. The best beef for burgers is an 80/20 blend. This means 80% lean meat and 20% fat. The fat adds flavor and keeps the burger juicy. You can also use ground chuck for great taste. Avoid very lean beef, as it can dry out. Yes, you can make garlic aioli in advance! It can sit in your fridge for up to three days. Just mix the mayo, garlic, lemon juice, salt, and pepper. Store it in an airtight container. The flavors will blend well, making it even tastier. To cook burgers for medium-rare, grill or pan-fry them for about 4-5 minutes on each side. The center should reach 130-135°F. Use a meat thermometer for accuracy. This gives you a juicy burger with a warm red center. Great sides for burgers include crispy fries, onion rings, or a fresh salad. You can also serve coleslaw or grilled vegetables. For a fun twist, try sweet potato fries or a loaded potato salad. These sides complement the flavors and add variety. You’ve learned how to make classic beef burgers from start to finish. We covered ingredients like beef, garlic aioli, and tasty toppings. You now know how to cook perfect patties and assemble your burger. Don’t forget the tips for juicy burgers and great presentation. Mix things up with variations and healthier options to suit your taste. Store leftovers properly and enjoy them later. Now, get cooking and impress your family and friends with your homemade burgers!

Classic Beef Burgers with Garlic Aioli Delight

If you’re craving a mouthwatering burger, you’re in the right place! I’ll show you how to make classic beef burgers

To make this savory dish, you will need: - 1 cup grits (stone-ground preferred) - 4 cups water or chicken broth - 1 pound shrimp, peeled and deveined - 1/2 pound Andouille sausage, sliced - 1 tablespoon olive oil - 1 tablespoon butter - 1 bell pepper (red or green), diced - 1 small onion, diced - 2 garlic cloves, minced - 1 teaspoon smoked paprika - 1/2 teaspoon cayenne pepper (adjust for spice preference) - Salt and black pepper to taste - 1 cup shredded sharp cheddar cheese - 1/4 cup chopped green onions for garnish - Lemon wedges for serving You will need a few key tools to create this dish: - Medium saucepan for the grits - Large skillet for the sausage and shrimp - Whisk for stirring the grits - Knife and cutting board for dicing vegetables - Measuring cups and spoons These tools make the cooking process smooth and easy. This dish serves four people. Each serving has: - Calories: 480 - Protein: 30g - Carbohydrates: 45g - Fat: 20g - Fiber: 2g - Sodium: 800mg Shrimp and grits offer a tasty balance of protein, carbs, and fats. This meal provides energy and satisfaction. For more detailed steps, check out the Full Recipe. Start by boiling water or chicken broth in a medium saucepan. Once it boils, slowly whisk in the grits. Be careful to avoid lumps. Reduce the heat to low and let them simmer for about 20-25 minutes. Stir them often to keep them from sticking. When thick, add cheese, butter, salt, and black pepper. Mix well and keep warm for later. Heat olive oil in a large skillet over medium heat. Add the sliced Andouille sausage and let it cook until it turns brown, which takes about 5-7 minutes. Once cooked, remove the sausage from the skillet and set it aside. This step adds a rich flavor to the dish. In the same skillet, toss in the diced onion, bell pepper, and minced garlic. Sauté these for about 5 minutes. You want them to soften and smell great. This mix will add depth to your dish. Next, push the veggies to one side of the skillet. Add the shrimp to the empty space. Sprinkle smoked paprika, cayenne pepper, salt, and black pepper over the shrimp. Cook for about 3-4 minutes. The shrimp should turn pink and opaque. Stir everything together to mix the flavors well. Now it's time to serve! Spoon the creamy cheese grits onto a plate. Top it generously with the shrimp and sausage mix. Finish by garnishing with chopped green onions. Serve with lemon wedges on the side for a fresh burst of flavor. Enjoy your Shrimp and Grits Delight, made using the Full Recipe! To make great grits, use stone-ground grits. They taste better and give a creamy texture. Always bring your water or broth to a boil before adding the grits. This step helps them cook evenly. Stir them well to avoid lumps. Keep the heat low and stir often. This keeps them from sticking. Cook until thick, about 20-25 minutes. Don’t forget to add cheese and butter for extra flavor! Shrimp cook fast. They only need about 3-4 minutes in the pan. Watch them closely. When they turn pink and opaque, they are done. Overcooking makes shrimp tough. To test, cut one open. It should be white inside. Always buy fresh, high-quality shrimp. This makes a big difference in taste. To boost flavors, use smoked paprika and cayenne pepper. They add depth and a bit of heat. If you like it spicy, adjust the cayenne to your taste. Fresh herbs also brighten the dish. Chopped green onions give a fresh crunch. A squeeze of lemon right before serving adds a zesty touch. Experiment with these tips to find your perfect balance. For the complete recipe, check the Full Recipe section. {{image_2}} You can change the shrimp to other proteins. Chicken or fish works well. For chicken, use boneless thighs. Cut them into small pieces. Cook them until golden brown. For fish, try salmon or tilapia. Cook it gently to keep it flaky. Each option brings a new taste to the dish. For a vegetarian twist, skip the shrimp and sausage. Use mushrooms or firm tofu instead. Sauté them until golden. Add extra veggies like spinach or zucchini for flavor. You can also use vegetable broth for the grits. This will keep it rich and tasty without meat. You can play with flavors in this dish. Add herbs like thyme or basil for a fresh taste. For a kick, use jalapeños or chipotle peppers. They add heat and a smoky flavor. You may also swap the cheese for a different kind. Try pepper jack for spice or feta for a tangy twist. Each change gives a new spin to this classic recipe. For more details on the recipe, check the Full Recipe. To keep your shrimp and grits fresh, store leftovers in an airtight container. Let the dish cool to room temperature before sealing it. Store it in the fridge for up to three days. Keep in mind that the grits may thicken as they cool. Reheat your shrimp and grits on the stove for best results. Add a splash of water or broth to the grits to restore creaminess. Heat over low heat, stirring until warm. For quick reheating, use the microwave. Place in a microwave-safe bowl, cover, and heat in 30-second intervals, stirring in between. You can freeze shrimp and grits but do it carefully. Place the cooled dish in a freezer-safe container. It will keep well for up to two months. When ready to eat, thaw overnight in the fridge. Reheat as mentioned above. Note that the texture may change slightly after freezing. For a full recipe, check out the details above. Yes, you can make shrimp and grits ahead of time. Cook the grits and shrimp separately. Store each in airtight containers. When ready to serve, reheat both in a pot over low heat. Stir occasionally to make them creamy again. If you can't find Andouille sausage, try using chorizo or kielbasa. Both have great flavor. You can also use turkey sausage for a lighter option. Just make sure to cook it well for the best taste. To add spice, use more cayenne pepper in the dish. You can also add hot sauce when cooking. Another option is to include diced jalapeños for a fresh kick. Adjust to your heat level for the perfect bite. For a great meal, pair shrimp and grits with a light salad. A green salad with lemon vinaigrette works well. You can also serve it with crusty bread and a glass of white wine. Enjoy the flavors together for a lovely dining experience. [Full Recipe] Shrimp and grits is a classic dish with deep roots in Southern cooking. The mix of shrimp and Andouille sausage brings bold flavors. This dish can be a meal for special occasions or everyday dinners. - 1 cup grits (stone-ground preferred) - 4 cups water or chicken broth - 1 pound shrimp, peeled and deveined - 1/2 pound Andouille sausage, sliced - 1 tablespoon olive oil - 1 tablespoon butter - 1 bell pepper (red or green), diced - 1 small onion, diced - 2 garlic cloves, minced - 1 teaspoon smoked paprika - 1/2 teaspoon cayenne pepper (adjust for spice preference) - Salt and black pepper to taste - 1 cup shredded sharp cheddar cheese - 1/4 cup chopped green onions for garnish - Lemon wedges for serving Use these tools for the best results: - Medium saucepan for grits - Large skillet for cooking - Whisk for mixing the grits - Cutting board and knife for chopping This dish offers a good balance of protein and carbs. Shrimp is low in fat and high in protein. Grits provide energy and fiber. The Andouille sausage adds flavor but also fat and calories. Enjoy it in moderation! Follow the steps in the Full Recipe to create a delicious meal. This guide offers clear instructions and tips. In this dish, cooking the grits well is key. Use stone-ground grits for the best texture. Cook them slowly to make them creamy. This patience pays off! When cooking the sausage, watch for a nice brown color. This adds flavor to the dish. Cook the shrimp until they are just pink. Overcooked shrimp become tough. I love to add diced vegetables. They give more flavor and color. Use fresh garlic for a strong taste. The smoked paprika and cayenne pepper bring warmth and depth. Garnishing with green onions adds a pop of color. Squeeze lemon on top before eating for a bright taste. Enjoy this dish with friends or family for an unforgettable meal. In this post, we explored how to make a delicious shrimp and grits dish. We covered key ingredients, cooking steps, and helpful tips. You learned about variations and how to store leftovers effectively. By following this guide, you can create a flavorful meal your friends and family will love. Remember, feel free to adjust ingredients to match your taste. Enjoy your cooking adventure!

Savory Shrimp and Grits with Andouille Sausage Delight

Are you ready to dive into a plate of comfort? This Savory Shrimp and Grits with Andouille Sausage Delight combines

To make a Grilled Vegetable Panini with Balsamic Glaze, gather these ingredients: - 1 medium zucchini, sliced - 1 red bell pepper, sliced - 1 yellow bell pepper, sliced - 1 small eggplant, sliced - 1 cup fresh spinach - 1 cup mozzarella cheese, shredded - 4 slices of ciabatta bread or whole-grain bread - 4 tablespoons balsamic glaze - 2 tablespoons olive oil - Salt and pepper to taste Garnishes can make your panini even better. Consider these: - Fresh basil leaves - Extra balsamic glaze Choosing fresh vegetables is key for great flavor. Here are some tips: - Look for bright colors. This often means better taste. - Choose firm vegetables. They should feel solid, not soft. - Check for spots or blemishes. Avoid any damaged veggies. - Smell the vegetables. Fresh ones often have a sweet smell. Using fresh vegetables makes your panini vibrant and full of taste. For the full recipe, check the recipe section. First, gather all your ingredients. You need zucchini, bell peppers, eggplant, spinach, mozzarella, and ciabatta bread. Slice the zucchini, red bell pepper, yellow bell pepper, and eggplant. Toss them in a bowl with olive oil, salt, and pepper. This adds flavor. Preheat your grill pan or grill to medium-high heat. Now, place the veggies on the grill. Cook them for about 5-7 minutes on each side. You want them tender with nice grill marks. This step adds a smoky flavor to your panini. Once cooked, take them off the grill and set them aside to cool. Take two slices of your bread. Add a generous amount of mozzarella cheese on one side. Next, layer grilled vegetables on top of the cheese. Then, add a handful of fresh spinach. Drizzle one tablespoon of balsamic glaze over the veggies. Finally, place another slice of bread on top. Repeat this for the second panini. Place the assembled paninis on the grill pan. Cook them for 3-5 minutes on each side. You want the bread to be golden brown and the cheese to melt. Press down gently as they cook for even heat. Once cooked, remove the paninis from the grill. Let them cool for one minute. Then, slice them diagonally. Drizzle more balsamic glaze on top if you like. Optionally, add fresh basil leaves for garnish. Serve immediately for best taste. Enjoy your delicious creation! For the best panini, use a grill pan or a panini press. A grill pan gives nice char marks, while a press ensures even heat. Heat your pan or press to medium-high. This helps the bread get crisp and the cheese melt well. Grilling vegetables is easy with a few simple steps. Cut your veggies into even slices. This helps them cook at the same rate. Toss them in olive oil, salt, and pepper before grilling. Grill the veggies for about 5-7 minutes on each side. Look for soft textures and beautiful grill marks. This adds flavor and makes a great base for your panini. Mozzarella cheese is classic for a panini, but feel free to swap it! Try provolone for a sharper taste or feta for a tangy twist. You can also use dairy-free cheese for a vegan option. Just make sure it melts well. Each cheese will change the flavor, so experiment to find your favorite! For the full recipe, check out the details above. Enjoy creating your grilled vegetable panini with balsamic glaze! {{image_2}} You can enhance your grilled vegetable panini by adding protein. Grilled chicken or tofu works great. If you choose chicken, season it well and grill until fully cooked. Slice it thinly and layer it with the grilled veggies. Tofu can be marinated for extra flavor. Grill it until it’s golden and crispy. Adding protein makes your meal filling and adds delicious taste. To make this dish vegan, simply skip the cheese. You can use avocado or hummus for creaminess. They add flavor and make the panini rich. If you want a cheesy texture, try vegan cheese. It melts nicely and keeps the panini satisfying. You can also add more veggies like mushrooms or artichokes for extra taste and nutrition. The type of bread you use can change your panini experience. Ciabatta gives a nice crust and soft inside. Whole-grain bread adds a hearty flavor. You can even try sourdough for a tangy twist. If you want gluten-free, use gluten-free bread. Each option brings out different flavors and textures in your panini. Explore these choices to find your favorite combination. For the full recipe, be sure to check the section above. To keep your grilled vegetable panini fresh, wrap it tightly in foil or plastic wrap. This protects it from air and keeps it moist. You can store it in the fridge for up to three days. If you want to enjoy it later, you can also place it in an airtight container. This method keeps the flavors intact and prevents sogginess. When it's time to eat your leftover panini, reheating it properly is key. The best way is to use a skillet. Heat the skillet over medium heat and place the panini in it. Cook for about three minutes on each side. This method helps restore that crispy crust while melting the cheese perfectly. You can also use a toaster oven if you want a faster option. If you've made extra paninis, freezing them is a great choice. Wrap each panini tightly in foil, then place them in a freezer bag. This keeps them fresh for up to three months. When you're ready to eat, let them thaw in the fridge overnight. Reheat them in a skillet or toaster oven for the best results. Enjoy your grilled vegetable panini with balsamic glaze anytime! For the full recipe, check the details above. The best bread for a panini is sturdy and holds up well. Ciabatta and whole-grain bread are great choices. They have a nice crust that gets crispy when grilled. You want bread that can hold the filling without falling apart. Focus on breads with a chewy texture and good flavor. Yes, you can use a sandwich press for this recipe. A sandwich press cooks the panini evenly and makes it crispy. Just place the assembled panini in the press and cook until golden. This method is quick and easy, and it gives you that perfect crunch. To adjust the recipe, simply multiply the ingredients. For more paninis, use more vegetables and cheese. You can also use more bread slices. If you make four paninis, double the amounts in the ingredient list. Just keep in mind that cooking times may change slightly. A grilled vegetable panini pairs well with a fresh salad or soup. A side of mixed greens adds color and crunch. You can also serve it with a light tomato soup. This balance makes for a filling and tasty meal. Consider pairing it with some chips for extra texture. For the full recipe, check out the details above! You now know how to make a tasty grilled vegetable panini. We covered the key ingredients and optional garnishes. You learned step-by-step how to prepare, grill, and cook the panini. I shared tips for perfect vegetables and tasty cheese swaps. We also explored fun variations and how to store leftovers. Try these ideas to create your perfect panini. Enjoy every bite!

Grilled Vegetable Panini with Balsamic Glaze Delight

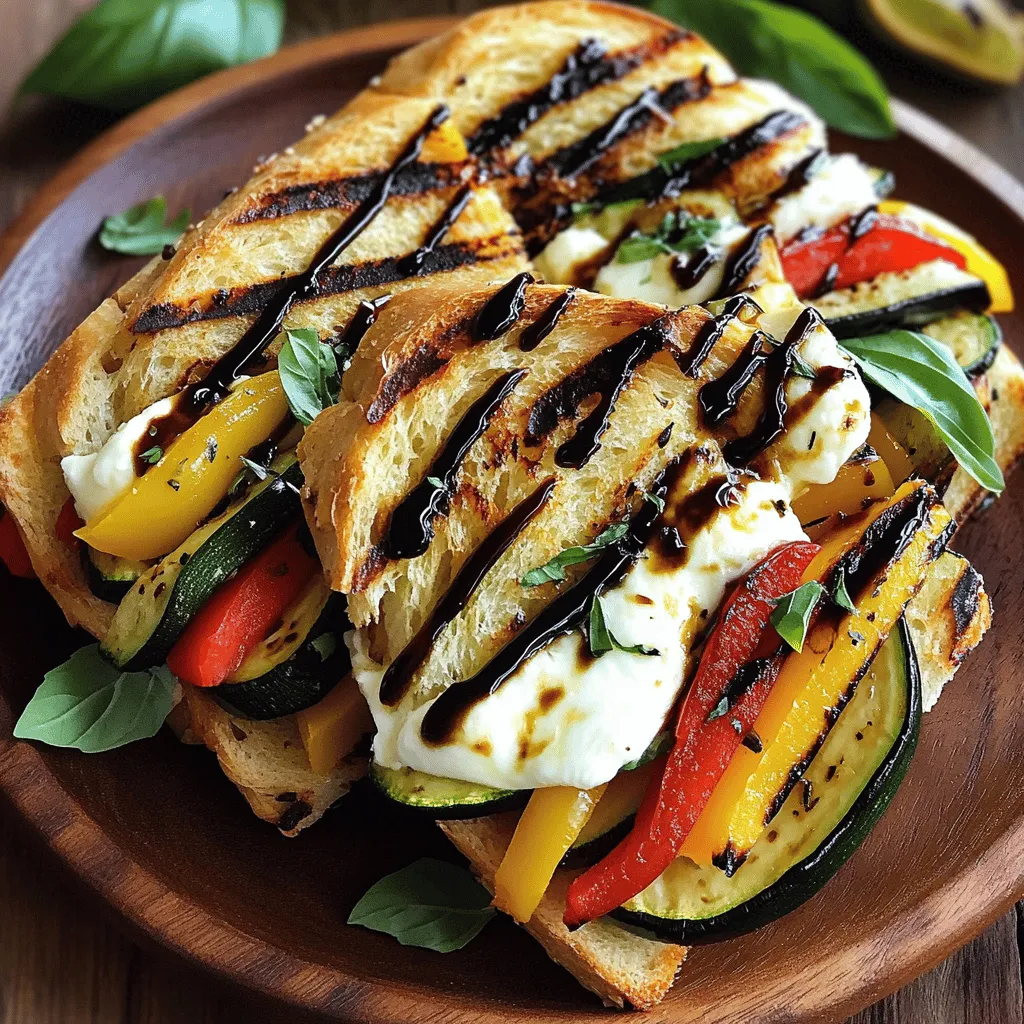
If you’re craving a quick, healthy meal, look no further than the Grilled Vegetable Panini with Balsamic Glaze. Bursting with

- 1 cup red lentils, rinsed - 1 can (14 oz) coconut milk - 1 tablespoon vegetable oil - 1 onion, finely chopped - 3 cloves garlic, minced - 1 tablespoon ginger, grated - 2 tablespoons red curry paste - 1 teaspoon ground turmeric - 4 cups vegetable broth - 1 cup diced tomatoes (fresh or canned) - 1 tablespoon soy sauce or tamari - 1 tablespoon lime juice - Salt and pepper to taste - Fresh cilantro, for garnish Gathering the right ingredients is key for this coconut curry lentil soup. I love using red lentils because they cook fast and add a nice texture. Coconut milk gives the soup a creamy feel and rich taste. You can swap the soy sauce for tamari if you want a gluten-free option. Fresh herbs like cilantro add a pop of color and flavor at the end. If you want to make it spicier, add more red curry paste. This soup fits many diets. It is vegan and can be gluten-free too. Just check the ingredients on your vegetable broth and soy sauce. For a full list of instructions, check out the Full Recipe. Start by heating 1 tablespoon of vegetable oil in a large pot over medium heat. Add 1 finely chopped onion and sauté until it turns soft, about 5 minutes. Next, stir in 3 minced garlic cloves and 1 tablespoon of grated ginger. Cook for 1 more minute until it smells great. Then, add 2 tablespoons of red curry paste and 1 teaspoon of ground turmeric. Mix well and cook for another minute. This base gives your soup a rich flavor. Now, it's time to add the main ingredients. Put in 1 cup of rinsed red lentils, 1 cup of diced tomatoes, and 4 cups of vegetable broth. Pour in 1 can of coconut milk, and bring everything to a boil. Once it's bubbling, lower the heat to a gentle simmer and cover the pot. Let it cook for 25 to 30 minutes until the lentils are soft. This step is key for a hearty soup. After cooking, stir in 1 tablespoon of soy sauce or tamari and 1 tablespoon of lime juice. Taste the soup and add salt and pepper as needed. For a creamier soup, use an immersion blender to blend part of it. If you prefer texture, mash some lentils with a fork right in the pot. Ladle the soup into bowls, and garnish with fresh cilantro. Enjoy your warm and cozy coconut curry lentil soup! For the full recipe, check the earlier section. To get the best texture, use red lentils. They cook fast and become soft. Rinse them well before using. If you want a creamier soup, blend part of it. You can use an immersion blender. If you don't have one, mash some lentils with a fork. This makes the soup thick and smooth. For more flavor, try adding fresh herbs. Cilantro works great as a garnish. You can also add a squeeze of lime juice. This adds a bright taste to the soup. If you like heat, add chili flakes or sliced jalapeños. They give the soup a nice kick. Serve the soup hot in bowls. A slice of lime on the side looks nice. You can sprinkle more cilantro on top for color. This soup pairs well with crusty bread or rice. Dip the bread in the soup for a tasty bite. For a fun touch, add a dollop of yogurt on top. This balances the spices and adds creaminess. For the complete cooking process and ingredient list, check the Full Recipe. {{image_2}} You can make this soup even better by adding vegetables. Carrots, spinach, or bell peppers work well. Simply chop them and add them when you mix in the lentils. This adds color and nutrition. You can also try zucchini or sweet potatoes for a different taste. If you love heat, use more red curry paste. Start with a little and taste as you go. For a mild version, reduce the curry paste. You can also add a splash of coconut milk to tone down the spice. This way, you control the heat. This soup is already vegan and gluten-free! To keep it that way, use tamari instead of soy sauce. Make sure your vegetable broth is gluten-free. You can also swap the coconut milk for another plant-based milk, but it might change the flavor. For the full recipe, check out the Coconut Curry Lentil Soup 🥥 section. Enjoy exploring these variations! You can store coconut curry lentil soup in the fridge. Place it in a sealed container. It stays fresh for about 3 to 5 days. Make sure to cool it first before sealing. This keeps the soup safe and tasty. To freeze the soup, let it cool completely. Use freezer-safe containers or bags. It lasts for about 2 to 3 months in the freezer. When ready to eat, thaw it overnight in the fridge. This keeps all the flavor and texture in check. Reheat the soup on the stove for best results. Use medium heat and stir often. You can also use a microwave. Heat it in a bowl, stirring every minute. Make sure it’s hot all the way through. Adding a splash of water or coconut milk can help restore creaminess. For more details, check the Full Recipe. Yes, you can use other lentils. Green and brown lentils work well. They take longer to cook, so adjust the time. Red lentils break down more, making the soup creamy. Green and brown lentils keep their shape. This gives the soup a different texture. To spice it up, add more red curry paste. You can also include fresh chili peppers. For a smoky flavor, try adding cayenne pepper. Adjust the spice to fit your taste. Remember to taste as you go, so it’s just right for you. Serve this soup with crusty bread or rice. Naan is another great choice. A fresh salad adds crunch and brightness. Pair it with lime wedges for a zesty kick. You can also enjoy it with yogurt for creaminess. Check out the Full Recipe for more ideas! This post outlined a tasty coconut curry lentil soup with simple steps. We covered key ingredients, including lentils, coconut milk, and spices. I shared tips for texture and flavor. You learned variations, like adding veggies or adjusting spice levels. Finally, we discussed storage and reheating for later enjoyment. This soup is easy and fun to make. Remember, cooking is about exploring flavors. So, dive in and enjoy every spoonful!

Coconut Curry Lentil Soup Simple and Hearty Delight

Are you ready to warm up with a bowl of comfort? Coconut Curry Lentil Soup is a simple and hearty

To make this tasty Mediterranean quinoa salad, gather these ingredients: - 1 cup quinoa, rinsed - 2 cups water or vegetable broth - 1 cucumber, diced - 1 cup cherry tomatoes, halved - 1 red bell pepper, diced - 1/2 red onion, finely chopped - 1 cup Kalamata olives, pitted and halved - 1/2 cup feta cheese, crumbled - 1/4 cup fresh parsley, chopped - 1/4 cup olive oil - 2 tablespoons lemon juice - 1 teaspoon dried oregano - Salt and pepper to taste When selecting your ingredients, freshness matters. Here are my top tips: - Quinoa: Choose organic quinoa if possible. Check for any small stones or debris. - Vegetables: Look for firm and vibrant cucumbers and bell peppers. For tomatoes, pick ones that are ripe and fragrant. - Olives: Opt for Kalamata olives in brine. They should be dark and glossy. - Feta Cheese: Use high-quality feta for the best flavor. Crumbled or block form is fine, but make sure it smells fresh. - Herbs: Fresh parsley should feel crisp and green. Avoid any that look wilted or brown. This salad is not just tasty but also healthy. Here’s what each key ingredient offers: - Quinoa: A great source of protein and fiber. It’s also gluten-free. - Cucumber: Hydrating and low in calories, cucumbers add crunch and vitamins. - Tomatoes: Packed with vitamins C and K, they support heart health. - Bell Pepper: High in vitamin A and antioxidants, these peppers help your immune system. - Olives: Rich in healthy fats, they promote heart health and add a savory flavor. - Feta Cheese: Provides calcium and protein, making the salad filling. This Mediterranean quinoa salad is a healthy delight that combines fresh flavors with nutrition. For the full recipe, check the section above! 1. Start with one cup of quinoa. Rinse it well under cold water. 2. In a medium saucepan, combine the rinsed quinoa with two cups of water or vegetable broth. 3. Bring this mixture to a boil. Then, lower the heat. Cover the saucepan and let it simmer. 4. Cook for about 15 minutes. The quinoa will become fluffy and absorb the liquid. 5. Once done, remove it from heat and let it cool. 6. While the quinoa cools, prepare your veggies. Dice the cucumber and bell pepper. 7. Chop the red onion finely and slice the cherry tomatoes in half. 8. Halve the Kalamata olives as well. 9. Grab a large mixing bowl. Add the cooled quinoa and all the chopped vegetables. 10. Crumble half a cup of feta cheese into the bowl. 11. In a small bowl, whisk together the olive oil, lemon juice, oregano, salt, and pepper. 12. Pour the dressing over the salad. Toss gently to coat everything evenly. 13. Lastly, fold in a quarter cup of fresh parsley. Adjust seasoning if needed. 14. Chill the salad for at least 30 minutes. This lets the flavors blend well. - When rinsing quinoa, use a fine mesh strainer to keep it all in. - The cooked quinoa should look fluffy and separate when done. - Make sure your veggies are chopped into bite-sized pieces for easy eating. - When mixing, a gentle toss helps keep the feta intact. - Use vegetable broth instead of water for a deeper flavor. - Always rinse quinoa to remove its natural coating, called saponin, which can taste bitter. - After cooking, let quinoa sit covered for 5 minutes before fluffing it with a fork. - For extra nutrition, consider adding spinach or herbs. They will boost the flavor and health benefits. For the full recipe, check the Mediterranean Quinoa Salad with Feta. Enjoy making this healthy delight! To elevate your Mediterranean quinoa salad, consider making a homemade dressing. Store-bought dressings often contain added sugars and preservatives. A simple mix of olive oil, lemon juice, and oregano brings out fresh flavors. Use about 1/4 cup of olive oil and 2 tablespoons of lemon juice for the perfect balance. Whisk them together and pour over your salad for a zesty kick. This dressing not only adds flavor but also helps coat the quinoa and veggies evenly. This salad shines on its own but pairs well with grilled chicken or fish. The lightness of the salad complements rich proteins. Serve it as a main dish for lunch or as a side for dinner. You can also add pita bread or hummus for a full Mediterranean feast. For a fun twist, try it in lettuce wraps for a crunchy bite. One common mistake is overcooking the quinoa. Follow the cooking time closely; it should be fluffy and not mushy. Another mistake is not letting the salad chill. Chilling helps the flavors meld together, making each bite more delicious. Lastly, don’t skip the seasoning. A pinch of salt and pepper can enhance all the other flavors and make your salad pop. For more guidance, check out the Full Recipe for Mediterranean Quinoa Salad with Feta. {{image_2}} You can make this salad even better by adding some tasty mix-ins. Here are my favorites: - Chickpeas: They add protein and creaminess. Just toss in one cup. - Avocado: Slice or dice one ripe avocado for smoothness. - Roasted Red Peppers: Use one cup for a sweet twist. - Artichoke Hearts: Add one can, drained and chopped, for a tangy bite. These add-ins boost flavor and nutrition, making your salad even more delightful. This salad is already gluten-free since quinoa is a gluten-free grain. To make it vegan, simply skip the feta cheese or use a plant-based cheese. Here are a few more ideas: - Vegan Option: Replace feta with tahini or avocado for creaminess. - Nut-Free: No nuts are in the recipe, so it's safe for nut allergies. - Low-Carb: Swap quinoa with riced cauliflower for fewer carbs. These tweaks help everyone enjoy this delicious dish. Adding spices and herbs can take your salad to new heights. Here are some great options: - Cumin: Add one teaspoon for a warm, earthy flavor. - Fresh Basil: Chop a handful for a fragrant twist. - Mint: A tablespoon of fresh mint brightens the dish. - Chili Flakes: For some heat, sprinkle in a pinch. Try these variations to make your Mediterranean quinoa salad unique. For the full recipe, click here. To keep your Mediterranean quinoa salad fresh, store it in an airtight container. Place it in the fridge. It will stay good for about three to four days. Make sure to cover it well. This helps keep it from drying out. You can freeze the salad for longer storage. Use a freezer-safe container. Keep it sealed tightly to avoid freezer burn. It can last up to three months in the freezer. When you’re ready to eat it, thaw it overnight in the fridge. If you want to warm it, use the microwave. Heat it for 30 seconds at a time. Stir in between to ensure even heat. You can also serve it cold. It tastes great straight from the fridge. For a fresh touch, add a drizzle of olive oil or a squeeze of lemon before serving. For the full recipe, check the earlier section! You can store Mediterranean Quinoa Salad in the fridge for up to five days. Make sure to keep it in a sealed container. The flavors will blend over time, which makes it even tastier. Just remember to check for any signs of spoilage before eating. Yes, you can make this salad ahead of time. In fact, it tastes better after chilling for a while. Prepare it a day before your event, and let it sit in the fridge. This will allow all the ingredients to soak up the dressing and flavors. If you need a substitute for feta cheese, try goat cheese or ricotta. Both add a creamy texture and great flavor. For a dairy-free option, use crumbled tofu mixed with a bit of lemon juice. This keeps the salad fresh and flavorful without the cheese. For the full recipe, check out the details provided above. Enjoy your cooking! In this blog post, we covered how to make a tasty Mediterranean Quinoa Salad. You learned about each ingredient, tips for choosing and using them, and the health benefits they provide. I shared step-by-step cooking instructions and common mistakes to avoid. We also discussed fun variations and the best ways to store and reheat your salad. Enjoy this dish for its flavors and health perks. Try different add-ins to keep it fresh and exciting. Your kitchen can become a place of flavor and health.

Mediterranean Quinoa Salad with Feta Healthy Delight

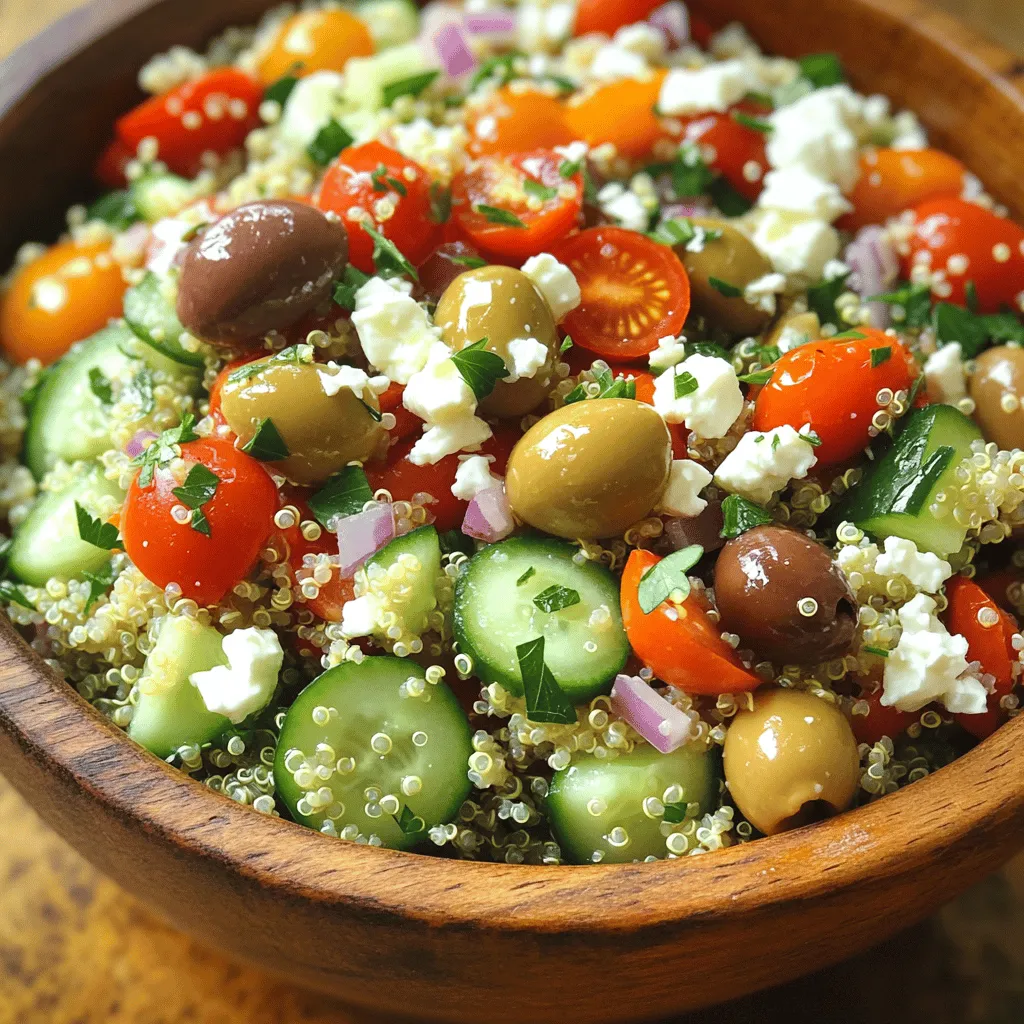
Looking for a healthy and tasty meal? You’ve found it! This Mediterranean Quinoa Salad with Feta is full of flavor

- 2 lbs beef sirloin, thinly sliced - 2 tablespoons olive oil - Salt and pepper, to taste - 1 medium onion, finely chopped - 3 cloves garlic, minced - 8 oz mushrooms, sliced - 2 cups beef broth - 1 cup sour cream - 2 tablespoons Dijon mustard - 1 tablespoon Worcestershire sauce (optional) - Fresh parsley, chopped (for garnish) - 12 oz egg noodles Beef Stroganoff is a classic dish. It brings warmth and comfort on cold days. The rich flavors of beef, cream, and mushrooms make it special. You can make this easy comfort meal with simple ingredients found in any store. For the beef, I use sirloin. This cut is tender when cooked right. I slice it thin to help it cook quickly. The olive oil adds a nice flavor and helps brown the meat. Salt and pepper bring out the best taste. Next, I chop a medium onion and mince three cloves of garlic. These aromatics add depth to the dish. Sliced mushrooms bring a nice earthiness. They cook down well and soak up the sauce. For the sauce, I use beef broth as the base. It adds richness. Sour cream gives it a nice creaminess. I also add Dijon mustard for a slight tang. Worcestershire sauce is optional but adds a nice umami flavor. Don't forget fresh parsley for garnish to brighten the dish. Finally, the egg noodles are the perfect match. They soak up the sauce and add texture. If you want to try this recipe, check out the Full Recipe for complete steps and details. Enjoy cooking! - Cook the egg noodles according to package instructions until al dente. - You want them slightly firm but not hard. This keeps them from getting mushy later. - Sear beef in olive oil until browned and set aside. - Use a hot skillet. This gives you a nice crust on the meat. Don’t crowd the pan. Sear in batches if needed. - Sauté onion and garlic until fragrant; then add mushrooms. - Cook the onion until it becomes clear. This brings out its sweetness. The garlic adds a lovely aroma. - Deglaze with beef broth, mix in mustard and Worcestershire sauce. - Scrape the bottom of the skillet. This releases all those tasty bits. The broth adds depth, while mustard gives a nice kick. - Incorporate beef and sour cream, then add cooked noodles. - Stir gently. You want every noodle coated in that rich, creamy sauce. This step is key for flavor. Remember, these steps come together to make a warm and comforting dish, perfect for any meal. For a complete guide, check the Full Recipe. To make the best beef stroganoff, choose the right cut of beef. I recommend using beef sirloin. It’s tender and cooks quickly, which helps keep the meat juicy. Sear the beef for just 2-3 minutes on each side. This short cooking time creates a nice brown crust. Be careful not to overcook it. Overcooked beef can turn tough and chewy. A creamy sauce is key for a great stroganoff. To add thickness, sour cream is your best friend. If you want it even creamier, try adding cream cheese or heavy cream. You can also use a bit of flour or cornstarch mixed with water. This mix helps thicken the sauce without changing the flavor. Just stir it in gently to avoid lumps. Seasoning is vital for flavor. Start with salt and pepper to taste. You can also add garlic powder or onion powder for extra depth. Fresh herbs like thyme or parsley can brighten the dish. For a little heat, try a pinch of cayenne pepper. Taste your sauce as you go. Adjust the spices to find the perfect balance. For the full recipe, check out the [Full Recipe]. {{image_2}} You can make Beef Stroganoff a bit lighter. Try using Greek yogurt in place of sour cream. It adds creaminess but cuts calories. For noodles, whole wheat egg noodles are a great swap. They have more fiber and nutrients compared to regular noodles. You can also use spiralized zucchini or other vegetables for a gluten-free option. To boost flavor, add fresh herbs like thyme or parsley. They add a nice touch of freshness. You can also sprinkle in some smoked paprika for a warm, smoky taste. A pinch of cayenne pepper can add a bit of heat, if you like spice. Just be careful not to overwhelm the dish with strong flavors. To make a vegetarian Beef Stroganoff, swap beef for mushrooms or lentils. Portobello mushrooms offer a meaty texture. Use vegetable broth instead of beef broth for the sauce. Replace sour cream with a plant-based yogurt or cashew cream. This way, you still enjoy that creamy sauce, but it’s all plant-based. You can create a delicious, hearty meal that everyone will love. For the full recipe, check out the details above. To keep your Beef Stroganoff fresh, cool it down first. Let it sit at room temperature for about 30 minutes. Then, transfer the leftovers to an airtight container. Store it in the fridge. It will stay good for up to three days. Always label the container with the date. This helps you keep track of freshness. When you're ready to enjoy the leftovers, reheat them gently. The best method is to use a skillet. Place the Stroganoff in the skillet over medium heat. Stir often to avoid burning. If it seems dry, add a splash of beef broth or water. This keeps the sauce creamy. You can also use a microwave. Heat it in short bursts, stirring in between. This method works well too. You can freeze Beef Stroganoff for later. First, cool it completely, just like before. Then, place it in a freezer-safe container or a heavy-duty freezer bag. Be sure to remove as much air as possible. It can last for up to three months in the freezer. When you want to eat it, move it to the fridge to thaw overnight. Reheat it as mentioned above for the best taste. For the complete recipe, check out the Full Recipe. You can pair Beef Stroganoff with several tasty sides. Here are my top picks: - Steamed broccoli: The crunch balances the creamy sauce. - Garlic bread: It’s perfect for soaking up the sauce. - Green salad: A fresh mix adds a nice contrast. - Roasted carrots: Their sweetness complements the savory dish. - Mashed potatoes: A classic comfort food choice. Yes, you can use other meats if you like. Here are some great options: - Chicken: Use thinly sliced chicken breast for a lighter version. - Pork: Pork tenderloin works well and adds a unique flavor. - Turkey: Ground turkey is a lean alternative that you can try. - Mushrooms: For a vegetarian version, use hearty mushrooms instead of meat. Beef Stroganoff can last for up to three days in the fridge. To keep it fresh: - Store it in an airtight container. - Reheat only the portion you plan to eat. - If you see any signs of spoilage, it’s best to throw it away. Absolutely! Beef Stroganoff is a great make-ahead meal. Here are some tips: - Cook the beef and sauce in advance: You can make it a day ahead and just heat it up. - Store separately: Keep the noodles apart until you serve to avoid sogginess. - Reheat gently: Use low heat on the stove or in the microwave to warm it through. For the full recipe, check the detailed cooking instructions and enjoy your meal! Beef Stroganoff is a hearty dish rich in flavor and texture. We started with key ingredients like beef, noodles, and creamy sauce. I guided you through steps to cook the beef perfectly and make a delicious sauce. Don’t forget the tips on making it creamier and adjusting flavors to your taste. This meal shines on its own or as part of a special dinner. Whether you try variations or store leftovers, Beef Stroganoff is a recipe you can enjoy many ways. Get cooking and savor this classic dish!

Beef Stroganoff with Egg Noodles Easy Comfort Meal

Craving a warm, hearty meal? Beef Stroganoff with egg noodles is the perfect comfort food! This dish combines tender beef,

- 2 cups cooked rice (white or brown) - 1 pound boneless, skinless chicken breasts, diced - 1 can (15 oz) diced tomatoes with green chilies - 1 can (15 oz) black beans, drained and rinsed - 1 cup corn (fresh or frozen) - 1 red bell pepper, chopped - 1 medium onion, diced - 2 cloves garlic, minced - 1 tablespoon chili powder - 1 teaspoon cumin - 1/2 teaspoon smoked paprika - 1/2 teaspoon cayenne pepper (adjust to taste) - 1 1/2 cups shredded cheddar cheese - 2 tablespoons olive oil - Salt and pepper to taste - Fresh cilantro, chopped (for garnish) You will need a few tools for this recipe: - Large skillet - 9x13 inch baking dish - Mixing bowl - Knife and cutting board - Measuring cups and spoons - Spoon for mixing Garnishes can make your dish shine. Consider these: - Fresh cilantro, chopped - Lime wedges for a zesty touch - Extra shredded cheese on top - Sliced jalapeños if you love heat Start by preheating your oven to 375°F (190°C). This ensures even cooking. Grab a large skillet and heat two tablespoons of olive oil over medium heat. Once hot, add one medium diced onion. Sauté for about 3-4 minutes until it turns soft and clear. Next, add two cloves of minced garlic and one chopped red bell pepper. Stir these for another minute to blend the flavors. Now, add one pound of diced boneless, skinless chicken breasts. Season with salt, pepper, one tablespoon of chili powder, one teaspoon of cumin, a half teaspoon of smoked paprika, and a half teaspoon of cayenne pepper. Cook this mix for 6-8 minutes, stirring often until the chicken is browned and fully cooked. In a large bowl, combine two cups of cooked rice, one 15 oz can of diced tomatoes with green chilies, one 15 oz can of black beans (drained and rinsed), and one cup of corn. Mix well. Once the chicken and veggies are ready, add them to this bowl and stir everything together. Transfer this mixture to a greased 9x13 inch baking dish. Top it with one and a half cups of shredded cheddar cheese. Bake the casserole for 25-30 minutes until the cheese is melted and bubbly. Let it sit for 5 minutes before serving. Optionally, you can garnish with fresh chopped cilantro for a burst of color. For the full recipe, be sure to check the details above! To boost the taste of your spicy chicken and rice casserole, use fresh herbs. Chopped cilantro adds a bright note. You can also squeeze lime juice over the dish before serving. This adds freshness and zing. Don't skip the cayenne pepper; it gives the dish a kick. If you like it spicier, add more. A dash of hot sauce before serving can also elevate the flavor. One common mistake is overcooking the chicken. Cook it just until it turns white and is no longer pink. This keeps it juicy. Another mistake is using old spices. Fresh spices have more flavor. Make sure your chili powder and cumin are fresh for the best taste. Finally, don’t forget to season your layers well. Each layer should have salt and pepper for balanced flavor. For a creamy texture, use cooked rice that’s not mushy. If you use brown rice, it should be fluffy. When mixing ingredients, fold gently to keep the chicken pieces intact. Avoid stirring too hard. When baking, cover the dish with foil for the first half of the time. This helps the casserole cook evenly without burning the cheese. Afterward, remove the foil to let the cheese brown nicely. Enjoy your tasty family meal! {{image_2}} You can easily make a vegetarian version of this dish. Simply swap the chicken for extra black beans or cooked lentils. You can also add more veggies like zucchini or spinach. Use vegetable broth instead of chicken broth for added flavor. This will keep your casserole hearty and filling without meat. If you want to try other proteins, consider using turkey or tofu. Ground turkey works great and cooks quickly. For tofu, use firm or extra-firm. Press the tofu to remove excess water, then cube it. Cook the tofu until golden before mixing it with the other ingredients. You can adjust the recipe to fit your diet. If you're gluten-free, make sure to use gluten-free rice and canned goods. For a dairy-free version, replace the cheese with a plant-based option. You can also use nutritional yeast for a cheesy flavor without dairy. Always check labels to ensure all ingredients meet your dietary needs. Feel free to explore these variations to make the dish your own! For the full recipe, check the earlier section. You can store any leftover spicy chicken and rice casserole in an airtight container. Let it cool down to room temperature before sealing it. This will help keep the flavors fresh. Store it in the fridge for up to four days. If you want to keep it longer, freezing is a great option. To reheat your casserole, preheat your oven to 350°F (175°C). Cover the dish with foil to keep it moist. Heat for about 20-25 minutes, or until it’s hot throughout. You can also use the microwave. Place a portion in a microwave-safe bowl and heat for 1-2 minutes. Stir halfway through to ensure even heating. Freezing is easy and keeps your casserole tasty. Make sure it’s fully cooled. Place it in a freezer-safe container or wrap it tightly in plastic wrap. Label it with the date. It will stay fresh for about three months. When you’re ready to eat, let it thaw overnight in the fridge. Then, reheat in the oven for the best results. For the full recipe, check it out! Yes, you can prepare it in advance. Make the casserole, but don’t bake it yet. Cover and refrigerate it for up to 24 hours. When you are ready to eat, just bake it straight from the fridge. You may need to add a few extra minutes to the bake time. This makes it great for busy days or family gatherings. You can serve this casserole with many sides. Here are some ideas: - A fresh green salad - Sliced avocado - Tortilla chips with salsa - Lime wedges for a zesty kick These options add color and flavor, making your meal more fun. To add even more heat, you can try these tips: - Use more cayenne pepper in the mix. - Add sliced jalapeños or fresh chili peppers. - Serve with hot sauce on the side. Each option brings a new level of warmth to your dish. For the full recipe, check out the details above. This blog post provided a detailed guide to making a Spicy Chicken and Rice Casserole. We explored the main ingredients, necessary tools, and optional garnishes. I shared step-by-step instructions for cooking, assembling, and baking the dish. Tips on enhancing flavor and avoiding common mistakes followed. We discussed various adaptations for diets and storage methods for leftovers. With the full recipe, you can create a comforting meal. Enjoy experimenting and making this dish your own!

Spicy Chicken and Rice Casserole Tasty Family Meal

Looking for a simple yet tasty family meal? This Spicy Chicken and Rice Casserole is the perfect choice! Packed with

- 1 can (15 oz) chickpeas, rinsed and drained - 1/4 cup plain Greek yogurt (or plant-based yogurt) - 1 tablespoon tahini - 1 tablespoon lemon juice - 1 tablespoon Dijon mustard - 1/2 teaspoon garlic powder - 1/2 teaspoon onion powder - 1/4 teaspoon smoked paprika - Salt and pepper to taste - 1/2 cup celery, finely chopped - 1/4 cup red onion, finely chopped - 1/4 cup pickles, diced - Leafy greens or lettuce for assembly - Whole grain or sourdough bread for serving To make a tasty chickpea salad sandwich, start with your main ingredients. The chickpeas are the star of this dish. They give protein and a nice texture. Greek yogurt adds creaminess, while tahini brings depth of flavor. Lemon juice and Dijon mustard brighten up the mix. Next, consider the optional ingredients. Garlic powder and onion powder add a savory touch. Smoked paprika gives a bit of warmth without heat. Adjust salt and pepper to suit your taste. Finally, for crunch and texture, add chopped celery, red onion, and pickles. These ingredients not only enhance flavor but also make each bite exciting. Use leafy greens or lettuce to add freshness. Whole grain or sourdough bread creates a sturdy base for your sandwich. For the complete recipe, check Chickpea Crunch Delight Sandwich 🥙. This sandwich is a healthy and fun way to enjoy chickpeas! - First, take a large mixing bowl and mash the chickpeas until chunky. Use a fork or potato masher for this. You want some bits to stay whole for texture. - Next, mix in the Greek yogurt, tahini, lemon juice, Dijon mustard, garlic powder, onion powder, smoked paprika, salt, and pepper. Stir until everything combines nicely. - Now, fold in the chopped celery, red onion, and diced pickles. This adds a nice crunch and flavor. - Taste your mixture and adjust the seasoning as needed. You can add more salt, pepper, or lemon juice to suit your taste. - Start by laying out slices of your chosen bread. - Add a layer of leafy greens on the first slice. - Spoon the chickpea mixture generously on top of the greens. Make sure to cover it well. - Finally, top with another slice of bread. Press down lightly to secure everything. - Cut the sandwich in half and serve right away, or wrap it in foil for a tasty packed lunch. For the full recipe, check Chickpea Crunch Delight Sandwich 🥙. To get the best texture, use a potato masher. It breaks down the chickpeas while keeping some chunks. This gives your salad a nice bite. If you find the salad too dry, add more lemon juice. This will brighten the flavor and balance the creaminess. Pair your sandwich with crunchy carrot sticks. They add a fresh contrast to the creamy salad. For a lovely look, garnish with fresh parsley. This adds color and a hint of herbal flavor. Want a different taste? Swap Greek yogurt with vegan yogurt to make it plant-based. You can also add any spices you like. A pinch of cumin or a dash of chili powder can give a kick. {{image_2}} You can easily make this sandwich vegan. Just replace the yogurt with plant-based yogurt. It keeps the creaminess without losing flavor. Always check all ingredients to ensure they are vegan-friendly. This way, everyone can enjoy the sandwich, and it tastes fantastic! If you need a gluten-free option, choose gluten-free bread. Many brands offer great textures and flavors. Always check all ingredients for gluten. Some sauces and seasonings may contain hidden gluten. Enjoy your sandwich without worry! Want to spice things up? Add spices from different cuisines. Try curry powder for an Indian twist or cumin for a Mexican flair. You can also mix in avocado or jalapeños for extra flavor and creaminess. These additions make the sandwich a fun adventure in taste! To keep your chickpea salad fresh, refrigerate it in an airtight container. This way, it stays safe and tasty. Aim to eat it within three days for the best flavor and texture. You can freeze the chickpea mixture if you have extras. Just freeze it separately from the bread. When you want to enjoy it again, thaw the mixture before making your sandwich. This helps keep the bread from getting soggy. I do not recommend reheating the chickpea salad. It tastes best when served fresh. Enjoy it cold for a crunchy, satisfying bite! Yes, it can be made a day ahead and stored in the fridge. This makes it easier for busy days. Just mix all the ingredients and keep it cold. When you're ready, assemble your sandwich. Great with a side salad, chips, or fresh fruit. You can enjoy it with crunchy carrot sticks or sweet apple slices. Each side adds more fun to your meal. Yes, it’s ideal for meal prep and packed lunches. You can make a big batch and store it. This way, you'll have tasty lunches ready for the week. Just grab your sandwich, and you're good to go! For the complete recipe, check Chickpea Crunch Delight Sandwich 🥙. In this post, we explored how to make a delicious chickpea salad sandwich. We covered the key ingredients, step-by-step instructions, and tips to enhance flavor and texture. You can customize this recipe to fit your taste and diet. Remember, it stores well in the fridge and is perfect for meal prep. Enjoy trying different variations, and make this sandwich your own! Your taste buds will thank you!

Chickpea Salad Sandwich Healthy and Flavorful Bite

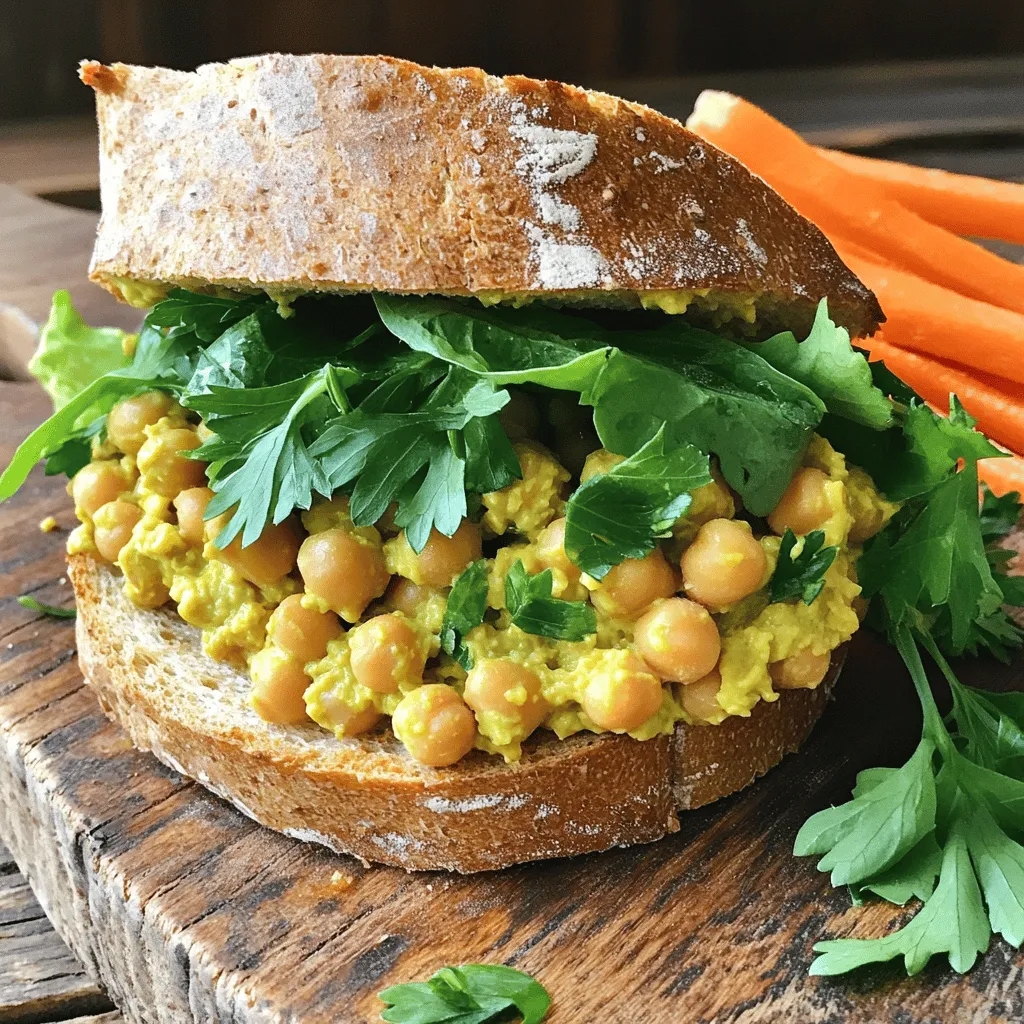
Are you ready to savor a healthy and flavorful Chickpea Salad Sandwich? Packed with protein and crunch, this tasty meal

In this vibrant dish, maple mustard glazed carrots shine as a delightful side. The blend of sweet maple and tangy mustard makes them irresistible. The full recipe for maple mustard glazed carrots is simple and quick. You will need only a few fresh ingredients. With just 10 minutes of prep time, you can enjoy this tasty dish in about 30 minutes. To make this side dish, gather these ingredients: - 1 lb (450g) baby carrots, peeled - 3 tablespoons pure maple syrup - 2 tablespoons Dijon mustard - 1 tablespoon olive oil - 1 tablespoon apple cider vinegar - 1 teaspoon garlic powder - Salt and pepper to taste - 1 tablespoon fresh thyme, finely chopped (optional) These ingredients create a sweet and savory flavor that pairs well with many main dishes. If you cannot find baby carrots, regular carrots work just fine. Cut them into similar-sized pieces for even cooking. You can replace Dijon mustard with whole grain mustard for extra texture. If maple syrup is not available, honey or agave syrup can work as sweeteners. Lastly, for a vegan option, just use maple syrup and skip the optional thyme. Start by washing and peeling the baby carrots. This helps them cook evenly. Measure out your ingredients. You need: - 1 lb (450g) baby carrots, peeled - 3 tablespoons pure maple syrup - 2 tablespoons Dijon mustard - 1 tablespoon olive oil - 1 tablespoon apple cider vinegar - 1 teaspoon garlic powder - Salt and pepper to taste - 1 tablespoon fresh thyme, finely chopped (optional) Preheat your oven to 400°F (200°C). This step warms the oven for roasting. In a mixing bowl, combine the maple syrup, Dijon mustard, olive oil, apple cider vinegar, garlic powder, salt, and pepper. Whisk until the mix is smooth. Place the peeled carrots on a baking sheet lined with parchment paper. Pour the maple mustard mixture over the carrots. Make sure they are well coated. Spread the carrots out in a single layer on the baking sheet for even cooking. Roast the carrots in the preheated oven for 20-25 minutes. Stir the carrots halfway to help them cook evenly. They are done when they are tender and caramelized. If you use fresh thyme, add it in the last 5 minutes for extra flavor. Remove from the oven and let cool slightly before serving. You can find the full recipe in the previous section. To get the best results, follow these tips: - Cut uniform pieces: If you're using larger carrots, cut them into similar sizes. This helps them cook at the same rate. - Use parchment paper: It keeps the carrots from sticking and makes cleanup easier. - Don’t crowd the pan: Leave space between the carrots. This allows heat to circulate and roast them evenly. To get the best glaze on your carrots, start with fresh baby carrots. They cook evenly and have a great flavor. When prepping, peel them to remove any dirt. This helps the glaze stick better. Make sure to coat the carrots well with your maple mustard mix. Use a large bowl to toss them. A good coat means more flavor! You can boost the taste of your glazed carrots easily. Try adding a pinch of cayenne pepper for a little heat. This complements the sweetness of the maple syrup. Fresh herbs like rosemary or dill work well too. They add a nice, earthy touch. If you want more tang, swap out the apple cider vinegar for lemon juice. This gives a bright note to each bite. For a stunning dish, serve your glazed carrots on a nice platter. Arrange them in a fan shape for visual appeal. A sprinkle of fresh thyme on top adds color and a lovely scent. You can also drizzle extra maple syrup for shine. This small touch makes the dish look even more inviting. Use a colorful napkin to brighten up your table. Your guests will love the look and taste of these carrots! For full details on how to create this dish, refer to the Full Recipe. {{image_2}} You can make maple mustard glazed carrots even better by adding herbs or spices. Fresh thyme adds a nice touch of flavor. You can also try rosemary or dill for a different taste. If you want some heat, add a pinch of cayenne pepper. This will give your dish a fun kick! If you want to change things up, you can use other sweeteners. Honey works great if you don't mind using animal products. Agave nectar is a vegan choice that adds sweetness. You can even use brown sugar for a deeper flavor. Each sweetener gives a unique taste, so feel free to experiment. This recipe is already quite flexible! For a vegan option, just stick to the maple syrup. It’s naturally sweet and plant-based. If you need it gluten-free, check that your mustard is gluten-free. Most Dijon mustard brands are safe. This way, everyone can enjoy these tasty carrots! After enjoying your maple mustard glazed carrots, you might have some leftovers. First, let the carrots cool to room temperature. Then, place them in an airtight container. This helps keep them fresh. Store the container in the fridge. These carrots can last about 3 to 5 days. If you want to keep them longer, freezing is a great option. Start by cooling the glazed carrots completely. Next, place them in a freezer-safe bag. Remove as much air as possible before sealing. You can freeze them for up to 3 months. When ready to eat, thaw them in the fridge overnight. When it’s time to reheat, use the oven for the best results. Preheat your oven to 350°F (175°C). Spread the carrots on a baking sheet. Heat for about 10-15 minutes until warm. You can also use the microwave. Just place the carrots in a safe dish and heat for 1-2 minutes. Stir halfway through for even warming. Enjoy your tasty side dish again! Yes, you can use regular carrots. Just peel and cut them into sticks. Aim for a size similar to baby carrots. This helps them cook evenly. Regular carrots offer a richer flavor. You can store glazed carrots in the fridge for about three to five days. Keep them in an airtight container. Make sure they cool down before sealing. This keeps them fresh and tasty for later meals. Serve these glazed carrots as a side dish with chicken or fish. They also pair well with grains like rice or quinoa. For a colorful plate, add a salad or roasted veggies. If you want a special touch, garnish with fresh herbs or a sprinkle of nuts. To sum up, we explored the simple recipe for maple mustard glazed carrots. You learned about the key ingredients, preparation steps, and cooking process. We covered tips for roasting and enhancing flavors. You also discovered fun variations and storage solutions. I hope this guide helps you make delicious glazed carrots at home. Enjoy your cooking and let those flavors shine!

Maple Mustard Glazed Carrots Flavorful Side Dish

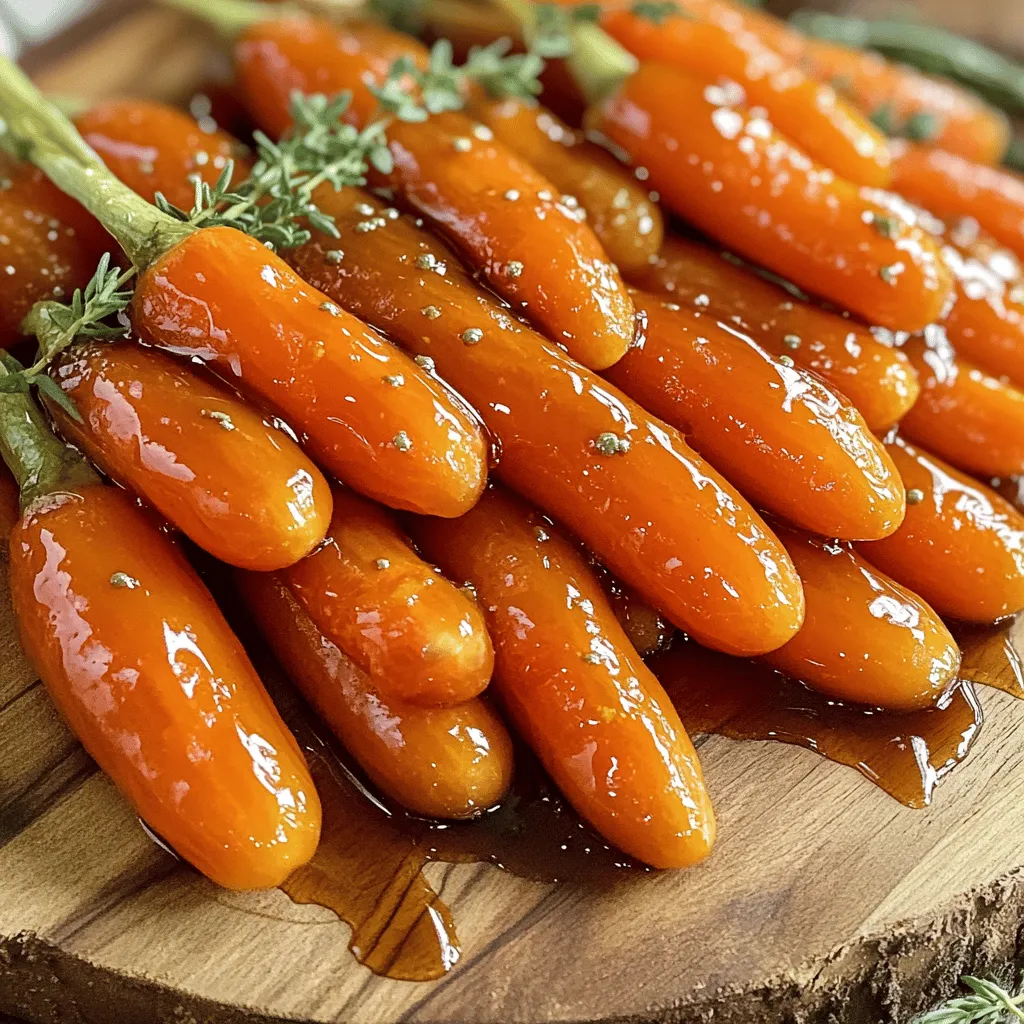
Are you ready to elevate your meal with a simple yet delicious side dish? My Maple Mustard Glazed Carrots are

Older posts
Newer posts
← Previous Page1 … Page27 Page28 Page29 … Page62 Next →

dsad

© 2025 Cooking Wells • Built with GeneratePress

Our Policies

  • Copyright Policy
  • Cookie Policy
  • GDPR Policy
  • Privacy Policy
  • Disclaimer
  • Terms Of Use

More Information

  • Home
  • About
  • Contact
  • Appetizers
  • Dessert
  • Dinner
  • Drinks
©2025, Cooking Wells About Back To Top