Skip to content
DisclaimerTerms Of UseGDPR PolicyCookie Policy

Cooking Wells

  • Home
  • Drinks
  • Appetizers
  • Dinner
  • Dessert
  • About
  • Contact
  • Privacy Policy
DisclaimerTerms Of UseGDPR PolicyCookie Policy

Mia

- Cherry tomatoes - Fresh mozzarella balls - Fresh basil leaves - Diced avocado - Balsamic glaze - Olive oil - Salt and pepper - Wooden skewers For making Caprese salad skewers, you need fresh, simple ingredients. Each item adds a unique taste and texture. Cherry tomatoes are sweet and juicy. They provide a bright pop of color. Fresh mozzarella balls are creamy and soft. They pair well with the tomatoes. Fresh basil leaves add an aromatic touch. Their flavor shines through in every bite. Diced avocado brings a creamy richness. It also adds healthy fats to the skewers. Balsamic glaze is tangy and sweet. It enhances the flavors beautifully. Olive oil adds depth and richness. Use it to coat the avocado to keep it fresh. Don't forget salt and pepper to taste. They bring out the natural flavors of each ingredient. Lastly, wooden skewers are essential for assembly. They make the skewers easy to serve and eat. With these ingredients, you can create a fresh, flavorful snack. For the full recipe, check out the detailed steps. Enjoy the burst of flavors in every bite! - Rinse the cherry tomatoes and basil leaves under cold water. Pat them dry with a towel. This step keeps them fresh and clean. - Dice the avocado into small pieces. Place them in a bowl. Drizzle with olive oil and sprinkle salt and pepper. This helps stop browning. Toss gently to coat each piece. - Now, it’s time to assemble the skewers. Take a wooden skewer and thread one cherry tomato, one mozzarella ball, a basil leaf, and a spoonful of the seasoned avocado. Repeat this until the skewer is full or until you run out of ingredients. - Finish each skewer with another cherry tomato on the end. This adds color and makes it look nice. - Once all skewers are ready, drizzle balsamic glaze over them. This adds a sweet and tangy flavor that makes each bite special. When you prepare these skewers, consider taking photos or making a video. Good lighting helps. Try to capture each step, especially the colorful assembly. Show the fresh ingredients and the final product. These images can inspire others to try making them too. Fresh ingredients are key to great taste. Use ripe tomatoes and fresh mozzarella for the best flavor. The basil should smell strong and fragrant. When skewering, keep the ingredients close together. This makes the skewers look fuller and more appealing. Arrange them neatly on a plate for serving, and don't forget to add a drizzle of balsamic glaze for that final touch. You can find the Full Recipe for these delightful Caprese Salad Skewers above. Enjoy the fun of making and sharing them! To make Caprese salad skewers even tastier, I recommend seasoning with sea salt and cracked pepper. These simple additions can bring out the fresh flavors. You can also try a splash of lemon juice for a zesty kick. If you want to switch things up, use a different dressing. A drizzle of pesto or a light vinaigrette can add a fun twist. You can mix it up and find what you like best. Making your skewers look great is key for any gathering. Arrange them in a circle on a platter for a fun display. You can also stand them up in a cup or a mason jar, which adds height and interest. For serving, consider pairing with a fresh bread basket or a bowl of olives. This creates a beautiful spread that will impress your guests. Let your creativity shine when you present these fresh and colorful skewers! {{image_2}} You can easily change the cheese in Caprese salad skewers. Try using feta or goat cheese for new flavors. If you want something creamier, consider burrata. For veggies, swap cherry tomatoes for roasted bell peppers or zucchini circles. Both add a nice twist. Want to add protein? Grilled chicken or shrimp works great! Just cut them into bite-sized pieces. You can also use marinated tofu for a plant-based option. This makes your skewers more filling and hearty. To make Caprese salad skewers vegan, skip the cheese. Use avocado or a vegan cheese alternative instead. You can also add nuts or seeds for extra texture and flavor. If you need gluten-free options, use wooden skewers, which are always gluten-free. Make sure any sauces or dressings are also gluten-free. Most balsamic glazes are safe, but check the label to be sure. These swaps and modifications keep your Caprese salad skewers fresh and exciting! Whether you're following a special diet or just want a new taste, these ideas help you enjoy this dish in many ways. For the full recipe, check out the Caprese Salad Skewers with a Twist section. To keep your Caprese salad skewers fresh, store them in an airtight container. Line the bottom with a paper towel. This helps absorb extra moisture. Place the skewers in a single layer if possible. If you have too many, consider stacking them with parchment paper in between. This prevents them from sticking together. They can last in the fridge for about two days. However, for the best taste, eat them within a day. You might wonder, can you freeze Caprese salad skewers? The answer is no. Freezing can ruin the texture of fresh ingredients. Tomatoes and mozzarella become mushy when thawed. Instead, prepare them fresh for the best flavor. If you need to save components, consider freezing the diced avocado separately. When you want to use it, thaw it in the fridge overnight. This way, you can still enjoy fresh skewers easily. To make Caprese Salad Skewers, you need to follow a few simple steps. First, rinse the cherry tomatoes and basil leaves. Pat them dry with a towel. Next, take an avocado and dice it. Drizzle the avocado with olive oil, adding salt and pepper. This keeps the avocado fresh. Now, grab some wooden skewers. On each skewer, you will thread one cherry tomato, a mozzarella ball, a basil leaf, and a spoonful of avocado. Repeat this until the skewer is full. End with another cherry tomato for a pop of color. Finally, drizzle balsamic glaze over the skewers for extra flavor. You can find the Full Recipe for more details. Yes, you can prepare Caprese Salad Skewers in advance. To do this, assemble the skewers a few hours before serving. Keep them in the fridge until you are ready to serve. If you make them too early, the avocado may brown. To prevent this, coat the avocado well with olive oil. You can also drizzle the balsamic glaze on right before serving. This keeps the skewers looking fresh. Caprese Salad Skewers pair well with many dishes and drinks. You can serve them with a light pasta salad or bruschetta. A fresh green salad also makes a great side. For drinks, consider serving white wine or sparkling water. These drinks enhance the fresh flavors of the skewers. They are a perfect snack for parties or gatherings! In this article, we explored how to make delicious Caprese Salad Skewers. I shared recipes, preparation steps, and storage tips. Fresh ingredients are key for great taste. Try different flavors by swapping ingredients or adding protein. Presentation matters, so get creative with your skewers. You can prepare these skewers ahead of time for any gathering. They are simple, tasty, and fun to make. Follow these steps, and enjoy a fresh twist on a classic dish. Happy cooking!

Caprese Salad Skewers Fresh and Flavorful Snack

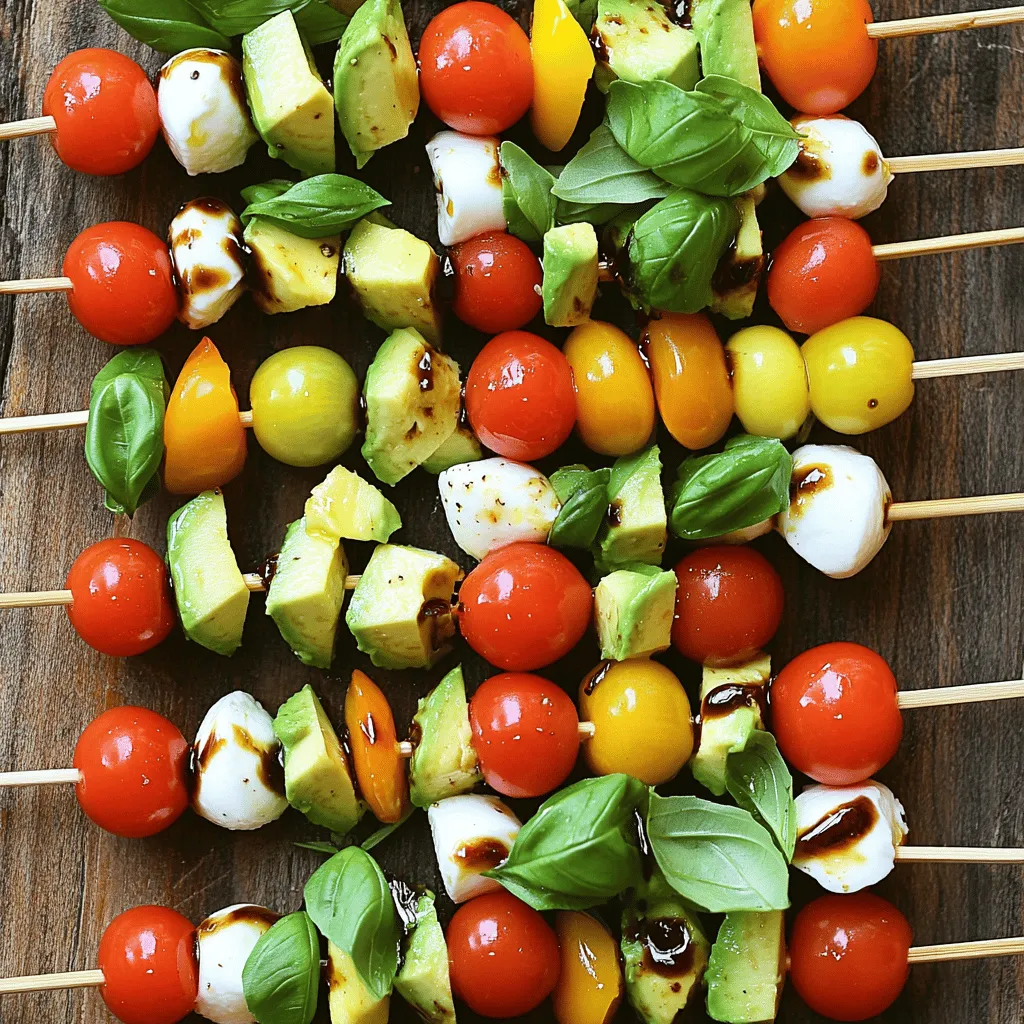
Looking for a fresh and easy snack that’s bursting with flavor? You’ve found it! Caprese Salad Skewers combine juicy cherry

For a tasty shrimp and grits dish, you will need: - 1 cup stone-ground grits - 4 cups chicken broth - 1 lb large shrimp, peeled and deveined - 1 cup shredded sharp cheddar cheese - 1/2 cup milk - 4 slices smoked gouda cheese (for topping) - 3 tablespoons butter - 4 green onions, chopped (white and green parts separated) - 2 cloves garlic, minced - 1 teaspoon paprika - 1/2 teaspoon cayenne pepper (adjust for spice preference) - 1 tablespoon olive oil - Salt and pepper to taste - Fresh parsley for garnish You will need some basic tools to make this dish: - A medium saucepan for the grits - A large skillet for the shrimp - A whisk for mixing the grits - Measuring cups and spoons - A cutting board and knife for chopping Add some flair to your dish with these garnishes: - Extra chopped green onions - A sprinkle of chili flakes for added heat - A squeeze of lemon juice for brightness - Additional fresh parsley for color - Crispy bacon bits for a savory crunch This recipe gives you a rich taste of the South. It’s simple, yet packed with flavor. Enjoy the creamy grits and tender shrimp together for a meal that feels like a warm hug. For the full recipe, check out the details above. To start, grab a medium saucepan. Pour in 4 cups of chicken broth and heat on medium-high. Bring it to a boil. Then, slowly whisk in 1 cup of stone-ground grits. Once added, lower the heat to low. Let the grits simmer while stirring often. This should take about 30 minutes. You'll know they are ready when thickened. After cooking, stir in 1 cup of sharp cheddar cheese and 1/2 cup of milk. Add 2 tablespoons of butter for richness. Mix until creamy, then season with salt and pepper to taste. Keep these grits warm while you cook the shrimp. Next, take a large skillet and add 1 tablespoon of olive oil. Heat this over medium heat. When hot, toss in the white parts of the chopped green onions and 2 cloves of minced garlic. Sauté them for about 1-2 minutes until fragrant. Now, it’s time to add the shrimp. Use 1 pound of large shrimp, peeled and deveined. Sprinkle on 1 teaspoon of paprika, 1/2 teaspoon of cayenne pepper, and some salt and pepper. Cook the shrimp for 2-3 minutes on each side. They should turn pink and be cooked through. To finish, add 1 tablespoon of butter to the skillet, tossing everything to coat. Now, it’s time to put your dish together. Use a spoon to place a generous portion of the creamy cheese grits on each plate. Top the grits with the cooked shrimp and pour any pan juices over them. For a special touch, add a slice of smoked gouda cheese on top. Let it melt slightly for extra flavor. Finally, sprinkle the green parts of the chopped green onions and some fresh parsley for a pop of color. Your shrimp and grits are now ready to enjoy. For the complete recipe, check out the Full Recipe section. To make perfect grits, use stone-ground grits. They have more flavor and texture. Always use chicken broth for richer taste. Bring the broth to a boil first. Slowly whisk in the grits to avoid lumps. Stir often to keep them smooth. Cook them for about 30 minutes on low heat. They should get thick and creamy. After cooking, mix in cheese and milk for extra creaminess. Season with salt and pepper to taste. For tender shrimp, use large shrimp and ensure they are fresh. Peel and devein them before cooking. Heat olive oil in a large skillet over medium heat. Sauté the white parts of green onions and garlic first. This adds great flavor. Cook the shrimp just until they turn pink. This takes about 2-3 minutes per side. Overcooking makes shrimp rubbery. Make sure to season well with paprika and cayenne pepper. Having the right tools helps you cook better. Use a heavy-bottomed saucepan for the grits. It heats evenly and prevents burning. A large skillet works best for the shrimp. Use a whisk to stir the grits smoothly. A wooden spoon is great for mixing in cheese and milk. Don’t forget measuring cups and spoons for accuracy. A sharp knife helps with chopping green onions. Having these tools makes your cooking easier and more fun. For the full recipe, check out the detailed instructions above. {{image_2}} For a kick, add more cayenne pepper. It heats up the dish nicely. You can also toss in diced jalapeños while cooking the shrimp. This adds both heat and flavor. Another option is to use a spicy sausage in place of some shrimp. This gives it a bold twist that many love. If you want a veggie version, use mushrooms instead of shrimp. Cook the mushrooms in olive oil and season them well. Add garlic, salt, and pepper for taste. For the grits, you can use vegetable broth instead of chicken broth. Stir in some sautéed spinach or kale for extra nutrients. This option is hearty and satisfying too. Different areas have their own takes on this dish. In New Orleans, they often add andouille sausage and Cajun spices. In Charleston, they may use a rich gravy with tomatoes and bell peppers. Each region adds its unique flair. You can even try adding local seafood or vegetables for a personal touch. For the full recipe, check out the details above. To keep your shrimp and grits fresh, let them cool first. Place them in an airtight container. Store the dish in the fridge for up to three days. Keep the shrimp separate from the grits if you can. This helps them stay fresh longer. For best results, reheat shrimp and grits in a pan. Add a splash of milk or broth to the grits to keep them creamy. Heat over low to medium heat, stirring gently. Cook the shrimp in the pan for a few minutes until warmed through. You can also use a microwave, but stir every 30 seconds to ensure even heating. You can freeze shrimp and grits for later. Place the cooled dish in a freezer-safe container. It will stay good for up to three months. When ready to eat, thaw it overnight in the fridge. Reheat it gently on the stove. The texture may change slightly, but it will still be tasty. For the full recipe, refer to the detailed instructions earlier in this article. Use stone-ground grits for the best flavor and texture. They are coarser than other types. Instant or quick-cooking grits will not give the same creamy finish. Stone-ground grits take longer to cook but are worth it. They soak up flavors well and create a rich dish. Yes, you can prepare the grits and shrimp ahead of time. Cook the grits and keep them warm. Store shrimp in the fridge after cooking. Reheat both just before serving. Add a splash of milk to grits for creaminess. Cooking the shrimp fresh gives the best taste. Shrimp and grits can easily be gluten-free. Just ensure the chicken broth is gluten-free. Most brands are, but check the label. Use stone-ground corn grits, which are naturally gluten-free. This way, you enjoy a flavorful meal without gluten. Absolutely! You can use chicken, sausage, or even tofu for a vegetarian twist. Each option brings a unique flavor. Adjust cooking times based on the protein you choose. Chicken takes longer, while sausage cooks quickly. Pair your dish with a light salad or a side of sautéed greens. Cornbread or a biscuit complements the meal well. These sides add texture and balance to the creamy grits. You control the spice level. The cayenne pepper is adjustable. Start with less and add more to taste. You can also add hot sauce at the end for extra heat. Yes, frozen shrimp work just fine. Just make sure to thaw them first. Pat them dry before cooking for the best results. This helps them sear nicely. Add cheese, butter, or cream for a richer taste. You can also stir in some herbs or spices. Garlic and onion can boost flavor too. If your grits are too thick, add more broth or water. Stir until you reach the desired consistency. They should be creamy, not dry. You can find the full recipe in the article above. Enjoy cooking this Southern delight! This blog post covered how to make shrimp and grits. I shared key ingredients, cooking steps, and helpful tips. You learned about variations, storage methods, and answers to common questions. Remember, practice makes perfect when cooking shrimp and grits. Enjoy experimenting with flavors and techniques. Start cooking and delight your taste buds!

Shrimp and Grits Flavorful Southern Delight

Welcome to the world of Shrimp and Grits—a true Southern delight! You’ll discover how to make this iconic dish that

To create a delicious miso glazed eggplant, gather these simple ingredients: - 2 medium-sized eggplants - 3 tablespoons white miso paste - 2 tablespoons maple syrup - 1 tablespoon soy sauce - 1 teaspoon sesame oil - 1 tablespoon rice vinegar - 1 tablespoon grated ginger - 2 cloves garlic, minced - 2 tablespoons sesame seeds - 2 green onions, finely chopped - Olive oil for drizzling - Salt and pepper, to taste These ingredients blend together to make a rich, savory glaze. The eggplant soaks up the flavors well, making each bite a treat. White miso brings a mild sweetness, while maple syrup adds a hint of caramel. Ginger and garlic lend warmth and depth. Sesame oil rounds out the taste with a nutty finish. You can find the full recipe and instructions to make this dish from scratch in the [Full Recipe]. Whether you are cooking for yourself or guests, these ingredients work wonders together, turning humble eggplant into a flavorful roasted delight. - Preheat the oven to 400°F (200°C) and prepare the baking sheet. - Slice the eggplants in half lengthwise and score the flesh in a diamond pattern. This helps the glaze soak in. - In a bowl, combine 3 tablespoons of white miso paste, 2 tablespoons of maple syrup, 1 tablespoon of soy sauce, 1 teaspoon of sesame oil, 1 tablespoon of rice vinegar, 1 tablespoon of grated ginger, and 2 cloves of minced garlic. Mix until smooth to create a tasty glaze. - Place the scored eggplant halves on the baking sheet, cut side up. Drizzle with olive oil and sprinkle with salt and pepper. - Brush the miso glaze generously over the cut sides of the eggplant. Roast for about 25 to 30 minutes, or until soft and caramelized. Halfway through, brush with more glaze for added flavor. - When done, sprinkle with 2 tablespoons of sesame seeds and 2 finely chopped green onions for a pop of color. This miso glazed eggplant is a flavorful roasted delight that brings joy to any meal. You can find the full recipe in the provided section. To get the best flavor, brush the eggplant with extra glaze halfway through roasting. This step adds depth and keeps the eggplant moist. The glaze caramelizes beautifully, giving you that rich, savory taste you want. Use parchment paper on your baking sheet. This simple trick makes cleanup easier and helps the eggplant not stick. It’s a little change that saves time and effort. You can focus on enjoying your dish instead of scrubbing pans. For a stunning presentation, serve your miso glazed eggplant on a nice platter. Drizzle with a bit of extra sesame oil for shine. Scatter sesame seeds on top for crunch and color. Add some chopped green onion for a fresh look. These small details make your dish look as good as it tastes. {{image_2}} Using different types of miso can change the flavor. You can try red or brown miso. Red miso is stronger and saltier. Brown miso has a rich, sweet taste. Each type adds a unique twist. You can mix and match depending on what you like. Experimenting with miso types can lead to fun, new flavors in your dish. To make this dish vegan, swap the maple syrup with agave nectar. You can also use tamari instead of soy sauce for a gluten-free option. These small changes keep the flavor but make it vegan-friendly. You can enjoy this dish while sticking to a plant-based diet. No one will miss the animal products with these tasty swaps. Want a heartier meal? Add more veggies or proteins. You can toss in bell peppers or zucchini. They roast well and add color. For protein, try tofu or tempeh. Just cube them and add to the baking sheet. These additions make your meal filling and satisfying. Experiment with what you have on hand for a unique twist. For the full recipe, check out the details shared earlier. To store miso-glazed eggplant, let it cool first. Place it in an airtight container. It will stay fresh in the fridge for up to four days. Keep the layers separated to avoid sogginess. If you have extra glaze, store it in a small jar. This will help keep the dish flavorful. To reheat, you can use the oven or microwave. For the oven, preheat it to 350°F (175°C). Place the eggplant on a baking sheet for about 10 minutes. This keeps the skin crisp. If using the microwave, heat it on medium power for 1-2 minutes. Check it often to avoid drying out. You can freeze miso-glazed eggplant, but it may change texture. To freeze it, wrap each piece in plastic wrap. Place them in a freezer bag to avoid freezer burn. It will stay good for up to three months. When ready to eat, thaw in the fridge overnight. Then reheat as described above for the best results. Miso is a thick paste made from fermented soybeans. It has a rich umami taste. You can find miso in many flavors. The most common types are white, yellow, and red. White miso is sweet and mild. Red miso is stronger and saltier. It adds depth to dishes, making them savory and satisfying. Yes, you can use other vegetables. Zucchini, bell peppers, or mushrooms work well. They can soak up the miso glaze and roast nicely. Each vegetable brings its own flavor and texture. This makes your meal unique and fun to try. Cooking miso-glazed eggplant takes about 25-30 minutes. You should preheat your oven to 400°F (200°C). Keep an eye on the eggplant as it roasts. Factors like size and thickness can change the cook time. You want them soft and caramelized for the best taste. For more tasty details, check out the Full Recipe. In this post, you learned how to make miso-glazed eggplant. We covered ingredients, step-by-step instructions, and cooking tips. You can explore variations with different miso types for added flavor. Remember, you can store leftovers properly to enjoy later. Don't hesitate to experiment with other vegetables too. This dish can be a great addition to any meal. Enjoy your cooking!

Miso Glazed Eggplant Flavorful Roasted Delight

If you’re looking for a delicious, easy dish, try my Miso Glazed Eggplant! This roasted delight combines miso paste with

To make the Rustic Apple Galette, you'll need a few simple ingredients. Here’s a complete list to gather before you start: - 3 medium apples (Granny Smith or Honeycrisp), peeled, cored, and thinly sliced - 1 tablespoon lemon juice - 2 tablespoons brown sugar - 1 teaspoon cinnamon - 1 teaspoon vanilla extract - 1 sheet of refrigerated pie crust (or homemade if preferred) - 1 tablespoon unsalted butter, cut into small pieces - 1 egg, beaten (for egg wash) - 1 tablespoon coarse sugar (for sprinkling) These ingredients come together to create a warm, inviting dessert. The apples add a sweet and tangy flavor. The cinnamon and vanilla give it a cozy aroma. The butter adds richness, while the pie crust provides that perfect flaky texture. You can find the Full Recipe to guide you through each step of making this delightful treat. Enjoy the process of making this rustic dessert! 1. First, preheat your oven to 425°F (220°C). This makes sure your galette bakes evenly. 2. Next, line a baking sheet with parchment paper. This helps with easy cleanup. 3. In a large bowl, toss the sliced apples with lemon juice, brown sugar, cinnamon, and vanilla extract. Let this sit for about 15 minutes. This step allows the flavors to mix well. 1. Roll out your pie crust on a lightly floured surface. Aim for a rough circle about 12 inches wide. 2. Transfer the rolled crust to your prepared baking sheet. 3. Pile the apple mixture in the center of the crust. Leave a 2-inch border around the edges. 4. Fold the edges of the crust over the apples. Pleat the dough as you go to create that rustic look. Gently press the edges to secure them. 1. Dot the apples with small pieces of butter for extra flavor. 2. Brush the folded edges of the crust with the beaten egg. This gives it a golden color. 3. Sprinkle coarse sugar over the entire galette for a sweet crunch. 4. Bake in the oven for 25-30 minutes. Look for a golden brown crust and tender apples. 5. Once baked, remove the galette from the oven. Let it cool for a few minutes before slicing. For the full recipe, refer to the Rustic Apple Galette section. To keep your galette from having a soggy bottom, try these steps: - Use cold ingredients: Keep your butter and water cold. This helps the crust stay flaky. - Pre-bake the crust: If you want to be extra safe, you can bake the crust for a few minutes before adding the filling. This step helps it cook through. When it comes to pie crust, you can choose between homemade or store-bought. Homemade crust has a fresh taste. It allows you to control the texture. However, store-bought crust saves time. It can still taste great if you choose a quality brand. To make your galette even more delicious, think about adding spices. Here are some great options: - Nutmeg: A pinch can add warmth. - Allspice: This spice brings a nice depth. - Ginger: Fresh or powdered ginger gives a kick. You can also adjust the sweetness. If your apples are tart, add more brown sugar. If they are sweet, cut back on sugar. Taste the filling before baking. This gives you control over the sweetness. For a perfect finish, serve your galette warm. Here are some tasty pairings: - Vanilla ice cream: The creaminess balances the tart apples. - Whipped cream: A dollop adds a light touch. For presentation, sprinkle some cinnamon on top or add fresh mint leaves. These small details make your dish look and taste even better. For the full recipe, check out the complete guide on Rustic Apple Galette. {{image_2}} Using the right apples makes your galette shine. I love using Granny Smith or Honeycrisp. Granny Smith gives a tart kick, while Honeycrisp adds sweetness. Mixing these two creates a great balance. I often add a third type, like Fuji, for extra depth. You can try other varieties like Braeburn or Pink Lady. Each apple brings its own flavor, giving you a unique taste. Need a vegan option? Swap butter with coconut oil. For the egg wash, use almond milk mixed with a bit of flour. This works well and keeps the crust golden. If gluten is a concern, you can make a gluten-free crust. Look for store-bought options, or try a simple blend of almond flour and coconut flour. Both options keep the galette delicious and light. Want to spice things up? Try adding chopped walnuts or pecans for crunch. You can also mix in dried cranberries or raisins for a sweet touch. Consider adding nutmeg or allspice to the filling. These spices complement the apples well. Just a pinch can take your galette to the next level. Each addition creates layers of flavor, making it even more special. You can keep the rustic apple galette at room temperature for about two days. It is best to cover it with a clean kitchen towel or plastic wrap to keep it fresh. This helps prevent it from drying out and losing its lovely texture. If you want to store the galette longer, refrigerate it. Place it in an airtight container or wrap it tightly with plastic wrap. It will last for up to five days in the fridge. When you are ready to eat it, you can warm it up in the oven for a few minutes. This will help restore the crust's crispiness. To freeze the galette, first let it cool completely. Then, wrap it tightly in plastic wrap or aluminum foil. Place it in a freezer-safe bag or container. It can last up to three months in the freezer. When you want to enjoy it, thaw it in the fridge overnight. Reheat it in a 350°F (175°C) oven for about 15-20 minutes. This will bring back its delicious flavor and texture. For the full recipe, check out the Rustic Apple Galette instructions above! Yes, you can use many kinds of fruit. Pears, peaches, or berries work well. Mix them up for fun flavors. Just keep the same basic method. Look for a golden-brown crust. The apples should be soft and bubbly. A nice aroma will fill your kitchen, too. It usually takes about 25-30 minutes at 425°F. Serve it warm with vanilla ice cream or whipped cream. A sprinkle of cinnamon makes it even better. You can also add a drizzle of caramel for extra sweetness. You can prepare the filling a day before. Store it in the fridge. You can also roll out the dough and chill it. Just bake it when you’re ready. This makes it easy to enjoy fresh dessert! For the full recipe, check the earlier section. The Rustic Apple Galette is simple to make and delicious. You learned about key ingredients, preparation steps, and tips for a perfect crust. You can choose different apples or add unique flavors too. Remember, it can be served warm with ice cream or whipped cream for a treat. Store leftovers properly and freeze them if needed. Enjoy your baking adventure, and don't hesitate to experiment with variations or flavors. The galette is a versatile dessert that can please everyone. You’ll love every bite you take.

Rustic Apple Galette Irresistible Fall Dessert Recipe

Fall is here, and what better way to celebrate than with a Rustic Apple Galette? This easy and delicious dessert

- 1 lb ground beef - 1 small onion, finely chopped - 2 cloves garlic, minced - 1 tablespoon olive oil - 1 teaspoon ground cumin - 1 teaspoon smoked paprika - 1 teaspoon chipotle powder (adjust for heat preference) - 1/2 teaspoon salt - 1/2 teaspoon black pepper - 1 can (8 oz) tomato sauce - 1 tablespoon adobo sauce (from chipotle peppers in adobo) - 8 small corn tortillas - Fresh cilantro, chopped (for garnish) - Lime wedges (for serving) To make these beef tacos, you only need a few tools: - Large skillet - Spatula - Cutting board - Knife - Measuring spoons - Can opener (for the tomato sauce) These tools help you prepare the dish easily and efficiently. Beef tacos are a balanced meal. Each taco has protein, healthy fats, and vitamins. Here’s a quick breakdown: - Calories: About 200-250 per taco - Protein: 15-20 grams - Fat: 10-15 grams - Carbohydrates: 20-30 grams - Fiber: 1-2 grams These nutrition facts can vary based on serving size and toppings. Enjoy your tacos while keeping health in mind. For the complete recipe, click [Full Recipe]. To start, heat 1 tablespoon of olive oil in a large skillet over medium heat. Once hot, add 1 finely chopped onion. Sauté it for about 5 minutes until it turns soft and clear. Next, add 2 minced garlic cloves and cook for another minute. You want that garlic smell to fill your kitchen! Now, add 1 pound of ground beef to the skillet. Use a spatula to break the beef into smaller pieces. Cook it until the beef is brown and fully cooked, which will take about 6 to 8 minutes. If there's extra fat, drain it out. Next, sprinkle in 1 teaspoon of ground cumin, 1 teaspoon of smoked paprika, 1 teaspoon of chipotle powder, ½ teaspoon of salt, and ½ teaspoon of black pepper. Stir everything well and let it cook for 2 to 3 minutes. This helps the spices mix nicely with the beef. Finally, pour in one 8-ounce can of tomato sauce and 1 tablespoon of adobo sauce from the chipotle peppers. Stir it all together, then let it simmer for about 5 minutes. This allows the flavors to blend and thicken a bit. While your beef mixture simmers, it’s time to warm the tortillas. Take 8 small corn tortillas and place them in a dry skillet over medium heat. Warm each side for about 30 seconds. You want them soft and easy to fold without tearing. Now comes the fun part! Grab a tortilla and spoon some of the chipotle beef mixture onto it. You can add as much as you like! Next, sprinkle some chopped fresh cilantro on top for that fresh kick. Serve your tacos with lime wedges on the side. Squeeze some lime juice over the tacos before you take a bite. This adds a bright flavor that really makes them pop. For the complete recipe, check out the Full Recipe. Enjoy your flavorful and simple beef tacos! To control the heat in your chipotle sauce, start with less chipotle powder. Use just half a teaspoon for a milder taste. You can always add more later if you want it spicier. If you want a smoky flavor without too much heat, try smoked paprika. This gives flavor without the burn. When you sauté meat, use a wide skillet. Heat the oil on medium heat before adding the onions. Cook the onions until they are soft and clear, about five minutes. Next, add the garlic for more flavor. When you add the ground beef, break it up into small pieces. This helps it cook evenly. Cook until the beef is brown, about six to eight minutes. Drain any extra fat to keep it lean. Fresh ingredients make a big difference. Use fresh garlic instead of powder for a punchier taste. Add lime juice just before serving for brightness. You can also top your tacos with fresh cilantro for a burst of flavor. Other great toppings include diced tomatoes, avocado, or crumbled cheese. Using fresh herbs and veggies makes your tacos vibrant and tasty. For the full recipe, check out the detailed steps. {{image_2}} You can swap ground beef for other proteins. Ground turkey and chicken work great. They absorb flavors well, just like beef. For a richer taste, try shredded pork or beef brisket. Each option changes the taco's feel and taste. You can even use fish or shrimp for a light twist. Just remember to adjust cooking times for each protein. If you want a meat-free meal, use beans, lentils, or mushrooms. Black beans or pinto beans add protein and fiber. Lentils cook fast and are very tasty. Sautéed mushrooms give a hearty bite. You can replace the beef with a mix of these options and still enjoy the chipotle sauce. This sauce adds a kick that pairs well with veggies. Tacos are fun because you can customize them. Try adding fresh avocado, diced tomatoes, or shredded cabbage. Each topping gives a new flavor and texture. Also, think about sides like rice, beans, or a fresh salad. Lime wedges brighten the dish. You can also add your favorite salsa for extra zest. Check out the Full Recipe for more ideas. After enjoying your tasty beef tacos, store the leftovers right away. Place any unused tacos in an airtight container. If you have leftover filling, keep it separate. This helps keep the tortillas from getting soggy. Store everything in the fridge. The beef filling lasts for up to three days. Make sure to label the container with the date. This way, you won’t forget when you made them. When you are ready to enjoy your leftovers, reheating is easy. For the beef filling, use a skillet on medium heat. Stir it often until it’s warm. This usually takes about five minutes. For tacos with tortillas, you can warm them in the oven. Set your oven to 350°F (175°C). Place the tacos on a baking sheet and heat for about 10 minutes. This method keeps them crisp and tasty. If you want to save the beef filling for later, freezing works well. Let the filling cool completely first. Then, scoop it into a freezer-safe bag. Squeeze out all the air before sealing. Write the date on the bag, so you remember when you froze it. The filling can stay fresh for up to three months. To use it, thaw in the fridge overnight and reheat as mentioned above. Enjoy your flavorful meals anytime! For more detail, check out the Full Recipe. You can serve beef tacos with various sides. Here are a few great options: - Mexican rice - Refried beans - Guacamole - Salsa - Chopped salad - Corn on the cob These sides add texture and flavor. They also balance the rich taste of beef tacos. You can mix and match based on your mood. To spice up your beef tacos, use more chipotle powder. You can also try: - Adding diced jalapeños - Mixing in hot sauce - Serving with spicy salsa These ideas enhance the kick of your tacos. Adjust the heat to fit your taste buds. Remember, it’s all about balance. Yes, you can use ground turkey instead of beef. Ground turkey is a leaner choice. It absorbs flavors well. When using turkey, follow these tips: - Cook it fully, as it may take a bit longer. - Add extra spices to enhance the flavor. - Adjust cooking times slightly if needed. Ground turkey makes a great alternative for a lighter taco. Enjoy the flavors from the Full Recipe you create! In this article, we explored how to make delicious beef tacos, from selecting ingredients to step-by-step assembly. You learned about kitchen tools and nutritional facts, plus tips for adjusting spice levels and enhancing flavors. Variations allow you to customize your meal, ensuring everyone can enjoy their tacos. Storing leftovers properly keeps your food fresh. With these insights, you can create tasty tacos that suit your taste and needs. Enjoy cooking and personalizing this classic dish!

Beef Tacos with Chipotle Sauce Flavorful and Simple

Craving a tasty meal that’s quick and easy? You’re in the right spot! My Beef Tacos with Chipotle Sauce are

- Grated zucchini: 2 medium zucchinis - Fresh or frozen corn: 1 cup corn kernels - Dry ingredients: 1/2 cup all-purpose flour, 1/2 cup cornmeal - 2 large eggs - 1/4 cup green onions, finely chopped - 1/4 cup fresh parsley, chopped - 1 teaspoon baking powder - 1 teaspoon garlic powder - Salt and pepper to taste - Olive oil for frying The main stars of this dish are the grated zucchini and corn. Zucchini adds moisture and a mild taste. Corn brings sweetness and crunch. You need two medium zucchinis for the right texture. Grate them well and squeeze out the water. This step helps keep your fritters crisp. Next, you can use fresh or frozen corn kernels. Either option works well. This ingredient adds bright color and flavor. For the dry ingredients, mix equal parts all-purpose flour and cornmeal. This blend gives a nice crunch. Don't forget the eggs! They bind the fritters together. The green onions and parsley add freshness. Baking powder helps the fritters rise, giving them a light feel. Garlic powder adds depth. Finally, season with salt and pepper to taste. You can find the complete instructions in the Full Recipe. Enjoy making these tasty fritters! Start by grating the zucchini. You need two medium zucchinis for this recipe. Use a box grater for best results. After grating, take a clean dish towel. Place the grated zucchini in the towel and twist it. This squeezes out the extra moisture. Removing moisture keeps your fritters from getting soggy. Next, grab a large bowl. Now, mix the squeezed zucchini with corn kernels. You can use fresh or frozen corn. Add half a cup of all-purpose flour and half a cup of cornmeal to the bowl. Then, crack two large eggs into the mix. Add finely chopped green onions and parsley, about a quarter cup each. Sprinkle in a teaspoon of baking powder and a teaspoon of garlic powder. Finally, season with salt and pepper. Stir everything until well combined and smooth. Heat a non-stick skillet over medium heat. Add a drizzle of olive oil to coat the bottom. Wait until the skillet is hot. This step is key to getting a nice golden brown color. Now it's time to cook. Drop spoonfuls of the fritter mixture onto the skillet. Flatten them slightly with the back of a spoon. Cook them in batches to avoid crowding the pan. Each fritter needs about 3-4 minutes on each side. Look for a golden brown and crispy finish. After cooking, transfer the fritters to a plate lined with paper towels. This helps drain any excess oil. Now your fritters are ready to enjoy! For a full recipe, check the recipe section above. To make great zucchini and corn fritters, start with the zucchini. Grated zucchini holds a lot of water. If you don’t squeeze out the moisture, your fritters will be soggy. Use a clean dish towel to twist and drain the zucchini well. Next, get the skillet hot enough. A medium heat is best for frying. If the skillet is too cool, the fritters will absorb oil and not crisp up. If it’s too hot, they may burn. A good tip is to add a drop of water. If it sizzles, your skillet is ready. These fritters are tasty on their own, but you can elevate them with dips. Try yogurt or a simple salsa. They also pair well with a spicy mayo for a kick. For garnishing, sprinkle chopped parsley on top. You can also add a squeeze of lemon for a fresh taste. These small touches make your dish look and taste better. For the full recipe, check the previous section. {{image_2}} You can make these zucchini and corn fritters even healthier. One great way is to use gluten-free flours like almond flour or chickpea flour. These flours work well and keep the fritters tasty. Adding spices can also boost flavor. Try adding cumin or smoked paprika. A little heat from chili powder can spice things up too. Mixing in other vegetables is fun! Bell peppers add a sweet crunch. Shredded carrots give a nice color and taste. You can also use cheese for extra flavor. Feta or cheddar cheese melts well and makes the fritters rich. Feel free to get creative and use what you love. You can check the Full Recipe for more ideas. After cooking, let the fritters cool to room temperature. This helps keep them crispy. Once cooled, place them in an airtight container. You can store them in the fridge for up to three days. If you plan to eat them later, freezing is a good option. To freeze, layer the fritters between parchment paper. This keeps them from sticking together. Put the wrapped fritters in a freezer bag. They can stay frozen for up to three months. To reheat your fritters, the best method is to use a skillet. Heat a little olive oil over medium heat. Once hot, add the fritters in a single layer. Cook for about two to three minutes on each side. This method helps keep them crispy. You can also use an oven. Preheat it to 375°F. Place the fritters on a baking sheet lined with parchment paper. Bake for about 10-15 minutes, flipping halfway. This also helps restore their crunchiness. Enjoy your leftovers just as much as the first time! Can I bake zucchini and corn fritters instead of frying? Yes, you can bake these fritters. Preheat your oven to 400°F (200°C). Place the fritters on a greased baking sheet. Bake for about 20 minutes, flipping halfway through. This method gives you a lower-fat option while keeping them tasty. How do I know when the fritters are done cooking? Look for a nice golden-brown color. Each fritter should be crispy on the outside. You can also gently press on them. If they feel firm, they are likely done. If they are soft, give them a minute more. What can I use instead of eggs in this recipe? You can use flaxseed meal as a great egg substitute. Mix one tablespoon of flaxseed meal with three tablespoons of water. Let it sit for about five minutes to thicken. This mix helps bind the fritters well. Can I use different types of corn for these fritters? Absolutely! Fresh corn tastes great, but frozen corn works too. You can also use canned corn. Just make sure to drain it first. Each type will add a slightly different taste while keeping the fritters delicious. For the full recipe, check the section above. Zucchini and corn fritters are easy to make with simple ingredients and steps. You can tweak the recipe to suit your taste and keep leftovers fresh. Remember, the key is to prep the zucchini well and choose the right cooking method. These fritters can be a fun, tasty snack or meal. Experiment with flavors or dips to make them your own. Enjoy your time in the kitchen!

Zucchini and Corn Fritters Tasty and Simple Recipe

Looking for a fun, tasty dish that’s easy to make? Zucchini and corn fritters are a perfect choice! They are

- 1 lb large shrimp, peeled and deveined - 2 tablespoons olive oil - 2 tablespoons honey - 1 tablespoon sriracha (adjust to your spice preference) - 1 teaspoon garlic powder - 1 teaspoon smoked paprika - Zest and juice of 1 lime - 8 small corn tortillas - 1 cup red cabbage, finely shredded - 1 avocado, sliced - Fresh cilantro, for garnish - Lime wedges, for serving - Salt and pepper, to taste You need these fresh ingredients for sweet and spicy shrimp tacos. The shrimp are the star. They soak up all the great flavors. The olive oil helps them cook perfectly. Honey adds a touch of sweetness. Sriracha brings the heat, so you can adjust it to your taste. Garlic powder and smoked paprika give depth to the dish. The lime zest and juice brighten the flavors. Corn tortillas hold everything together and add a nice texture. Red cabbage adds crunch, while avocado brings creaminess. Fresh cilantro adds a pop of color and flavor. Don't forget lime wedges for extra zing. For more details, check the Full Recipe. In a large bowl, I combine the olive oil, honey, sriracha, garlic powder, smoked paprika, lime zest, lime juice, salt, and pepper. This mix brings sweet and spicy flavors together. You can adjust the sriracha to make it hotter or milder. Next, I add the shrimp to the bowl. I toss the shrimp until they are evenly coated with the marinade. Then, I let them sit for 15 to 20 minutes. This step helps the shrimp soak up all those great flavors. I heat a non-stick skillet over medium-high heat. Once it’s hot, I add the marinated shrimp in a single layer. I cook them for 2 to 3 minutes on each side. When they turn pink and opaque, they are ready. This cooking time ensures they stay juicy. While the shrimp cook, I warm corn tortillas in a separate skillet. I heat them for about 30 seconds on each side. This makes them soft and pliable, perfect for holding all the tasty fillings. To build the tacos, I place a handful of shredded red cabbage on each tortilla. Then, I add a few shrimp on top. I finish with avocado slices and garnish with fresh cilantro. Each bite packs a punch of flavor. For a complete meal, serve with lime wedges for extra zest. For the full recipe, check out the detailed instructions above. For a balanced flavor, you can adjust the spice level. If you want more heat, add more sriracha. If you prefer less spice, simply use less. This will help you enjoy the dish just the way you like it. Cooking shrimp perfectly is key. Make sure your skillet is hot before adding the shrimp. Cook them for just 2-3 minutes on each side. They should turn pink and opaque. Overcooking makes them tough, so watch them closely. A beautiful taco platter makes a real impact. Arrange the tacos neatly on a vibrant plate. Add lime wedges around the tacos for a pop of color. Finish with a sprinkle of fresh cilantro on top. This simple touch makes your meal look fantastic. For the full recipe, check out the Sweet and Spicy Shrimp Tacos section. {{image_2}} You can switch shrimp for other proteins. Chicken works great in this dish. Just cut it into small pieces and cook it until done. Tofu is another good choice. Press it to remove water, then cube it. Fish is also an option; choose a firm type like tilapia or cod. Each protein adds its own flavor. Want to mix it up? Try adding mango salsa. It brings a sweet and tangy flavor that pairs well. You can also add jalapeños if you want more heat. Slice them thin and sprinkle on top. These extras make your tacos even more fun and tasty. The type of taco shell can change everything. Soft corn tortillas are traditional, but hard shells are great too. You can add toppings like cheese or sour cream. Cheese can add a creamy texture, while sour cream cools the heat. Play with different styles to find your favorite. For the full recipe, check out the Sweet and Spicy Shrimp Tacos. To keep leftover shrimp and toppings fresh, follow these steps: - Place shrimp in an airtight container. - Store shredded cabbage and avocado in separate containers. - Seal everything tightly to avoid air exposure. - Refrigerate leftovers within two hours of cooking. This will keep your shrimp tasty for up to three days. To reheat shrimp without losing texture, try these methods: - Use a skillet over medium heat. - Add a splash of water and cover to steam gently. - Heat for about two to three minutes until warmed. This keeps the shrimp juicy and avoids rubbery bites. If you want to freeze shrimp, follow these tips: - Lay shrimp flat on a baking sheet. - Freeze for about one hour until firm. - Then transfer to a freezer bag, removing as much air as possible. Keep shrimp and toppings separate to maintain their flavors. For best taste, use frozen shrimp within three months. For the full recipe, check out the Sweet and Spicy Shrimp Tacos section. You can store leftover tacos for up to two days. Place them in an airtight container. Keep the shrimp and toppings separate. This helps maintain texture and flavor. When ready to eat, reheat the shrimp in a skillet. Avoid microwaving, as it can make them rubbery. Yes, you can prepare components ahead of time. Marinate the shrimp and store them in the fridge for up to 24 hours. Warm the tortillas just before serving. You can also slice the avocado and shred the cabbage a few hours before. This way, you save time and enjoy fresh flavors. These tacos pair well with many sides. Here are a few ideas: - Mexican street corn - Black bean salad - Cilantro lime rice - Fresh guacamole - Salsa and tortilla chips These sides add flavor and complement the tacos perfectly. The spice level depends on your taste. The recipe uses one tablespoon of sriracha. You can adjust this amount to control the heat. For less spice, reduce the sriracha. For more heat, add extra sriracha or diced jalapeños. Try tasting the marinade before adding shrimp to find your ideal balance. Sweet and spicy shrimp tacos are simple and fun to make. We covered key ingredients and steps for a tasty meal. You learned ways to perfect your marinade and cook shrimp just right. Remember, you can switch shrimp for other proteins or add fun flavors like mango salsa. Store leftovers correctly or freeze for later. Enjoy these tacos any night, and don't hesitate to get creative with your toppings. Great food brings joy, so dive in and share them with friends!

Sweet and Spicy Shrimp Tacos Flavorful and Easy Meal

Are you ready to spice up your dinner routine with a fun twist? Sweet and Spicy Shrimp Tacos are not

- 2 pounds baby potatoes, halved - 4 tablespoons olive oil - 6 cloves garlic, minced - 1 teaspoon dried rosemary - 1 teaspoon paprika - Salt and pepper to taste - Fresh parsley, chopped The heart of crispy garlic roasted potatoes lies in simple yet flavorful ingredients. First, you need baby potatoes. They stay firm and cook evenly. Next, olive oil adds richness and helps achieve that crispy texture. Garlic brings a punch of flavor, making every bite delightful. For seasoning, dried rosemary adds an earthy touch. Paprika gives a hint of smoke and color. Salt and pepper enhance all the flavors, so don’t skip them! Lastly, fresh parsley makes a bright garnish. It adds color and a fresh taste. When you combine these ingredients, magic happens. You create a dish that is both simple and truly tasty. Check out the Full Recipe for more details on how to make this delicious dish! First, preheat your oven to 425°F (220°C). This step is key for getting that perfect crisp. While the oven warms up, take your two pounds of baby potatoes and halve them. This size helps them cook evenly and get crispy. Now, grab a large mixing bowl. Toss the halved potatoes with four tablespoons of olive oil. Next, add six cloves of minced garlic. This will give the potatoes a rich flavor. Then, sprinkle in one teaspoon of dried rosemary and one teaspoon of paprika. Don’t forget salt and pepper to taste. Mix everything well until the potatoes are coated nicely. Spread the seasoned potatoes in a single layer on a baking sheet lined with parchment paper. This helps with cleanup and prevents sticking. Roast the potatoes in your preheated oven for 25-30 minutes. Make sure to turn them halfway through so they brown evenly. You want them golden brown and crispy. Once they are done, let them cool for a few minutes. For a nice touch, garnish with chopped fresh parsley before serving. For the full recipe, check out the details provided above. For crispy garlic roasted potatoes, choose the right type of potato. Baby potatoes work best because they have a waxy texture. This helps them stay moist inside while getting crispy on the outside. You can also use Yukon Gold or red potatoes. They give a nice flavor and texture. Spacing is key on your baking sheet. If the potatoes are too close, they will steam instead of roast. Leave enough room between them so hot air can flow. This will help them crisp up evenly. To boost the flavor, try adding herbs or spices. Rosemary pairs well with garlic, but you can use thyme or oregano too. Just sprinkle a bit more on before roasting. Parmesan cheese is another great addition. Grate it and sprinkle it on the potatoes halfway through cooking. This adds a delicious, cheesy crust. If you want to try different methods, the air fryer works wonders. It cooks the potatoes faster and keeps them crispy. Just set it to 400°F and check them after 15-20 minutes. For larger potatoes, cut them into smaller pieces. Aim for uniform sizes to ensure even cooking. You can also adjust the cooking time; larger pieces may need a bit longer. For the full recipe, check the section above. Happy cooking! {{image_2}} You can easily change the herbs in this dish. I love to use thyme or oregano. Both herbs add a nice touch. Thyme gives a warm flavor, while oregano adds a bit of zest. You can mix these herbs into your olive oil and garlic before tossing them with the potatoes. Try different amounts to find what you like best. Spices can bring a new twist to your crispy garlic roasted potatoes. Consider adding chili flakes for some heat. They can make the dish exciting and bold. If you prefer a fresh taste, lemon zest works well too. It brightens the flavor and makes the potatoes pop. Just sprinkle some in when mixing the other ingredients. If you want to make this dish vegan, it’s very simple. Just use the ingredients listed in the Full Recipe. All the ingredients are plant-based. For those needing gluten-free options, you are in luck. This recipe is already gluten-free. No changes are needed. Enjoy these potatoes without worry about your diet! To keep your crispy garlic roasted potatoes fresh, store them in an airtight container. Let them cool first, then seal them up. This way, they stay tasty for up to three days. If you want to keep them longer, try freezing. Just remember, the texture may change a bit after freezing. When it's time to enjoy leftovers, you have two good options: the oven or microwave. For the oven, preheat it to 400°F (200°C). Spread the potatoes on a baking sheet and heat for about 10-15 minutes. This helps them stay crispy. If you use the microwave, place them on a plate and cover with a damp paper towel. Heat for 1-2 minutes. They won’t be as crispy, but they will still taste great. Freezing roasted potatoes is easy. First, let them cool completely. Then, spread them on a baking sheet in a single layer. Freeze for about an hour until solid. Once frozen, transfer them to a freezer bag or container. They can last up to three months in the freezer. When you’re ready to eat, cook them directly from frozen in the oven for best results. For the full recipe, check the earlier section. To make crispy garlic roasted potatoes, first gather your ingredients. You will need baby potatoes, olive oil, garlic, dried rosemary, paprika, salt, and pepper. 1. Preheat your oven to 425°F (220°C). 2. Halve the baby potatoes and place them in a bowl. 3. Toss the potatoes with olive oil, minced garlic, rosemary, paprika, salt, and pepper. Make sure they are evenly coated. 4. Spread the potatoes on a baking sheet lined with parchment paper. This helps with easy cleanup. 5. Roast them for 25-30 minutes. Turn them halfway through for even cooking. They should turn golden brown and crispy. 6. Garnish with parsley before serving. Enjoy! Yes, you can use regular potatoes. Just make sure to cut them into smaller pieces. Baby potatoes are great for their small size and thin skin. They cook faster and crisp up nicely. Regular potatoes can also be delicious, but they may take longer to cook. To reheat roasted potatoes, the oven works best. Preheat your oven to 400°F (200°C). Spread the potatoes on a baking sheet. Heat them for about 10-15 minutes. This method keeps them crispy. You can also use a skillet on the stove. Heat the skillet over medium heat and add potatoes. Cook until warmed through, stirring often. Avoid the microwave, as it can make them soggy. This post covered how to make crispy garlic roasted potatoes. We discussed essential ingredients like baby potatoes and garlic, then moved into mixing and roasting them. I shared tips for extra crispiness and flavor. You can also try different herbs, spices, and dietary options. Proper storage and reheating methods ensure your leftovers taste great. Experiment with this simple recipe to make it your own. Enjoy your delicious, crispy side dish!

Crispy Garlic Roasted Potatoes Simple and Flavorful Dish

Do you crave a simple, tasty side dish? Crispy Garlic Roasted Potatoes are perfect! This dish lets the flavor shine

Here’s what you need for your satisfying pasta with spinach and feta dish. This list makes it easy to gather everything and get cooking. - 300g pasta (fusilli or penne) - 2 cups fresh spinach, roughly chopped - 150g feta cheese, crumbled - 2 tablespoons olive oil - 3 cloves garlic, minced - 1 teaspoon chili flakes (adjust to taste) - 1 tablespoon lemon zest - 2 tablespoons lemon juice - Salt and pepper to taste - Fresh basil leaves for garnish - Optional: toasted pine nuts for crunch This combination of ingredients creates a bright and tasty meal. Fresh spinach adds color and nutrients. Feta cheese brings a creamy, salty kick. Olive oil and garlic create a rich flavor base. Lemon zest and juice give the dish a refreshing twist. Adjust the chili flakes to your spice liking. If you want extra crunch, add toasted pine nuts. By using these fresh and simple ingredients, you make a dish that feels special but is easy to prepare. For the full recipe, check [Full Recipe]. Start by boiling a large pot of salted water. This step adds flavor to the pasta. Once the water is bubbling, add 300g of pasta, like fusilli or penne. Cook it according to the package instructions. Aim for al dente, which usually takes about 8 to 10 minutes. Before draining, save 1 cup of pasta water for later. This water helps create a creamy sauce. While the pasta cooks, heat 2 tablespoons of olive oil in a large skillet over medium heat. Once the oil is warm, add 3 cloves of minced garlic and 1 teaspoon of chili flakes. Sauté this mixture for about 1 to 2 minutes. You want the garlic to smell great but not burn. The chili flakes add a nice kick to the dish. Now it’s time to bring it all together. Add 2 cups of roughly chopped spinach to the skillet. Stir it often until it wilts, which takes about 2 to 3 minutes. Next, add the drained pasta to the skillet. Toss in 150g of crumbled feta cheese, 1 tablespoon of lemon zest, and 2 tablespoons of lemon juice. Mix everything well. If it feels too dry, add some reserved pasta water a little at a time. This will make your dish creamier and more vibrant. Cooking should be fun and rewarding! For the complete recipe, check out the Full Recipe. To make al dente pasta, start with a big pot of salted water. Bring it to a full boil. Add the pasta and stir it often. Check the package for cooking times. Taste a piece a minute or two before the time is up. It should be firm but not hard. When you drain the pasta, don’t forget to save some pasta water. This water is starchy and helps make your dish creamy. Keep about one cup of it in a bowl before you drain the rest. To boost flavor, try adding a pinch of nutmeg or some fresh herbs like parsley. You can also add more chili flakes if you like heat. A splash of balsamic vinegar is great for depth too. For presentation, use wide, shallow bowls. This makes the dish look fancy. Add some extra feta on top and a few fresh basil leaves. A drizzle of olive oil will shine and add flavor. One common mistake is overcooking the spinach. It should wilt, not turn mushy. Cook it just until it’s bright green. When mixing ingredients, add the feta gently. Crumble it on top of the pasta instead of mixing it in too hard. This keeps the cheese from breaking apart too much. Remember, a little goes a long way in flavor! For the full recipe, check out the Spinach & Feta Fiesta Pasta recipe. {{image_2}} You can add protein to make this dish heartier. For a classic twist, grilled chicken works well. Simply slice cooked chicken and toss it in with the pasta. Shrimp is another great choice. Sauté shrimp in olive oil until pink, then mix it in. If you prefer vegetarian options, consider chickpeas or tofu. Chickpeas add protein and fiber. Just rinse and drain a can. For tofu, cube it and sauté until golden. Both options blend nicely with spinach and feta. Cheese can change the flavor of this dish. If you want a milder taste, try goat cheese or ricotta. These cheeses will add creaminess and a unique touch. You can also use Parmesan for a sharper flavor. For those avoiding dairy, go for nutritional yeast. It provides a cheesy flavor without milk. Another option is cashew cheese. Blend soaked cashews with lemon juice for a creamy, dairy-free alternative. Using seasonal ingredients can elevate this recipe. In spring, add fresh peas for a pop of sweetness. In summer, cherry tomatoes burst with flavor and color. For fall, consider roasted butternut squash for a sweet note. You can also swap in other greens. Kale or arugula can add a peppery kick. Just remember to cook them until tender. Mixing in colorful veggies not only boosts nutrition but also makes your dish more vibrant. For the complete recipe, check out the Full Recipe section. To keep your pasta fresh, choose airtight containers. Glass or plastic containers work well. Make sure to let the pasta cool down first before sealing. Store it in the fridge for up to three days. When reheating, avoid the microwave if you can. Instead, use a skillet over low heat. Add a splash of water or olive oil to help restore moisture. Stir gently to keep the texture nice. You can also reheat in the oven at 350°F for about 10 minutes. You can freeze leftover portions for later. Divide the pasta into single servings and place them in freezer-safe bags. Remove as much air as possible. For best quality, eat within three months. When ready to eat, thaw in the fridge overnight and reheat as mentioned. For the full recipe, check out the Spinach & Feta Fiesta Pasta. You can pair this dish with simple sides. Here are some ideas: - Garlic bread: Crunchy and buttery, it complements pasta well. - Mixed green salad: Fresh greens with a light vinaigrette provide a nice contrast. - Roasted vegetables: Carrots, zucchini, or bell peppers add color and flavor. - Wine: A crisp white like Sauvignon Blanc goes well with this meal. You can store this dish in the refrigerator for about 3 days. Make sure to use an airtight container. If you want to freeze it, it can last up to 2 months. Just remember, the texture may change a bit after freezing. Yes, you can prep most of the ingredients ahead. Chop the spinach and garlic, and store them in the fridge. Cook the pasta and let it cool before storing it. The best way to assemble is just before serving. Mix everything together fresh for the best flavor. This dish combines fresh ingredients like spinach and feta to create delicious pasta. You learned how to cook the pasta perfectly, prepare a tasty sauce, and mix everything for a creamy finish. I also shared some helpful tips to avoid common mistakes. Lastly, you saw different variations and storage methods to suit your taste and needs. Enjoy experimenting with your own version of this dish! Your kitchen adventures are just beginning.

Satisfying Pasta with Spinach and Feta Recipe Guide

Pasta with Spinach and Feta is a simple dish that shines with bold flavors. In this guide, I’ll show you

To make a tasty teriyaki chicken bowl, you need some basic ingredients. Here’s what you’ll need: - 2 large chicken breasts, sliced into bite-sized pieces - 1 cup broccoli florets - 1 cup bell peppers, sliced (red, yellow, or orange) - 1 cup snap peas - 2 cups cooked brown rice - ¼ cup soy sauce (low-sodium preferred) - 2 tablespoons honey - 1 tablespoon sesame oil - 1 tablespoon rice vinegar - 2 garlic cloves, minced - 1 teaspoon fresh ginger, minced - 1 tablespoon cornstarch mixed with 2 tablespoons water (for thickening the sauce) - Sesame seeds for garnish - Green onions, sliced for garnish These ingredients come together to create a delicious meal. The chicken gives protein, while the veggies add color and crunch. The sauce ties it all together with sweet and savory flavors. You can add more fun with extra ingredients and garnishes. Consider these options: - Carrots, shredded or sliced - Cabbage, thinly sliced - Edamame, shelled - Avocado, sliced - Nori sheets, cut into strips These extras bring new textures and flavors. You can mix and match to suit your taste. Feeling creative? You can customize your teriyaki bowls even more. Here are some ideas: - Use tofu instead of chicken for a vegetarian option. - Swap brown rice for quinoa or cauliflower rice. - Try different sauces, like sweet chili or hoisin sauce. - Add hot sauce if you like some heat. Customization makes your meal unique. Don’t hesitate to experiment with different ingredients. The possibilities are endless! If you want to see the full recipe, check the section above. First, gather your ingredients. You will need soy sauce, honey, sesame oil, rice vinegar, garlic, and ginger. In a medium bowl, whisk these together. This sauce gives your chicken a sweet, savory flavor. Set it aside for now. Next, heat a large skillet or wok over medium-high heat. Add a small amount of oil. Once hot, add the sliced chicken pieces. Cook them for about 5 to 7 minutes. You want them browned and fully cooked. Once done, remove the chicken from the skillet and set it aside. Now, in the same skillet, add your broccoli, bell peppers, and snap peas. Stir-fry these for about 3 to 4 minutes. You want them to be tender but still crunchy. This keeps the bright colors and fresh taste. Return the cooked chicken to the skillet. Pour the teriyaki sauce over the chicken and vegetables. Stir well to coat everything. Next, add the cornstarch mixture to thicken the sauce. Cook for another 2 to 3 minutes. This helps the sauce stick to the ingredients. To serve, put a scoop of cooked brown rice in each bowl. Top with the teriyaki chicken and veggies. Finally, garnish with sesame seeds and sliced green onions. Enjoy your tasty meal! For the complete details, check the Full Recipe. To make your teriyaki chicken bowls pop, focus on your sauce. Use fresh ingredients like garlic and ginger. They add a punch of flavor! Also, let your chicken marinate in the sauce for 30 minutes. This soak time lets the flavors seep in. If you can, use low-sodium soy sauce. It keeps the dish tasty without being too salty. Cooking chicken can be simple if you follow a few tips. First, cut your chicken into small pieces. This helps it cook evenly. Use a hot skillet or wok. This creates a nice sear on the chicken. Searing gives your meat a great flavor and texture. Cook until the chicken is golden brown and no longer pink inside. That should take about 5-7 minutes. Cooking brown rice can be tricky, but it's easy with the right steps. Start by rinsing the rice under cold water. This removes excess starch and helps it cook better. Then, use a ratio of 1 part rice to 2 parts water. Bring the water to a boil before adding the rice. Cover the pot and lower the heat. Let it simmer for about 45 minutes. Afterward, let it sit for 10 minutes before fluffing with a fork. Perfect brown rice makes your teriyaki chicken bowls complete! {{image_2}} You can easily make teriyaki bowls vegetarian or vegan. Swap chicken for tofu. Use firm tofu for the best texture. Press it to remove excess water, then cut it into cubes. Marinate it in the same teriyaki sauce. Cook it until golden and crispy. You can also use tempeh or seitan for added protein. For veggies, add mushrooms or eggplant. They soak up the sauce well. If you want different proteins, try shrimp or salmon. Shrimp cooks quickly and adds great flavor. Just toss it in the skillet after the veggies. Salmon gives a rich taste. Cook it skin-side down to keep it moist. You can even use grilled chicken thighs for a juicier option. Each protein brings its own twist to the teriyaki experience. You can switch up the flavor by using different sauces. Try hoisin sauce for sweetness and depth. Sriracha adds a spicy kick if you like heat. Add peanut sauce for a nutty twist. You can also mix in orange juice for a citrusy touch. Experiment with these sauces to find your favorite flavor. Each variation makes the bowl unique and fun. For more ideas, check out the Full Recipe. To keep your teriyaki chicken bowls fresh, let them cool first. Then, place them in a sealed container. Store the bowls in the fridge. They stay good for up to three days. Make sure to keep the chicken and rice separate if possible. This helps keep everything fresh and tasty. When you are ready to eat your leftovers, reheating is key. The best way is to use the microwave. Place the food in a microwave-safe bowl. Cover it with a damp paper towel. Heat on medium for about two minutes. Stir halfway through to ensure even heating. You can also reheat it on the stove. Add a splash of water to keep it moist. If you want to save some for later, freezing works great. Pack the teriyaki chicken and rice in separate containers. Use airtight bags or containers to prevent freezer burn. Label them with the date. They can last up to three months in the freezer. When you are ready to eat, thaw it overnight in the fridge before reheating. This method keeps the flavors intact. The best rice for teriyaki chicken bowls is brown rice. It has a nutty flavor and chewy texture. It also adds fiber, making your meal more filling. White rice works too, but brown rice is healthier. You can also try jasmine rice for a fragrant option. Yes, you can make teriyaki chicken in advance! Cook the chicken and veggies, then store them in the fridge. The flavors blend well if you let it sit overnight. Just reheat the dish when you are ready to eat. This saves time on busy days and is great for meal prep. To adjust the recipe for more servings, simply double or triple the ingredients. Make sure to keep the same ratios for the sauce. If you need to cook larger amounts, use a bigger pan. This way, everything cooks evenly. You can find the Full Recipe for Teriyaki Chicken Bowls in the earlier sections of this article. It contains all the details you need to make this dish. Enjoy cooking and make it your own! Teriyaki chicken bowls are easy to make and delicious. We covered the key ingredients, from the main chicken to tasty garnishes. You learned how to prepare the sauce and cook everything perfectly. We also explored tips for flavor and storage options for leftovers. Remember, you can customize these bowls easily with different proteins or sauces. Enjoy making your own teriyaki chicken bowl and have fun with it!

Teriyaki Chicken Bowls Flavorful and Fun Meal Idea

Are you ready to spice up your dinner routine? Teriyaki chicken bowls are a fun and flavorful meal that everyone

Older posts
Newer posts
← Previous Page1 … Page30 Page31 Page32 … Page61 Next →

dsad

© 2025 Cooking Wells • Built with GeneratePress

Our Policies

  • Copyright Policy
  • Cookie Policy
  • GDPR Policy
  • Privacy Policy
  • Disclaimer
  • Terms Of Use

More Information

  • Home
  • About
  • Contact
  • Appetizers
  • Dessert
  • Dinner
  • Drinks
©2025, Cooking Wells About Back To Top