Skip to content
DisclaimerTerms Of UseGDPR PolicyCookie Policy

Cooking Wells

  • Home
  • Drinks
  • Appetizers
  • Dinner
  • Dessert
  • About
  • Contact
  • Privacy Policy
DisclaimerTerms Of UseGDPR PolicyCookie Policy

Mia

To make zesty cilantro lime rice, gather these simple items: - 1 cup basmati rice - 2 cups vegetable broth - 1 tablespoon olive oil - 1 teaspoon garlic powder - Juice of 1 lime - Zest of 1 lime - 1/2 cup fresh cilantro, chopped - Salt to taste - Freshly ground black pepper to taste These ingredients create a fresh, bright flavor that pairs well with many dishes. You can add extra ingredients for more flavor. Here are some tasty options: - 1/4 cup diced red onion for a sweet crunch - 1/4 cup corn for a touch of sweetness - 1/2 teaspoon cumin for a warm spice - 1 jalapeño, diced for some heat Feel free to mix in what you love! Sometimes, you may not have an ingredient. Here are some swaps: - Use chicken broth instead of vegetable broth for a richer taste. - Swap lime for lemon juice if you want a different citrus kick. - Try quinoa instead of rice for a gluten-free option. These changes keep your dish fun and exciting while still tasting great! For the full recipe, check the link above. To start, rinse the basmati rice. Place it in a fine mesh strainer. Run cold water over it until the water runs clear. This step removes excess starch. It helps the rice stay fluffy and light. Rinsing is key for perfect rice. After rinsing, let the rice drain for a few minutes. This helps it dry out before cooking. Next, heat olive oil in a medium saucepan over medium heat. Once the oil is hot, add the rinsed rice. Sauté the rice for 2-3 minutes. Stir it often to keep it from burning. You want the rice to toast lightly. This gives it a nice flavor. After toasting, add vegetable broth and garlic powder. Add a pinch of salt too. Bring the mixture to a boil. Once boiling, reduce the heat to low and cover the pot. Let it simmer for 15 minutes. The rice will absorb all the liquid and become tender. When the rice is cooked, take the pot off the heat. Let it sit covered for 5 minutes. This resting time allows the flavors to blend. After 5 minutes, fluff the rice with a fork. Add lime juice, lime zest, and chopped cilantro. Mix well to combine. Season with salt and black pepper to taste. This Zesty Cilantro Lime Rice is now ready to serve as a side dish. Enjoy it warm with your favorite meals or in a grain bowl. For the full recipe, refer to the earlier section. To get fluffy rice, rinse the basmati rice well. Rinsing removes excess starch. This step helps the rice separate nicely. After cooking, let the rice sit covered for five minutes. This gives it time to steam and absorb flavors. Fluff the rice gently with a fork before serving. Use a medium saucepan with a lid. A sturdy pot distributes heat evenly. A fork is great for fluffing the rice. A measuring cup ensures you use the right amount of rice and broth. You can add more flavor with lime zest and juice. Fresh cilantro adds brightness and color. For a kick, include jalapeños. You might also try adding diced tomatoes or black beans. These additions make your dish more colorful and tasty. For the full recipe, check the section above. {{image_2}} You can boost the nutrition of your zesty cilantro lime rice by adding vegetables. Try mixing in diced bell peppers or sweet corn. These veggies add color and crunch. You can also use peas or carrots for a pop of sweetness. Just sauté them with the rice for a few minutes. This step makes sure they cook well and blend nicely with the flavors. If you like heat, consider adding jalapeños. Chop one or two jalapeños and mix them in while cooking the rice. You can adjust the amount to match your taste. This spicy twist brings a kick and makes the dish even more exciting. The heat from the jalapeños pairs well with the zesty lime. While cilantro shines in this recipe, you can switch it up. Parsley or mint works great for a fresh touch. Parsley gives a mild flavor, while mint adds a sweet and cooling effect. You can use either herb in place of cilantro. Just chop finely and mix in after cooking. This change keeps the dish interesting and personal. For the full recipe, check out the Zesty Cilantro Lime Rice section. To keep your Zesty Cilantro Lime Rice fresh, store it in an airtight container. Make sure to let the rice cool before sealing it. This helps prevent moisture buildup, which can lead to spoilage. You can store it in the fridge for up to four days. Label the container with the date, so you know when to use it. When you're ready to enjoy the rice again, reheating it properly is key. Place the rice in a pot with a splash of water. Cover it and heat over low to medium heat. Stir occasionally to ensure even warming. You can also use a microwave. Just add a few drops of water, cover it, and heat in short bursts. This helps keep the rice moist and tasty. If you want to freeze the rice, first let it cool completely. Divide it into portions for easy use later. Store it in freezer-safe bags or containers. When thawing, move it to the fridge overnight. You can reheat it straight from the freezer, but it may take longer. Enjoy your Zesty Cilantro Lime Rice even after a few weeks by following these steps! For the full recipe, check out the detailed instructions. Yes, you can use brown rice. Brown rice has a nuttier flavor and more fiber. However, it cooks longer than basmati rice. Use 2.5 cups of vegetable broth for 1 cup of brown rice. Cook for about 40-45 minutes instead of 15 minutes. Check the rice often to avoid burning. To make more servings, simply double or triple the ingredients. For each additional cup of rice, add 2 cups of broth. Adjust lime juice and cilantro to your taste. This method keeps the flavor strong and tasty. You can easily prepare this dish for gatherings or large family dinners. Zesty Cilantro Lime Rice goes great with many dishes. It shines next to grilled chicken or fish. You can serve it with tacos or burritos too. It also works well in grain bowls with veggies and protein. Try it with black beans for a hearty meal. This blog post covered key steps for making Zesty Cilantro Lime Rice. I shared how to choose ingredients and prepare basmati rice perfectly. You learned about storage tips and various tasty variations for extra flavor. In closing, adventure awaits in your kitchen! Try out different herbs or spices to make the dish your own. Enjoy your rice as a side or a base for your favorite meal. The possibilities are endless!

Zesty Cilantro Lime Rice Flavorful Side Dish Recipe

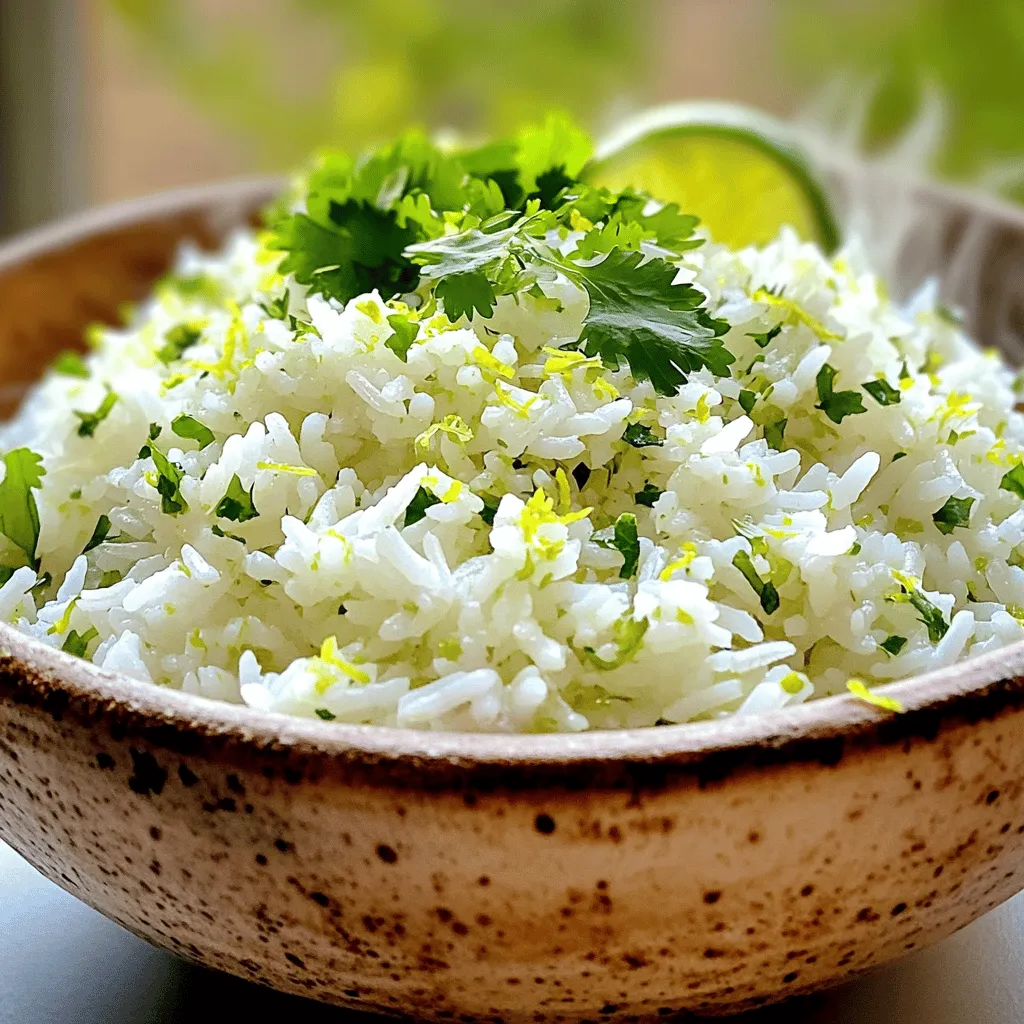
Looking for a side dish that packs a punch? My Zesty Cilantro Lime Rice brings bright flavors to your plate.

- 1 cup quinoa, rinsed - 2 cups vegetable broth - 1 medium onion, finely chopped - 2 garlic cloves, minced - 1 bell pepper, diced (any color) - 1 carrot, diced - 1 zucchini, diced - 1 cup green peas (fresh or frozen) - 1 teaspoon ground cumin - 1 teaspoon paprika - 2 tablespoons olive oil - Salt and pepper to taste - Fresh parsley, chopped, for garnish In this quinoa vegetable pilaf, we use fresh and simple ingredients. Quinoa is the star, providing protein and fiber. You rinse the quinoa before cooking. This step helps remove any bitter taste. Next, we add vegetable broth. It gives the pilaf a rich flavor. You can use homemade broth for the best taste. If you prefer, store-bought broth works well too. The vegetables add color and nutrients. Onions and garlic bring a lovely aroma. Bell peppers are crunchy and sweet, while carrots and zucchini add texture. Green peas boost the dish with more flavor. Spices like cumin and paprika enhance the taste. They make the dish warm and inviting. Finally, olive oil adds a nice richness and helps the veggies sauté well. Don't forget salt and pepper for seasoning. Fresh parsley at the end brightens each bite. For the full recipe, check the instructions to create this hearty dish. - Heat the olive oil in a medium pot over medium heat. - Sauté the chopped onion until it turns soft and clear. This takes about 3-4 minutes. - Add the minced garlic, diced bell pepper, and carrot. Cook for another 3-4 minutes. - Now, incorporate the spices. Stir in ground cumin and paprika. This adds a wonderful aroma. - Mix in the diced zucchini and green peas. Cook for 2-3 minutes to blend the flavors. - Add the rinsed quinoa and vegetable broth. Bring this mixture to a boil. - Once it boils, reduce the heat to low. Cover the pot and let it simmer for 15 minutes. - After simmering, remove it from heat. Let it sit for 5 minutes without lifting the lid. Fluff the quinoa with a fork. - Season with salt and pepper to taste. Garnish with fresh parsley before serving. For the complete recipe, check out the [Full Recipe]. To make the best quinoa vegetable pilaf, start with proper rinsing. Rinse the quinoa under cold water for a few minutes. This removes a bitter coating called saponin. It helps the quinoa taste fresh and clean. Next, adjust the spice levels to fit your taste. Start with the recipe's spices, then taste. If you want more flavor, add extra cumin or paprika. Spice is personal, so feel free to experiment! Using homemade vegetable broth makes a big difference. Store-bought broth can taste too salty or artificial. A good broth will add depth and richness to your pilaf. Sautéing the onion and garlic first builds great flavor. Cook them until they are soft and fragrant. This step creates a nice base for the rest of the dish. Controlling the simmering time is key. Keep the heat low once boiling. Cover the pot and let it simmer for about 15 minutes. This way, the quinoa cooks evenly. Fluffing quinoa correctly is important. After cooking, let it sit for five minutes. Then, use a fork to fluff it gently. This keeps the grains separate and light. Pair your pilaf with proteins like chicken, tofu, or fish. It also works well with salads for a fresh touch. The pilaf is tasty on its own but can complement many dishes. Serve it warm. This dish is best enjoyed fresh. If you let it cool, it can lose some flavor. For presentation, use a colorful garnish. Fresh parsley adds a nice pop of color. You can also use lemon wedges for a bright touch. For the full recipe, check out the detailed steps above. {{image_2}} You can easily swap vegetables in this recipe. Use what you like or have on hand. Here are some ideas: - Alternative vegetables: Try broccoli, spinach, or sweet potatoes. - Grain alternatives: Use farro, bulgur, or rice if you prefer. - Vegan vs. non-vegan options: For a non-vegan twist, add chicken or shrimp. To amp up the taste, consider these options: - Adding herbs: Fresh herbs like thyme or basil can brighten the dish. - Incorporating nuts or dried fruits: Almonds, cashews, or raisins add texture and sweetness. - Suggested sauces or dressings: A splash of soy sauce or tahini dressing can bring new layers of flavor. Making this pilaf ahead of time is simple and smart: - Make-ahead suggestions: Cook the pilaf and store it in the fridge for easy meals. - Freezing instructions: Portion the pilaf in freezer-safe bags. It lasts up to three months. - Ideas for meal prepping ahead of time: Prepare individual servings for lunch or dinner to save time during the week. For the full recipe, check out Quinoa Vegetable Pilaf 🥦. Enjoy experimenting with these variations to find your perfect dish! To keep your quinoa vegetable pilaf fresh, use airtight containers. Glass or plastic containers work well. Before you store, let the pilaf cool down. This prevents moisture buildup, which can spoil your dish. You can keep the pilaf in the fridge for about 4 to 5 days. However, if you see any mold or off smells, it’s time to toss it. Always check for texture changes, as this can mean spoilage too. When reheating, the best methods are using a microwave or stovetop. Add a splash of water or broth to keep the pilaf moist. Heat in short bursts, stirring often. This way, you’ll enjoy a warm, tasty dish again. For the full recipe, check back at the beginning! How do you make quinoa fluffy? To make quinoa fluffy, rinse it well before cooking. This removes the bitter coating called saponin. Use the right water-to-quinoa ratio, which is two cups of broth for every one cup of quinoa. Bring the mixture to a boil, then cover and simmer on low heat. Let it sit off the heat for a few minutes. Fluff it gently with a fork to separate the grains. Can I use a different type of broth? Yes, you can use any broth you like. Vegetable broth adds a nice flavor, but chicken or beef broth works too. You can even use water if you don't have broth on hand. Just remember to season it well to enhance the taste. Is it possible to make quinoa vegetable pilaf ahead of time? Absolutely! You can prepare quinoa vegetable pilaf in advance. Cook it and let it cool before storing. Place it in an airtight container and keep it in the fridge for up to four days. Reheat it gently on the stove or in the microwave. Caloric breakdown and nutrient values One serving of quinoa vegetable pilaf has about 220 calories. It contains roughly 8 grams of protein, 4 grams of fiber, and healthy fats from the olive oil. This dish is low in saturated fat and contains no cholesterol. Health benefits of quinoa Quinoa packs a punch of nutrients. It is a complete protein, meaning it has all nine essential amino acids. It's also rich in antioxidants, vitamins, and minerals. Eating quinoa can support heart health and aid digestion due to its high fiber content. What to do if quinoa is mushy? If quinoa turns out mushy, it might have cooked too long or had too much liquid. To fix it, spread it out on a baking sheet to cool. This helps it dry out. You can also try mixing in some cooked grains or nuts to add texture. Fixing undercooked quinoa If your quinoa is still hard, add a little more liquid and cover it. Cook it on low heat for a few more minutes. Check it often to ensure it doesn't burn. Once it's soft, fluff it up, and enjoy! This quinoa vegetable pilaf is easy to make and full of flavor. You learned about the key ingredients, step-by-step instructions, and useful tips. Don’t forget to experiment with substitutions and flavor additions to make it your own. Proper storage and reheating will keep your pilaf fresh and tasty. Enjoy creating a nutritious dish that fits your needs and tastes. Your kitchen adventures will be rewarding and fun. Dive in and share this dish with family and friends!

Quinoa Vegetable Pilaf Flavorful and Nutritious Dish

Looking for a tasty and healthy dish? This Quinoa Vegetable Pilaf is packed with flavor and nutrients! In just a

To make creamy avocado pasta, you need a few key ingredients. Here’s what you’ll need: - 2 ripe avocados, peeled and pitted - 2 cloves garlic, minced - 2 tablespoons fresh lemon juice - 1/4 cup extra virgin olive oil - 1/4 teaspoon red pepper flakes (adjust to taste) - Salt and pepper to taste - 12 ounces spaghetti (or pasta of choice) - 1/4 cup fresh basil leaves, chopped (plus extra for garnish) - 1/4 cup grated Parmesan cheese (optional) These ingredients work together to create a rich and creamy sauce. The avocados add a smooth texture, while the garlic and lemon juice give it a bright flavor. You can customize this dish to suit your taste. Here are some optional ingredients you might like: - Cherry tomatoes, halved - Spinach or arugula - Nuts, like pine nuts or walnuts - Cooked chicken or shrimp for protein - Different herbs like parsley or cilantro Feel free to mix and match these options. They can add extra color, texture, and flavor to your pasta. Garnishes can elevate your creamy avocado pasta. Here are some ideas to make your dish pop: - Extra chopped basil leaves - A sprinkle of grated Parmesan cheese - A drizzle of olive oil - Freshly cracked black pepper - Lemon zest for a citrus kick These garnishes add a nice touch. They not only make the dish look beautiful but also enhance the taste. For the full recipe, check out the instructions above! Start by boiling a large pot of salted water. Once the water is boiling, add 12 ounces of spaghetti or your favorite pasta. Cook it according to the package instructions until it is al dente. This usually takes about 8 to 10 minutes. Be sure to taste a piece to check if it’s done. When it is ready, scoop out 1 cup of the pasta water. This water is starchy and helps the sauce stick. Drain the pasta and set it aside in a large bowl. While the pasta cooks, you can make the delicious avocado sauce. Take 2 ripe avocados and peel them. Remove the pit and place the flesh into a blender or food processor. Add 2 cloves of minced garlic, 2 tablespoons of fresh lemon juice, and 1/4 cup of extra virgin olive oil. For a kick, throw in 1/4 teaspoon of red pepper flakes, plus salt and pepper to taste. Blend all the ingredients until they turn smooth and creamy. If the sauce is too thick, add a bit of the reserved pasta water until you reach the right consistency. Now comes the fun part! Pour the creamy avocado sauce over your drained pasta. Use a large spoon to toss everything together. Make sure every piece of pasta is coated with that rich sauce. If it seems too thick, add more of the reserved pasta water. For big flavor, gently mix in 1/4 cup of chopped fresh basil and, if you like, some grated Parmesan cheese. Serve this dish hot in bowls and enjoy the vibrant flavors. For the full recipe, check out the complete instructions. To get smooth avocado sauce, start with ripe avocados. Press gently; they should feel soft. If they are hard, let them ripen at room temperature. Once ripe, peel and pit them before blending. Blend until the mix is creamy and smooth. If it’s too thick, add a little pasta water. This helps achieve that perfect creamy texture. I love a little kick in my creamy avocado pasta. Start with 1/4 teaspoon of red pepper flakes. Taste after blending the sauce. If you want more heat, add more flakes. You can also use fresh chili or hot sauce. Just remember, it's easy to add but hard to take away! You can make this dish your own with a few simple add-ins. Try adding sun-dried tomatoes for a tangy touch. Fresh spinach adds color and nutrition. You can also mix in cooked chicken or shrimp for extra protein. For a nutty flavor, sprinkle in some toasted pine nuts. Each add-in brings its own twist to this creamy avocado pasta. For the full recipe, check out the details above! {{image_2}} You can switch up the pasta in this dish. Try whole wheat pasta for more fiber. Gluten-free pasta works well, too. You might use zoodles for a low-carb option. Even chickpea pasta adds protein and flavor. Each type brings its own taste. Experiment to find what you love best. To make this dish vegan, skip the Parmesan cheese. The creamy avocado sauce is rich enough without it. You can add nutritional yeast for a cheesy flavor. This keeps the dish plant-based and tasty. It’s a great way to enjoy the same flavors without dairy. Want to boost your meal? Add grilled chicken or shrimp for protein. Tofu or chickpeas also work well for a plant-based option. You can mix in cooked lentils for a hearty touch. These additions make your creamy avocado pasta even more filling and balanced. To keep leftover creamy avocado pasta fresh, place it in an airtight container. Make sure to seal it well. Store it in the fridge for up to two days. The sauce may thicken over time, but it will still taste great. If you have extra sauce, store it separately. This helps keep the pasta from getting mushy. When you're ready to eat the pasta again, reheat it gently. You can use a pan over low heat. Add a splash of water or olive oil to help loosen the sauce. Stir often to avoid burning. If you prefer, you can microwave it. Place the pasta in a microwave-safe dish, cover it, and heat in short bursts. Stir in between to ensure even heating. If you want to save your creamy avocado pasta for later, freezing is an option. However, the texture might change once it thaws. To freeze, place the pasta in a freezer-safe container. Make sure to keep it airtight. It can last up to three months in the freezer. When you're ready to eat, thaw it in the fridge overnight. Reheat as mentioned earlier. Enjoy the creamy goodness even after some time! For the full recipe, check out Creamy Avocado Pasta. Yes, you can use overripe avocados. They are very soft and creamy. This works well for creamy avocado pasta. Just check for any dark spots or bad smells. If they seem fine, go ahead and use them. They will still taste great! To stop the avocado from browning, use lemon juice. The acid in lemon juice slows down the browning process. You can add a bit more lemon juice to the sauce. Store any leftovers in an airtight container too. Cover the surface of the sauce with plastic wrap. This helps keep it fresh. You can serve creamy avocado pasta with several side dishes. A simple green salad pairs well. Roasted vegetables add a nice touch too. You can also try garlic bread for a crunchy side. If you want protein, grilled chicken or shrimp work great. Check out the Full Recipe for more ideas! You now know how to make creamy avocado pasta from start to finish. We explored key ingredients, cooking steps, and tips for perfecting texture. You learned how to customize the dish and even store leftovers. This recipe is simple yet offers many ways to make it your own. Embrace your creativity in the kitchen. Enjoy your tasty pasta and share it with others!

Creamy Avocado Pasta Rich and Flavorful Dish

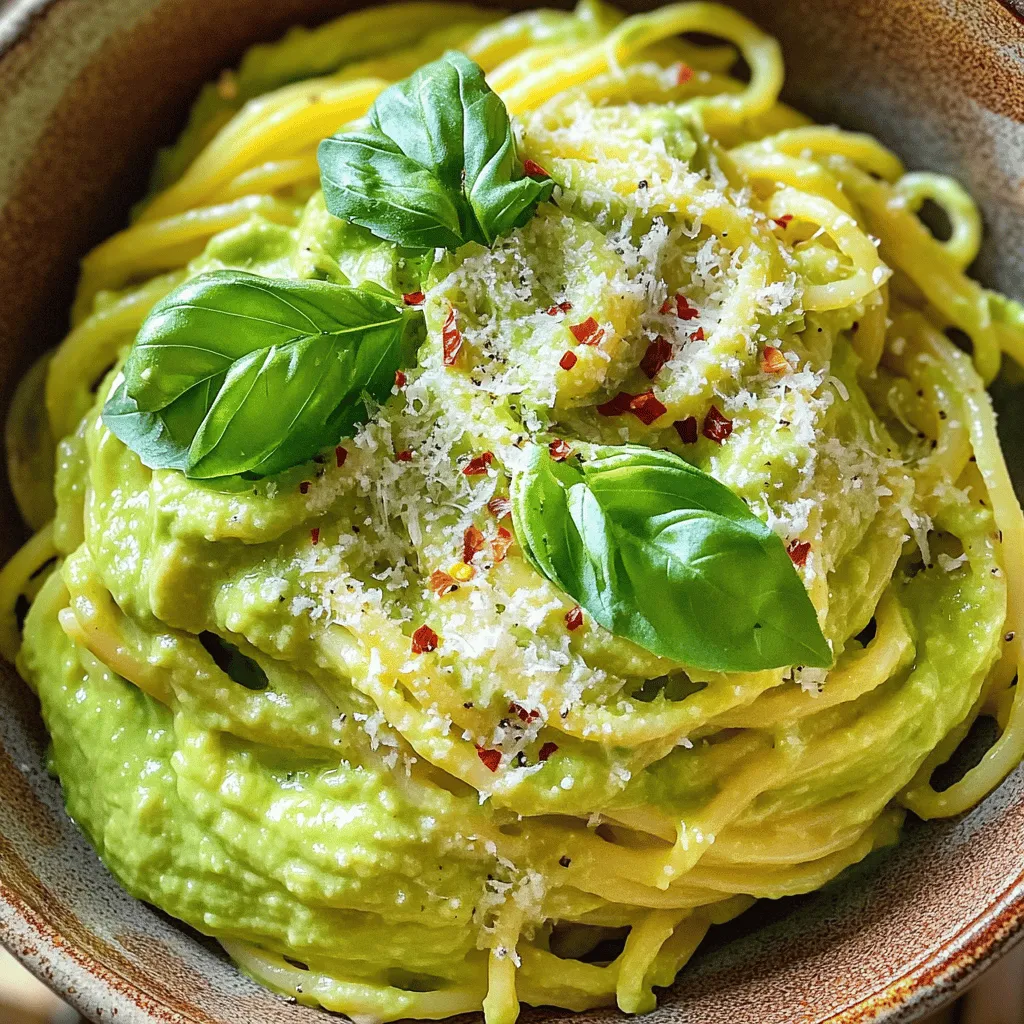
If you’re looking for a quick, rich, and flavorful dish, creamy avocado pasta is the answer. This meal combines creamy

- Cauliflower: Choose one large head. Cut it into bite-sized florets for easy eating. - Flour options: Use one cup of all-purpose flour or chickpea flour for a gluten-free option. - Plant-based milk options: Almond or soy milk works best. You need one cup for the batter. - Garlic powder: One teaspoon adds a nice kick of flavor. - Onion powder: One teaspoon gives depth to the taste. - Smoked paprika: One teaspoon brings warmth and a hint of smokiness. - Buffalo sauce: You can use store-bought or make your own. One cup is perfect for coating. - Vegan butter: Two tablespoons, melted, makes the sauce rich and smooth. - Accompaniments: Serve with fresh celery and carrot sticks. Don’t forget vegan ranch dressing for dipping. These ingredients come together to create a delicious and simple dish. You’ll love how easy it is to make vegan cauliflower buffalo wings. For the full recipe, check out the details above. To start, take your large head of cauliflower. Cut it into bite-sized florets. Make sure the pieces are even. This helps them cook evenly. Rinse the florets under cold water. Pat them dry with a clean towel. Dry florets hold batter better. In a large mixing bowl, combine the dry and wet ingredients. Add 1 cup of flour to the bowl. You can use all-purpose flour or chickpea flour. Then, pour in 1 cup of plant-based milk. Add 1 teaspoon each of garlic powder, onion powder, and smoked paprika. Don’t forget 1 teaspoon of salt and 1/2 teaspoon of black pepper. Whisk the mixture until it is smooth and free of lumps. Now, preheat your oven to 450°F (232°C). Line a baking sheet with parchment paper. Dip each cauliflower floret into the batter. Make sure they are well-coated. Shake off the extra batter. Place them on the baking sheet in a single layer. Bake the cauliflower wings for 25-30 minutes. Turn them halfway through for even cooking. You want them golden and crispy. While the wings bake, mix 1 cup of buffalo sauce with 2 tablespoons of melted vegan butter. Stir until well blended. Once the wings are done baking, remove them from the oven. Toss the hot wings in the buffalo sauce mixture. Ensure they are evenly coated. Return them to the baking sheet for another 10-15 minutes. This will set the sauce. Enjoy your delicious wings! For the full recipe, check out the Spicy Vegan Cauliflower Buffalo Wings recipe. To get your cauliflower wings crispy, follow these steps: - Preheat your oven to 450°F (232°C). A hot oven helps to crisp the batter. - Use parchment paper on your baking sheet. It prevents sticking and aids in even cooking. - Spread the wings out in a single layer. Crowding them can lead to soggy wings. - Flip halfway through cooking. This ensures both sides get golden brown. - Bake longer if needed. If they are not crispy enough, add a few more minutes. If you need to tweak the recipe, here are some good swaps: - Flour: Use chickpea flour instead of all-purpose flour for gluten-free wings. - Milk: Almond or soy milk works well. Choose your favorite plant-based milk. - Buffalo sauce: Many brands offer vegan options, but you can also make your own. Adjust the spice in your wings to fit your taste: - Buffalo sauce: Start with a mild sauce if you prefer less heat. You can always add more later. - Extra spices: Consider adding cayenne pepper for more heat or smoked paprika for a smoky flavor. - Taste as you go: Mix the sauce and taste it before tossing the wings. This way, you can control the heat perfectly. For the complete recipe, check out the Full Recipe section. Enjoy your cooking adventure! {{image_2}} You can change up the flavor of your cauliflower wings easily. Instead of buffalo sauce, try teriyaki sauce for a sweet and savory twist. BBQ sauce also works well and gives a smoky flavor. These sauces add new tastes while keeping the dish fun and exciting. If you need a gluten-free version, use chickpea flour instead of all-purpose flour. Chickpea flour gives a nutty taste and crisp texture. Always check the labels on your sauces to ensure they are gluten-free, too. This way, you can enjoy the wings without worry. You can add other veggies to your wings for extra crunch. Try adding sliced bell peppers or broccoli florets. You can also mix in spices like cayenne pepper for heat or nutritional yeast for a cheesy flavor. These additions make your wings even more delicious and interesting. Explore the [Full Recipe] for more on how to make these tasty treats! To keep your cauliflower wings fresh, store them in an airtight container. Place parchment paper between layers to avoid sticking. They will stay good for about three days in the fridge. If you want to maintain their crispy texture, avoid covering them tightly. For the best reheating, use an oven. Preheat it to 350°F (175°C). Place the wings on a baking sheet. Heat them for about 10-15 minutes until they are crispy again. You can also use an air fryer for a quick crisp. Set it to 350°F (175°C) and heat for about 5-7 minutes. To freeze the wings, place them in a single layer on a baking sheet. Freeze until solid, then transfer them to a freezer bag. They can last up to three months. When ready to eat, thaw them overnight in the fridge. Bake or air fry until hot and crispy. Yes, you can prep these wings ahead of time. Cut the cauliflower and mix the batter. Store the cauliflower florets in the fridge. When you're ready, just dip in the batter and bake. You can also bake them ahead, let them cool, and store them in an airtight container. Reheat in the oven before serving for a crispy texture. These wings taste great with several sides. Here are some ideas: - Fresh celery sticks - Carrot sticks - Vegan ranch dressing - Hummus - Guacamole - A fresh salad These sides balance the spice and add refreshing flavors. The spice level can vary. The buffalo sauce you choose makes a big difference. If you want less heat, use a mild sauce or mix it with some vegan mayo. You can also adjust the amount of sauce you use. Start with a little and add more if you want extra heat. For the detailed Spicy Vegan Cauliflower Buffalo Wings recipe, check out the [Full Recipe]. In this article, we covered the key steps to making spicy vegan cauliflower buffalo wings. We discussed the main ingredients, flavor enhancers, and how to prepare and bake the cauliflower. You learned ways to customize the spice level and explore different sauces for unique flavors. Remember, tweaking these recipes to fit your taste makes them even better. Dive in and enjoy your creation!

Vegan Cauliflower Buffalo Wings Tasty and Simple Recipe

Are you ready to dive into a delicious twist on a classic snack? My Vegan Cauliflower Buffalo Wings are not

To make a tasty Strawberry Shortcake Trifle, gather these key ingredients: - 2 cups fresh strawberries, hulled and sliced - 1/4 cup granulated sugar (divided) - 1 cup heavy whipping cream - 1/2 teaspoon vanilla extract - 1 cup pound cake, cut into cubes - 1/2 cup vanilla pudding - Fresh mint leaves for garnish These ingredients create the perfect balance of sweet, creamy, and fruity flavors. Fresh strawberries bring a burst of flavor, while the whipped cream adds a light and airy texture. You can easily make this trifle your own with some optional ingredients: - Different fruits, like blueberries or raspberries, add color and taste. - Flavored pudding options, such as chocolate or banana, can change the flavor. - Alternate cake varieties, like angel food cake, offer a lighter choice. Feel free to mix and match based on what you have at home. This recipe is flexible and fun! For the complete process, check the [Full Recipe]. To start, you need to macerate the strawberries. This process brings out their natural sweetness. Take 2 cups of fresh strawberries, hulled and sliced. Place them in a mixing bowl. Now, add 2 tablespoons of granulated sugar and gently toss them. Let the strawberries sit for about 15 minutes. As they rest, the sugar will draw out their juices, creating a sweet syrup. Next, we whip the cream. In a separate bowl, pour in 1 cup of heavy whipping cream. Use a mixer on medium speed and whip until soft peaks form. This usually takes about 1-2 minutes. Now, slowly add the remaining 2 tablespoons of granulated sugar and 1/2 teaspoon of vanilla extract. Continue to whip until stiff peaks form. This means your cream will hold its shape well. Now comes the fun part: layering! Grab a large trifle bowl or individual glasses. Start with a layer of pound cake cubes, about 1 cup. Next, add a layer of your macerated strawberries, followed by a layer of 1/2 cup of vanilla pudding. Now, spoon a layer of your whipped cream over the pudding. Repeat these layers until you reach the top of the bowl. Finish with a generous layer of whipped cream. For a beautiful touch, garnish with additional sliced strawberries and fresh mint leaves. Chill the trifle in the refrigerator for at least 30 minutes before serving. This helps all the flavors meld together beautifully. For the full recipe, check the details above. Enjoy making this delightful dessert! To make the best strawberry shortcake trifle, you need ripe strawberries. Look for berries that are bright red, firm, and sweet-smelling. Avoid any with soft spots or mold. Before using them, hull your strawberries. This means removing the green tops and the white core. Slice them evenly for a nice look. Toss them with some sugar to bring out their juice. Let them sit for about 15 minutes. This process is called macerating, and it makes the strawberries even sweeter and juicier. Whipping cream adds a rich, fluffy layer to your trifle. Start with cold heavy cream for the best results. Use a mixing bowl that is also cold. This helps the cream whip up faster. Beat the cream on medium speed until soft peaks form. Then, add sugar and vanilla extract slowly. Keep whipping until you see stiff peaks. This means the cream will hold its shape when you layer it. Be careful not to over-whip, or it may turn into butter. Creating beautiful layers makes your trifle stand out. Start with a layer of pound cake cubes at the bottom of your bowl. Press them down slightly for a strong base. Next, add a layer of macerated strawberries. Follow this with a layer of vanilla pudding. Finally, add a layer of whipped cream. Repeat these layers until you reach the top. Finish with a generous layer of whipped cream. Top it off with more strawberries and fresh mint leaves. This adds color and makes it look gourmet. {{image_2}} You can switch up the fruits in your trifle. Instead of strawberries, try using blueberries, raspberries, or blackberries. If you love tropical flavors, go for diced mango, pineapple, or even kiwi. Mixing fruits adds new tastes and colors to your dish. It keeps things fun and fresh! If you want a gluten-free trifle, use gluten-free cake. Many brands offer great options that taste just as good. For a dairy-free version, substitute the heavy cream with coconut cream or almond cream. You can use dairy-free whipped toppings too. These swaps keep the spirit of the trifle while meeting your dietary needs. You can serve the trifle in individual glasses for a fun twist. This makes it easy for guests to grab their own serving. If you prefer a large trifle bowl, that works too! To make it look fancy, layer the ingredients so they show off the colors. Add fresh mint leaves on top for a burst of green. You can even add chocolate shavings or nuts for extra crunch. To store leftovers in the refrigerator, place the trifle in an airtight container. This keeps it fresh for up to three days. Make sure to cover the top with plastic wrap or a lid. If you used fresh strawberries, they may spoil faster. Always check for signs of spoilage before serving. Freezing a trifle isn’t ideal because the textures change. If you must freeze it, separate the layers. Freeze the cake and pudding in one container. Freeze the strawberries and cream in another. Use freezer-safe bags or containers. This way, you can keep them for about two months. When serving later, reassemble the trifle just before serving. Start with the cake, then layer the strawberries and pudding. Finish with whipped cream on top. This keeps the whipped cream fluffy and the strawberries fresh. If you pre-assemble, the cream may become watery. Enjoy your trifle with the best texture! To make your trifle gluten-free, start with gluten-free pound cake. You can find gluten-free options in stores or make your own using almond flour or coconut flour. For the pudding, use a gluten-free vanilla pudding mix or make your own. This mix often has cornstarch as a base, which is safe for gluten-free diets. Ensure all your ingredients are labeled gluten-free to avoid any cross-contamination. Yes, you can prepare your trifle a day ahead. To keep it fresh, layer the ingredients, but wait to add the whipped cream until just before serving. This helps the cream stay fluffy and prevents it from becoming soggy. Cover the trifle tightly with plastic wrap to keep it from absorbing any odors from your fridge. Refrigerate it until you’re ready to serve. If you want to change the flavor, many options work well. You can use chocolate pudding for a rich twist. Butterscotch or banana pudding can also add fun flavors. If you prefer homemade, mix 2 cups of milk with cornstarch and sugar on the stove until thickened. Add the flavor of your choice to create your own pudding base. This adds a personal touch to your trifle. For the full recipe, check out the detailed instructions above. To sum up, making a Strawberry Shortcake Trifle is simple and fun. You need fresh strawberries, cream, and cake cubes, layered perfectly. Remember to macerate your strawberries to enhance their sweetness. Use different fruits for a tasty twist. Store leftovers properly to keep them fresh. With these tips, you’ll impress everyone with your trifle. Enjoy this delicious dessert at any gathering. It’s sure to be a hit!

Strawberry Shortcake Trifle Delightful and Easy Recipe

Are you ready to whip up a dessert that shines at any gathering? This Strawberry Shortcake Trifle is not only

- 1 sheet of puff pastry, thawed - 2 cups fresh spinach, roughly chopped - 1 cup feta cheese, crumbled - 1 medium onion, finely chopped - 2 cloves garlic, minced - 1 egg, beaten (for egg wash) - 2 tablespoons olive oil - Salt and pepper to taste - 1 teaspoon dried oregano - Sesame seeds (optional, for garnish) For this dish, fresh spinach and feta cheese shine. The puff pastry gives it a nice crunch. Each ingredient brings its own unique taste. - Fresh herbs like dill or parsley - A pinch of red pepper flakes for heat - A squeeze of lemon juice for brightness - Cream cheese for a creamier filling These optional ingredients can elevate your dish. Add herbs for freshness or spice for a kick. - Large skillet for sautéing - Mixing bowl for combining ingredients - Rolling pin for puff pastry - Baking sheet lined with parchment paper - Pastry brush for egg wash Having the right tools helps make cooking easier. A large skillet ensures even cooking, while a rolling pin helps you shape the pastry just right. For a delightful dish, gather these tools before you start cooking. Don't forget to check the Full Recipe for a detailed guide! Start by heating olive oil in a large skillet over medium heat. Add the finely chopped onion and cook for about 3-4 minutes until it turns translucent. Then, add minced garlic and sauté for one more minute. Next, toss in the roughly chopped spinach. Cook it until it wilts, which takes about 2-3 minutes. Season the mix with salt, pepper, and dried oregano. Remove the skillet from heat and let it cool for a bit. Once cool, mix the spinach with crumbled feta cheese in a bowl. This filling will be tasty and rich. Roll out your thawed puff pastry on a lightly floured surface. Aim for a thickness of about 1/8 inch. Cut the pastry into squares or rectangles that are around 4x4 inches. This size will be perfect for holding the filling without spilling. Make sure to keep the edges neat for easy folding later. Now it’s time to fill the pastries. Place a generous spoonful of your spinach and feta mix in the center of each pastry square. Fold the corners over the filling to create triangles or rectangles. Be sure to press the edges to seal them well. This step is key to keep the filling safe inside while baking. Transfer all your filled pastries to a baking sheet lined with parchment paper. Brush the tops with the beaten egg. This will give them a nice golden color when baked. Optionally, sprinkle sesame seeds on top for extra flavor and crunch. Bake in the preheated oven at 400°F (200°C) for 20-25 minutes. Watch for them to puff up and turn golden brown. Once done, let them cool slightly before serving. Enjoy this delightfully savory treat! For the complete details, refer to the Full Recipe. To keep your puff pastry crisp, you need to dry the filling. After cooking the spinach, let it cool. Squeeze out any extra moisture. This step stops water from making the pastry soggy. Also, don’t overfill the pastries. Less is more. You can swap feta for other cheeses. Try ricotta or goat cheese for a different taste. If you want a stronger flavor, add sun-dried tomatoes or olives. For a little heat, mix in some red pepper flakes. You can use frozen spinach too. Just thaw and drain it well. Always keep puff pastry cold. Warm pastry can lose its puff. Roll it out on a floured surface to avoid sticking. Cut your shapes carefully. Use a sharp knife for clean edges. When sealing, press firmly. This keeps the filling inside while baking. For the full recipe, check out the detailed instructions above. {{image_2}} You can easily make this dish vegetarian-friendly. Swap the feta with ricotta for a creamy twist. Add sun-dried tomatoes for a burst of flavor. You can also toss in some artichoke hearts for extra texture. Another great option is mixing in herbs like dill or basil for a fresh taste. For meat lovers, adding protein makes this dish heartier. Chicken works well, especially when cooked and shredded. You can mix in diced ham or even cooked bacon for a smoky flavor. Just remember to adjust the seasonings to match the added protein. This extra step can turn your savory puff into a meal. While feta is classic, feel free to experiment with cheese. Goat cheese adds a tangy kick that pairs nicely with spinach. Cheddar gives a rich, sharp flavor. For a milder taste, you might try mozzarella. Mixing cheeses can create unique flavors and textures that elevate your dish. For the full recipe, check out the Savory Spinach and Feta Puff Pastry. To store leftover puff pastry, place it in an airtight container. You can also wrap it tightly in plastic wrap. Make sure to keep it in the fridge. This keeps it fresh for about 2 to 3 days. If you notice any moisture, use a paper towel to absorb it. This helps prevent sogginess. When you want to enjoy your leftover pastries, reheat them in the oven. Preheat the oven to 350°F (175°C). Place the pastries on a baking sheet. Heat them for about 10 to 15 minutes. This method helps to restore their crispiness. You can also use an air fryer for quicker reheating. If you have extra pastries, freezing is a great option. Allow them to cool completely first. Then, wrap each pastry in plastic wrap. Place them in a freezer-safe bag or container. You can freeze them for up to 2 months. When ready to eat, thaw them in the fridge overnight. Reheat in the oven for the best texture. For the full recipe, check out the earlier sections. You can prepare the filling a day in advance. Store it in the fridge. When ready, just assemble the pastries. You can also shape them ahead of time. Cover them well and chill before baking. Bake them fresh when you want to serve. Yes, you can use frozen spinach. Just thaw it and drain excess water. Frozen spinach may have a softer texture, but it still tastes great. It saves time and is easy to find. Many sauces go well with these pastries. Try a yogurt sauce with lemon and herbs. A spicy tomato sauce also works well. You could even use a tangy balsamic glaze for a twist. To get a crispy texture, ensure your oven is preheated well. Brush the tops with an egg wash before baking. You can also sprinkle sesame seeds on top for added crunch. Bake until they turn golden brown. Absolutely! Store-bought puff pastry saves time and effort. It often comes ready to use and is easy to work with. Just follow the same steps in the Full Recipe to create delicious bites. In this post, I shared how to make savory spinach and feta puff pastry. You learned about key ingredients, helpful tips, and variations to suit your taste. Remember, avoid soggy pastry by following the right techniques. You can also play with ingredients to create new flavors. Store extras properly to enjoy them later. With these steps, you can impress anyone with your baking skills! Enjoy making and sharing these tasty pastries!

Savory Spinach and Feta Puff Pastry Delightful Bite

Are you ready to treat your taste buds? In this post, I’ll show you how to make these tasty Savory

To make this mousse, you need a few key ingredients: - 2 ripe avocados, pitted and peeled - 1/2 cup unsweetened cocoa powder - 1/4 cup maple syrup (or agave syrup for a lower glycemic option) - 1/4 cup almond milk (or other dairy-free milk) - 1 teaspoon vanilla extract - A pinch of sea salt - Optional: 1/4 cup coconut cream for a creamier texture These ingredients work together to create a rich and velvety dessert. The avocados provide a creamy base without any dairy. Cocoa powder adds that deep chocolate flavor we all love. Toppings can truly elevate your mousse. Here are some great options: - Fresh berries (like raspberries or strawberries) - Shredded coconut - A sprinkle of sea salt These toppings add color, texture, and extra flavor to your mousse. You can mix and match or use what you have at home. You can easily tweak the recipe to fit your needs. Here are some substitutions: - Sweeteners: If you prefer, use honey or agave syrup instead of maple syrup. - Milk Options: You can swap almond milk for coconut milk, soy milk, or oat milk. Each will give a different flavor and texture. - Coconut Cream: If you don’t have coconut cream, you can skip it or use extra almond milk to keep it creamy. These substitutions help you customize the mousse. You can make it sweeter or creamier based on your taste. For the full recipe, check out the details above. Start by choosing two ripe avocados. They should feel soft but not mushy. Cut them in half, remove the pit, and scoop the flesh into a food processor. Make sure to get every bit out. This is the base of your mousse. Blend the avocados until they are smooth. This step is key for a creamy texture. Now, add the unsweetened cocoa powder and a pinch of sea salt to the avocados. Blend this mixture until smooth. Next, pour in the maple syrup, almond milk, and vanilla extract. If you want a richer mousse, add coconut cream here. Blend everything together until it’s fully combined. Make sure to scrape the sides of the processor to catch all the ingredients. Taste the mousse to see if it needs more sweetness. You can add more maple syrup if you like it sweeter. Once your mousse is blended and smooth, spoon it into small bowls or cups. Place the bowls in the refrigerator for at least 30 minutes. Chilling helps the mousse firm up and lets the flavors blend. After chilling, take the mousse out. Top it with fresh berries, shredded coconut, or a sprinkle of sea salt. These toppings add color and flavor. Enjoy your Dairy-Free Chocolate Avocado Mousse with friends or family. For the complete recipe, check out the Full Recipe. To get that rich and smooth mousse, use ripe avocados. They should feel soft but not mushy. When you blend the ingredients, make sure to scrape down the sides of the food processor. This helps mix everything evenly. Optionally, add coconut cream for an even creamier texture. Blend until it is completely smooth. A great mousse has no lumps! Taste your mousse before chilling it. If it’s not sweet enough, add a little more maple syrup. You can also try adding a dash of vanilla or a pinch of sea salt. These small tweaks can really enhance the flavor. Remember, everyone's taste is different. Adjust until it’s just right for you! When serving, use small bowls or cute glasses. This makes a lovely presentation. For toppings, fresh berries add color and flavor. Shredded coconut gives a nice texture. A sprinkle of sea salt can enhance the chocolate flavor too. Chill the mousse well before serving for the best taste. Enjoy your creamy delight! {{image_2}} You can really boost the taste of your mousse. A dash of cinnamon adds warmth. A pinch of cayenne gives it a fun kick. For a sweeter touch, try adding a few drops of almond extract. These small changes can make a big difference. If you want a low-sugar option, use stevia or monk fruit sweetener instead of maple syrup. This keeps the mousse sweet without extra calories. You can also skip the chocolate. Use carob powder for a unique flavor. It’s a tasty twist that’s also dairy-free. Serving styles can change how your mousse feels. For a fun dessert, layer it with fruits in a glass. You can create parfaits with fresh berries. This adds color and nutrition. Another idea is to serve it in mini cups. Top with coconut cream for a fancy touch. Remember, your presentation can make your mousse even more enjoyable. For the full recipe, check out my easy steps to create this rich and creamy delight! To keep your mousse fresh, cover it tightly. Use plastic wrap or a lid. This helps prevent air from making it dry. Store the mousse in the fridge right away after serving. It will stay creamy and delicious. You can keep the mousse in the fridge for up to three days. After that, it may lose its nice texture and flavor. Always check for any changes in smell or appearance before eating. Trust your senses! If you want to save the mousse for later, you can freeze it. Scoop the mousse into an airtight container. Leave some space at the top, as it will expand when frozen. The mousse can last for up to two months in the freezer. When you want to eat it, thaw it overnight in the fridge. Give it a good stir before serving. This will help restore its creamy texture. Want to learn how to make this tasty dessert? Check out the Full Recipe! To ripen an avocado fast, place it in a brown paper bag. This traps the ethylene gas, speeding up ripening. You can add an apple or banana to the bag for even faster results. Check the bag daily. Yes, you can use various non-dairy milks. Almond milk works great, but you can also try oat, soy, or coconut milk. Each type will add its unique touch to the mousse. Choose one that fits your taste and diet. A ripe avocado feels slightly soft when you gently squeeze it. Look for dark green or black skin. If it is too firm, let it sit for a few days. Avoid avocados with large dark spots, as they may be overripe. For the full recipe, visit the section above. This blog post covered how to make a delicious dairy-free chocolate avocado mousse. We explored key ingredients, step-by-step instructions, and helpful tips for creamy texture. You learned about tasty variations and storage methods to keep your mousse fresh. Remember, with simple swaps, you can make this dessert fit your diet. Try different toppings and flavors to make it your own. Enjoy your mousse, and share it with friends for smiles all around!

Dairy-Free Chocolate Avocado Mousse Rich and Creamy Delight

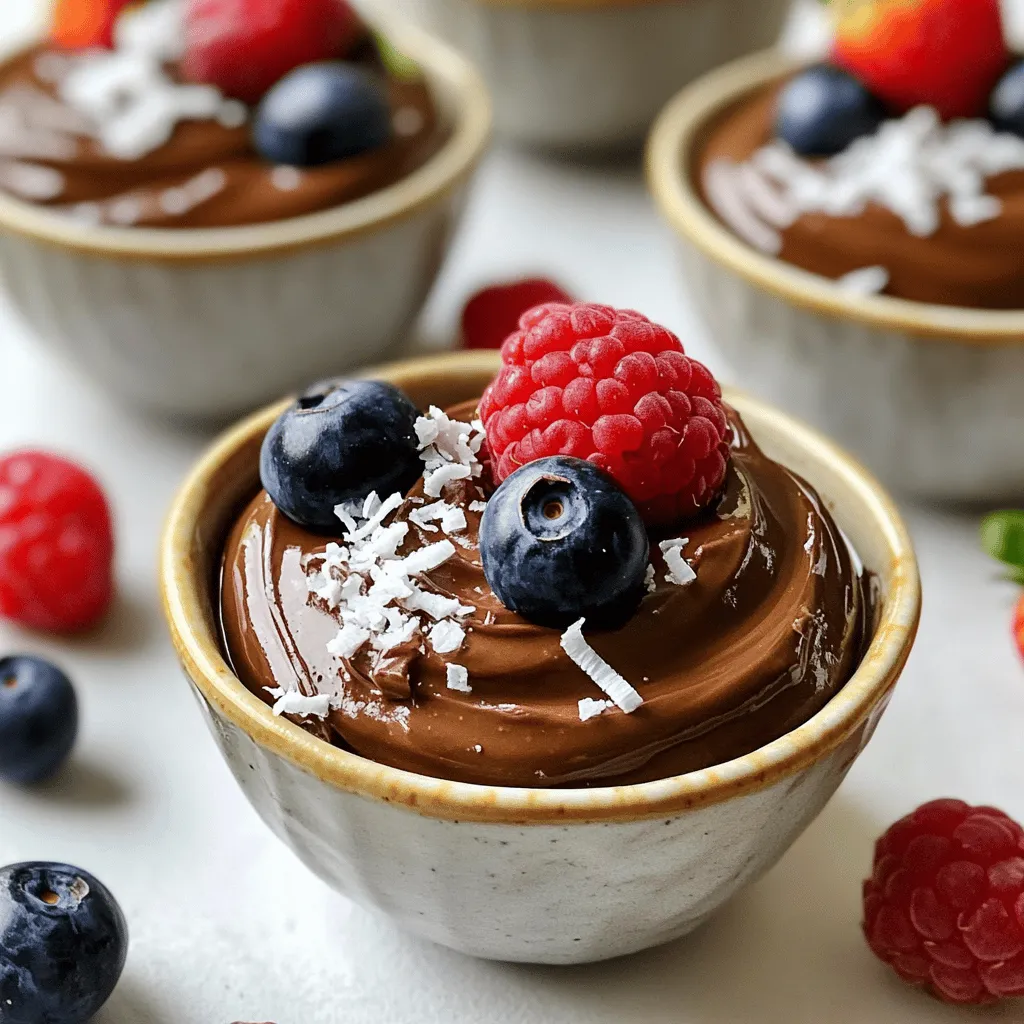
If you love rich, creamy desserts but need a dairy-free option, you’re in the right spot! This Dairy-Free Chocolate Avocado

To make One-Pot Creamy Mushroom Pasta, you'll need the following: - 12 oz pasta (fettuccine or penne works great) - 2 tablespoons olive oil - 1 small onion, finely chopped - 3 cloves garlic, minced - 16 oz mushrooms (cremini or button), sliced - 2 cups vegetable broth - 1 cup heavy cream (or coconut cream for a dairy-free option) - 1 teaspoon dried thyme - 1 teaspoon dried oregano - Salt and pepper to taste - ½ cup grated Parmesan cheese (optional) - Fresh parsley, chopped (for garnish) If you have dietary needs, you can make easy swaps. Use gluten-free pasta for a gluten-free meal. For dairy-free, substitute heavy cream with coconut cream. If you want a lighter option, use a low-fat cream. You can also skip the cheese or use a vegan alternative. Make sure to check labels for allergens. I love using fettuccine or penne for this dish. They hold the sauce well and mix nicely with mushrooms. Other great options are bowtie or rotini. These shapes capture every bit of the creamy sauce. Choose any pasta you enjoy, but keep cooking times in mind to ensure they are al dente. Before you start cooking, gather your ingredients. You’ll need pasta, olive oil, onion, garlic, mushrooms, vegetable broth, and cream. Having everything ready makes the process easier and faster. This dish comes together in just 30 minutes. 1. Heat the oil: In a large pot, heat the olive oil on medium heat. 2. Sauté the onion: Add the chopped onion. Cook for 3-4 minutes until it’s soft and clear. 3. Add garlic and mushrooms: Stir in the minced garlic and sliced mushrooms. Cook for 5-7 minutes. The mushrooms should be soft and juicy. 4. Combine all ingredients: Add the pasta, vegetable broth, cream, thyme, oregano, salt, and pepper. Stir well. Make sure the pasta is fully covered in liquid. 5. Cook the mixture: Bring it to a gentle boil. Then, lower the heat, cover, and let it simmer for 12-15 minutes. Stir it occasionally. The pasta should be al dente, and the sauce creamy. 6. Add cheese: If you want, stir in the grated Parmesan cheese until it melts. Taste and adjust the seasoning with salt and pepper. 7. Let it thicken: Remove the pot from heat. Let it sit for a couple of minutes to thicken if you like. 8. Garnish and serve: Sprinkle chopped parsley on top before serving. To make your sauce truly creamy, use heavy cream. If you want a lighter option, coconut cream works well, too. Stir the sauce gently to keep it smooth. If it seems too thick, add a splash of broth to reach your desired consistency. Enjoy the rich flavors of your One-Pot Creamy Mushroom Pasta! For the complete recipe, refer to the Full Recipe section. Cooking pasta in one pot is easy and fun. Start by choosing the right pot. Use a large pot or Dutch oven. This gives the pasta enough room to cook well. Always add enough water or broth. This helps the pasta cook evenly. Make sure the liquid covers the pasta. Stir it often to prevent sticking. Herbs and spices can make your dish shine. I love using dried thyme and oregano. They add warmth and depth to the pasta. You can also add fresh herbs. Chopped parsley gives a fresh taste. For a twist, try red pepper flakes. They add a nice kick! There are some easy mistakes to avoid. First, don’t skip the sautéing step. Cooking the onion, garlic, and mushrooms first adds flavor. Second, don't overcook the pasta. It should be al dente, firm but not hard. Lastly, be careful with salt. Taste your dish before adding more. For more details on making this dish, check the Full Recipe. {{image_2}} You can easily add proteins to make your One-Pot Creamy Mushroom Pasta heartier. Chicken works well. Just cut it into small pieces and cook it with the onions until golden. Shrimp is another great option. Add it after sautéing the mushrooms, and cook until they turn pink. This adds flavor and makes your dish more filling. For a vegetarian version, you can skip the meat and use more mushrooms. They add a nice, savory flavor. To make it vegan, replace heavy cream with coconut cream. Use nutritional yeast instead of Parmesan for a cheesy taste. You still get a rich and creamy dish without any animal products. Adding seasonal vegetables can boost flavor and nutrition. In spring, consider adding peas or asparagus. In summer, zucchini or cherry tomatoes bring freshness. In fall, try kale or spinach. Just toss them in with the pasta during the last few minutes of cooking. This way, you keep the veggies crisp and vibrant. Enjoy experimenting with different flavors! For the complete recipe, check the Full Recipe section. To store leftover creamy mushroom pasta, first let it cool. Then, place it in an airtight container. Make sure to seal it well. You can keep it in the fridge for up to three days. If you are storing it longer, consider freezing it. When reheating, add a splash of water or broth. This helps to revive the creamy sauce. You can use the microwave or a stovetop. If using the microwave, heat in short bursts. Stir every minute to ensure even heating. On the stovetop, use low heat and stir frequently. To freeze the pasta, pack it into freezer-safe containers. Leave some space at the top for expansion. It can last in the freezer for up to three months. When ready to eat, thaw it overnight in the fridge. Reheat as mentioned above for the best taste. For a quick meal, you can also reheat directly from frozen, but it will take longer. Enjoy your creamy mushroom pasta anytime! It takes about 30 minutes to cook One-Pot Creamy Mushroom Pasta. You will spend 10 minutes prepping the ingredients. The cooking time is around 20 minutes. This quick recipe is perfect for weeknight dinners. Yes, you can make this recipe gluten-free. Use gluten-free pasta instead of regular pasta. Many brands offer great options that cook well. Just follow the package instructions for cooking time. You can use coconut cream for a dairy-free version. It gives a rich texture and flavor. Another option is to blend soaked cashews with water. This creates a creamy sauce that tastes great. Both methods keep the dish delicious and creamy. In this post, we covered everything about making One-Pot Creamy Mushroom Pasta. We looked at the best ingredients, cooking steps, and tips for a creamy sauce. We shared how to make it your own with different proteins and veggies. Lastly, we provided storage advice to keep your pasta fresh. With these tips, you can create a tasty meal with ease. Enjoy your cooking!

One-Pot Creamy Mushroom Pasta Rich and Easy Recipe

Craving a warm, tasty meal that’s easy to make? You’re in the right place! This One-Pot Creamy Mushroom Pasta recipe

To make Zucchini Noodles with Pesto, gather the following fresh ingredients: - 3 medium zucchinis, spiralized - 1 cup fresh basil leaves - 1/4 cup toasted pine nuts - 1/4 cup grated Parmesan cheese - 2 garlic cloves - 1/4 cup olive oil - Salt and pepper to taste - 1 cup cherry tomatoes, halved (for garnish) - Optional: Red pepper flakes for a kick These ingredients bring together a healthy and flavorful dish. The zucchini serves as a great pasta alternative. The pesto adds a fresh, vibrant flavor. Each element works in harmony to create a light meal that feels indulgent. You can find the full recipe included above for all the steps to create this delightful dish. How do you spiralize zucchinis? First, wash your zucchinis well. Cut off the ends. Place one zucchini in the spiralizer and twist it. The machine will turn the zucchini into long, noodle-like strands. Repeat this with all zucchinis. What are tips for choosing the right zucchinis? Look for firm zucchinis with smooth skin. They should feel heavy for their size. Avoid zucchinis with soft spots or wrinkles. Fresh zucchinis give the best flavor and texture for your dish. What ingredients do you need for homemade pesto? You will need fresh basil leaves, toasted pine nuts, grated Parmesan cheese, garlic cloves, and olive oil. How do you make smooth pesto in a food processor? Start by adding basil, pine nuts, Parmesan, and garlic to the food processor. Pulse until finely chopped. Then, with the processor running, slowly drizzle in olive oil. Continue until the mixture is creamy. Taste and adjust seasoning with salt and pepper. How should you sauté zucchini noodles? Heat a large skillet over medium heat. Add the zucchini noodles and sauté gently for about 2-3 minutes. Stir often, but do not overcook. The noodles should remain slightly crunchy. How do you mix pesto with zoodles without overcooking? After sautéing, remove the skillet from heat. Add the prepared pesto to the zucchini noodles. Toss everything together gently. This keeps the zoodles fresh and vibrant. You can find the full recipe for this delicious dish in the earlier sections. To make your zucchini noodles with pesto really pop, consider these seasoning tips: - Add a pinch of salt while cooking to boost flavor. - A squeeze of fresh lemon juice brightens the dish. - Try adding garlic powder or onion powder for depth. - Fresh herbs like parsley or thyme can enhance the taste. When it comes to pesto, fresh is best. Homemade pesto from the recipe tastes amazing. Store-bought pesto is fine for a quick meal but may lack freshness. If using store-bought, look for ones with few ingredients for better flavor. Sautéing zucchini noodles properly makes all the difference. Here are my best tips: - Heat your skillet before adding zoodles. This helps them cook quickly. - Cook them for just 2-3 minutes. You want them tender but still crunchy. - Avoid overcrowding the skillet. Cook in batches if needed. To prevent soggy zoodles, be mindful of moisture. After spiralizing, let the noodles sit. This allows excess water to drain. You can also pat them dry with a paper towel before cooking. Pair your zucchini noodles with protein for a full meal. Grilled chicken or shrimp works well. If you want to keep it light, serve with a side salad. For garnishing, consider: - Halved cherry tomatoes for a fresh burst. - Toasted pine nuts for a crunchy texture. - A sprinkle of grated Parmesan to add richness. These touches not only enhance flavor but also make your plate look appealing. Enjoy your meal! {{image_2}} If you seek gluten-free choices, zucchini noodles are a great fit. They replace traditional pasta and keep your meal light. You can also use gluten-free pasta if you prefer. For added protein, consider grilled chicken or shrimp. Both pair well with the zesty pesto and add a satisfying bite. To make this dish vegan, you can create a plant-based pesto. Replace Parmesan cheese with nuts like cashews or nutritional yeast. This keeps the rich flavor while making it dairy-free. Just blend fresh basil, garlic, and olive oil with your chosen substitute for a creamy texture. Feel free to get creative with seasonal veggies. Fresh bell peppers, spinach, or peas can add color and taste. You can also toss in roasted cherry tomatoes or sautéed mushrooms for a twist. These additions make the dish suitable for any occasion, from casual dinners to festive gatherings. To keep your zucchini noodles fresh, store them in an airtight container. Place a paper towel inside to absorb moisture. This helps maintain their crispness. For the pesto, transfer it to a clean jar and cover it with a thin layer of olive oil. This layer prevents air from reaching the pesto and keeps it vibrant and green longer. When reheating zucchini noodles, use a skillet over low heat. This method warms them without making them mushy. Stir gently for a few minutes until heated through. Avoid the microwave, as it can release too much water, making the noodles soggy. For pesto, add a little olive oil while reheating to keep its smooth texture. You can prepare components ahead of time for easy meals. Spiralize the zucchini and store it in the fridge. Make the pesto and keep it in the fridge too. When ready to eat, heat the zoodles briefly and mix in the pesto. This way, you enjoy a quick, delicious meal on busy weeknights. For the full recipe, refer back to the earlier sections. You can make zucchini noodles using a peeler or a knife. A vegetable peeler can create long, thin strips that look like noodles. A sharp knife can cut the zucchini into thin slices, then stack and slice them again into strips. Both methods give you a nice texture, though they may not be as uniform as spiralized noodles. The key is to slice thinly, so they cook evenly and retain their crunch. Yes, you can use frozen zucchini noodles. They are convenient and save time. However, frozen noodles may lose some texture and flavor. They tend to be softer after cooking compared to fresh zoodles. If you choose frozen, thaw them first and pat them dry to remove excess moisture. This helps prevent a watery dish. Fresh is always best, but frozen works well in a pinch. Zucchini noodles last about 2 to 3 days in the fridge. Store them in an airtight container to keep them fresh. Check for signs of spoilage, like a slimy texture or a bad smell. If they look soggy or brown, it’s best to toss them. For longer storage, consider freezing them. You can also use the Full Recipe to make a batch and enjoy them fresh! In this post, we explored a tasty zucchini noodle dish. We covered key ingredients, step-by-step instructions, and helpful tips for flavor and storage. You can easily adjust the recipe for dietary needs, like vegan or gluten-free. Whether you're a novice or an expert, these simple ideas will elevate your meal. Enjoy your cooking process and share your creations! You now have all you need for a delicious and healthy dish.

Zucchini Noodles with Pesto Healthy and Flavorful Dish

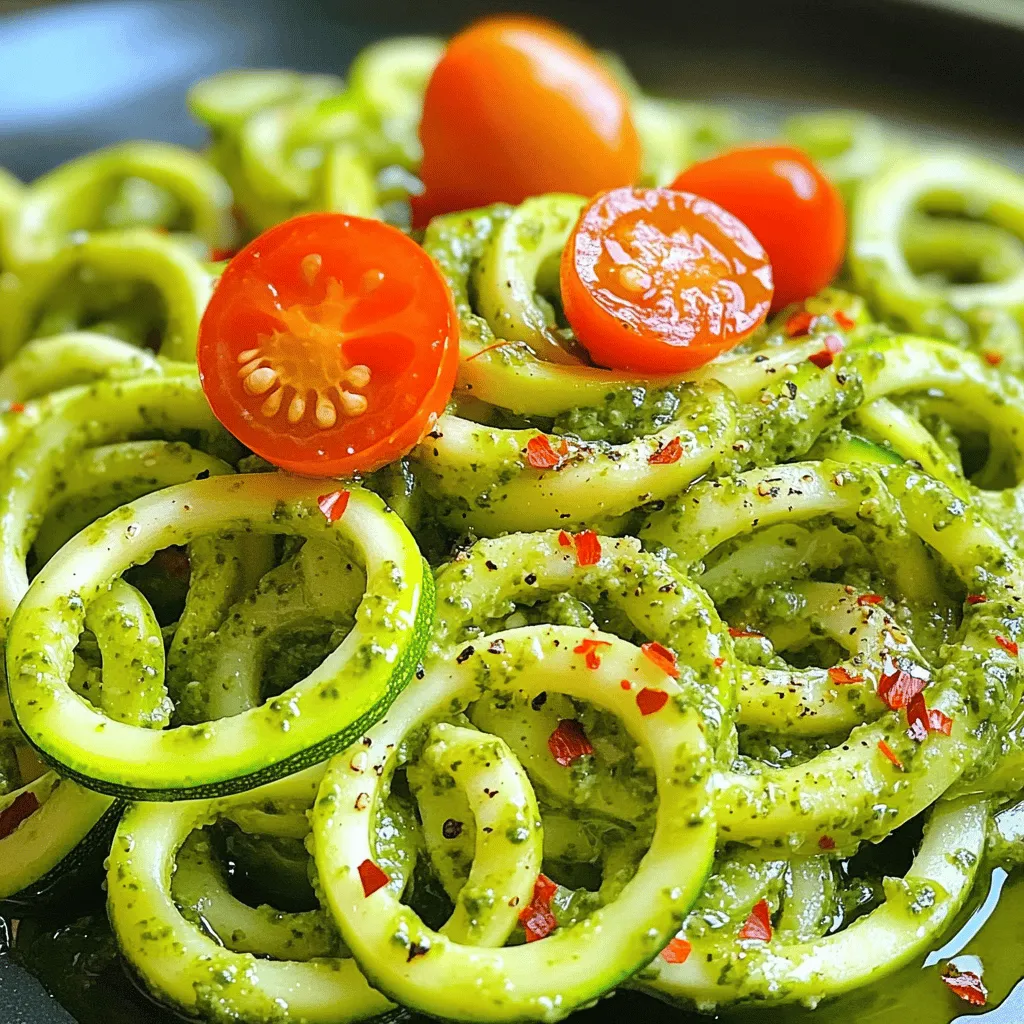
Looking for a dish that’s both healthy and bursting with flavor? Try zucchini noodles with pesto! This light and vibrant

To make Peanut Butter Chocolate Chip Blondies, gather these simple ingredients: - 1 cup creamy peanut butter - 1 cup brown sugar, packed - 1/2 cup granulated sugar - 2 large eggs - 1 teaspoon vanilla extract - 1 cup all-purpose flour - 1/2 teaspoon baking powder - 1/4 teaspoon salt - 1 cup semi-sweet chocolate chips - 1/2 cup chopped peanuts (optional) Each ingredient plays a key role. The creamy peanut butter gives the blondies their rich texture. The brown sugar adds depth and moisture, while granulated sugar balances the sweetness. Eggs help bind everything together. Vanilla extract enhances the flavor, making each bite delicious. Flour provides the structure. The baking powder makes them rise. Salt brings out the sweetness, making the flavors pop. Chocolate chips add joy and richness. If you like a crunch, add chopped peanuts for extra fun. This list of ingredients is all you need for a sweet treat. For the complete process, check out the Full Recipe. 1. Preheat the oven to 350°F (175°C). 2. Grease a 9x9 inch baking pan or line it with parchment paper. 1. In a large mixing bowl, combine the creamy peanut butter, brown sugar, and granulated sugar. Mix until smooth and creamy. 2. Add the eggs, one at a time, mixing well after each. Then, stir in the vanilla extract. 3. In another bowl, whisk together the flour, baking powder, and salt. Gradually fold this into the peanut butter mix until just combined. 1. Gently fold in the chocolate chips and chopped peanuts if you want extra crunch. 2. Pour the batter into the prepared baking pan and spread it evenly. 3. Bake in the preheated oven for 25-30 minutes. The edges should be golden brown. A toothpick inserted in the center should come out mostly clean. 4. Let the blondies cool in the pan for about 10 minutes. After that, transfer them to a wire rack to cool completely. 5. Once cooled, cut them into squares and enjoy! For the full recipe, check the section above. - Ensure all ingredients are at room temperature. This helps them mix well. - Use a toothpick to check doneness. Insert it into the center. If it comes out mostly clean, your blondies are ready. - Serve with a drizzle of melted chocolate. It adds a rich touch. - Dust with powdered sugar for extra flair. This makes the blondies look fancy. - Overmixing the batter can make the blondies tough. Mix just until combined. - Not cooling completely before cutting can lead to messy squares. Let them cool first. For more details, check the Full Recipe. {{image_2}} You can switch up the flavor of your blondies easily. Try using crunchy peanut butter for a different texture. It adds a nice crunch in every bite. You can also experiment with different types of chocolate. Dark, milk, or white chocolate can change the taste completely. Each type brings its unique sweetness. Want to make your blondies even more special? Incorporate dried fruits like raisins or cranberries. They add a chewy texture and extra sweetness. You can also consider adding a swirl of caramel for added flavor. The caramel will melt into the blondies, making them even richer. Are you looking for healthier options? You can make these blondies gluten-free by using almond flour instead of all-purpose flour. This change keeps them delicious and suitable for those with gluten sensitivities. You can also substitute sugar with a natural sweetener like honey or maple syrup. This swap can make your blondies a bit healthier while still tasting great. For the full recipe, check the instructions above! Store your peanut butter chocolate chip blondies in an airtight container at room temperature. They will stay fresh for up to 3 days. This keeps them soft and delicious. For longer storage, you can refrigerate the blondies. They will last up to a week this way. If you need to keep them even longer, freeze them. Wrap the blondies tightly in plastic wrap and place them in a freezer bag. They will stay good for up to 3 months. This makes it easy to enjoy them later! When you want to enjoy your blondies again, warm them in the microwave for a few seconds. This makes the chocolate gooey and the flavors pop. Just be careful not to overheat them! Yes, these blondies can be made in advance and stored as instructed. Just let them cool completely before you store them. You can wrap them in plastic wrap or put them in an airtight container. They stay fresh for a few days, but they taste best within the first few days. A toothpick should come out with a few moist crumbs for the best texture. If the toothpick is clean, you might overbake them. The edges should look golden brown, while the center stays soft. Keep an eye on them during the last few minutes. Yes, almond butter or cashew butter can be used for a different flavor. Each nut butter gives a unique taste. Almond butter has a light, nutty flavor, while cashew butter is creamier. They work well in this recipe. Use a sharp knife, and run it under hot water for cleaner cuts. This trick helps prevent sticking and gives you nice, even pieces. Wipe the knife with a towel between cuts for the best results. This blog post shared a great recipe for Peanut Butter Chocolate Chip Blondies. We covered all the essential ingredients, step-by-step instructions, helpful tips, tasty variations, and storage options. Each part helps you bake these delicious treats perfectly. Remember, baking can be fun and rewarding! Whether you stick with the classic or try new flavors, these blondies will impress. Enjoy every bite, share with friends, and make sweet memories!

Peanut Butter Chocolate Chip Blondies Easy Dessert Recipe

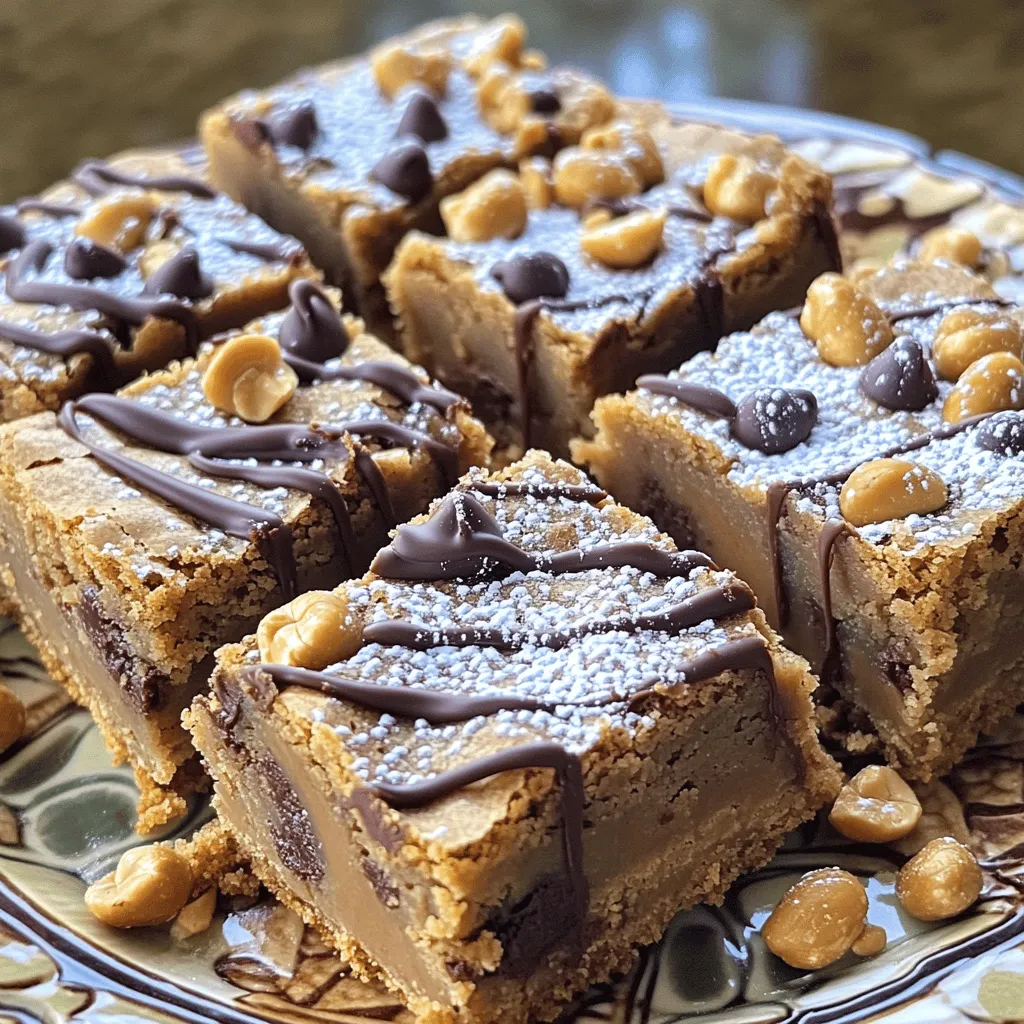
Craving a sweet treat that’s quick and simple? Look no further! These Peanut Butter Chocolate Chip Blondies are the answer.

Older posts
Newer posts
← Previous Page1 … Page41 Page42 Page43 … Page60 Next →

dsad

© 2025 Cooking Wells • Built with GeneratePress

Our Policies

  • Copyright Policy
  • Cookie Policy
  • GDPR Policy
  • Privacy Policy
  • Disclaimer
  • Terms Of Use

More Information

  • Home
  • About
  • Contact
  • Appetizers
  • Dessert
  • Dinner
  • Drinks
©2025, Cooking Wells About Back To Top