Skip to content
DisclaimerTerms Of UseGDPR PolicyCookie Policy

Cooking Wells

  • Home
  • Drinks
  • Appetizers
  • Dinner
  • Dessert
  • About
  • Contact
  • Privacy Policy
DisclaimerTerms Of UseGDPR PolicyCookie Policy

Mia

To make this fresh and tasty dip, you will need: - 1 large ripe mango, diced - 2 ripe avocados, diced - 1 small red onion, finely chopped - 1 red bell pepper, finely chopped - 1 jalapeño pepper, deseeded and minced - 1/4 cup fresh cilantro, chopped - Juice of 2 limes - Salt and pepper to taste - 1 tablespoon olive oil These ingredients blend together for a colorful and vibrant salsa. The mango gives a sweet touch, while the jalapeño adds a bit of kick. If you can’t find one of the key ingredients, here are some swaps: - Mango: Use peach or pineapple for a different fruit flavor. - Avocado: Try using diced cucumber for a lighter option. - Red onion: Yellow onion or green onion works well, too. - Jalapeño: Use a bell pepper for no heat or a serrano for more spice. - Cilantro: If you dislike cilantro, parsley is a good substitute. These substitutions keep the salsa fresh while allowing you to adapt to what you have. When picking mangoes, look for fruit that gives slightly when pressed. They should smell sweet and fragrant. Choose avocados that are dark green and yield to gentle pressure. Avoid ones with dark spots or wrinkles. For the best flavor, use ripe fruit in your salsa. Always taste your fruits first; they set the tone for the whole dish. If you want the full recipe, check out the Mango Avocado Salsa Delight 🥭🥑. To make mango avocado salsa, start with fresh ingredients. Begin by dicing one large ripe mango. Make sure it is sweet and juicy. Next, take two ripe avocados and dice them. Use a sharp knife to slice carefully. In a large mixing bowl, combine the diced mango and avocado. Then, finely chop one small red onion and add it to the bowl. For a touch of color, finely chop one red bell pepper. Next, take one jalapeño pepper. Remove the seeds and mince it. Add this to the mix, adjusting for your spice level. Now, chop a quarter cup of fresh cilantro. Toss it in for a burst of flavor. Squeeze the juice from two limes over the mixture. This adds brightness and balances the sweetness. Drizzle in one tablespoon of olive oil. Gently toss everything together without mashing the avocados. Season with salt and pepper to taste. Let the salsa sit for about ten minutes. This helps the flavors mix well. For the full recipe, refer to the previous section. Dicing fruits and vegetables can be easy with the right method. First, always use a sharp knife. A dull knife can slip and cause accidents. Start by cutting off the ends of the fruit. This creates a flat surface for safety. When dicing mango, slice around the pit. Use your knife to score the flesh in a grid pattern. Then, scoop out the pieces with a spoon. For avocados, cut in half and remove the pit. Use a spoon to scoop out the flesh. For onions and bell peppers, slice them into strips first. Then, chop across the strips to create small pieces. Keep the pieces uniform for even mixing and cooking. To enhance the flavor of your salsa, consider adding extra ingredients. A dash of cumin can give it a warm, earthy taste. For a zesty kick, add a splash of apple cider vinegar. If you like a fresh twist, try adding diced pineapple or mango. This adds sweetness and pairs well with the avocado. For a more savory bite, consider adding diced tomatoes or corn. Experiment with fresh herbs too. Chopped mint or basil can bring unique flavors. Remember to taste as you go. Adjust the lime juice, salt, and pepper as needed. This will ensure your mango avocado salsa is just right. When you serve mango avocado salsa, presentation matters. Use a bright bowl to show off the colors. Garnish with more cilantro on top for a fresh look. Serve it with crispy tortilla chips. You can also top grilled chicken or fish for added flavor. Keep it chilled before serving for the best taste. To boost the flavor of your salsa, try adding more herbs. Fresh mint adds a nice twist. For extra crunch, mix in diced cucumber. A dash of honey can enhance the sweetness of the mango. If you love spice, add more jalapeño or even a pinch of cayenne pepper. These simple tweaks can make your salsa stand out. Avoid over-mashing the avocados. You want them to stay chunky for texture. Don’t skip the lime juice; it brightens the flavors. If you add too much salt, it can overpower the dish. Always taste as you go. Lastly, let your salsa sit for a bit. This allows the flavors to blend nicely. For the full recipe, check out the Mango Avocado Salsa Delight 🥭🥑. {{image_2}} You can add different fruits to your salsa for a twist. Pineapple and papaya work great. Both fruits bring sweetness and a tropical vibe. Try mango with diced pineapple for a fruity explosion. You could also mix in kiwi for a tangy touch. Each fruit adds unique flavors that keep your salsa fresh and exciting. Adjust the heat in your salsa for your taste. If you like it mild, skip the jalapeño. Instead, use a sweet bell pepper for a crunch. If you want more heat, add a serrano pepper. You can also try a sprinkle of cayenne pepper for an extra kick. Experimenting with heat makes the salsa more personal and fun. For a creamy twist, mash one avocado and mix it in. This gives the salsa a smooth texture. You can also add Greek yogurt or sour cream for creaminess. These additions make the salsa rich and satisfying. Use this creamy version as a dip or spread for wraps and sandwiches. Enjoy your Mango Avocado Salsa Delight! For the complete recipe, check the Full Recipe. To keep your leftover salsa fresh, put it in an airtight container. This helps keep air out and stops it from going bad. Store the container in the fridge. Leftover salsa will stay good for 2 to 3 days. Make sure to check it before using. You can freeze salsa for longer storage. Use a freezer-safe container or a plastic bag. Just leave some space for expansion. Salsa can last up to three months in the freezer. When you're ready to use it, defrost it in the fridge overnight. Look for signs of spoilage in your salsa. If you see mold, throw it away. If it smells off or looks watery, it's best not to eat it. To keep your salsa fresh, eat it within a few days and store it well. Always taste a little before using. For more details, check out the Full Recipe. Yes, you can make Mango Avocado Salsa ahead of time. However, the avocados may brown. To slow this down, add lime juice to the mix. You can prepare the salsa a few hours before serving. Just keep it in the fridge. Mix it gently before serving to freshen it up. Mango Avocado Salsa goes great with many dishes. Here are some ideas: - Grilled chicken or fish - Tacos or burritos - Tortilla chips - Salads - Rice bowls This salsa adds a fresh taste to any meal. It brightens up simple dishes and makes them special. Yes, Mango Avocado Salsa is a healthy choice. It is full of nutrients. Mangoes provide vitamins A and C. Avocados offer healthy fats, good for your heart. This salsa is low in calories and full of fiber. You can enjoy it guilt-free as a dip or topping. For the full recipe, check out Mango Avocado Salsa Delight 🥭🥑. In making Mango Avocado Salsa, we covered everything from ingredients to storage. You learned about choosing the best mangoes and avocados, and how to prepare them. I shared tips on serving and avoiding mistakes. The variations allow you to get creative with flavors and heat levels. Lastly, I discussed storage options to keep your salsa fresh. Enjoy this bright salsa with your meals, and feel free to experiment!

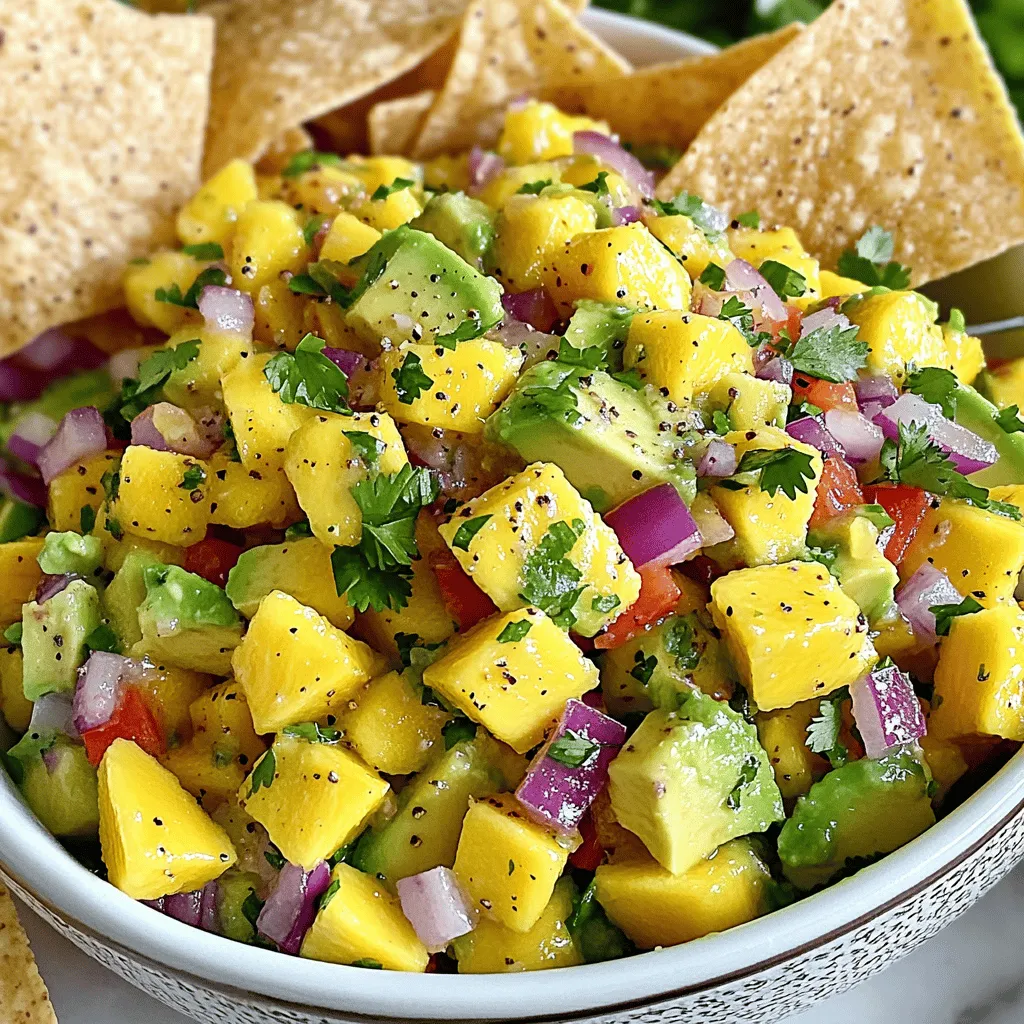
Mango Avocado Salsa Fresh and Tasty Summer Dip

Looking for a refreshing summer dip? Look no further! This Mango Avocado Salsa is the perfect blend of sweet and

- 1 pound shrimp, peeled and deveined - 3 tablespoons olive oil - 4 cloves garlic, minced - 1 teaspoon red pepper flakes (adjust to taste) - 1 teaspoon smoked paprika - Salt and pepper to taste - 8 small corn tortillas - 1 cup red cabbage, shredded - 1 avocado, sliced - Fresh cilantro, chopped (for garnish) - ½ cup sour cream - 1 tablespoon chipotle sauce (optional for extra spice) The main ingredients set the stage for your Spicy Garlic Shrimp Tacos. Shrimp is a great protein that cooks fast. Olive oil adds richness. Garlic brings a bold taste that makes this dish shine. For spices, I love using red pepper flakes. They add heat, which you can adjust based on your taste. Smoked paprika offers a nice smoky flavor that pairs well with shrimp. Salt and pepper enhance all these flavors. Tortillas are the perfect vessel for your toppings. Corn tortillas have a classic taste and texture. The shredded red cabbage adds crunch and color. Sliced avocado brings creaminess, while cilantro adds freshness. Sour cream cools the spice down. Chipotle sauce can give an extra kick if you want more heat. You can find the full recipe above to create this dish. Enjoy the flavorful journey! First, gather your shrimp, olive oil, garlic, red pepper flakes, smoked paprika, lime juice, salt, and pepper. In a bowl, combine the shrimp with 3 tablespoons of olive oil and the seasonings. Be sure to mix well so each shrimp gets coated. Let the shrimp sit for 15 minutes. This time allows the shrimp to absorb all the tasty flavors. Next, heat a skillet over medium-high heat. Once the skillet is hot, add the marinated shrimp. Cook the shrimp for 2-3 minutes on each side. They will turn pink and opaque when done. Remove them from heat and set them aside. While the shrimp cooks, warm your corn tortillas in a separate skillet. Heat them for about 30 seconds on each side until they are warm and slightly crispy. Now, it's time to assemble your tacos! Place a generous scoop of spicy garlic shrimp on each tortilla. Top with shredded red cabbage and slices of avocado. Drizzle some sour cream over the top. If you like extra kick, add a touch of chipotle sauce. Finish with fresh cilantro for a beautiful touch. You can find the complete recipe [here](Full Recipe). To get great shrimp, avoid overcooking. Shrimp cook quickly. When they turn pink and opaque, they are done. If you cook them too long, they can become rubbery. Adjust seasoning levels based on your taste. Do you like spicy? Add more red pepper flakes. Prefer milder? Use less. Serve your tacos on a nice platter. Add lime wedges for a fresh touch. Guests can squeeze lime juice over their tacos. It adds a nice zing! Garnish with fresh cilantro for color and taste. A beautiful plate makes food more appealing. You can change the spice level to fit your group. For less heat, cut back on red pepper flakes. You can also leave out the chipotle sauce. If you want it spicier, add more red pepper flakes or a dash of hot sauce. Remember, balance is key. Enjoy this Spicy Garlic Shrimp Tacos Full Recipe and make it your own! {{image_2}} You can swap shrimp for other proteins to suit your taste. Chicken works great for those who prefer poultry. Simply cut it into bite-sized pieces and follow the same cooking steps. Tofu is a fantastic plant-based option. Press the tofu to remove water, then cube it. Sauté it just like the shrimp. For seafood lovers, consider scallops or cod. Both offer a unique twist to the dish. Change up your toppings for new flavors and textures. Instead of red cabbage, try crisp lettuce or colorful bell peppers. They add a nice crunch. You can also use diced tomatoes or corn for sweetness. For sauces, experiment with a zesty salsa or a creamy avocado sauce. Each choice brings a different taste to your tacos. Tortillas are key to any taco. While corn tortillas are classic, flour tortillas can be softer and chewier. They wrap around fillings easily. If you're looking for a low-carb meal, consider using lettuce wraps. They keep the tacos light and fresh. Each tortilla option can change the whole feel of your dish. To keep your spicy garlic shrimp fresh, store shrimp and tacos separately. Place cooked shrimp in an airtight container. Use a container that seals well to keep moisture out. For the tortillas, wrap them in foil or place them in a zip-top bag. This keeps them from drying out. Store both in the fridge for up to three days. You can freeze shrimp tacos, but it's best to freeze shrimp and toppings separately. Freeze cooked shrimp in a single layer on a baking sheet. Once frozen, transfer them to a freezer bag. For best results, use the shrimp within three months. When you're ready to eat, thaw shrimp in the fridge overnight. To reheat shrimp, use a skillet over medium heat. This helps keep the texture nice. Heat for about two to three minutes, just until warm. For tortillas, warm them in a dry skillet for about 30 seconds on each side. This brings back their crispness. Enjoy your delicious tacos as if they were fresh! I love pairing these tacos with a few tasty sides. Here are my favorites: - Mexican street corn: Sweet corn topped with cheese and lime. - Black beans: Simple, flavorful, and full of protein. - Fresh guacamole: Creamy avocado dip adds a nice touch. - Cilantro lime rice: A refreshing side that complements the shrimp. - Chips and salsa: Crunchy and zesty, perfect for snacking. Yes, you can prep some parts in advance. Here are my tips: - Marinate shrimp: You can marinate the shrimp up to 2 hours ahead. - Prep toppings: Chop cabbage and slice avocado before serving. - Warm tortillas: Heat them right before serving for the best taste. This way, you save time and still enjoy fresh tacos! Making these tacos gluten-free is easy! Here’s how: - Tortillas: Use corn tortillas, as they are naturally gluten-free. - Sauces: Check that the sour cream and chipotle sauce are gluten-free. - Cross-contamination: Always use clean utensils and surfaces. This way, everyone can enjoy these spicy garlic shrimp tacos! For the full recipe, check the section above. Enjoy cooking! You now have a simple recipe for Spicy Garlic Shrimp Tacos. We discussed key ingredients and their roles. I shared tips for cooking shrimp just right and suggested ways to customize your tacos. Remember, you can use different proteins and toppings to fit your taste. Store leftovers properly and enjoy these tacos any time. This dish is easy to make and sure to please. Grab your ingredients and start cooking today!

Spicy Garlic Shrimp Tacos Flavorful and Easy Recipe

Ready to spice up your taco night? My Spicy Garlic Shrimp Tacos are packed with flavor and super easy to

- 2 large apples (Granny Smith or Honeycrisp), sliced - 1 cup caramel sauce (store-bought or homemade) - 1/2 cup cream cheese, softened - 1/4 cup brown sugar - 1 teaspoon vanilla extract - 1/2 teaspoon ground cinnamon - 1/4 cup chopped nuts (peanuts, pecans, or walnuts) - Optional toppings: mini chocolate chips, sprinkles, or extra caramel drizzle You can switch the apples for any type you like. Try Fuji or Gala for a sweeter taste. If you want a dairy-free dip, use coconut cream instead of cream cheese. Maple syrup can replace brown sugar for a new twist. You can also use any nut butter if you prefer a nutty flavor. When choosing apples, look for firm ones with no soft spots. Granny Smith apples provide a nice tartness. Honeycrisp apples are sweeter and great for dipping. Always pick apples that smell fresh, as this shows they are ripe. If you want a mix of flavors, grab one of each! To make caramel apple dip, gather your ingredients first. You will need two large apples, caramel sauce, cream cheese, brown sugar, vanilla extract, ground cinnamon, and chopped nuts. Slice the apples into wedges for easy dipping. This dip is quick to prepare, taking just ten minutes. Start by mixing the cream cheese, brown sugar, and vanilla in a bowl. Use an electric mixer on medium speed. Mix until smooth and creamy. Next, slowly add the caramel sauce. Keep mixing until everything blends well. Stir in cinnamon and fold in chopped nuts if you want crunch. This adds a nice texture to the dip. Transfer the dip into a serving bowl. Smooth the top for a nice look. Drizzle more caramel sauce on top for decoration. Add toppings like chocolate chips or sprinkles if you like. Arrange apple slices around the dip for dipping. You can also use pretzel sticks or graham crackers. This makes it fun for everyone! For the complete recipe, refer to the Full Recipe section. To get the best dip, mix cream cheese until smooth. The cream cheese needs to be soft. This makes it easy to blend. Add the caramel sauce slowly. Mix well after each addition. If the dip seems too thick, add a tiny bit of milk. This helps it stay creamy. Taste and adjust sweetness if needed. You want a balance of tart and sweet. If you have leftover dip, cover it tightly. Use plastic wrap or a lid. Store it in the fridge. It can last up to three days. When ready to eat again, stir it well. The flavors will meld nicely. If it thickens, add a splash of milk again. This keeps it smooth and tasty. When you serve this dip, presentation matters. Use a nice bowl that stands out. Surround it with apple slices. You can also add pretzel sticks or graham crackers. For a fun twist, let guests add their toppings. Mini chocolate chips or extra caramel drizzle are great options. This way, everyone makes their own perfect bite. Enjoy the smiles when they taste this delightful treat! For the complete recipe, check out the Full Recipe. {{image_2}} You can change the flavor of your caramel apple dip easily. Try adding a little cocoa powder for a chocolatey twist. You can also mix in pumpkin spice for a fall taste. For something fruity, add some crushed strawberries or raspberries. Each change makes the dip unique and fun! If you're looking for a healthier option, swap the cream cheese for Greek yogurt. This keeps it creamy but cuts fat. You can use sugar-free caramel sauce to lower the sugar content. For nut allergies, skip the nuts or use seeds like sunflower seeds instead. These swaps help everyone enjoy the dip. Sliced apples are classic, but you can get creative! Try dipping pretzel sticks for a sweet and salty combo. Graham crackers add a nice crunch, too. For a fun twist, use banana slices or even strawberries. Each dipper brings a new flavor and texture to your caramel apple dip delight. For the full recipe, check out Caramel Apple Dream Dip ! To store caramel apple dip, place it in an airtight container. Make sure the lid fits tightly. This keeps air out and helps the dip stay fresh. You can also cover the dip with plastic wrap. Just press the wrap directly onto the dip's surface. This method helps avoid any crust forming on top. When preserving freshness, keep the dip in the fridge. The cool temperature slows down spoilage. Avoid leaving the dip out for more than two hours. If you have leftovers, always return them to the fridge promptly. If you add toppings, store them separately. This way, they stay crispy and do not make the dip watery. You can keep caramel apple dip for about five days in the fridge. After that, the quality may start to decline. Always check for any off smells or changes in texture before eating. If you notice anything odd, it’s best to toss it out. Enjoy your caramel apple dip while it’s fresh for the best taste! Yes, you can use store-bought caramel sauce. It saves time and tastes great. Many brands offer rich and smooth options. Just pour it right into the dip mix. If you want, you can also make your own caramel sauce. Homemade sauce adds a special touch. You can prepare the dip a day ahead. Just mix all the ingredients and store in the fridge. Cover it tightly with plastic wrap. This keeps it fresh and ready to serve. When you’re ready to serve, just add some fresh toppings. Besides apples, you can use many fruits. Pears are sweet and juicy. Bananas add a creamy texture. Strawberries bring a bright flavor. You can even try grapes or pineapple chunks. Each fruit adds a unique taste to your dip. The options are endless! This blog covered how to make a tasty caramel apple dip. We started with the essential ingredients and their substitutions. Then, I shared step-by-step instructions and tips for perfecting your dip. You can impress guests with fun variations and clever serving ideas. Remember, this dip is easy! It’s perfect for parties and gatherings. With a little care, you can enjoy it fresh for days. Dive into this treat and enjoy the sweet flavors!

Caramel Apple Dip Delightful and Simple Treat

Are you craving a sweet snack? Look no further than this Caramel Apple Dip! It’s easy to make and perfect

To make a rich and creamy chocolate avocado mousse, you need just a few key ingredients: - 2 ripe avocados, peeled and pitted - 1/2 cup unsweetened cocoa powder - 1/4 cup pure maple syrup or honey - 1/4 cup almond milk (or any milk of choice) - 1 teaspoon vanilla extract - A pinch of sea salt These ingredients work together to create a smooth, decadent dessert. The ripe avocados give the mousse its creamy texture while adding healthy fats. Cocoa powder adds a rich chocolate flavor. Maple syrup or honey sweetens the mousse, and almond milk helps blend it all together. You can customize your mousse with these optional ingredients and toppings: - Shaved dark chocolate - Chopped nuts - Fresh berries These extras not only add flavor but also give a nice texture and color contrast. You can mix and match these toppings based on what you like best. If you don’t have some ingredients, here are simple substitutes: - Use any ripe fruit, like banana, instead of avocado. - Swap maple syrup for agave nectar or sugar. - Use coconut milk instead of almond milk. These swaps can change the taste, but they still keep it delicious. The mousse remains easy and quick to prepare. For the full recipe, check the full recipe section. First, you need ripe avocados. Choose avocados that feel soft when you gently press them. Cut the avocados in half and remove the pit. Use a spoon to scoop the green flesh into your food processor. This step is easy and quick. Ripe avocados will give your mousse a creamy texture. Now, it’s time to blend. Add the cocoa powder to the avocados in the food processor. Next, pour in the maple syrup or honey, almond milk, and vanilla extract. Don’t forget the pinch of sea salt! Blend the mix until it is smooth and creamy. Scrape down the sides if needed. Taste the mousse and adjust the sweetness, if you want. Blend again briefly to mix. Spoon the mousse into bowls or glasses. It looks nice in clear dishes. Cover the bowls with plastic wrap and place them in the fridge. Let the mousse chill for at least 30 minutes. This time helps the flavors blend and the mousse firm up. Before serving, you can add toppings like shaved dark chocolate, nuts, or fresh berries. These make the dish even more special! To make your mousse smooth, use ripe avocados. They should feel soft but not mushy. Blend the avocados with cocoa powder first. This step helps break down the avocado fully. Then, add the milk and sweetener. Make sure to blend until you get a creamy texture. If it seems thick, add a bit more milk. Keep blending until it’s velvety and light. The key to great mousse is balance. Taste the mix after blending. If it is too bitter, add more maple syrup or honey. A pinch of salt brings out the chocolate flavor. Do not skip the vanilla extract. It adds depth and enhances the taste. You can also add a splash of coffee for more richness. One common mistake is using unripe avocados. This can make the mousse grainy. Always blend well to avoid lumps. Another error is not tasting the mix. Adjust sweetness before serving. Lastly, remember to chill the mousse. It helps the flavors meld and improves the texture. For more detailed steps, check the Full Recipe. {{image_2}} You can make this mousse dairy-free and vegan easily. Use almond milk or oat milk instead of regular dairy milk. Replace honey with pure maple syrup for a plant-based sweetener. This keeps the mousse creamy and rich without any animal products. Want to add a twist? Try adding a few drops of mint extract for a fresh taste. You can also mix in espresso powder for a coffee flavor that pairs well with chocolate. Another fun option is to add a pinch of cinnamon for warmth. These small changes can make your mousse exciting and new. When serving, think about fun ways to dress it up. You can spoon the mousse into fancy glasses for a special touch. Top it with shaved dark chocolate for a rich look. Fresh berries add color and a burst of flavor. Chopped nuts give a nice crunch. These toppings not only taste great but also make your dessert look amazing. For the full recipe, check out the recipe section above. Store your Chocolate Avocado Mousse in an airtight container. This keeps the mousse fresh and tasty. Make sure to cover it well. You can use plastic wrap or a lid. I recommend chilling it in the fridge right away. The mousse lasts about three days in the fridge. After that, it may lose its creamy texture. If you want to save it longer, you can freeze it. Place the mousse in a freezer-safe container. It stays good for about a month in the freezer. Thaw it in the fridge before eating. You can use leftover mousse in fun ways. Try spreading it on toast for a sweet treat. You can also layer it with granola and fruit for a parfait. Another idea is to blend it into smoothies for extra creaminess. This mousse is versatile and adds flavor to many dishes! Chocolate avocado mousse is a creamy dessert made with ripe avocados and cocoa powder. This mousse is rich, smooth, and has a deep chocolate flavor. It also has a silky texture that melts in your mouth. The avocados provide healthy fats, making this treat both tasty and nutritious. Yes, you can make this recipe ahead of time. In fact, it tastes even better if you let it chill in the fridge for a few hours. Just store it in an airtight container. This way, the flavors blend well, and the mousse firms up nicely. Absolutely! This dessert is healthier than many other options. Avocados are full of good fats and nutrients. The cocoa powder is rich in antioxidants. Using maple syrup or honey keeps the sugar content lower than traditional desserts. So, you can enjoy a sweet treat without guilt. You can easily adjust the sweetness to your taste. If you want it sweeter, add more maple syrup or honey. Blend it again after adding. If it’s too sweet, you can add a little more cocoa powder or almond milk to balance the flavor. If you can't find avocados, you can try silken tofu or creamy bananas. Both options create a smooth texture. They also add a nice flavor. However, the taste will change a bit, but it will still be delicious. For the best results, use ripe bananas to mimic the creaminess of avocados. For the full recipe, check out the Full Recipe section! You learned how to make chocolate avocado mousse, explore ingredient options, and avoid common mistakes. The blend of creamy avocado and rich chocolate creates a delightful dessert. Remember, variations like mint and espresso can add a twist. Proper storage keeps your mousse fresh for longer. Now, you can feel confident making this dish. Enjoy the fun of creating your own delicious mousse!

Chocolate Avocado Mousse Rich and Simple Delight

Indulging in a rich dessert doesn’t mean sacrificing health. Chocolate avocado mousse offers a creamy, dreamy delight that’s surprisingly simple

To make a vibrant vegan Buddha bowl, you need these key ingredients: - 1 cup quinoa, rinsed and drained - 2 cups vegetable broth - 1 cup chickpeas, cooked or canned (rinsed and drained) - 1 medium sweet potato, peeled and diced - 1 cup broccoli florets - 1 medium carrot, julienned - 1 avocado, sliced - ½ cup cherry tomatoes, halved - 2 cups mixed greens (spinach, kale, or arugula) - 2 tablespoons olive oil - 1 tablespoon tahini - 1 tablespoon lemon juice - 1 tablespoon maple syrup - Salt and pepper to taste - Sesame seeds for garnish Each of these ingredients brings unique flavors and textures to your bowl. Quinoa serves as a hearty base. Sweet potatoes add sweetness and creaminess. Chickpeas give protein and fiber. Broccoli and carrots add crunch and color. Avocado brings healthy fats, while cherry tomatoes brighten your dish. You can customize your Buddha bowl with these fun add-ins: - Roasted bell peppers - Sliced radishes - Pickled red onions - Nuts or seeds like pumpkin or sunflower - Fresh herbs like cilantro or parsley These add-ins give your bowl a personal touch. They also add more nutrients and exciting flavors. Mix and match to keep your Buddha bowl fresh and new each time. Here are the health benefits of these key ingredients: - Quinoa: High in protein and gluten-free. It has all nine essential amino acids. - Chickpeas: Great source of protein and fiber. They help keep you full. - Sweet Potatoes: Packed with vitamins A and C. They are great for your skin and vision. - Broccoli: Rich in vitamins K and C. It has antioxidants that boost your immune system. - Carrots: High in beta-carotene. They promote eye health and skin health. - Avocado: Full of healthy fats. It helps lower bad cholesterol levels. - Cherry Tomatoes: They are low in calories and high in vitamins. They help keep your heart healthy. - Mixed Greens: They provide vitamins and minerals. They are also low in calories. This combination not only tastes great but also nourishes your body. Each bite is filled with health benefits. Use the [Full Recipe] to guide you in making this delicious bowl. Start by washing and peeling your sweet potato. Dice it into small cubes. This helps it cook evenly. Next, wash the broccoli florets. You want to keep them bite-sized. Toss both the sweet potato and broccoli with olive oil, salt, and pepper. This adds flavor and helps with roasting. Spread them on a baking sheet. Make sure they are in a single layer. This helps them roast well. In a medium saucepan, combine one cup of rinsed quinoa and two cups of vegetable broth. Bring this mixture to a boil over medium heat. Once it boils, reduce the heat to low. Cover the pot and let it cook for 15 minutes. After that, remove it from heat and let it sit for five minutes, still covered. This resting time makes the quinoa fluffy. In a small bowl, mix tahini, lemon juice, and maple syrup. Add a pinch of salt for taste. Pour a tablespoon of water in and whisk until smooth. If the dressing is too thick, add a bit more water. You want it creamy, but pourable. This dressing adds a rich flavor to your bowl. Now you're ready to assemble your Vegan Buddha Bowl. Follow the [Full Recipe] for complete assembly steps! Roasting brings out the best flavors in vegetables. First, cut them evenly. This helps them cook at the same time. Use enough olive oil to coat them lightly. Salt and pepper enhance their taste. Spread them out on the baking sheet. Crowded veggies steam instead of roast. Roast at 425°F for crispiness. Stir halfway to ensure even cooking. Sweet potatoes and broccoli need about 20-25 minutes. You want them tender and slightly golden. A beautiful bowl makes the meal more inviting. Start with a base of fluffy quinoa. Layer the roasted veggies on top. Use colors to create a rainbow effect. Add bright cherry tomatoes and green avocado slices. A handful of mixed greens adds freshness. Drizzle with tahini dressing for a glossy finish. Sprinkle sesame seeds for crunch. Arrange everything neatly and enjoy the visual treat. Pair bold flavors to make your bowl pop. Chickpeas add protein and a nutty taste. Sweet potatoes bring a creamy, sweet touch. Use a tahini dressing for a rich, nutty contrast. Lemon juice brightens up the dish. For a kick, try adding sriracha or hot sauce. Fresh herbs like cilantro or parsley add a burst of flavor too. Don’t forget to adjust seasoning to your taste. Enjoy exploring different flavor combinations! For the full recipe, check out the Vibrant Vegan Buddha Bowl. {{image_2}} You can switch up the protein in your Buddha bowl. Chickpeas are great, but you might enjoy black beans or lentils too. Tofu is another fantastic choice. Try marinated and baked tofu for extra flavor. Tempeh works well since it has a nutty taste. You can also add edamame for a fresh twist. Each of these options gives you a different taste and texture. While quinoa is a popular base, you can use other grains. Brown rice is a filling choice. It adds a chewy texture and a nutty flavor. Farro is another fun grain that has a slightly chewy bite. If you're looking for something lighter, try cauliflower rice. It's low in carbs and adds a unique taste. Each grain brings its own flair to the bowl. Using seasonal produce makes your Buddha bowl fresh and exciting. In spring, add asparagus or peas for a bright touch. Summer calls for zucchini and bell peppers. In fall, sweet potatoes or butternut squash shine. Winter is perfect for root veggies like carrots and beets. Adjusting your ingredients based on the season keeps your meals interesting and flavorful. For a full recipe, check out the Vibrant Vegan Buddha Bowl. Store leftover Buddha bowls in an airtight container. This keeps the flavors fresh. You can keep them in the fridge for up to three days. If you want to save space, separate the toppings. This way, the ingredients stay crisp and tasty. You can freeze certain ingredients for later use. Cooked quinoa and chickpeas freeze well. Portion them in bags or containers. Make sure to remove air to avoid freezer burn. Sweet potatoes and roasted veggies can also be frozen. Just let them cool first. They will keep for about three months in the freezer. When you reheat your Buddha bowl, do it gently. Use a microwave or stove. If using a microwave, cover the bowl to keep moisture. Heat in short bursts to avoid overcooking. If using a pan, add a splash of water. This helps steam the ingredients. For the best taste, enjoy your bowl warm, but not too hot. For more details, check the Full Recipe. A Buddha bowl is a meal served in a single bowl. This dish is colorful and often filled with grains, veggies, proteins, and healthy fats. The name comes from the way it looks; it’s often piled high like a Buddha's belly. You can mix and match ingredients based on your taste. This makes each bowl unique and fun to create. Yes, you can easily make a Buddha bowl gluten-free. Just pick gluten-free grains like quinoa or rice. Make sure to check labels on packaged ingredients like dressings and sauces. Many veggies and legumes are gluten-free too. This way, you can enjoy a tasty and safe meal without worry. You can use many toppings for your Vegan Buddha bowl. Here are some great ideas: - Sliced avocado - Cherry tomatoes - Fresh herbs like cilantro or parsley - Seeds like pumpkin or sunflower - Nuts like almonds or walnuts - Sauces like soy sauce or hot sauce - Pickled vegetables for a tangy kick Feel free to get creative! You can mix and match toppings to suit your taste. For the full recipe, check out the Vibrant Vegan Buddha Bowl 🥗. In this post, we explored how to create a delicious Vegan Buddha Bowl. We covered essential ingredients, step-by-step instructions, and helpful tips. Each ingredient brings unique nutrition and flavor that makes your bowl special. Remember, you can mix and match for variety. Consider seasonal veggies or alternative proteins for a fresh twist. Storing leftovers correctly keeps your meal tasty for later. Buddha bowls are not just healthy but also fun to make. Embrace your creativity and enjoy the process!

Vegan Buddha Bowl Nourishing and Flavorful Delight

Are you ready to dive into a world of flavor and nutrition? A Vegan Buddha Bowl is your answer! Packed

- 1 pound large shrimp, deveined and peeled - 1 tablespoon olive oil - 1 teaspoon smoked paprika - 1 teaspoon cumin - 1 teaspoon garlic powder - 1/2 teaspoon cayenne pepper (adjust to taste) - Salt and pepper, to taste - 8 small corn tortillas - 1 ripe mango, diced - 1/2 red onion, finely chopped - 1 jalapeño, deseeded and minced - 2 tablespoons fresh cilantro, chopped - Juice of 1 lime - Optional extras like avocado, sliced I love using large shrimp for these tacos. They soak up the marinade well and cook fast. I add olive oil and spices like smoked paprika, cumin, and garlic powder. These give the shrimp a smoky and savory taste. Adjust the cayenne pepper to control the heat. For the corn tortillas, I choose small ones. They hold the shrimp and salsa perfectly. Now, let’s talk about the mango salsa. I use fresh mango for sweetness, red onion for crunch, and jalapeño for spice. The cilantro adds a fresh taste, while lime juice brightens everything. You can add sliced avocado for creaminess, too. Check out the Full Recipe to get all the steps and tips for making these tasty tacos! To marinate the shrimp, mix them with olive oil, smoked paprika, cumin, garlic powder, cayenne pepper, salt, and pepper. You want to coat the shrimp well. Cover the bowl and let it chill in the fridge for 15 to 20 minutes. This marinating time helps the shrimp soak up all the flavors. A good balance of seasoning makes all the difference. Too much spice can overwhelm the dish. Taste and adjust if needed before cooking. For the mango salsa, start by dicing the ripe mango, red onion, and jalapeño. Use a sharp knife for clean cuts and a safe grip. Place them in a bowl and add the chopped cilantro and lime juice. Stir gently to mix everything. Let the salsa sit for a bit. This time allows the flavors to meld. Taste it again and add salt if needed. Fresh ingredients create a bright, tasty salsa that pairs well with the shrimp. Heat a skillet or grill to medium-high heat. Add the marinated shrimp and cook them for 2 to 3 minutes on each side. They should turn pink and opaque when done. Remove the shrimp from heat and let them rest. Next, warm the corn tortillas. Use a dry skillet over medium heat for about 30 seconds on each side. This step makes them soft and pliable, perfect for holding the filling. Now it's time to assemble the tacos! Take a warm tortilla and add a few shrimp to the center. Top it with a generous spoonful of mango salsa. Then, add a couple of avocado slices for creaminess. The layers should be balanced, so every bite has shrimp, salsa, and avocado. Serve the tacos warm, and consider adding lime wedges on the side. Squeezing fresh lime juice over the top adds a zesty kick that enhances the flavors. For the full recipe, check out the detailed instructions above. To start, always pick shrimp that smells fresh, not fishy. Look for shrimp with a shiny, firm texture. If you can, buy shrimp with the shell on. This keeps the shrimp juicy. Check for labels that say "sustainable" or "wild-caught." These options are better for the ocean and often taste better. You can boost flavor with extra spices. Try adding chili powder or lime zest for a kick. Fresh herbs like basil or mint can add depth. For toppings, consider fresh radishes, crumbled queso, or shredded cabbage. These add crunch and more flavor to your tacos. One big mistake is overcooking shrimp. Shrimp cooks fast, usually just 2-3 minutes on each side. Keep an eye on them! Another mistake is not warming tortillas properly. A warm tortilla makes a huge difference. Heat them on a dry skillet until they are soft and pliable. This will make your tacos taste better and easier to eat. For the full recipe, check the detailed instructions above to create your perfect meal! {{image_2}} You can change the shrimp for other proteins. Fish works great in these tacos. Try grilled salmon or tilapia for a tasty twist. Chicken is another option. Season it like the shrimp for a familiar flavor. For a vegetarian version, use black beans or chickpeas. They add protein and fiber while keeping the dish hearty. Mango salsa is a hit, but you can switch it up! Try pineapple or peach for a sweet twist. For a spicy kick, add diced habaneros instead of jalapeños. You can use seasonal fruits too. In summer, fresh strawberries or melons can make a fun salsa. Get creative and mix flavors that you love! Tacos can be more than just tortillas! Use lettuce wraps for a low-carb option. Romaine or butter lettuce works well. You can also serve the shrimp and salsa as a taco salad. Just layer everything in a bowl, add some chips for crunch, and enjoy. This makes for a fun meal idea for gatherings. For the full recipe, check out Spicy Shrimp Tacos with Mango Salsa. To keep your shrimp fresh, store them in an airtight container. Place the cooked shrimp in the fridge. They will stay good for up to three days. For the salsa, it’s best to store it separately. Keep it in a sealed container to avoid sogginess. This way, both the shrimp and salsa keep their flavor and texture. When reheating shrimp, the best method is using a skillet. Heat it over medium-low heat. Add a little olive oil to the pan to prevent sticking. Cook the shrimp for just a few minutes until heated. To keep tortillas pliable, warm them in a dry skillet for about 30 seconds on each side. This method makes them soft and easy to fold. You can freeze shrimp, but it’s best to do this before cooking. Place them in a freezer bag, removing as much air as possible. For salsa, you can freeze it too, but avoid freezing the avocado. It doesn’t thaw well. When freezing, use small containers or bags. This makes it easy to thaw just what you need for your next taco night. If you can't find shrimp, you have options. You can use fish like tilapia or cod. These have a mild taste and cook well. If you prefer seafood, try scallops or crab meat. Both add a nice flavor. For plant-based options, consider using tofu or tempeh. Both soak up flavors well. You can also use chickpeas for a hearty choice. They add protein and texture. Just season them like you would the shrimp. The spice level in these tacos can change. The cayenne pepper adds heat. You can adjust it to fit your taste. If you like mild flavors, use less cayenne. If you enjoy a kick, add more. You can also add hot sauce to your tacos. This lets each person choose their spice. For those who want less heat, skip the jalapeño in the salsa. You can still have great flavor without the spice. You can prep these tacos ahead of time. This is great for busy nights. Marinate the shrimp and make the salsa in advance. Keep them in the fridge until you're ready to cook. Warm the tortillas just before serving. This keeps them fresh. If you assemble the tacos too early, the tortillas may get soggy. Keep the shrimp and salsa separate until it's time to eat. For the full recipe, check out the detailed steps provided. To wrap up, you now have all you need to make delicious spicy shrimp tacos. We started with the main ingredients, including fresh shrimp and a tasty mango salsa. I provided step-by-step instructions for marinating, cooking, and assembling your tacos for the best flavor. Remember to choose high-quality shrimp and avoid common mistakes. You can even try different proteins or salsa variations to mix things up. Enjoy every bite and share the joy of making these tacos with others!

Spicy Shrimp Tacos with Mango Salsa Delightful Meal

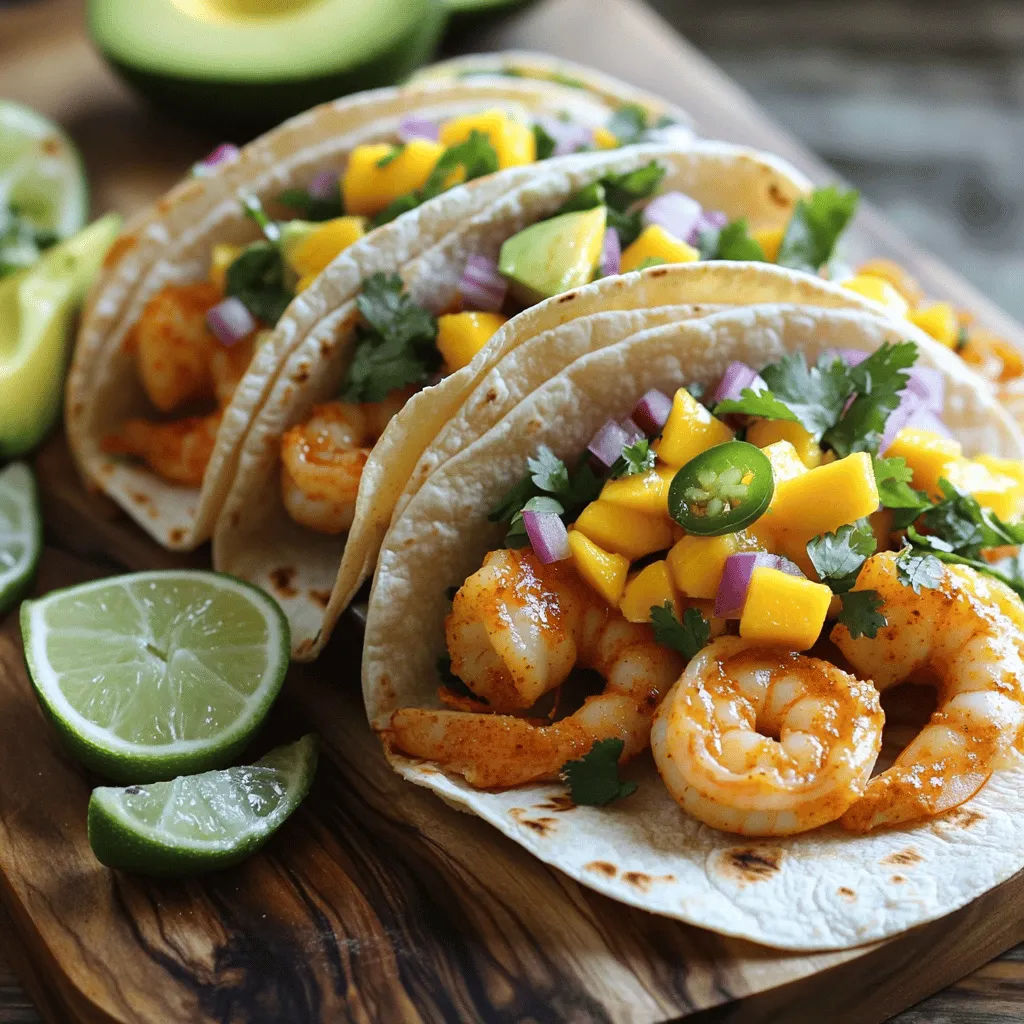
Are you ready for a flavor explosion? My Spicy Shrimp Tacos with Mango Salsa are a treat for your taste

To make delightful Lemon Blueberry Muffins, gather these simple ingredients: - 2 cups all-purpose flour - 1 cup fresh blueberries - 1 cup granulated sugar - 1/2 cup unsalted butter, melted - 1 cup milk (or a milk alternative) - 2 large eggs - 1 tablespoon lemon zest - 2 tablespoons fresh lemon juice - 1 tablespoon baking powder - 1/2 teaspoon baking soda - 1/2 teaspoon salt - 1 teaspoon vanilla extract - Optional: Powdered sugar for dusting Each ingredient plays a key role in creating that perfect muffin. The all-purpose flour gives the muffins structure. Fresh blueberries add juicy bursts of flavor. Granulated sugar balances the tartness of lemon. Unsalted butter brings richness and moisture. You can use milk or any milk alternative based on your preference. Lemon zest and fresh lemon juice brighten up the flavor. They make the muffins taste fresh and vibrant. Baking powder and baking soda help the muffins rise, while salt enhances the overall taste. Finally, vanilla extract adds a lovely warmth to each bite. If you want an extra touch of sweetness, consider dusting with powdered sugar. You can find the full recipe above to guide you through the steps. Enjoy baking these tasty treats! - Preheat the oven Start by preheating your oven to 400°F (200°C). This helps the muffins rise perfectly. - Assemble the muffin tin Line a muffin tin with paper liners or lightly grease it. This makes for easy removal. - Prepare dry ingredients In a large bowl, whisk together 2 cups of all-purpose flour, 1 tablespoon of baking powder, 1/2 teaspoon of baking soda, and 1/2 teaspoon of salt. Mix until well combined. - Combine wet ingredients In a separate bowl, mix 1/2 cup of melted unsalted butter, 1 cup of granulated sugar, 2 large eggs, 1 cup of milk, 1 tablespoon of lemon zest, 2 tablespoons of fresh lemon juice, and 1 teaspoon of vanilla extract. Whisk until it's smooth. - Mix wet and dry ingredients Gently fold the wet mixture into the dry ingredients. Mix just until combined. Be careful not to overmix, as this makes the muffins tough. - Fold in blueberries Add 1 cup of fresh blueberries into the batter. Gently fold them in so they are evenly mixed. - Fill muffin cups Spoon the batter into each muffin cup, filling them about two-thirds full. This leaves room for rising. - Baking time and checking for doneness Bake for 18-20 minutes. Check if they are done by inserting a toothpick into the center. If it comes out clean, they are ready. Let them cool in the tin for 5 minutes before moving them to a wire rack. For detailed instructions, check the [Full Recipe]. To make the best Lemon Blueberry Muffins, avoid overmixing. When you mix the wet and dry ingredients, stop as soon as you see no dry flour. This helps keep your muffins light and fluffy. Next, let’s talk about baking. The optimal baking temperature for these muffins is 400°F (200°C). This high heat gives them a nice rise and a golden top. Always preheat your oven. This step is key for even baking. Cooling is also important. After baking, let the muffins cool in the tin for five minutes. Then, transfer them to a wire rack. This helps them stay moist and prevents sogginess. Using lemon zest can really boost the flavor. Zest the lemon before juicing it. This zest adds a bright taste that pairs perfectly with blueberries. Just one tablespoon is enough for a burst of lemon flavor. For the blueberry flavor, go for fresh berries. They taste better than frozen ones. You can also toss the blueberries in a bit of flour before adding them to the batter. This helps them stay suspended and prevents them from sinking. For the full recipe, check the earlier section. Enjoy baking these delicious muffins! {{image_2}} You can easily change this recipe to fit your needs. Here are some great swaps: - Gluten-free options: Use a gluten-free flour blend instead of all-purpose flour. This keeps the texture light and fluffy. - Vegan substitutions: Replace the eggs with flaxseed meal or applesauce. Use almond milk or oat milk for the dairy. - Alternative fruit mixes: Try raspberries, blackberries, or peaches instead of blueberries. Each fruit adds its unique twist to the muffins. You can enhance the flavor of these muffins with some fun additions: - Adding nuts or seeds: Chopped walnuts or sunflower seeds add a nice crunch. Mix in about half a cup for extra texture. - Including spices for a different flavor profile: A pinch of cinnamon or nutmeg can give a warm, cozy flavor. Experiment with these spices to find your perfect blend. These variations let you customize your Lemon Blueberry Muffins. Feel free to mix and match ingredients to create your own special treat. For the complete recipe, check the [Full Recipe]. To keep your lemon blueberry muffins fresh, store them in an airtight container. This helps retain moisture and flavor. If you want to keep them for longer, place the container in the fridge. Muffins stay fresh for about 2-3 days when stored at room temperature. In the fridge, they can last up to a week. Reheating muffins is easy. You can use the microwave or the oven. For the microwave, heat for 10-15 seconds. This warms them quickly but may make them a bit soft. If you want them crispy, use the oven. Preheat it to 350°F (175°C) and heat for about 5-10 minutes. When reheating, avoid overdoing it. Too much time can dry them out. Always check for warmth and enjoy your delicious treat again! For the full recipe, check the section above. How long do Lemon Blueberry Muffins last? Lemon blueberry muffins stay fresh for about 3 days at room temperature. Keep them in an airtight container to maintain moisture. You can also store them in the fridge for up to a week. Can I freeze Lemon Blueberry Muffins? Yes, you can freeze these muffins. Just place them in a freezer bag after they cool. They will last for about 2 to 3 months in the freezer. Thaw them at room temperature when ready to eat. What if I want to reduce sugar? You can cut the sugar by about a third without losing flavor. You can also try using a sugar substitute if you want. This keeps the muffins tasty while lowering calories. How can I make them more lemony? To boost lemon flavor, add more lemon zest or an extra tablespoon of lemon juice. You can also use lemon extract for a stronger taste. This adds a bright, zesty kick to each bite. Can I use frozen blueberries? Yes, frozen blueberries work well. Just toss them in a bit of flour before adding to the batter. This helps them stay suspended in the mix and prevents them from bleeding too much. Can I replace the butter with oil? You can replace butter with oil, like canola or coconut oil. Use the same amount of oil as butter. This change may make the muffins slightly denser but still delicious. What’s the best way to ensure the muffins rise? Make sure your baking powder is fresh. Also, do not overmix the batter. This keeps the muffins light and fluffy. Filling the cups to about two-thirds full also helps them rise nicely. For the full recipe, check out the Lemon Burst Blueberry Muffins section. You now have a complete guide for making delicious Lemon Blueberry Muffins. We covered the key ingredients, step-by-step instructions, and valuable tips to help you succeed. Remember to avoid overmixing and to cool your muffins properly. You can even try variations like gluten-free or vegan options if needed. Store your muffins well to keep them fresh. Enjoy baking these tasty treats and share them with friends and family! This recipe is sure to bring joy to your kitchen.

Lemon Blueberry Muffins Fresh and Flavorful Treat

Are you ready to delight your taste buds with Lemon Blueberry Muffins? These treats burst with fresh lemon and juicy

- 4 medium zucchinis - 1 ripe avocado - 2 cups fresh basil leaves - 1/4 cup walnuts (or pine nuts) - 2 cloves garlic, minced - 2 tablespoons nutritional yeast - 2 tablespoons lemon juice - 1/4 cup extra-virgin olive oil - Salt and pepper to taste - Cherry tomatoes, halved (for garnish) - Grated Parmesan cheese or vegan alternative (optional, for serving) When measuring ingredients, use standard kitchen tools. A cup is 8 ounces. A tablespoon is 15 milliliters. For smaller amounts, a teaspoon is 5 milliliters. Precision gives you better taste. You can add a pinch of red pepper flakes for heat. A squeeze of lime juice gives a fresh twist. Try adding spinach to the pesto for extra greens. Sun-dried tomatoes can add depth to your dish. To start, take four medium zucchinis. Use a spiralizer or a vegetable peeler to make zucchini noodles, often called zoodles. If you use a spiralizer, it’s quick and fun! After you create the zoodles, place them in a colander. This step helps drain out excess moisture. Let them sit for about five minutes. This way, your dish won't get watery later. Next, we need to make our creamy avocado basil pesto. Grab one ripe avocado and scoop it into a food processor. Add in two cups of fresh basil leaves for a bright flavor. Toss in a quarter cup of walnuts or pine nuts for some crunch. Then, add two cloves of minced garlic for a kick. Sprinkle in two tablespoons of nutritional yeast. This adds a cheesy taste without dairy. Squeeze in two tablespoons of lemon juice for a fresh zing. Season with salt and pepper to taste. Blend everything until smooth. While blending, slowly pour in a quarter cup of extra-virgin olive oil. This makes the pesto creamy. Taste it and adjust the seasoning if needed. Now it’s time to bring it all together. In a large bowl, add the drained zucchini noodles. Pour the avocado basil pesto over the zoodles. Toss them gently until the noodles are evenly coated. This is where the magic happens! The zoodles soak up all that rich flavor. For a nice touch, plate the zoodles and top them with halved cherry tomatoes. If you like, add some grated Parmesan cheese or a vegan option on top. Enjoy your meal fresh and vibrant! For the full recipe, check out the section above. To make perfect zucchini noodles, you need a few tools. A spiralizer is my favorite. It turns the zucchini into long, fun noodles. You can also use a vegetable peeler. This tool makes wide strips. A sharp knife works too; just cut thin slices. Each tool gives you a different shape and texture. Choose the one that suits you best! If you have leftovers, store them right. Keep the zucchini noodles and pesto separate. Use an airtight container to keep them fresh. The noodles can last in the fridge for two days. The pesto stays good for about a week. Just make sure to cover it with oil to prevent browning. When you're ready to eat, mix them again for a tasty meal. Watery zoodles can ruin your dish. To prevent this, salt the noodles first. Place them in a colander and let them sit for 10-15 minutes. This step helps draw out extra moisture. You can also pat them with a paper towel. Cooking the noodles briefly in a hot pan can help too. Just sauté them for a minute. This keeps them firm and tasty. {{image_2}} You can change up the pesto for fun flavors. Try using spinach or arugula instead of basil. You can also swap walnuts for almonds or cashews. If you want a kick, add some chili flakes. For a creamier texture, blend in some Greek yogurt. These changes can make your dish unique and tasty. Serving zucchini noodles is easy and fun. You can add a sprinkle of lemon zest for a fresh twist. Another idea is to mix in roasted veggies, like bell peppers or mushrooms. This gives a nice crunch and color. You could also serve the zoodles in a bowl topped with your favorite sauce. Get creative with your servings to make every meal special. If you want extra protein, there are many options. Grilled chicken or shrimp works well with zucchini noodles. You can also use chickpeas for a plant-based choice. Tofu is another great option; just sauté it until golden. Adding protein makes the meal more filling and nutritious. Each choice can change the flavor and texture, so have fun experimenting! For the complete recipe, check out the Full Recipe section. Each serving of zucchini noodles with pesto is rich in nutrients. It has about: - Calories: 250 - Protein: 6g - Carbs: 12g - Fat: 22g This dish gives you a good balance of healthy fats and carbs. Zucchini adds fiber, and avocado brings healthy fats. Zucchini is low in calories but high in water. It helps keep you hydrated. It also has vitamins A and C. These vitamins boost your immune system and skin health. Pesto, made with basil and nuts, is full of antioxidants. Basil helps reduce inflammation. Nuts give you healthy fats and protein. Together, they create a tasty, healthful meal. This meal is light but filling. It offers a good mix of macronutrients. Zucchini noodles are low in calories and carbs, making them a great choice for weight loss. The avocado creates a creamy texture and adds healthy fats. Pesto enhances flavor while keeping the dish nutritious. For more details on how to prepare this dish, check the Full Recipe! You can make zucchini noodles with a simple vegetable peeler. First, wash the zucchinis. Then, hold the zucchini steady and peel long strips down the length. Keep going until you reach the seeds in the middle. This will give you flat noodles. You can cut these strips into thinner pieces to resemble traditional noodles. It takes a bit more time, but it's easy and fun! Yes, you can use store-bought pesto. It saves time and works well. Just make sure to choose a brand that uses fresh ingredients. Look for options without added preservatives. You can even mix in some fresh basil to enhance the flavor. It’s a great shortcut if you want a quick meal but still want that delicious pesto taste. Absolutely! This recipe is great for meal prep. You can make the zoodles and pesto in advance. Just keep them separate until you are ready to eat. Store the zoodles in a sealed container. The pesto can go in a jar or bowl. They will last in the fridge for up to three days. This way, you can have a fresh meal ready in minutes. Don't forget to check the Full Recipe for more tips! This blog post covered how to make tasty zucchini noodles with avocado basil pesto. We explored the key ingredients, gave step-by-step instructions, and shared handy tips. You learned about flavor variations and the health benefits of this dish. Consider trying unique ingredients or adding protein to make it your own. Enjoy your meals and feel proud of your cooking! Zucchini noodles can be fun and healthy with just a little creativity.

Zucchini Noodles with Pesto Flavorful and Quick Meal

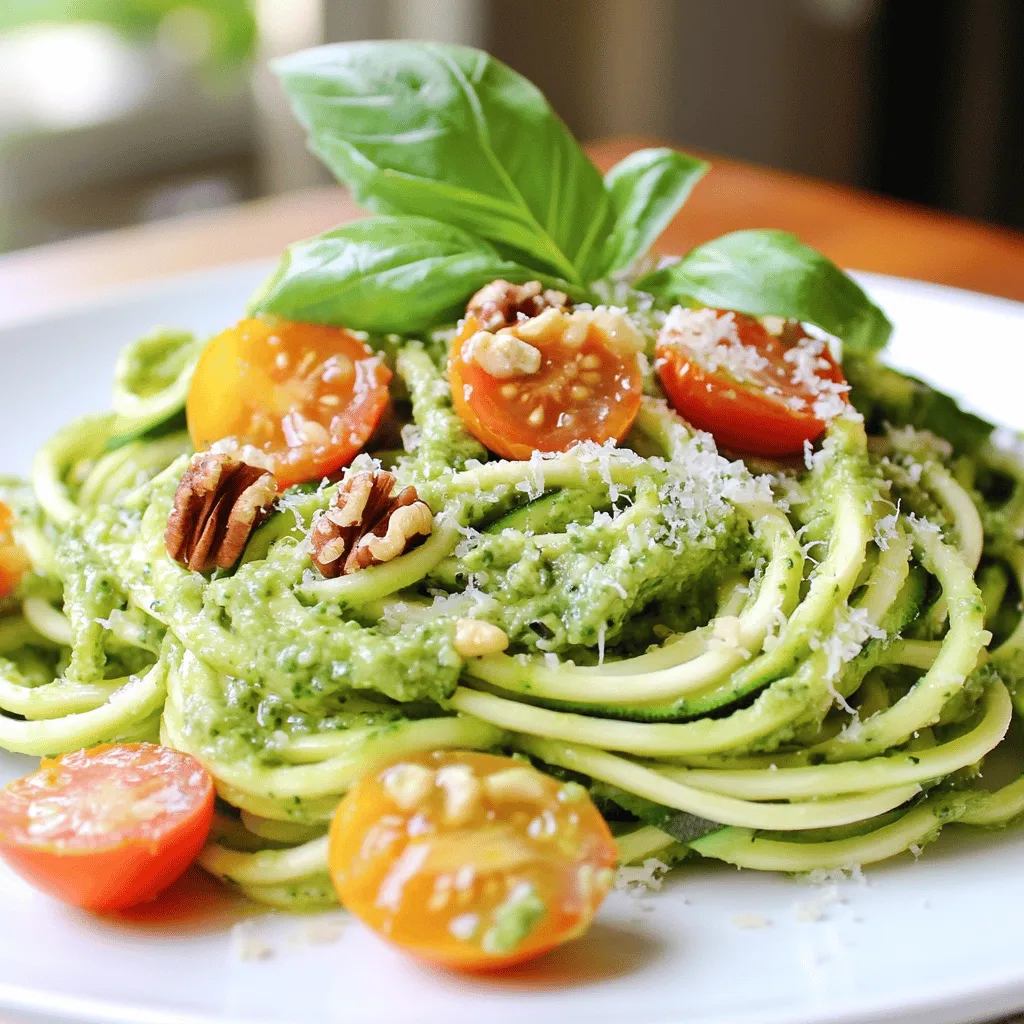
Are you looking for a quick and tasty meal that’s also healthy? My Zucchini Noodles with Pesto make a perfect

- 2 cups cooked jasmine rice (preferably day-old) - 1 cup fresh pineapple chunks - 1 tablespoon vegetable oil - 1 small onion, finely chopped - 2 cloves garlic, minced - 1 small red bell pepper, diced - 1 small green bell pepper, diced - 1 cup frozen peas - 2 green onions, chopped - Scrambled eggs or tofu - Fresh cilantro for garnish - 3 tablespoons soy sauce - 1 tablespoon sesame oil - 1 teaspoon curry powder - Salt and pepper to taste When I create pineapple fried rice, I start with the main ingredients. Day-old jasmine rice gives the best texture. Fresh pineapple adds a sweet and juicy burst. A bit of vegetable oil helps everything cook evenly. I also choose a small onion and a couple of garlic cloves for flavor. Next, I add colorful bell peppers. Red and green bell peppers add crunch and sweetness. Frozen peas bring in a pop of color and nutrition. Green onions add a fresh finish. For optional ingredients, I often scramble some eggs or use tofu. Both options make the dish more filling. I always garnish with fresh cilantro for that extra zing. Now, let’s talk about seasoning. Soy sauce brings saltiness and depth. Sesame oil adds a nutty flavor. Curry powder gives warmth and a unique twist. I also add salt and pepper to balance everything. You can find the full recipe to make this delightful dish in the article. Enjoy your cooking! - Preparing your ingredients: Start by chopping the onions, bell peppers, and green onions. Measure out your pineapple chunks and cooked rice. Having everything ready makes cooking easier and faster. - Heating the skillet: Pour vegetable oil into a large skillet or wok. Heat it on medium-high until it's hot but not smoking. This helps to fry the ingredients evenly. - Sautéing onions and garlic: Once the oil is hot, add the chopped onions and minced garlic. Stir them for about 2-3 minutes. You want the onions to turn translucent and fragrant. - Adding bell peppers and pineapple: Next, toss in the diced red and green bell peppers. Cook for another 2-3 minutes until they soften. Then, add the pineapple chunks. Let them cook for about 2 minutes to caramelize slightly. - Stir-frying the rice: Push the cooked veggies to one side of the skillet. If you want, scramble some eggs or tofu in the empty space. Then, add your chilled jasmine rice. Mix everything well, breaking up any rice clumps. Stir-fry for about 5 minutes until heated. - Incorporating sauces and seasonings: Drizzle soy sauce and sesame oil over the rice. Sprinkle in the curry powder, salt, and pepper. Stir everything together to coat the rice evenly. Finally, fold in the frozen peas and chopped green onions. Cook for an extra 2 minutes to heat the peas. For the full recipe, refer to the earlier section. Enjoy your delightful pineapple fried rice! - Using day-old rice: Day-old rice works best. It’s less sticky. Freshly cooked rice can clump together. Let it cool before using. - Adjusting sweetness and saltiness: Taste your dish as you cook. Add more soy sauce for salt. If it’s too salty, add more pineapple. - Stir-frying vs. steaming: Stir-frying gives a nice crispy texture. It allows flavors to blend well. Steaming is milder, but you miss the crispiness. - Maintaining texture: Keep your heat high while cooking. This helps keep veggies crunchy. Avoid overcooking the rice to keep it fluffy. - Complementary dishes: Serve with grilled chicken or shrimp. These add protein and flavor. A fresh salad pairs nicely too. - Best garnishes: Fresh cilantro adds color and freshness. You can also use lime wedges. They bring a zesty kick to each bite. For the full recipe, check out the Tropical Delight Pineapple Fried Rice section. {{image_2}} You can make pineapple fried rice even better by adding more vegetables. Try carrots, peas, or corn for extra color and crunch. You can also mix in leafy greens like spinach or kale for added nutrition. If you want protein, tofu is a great choice. It soaks up flavors well and is easy to prepare. Scrambled eggs are another tasty option for extra protein. To give your dish a tropical twist, add other fruits. Mango or kiwi can bring a sweet touch. You can also use coconut milk instead of water for cooking the rice. This adds creaminess and a distinct flavor. Adjust your spices too; try adding cumin or chili powder for a different kick. Each region has its own flair, so feel free to experiment! If you want a low-carb version, consider using cauliflower rice. It gives you the same texture without the carbs. Simply pulse cauliflower in a food processor until it resembles rice. You can also look for gluten-free soy sauce if you're avoiding gluten. This way, you can still enjoy all the flavors without worries. For the full recipe, click here: [Full Recipe]. To keep your pineapple fried rice fresh, cool it down first. Spread it out on a plate or in a shallow pan. This helps it cool fast. Once cool, place it in an airtight container. It can stay in the fridge for about 3 to 4 days. When you reheat, use a skillet or a microwave. For the skillet, add a splash of water or oil. This keeps the rice moist. Heat it on medium until hot, about 5 minutes. If using a microwave, cover the bowl and heat in 1-minute bursts. Aim for a safe temperature of 165°F (74°C). To freeze pineapple fried rice, let it cool completely. Then, portion it into freezer bags or containers. Remove as much air as possible to prevent freezer burn. It can last up to 2 months frozen. When ready to eat, thaw it in the fridge overnight or use the microwave. Reheat thoroughly before serving. For a complete guide, check the Full Recipe for more tips and details! You can use several options instead of jasmine rice: - Basmati rice: It has a nice aroma and light texture. - Brown rice: This adds a nutty flavor and more fiber. - Quinoa: A great gluten-free choice that is high in protein. - Cauliflower rice: Perfect for low-carb diets, it offers a light base. Each alternative brings its own unique taste and texture, so feel free to experiment! Yes, you can skip the soy sauce. Here are some options: - Coconut aminos: A soy sauce alternative made from coconut sap. - Tamari: A gluten-free soy sauce that works well. - Liquid aminos: A non-soy sauce option that adds umami flavor. These substitutes still pack flavor, so your dish will stay tasty! Pineapple fried rice can last in the fridge for up to four days. Here are some tips for safety: - Store it in an airtight container to keep it fresh. - Always cool the rice to room temperature before refrigerating. - Reheat it well before eating, ensuring it reaches 165°F. Following these steps helps you enjoy your leftovers safely! Pineapple fried rice is a fun and tasty dish to make. We explored key ingredients like jasmine rice, pineapple, and essential seasonings. I shared easy steps to prepare and cook your rice, along with tips for the best texture and flavor. You can customize it with veggies or proteins. Remember to store any leftovers properly and reheat them safely. Enjoy your cooking adventure!

Pineapple Fried Rice Delightful and Easy Recipe

Are you ready to experience a burst of tropical flavor? Pineapple Fried Rice is a delightful dish that combines sweetness,

- 2 tablespoons olive oil - 1 medium onion, chopped - 4 cloves garlic, minced - 1 can (28 ounces) crushed tomatoes - 2 cups vegetable broth - 1 teaspoon sugar - 1 teaspoon dried oregano - Salt and pepper to taste - 1 cup heavy cream (or coconut cream for dairy-free) - 1/2 cup fresh basil leaves, chopped - Optional: A drizzle of balsamic glaze for serving For a rich and flavorful Creamy Tomato Basil Soup, you'll need these simple ingredients. Each one plays an important role in creating that comforting taste we all love. The olive oil helps to start the cooking process, adding depth to the soup. The onion and garlic bring a savory base that makes your kitchen smell amazing. Crushed tomatoes are the star of this dish. They give the soup its signature red color and sweet flavor. The vegetable broth adds layers of taste and helps create the perfect texture. A touch of sugar balances the acidity of the tomatoes, while dried oregano adds an earthy flavor. Don't forget salt and pepper! They are key to making the flavors pop. The heavy cream or coconut cream brings a creamy richness that makes the soup indulgent. Lastly, fresh basil adds a bright, aromatic finish. You can also drizzle balsamic glaze over your soup for a sweet and tangy touch. This simple addition can elevate your dish in seconds. Now you have a clear picture of what you'll need to make this delightful soup. For the full recipe, follow the steps that guide you through each part of the cooking process. Enjoy! To start, heat 2 tablespoons of olive oil in a large pot over medium heat. Once hot, add 1 chopped onion. Cook it for about 5 to 7 minutes until it is soft and clear. Next, stir in 4 minced garlic cloves. Cook this for another 1 to 2 minutes until it smells great. Now, pour in 1 can of crushed tomatoes and 2 cups of vegetable broth. Stir everything together. Add in 1 teaspoon of sugar, 1 teaspoon of dried oregano, and salt and pepper to taste. Bring the mixture to a simmer. Let it cook for around 15 minutes. This helps all the flavors blend well. After simmering, it’s time to blend the soup. I prefer using an immersion blender. It’s easy and quick. Just blend the soup right in the pot until it is smooth. If you don’t have one, you can use a standard blender. But, be careful! Blend in small batches to avoid spills. Once blended, pour the soup back into the pot if you used a standard blender. Stir in 1 cup of heavy cream for that creamy texture. Heat it gently on low until warm. Finally, fold in 1/2 cup of chopped fresh basil. This adds a fresh flavor right before serving. Adjust the seasoning if you need to. Now, your soup is ready to enjoy! Check out the Full Recipe for all the details. To make your creamy tomato basil soup even tastier, try adding a few spices and herbs. Here are some ideas: - Red pepper flakes: Add a pinch for heat. - Fresh thyme: A few sprigs can bring depth. - Smoked paprika: This gives a nice smoky flavor. - Bay leaf: Add while simmering for extra aroma. - Parmesan cheese: Stir in for a rich, savory taste. These additions can transform your soup into something special! How you serve the soup matters. Here’s how to make it look great: - Use warm bowls to keep the soup hot. - Garnish with fresh basil leaves on top. - Drizzle heavy cream in a swirl for elegance. - Serve with crusty bread on the side. - Add a drizzle of balsamic glaze for a pop of color. These tips make your dish appealing and inviting. Watch out for these common mistakes while making your soup: - Don’t skip the sautéing step. This builds flavor. - Make sure to blend the soup well. A smooth texture is key. - Avoid overcooking the basil. Add it at the end. - Taste and adjust seasoning as needed. A little salt can enhance flavors. Being mindful of these points helps you create the best soup. For the complete recipe, check out the Full Recipe. {{image_2}} To make a vegan version of creamy tomato basil soup, swap the heavy cream for coconut cream. Coconut cream gives a rich texture while keeping it plant-based. You can also use cashew cream. To make cashew cream, soak raw cashews in water for a few hours, then blend them with a bit of water until smooth. This adds a nice creaminess without dairy. Want to boost the nutrition? Add veggies like carrots or bell peppers. Chop them small and sauté them with the onions at the start. This adds color and flavor. You could also try adding spinach or kale for extra greens. Just stir them in right before serving so they stay fresh. Pair your soup with crusty bread or a warm baguette. A grilled cheese sandwich makes a tasty side too. For a twist, serve it with garlic bread or a fresh salad. Drizzle a bit of balsamic glaze on top for an extra touch of flavor. This makes your soup look great and taste even better. To store leftover creamy tomato basil soup, let it cool first. Pour the soup into an airtight container. This helps keep it fresh. Place the container in the fridge. It is best to use the soup within 3-4 days. For longer storage, you can freeze it. Use freezer-safe bags or containers. Leave some space at the top. The soup will expand as it freezes. When reheating, you want to keep the soup tasty. The best way is to use a pot on the stove. Heat it over low to medium heat. Stir often to avoid sticking. You can also use a microwave. Transfer the soup to a microwave-safe bowl. Heat in short bursts, stirring in between. This helps keep the creamy texture. In the fridge, your creamy tomato basil soup lasts about 3-4 days. If you freeze it, it stays good for up to 3 months. Just remember to label your container with the date. This way, you know when to use it. Enjoy it warm, and you'll love the fresh taste every time! You can easily make this soup dairy-free by using coconut cream instead of heavy cream. Coconut cream gives a rich and smooth texture. You can also use cashew cream or almond milk. To make cashew cream, blend soaked cashews with water until smooth. This keeps your soup creamy without dairy. Yes, you can use fresh tomatoes! For this soup, use about 2 pounds of ripe tomatoes. First, blanch them in boiling water for about 30 seconds. Then, cool them in ice water to peel easily. Chop them up and add them to the pot. You might need to adjust the broth since fresh tomatoes can be juicier and require less liquid. This soup pairs well with many sides. You can serve it with grilled cheese sandwiches for a classic combo. A fresh salad also makes a nice addition. Consider crusty bread or garlic bread for dipping. For a gourmet touch, top the soup with croutons or a drizzle of balsamic glaze. Yes! This soup tastes even better after a day in the fridge. Make it, let it cool, and then store it in an airtight container. To reheat, warm it gently on the stove. Stir well and adjust seasoning if needed. This makes it great for meal prep or when hosting friends. For the full recipe, check the previous section. This post covered a delicious Creamy Tomato Basil Soup. We discussed key ingredients like olive oil, garlic, and fresh basil. You learned step-by-step instructions, blending techniques, and helpful tips to enhance flavor. Variations show the soup can fit anyone's needs, whether vegan or with added veggies. Lastly, I shared safe storage methods and answered common questions. In conclusion, making this soup is simple and fun. Enjoy experimenting with flavors and serving it your way. You’ll have a dish that warms hearts and brings smiles.

Creamy Tomato Basil Soup Flavorful and Simple Recipe

Are you ready for a warm bowl of comfort? This Creamy Tomato Basil Soup is not only tasty but also

Older posts
Newer posts
← Previous Page1 … Page53 Page54 Page55 … Page57 Next →

dsad

© 2025 Cooking Wells • Built with GeneratePress

Our Policies

  • Copyright Policy
  • Cookie Policy
  • GDPR Policy
  • Privacy Policy
  • Disclaimer
  • Terms Of Use

More Information

  • Home
  • About
  • Contact
  • Appetizers
  • Dessert
  • Dinner
  • Drinks
©2025, Cooking Wells About Back To Top