Skip to content
DisclaimerTerms Of UseGDPR PolicyCookie Policy

Cooking Wells

  • Home
  • Drinks
  • Appetizers
  • Dinner
  • Dessert
  • About
  • Contact
  • Privacy Policy
DisclaimerTerms Of UseGDPR PolicyCookie Policy

Mia

To make this tasty dish, you need a few key items. Here’s what to gather: - 1 pound large shrimp, peeled and deveined - 2 cups fresh broccoli florets - 3 tablespoons honey - 3 tablespoons soy sauce (low sodium) - 4 cloves garlic, minced - 1 tablespoon fresh ginger, grated - 2 tablespoons vegetable oil - 1 teaspoon sesame oil - Salt and pepper, to taste These ingredients come together to create a sweet and savory flavor. The shrimp adds protein, while broccoli brings in nutrients and crunch. Once your dish is cooked, you can make it pop with a few simple garnishes. Grab these extras: - 1 teaspoon sesame seeds, for garnish Adding sesame seeds gives it a nice crunch and enhances the dish's look. This dish pairs well with rice. I suggest using: - Cooked jasmine rice, for serving Jasmine rice is fragrant and fluffy, making it a perfect base for the honey garlic shrimp and broccoli. If you like, you can also try brown rice or cauliflower rice for a twist. For the full recipe, check the detailed instructions. To make the honey garlic sauce, grab a small bowl. Add 3 tablespoons of honey, 3 tablespoons of low-sodium soy sauce, 4 minced garlic cloves, and 1 tablespoon of grated ginger. Whisk everything together until it blends well. This sauce is sweet, salty, and full of flavor. Set it aside for later. Now, let’s cook the broccoli. Heat 1 tablespoon of vegetable oil in a large skillet over medium-high heat. Once the oil is hot, toss in 2 cups of fresh broccoli florets. Stir-fry these for about 2-3 minutes. You want them bright green and just tender. After cooking, take the broccoli out and set it aside. In the same skillet, add 1 more tablespoon of vegetable oil and 1 teaspoon of sesame oil. Heat these oils until they shimmer. Next, add 1 pound of large shrimp in a single layer. Lightly season with salt and pepper. Cook for 2-3 minutes on each side until the shrimp turns pink and opaque. Now, lower the heat to medium. Pour the honey garlic sauce over the shrimp. Add the cooked broccoli back into the skillet. Toss everything together so the shrimp and broccoli get coated in that tasty sauce. Let it cook for an extra 1-2 minutes. This will help the flavors mix nicely. Serve this dish over jasmine rice for a complete meal. Don’t forget to sprinkle some sesame seeds on top for a nice finish. For the full recipe, check the details above. To make sure your shrimp stay tender, avoid overcooking. Cook them for just 2-3 minutes per side. Look for a pink color and opaque look. If they curl tightly, they might be overcooked. Always use fresh shrimp when possible. Fresh shrimp taste better and have a nice texture. You can add more depth to your dish. Try adding red pepper flakes for heat. A squeeze of lime juice will brighten the taste. Chopped green onions add freshness. You can also toss in some bell peppers for color and crunch. Each extra ingredient enhances the honey garlic shrimp and broccoli. Use a hot skillet or wok. This keeps the food from steaming. Stir-fry quickly for great texture. Keep ingredients moving to cook evenly. Always prep your ingredients first to make cooking smooth. This way, your meal comes together fast and stays fresh. For the best results, use high smoke point oils like vegetable oil. For the complete recipe, check the [Full Recipe]. {{image_2}} You can easily swap the shrimp for other proteins. Tofu works great for a plant-based option. Just press the tofu to remove extra water, then cut it into cubes. Cook it until golden brown for a tasty addition. Chicken is another good choice. Use chicken breast or thighs, cut into bite-sized pieces. Cook the chicken until it's no longer pink. Both options absorb the honey garlic sauce well. Feel free to use other vegetables in your stir-fry. Bell peppers add color and crunch. Snap peas provide a sweet flavor. Carrots can also brighten up the dish. Just make sure to cut them into small pieces for even cooking. You can even try using bok choy or green beans. The key is to keep the cooking time similar so everything stays tender and crisp. You can adjust the sauce to fit your taste. For more heat, add red pepper flakes or sriracha. Start with a small amount, then add more if needed. If you like it sweeter, add a bit more honey. This makes the dish even more delicious. You can also try adding a splash of rice vinegar for a tangy twist. Remember to taste as you go, so the balance stays just right. Find the full recipe for honey garlic shrimp and broccoli to make your own delicious dish. To keep your honey garlic shrimp and broccoli fresh, place leftovers in an airtight container. Make sure to cool the dish to room temperature first. Store it in the fridge for up to three days. Layer the shrimp and broccoli neatly to prevent any squishing. This helps retain the shrimp's texture and the broccoli's crunch. When you are ready to eat your leftovers, avoid the microwave if you can. Instead, heat a skillet over medium heat. Add a splash of water or broth to keep the dish moist. Sauté the leftovers for about five minutes, stirring gently. This method warms the dish evenly and keeps the flavors intact. You can freeze honey garlic shrimp and broccoli for later meals. Use a freezer-safe container or bag. Make sure to remove as much air as possible. Label the container with the date. It can last up to three months in the freezer. When you are ready to eat, thaw it overnight in the fridge before reheating. This keeps your meal safe and tasty. For the full recipe, check back to make this dish fresh! You can enjoy this dish with many sides. I suggest serving it over jasmine rice. The rice soaks up the sweet sauce. You can also try it with quinoa or cauliflower rice for a low-carb option. A simple side salad can add freshness. For extra crunch, serve with some toasted sesame seeds. Leftovers can stay fresh for up to three days. Make sure to store them in an airtight container. This keeps the shrimp juicy and the broccoli crisp. Reheat gently in a skillet or microwave. Avoid overcooking to keep the shrimp tender. Yes, frozen shrimp work well in this dish. Just make sure to thaw them first. You can do this by placing them in cold water for about 20 minutes. Pat them dry before cooking. This ensures they cook evenly and absorb the honey garlic sauce well. For the full recipe, refer to the previous sections. In this blog post, I covered how to make Honey Garlic Shrimp and Broccoli. We explored the key ingredients, like shrimp, garlic, and broccoli. I shared step-by-step instructions to create a tasty dish. Tips and tricks helped ensure you cook tender shrimp. You can also try different proteins and veggies, adapting the sauce to your taste. For storage, I provided easy methods for leftovers. Enjoy this meal and make it your own! Cooking can be simple, fun, and full of flavor.

Honey Garlic Shrimp and Broccoli Flavorful Dish

If you’re craving a quick and tasty meal, look no further! Honey Garlic Shrimp and Broccoli is a dish packed

- 1 cup graham cracker crumbs - 1/4 cup unsalted butter, melted - 2 (8 oz) packages cream cheese, softened - 1 cup powdered sugar - 1 teaspoon vanilla extract - 1 cup heavy whipping cream - 1/2 cup fresh berries for garnish - Optional: 1/4 cup lemon juice for tanginess When making No-Bake Cheesecake Jars, the ingredients are key to the flavor. First, you need graham cracker crumbs for the crust. This will give your dessert a sweet and crunchy base. Melted unsalted butter helps bind the crumbs together. Next, you will use cream cheese for the filling. It provides that creamy texture we love. Powdered sugar sweetens the mix, while vanilla extract adds a warm flavor. Heavy whipping cream makes the filling light and fluffy. Fresh berries on top not only look good but taste great too. You can add lemon juice if you like a bit of tang. This can balance the sweetness and add a refreshing taste. - Mixing bowls - Electric mixer - Jars or cups for serving - Spatula To make these jars, you’ll need some basic tools. Mixing bowls help combine your ingredients. An electric mixer is great for beating the cream cheese until it’s smooth. You will also need jars or cups to serve your cheesecake. They can be any size, but smaller jars look cute. Lastly, a spatula is handy for scraping the sides of bowls and filling your jars. For the full recipe, check out the detailed steps above. These ingredients and tools will set you up for a delightful dessert experience! - In a medium bowl, combine 1 cup of graham cracker crumbs with 1/4 cup of melted butter. - Mix until the crumbs look like wet sand. - Spoon about 2 tablespoons of this mixture into the bottom of each jar. - Press the crumbs down gently to make a firm layer. - In a large bowl, beat 2 packages of softened cream cheese until smooth. - Gradually mix in 1 cup of powdered sugar and 1 teaspoon of vanilla extract. - Keep beating until it forms a creamy mixture. - In another bowl, whip 1 cup of heavy cream with an electric mixer. - Whip until stiff peaks form. This makes the filling light and fluffy. - Carefully fold the whipped cream into the cream cheese mixture. - Spoon or pipe the cheesecake filling over the crust in each jar. - Fill each jar about three-quarters full, leaving some space for chilling. - Cover the jars with lids or plastic wrap. - Refrigerate them for at least 4 hours, or overnight for a firmer texture. - For the best results, let them chill longer if you can. This simple method leads to delicious No-Bake Cheesecake Jars, perfect for any occasion. For the full recipe, check back with the ingredients list above! Softened cream cheese is key for a smooth filling. If it is too cold, lumps can form. To soften, leave cream cheese out for at least 30 minutes. You can also microwave it for 10 seconds, but watch carefully. Whipping cream well creates a light texture. Use a chilled bowl and beaters for the best results. Start on low speed, then increase to high. Stop when you see stiff peaks, but don’t overbeat. Overbeating makes the cream grainy. Serve your cheesecake jars in fun and unique ways. Group them on a colorful tray for a cheerful look. You can also layer different flavors in the jars. This adds visual interest. Adding garnishes makes each jar pop. Fresh berries on top give color and flavor. A sprig of mint adds freshness. You can also drizzle chocolate or honey for a sweet touch. One mistake is overmixing the cream cheese. This can add too much air and make the texture too light. Mix just until smooth. Not chilling long enough is another pitfall. This dessert needs time to set. Aim for at least four hours in the fridge. Overnight chilling works best for a firmer texture. {{image_2}} You can make your no-bake cheesecake jars even more fun with flavor twists. Adding fruit purees or extracts can give your dessert a fresh twist. For example, mix in raspberry puree or lemon extract for a bright taste. You can also create a chocolate or peanut butter version. Just fold in melted chocolate or creamy peanut butter to the filling. This makes each jar a unique treat. While graham crackers are a classic choice, don't be afraid to get creative with the crust. You can use cookies like Oreos or digestive biscuits for a fun flavor change. If you're looking for a healthier option, try nut-based crusts. Ground almonds or walnuts mixed with a bit of butter make a tasty and crunchy base. Toppings can take your cheesecake jars to the next level. Fresh berries like strawberries, blueberries, or raspberries add color and flavor. You can also drizzle chocolate ganache on top for a rich finish. If you want a bit of fun, add whipped cream and colorful sprinkles. Each of these toppings can make your jars look as good as they taste. To keep your no-bake cheesecake jars fresh, store them in the refrigerator. Use airtight lids or plastic wrap to cover the jars. This helps prevent any unwanted odors or flavors from mixing in. You can keep them in the fridge for up to five days. If they are not eaten by then, they may lose their creamy texture. Yes, you can freeze no-bake cheesecake jars. Freezing keeps them fresh for a longer time. To freeze, cover each jar tightly with plastic wrap or foil. Then, place the jars in a freezer-safe container. They can last in the freezer for up to two months. When you're ready to enjoy, take a jar out and let it thaw overnight in the fridge. This keeps the texture nice and smooth. Enjoy your dessert! For the full recipe, check out the link provided. No-Bake Cheesecake Jars can last up to five days in the fridge. To keep them fresh, cover each jar tightly with a lid or plastic wrap. This prevents them from absorbing odors from other foods. If you see any moisture on the lid, wipe it off before sealing. Yes, you can use low-fat cream cheese. However, it may change the taste and texture. Low-fat cream cheese can make your cheesecake less rich and creamy. You won’t get that full, smooth texture you want. If you want to keep it light, try using half low-fat and half regular cream cheese. If you don’t have heavy cream, you can use half-and-half or whole milk with a little butter. For every cup of heavy cream, use ¾ cup of half-and-half and ¼ cup of melted butter. This mix will help you get a similar texture, but it won’t be as thick. Serve your cheesecake jars chilled for the best taste. Before serving, add fresh berries or a drizzle of chocolate sauce on top. You can also add a sprig of mint for color. Place the jars on a nice tray to make them look special at gatherings. Yes, you can make No-Bake Cheesecake Jars in advance. Prepare them the night before and refrigerate them. They taste even better after chilling for a few hours. Just remember to add any toppings right before serving to keep them fresh. If you want the full recipe, check out our detailed guide! No-Bake Cheesecake Jars are simple and fun to make. We covered key ingredients, tools, and easy steps. Plus, I shared helpful tips for texture and presentation. You can also explore fun variations and storage methods. Enjoy making these jars your way. Remember, the best cheesecake is all about balance. Avoid common mistakes for the best results. Dive in, get creative, and impress your friends and family with this delightful dessert!

No-Bake Cheesecake Jars Dreamy Dessert Delight

Looking for an easy yet indulgent dessert? My No-Bake Cheesecake Jars are a perfect treat! These creamy delights mix rich

For my sweet potato casserole, you will need these items: - 4 large sweet potatoes, peeled and cubed - 1/2 cup granulated sugar - 1/4 cup brown sugar - 1/2 cup milk - 1/2 cup unsalted butter, melted - 2 large eggs - 1 teaspoon vanilla extract - 1 teaspoon cinnamon - 1/2 teaspoon nutmeg - 2 cups mini marshmallows - 1/2 cup pecans, chopped (optional) To get the best flavors, measure your ingredients carefully. Use dry measuring cups for sugar and flour. Use liquid measuring cups for milk and melted butter. For the sweet potatoes, make sure they are evenly cubed. This helps them cook at the same rate. A kitchen scale can help too. It gives precise weight for ingredients like butter and sugar. If you don’t have a few items, don’t worry! Here are some easy swaps: - Instead of granulated sugar, use coconut sugar for a lighter taste. - You can swap out milk for almond milk or oat milk for a dairy-free version. - If you want a richer flavor, use brown butter instead of regular butter. - For a nut-free option, leave out the pecans or use sunflower seeds. Feel free to mix and match these substitutions to make the dish your own. Enjoy the process! For the full recipe, check out the details above. Start by rinsing your sweet potatoes. Then, peel and cube them. Place the cubes into a large pot. Fill the pot with water and add a pinch of salt. Bring the water to a boil. Cook the sweet potatoes for 15 to 20 minutes. They should be soft when you poke them with a fork. After cooking, drain the water and put the sweet potatoes in a mixing bowl. Use a potato masher or electric mixer to mash the sweet potatoes until they are smooth. Now, it’s time to mix in the other ingredients. Add the granulated sugar and brown sugar to the mashed sweet potatoes. Then, pour in the milk and melted butter. Crack the eggs into the bowl, followed by the vanilla extract, cinnamon, and nutmeg. Use a spatula or mixer to combine everything well. You want a creamy texture. This mixture should look inviting and smell amazing. Take a greased 9x13-inch baking dish and transfer the sweet potato mixture into it. Spread the mixture evenly with a spatula. Next, sprinkle mini marshmallows over the top. If you like, add chopped pecans for extra crunch. Preheat your oven to 350°F (175°C). Bake the casserole for 25 to 30 minutes. Look for golden brown marshmallows on top. When it’s done, take it out and let it cool for a few minutes. This casserole is best served warm. If you want the full recipe, you can check back for complete details. To get the best texture in your sweet potato casserole, start with the right potatoes. Use large, firm sweet potatoes. They mash well and keep a nice creamy feel. Make sure you cook them until they're soft. This helps create a smooth mixture. After cooking, mash them thoroughly. I like using a potato masher for a rustic texture. If you prefer it even smoother, use a mixer. The right seasonings can make your casserole shine. I always add cinnamon and nutmeg. They bring warmth and depth to the dish. Consider adding a pinch of salt to balance the sweetness. You can also mix in chopped pecans for a nice crunch. If you want a twist, try adding maple syrup or a splash of orange juice. These add unique flavors that complement the sweet potatoes. One common mistake is overcooking the sweet potatoes. This can lead to a watery casserole. Make sure to drain them well after boiling. Another mistake is not mixing the ingredients enough. You want everything blended for a smooth taste. Lastly, don't skip the baking step. Baking helps the flavors combine and gives a nice finish. Follow these tips for a perfect sweet potato casserole! {{image_2}} If you want to switch things up, try different toppings. Instead of marshmallows, you can use crushed graham crackers. They add a nice crunch and sweetness. Another option is to sprinkle brown sugar on top for a caramelized finish. You could also use chopped pecans or walnuts for a nutty flavor. These alternatives can make your casserole unique and fun. You can make a healthier version of sweet potato casserole. Substitute sugar with maple syrup or honey for natural sweetness. Use unsweetened almond milk instead of regular milk for fewer calories. You could even skip the butter and use coconut oil. These swaps still give you a tasty dish but with less guilt. Many cultures have their own take on sweet potato casserole. In some Southern kitchens, you might find a dash of cayenne pepper for heat. In Japan, they might mix in miso for a savory twist. Try adding spices like ginger or cardamom for a unique flavor. These twists can bring new life to your casserole. Don't forget to check the Full Recipe for the basic version before you experiment! To keep your sweet potato casserole fresh, let it cool first. Once cooled, cover it tightly with plastic wrap or aluminum foil. You can also transfer it to an airtight container. Store it in the fridge for up to three days. If you plan to eat it later, follow the freezing steps below. When you want to enjoy the leftovers, preheat your oven to 325°F (160°C). Place the casserole in an oven-safe dish. Cover it with foil to keep it moist. Heat for about 20-25 minutes or until warmed through. If you want the marshmallows crispy again, uncover for the last 5 minutes. You can freeze the casserole before or after baking. If freezing before, assemble the casserole but skip baking. Wrap it well in plastic wrap and foil. It can last up to two months in the freezer. When you're ready to bake, thaw it overnight in the fridge and bake as usual. If already baked, let it cool, then freeze it. To reheat, follow the same steps as above. This way, you can have a delicious treat anytime! For the full recipe, check out the Heavenly Marshmallow Sweet Potato Bake. Yes, you can make the casserole ahead. Prepare it one day in advance. Just follow the recipe until the baking step. Store it in the fridge covered with plastic wrap. When you’re ready, bake it straight from the fridge. This saves time and lets flavors meld. If you need a butter substitute, use coconut oil or vegetable oil. Both options work well. You can also try applesauce for a lighter option. Use the same amount as the butter called for in the recipe. Each substitute adds a different taste but keeps the dish creamy. To stop marshmallows from burning, add them halfway through baking. Bake the casserole until almost done, then add marshmallows. This way, they get golden brown but don’t char. Keep an eye on them, as ovens vary. Enjoy that sweet, gooey topping! For the full recipe, check out the Heavenly Marshmallow Sweet Potato Bake . This blog post covered everything you need for sweet potato casserole. We discussed ingredients, measurements, and substitutions to ensure success. You learned how to prepare, mix, and bake the dish. Tips helped you avoid common mistakes and achieve great taste. We explored healthy variations and unique twists. Finally, I shared the best ways to store and reheat leftovers. With these insights, you can create a delicious casserole that impresses everyone. Enjoy making your dish and share it with loved ones!

Savory Sweet Potato Casserole with Marshmallows Recipe

If you’re looking for a delicious dish that brings comfort and joy, you’ve found it! My Savory Sweet Potato Casserole

Here is what you need for this easy chicken Alfredo pasta bake: - 12 oz penne pasta - 2 cups cooked chicken breast, shredded - 3 cups Alfredo sauce (store-bought or homemade) - 1 cup mozzarella cheese, shredded - 1/2 cup Parmesan cheese, grated - 1 cup broccoli florets (fresh or frozen) - 1 teaspoon garlic powder - 1 teaspoon Italian seasoning - Salt and pepper to taste - Fresh parsley, chopped (for garnish) These ingredients come together to create a rich and creamy dish. You can use leftover chicken or buy a rotisserie chicken for ease. The broccoli adds a nice crunch and color. If you want a little spice, feel free to add red pepper flakes. For a twist, you can substitute other cheeses or veggies. Check out the Full Recipe for more details, and get ready to enjoy a delicious meal! - Preheat your oven to 375°F (190°C). - Cook 12 oz of penne pasta until it is al dente. Drain and set it aside. - In a bowl, mix 2 cups of shredded chicken with 3 cups of Alfredo sauce. Add 1 teaspoon of garlic powder, 1 teaspoon of Italian seasoning, and 1 cup of broccoli florets. Stir well. - In a large baking dish, spread half of the cooked penne at the bottom. Pour half of the chicken and sauce mix over the pasta. Sprinkle with half of the shredded mozzarella. - Repeat this with the remaining penne, chicken mix, and top with the rest of the mozzarella and ½ cup of grated Parmesan. - Cover the baking dish with foil and bake for 20 minutes. - After 20 minutes, remove the foil and bake for another 10 minutes. You want the cheese to be bubbly and golden. - When done, take it out and let it rest for 5 minutes. This helps the flavors settle. Now you're ready to serve your Easy Chicken Alfredo Pasta Bake! You can find the Full Recipe for more details. Choosing the best Alfredo sauce For your Chicken Alfredo Pasta Bake, you can choose store-bought sauce or make your own. Store-bought sauces save time, but homemade sauces can taste fresher. If you go for homemade, use cream, butter, Parmesan, and garlic. This mix gives a rich flavor. Chicken options: rotisserie, grilled, or baked Rotisserie chicken is great for quick meals. It’s already cooked, so you save time. Grilled chicken adds a nice smoky taste. Baked chicken is juicy and flavorful too. Use whatever you like best or have on hand! How to achieve perfect cheese melt To get that perfect cheese melt, use a mix of mozzarella and Parmesan. Layer the cheeses between the pasta and chicken mixture. Cover the dish with foil during the first baking phase. This traps steam and helps the cheese melt nicely. Ensuring pasta is al dente Cook the penne pasta just until it’s al dente. This means it should be firm when bitten. Remember, it will cook more while baking. If you overcook it, it will turn mushy in the bake. Trust me, no one likes mushy pasta! Best sides to pair with pasta bake Serve your pasta bake with a simple green salad. A fresh salad adds a nice crunch. Garlic bread is also a great side. It helps soak up all that creamy sauce. Ideal garnishes for presentation For a lovely touch, sprinkle fresh parsley on top before serving. It adds color and freshness. You can also add a bit of extra cheese on top for a cheesy finish. For the complete recipe, check the [Full Recipe]. {{image_2}} You can easily change the flavors of your chicken Alfredo pasta bake. Adding different vegetables can make it more colorful and nutritious. Spinach and bell peppers work great. Just chop them up and mix them into your chicken and sauce blend. You can also switch up the cheese. While mozzarella is classic, using cheddar or gouda can give it a unique taste. These cheeses melt well and add a nice depth of flavor. Try mixing different cheeses for a fun twist. If you need gluten-free options, look for gluten-free pasta. Many brands offer great choices that taste good. Just cook them according to package instructions. Your dish will still be delicious! For dairy-free eaters, you can find Alfredo sauce made from nuts or soy. These options taste great and keep the creaminess. You can also use dairy-free cheese for that gooey texture. Enjoy your meal without worrying about dietary needs! Feel free to explore these variations and make this easy chicken Alfredo pasta bake your own. For the full recipe, check out the link above! To keep your chicken Alfredo pasta bake fresh, place it in an airtight container. Let it cool down before sealing. Refrigerate it for up to three days. This method helps keep the flavors intact. If you want to store it longer, freezing is a good option. For freezing, wrap individual portions tightly in plastic wrap. Then, place them in a freezer-safe bag. You can freeze it for up to three months. When you're ready to eat, just thaw in the fridge overnight. You can reheat your pasta bake in the microwave or oven. The microwave is quick but may not keep the texture. Use a microwave-safe dish and cover it. Heat in short bursts, stirring in between. For the oven, preheat it to 350°F (175°C). Place the pasta bake in a baking dish and cover it with foil. Heat for about 20 minutes. This keeps the cheese nice and melty. Make sure to check the middle to ensure it’s heated through. Enjoy your meal as if it was freshly made! Can I make this recipe ahead of time? Yes, you can make this dish ahead of time. Prepare the pasta and chicken mix, then layer it in the baking dish. Cover it and store it in the fridge for up to 24 hours. When you’re ready, bake it straight from the fridge, adding a few extra minutes to the cooking time. How do I know when the pasta bake is done? Check for a bubbly and golden top. You can also insert a knife into the pasta to see if it's hot all the way through. It should feel warm and soft. If you see melted cheese and a nice color, it’s done. What can I substitute if I don't have Alfredo sauce? You can use a white sauce or a simple mixture of cream and cheese. If you want a lighter option, mix plain yogurt with grated cheese to keep it creamy. What to do if the pasta is overcooked? If your pasta is overcooked, it may be mushy. To fix this, add less sauce so the texture can hold. Also, let it bake uncovered for a few minutes to help it dry out slightly. Solutions for a dry pasta bake If your bake turns out dry, add a splash of chicken broth or more Alfredo sauce before serving. Stir it gently to mix in the moisture. How to fix a too-salty dish If your dish is too salty, add a bit of cream or milk to balance the flavor. You can also mix in extra cooked pasta to absorb some saltiness. You now have a complete guide to making a delicious pasta bake. We covered ingredients, preparation steps, baking tips, and variations. Each section aims to help you create a dish that suits your taste. Don't forget to experiment with different veggies and cheeses. Proper storage and reheating keep the leftovers tasty. With this knowledge, you're ready to impress your family or friends. Enjoy your cooking journey and make this meal a favorite!

Easy Chicken Alfredo Pasta Bake Quick and Tasty Meal

If you’re looking for a quick and tasty meal, you’ve come to the right place! This Easy Chicken Alfredo Pasta

- 1 lb Brussels sprouts, trimmed and halved - 3 tablespoons balsamic vinegar - 2 tablespoons honey or maple syrup - 2 tablespoons olive oil - 1 teaspoon garlic powder - 1/2 teaspoon sea salt - 1/4 teaspoon black pepper - 1/2 cup pecans, roughly chopped - 1/4 cup grated Parmesan cheese - Fresh rosemary or thyme for garnish Balsamic glazed Brussels sprouts are a treat! They are easy to make and taste great. You need fresh Brussels sprouts for the best flavor. Trim and halve them to help them cook evenly. The balsamic vinegar gives a sweet and tangy taste. Honey or maple syrup adds a touch of sweetness. Olive oil helps the sprouts roast well, making them crispy. Garlic powder brings a warm, savory flavor. Salt and pepper add the finishing touch. If you want to take it up a notch, add pecans for crunch. Grated Parmesan cheese can add a creamy, salty twist. Fresh herbs like rosemary or thyme will brighten the dish. For the full recipe, check the recipe section. Enjoy making this flavorful dish! 1. First, preheat your oven to 400°F (200°C). This temperature helps the Brussels sprouts roast perfectly. 2. In a large bowl, mix the balsamic vinegar, honey or maple syrup, olive oil, garlic powder, sea salt, and black pepper. Whisk until everything blends well. 3. Now, add the halved Brussels sprouts to the bowl. Toss them gently until they are evenly coated with the balsamic mixture. 1. Spread the Brussels sprouts in a single layer on a baking sheet lined with parchment paper. This helps them roast evenly. 2. Roast in the oven for 20–25 minutes. Stir halfway through to ensure even cooking and nice caramelization. 3. If you choose to add pecans, toss them onto the baking sheet in the last 5 minutes of roasting. This will toast them lightly and add great flavor. 1. Once they are done, remove the Brussels sprouts from the oven. If you like, sprinkle grated Parmesan cheese on top while they are still hot. 2. Finally, garnish with fresh rosemary or thyme before serving. This adds a lovely touch to your dish. For the complete recipe, check out Full Recipe. To make the glaze just right, adjust the sweetness to your taste. If you want it sweeter, add more honey or maple syrup. You can also reduce the amount of balsamic vinegar for a less tangy flavor. For the best caramelization, roast the Brussels sprouts at a high temperature. This helps them get crispy and brown. Spread them out in a single layer on the baking sheet. Avoid crowding them; they need space to roast well. Brussels sprouts pair well with many proteins. Try serving them with chicken, pork, or fish. They also complement vegetarian dishes like quinoa or lentils. For side dishes, consider mashed potatoes, rice, or a fresh salad. Their rich flavor makes them a great centerpiece. To boost the flavor, try adding spices like smoked paprika or chili flakes. These spices add warmth and depth to the dish. You can also switch up the vinegar. Try apple cider vinegar for a fruity twist or red wine vinegar for a different tang. For sweeteners, agave syrup works as a great alternative to honey or maple syrup. For the full recipe, check out Balsamic Bliss Brussels Sprouts. {{image_2}} To make this dish dairy-free, simply skip the cheese. You can still enjoy the rich flavor of Balsamic Glazed Brussels Sprouts without it. If you crave creaminess, try using a dairy-free cheese. Look for brands that melt well and add a nice touch to your meal. If you want to keep it plant-based, switch honey for maple syrup. Maple syrup adds a lovely sweetness. For cheese lovers, use a non-dairy cheese alternative. These options keep the dish flavorful while meeting your dietary needs. Feel free to add root vegetables like carrots or sweet potatoes. They roast well and add extra flavor and texture. You can also combine Brussels sprouts with other greens. Kale or spinach can uplift the dish and enhance its nutritional value. Mixing in these vegetables creates a more colorful plate and a fun twist on the classic recipe. For the full recipe, check out the Balsamic Bliss Brussels Sprouts. To keep your leftover balsamic glazed Brussels sprouts fresh, store them in airtight containers. Make sure they cool down first. Place a paper towel inside the container to absorb moisture. This helps prevent sogginess. You can store them in the fridge for about 3 to 5 days. When reheating, use the oven for the best results. Preheat it to 350°F (175°C). Spread the sprouts on a baking sheet. Heat for about 10 to 15 minutes. This keeps them crispy and tasty. You can also use a microwave, but they may lose some crunch. You can freeze Brussels sprouts for later use. First, blanch them in boiling water for 3 minutes. Then, quickly cool them in ice water. Drain well and transfer to freezer bags. Remove as much air as possible. This helps avoid freezer burn. They can last up to 3 months in the freezer. To thaw, place the sprouts in the fridge overnight. If you’re in a hurry, use cold water. After thawing, roast them again for great flavor. Just remember to adjust the cooking time. Roasting frozen sprouts may take a few extra minutes. For the best flavor, follow the Full Recipe for roasting instructions. To cook Brussels sprouts, roast them for 20 to 25 minutes at 400°F (200°C). You want them tender and a bit caramelized. Stir them halfway through to ensure even cooking. If you like them softer, add a few extra minutes. Yes, you can use frozen Brussels sprouts! Just thaw them first. Pat them dry to remove excess water. Then follow the same roasting steps as fresh ones. Cook them for about 30 minutes, stirring halfway through. You can try many seasonings for Brussels sprouts. Here are some ideas: - Lemon zest for brightness - Chili flakes for heat - Smoked paprika for a smoky flavor - Maple syrup for extra sweetness Experiment with these to find your favorite taste! Balsamic glaze can be healthy in moderation. It has some sugar, but it also offers antioxidants. The vinegar in balsamic glaze can help with digestion. Just be mindful of how much you use. A little goes a long way in flavor! For a full recipe, check out the Balsamic Bliss Brussels Sprouts. In this post, we covered how to make tasty roasted Brussels sprouts. We looked at key ingredients like balsamic vinegar and honey, and shared tips to perfect your glaze. You learned about optional ingredients, cooking steps, and ways to enjoy leftovers. In the end, roasted Brussels sprouts can elevate any meal. Customize your recipe to suit your taste and enjoy!

Balsamic Glazed Brussels Sprouts Flavorful and Simple Dish

Looking to impress your guests with a simple yet flavorful dish? Balsamic Glazed Brussels Sprouts are the answer! These roasted

- 2 lbs chicken thighs, boneless and skinless - 1 cup plain yogurt - 2 tablespoons garam masala

Slow Cooker Chicken Tikka Masala Flavorful Delight

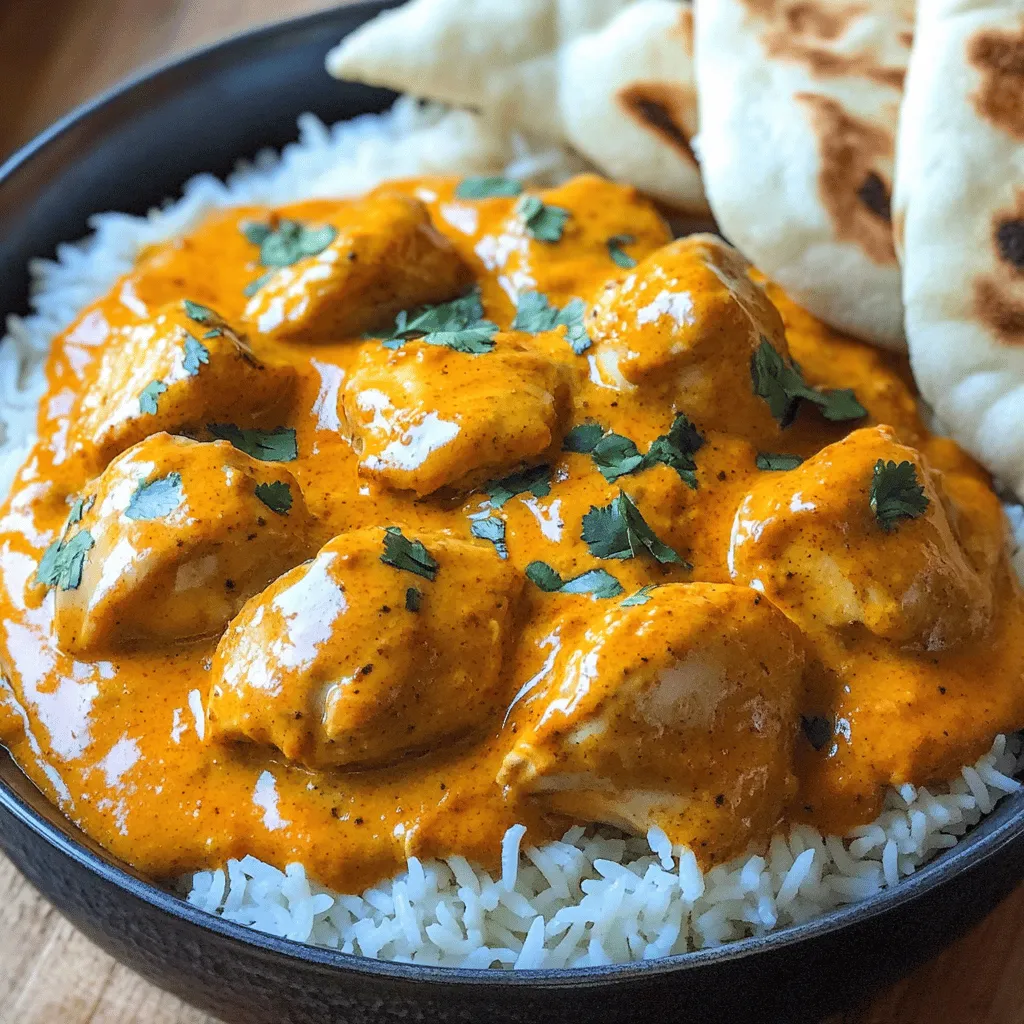
Are you ready to savor a flavorful delight with my Slow Cooker Chicken Tikka Masala? This dish offers tender, juicy

- Ripe avocados - Unsweetened cocoa powder - Maple syrup or honey - Almond milk (or milk of choice) - Vanilla extract - Sea salt - Optional garnish: dark chocolate shavings, fresh berries

Chocolate Avocado Mousse Creamy and Delicious Dessert

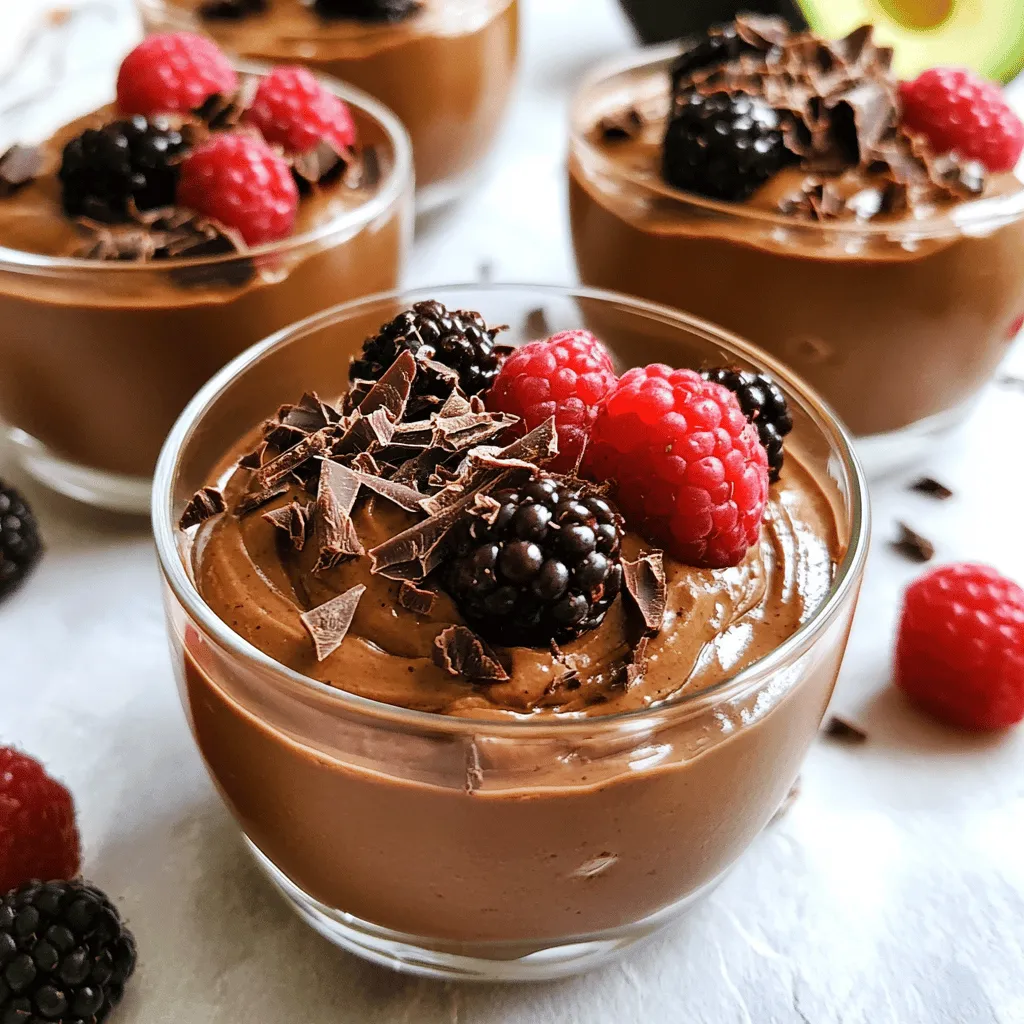
Are you ready to treat yourself to a dessert that’s both creamy and healthy? Chocolate Avocado Mousse is your ticket

For this tasty Instant Pot Chicken and Rice Casserole, you will need: - 1 pound boneless, skinless chicken thighs, cut into bite-sized pieces - 1 cup long-grain white rice, rinsed and drained - 1 medium onion, finely chopped - 2 cloves garlic, minced - 2 cups low-sodium chicken broth - 1 cup frozen mixed vegetables (peas, carrots, corn) - 1 cup cream of mushroom soup (or homemade equivalent) - 1 teaspoon garlic powder - 1 teaspoon onion powder - 1 teaspoon dried thyme - 1 teaspoon paprika - Salt and pepper, to taste - 2 tablespoons olive oil - Fresh parsley, chopped, for garnish

Instant Pot Chicken and Rice Casserole Delight

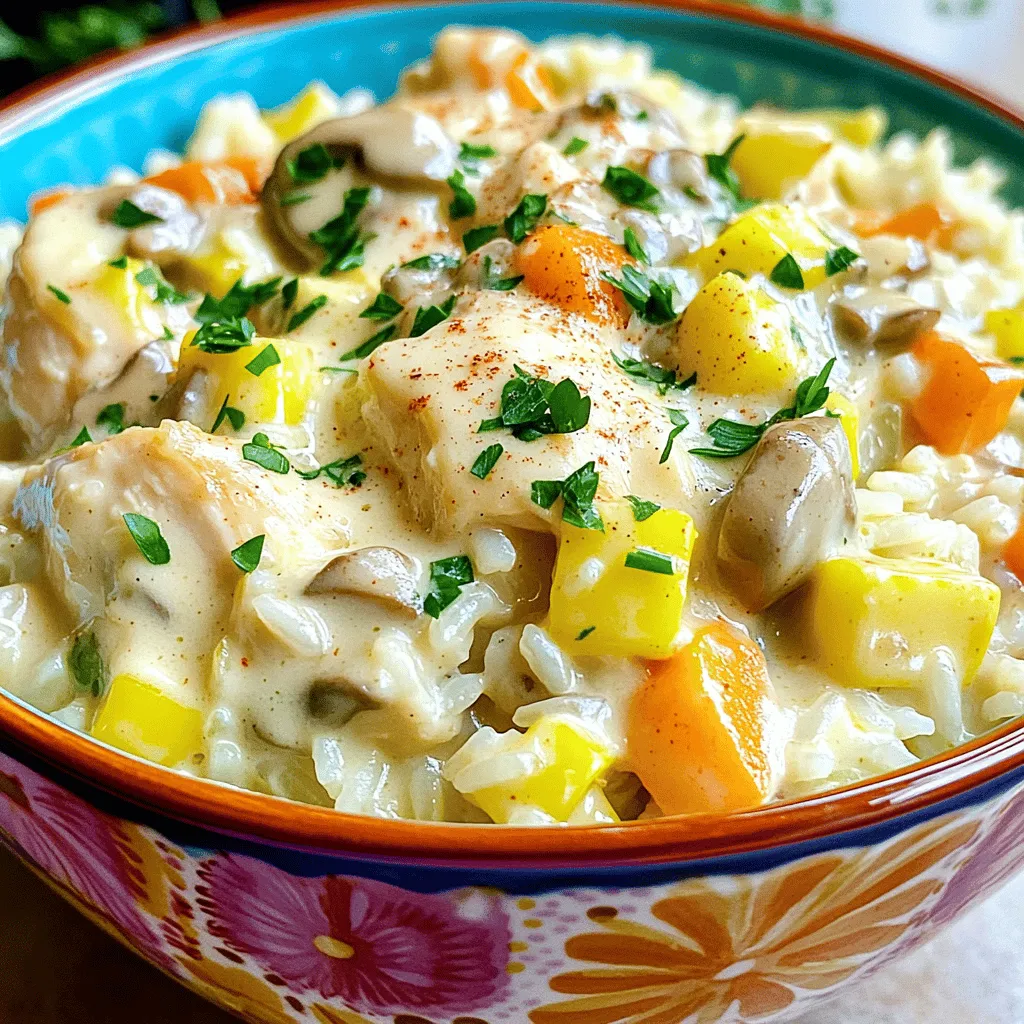
Are you ready to impress your family with a tasty and easy meal? My Instant Pot Chicken and Rice Casserole

- 2 slices of high-quality whole grain or sourdough bread - 1 ripe avocado - 2 large eggs - 1 tablespoon apple cider vinegar - 1/4 teaspoon red pepper flakes - 1/4 cup pumpkin seeds - 1 tablespoon olive oil - Salt and freshly cracked black pepper, to taste - Zest of 1 lemon - Fresh herbs (such as cilantro or parsley) for garnish

Savory Avocado Toast with Poached Egg Recipe

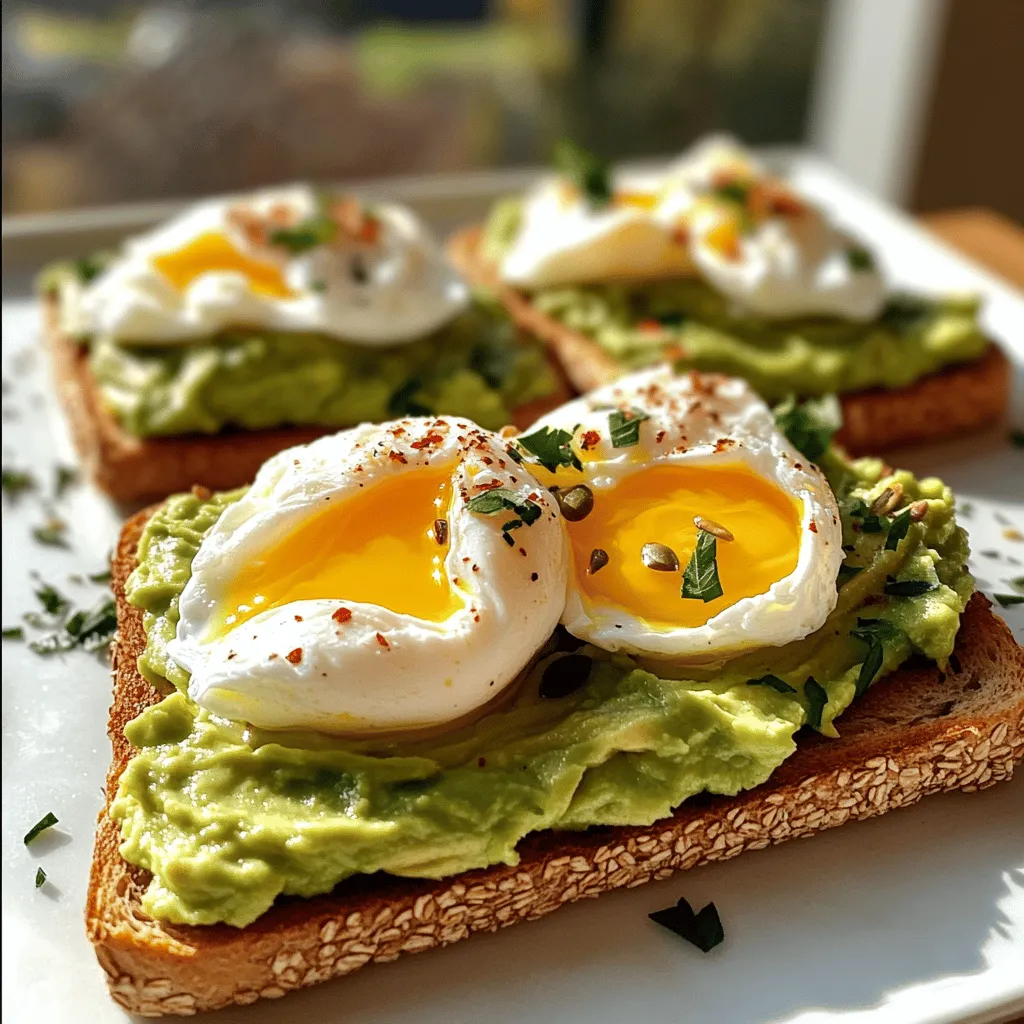
If you’re looking for a tasty and healthy breakfast, this Savory Avocado Toast with Poached Egg recipe is perfect for

- 2 tablespoons olive oil - 1 medium onion, finely chopped - 3 cloves garlic, minced - 2 (14-ounce) cans diced tomatoes (preferably fire-roasted) - 1 cup vegetable broth - 1 teaspoon sugar - 1 teaspoon dried basil - 1/2 teaspoon salt - 1/4 teaspoon black pepper - 1 cup heavy cream (or coconut milk for a dairy-free option) - 1/4 cup fresh basil, chopped

Creamy Tomato Basil Soup Simple and Delicious Recipe

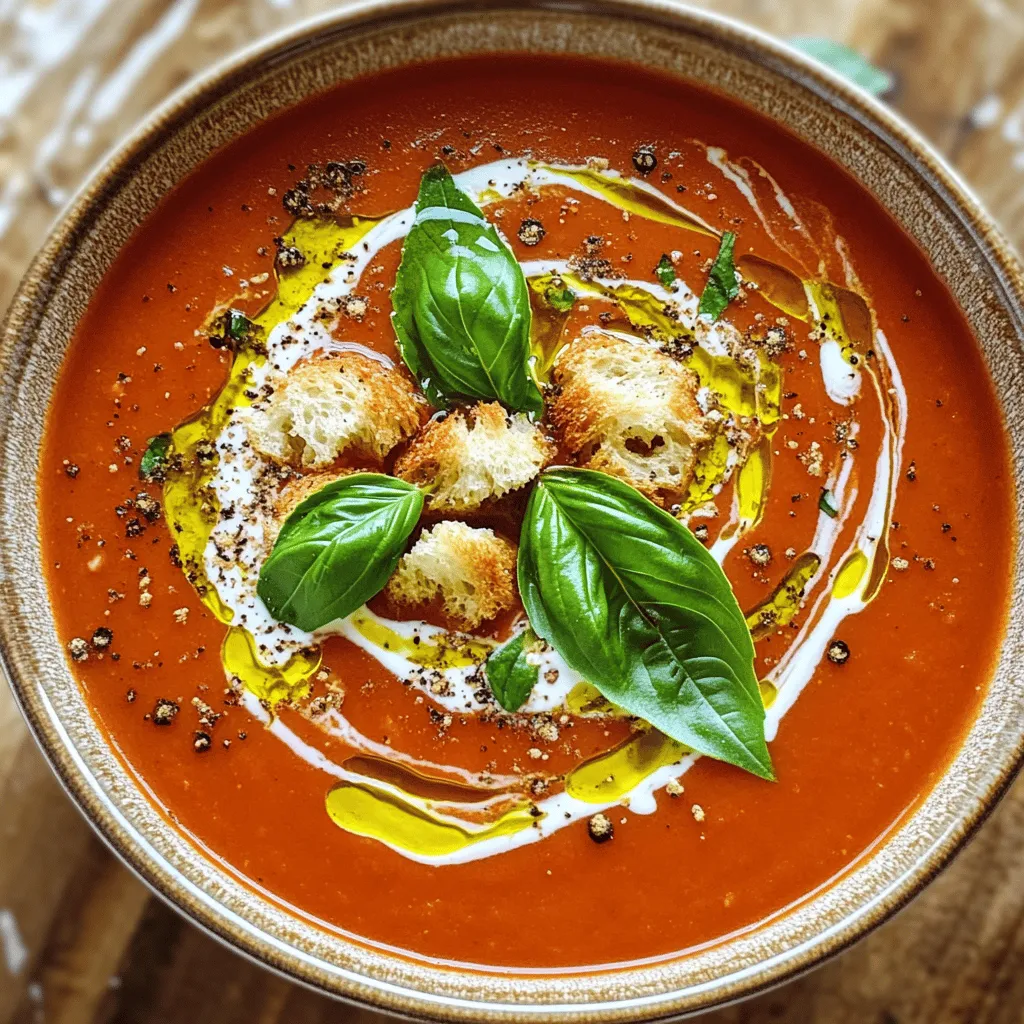
Welcome to your new favorite cozy dish! Creamy Tomato Basil Soup is simple and bursting with flavor. In this post,

Older posts
Newer posts
← Previous Page1 … Page55 Page56 Page57 Page58 Next →

dsad

© 2025 Cooking Wells • Built with GeneratePress

Our Policies

  • Copyright Policy
  • Cookie Policy
  • GDPR Policy
  • Privacy Policy
  • Disclaimer
  • Terms Of Use

More Information

  • Home
  • About
  • Contact
  • Appetizers
  • Dessert
  • Dinner
  • Drinks
©2025, Cooking Wells About Back To Top