Classic Chicken Tenders Crispy and Easy Dinner Guide

Are you ready to make the perfect chicken tenders? In my Classic Chicken Tenders Crispy and Easy Dinner Guide, I’ll show you how to create tender, golden bites that everyone will love. With simple ingredients and easy steps, you can whip up this crowd-pleaser for dinner tonight. Let’s dive into the details that will transform your chicken into a crispy delight!

Ingredients

List of Ingredients

– 2 boneless, skinless chicken breasts, sliced into strips

– 1 cup buttermilk

– 1 teaspoon garlic powder

– 1 teaspoon onion powder

– 1 teaspoon smoked paprika

– 1 teaspoon dried oregano

– 1 teaspoon dried thyme

– 1 cup all-purpose flour

– 1 cup breadcrumbs (preferably panko for extra crunch)

– Salt and pepper to taste

– Vegetable oil for frying

Ingredient Substitutions

You can swap buttermilk for regular milk mixed with a bit of vinegar. This gives a similar tang. If you don’t have garlic or onion powder, fresh garlic and onion work too. Use fresh herbs instead of dried if you have them. You can replace all-purpose flour with gluten-free flour or cornstarch for a gluten-free option.

Importance of Each Ingredient

Each ingredient plays a key role in making chicken tenders crisp and tasty.

Chicken breasts provide a lean protein base. They cook quickly and stay juicy.

Buttermilk tenderizes the chicken and adds flavor. It helps create a nice crust.

Spices like garlic powder and smoked paprika boost flavor. They add depth and warmth.

Breadcrumbs, especially panko, give that crunchy texture we all love.

Flour helps the coating stick. It also adds to the crispiness when fried.

Salt and pepper enhance all the flavors in the dish.

Vegetable oil is crucial for frying. It helps achieve that golden, crispy exterior.

For the full recipe, check out the Crispy Herb-Infused Chicken Tenders.

Step-by-Step Instructions

Preparation of Chicken

Start by gathering your chicken and ingredients. Take the chicken breasts and slice them into strips. I like to make them about one inch wide. This size cooks evenly and stays juicy. Next, mix the buttermilk with garlic powder, onion powder, smoked paprika, oregano, and thyme in a large bowl. This mix adds great flavor and helps the breading stick. Place the chicken strips in the bowl, cover it, and let it chill in the fridge for at least one hour. If you have time, marinate them overnight for even more taste.

Coating Process

Once your chicken is marinated, it’s time to coat it. Set up two bowls: one with seasoned flour and the other with breadcrumbs. Make sure to add salt and pepper to the flour. Take each chicken strip from the marinade. Let the extra liquid drip off, then coat it in the flour. Shake off any excess flour. After that, dip the strip back into the buttermilk mixture briefly. This step helps the breadcrumbs stick better. Finally, roll the chicken in the breadcrumbs and press gently. This ensures a nice, even coating.

Frying Techniques

Now comes the fun part—frying! Heat about one inch of vegetable oil in a large frying pan. Aim for a temperature of 350°F (175°C). You can check this with a kitchen thermometer. Carefully add the chicken strips in batches. Avoid crowding the pan, as this can lower the oil’s temperature. Fry each side for around 4-5 minutes. Look for a golden brown color that shows they are ready. Once cooked, move the chicken tenders to a plate lined with paper towels. This helps soak up extra oil. Serve them hot with your favorite dipping sauces for a tasty treat. Enjoy your crispy chicken tenders! For a detailed recipe, you can check the Full Recipe.

Tips & Tricks

Achieving Perfect Crispy Texture

To get that perfect crispy texture, start with panko breadcrumbs. They are light and airy, giving your chicken a great crunch. After marinating, let the chicken strips rest for a few minutes. This helps the coating stick better. When frying, use enough oil to cover the chicken halfway. This ensures even cooking and crispiness. Flip the chicken only once to avoid losing that crunchy layer.

Marinating Recommendations

Marinating is key for flavor and juiciness. Use buttermilk for the best result. It tenderizes the chicken and adds great taste. For extra flavor, try adding hot sauce or lemon juice to your marinade. You can marinate the chicken for one hour at a minimum. However, if you have time, let it sit overnight. This makes the chicken even tastier.

Serving Suggestions

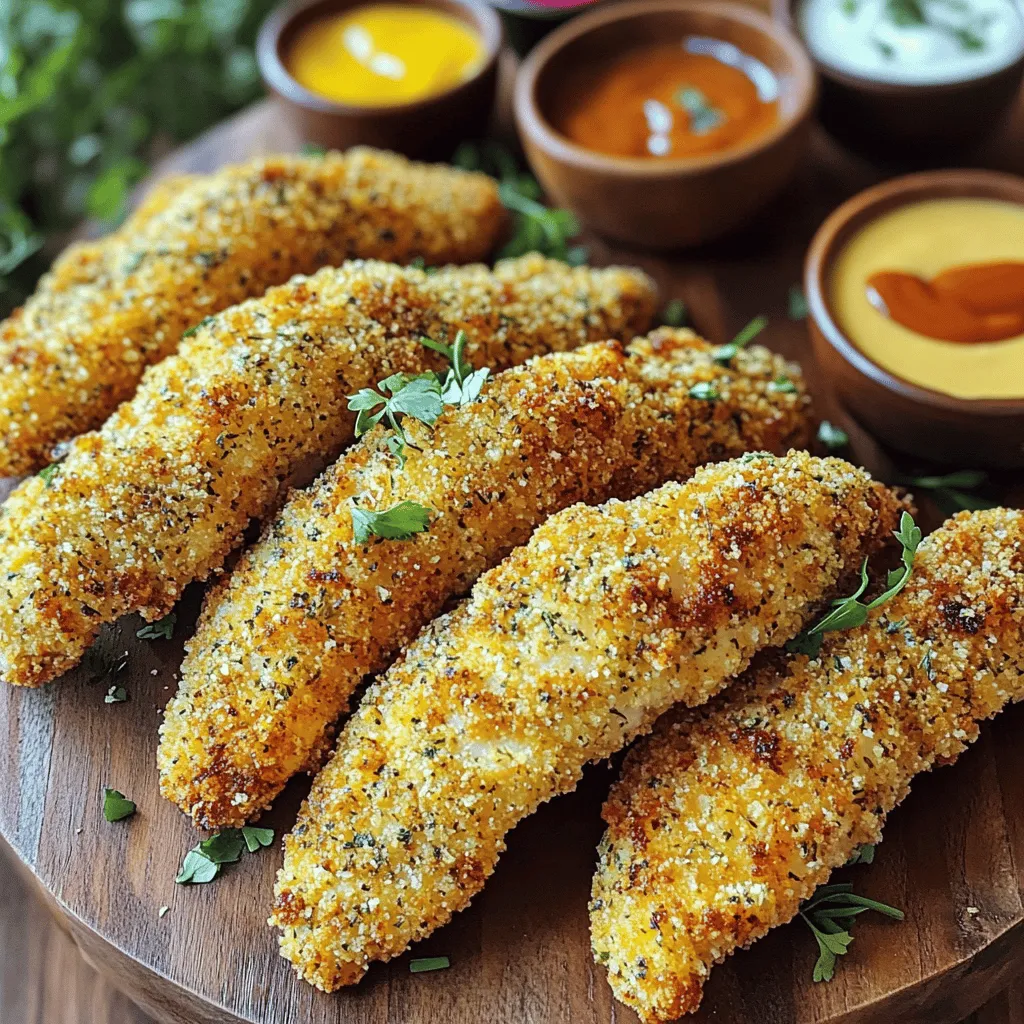
Serve your chicken tenders with a variety of dipping sauces. Honey mustard, ranch, or barbecue sauce are all great choices. You can also pair them with a fresh salad for a complete meal. Arrange the tenders on a pretty platter and add some herbs for color. This makes your meal look inviting and fun. For a side, try crispy fries or a light coleslaw. Enjoy your delicious chicken tenders with friends and family!

Variations

Healthier Baked Chicken Tenders

You can make baked chicken tenders for a healthier option. Start with the same marinated chicken. Instead of frying, place the coated chicken on a baking sheet. Use parchment paper for easy cleanup. Spray the chicken lightly with cooking spray. Bake at 400°F (200°C) for about 20-25 minutes. Flip halfway through for even cooking. You’ll still enjoy a crispy outside and juicy inside.

Flavor Enhancements (spices, sauces)

Adding spices can change the taste of your chicken tenders. Try adding cayenne pepper for heat or Italian herbs for a fresh twist. You can also mix in some parmesan cheese with the breadcrumbs. For sauces, offer options like buffalo sauce, sweet chili sauce, or a tangy barbecue sauce. A squeeze of lemon can brighten the flavors too. Experiment to find your favorite combo.

Kid-Friendly Modifications

Kids love fun shapes and flavors. Use cookie cutters to shape chicken tenders into dinosaurs or stars. You can also create a fun dipping station. Offer a variety of dips like ketchup, ranch, or honey. To make them more appealing, serve with colorful veggies or fruit on the side. This keeps mealtime fun and exciting for little ones.

For the full recipe, check out the [Full Recipe].

Storage Info

How to Store Leftovers

After enjoying your chicken tenders, let them cool down. Place leftovers in an airtight container. Make sure they are sealed tightly. Store them in the fridge for up to 3 days. If you have a lot, consider portioning them out. This way, you can grab just what you need later.

Reheating Methods

To reheat chicken tenders, you have a few great options. For the best texture, use an oven. Preheat the oven to 375°F (190°C). Place the tenders on a baking sheet and heat for 10 to 15 minutes. You can also use an air fryer. Set it to 350°F (175°C) and cook for about 5 to 7 minutes. Both methods keep the tenders crispy. If you’re in a hurry, a microwave will work too. Heat them in short bursts, checking often. They won’t be as crispy, but they’ll still taste good.

Freezing and Thawing Tips

Freezing is a great way to save chicken tenders. First, let them cool completely. Then, wrap each piece in plastic wrap. Place the wrapped tenders in a freezer bag. Squeeze out all the air before sealing. They will stay fresh for up to 2 months. To thaw them, move the bag to the fridge for the night. You can also use the microwave, but be careful not to cook them. Once thawed, use the reheating methods mentioned above. This keeps them tasty and enjoyable. For more details, check the Full Recipe.

FAQs

What is the best way to ensure chicken tenders are cooked through?

To cook chicken tenders well, use a meat thermometer. Insert it into the thickest part of the chicken. The right temperature is 165°F (74°C). This ensures the chicken is safe to eat. Uniformly sized strips also help with even cooking. Fry the chicken until golden brown for the best flavor and texture.

How long can you marinate chicken?

You can marinate chicken for 30 minutes to 24 hours. For a quick soak, 30 minutes is enough to add flavor. If you want a deeper taste, marinate overnight. Just remember, if you marinate too long, the texture can change. The acid in the marinade can make the chicken mushy.

Can you make these chicken tenders gluten-free?

Yes, you can make chicken tenders gluten-free. Instead of all-purpose flour, use a gluten-free flour blend. For the breadcrumbs, use gluten-free panko. These swaps will keep the crispiness you want. Always check labels to ensure all ingredients are gluten-free.

Where did chicken tenders originate?

Chicken tenders started in the United States. They became popular in the 1970s. The name “tender” comes from the tender meat used in the dish. Many people love them for their taste and ease. They fit well in meals for kids and adults alike.

In this post, we covered delicious chicken tenders. We looked at key ingredients and ideas for substitutions. You learned step-by-step ways to prepare, coat, and fry. I shared tips for a crispy texture and fun serving ideas. We explored healthier versions and storage tips too.

Making chicken tenders can be simple and fun. Enjoy experimenting with flavors and variations. You now have all you need to create perfect chicken tenders!
- 2 boneless, skinless chicken breasts, sliced into strips - 1 cup buttermilk - 1 teaspoon garlic powder - 1 teaspoon onion powder - 1 teaspoon smoked paprika - 1 teaspoon dried oregano - 1 teaspoon dried thyme - 1 cup all-purpose flour - 1 cup breadcrumbs (preferably panko for extra crunch) - Salt and pepper to taste - Vegetable oil for frying You can swap buttermilk for regular milk mixed with a bit of vinegar. This gives a similar tang. If you don’t have garlic or onion powder, fresh garlic and onion work too. Use fresh herbs instead of dried if you have them. You can replace all-purpose flour with gluten-free flour or cornstarch for a gluten-free option. Each ingredient plays a key role in making chicken tenders crisp and tasty. - Chicken breasts provide a lean protein base. They cook quickly and stay juicy. - Buttermilk tenderizes the chicken and adds flavor. It helps create a nice crust. - Spices like garlic powder and smoked paprika boost flavor. They add depth and warmth. - Breadcrumbs, especially panko, give that crunchy texture we all love. - Flour helps the coating stick. It also adds to the crispiness when fried. - Salt and pepper enhance all the flavors in the dish. - Vegetable oil is crucial for frying. It helps achieve that golden, crispy exterior. For the full recipe, check out the Crispy Herb-Infused Chicken Tenders. Start by gathering your chicken and ingredients. Take the chicken breasts and slice them into strips. I like to make them about one inch wide. This size cooks evenly and stays juicy. Next, mix the buttermilk with garlic powder, onion powder, smoked paprika, oregano, and thyme in a large bowl. This mix adds great flavor and helps the breading stick. Place the chicken strips in the bowl, cover it, and let it chill in the fridge for at least one hour. If you have time, marinate them overnight for even more taste. Once your chicken is marinated, it’s time to coat it. Set up two bowls: one with seasoned flour and the other with breadcrumbs. Make sure to add salt and pepper to the flour. Take each chicken strip from the marinade. Let the extra liquid drip off, then coat it in the flour. Shake off any excess flour. After that, dip the strip back into the buttermilk mixture briefly. This step helps the breadcrumbs stick better. Finally, roll the chicken in the breadcrumbs and press gently. This ensures a nice, even coating. Now comes the fun part—frying! Heat about one inch of vegetable oil in a large frying pan. Aim for a temperature of 350°F (175°C). You can check this with a kitchen thermometer. Carefully add the chicken strips in batches. Avoid crowding the pan, as this can lower the oil's temperature. Fry each side for around 4-5 minutes. Look for a golden brown color that shows they are ready. Once cooked, move the chicken tenders to a plate lined with paper towels. This helps soak up extra oil. Serve them hot with your favorite dipping sauces for a tasty treat. Enjoy your crispy chicken tenders! For a detailed recipe, you can check the Full Recipe. To get that perfect crispy texture, start with panko breadcrumbs. They are light and airy, giving your chicken a great crunch. After marinating, let the chicken strips rest for a few minutes. This helps the coating stick better. When frying, use enough oil to cover the chicken halfway. This ensures even cooking and crispiness. Flip the chicken only once to avoid losing that crunchy layer. Marinating is key for flavor and juiciness. Use buttermilk for the best result. It tenderizes the chicken and adds great taste. For extra flavor, try adding hot sauce or lemon juice to your marinade. You can marinate the chicken for one hour at a minimum. However, if you have time, let it sit overnight. This makes the chicken even tastier. Serve your chicken tenders with a variety of dipping sauces. Honey mustard, ranch, or barbecue sauce are all great choices. You can also pair them with a fresh salad for a complete meal. Arrange the tenders on a pretty platter and add some herbs for color. This makes your meal look inviting and fun. For a side, try crispy fries or a light coleslaw. Enjoy your delicious chicken tenders with friends and family! {{image_2}} You can make baked chicken tenders for a healthier option. Start with the same marinated chicken. Instead of frying, place the coated chicken on a baking sheet. Use parchment paper for easy cleanup. Spray the chicken lightly with cooking spray. Bake at 400°F (200°C) for about 20-25 minutes. Flip halfway through for even cooking. You’ll still enjoy a crispy outside and juicy inside. Adding spices can change the taste of your chicken tenders. Try adding cayenne pepper for heat or Italian herbs for a fresh twist. You can also mix in some parmesan cheese with the breadcrumbs. For sauces, offer options like buffalo sauce, sweet chili sauce, or a tangy barbecue sauce. A squeeze of lemon can brighten the flavors too. Experiment to find your favorite combo. Kids love fun shapes and flavors. Use cookie cutters to shape chicken tenders into dinosaurs or stars. You can also create a fun dipping station. Offer a variety of dips like ketchup, ranch, or honey. To make them more appealing, serve with colorful veggies or fruit on the side. This keeps mealtime fun and exciting for little ones. For the full recipe, check out the [Full Recipe]. After enjoying your chicken tenders, let them cool down. Place leftovers in an airtight container. Make sure they are sealed tightly. Store them in the fridge for up to 3 days. If you have a lot, consider portioning them out. This way, you can grab just what you need later. To reheat chicken tenders, you have a few great options. For the best texture, use an oven. Preheat the oven to 375°F (190°C). Place the tenders on a baking sheet and heat for 10 to 15 minutes. You can also use an air fryer. Set it to 350°F (175°C) and cook for about 5 to 7 minutes. Both methods keep the tenders crispy. If you're in a hurry, a microwave will work too. Heat them in short bursts, checking often. They won’t be as crispy, but they’ll still taste good. Freezing is a great way to save chicken tenders. First, let them cool completely. Then, wrap each piece in plastic wrap. Place the wrapped tenders in a freezer bag. Squeeze out all the air before sealing. They will stay fresh for up to 2 months. To thaw them, move the bag to the fridge for the night. You can also use the microwave, but be careful not to cook them. Once thawed, use the reheating methods mentioned above. This keeps them tasty and enjoyable. For more details, check the Full Recipe. To cook chicken tenders well, use a meat thermometer. Insert it into the thickest part of the chicken. The right temperature is 165°F (74°C). This ensures the chicken is safe to eat. Uniformly sized strips also help with even cooking. Fry the chicken until golden brown for the best flavor and texture. You can marinate chicken for 30 minutes to 24 hours. For a quick soak, 30 minutes is enough to add flavor. If you want a deeper taste, marinate overnight. Just remember, if you marinate too long, the texture can change. The acid in the marinade can make the chicken mushy. Yes, you can make chicken tenders gluten-free. Instead of all-purpose flour, use a gluten-free flour blend. For the breadcrumbs, use gluten-free panko. These swaps will keep the crispiness you want. Always check labels to ensure all ingredients are gluten-free. Chicken tenders started in the United States. They became popular in the 1970s. The name "tender" comes from the tender meat used in the dish. Many people love them for their taste and ease. They fit well in meals for kids and adults alike. In this post, we covered delicious chicken tenders. We looked at key ingredients and ideas for substitutions. You learned step-by-step ways to prepare, coat, and fry. I shared tips for a crispy texture and fun serving ideas. We explored healthier versions and storage tips too. Making chicken tenders can be simple and fun. Enjoy experimenting with flavors and variations. You now have all you need to create perfect chicken tenders!
Classic Chicken Tenders

Discover the secret to crispy herb-infused chicken tenders that will wow your taste buds! This simple recipe combines juicy chicken with a flavorful marinade and a crunchy coating, perfect for family dinners or game day snacks. With easy-to-follow steps and just a few ingredients, you’ll have delicious tenders ready in no time. Click through to explore the full recipe and elevate your cooking game today!

Ingredients
  

2 boneless, skinless chicken breasts, sliced into strips

1 cup buttermilk

1 teaspoon garlic powder

1 teaspoon onion powder

1 teaspoon smoked paprika

1 teaspoon dried oregano

1 teaspoon dried thyme

1 cup all-purpose flour

1 cup breadcrumbs (preferably panko for extra crunch)

Salt and pepper to taste

Vegetable oil for frying

Instructions
 

In a large mixing bowl, whisk together the buttermilk, garlic powder, onion powder, smoked paprika, dried oregano, and dried thyme. This will be your marinade.

    Add the chicken strips to the marinade, cover, and refrigerate for at least 1 hour (or overnight for deeper flavor).

      In a separate shallow bowl, combine the flour and season with salt and pepper. In another bowl, place the breadcrumbs.

        Remove the marinated chicken from the refrigerator. Take each strip, allowing excess marinade to drip off, and first coat it in the seasoned flour, shaking off any excess.

          Next, dip the floured chicken strip back into the buttermilk marinade briefly, then coat it in breadcrumbs, pressing gently to ensure the breadcrumbs stick well.

            Heat about 1 inch of vegetable oil in a large frying pan over medium heat until it reaches 350°F (175°C). Carefully add the chicken tenders in batches, avoiding overcrowding the pan. Fry each side for about 4-5 minutes or until golden brown and cooked through.

              Once cooked, remove the chicken tenders and place them on a plate lined with paper towels to absorb excess oil.

                Serve hot with your favorite dipping sauces, like honey mustard, ranch, or barbecue sauce.

                  Prep Time: 15 minutes | Total Time: 1 hour 15 minutes (includes marinating time) | Servings: 4

                    - Presentation Tips: Arrange the chicken tenders on a wooden platter, sprinkle with fresh herbs for garnish, and serve with an assortment of colorful dipping sauces in small bowls around them.

                      Leave a Comment

                      Recipe Rating