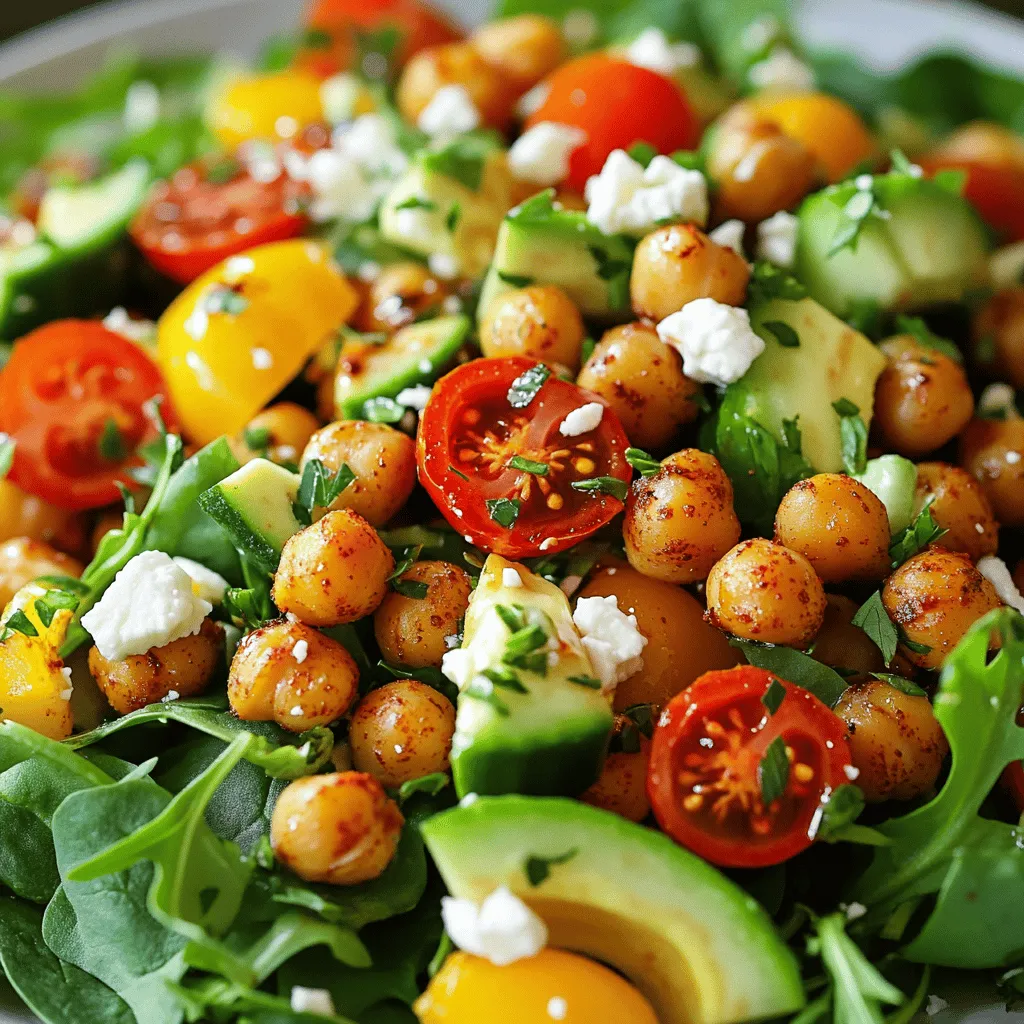
Looking for a healthy yet tasty meal? Try my Crispy Chickpea Salad! It’s easy to make and full of flavor. With simple ingredients and fun variations, you can enjoy a filling dish that’s perfect for lunch or dinner. Plus, I’ll share expert tips to keep your chickpeas crispy and delicious. Get ready to discover a salad that will make your taste buds dance! Let’s dive in!
Ingredients
Main Ingredients for Crispy Chickpea Salad
To make a tasty Crispy Chickpea Salad, gather these main items:
– 1 can (15 oz) chickpeas, drained and rinsed
– 2 tablespoons olive oil
– 1 teaspoon smoked paprika
– 1 teaspoon garlic powder
– Salt and pepper to taste
– 4 cups mixed salad greens (like spinach, arugula, romaine)
– 1 cup cherry tomatoes, halved
– 1 cucumber, diced
– 1 bell pepper (any color), diced
– 1 avocado, sliced
– 2 tablespoons lemon juice
– 1 tablespoon balsamic vinegar
These ingredients work well together, giving flavor and texture.
Optional Ingredients to Enhance Flavor
You can add optional items for extra taste and richness:
– ¼ cup feta cheese, crumbled
– Fresh herbs (like parsley or cilantro), chopped for garnish
These optional ingredients add creaminess and a fresh touch.
Nutritional Benefits of Each Ingredient
Each ingredient in this salad brings health benefits:
– Chickpeas: Packed with protein and fiber, they keep you full.
– Olive oil: A healthy fat that supports heart health.
– Smoked paprika: Offers antioxidants and adds a smoky taste.
– Garlic powder: May boost your immune system and flavor.
– Salad greens: Low in calories, high in vitamins A and C.
– Cherry tomatoes: Rich in vitamins and antioxidants, good for your skin.
– Cucumber: Hydrating and low-calorie, perfect for freshness.
– Bell peppers: High in vitamin C, aiding your immune system.
– Avocado: Provides healthy fats and fiber, promoting satiety.
– Feta cheese: Adds calcium and flavor, though it is optional.
– Lemon juice: Adds vitamin C and brightens the dish.
– Balsamic vinegar: May help with digestion and adds a sweet touch.
These ingredients not only taste great but also nourish your body.
Step-by-Step Instructions
Preparation Steps for the Ingredients
First, gather your ingredients. You will need one can of chickpeas, olive oil, smoked paprika, garlic powder, salt, and pepper. Also, get your salad greens, cherry tomatoes, cucumber, bell pepper, avocado, feta cheese, lemon juice, balsamic vinegar, and fresh herbs. Drain and rinse the chickpeas well. That helps them crisp up nicely. Next, chop the veggies. Halve the cherry tomatoes, dice the cucumber and bell pepper, and slice the avocado. Set everything aside as we move on.
Baking the Chickpeas to Achieve Crispiness
Preheat your oven to 400°F (200°C). Spread the chickpeas on a baking sheet in a single layer. Drizzle them with olive oil. Then, sprinkle the smoked paprika, garlic powder, salt, and pepper over them. Toss the chickpeas gently to coat them evenly. Bake in the oven for 20 to 25 minutes. Shake the pan halfway through. This step helps the chickpeas cook evenly and become golden and crispy. Keep an eye on them as they bake. You want them crunchy, not burnt!
Assembling the Salad
While the chickpeas bake, prepare your salad. In a large bowl, combine the mixed salad greens, cherry tomatoes, cucumber, bell pepper, and avocado. In a small bowl, whisk together the lemon juice, balsamic vinegar, salt, and pepper. This will be your dressing. Once the chickpeas are done, let them cool for a few minutes. Then, add them to your salad. Drizzle the dressing over the top. Toss gently to mix everything well. If you like, sprinkle crumbled feta cheese and fresh herbs on top. Now, your crispy chickpea salad is ready to enjoy!
Tips & Tricks
How to Ensure Chickpeas Remain Crispy
To keep your chickpeas crispy, start with dry chickpeas. If using canned, drain and rinse them well. Pat them dry with a towel. This step removes excess moisture, which can make them soggy. Coat them lightly with olive oil and spices. Bake them at 400°F for 20-25 minutes. Shake the pan halfway through to crisp all sides. Let them cool for a few minutes after baking. This cooling time helps them stay crunchy when added to the salad.
Customizing the Salad for Added Nutrition
You can easily boost the salad’s nutrition. Add more veggies like carrots, radishes, or kale. These add color and vitamins. You can also throw in some nuts or seeds for healthy fats. Walnuts or sunflower seeds work well. If you want extra protein, toss in some cooked quinoa or beans. This makes the salad more filling and satisfying. Feel free to mix and match based on what you have at home.
Dressing Variations for Extra Flavor
The dressing can change the whole taste of your salad. A simple lemon juice and balsamic vinegar mix is great. But you can add other flavors too. Try a yogurt dressing for creaminess. Or mix in tahini for a nutty flavor. You can also use honey or maple syrup for sweetness. Just remember to keep the balance of flavors. A tangy dressing pairs well with crispy chickpeas. Experiment with different herbs and spices for unique tastes.
Variations
Vegetarian and Vegan-Friendly Options
This salad is already a great choice for vegetarians and vegans. The chickpeas offer protein and fiber. If you skip the feta cheese, the salad stays fully vegan. You can also add more veggies. Try shredded carrots or roasted zucchini for extra flavor and crunch.
Ingredient Swaps for Dietary Preferences
You can swap out ingredients based on what you like. If you avoid olive oil, use avocado oil instead. For a nut-free option, skip the feta cheese. If you need a lower-carb choice, replace chickpeas with roasted cauliflower. This keeps the dish tasty and suitable for your diet.
Seasonal Variations to Keep it Fresh
Change the salad based on the season. In spring, add fresh peas or asparagus for a pop of color. Summer is perfect for juicy peaches or strawberries. In fall, roasted sweet potatoes work well. Winter calls for hearty greens like kale or Brussels sprouts. Each season brings new flavors to enjoy in your crispy chickpea salad.
Storage Info
Best Practices for Storing Leftovers
To store leftover crispy chickpea salad, keep the chickpeas and greens separate. Use an airtight container for both. This helps prevent sogginess. Store in the fridge for up to three days. If you mix them together, the salad will lose its crispiness.
How to Keep Chickpeas Crispy When Reheating
When reheating leftover chickpeas, avoid the microwave. Instead, use an oven or air fryer. Preheat your oven to 375°F (190°C). Spread the chickpeas in a single layer on a baking sheet. Heat them for about 10-15 minutes until warm and crispy again. This method keeps them crunchy.
Duration and Signs of Spoilage
Leftover salad lasts three days in the fridge. Check for changes in smell or color. If the salad looks dull or has a strange odor, it’s best to toss it. Always trust your senses. Fresh ingredients make a big difference in taste and safety.
FAQs
How long does it take to make Crispy Chickpea Salad?
It takes about 35 minutes to make this salad. You need 10 minutes to prep the ingredients. The chickpeas bake for around 20-25 minutes, giving them a nice crunch.
Can I prepare this salad in advance?
Yes, you can prepare this salad ahead of time. Make the chickpeas and store them in an airtight container. Keep the salad greens and other veggies separate until you’re ready to eat. This keeps everything fresh and crisp.
What are some protein additions to make it more filling?
You can add several proteins to this salad. Here are some tasty options:
– Grilled chicken
– Cooked quinoa
– Chickpeas (double the amount for more crunch)
– Hard-boiled eggs
– Tofu or tempeh for a plant-based option
These proteins will boost the nutrition and keep you full longer.
Is this salad gluten-free?
Yes, this salad is gluten-free. All the ingredients, including chickpeas and veggies, are naturally gluten-free. Just ensure any added dressing or toppings do not contain gluten. For instance, check that the balsamic vinegar is pure and gluten-free for safety.
This blog post covered how to make a Crispy Chickpea Salad. We explored key ingredients, from the main elements to optional flavor boosters. I shared step-by-step instructions, including how to keep those chickpeas crispy. We discussed helpful tips and variations to suit different diets and seasons.
In the end, this salad is not only tasty but also packed with nutrition. You can enjoy it any time and make it your own. Try it out, and let your taste buds lead the way!