No-Bake Raspberry Chocolate Cheesecake Cups Delight

WANT TO SAVE THIS RECIPE?

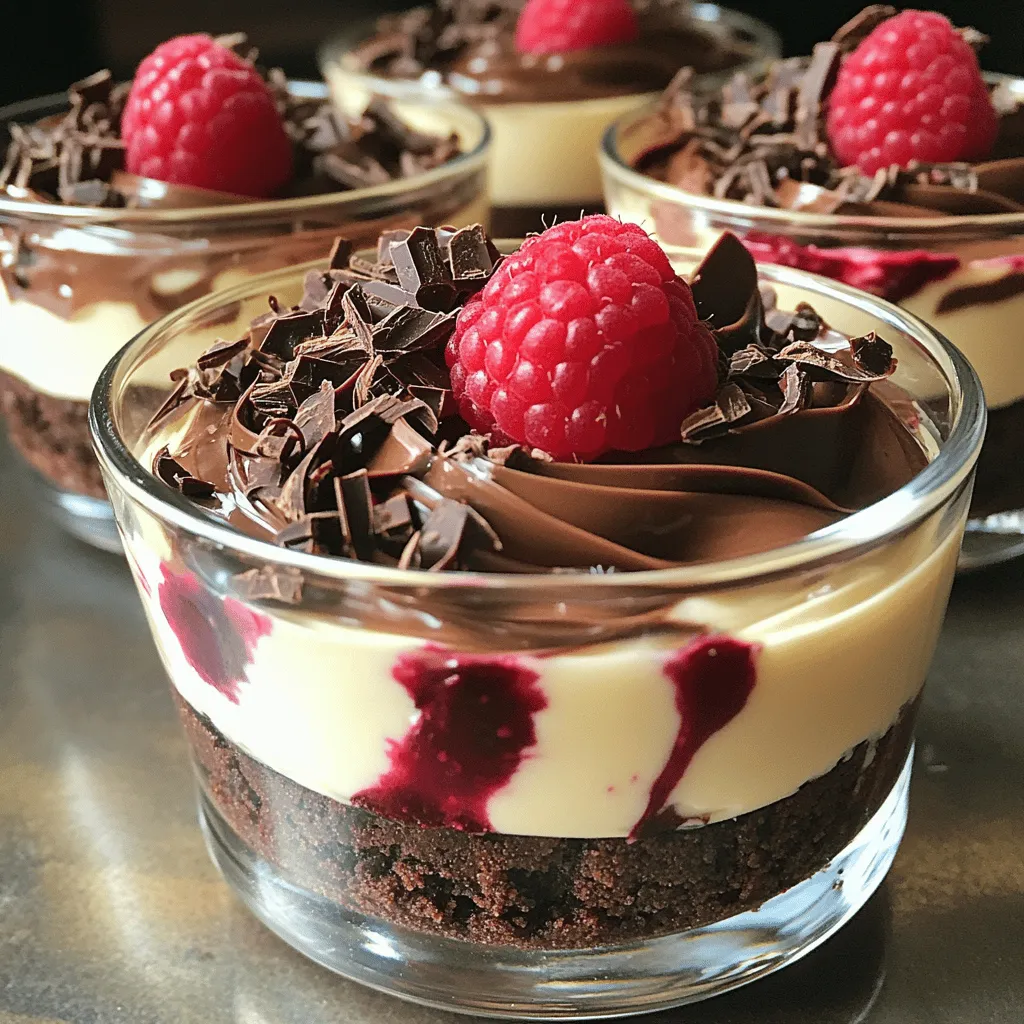
Are you ready to indulge in a dessert that’s both easy and delicious? My No-Bake Raspberry Chocolate Cheesecake Cups will wow your taste buds! Imagine a creamy cheesecake filled with fresh raspberries and rich chocolate, all without turning on the oven. In this post, I’ll guide you step-by-step, share helpful tips, and explore fun variations. Let’s dive into this sweet treat that’s perfect for any occasion!

Ingredients

List of ingredients for No-Bake Raspberry Chocolate Cheesecake Cups

  • 1 cup chocolate cookie crumbs
  • 3 tablespoons unsalted butter, melted
  • 8 oz cream cheese, softened
  • 1/2 cup powdered sugar
  • 1/2 cup heavy whipping cream
  • 1 teaspoon vanilla extract
  • 1 cup fresh raspberries
  • 1/4 cup dark chocolate chips, melted
  • Extra raspberries and chocolate shavings for garnish

Measurement details and tips for choosing quality ingredients

When you pick ingredients, quality matters. Use fresh raspberries for the best taste. Look for ripe, firm berries with no spots. Choose unsalted butter for better control of salt in the recipe. Cream cheese should be soft, not cold, for easy mixing. When you buy chocolate chips, go for dark chocolate for rich flavor. The higher the cocoa content, the better.

Suggestions for substitutions to accommodate dietary restrictions

You can swap some ingredients to fit dietary needs. If you want a gluten-free option, use gluten-free chocolate cookie crumbs. For a dairy-free version, look for vegan cream cheese and coconut cream instead of heavy cream. If someone is allergic to nuts, check labels on cookie crumbs. Always read the package for hidden ingredients.

Step-by-Step Instructions

Preparation of cookie crust

To start, grab a medium bowl. Mix together 1 cup of chocolate cookie crumbs with 3 tablespoons of melted unsalted butter. Stir until it looks like wet sand. Press this mixture firmly into the bottom of your serving cups. This forms the crust layer. Chill the cups in the fridge for about 10 minutes to help it set.

Making the cheesecake filling

Next, take a large mixing bowl. Beat 8 ounces of softened cream cheese with an electric mixer. Keep mixing until it’s smooth and creamy. Then, add in 1/2 cup of powdered sugar and 1 teaspoon of vanilla extract. Mix until everything is well blended. In a separate bowl, whip 1/2 cup of heavy cream. Beat until stiff peaks form. Now, gently fold this whipped cream into your cream cheese mixture. Once combined, swirl in 1/4 cup of melted dark chocolate. This creates a nice marbled effect.

Assembling and chilling the cups

Now, it’s time to assemble. Spoon the cheesecake mixture over the chilled cookie crusts in each cup. Fill them nearly to the top, leaving space for the raspberries. Next, place fresh raspberries on top. Press them gently into the cheesecake. Finally, chill the cups in the fridge for at least 2 hours. This cooling time helps the cheesecake firm up. Before serving, drizzle some melted chocolate on top and add extra raspberries and chocolate shavings for garnish. Enjoy your delightful treat!

Tips & Tricks

How to achieve the perfect cheesecake texture

To get a smooth, creamy cheesecake, soften the cream cheese first. Use an electric mixer to blend it until it’s soft. Mix in the powdered sugar and vanilla well. This step helps avoid lumps. When you whip the heavy cream, whisk until you see stiff peaks. Gently fold this whipped cream into the cream cheese mix. This keeps the cheesecake light and airy.

Tips for garnishing and presentation

Garnishing makes your cheesecake cups look nice. After chilling, add fresh raspberries on top. Press them gently into the cheesecake. This makes them stick better. Drizzle melted chocolate over the cups for a tasty touch. Use a grater to add chocolate shavings too. This adds a nice look and taste.

Common mistakes to avoid while preparing

One common mistake is not chilling the crust long enough. Always chill for at least 10 minutes. This helps it set properly. Another mistake is overmixing the cream cheese. Mix just until smooth; lumps are okay. Remember not to skip the whipping of the cream. It keeps your cheesecake light and fluffy. Lastly, let the cheesecake chill for at least 2 hours before serving. This helps it firm up nicely.

Variations

Alternative flavor combinations for cheesecake cups

You can change up the flavors in your cheesecake cups. Try using strawberries instead of raspberries. You can also mix in lemon zest for a bright twist. Another great option is to add some peanut butter to the cream cheese mix. This gives a rich, nutty taste. You can even swap chocolate for white chocolate. Each option offers a new taste adventure.

Ideas for different crust options

While chocolate cookie crumbs shine, other crusts can be just as tasty. Use graham crackers for a classic flavor. You can also try crushed Oreos for a fun twist. If you want something healthier, blend nuts and dates to form a base. Each crust change can add a unique touch to your cheesecake cups.

Vegan or gluten-free adaptations

You can make these cheesecake cups vegan or gluten-free with a few swaps. For a vegan version, use coconut cream instead of cream cheese. You can sweeten it with maple syrup. Use gluten-free cookies for your crust. This way, everyone can enjoy these treats without worry. Each adaptation keeps the great taste while meeting dietary needs.

Storage Info

Best practices for storing cheesecake cups

To keep your no-bake raspberry chocolate cheesecake cups fresh, store them in the fridge. Use an airtight container to prevent moisture loss. If you stack the cups, place parchment paper between them. This avoids a messy situation. You want to keep the toppings intact.

Shelf life and freezing information

These cheesecake cups last about 3 to 4 days in the fridge. If you want to extend their life, you can freeze them. Wrap each cup in plastic wrap, then place them in a freezer-safe bag. They will stay good for about 2 months. Thaw them in the fridge before serving.

Reheating tips for leftover components

You don’t need to reheat cheesecake cups. They taste best cold. If you have leftover crust or filling, store them separately. You can use the crust for other desserts or as a topping. Keep the filling in a sealed container in the fridge for up to 3 days.

FAQs

Can I make No-Bake Raspberry Chocolate Cheesecake Cups in advance?

Yes, you can make these cheesecake cups ahead of time. It is a great way to save time. Prepare the cups and chill them in the fridge. You can make them one day before serving. This will enhance the flavors and texture. Just be sure to cover them well to prevent drying out.

How long do these cheesecake cups last in the fridge?

These cheesecake cups can last up to three days in the fridge. After that, they may start to lose their freshness. Keep them in an airtight container for best results. If you see any changes in color or smell, it’s best to discard them.

Can I substitute other fruits for raspberries in the recipe?

Absolutely! You can use many fruits in place of raspberries. Strawberries, blueberries, or blackberries work well. Each fruit will add a unique flavor. Just make sure to adjust the sweetness if needed. Fresh fruits will give your cheesecake cups a lovely touch.

In this blog post, we explored how to make No-Bake Raspberry Chocolate Cheesecake Cups. We covered the ingredients needed, measured details, and substitutions for your diet. You learned step-by-step instructions, tips for texture, and common mistakes to avoid. I also shared variations for flavors and crusts, along with storage info for keeping them fresh. Remember, these cups are easy to adapt and delicious. Try different flavors or crusts to find your favorite! Enjoy making this treat and impressing your friends with your skills.

- 1 cup chocolate cookie crumbs - 3 tablespoons unsalted butter, melted - 8 oz cream cheese, softened - 1/2 cup powdered sugar - 1/2 cup heavy whipping cream - 1 teaspoon vanilla extract - 1 cup fresh raspberries - 1/4 cup dark chocolate chips, melted - Extra raspberries and chocolate shavings for garnish When you pick ingredients, quality matters. Use fresh raspberries for the best taste. Look for ripe, firm berries with no spots. Choose unsalted butter for better control of salt in the recipe. Cream cheese should be soft, not cold, for easy mixing. When you buy chocolate chips, go for dark chocolate for rich flavor. The higher the cocoa content, the better. You can swap some ingredients to fit dietary needs. If you want a gluten-free option, use gluten-free chocolate cookie crumbs. For a dairy-free version, look for vegan cream cheese and coconut cream instead of heavy cream. If someone is allergic to nuts, check labels on cookie crumbs. Always read the package for hidden ingredients. To start, grab a medium bowl. Mix together 1 cup of chocolate cookie crumbs with 3 tablespoons of melted unsalted butter. Stir until it looks like wet sand. Press this mixture firmly into the bottom of your serving cups. This forms the crust layer. Chill the cups in the fridge for about 10 minutes to help it set. Next, take a large mixing bowl. Beat 8 ounces of softened cream cheese with an electric mixer. Keep mixing until it’s smooth and creamy. Then, add in 1/2 cup of powdered sugar and 1 teaspoon of vanilla extract. Mix until everything is well blended. In a separate bowl, whip 1/2 cup of heavy cream. Beat until stiff peaks form. Now, gently fold this whipped cream into your cream cheese mixture. Once combined, swirl in 1/4 cup of melted dark chocolate. This creates a nice marbled effect. Now, it’s time to assemble. Spoon the cheesecake mixture over the chilled cookie crusts in each cup. Fill them nearly to the top, leaving space for the raspberries. Next, place fresh raspberries on top. Press them gently into the cheesecake. Finally, chill the cups in the fridge for at least 2 hours. This cooling time helps the cheesecake firm up. Before serving, drizzle some melted chocolate on top and add extra raspberries and chocolate shavings for garnish. Enjoy your delightful treat! To get a smooth, creamy cheesecake, soften the cream cheese first. Use an electric mixer to blend it until it’s soft. Mix in the powdered sugar and vanilla well. This step helps avoid lumps. When you whip the heavy cream, whisk until you see stiff peaks. Gently fold this whipped cream into the cream cheese mix. This keeps the cheesecake light and airy. Garnishing makes your cheesecake cups look nice. After chilling, add fresh raspberries on top. Press them gently into the cheesecake. This makes them stick better. Drizzle melted chocolate over the cups for a tasty touch. Use a grater to add chocolate shavings too. This adds a nice look and taste. One common mistake is not chilling the crust long enough. Always chill for at least 10 minutes. This helps it set properly. Another mistake is overmixing the cream cheese. Mix just until smooth; lumps are okay. Remember not to skip the whipping of the cream. It keeps your cheesecake light and fluffy. Lastly, let the cheesecake chill for at least 2 hours before serving. This helps it firm up nicely. {{image_2}} You can change up the flavors in your cheesecake cups. Try using strawberries instead of raspberries. You can also mix in lemon zest for a bright twist. Another great option is to add some peanut butter to the cream cheese mix. This gives a rich, nutty taste. You can even swap chocolate for white chocolate. Each option offers a new taste adventure. While chocolate cookie crumbs shine, other crusts can be just as tasty. Use graham crackers for a classic flavor. You can also try crushed Oreos for a fun twist. If you want something healthier, blend nuts and dates to form a base. Each crust change can add a unique touch to your cheesecake cups. You can make these cheesecake cups vegan or gluten-free with a few swaps. For a vegan version, use coconut cream instead of cream cheese. You can sweeten it with maple syrup. Use gluten-free cookies for your crust. This way, everyone can enjoy these treats without worry. Each adaptation keeps the great taste while meeting dietary needs. To keep your no-bake raspberry chocolate cheesecake cups fresh, store them in the fridge. Use an airtight container to prevent moisture loss. If you stack the cups, place parchment paper between them. This avoids a messy situation. You want to keep the toppings intact. These cheesecake cups last about 3 to 4 days in the fridge. If you want to extend their life, you can freeze them. Wrap each cup in plastic wrap, then place them in a freezer-safe bag. They will stay good for about 2 months. Thaw them in the fridge before serving. You don’t need to reheat cheesecake cups. They taste best cold. If you have leftover crust or filling, store them separately. You can use the crust for other desserts or as a topping. Keep the filling in a sealed container in the fridge for up to 3 days. Yes, you can make these cheesecake cups ahead of time. It is a great way to save time. Prepare the cups and chill them in the fridge. You can make them one day before serving. This will enhance the flavors and texture. Just be sure to cover them well to prevent drying out. These cheesecake cups can last up to three days in the fridge. After that, they may start to lose their freshness. Keep them in an airtight container for best results. If you see any changes in color or smell, it’s best to discard them. Absolutely! You can use many fruits in place of raspberries. Strawberries, blueberries, or blackberries work well. Each fruit will add a unique flavor. Just make sure to adjust the sweetness if needed. Fresh fruits will give your cheesecake cups a lovely touch. In this blog post, we explored how to make No-Bake Raspberry Chocolate Cheesecake Cups. We covered the ingredients needed, measured details, and substitutions for your diet. You learned step-by-step instructions, tips for texture, and common mistakes to avoid. I also shared variations for flavors and crusts, along with storage info for keeping them fresh. Remember, these cups are easy to adapt and delicious. Try different flavors or crusts to find your favorite! Enjoy making this treat and impressing your friends with your skills.

No-Bake Raspberry Chocolate Cheesecake Cups

Indulge in the delightful taste of no-bake raspberry chocolate cheesecake cups that are perfect for any occasion. With a rich chocolate cookie crust, creamy cheesecake filling, and fresh raspberries, this easy recipe combines sweetness and sophistication. In just a few simple steps, you can create these delectable cups that everyone will love. Click through to explore the full recipe and impress your guests with this stunning dessert!

Ingredients
  

1 cup chocolate cookie crumbs

3 tablespoons unsalted butter, melted

8 oz cream cheese, softened

1/2 cup powdered sugar

1/2 cup heavy whipping cream

1 teaspoon vanilla extract

1 cup fresh raspberries

1/4 cup dark chocolate chips, melted

Extra raspberries and chocolate shavings for garnish

Instructions
 

In a medium bowl, mix the chocolate cookie crumbs and melted butter until well combined.

    Press the crumb mixture evenly into the bottom of serving cups or glasses to create a crust layer. Chill in the refrigerator for about 10 minutes to set.

      In a large mixing bowl, beat the softened cream cheese with an electric mixer until smooth and creamy.

        Add the powdered sugar and vanilla extract to the cream cheese, and mix until fully incorporated.

          In a separate bowl, whip the heavy cream until stiff peaks form. Gently fold the whipped cream into the cream cheese mixture until combined.

            Swirl in the melted dark chocolate until you achieve a marbled effect in the cheesecake batter.

              Spoon the cheesecake mixture over the chilled cookie crust in each cup until nearly full, leaving some space for the raspberries.

                Top each cheesecake cup with fresh raspberries, pressing them gently into the cheesecake layer.

                  Chill in the refrigerator for at least 2 hours or until firm.

                    Before serving, drizzle with extra melted chocolate and garnish with grated chocolate shavings and additional raspberries.

                      Prep Time: 20 minutes | Total Time: 2 hours 20 minutes | Servings: 4-6 cups

                        WANT TO SAVE THIS RECIPE?

                        Leave a Comment

                        Recipe Rating