Skip to content
DisclaimerTerms Of UseGDPR PolicyCookie Policy

Cooking Wells

  • Home
  • Drinks
  • Appetizers
  • Dinner
  • Dessert
  • About
  • Contact
  • Privacy Policy
DisclaimerTerms Of UseGDPR PolicyCookie Policy

NO-ING-IMG

To make No-Bake Snickerdoodle Energy Bites, gather these simple ingredients: - 1 cup rolled oats - 1/2 cup almond butter (or any nut butter) - 1/4 cup honey (or maple syrup for a vegan option) - 1/2 cup almond flour - 2 teaspoons cinnamon - 1/2 teaspoon vanilla extract - 1/4 teaspoon salt - 1/4 cup chocolate chips (optional) - Extra cinnamon sugar for rolling (optional) These ingredients give the bites their great taste and texture. The oats provide fiber, while almond butter adds healthy fats. Honey or maple syrup sweetens the mix naturally. Almond flour gives a nutty flavor, and cinnamon adds that classic snickerdoodle taste. If you want a hint of chocolate, add the chips. Lastly, rolling the bites in cinnamon sugar makes for a fun finish! - Mix the dry ingredients in a large bowl. Start with 1 cup of rolled oats, 1/2 cup of almond flour, 2 teaspoons of cinnamon, and 1/4 teaspoon of salt. This mix gives your bites a great base. - Combine wet ingredients for flavor and texture. Add 1/2 cup of almond butter and 1/4 cup of honey or maple syrup. The almond butter binds everything. Honey adds sweetness. - Adjust consistency if needed. If the mixture feels too dry, add a splash of water or more honey. It should hold together well when you squeeze it. - Use your hands to form small balls. Each ball should be about 1 inch in diameter. This size is perfect for snacking. - If you like, roll the balls in cinnamon sugar. Mix 2 tablespoons of sugar with 1 teaspoon of cinnamon for this step. It adds a nice touch! - Refrigerate the energy bites for at least 30 minutes. This helps them firm up. After chilling, they are ready to enjoy! To get the right texture, start with the right moisture. If your mix feels dry, add a splash of water or a bit more honey. This helps the bites stick together. On the other hand, if it feels too wet, add a little more almond flour. Aim for a mixture that holds when you squeeze it in your hand. You can boost flavor by adding different mix-ins. Try adding chopped nuts, seeds, or dried fruits. They add crunch and taste. For a twist, use spices like nutmeg or ginger. Each spice changes the flavor, making it fun to try new things. For a great look, serve your energy bites in a pretty jar or on a colorful plate. You can sprinkle extra cinnamon sugar on top for a nice touch. It makes them look fancy and inviting. Storing them in decorative containers also keeps them fresh and ready to grab. {{image_2}} To make these energy bites vegan, swap the honey for maple syrup. This keeps the sweetness but fits a vegan diet. You can use any nut butter, but almond butter works best. Just ensure your nut butter is free from added sugars or oils. For a gluten-free version, use gluten-free rolled oats and almond flour. These ingredients provide the same texture and taste without gluten. Always check the packaging to ensure they are certified gluten-free, especially for oats, as cross-contamination can happen. Feel free to get creative with flavors! You can try different nut butters like peanut or cashew. Each nut butter brings a unique taste. Adding spices like nutmeg or cloves can also enhance the flavor. Just a pinch can make a big difference. You can even mix in dried fruits or seeds for added texture and nutrition. Store your energy bites in the fridge. This keeps them fresh and tasty. Use an airtight container to prevent moisture. If you want to keep them longer, freeze them. Just place them in a freezer-safe bag. They can last for a while this way. In the fridge, these energy bites last about one week. If you freeze them, they can stay good for up to three months. Always check for any signs of spoilage before eating. If they smell off, it's best to throw them away. You don’t need to reheat these bites. They taste great cold. You can serve them as is or roll them in extra cinnamon sugar for a sweet touch. Add them to a snack platter or a decorative jar for fun. Enjoy them on busy days or after workouts for a quick energy boost. To make no-bake Snickerdoodle energy bites, gather your ingredients first. You will need rolled oats, almond butter, honey, almond flour, cinnamon, vanilla extract, and salt. If you like, add chocolate chips. 1. In a big bowl, mix the rolled oats, almond butter, honey, almond flour, cinnamon, vanilla, and salt. 2. Use a spatula or your hands to blend it well. If it's too dry, add water or more honey. 3. If you want chocolate chips, fold them in until even. 4. Roll the mixture into small balls, about one inch wide. 5. If you like, roll the balls in cinnamon sugar. 6. Place them on a plate and refrigerate for at least 30 minutes. This recipe takes about 10 minutes to prep and 30 minutes to chill. Yes, energy bites are healthy! They pack a lot of goodness in a small bite. Here’s why: - Rolled oats give you fiber and help with digestion. - Almond butter adds protein and healthy fats. - Honey or maple syrup provides natural sweetness and energy. - Almond flour is low in carbs and rich in nutrients. - Cinnamon can help regulate blood sugar levels. These bites are a great snack. They give you energy without added sugars or junk. Absolutely! You can change up the recipe to fit your taste. Here are some ideas: - Nut butter: Swap almond butter for peanut butter or cashew butter. - Sweeteners: Use agave syrup instead of honey for a different flavor. - Add-ins: Toss in chia seeds, flaxseeds, or dried fruit for extra nutrition. - Spices: Try nutmeg or pumpkin spice for a twist. Feel free to get creative! You now have a complete guide to making energy bites. We covered the key ingredients, preparation steps, tips for perfect consistency, and many delicious variations. These bites are easy to customize and store, making them a perfect snack. You can enjoy them at home or on the go. With these steps, you can create a tasty treat that's healthy and fun to make. Try the recipe and discover your favorite flavors!

No-Bake Snickerdoodle Energy Bites Easy Recipe

Looking for a quick treat packed with energy? You’ll love this easy No-Bake Snickerdoodle Energy Bites recipe! With simple ingredients

To make a high-protein chocolate peanut butter mug cake, you need these key ingredients: - 4 tablespoons almond flour - 2 tablespoons unsweetened cocoa powder - 1 scoop of chocolate protein powder - 1/2 teaspoon baking powder - 1 tablespoon peanut butter - 3 tablespoons unsweetened almond milk (or any milk of choice) - 1 tablespoon maple syrup (or honey) - 1/4 teaspoon vanilla extract - A pinch of salt These ingredients will create a rich and satisfying cake that packs a protein punch. To make your mug cake even more special, consider these toppings: - Chocolate chips - Crushed peanuts - Greek yogurt - Whipped cream Adding these toppings can enhance the texture and flavor of your cake. If you need to swap out some ingredients, here are some great options: - Use coconut flour instead of almond flour for a different flavor. - Substitute peanut butter with almond butter for a nut-free version. - Try honey instead of maple syrup for a touch of sweetness. - Use dairy milk if you don’t have almond milk. These substitutions keep the cake delicious while catering to your needs. To make your High-Protein Chocolate Peanut Butter Mug Cake, start with the right tools. Grab a microwave-safe mug. You’ll need the following ingredients: - 4 tablespoons almond flour - 2 tablespoons unsweetened cocoa powder - 1 scoop of chocolate protein powder - 1/2 teaspoon baking powder - 1 tablespoon peanut butter - 3 tablespoons unsweetened almond milk - 1 tablespoon maple syrup - 1/4 teaspoon vanilla extract - A pinch of salt First, mix the almond flour, cocoa powder, chocolate protein powder, baking powder, and salt in your mug. Stir well to break up any lumps. This step is key to a smooth cake. Next, add in the peanut butter, almond milk, maple syrup, and vanilla extract. Use a fork or small whisk to blend everything until smooth. If you want a sweeter touch, fold in some chocolate chips. Now, it’s time to cook your mug cake. Place the mug in the microwave and set the timer for 1 minute and 30 seconds. But keep an eye on it! At the 1-minute mark, check to see how it looks. The cake should rise and look set. It should feel moist in the center. If it’s not quite done, give it a few more seconds. Microwaves can vary, so adjust the time as needed. To check if your cake is done, look for these signs: - The top should look firm - There shouldn’t be any wet batter on the surface - A toothpick should come out clean or with a few moist crumbs Let your cake cool for a minute before digging in. This helps the flavors settle. For extra flair, sprinkle some crushed peanuts and chocolate chips on top. Enjoy your tasty treat! To get the best texture, mix dry and wet ingredients well. Each ingredient needs to blend smoothly. I like to use a fork for this. It helps break up lumps in the almond flour. The cake should feel thick but smooth. If it’s too runny, add a bit more almond flour. If it’s too thick, add a bit more almond milk. The right balance makes a fluffy cake. You can make this mug cake even better with simple tweaks. Try adding a dash of cinnamon for warmth. A pinch of sea salt enhances sweet flavors too. You can also add chocolate chips for extra richness. If you love nuts, fold in crushed peanuts. They add crunch and flavor. A dollop of Greek yogurt on top gives a creamy finish. Also, drizzle some honey or maple syrup on top for extra sweetness. One big mistake is not mixing well. If you skip this, the cake can have lumps. Another common error is overcooking. Microwaves vary, so check at one minute. The cake should rise and look set but still soft inside. Don’t forget to let it cool for a minute. This waiting time helps the cake finish cooking. Lastly, be careful with toppings. Too many can make the cake soggy. Keep it simple for the best results. {{image_2}} You can change the taste of your mug cake. Try using different nut butters like almond or cashew. You can also swap cocoa powder for carob powder. This gives a unique twist. Adding spices like cinnamon or nutmeg can add warmth. For a minty flavor, mix in a drop of peppermint extract. You can even fold in fruits like mashed banana or berries for freshness. If you want a gluten-free version, almond flour works great. For a lower-calorie option, use less peanut butter or a lower-calorie sweetener. You can also make it dairy-free by using almond milk or coconut milk. If you need it egg-free, this recipe is already eggless! Just be sure to check your protein powder for allergens. You can switch almond flour for coconut flour, but use less. Coconut flour absorbs more liquid. Instead of maple syrup, try agave syrup or stevia. If you want it richer, use full-fat coconut milk. For a protein boost, add Greek yogurt to the mix. Mix and match to create your perfect mug cake! To store your mug cake, let it cool first. Cover it tightly with plastic wrap or place it in an airtight container. This keeps it fresh for up to two days. If you want to keep it longer, freeze it instead. When you're ready to enjoy your leftover mug cake, heat it in the microwave. Start with 15 to 20 seconds on high. Check if it’s warm enough. If not, heat it for another 10 seconds. Be careful not to overcook it. For freezing, wrap the mug cake tightly in plastic wrap. Place it in a freezer-safe bag or container. It can stay in the freezer for up to a month. To eat, thaw it in the fridge overnight. Then, reheat as mentioned. This way, you can enjoy your high-protein treat anytime! Yes, you can use other protein powders. Whey, casein, or plant-based options work well. Each type may change the taste and texture slightly. If you use a different flavor, adjust the cocoa powder for balance. To make this mug cake vegan, use plant-based protein powder. Swap the maple syrup for agave nectar. Instead of almond milk, any non-dairy milk like soy or oat will work. Lastly, use a vegan peanut butter without added sugar. I love enjoying this mug cake warm. It tastes great plain or topped. Try adding Greek yogurt, whipped cream, or even ice cream. For crunch, sprinkle crushed peanuts or chocolate chips on top. Enjoy right from the mug or flip it onto a plate for a fun twist! We explored the key ingredients and cooking steps for your mug cake. We discussed tips for texture and flavor, plus how to avoid common mistakes. Variations offer options for any diet, and knowing how to store leftovers ensures you enjoy your treat later. Now you can create a perfect mug cake that fits your taste. Have fun baking and enjoy every delicious bite!

High-Protein Chocolate Peanut Butter Mug Cake Delight

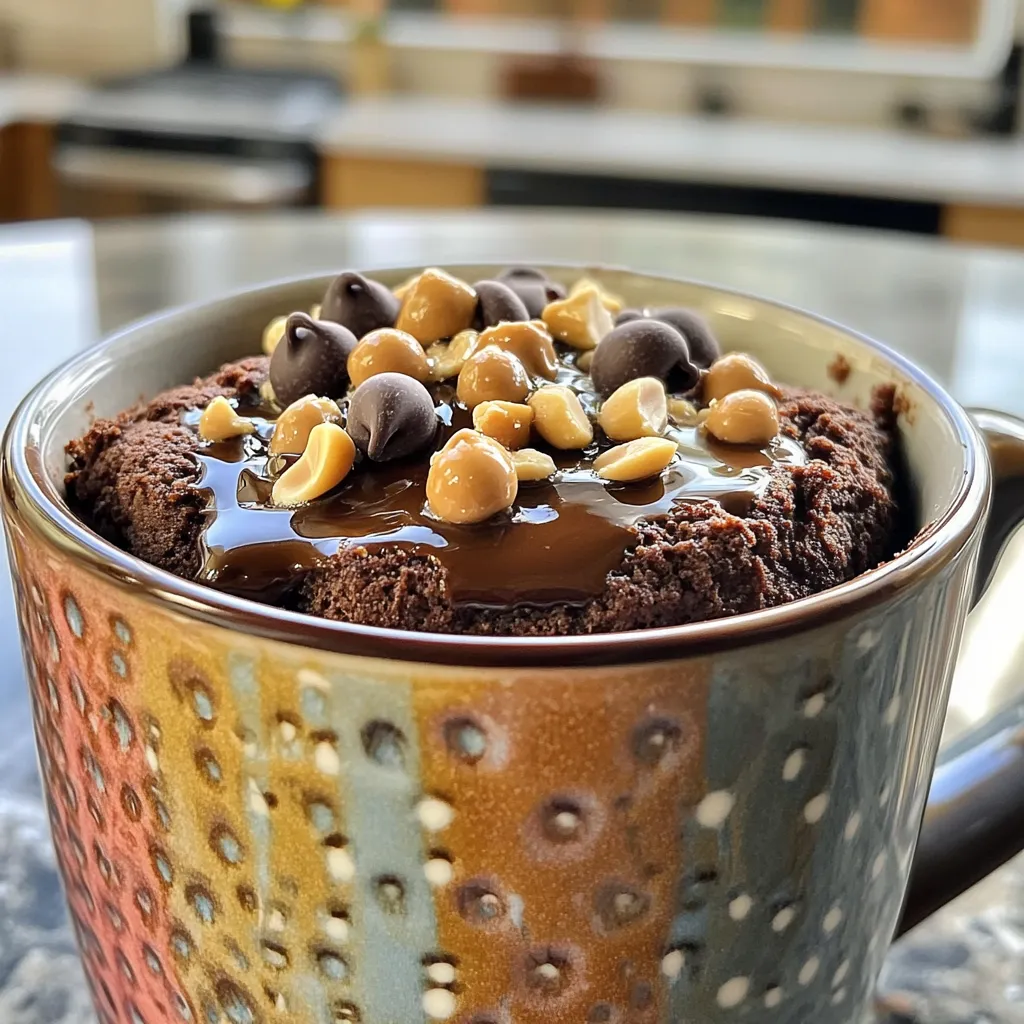
Craving something sweet and protein-packed? Meet your new favorite treat: the High-Protein Chocolate Peanut Butter Mug Cake! This quick recipe

- 1 ½ cups all-purpose flour - 1 cup granulated sugar - ½ cup brown sugar, packed - 2 teaspoons baking powder - 1 teaspoon ground cinnamon - ½ teaspoon ground nutmeg - ½ teaspoon salt - ½ cup unsalted butter, melted - 2 large eggs - 1 teaspoon vanilla extract - ½ cup milk - 1 cup rolled oats - 1 teaspoon ground flaxseed (optional) To make these delicious Apple Cinnamon Crumble Muffins, you need a mix of dry and wet ingredients. First, for the dry mix, you’ll use all-purpose flour, granulated sugar, brown sugar, baking powder, ground cinnamon, nutmeg, and salt. This mix gives the muffins their structure and flavor. Next, you’ll gather your wet ingredients. This includes melted butter that adds richness, eggs for binding, vanilla extract for aroma, and milk for moisture. These ingredients create a batter that is soft and tasty. Don’t forget the topping! Rolled oats give a nice crunch, while ground flaxseed can boost nutrition. This extra layer makes your muffins even more special. - Preheat the oven to 350°F (175°C). - Prepare your muffin tin with paper liners or spray it with non-stick spray. - In a bowl, mix rolled oats, brown sugar, a pinch of cinnamon, and melted butter. - Stir until the mixture is crumbly. Set it aside for later. - In a large bowl, whisk together the flour, granulated sugar, baking powder, cinnamon, nutmeg, and salt. - In another bowl, beat the eggs. Add melted butter, vanilla extract, and milk. Whisk until blended. - Pour the wet mixture into the dry ingredients. Stir gently until just combined. It’s okay if some lumps remain. - Carefully fold in the diced apples until they are evenly spread in the batter. - Divide the batter evenly into the muffin tin, filling each cup about two-thirds full. - Sprinkle the crumble topping generously over each muffin. - Bake in the preheated oven for 20 to 25 minutes. Check for doneness by inserting a toothpick into the center of a muffin; it should come out clean. To make the best apple cinnamon crumble muffins, avoid overmixing the batter. Mix until just combined to keep them fluffy. A few lumps in the batter are okay. Using fresh apples is key for great flavor. I love Granny Smith or Honeycrisp apples. They add a nice tartness and sweetness to the muffins. Set your oven to 350°F (175°C) for the perfect bake. If you have a hot oven, check your muffins a few minutes early. They should bake for 20-25 minutes. To know when they are done, insert a toothpick into the center. If it comes out clean, the muffins are ready. Pair your muffins with a warm drink. Coffee or tea complements the flavors well. For a special touch, serve the muffins warm with a dusting of powdered sugar or a dollop of whipped cream. You can also display them on a pretty plate for a nice presentation. {{image_2}} You can switch up the apples in this recipe. Try using Fuji or Gala apples for a sweeter taste. If you want to get creative, toss in some diced pears or berries. Each fruit brings its own flavor and texture. This makes the muffins fun and unique every time! For a healthier version, use whole wheat flour instead of all-purpose flour. This gives your muffins more fiber. You can also swap granulated sugar with honey or maple syrup. These options add a natural sweetness. Adding nuts, like walnuts or pecans, boosts the crunch. Dried fruits, such as cranberries or raisins, can add extra flavor too. Change the spices to match the season. In fall, add a pinch of ginger or cloves for a warm taste. During winter, try a hint of cardamom to spice things up. If you want to gift these muffins, wrap them in pretty paper. A nice box adds a special touch for holidays or birthdays. To keep your muffins fresh, store them in an airtight container. This helps prevent them from drying out. Place a paper towel in the container to absorb moisture. Muffins taste best within 2-3 days of baking. If you want to enjoy them later, freezing is a great option. To freeze muffins, let them cool completely first. Wrap each muffin in plastic wrap, then place them in a freezer bag. This prevents freezer burn. You can freeze your muffins for up to three months. When you're ready to eat, just take one out. Thaw it at room temperature or microwave it for about 15 seconds. For a warm muffin, heat it in the oven at 350°F (175°C) for 5-10 minutes. At room temperature, muffins last about 2-3 days. If you store them in the fridge, they can last up to a week. However, cold storage can change their texture. For the best taste, enjoy them fresh or freeze them right away! Yes, you can. Use gluten-free flour instead of all-purpose flour. Brands like almond flour or coconut flour work well. Just remember to adjust the liquid in the recipe since gluten-free flour can absorb more moisture. Insert a toothpick into the center of a muffin. If it comes out clean or with just a few crumbs, they are done. Make sure not to open the oven too early. This can cause the muffins to sink. You can use applesauce, mashed bananas, or flaxseed meal mixed with water. For each egg, mix 1 tablespoon of flaxseed meal with 2.5 tablespoons of water. Let it sit for about 5 minutes before adding to the batter. Absolutely! You could use ginger, allspice, or cardamom for a unique twist. Experiment with the amounts to find your favorite mix. Just start with a small pinch and adjust to taste. Adding a splash of lemon juice or zest brightens the flavor. You can also mix in chopped nuts or dried fruits like cranberries. A little vanilla extract goes a long way for extra sweetness. This blog post covered all steps to make delicious muffins. We discussed dry and wet ingredients, plus toppings. I shared clear instructions to guide you through the baking process effectively. You learned tips to perfect your muffins and explore tasty variations. For best results, focus on fresh ingredients and precise baking. Enjoy your baking journey and share your muffins with friends! You now have the tools to impress everyone with your new skills.

Apple Cinnamon Crumble Muffins Fresh and Tasty Treat

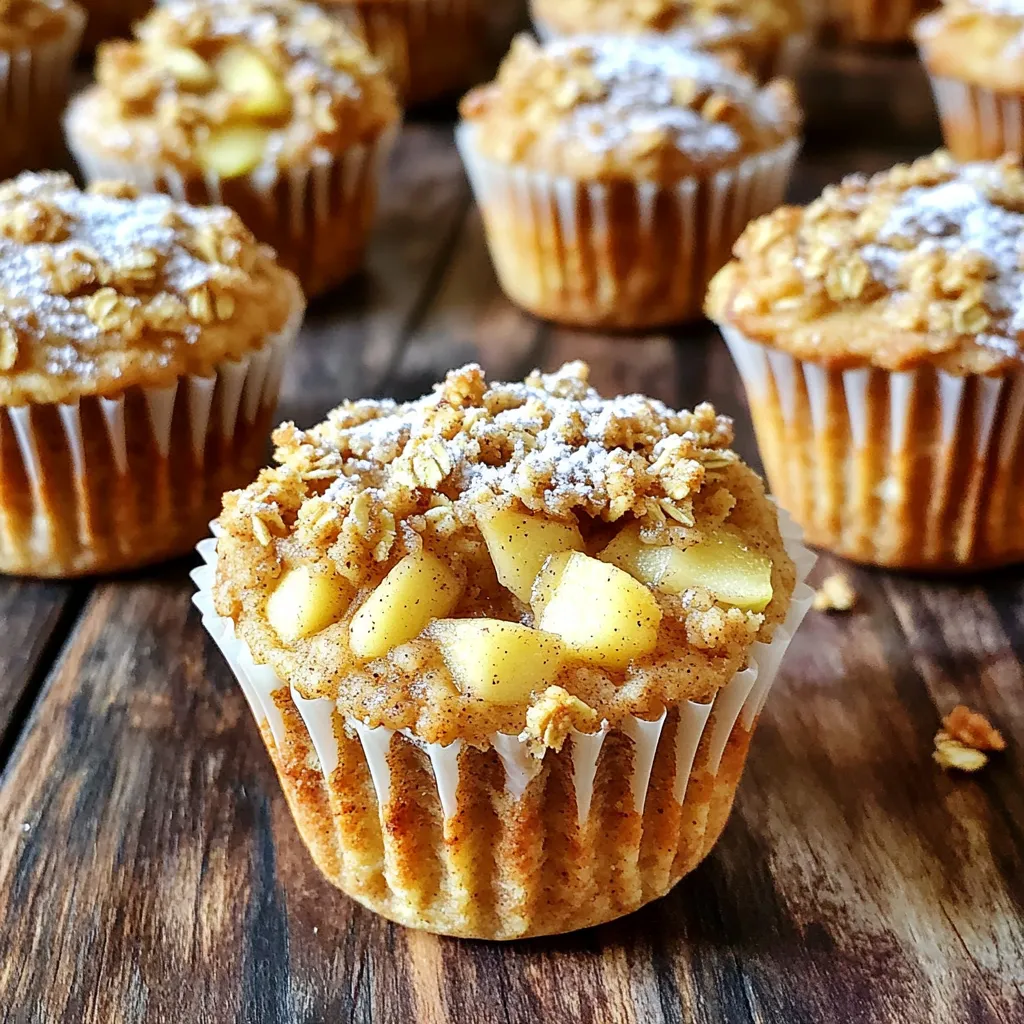
Are you ready to bake something delicious? These Apple Cinnamon Crumble Muffins are fresh, easy, and oh-so-tasty! With a sweet

- 6 slices of thick bread (such as brioche or challah) - 1 cup cream cheese, softened - 1/4 cup powdered sugar - 1 teaspoon vanilla extract - 1 cup fresh blueberries (plus extra for garnish) - 2 large eggs - 1/2 cup milk - 1 teaspoon ground cinnamon - 1 tablespoon butter (for frying) - Maple syrup (for serving) 1. Thick bread: Use 6 slices. Brioche or challah work best. 2. Cream cheese: You need 1 cup, and it should be soft. 3. Powdered sugar: Measure out 1/4 cup to sweeten the mix. 4. Vanilla extract: Just 1 teaspoon adds flavor. 5. Fresh blueberries: Use 1 cup for the mix, plus some more for garnish. 6. Large eggs: You need 2 eggs for the batter. 7. Milk: Measure 1/2 cup to make the batter creamy. 8. Ground cinnamon: Use 1 teaspoon for a warm spice touch. 9. Butter: 1 tablespoon is perfect for frying. 10. Maple syrup: Serve it on top for added sweetness. - Bread: You can swap thick bread for gluten-free bread if needed. - Cream cheese: Use mascarpone or a dairy-free cream cheese for a change. - Powdered sugar: You can use maple sugar as a natural sweetener. - Blueberries: If you don't have blueberries, try raspberries or strawberries. - Milk: Non-dairy milk, such as almond or oat milk, works well too. - Butter: Coconut oil can be used for frying instead. - Cinnamon: You can skip it or use nutmeg for a different taste. {{ingredient_image_1}} First, grab a mixing bowl. Add 1 cup of softened cream cheese. Then, mix in 1/4 cup of powdered sugar. Next, pour in 1 teaspoon of vanilla extract. Blend these until smooth. You want a nice, creamy texture. Now, gently fold in 1 cup of fresh blueberries. Be careful not to smash them. You want whole berries for bursts of flavor. Take your thick bread slices. A good choice is brioche or challah. Using a knife, carefully cut a pocket in each slice. Cut through the center but do not cut all the way. You want to keep the bottom intact. This pocket will hold the delicious cream cheese mixture. Spread about 2-3 tablespoons of the blueberry cream cheese mix inside each pocket. Make sure it's filled well but not overflowing. In a separate bowl, whisk together 2 large eggs, 1/2 cup of milk, and 1 teaspoon of ground cinnamon. Mix until it's all combined. Heat a skillet over medium heat and add 1 tablespoon of butter. Let it melt and coat the pan. Now, dip each stuffed slice of bread into the egg mixture. Make sure both sides are well-coated. Place the dipped bread in the skillet. Cook for about 3-4 minutes on each side. Look for a nice golden brown color. Once cooked, remove from the skillet and repeat with the remaining slices. Serve warm, drizzled with maple syrup and extra blueberries on top. Enjoy this sweet treat! To get the best stuffing for your French toast, use a thick bread. Brioche or challah works great. These breads soak up the egg mixture well and stay soft. When mixing the cream cheese, powdered sugar, and vanilla, make sure it’s smooth. This makes your filling creamy. Gently fold in the blueberries. Be careful not to squish them too much. You want whole berries in each bite. Heat your skillet to medium. A hot skillet helps get that nice golden color. Use butter in the pan; it adds flavor and helps with browning. When you dip the bread, make sure both sides are coated but not soggy. Let the excess drip off before cooking. Cook each slice for about 3-4 minutes on each side. Watch for that lovely golden brown color. Serve this dish warm for the best taste. Drizzle maple syrup over the top for sweetness. Add a handful of fresh blueberries on top for a nice touch. You can also sprinkle some powdered sugar for an extra treat. Serve with a side of bacon or sausage for a full breakfast experience. Enjoy your delicious creation! Pro Tips Choose the Right Bread: Using thick slices of brioche or challah not only enhances the flavor but also ensures that the bread holds up to the filling without falling apart. Perfectly Whipped Cream Cheese: Make sure your cream cheese is softened to room temperature for easy blending, resulting in a smooth and creamy filling. Don’t Overcrowd the Pan: Fry the French toast in batches to prevent steaming, ensuring a perfectly crispy exterior on each slice. Add a Touch of Zest: For an extra layer of flavor, consider adding a teaspoon of lemon zest to the cream cheese mixture to complement the blueberries beautifully. {{image_2}} You can switch up the fruit in this recipe. Try strawberries, raspberries, or peaches. Each fruit brings its own taste and texture. For a twist, use a mix of berries. This adds color and flavor. You can also spice things up. Add lemon zest or a dash of nutmeg to the cream cheese. This gives your dish a new depth. If you're gluten-free, choose gluten-free bread. It works just as well for this recipe. For a dairy-free option, use a non-dairy cream cheese. Almond or cashew cream cheese is great. You can also swap the milk for almond or oat milk. These small changes keep the dish tasty. Serve this French toast as a dessert! Top with whipped cream and a sprinkle of cinnamon. You can even layer it with chocolate sauce for a sweet treat. Try adding nuts or granola for crunch. This turns breakfast into a special dessert that everyone will love! To store your Blueberry Cheesecake Stuffed French Toast, let it cool first. Place the slices in an airtight container. You can keep it in the fridge for up to three days. If you want to keep it longer, consider freezing it instead. You can freeze this tasty treat for later. Wrap each slice tightly in plastic wrap. Then, place them in a freezer-safe bag or container. This helps prevent freezer burn. You can freeze them for up to three months. When you're ready to eat, just thaw them in the fridge overnight. Reheating is simple. Preheat your oven to 350°F (175°C). Place the French toast on a baking sheet. Heat for about 10-15 minutes, or until warm. You can also use a microwave for faster results. Heat each slice for about 30 seconds to 1 minute. Just watch it closely so it doesn’t get too hot! Enjoy the warm, gooey goodness again. Yes, you can prepare the cream cheese mixture a day before. Store it in the fridge. You can also cut pockets in the bread ahead of time. Just keep them in an airtight container. When you’re ready to cook, stuff the bread and dip it in the egg mix. This saves time and gives you more room to enjoy breakfast. Thick bread works best for this dish. I recommend using brioche or challah. These breads are soft and soak up the egg mixture well. They also give a nice texture when cooked. You can use other types of bread, but they may not hold up as well. Leftovers will last for about 2-3 days in the fridge. Store them in an airtight container. To reheat, just warm them in a skillet or microwave. This keeps them tasty and soft. If you have extra filling, store that separately too. This blog post covered a simple and tasty French toast recipe. We explored key ingredients, measurements, and substitutions. I shared step-by-step instructions for great results. You learned tips for perfect stuffing and even cooking. You also discovered flavor variations and dietary options. In closing, enjoy experimenting with this recipe. Make it your own and share it with loved ones!

Blueberry Cheesecake Stuffed French Toast Delight

Get ready to savor a breakfast treat like no other! Blueberry Cheesecake Stuffed French Toast Delight takes your morning routine

- 1/2 cup semi-sweet chocolate chips - 1/4 cup unsalted butter - 1 large egg - 1 large egg yolk - 1/4 cup granulated sugar - 2 tablespoons all-purpose flour - 1/4 teaspoon vanilla extract - 1/8 teaspoon salt - Optional garnishes: powdered sugar and fresh berries Gathering your ingredients is key to making these air fryer chocolate lava cakes. You want to use fresh items for the best flavor. I love using semi-sweet chocolate chips for a rich taste. Unsalted butter is perfect for controlling the salt in your dish. The eggs add structure and richness. The granulated sugar gives sweetness and helps with the texture. Using all-purpose flour keeps the batter light and fluffy. Vanilla extract adds a nice touch of flavor. Finally, a pinch of salt enhances all the tastes. Don’t forget the optional garnishes! Powdered sugar gives a lovely finish, and fresh berries add a burst of freshness. These ingredients come together to create a delicious dessert that feels fancy but is super easy to make. To start, you need to melt the chocolate and butter. Take a microwave-safe bowl and add the chocolate chips and butter. Microwave them together in 20-second bursts. After each burst, stir until it is smooth. This should take about one minute in total. Let the mixture cool a bit before using it. Next, grab another bowl for the egg mixture. Whisk together one egg, one egg yolk, and granulated sugar. Keep whisking until the mix turns pale and thick. This process takes about two minutes. You want it to be fluffy for the best texture. Now, pour the melted chocolate into the egg mix. Add the vanilla and salt. Stir everything together until well combined. After that, gently fold in the flour. Be careful here. Overmixing will make the cakes tough. You want a silky and smooth batter. Preheat your air fryer to 350°F (175°C). While it's heating, prepare four ramekins by greasing them with cooking spray or butter. Pour the batter into each ramekin, filling them about three-quarters full. Place the ramekins in the air fryer basket and cook for about 8 to 10 minutes. The edges should be set, but the center needs to be soft. Once the time is up, carefully take the ramekins out of the air fryer. Let them cool for 1 to 2 minutes. To serve, invert each ramekin onto a plate. Dust them with powdered sugar and add fresh berries for a nice touch. Enjoy your warm, gooey chocolate lava cakes! Overmixing your batter is a common mistake. When you mix too much, the cakes can turn out tough. You want a smooth batter, but don’t overdo it. Also, be careful with your baking times. If you bake too long, the centers will not be gooey. Aim for 8-10 minutes in your air fryer. Check them at 8 minutes to see if they are set around the edges but still soft in the middle. Set your air fryer to 350°F (175°C). This temperature is essential for perfect lava cakes. It helps create a nice outer layer while keeping the inside oozy. Always preheat your air fryer for even cooking. This step is key to avoid uneven results. You can easily change the flavor of your lava cakes. For a coffee twist, add a teaspoon of espresso powder to the batter. If you like citrus, add some orange zest. This small touch brings a fresh taste. You can also try adding a few chocolate chunks for extra richness. Get creative and make it your own! {{image_2}} You can choose between dark chocolate and semi-sweet chocolate for your lava cakes. Dark chocolate gives a richer taste. It has a strong flavor, which many love. Semi-sweet chocolate is sweeter and milder. I often use semi-sweet chocolate chips because they melt well and balance the sweetness of the cake. Feel free to experiment with both types to find your favorite. If you need a gluten-free option, you can use almond flour or coconut flour. Almond flour adds a nutty taste, while coconut flour makes the cake lighter. Just remember, these flours absorb more moisture. You may need to adjust the liquid in your recipe. Start with a small amount and add more if needed to keep the batter smooth. You can customize your lava cakes with fun add-ins. Chopped nuts, like walnuts or pecans, add crunch. Fresh fruit, such as raspberries or strawberries, brings a tartness that pairs well with chocolate. You can even toss in chocolate pieces or caramel bits for a surprise inside. Just remember, don't add too much, or the lava cake may not bake properly. Store your lava cakes in the fridge. Place them in an airtight container. They will stay fresh for about two days. If you want to keep them longer, freeze them. Wrap each ramekin tightly in plastic wrap. Then, place them in a freezer-safe bag. These cakes can last up to three months in the freezer. To reheat your lava cakes, use the air fryer. Preheat it to 350°F (175°C). Remove the cakes from the fridge or freezer. Place them in the air fryer basket. Heat for about 5 minutes if cold. For frozen cakes, heat for about 8-10 minutes. Check to ensure the center is warm and gooey. Enjoy your warm and delicious lava cakes! Yes, you can prepare the lava cakes in advance. Make the batter and pour it into greased ramekins. Cover them with plastic wrap and store them in the fridge. When you're ready to bake, just take them out and cook them in the air fryer. This way, you save time and can impress your guests with warm, gooey cakes. To check if your lava cakes are done, look for the edges. They should be set and firm, while the center remains soft. The tops may also look slightly puffed. You can gently shake the ramekin; if the center jiggles a bit, it’s perfect. Remember, the cooking time is key, so keep an eye on them as they cook. Absolutely! You can bake these cakes in a conventional oven. Preheat your oven to 425°F (220°C). Place the ramekins on a baking sheet and bake for about 12-14 minutes. Keep an eye on them to ensure they don’t overcook. The result will be just as delicious, but the air fryer does speed up the process. This blog post covered making delicious lava cakes in an air fryer. You learned about the key ingredients and step-by-step instructions to create the perfect dessert. We explored tips to avoid common mistakes and ideas for variations. Proper storage and reheating methods ensure you can enjoy leftovers. Remember, practice makes perfect. Don’t be afraid to experiment with flavors and textures. Your lava cakes will impress everyone. Follow these steps, and you’ll bake a dessert that brings joy in every bite. Enjoy your tasty creation!

Air Fryer Chocolate Lava Cakes Delightful and Easy

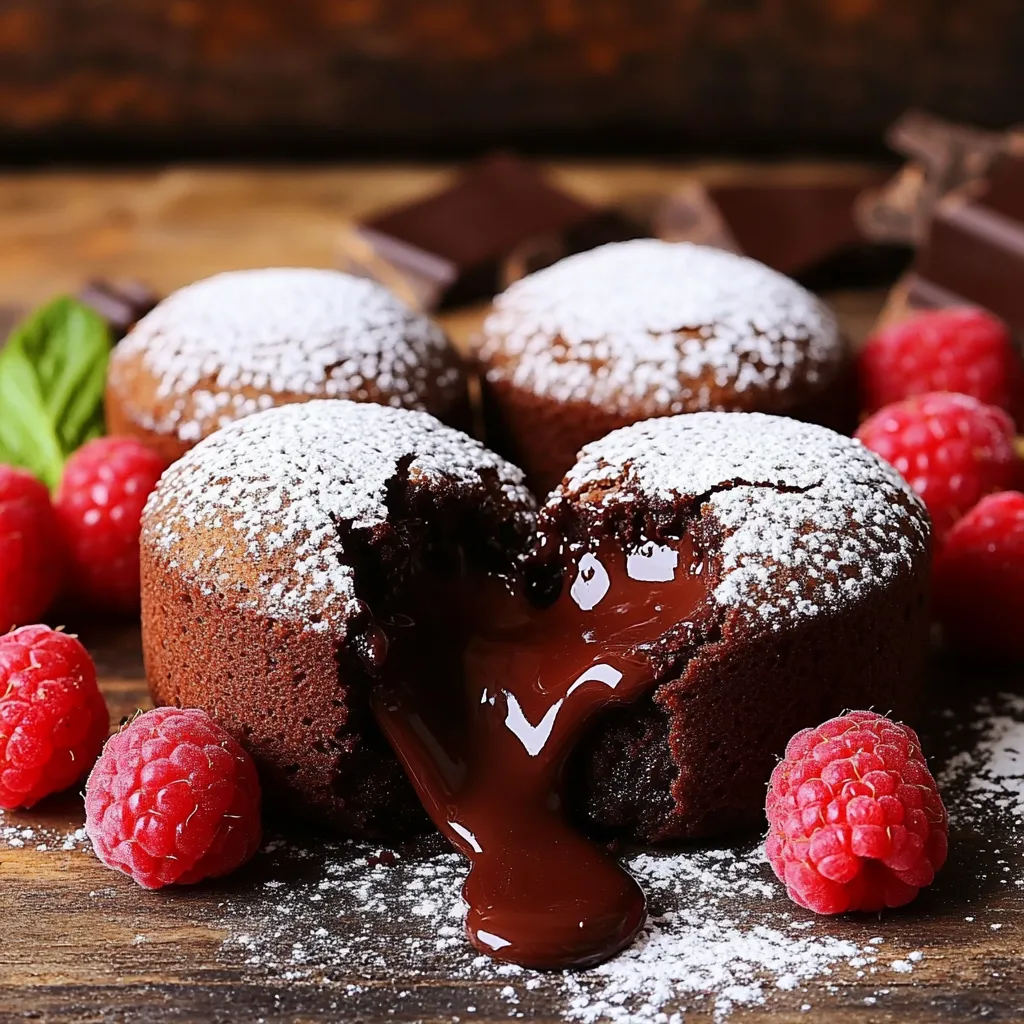
If you crave something sweet, you’ll love Air Fryer Chocolate Lava Cakes. They’re quick and easy to make, with a

- 1 cup almond flour - 1/2 cup rolled oats - 1/4 cup coconut sugar - 1/2 teaspoon baking soda - 1/4 teaspoon salt - 1/2 teaspoon cinnamon - 1/4 cup unsweetened applesauce - 1/4 cup almond butter - 1 teaspoon vanilla extract - 3/4 cup fresh blueberries (or frozen, thawed) - 1/4 cup slivered almonds (plus extra for topping) Each ingredient plays a role in making these cookies tasty and nutritious. Almond flour gives a nice texture and a nutty flavor. Rolled oats add fiber and help keep you full. Coconut sugar is a natural sweetener that brings a touch of caramel flavor. Baking soda helps the cookies rise while salt and cinnamon enhance the taste. Applesauce keeps the cookies moist and adds sweetness without extra sugar. Almond butter offers healthy fats and protein, making these cookies a good choice for breakfast. Vanilla extract adds a warm, sweet aroma. Blueberries are juicy and provide antioxidants, while slivered almonds give a nice crunch. - Calories per cookie: About 100 calories - Macronutrient breakdown: - Carbohydrates: 12g - Protein: 3g - Fat: 4g The main ingredients bring several health benefits. Almond flour is gluten-free and rich in vitamin E. Rolled oats help lower cholesterol and improve heart health. Blueberries are known for their high antioxidant content. Almond butter provides protein and healthy fats, which can help keep you energized throughout the day. First, preheat your oven to 350°F (175°C). This helps the cookies bake evenly. Next, line a baking sheet with parchment paper. This makes cleanup easy and keeps cookies from sticking. Now, let’s mix the dry ingredients. In a large bowl, combine: - 1 cup almond flour - 1/2 cup rolled oats - 1/4 cup coconut sugar - 1/2 teaspoon baking soda - 1/4 teaspoon salt - 1/2 teaspoon cinnamon Stir these together until they blend well. This is key for even flavor. Next, we’ll combine the wet ingredients. In another bowl, whisk together: - 1/4 cup unsweetened applesauce - 1/4 cup almond butter - 1 teaspoon vanilla extract Whisk until the mix is smooth. This will add moisture and flavor to your cookies. Now, pour the wet mix into the dry ingredients. Stir until just combined. Be careful not to overmix. This keeps your cookies soft. Finally, gently fold in: - 3/4 cup fresh blueberries (or frozen, thawed) - 1/4 cup slivered almonds Fold slowly to avoid breaking the blueberries. For shaping, use a tablespoon or cookie scoop. Form cookie dough balls and place them on the prepared baking sheet. Space them about 2 inches apart. This gives them room to spread. Next, flatten each cookie slightly with your fingers. Then, sprinkle a few extra slivered almonds on top for a nice touch. Now, it’s time to bake! Place the baking sheet in the oven and bake for 12-15 minutes. Look for golden-brown edges. Once done, remove the cookies from the oven. Let them cool on the baking sheet for 5 minutes. This helps them set. Then, transfer them to a wire rack to cool completely. Enjoy your delicious Blueberry Almond Breakfast Cookies! - Preventing overmixing: Mix your wet and dry ingredients until just combined. Overmixing makes cookies tough. A gentle touch leads to soft, chewy cookies. - Keeping blueberries intact: Fold in the blueberries gently. This keeps them whole and juicy. Broken blueberries create a mushy texture. - Achieving the ideal texture: Use almond flour for a soft base. The oats add chewiness. Aim for a cookie that’s golden-brown at the edges but soft in the middle. - Best mixing bowls: Use a large, sturdy bowl. A glass or stainless steel bowl works well. This helps you mix without spills. - Cookie scoop vs. tablespoon: A cookie scoop gives you uniform sizes. This ensures even baking. If you don’t have one, a tablespoon works too. - Essential baking sheet features: Choose a heavy-duty baking sheet. Parchment paper helps prevent sticking. This saves you cleanup time and keeps cookies intact. {{image_2}} You might want to make some changes to fit your needs. Here are a few ideas: - Gluten-free options: Use gluten-free rolled oats instead of regular oats. This keeps the cookie safe for those with gluten allergies. Almond flour is already gluten-free, so it works perfectly. - Alternative sweeteners: If you want a different sweetness, try honey or maple syrup. Adjust the wet ingredients slightly if you use these. - Additional mix-ins: You can add more texture by including nuts or seeds. Chia seeds, walnuts, or pumpkin seeds all work well with these cookies. To make your cookies even tastier, consider these options: - Adding spices or extracts: A pinch of nutmeg or some almond extract can boost the flavor. Just a little can make a big difference. - Using different fruits: You can swap blueberries for other fruits. Raspberries or chopped apples can add new flavors and textures. - Vegan modification suggestions: Replace almond butter with a seed butter like sunflower seed butter. Use a flax egg instead of applesauce for a vegan twist. Experimenting with these variations can keep your breakfast cookies exciting and fun! Store your Blueberry Almond Breakfast Cookies in an airtight container. This keeps them fresh. If you want to keep them at room temperature, they last about five days. For longer storage, place them in the fridge. They can stay fresh for up to two weeks in the fridge. To freeze cookies, let them cool completely first. Then, wrap each cookie in plastic wrap. Place them in a freezer-safe bag. They can last up to three months in the freezer. When you want to eat them, just take out what you need. For freshness, check for any signs of moisture or changes in smell. This helps ensure you enjoy tasty cookies every time. Reheat your cookies to bring back that fresh-baked taste. The best method is using an oven. Preheat it to 300°F (150°C). Place the cookies on a baking sheet. Heat them for about 5 minutes. This warms them through and keeps them soft. You can also use the microwave. Heat each cookie for about 10-15 seconds. Don’t overdo it, or they will get dry. Enjoy your warm cookies, and feel the deliciousness! Yes, you can use frozen blueberries in these cookies. However, they may change the texture. Frozen blueberries often have more moisture. This can make your cookies a bit wetter. When using frozen blueberries, let them thaw and drain excess juice. This will help keep your cookies from becoming too soggy. You still get the same burst of flavor, just with a slightly different texture. To make these cookies vegan, swap out some ingredients. Use flaxseed meal mixed with water instead of applesauce. For each egg, mix 1 tablespoon of flaxseed meal with 2.5 tablespoons of water. You can also replace almond butter with a nut-free butter. Choose coconut oil instead of butter. These swaps keep the cookies tasty and plant-based. Yes, you can easily make a larger batch. Just double or triple the ingredients based on your needs. When you do this, keep an eye on the baking time. Larger batches may need a bit more time in the oven. Check for doneness by looking for golden-brown edges. If you make many cookies, use multiple baking sheets. This helps them bake evenly. In this article, we explored how to make Blueberry Almond Breakfast Cookies. You learned the key ingredients and their health benefits. We covered step-by-step instructions, tips for perfect cookies, and storage ideas. These cookies are simple, tasty, and healthy. Feel free to get creative with variations. Enjoy baking! Your kitchen is now ready for delicious cookies anytime.

Blueberry Almond Breakfast Cookies Quick and Tasty Treat

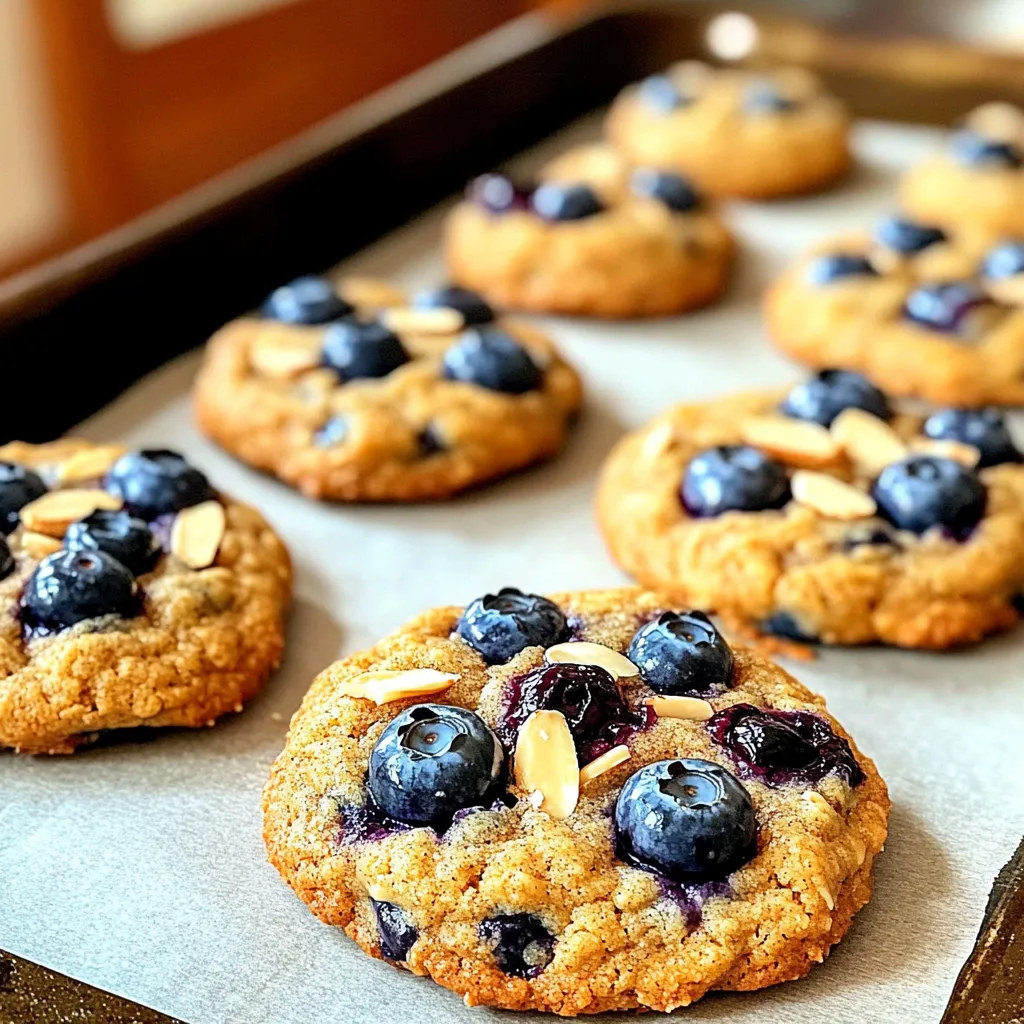
Looking for a quick, tasty breakfast that packs a punch? I’ve got the perfect solution: Blueberry Almond Breakfast Cookies! These

- 2 cups rolled oats - 1 cup almond butter - 1/2 cup honey or maple syrup The base of these bars starts with rolled oats. They give great texture and fiber. Almond butter adds healthy fats and protein. Honey or maple syrup serves as a natural sweetener. You can choose between them based on taste. - 1 cup freeze-dried strawberries, crushed - 1/2 cup vanilla protein powder - 1/4 tsp salt - 1/2 tsp vanilla extract - Optional: 1/4 cup dark chocolate chips Freeze-dried strawberries bring a burst of fruity flavor. They add a fun crunch, too. Protein powder boosts the bars' nutrition. Salt enhances the sweetness, while vanilla extract adds warmth. If you love chocolate, dark chocolate chips can be a tasty drizzle. - Mixing bowl - Baking dish (8x8 inch) - Parchment paper You need a mixing bowl to combine all the ingredients. A baking dish helps form the bars. Parchment paper makes removal easy later. These tools make the process smooth and fun. - In a large mixing bowl, combine all primary ingredients: rolled oats, almond butter, honey or maple syrup. Add freeze-dried strawberries, protein powder, salt, and vanilla extract. Mix well until you get a sticky mixture. - Next, line an 8x8 inch baking dish with parchment paper. The paper should hang over the sides. This helps you remove the bars easily later. - Transfer the sticky mixture into the prepared baking dish. Use your hands or a spatula to press it down firmly. Make sure it's even throughout. - If you want, melt dark chocolate chips in a microwave-safe bowl. Heat them in 20-second intervals and stir until smooth. Drizzle the melted chocolate over the pressed mixture for an extra treat. - Place the baking dish in the refrigerator. Let it chill for at least 1 hour. This allows the bars to set properly. - After an hour, remove the dish from the fridge. Use the parchment paper to lift the bars out. Cut them into your desired sizes. Enjoy your tasty, no-bake strawberry protein bars! To make sure your bars have the right texture, you need a sticky mixture. Mix all ingredients well. The almond butter and honey help create this stickiness. If it feels too dry, add a little extra almond butter or honey. Next, press the mixture down firmly. Use your hands or a spatula for this. Pressing down helps the bars hold together. An even layer ensures they cut nicely later. When melting chocolate, use a microwave-safe bowl. Heat the chocolate in short bursts, about 20 seconds at a time. Stir after each burst. This method prevents burning. You want the chocolate to be smooth before you drizzle it. If you want an alternative to chocolate drizzle, try using yogurt or nut butter. These options add flavor without the hassle of melting chocolate. For a great presentation, arrange the bars on a serving plate. Garnish with fresh strawberries. A sprinkle of crushed freeze-dried strawberries adds color and fun. Pair the bars with a glass of milk or a smoothie for a complete snack. This combo makes a tasty and healthy option any time of day. {{image_2}} You can switch up the flavor by using different freeze-dried fruits. Try blueberries or raspberries for a fun twist. Fresh fruits also work well. Just chop them small and mix them in. Keep in mind, fresh fruits add moisture. You may need to adjust the dry ingredients to keep the bars firm. If you don’t have vanilla protein powder, you can use chocolate protein powder instead. This option adds a rich flavor. You can also try plant-based protein powders for a vegan choice. For nut or seed butter, swap almond butter for peanut or sunflower seed butter. Each will change the taste but still keep the bars yummy. You can change the sweetness by adjusting the honey or maple syrup. If you like it sweeter, add more. For less sweetness, lessen the amount. You can also try sugar-free alternatives like stevia or monk fruit sweetener. Just remember, these can be sweeter than regular sweeteners. Start with a small amount and taste as you go. To keep your no-bake strawberry protein bars fresh, use an airtight container. Glass or plastic containers work well. Make sure they seal tight to keep moisture out. Store them in the fridge. This helps maintain their taste and texture. These bars last about one week in the fridge. For longer storage, you can freeze them. Wrap each bar in plastic wrap, then place them in a freezer bag. They can last up to three months in the freezer. When serving from the fridge, let the bars sit for a few minutes. This helps soften them a little. If you freeze the bars, thaw them in the fridge overnight. This way, they stay tasty and safe to eat. Yes, you can use other nut butters. Peanut butter adds a strong flavor. Cashew butter gives a creamier texture. Sunflower seed butter is a great nut-free option. Each nut butter changes the taste a bit, but they work well in this recipe. Yes, these bars are healthy. They combine oats, nut butter, and protein powder. Oats provide fiber, which helps digestion. Nut butter adds healthy fats and protein. Strawberries bring vitamins and antioxidants. This snack is great for energy and muscle recovery. To make these bars vegan, use maple syrup instead of honey. Choose a plant-based protein powder. Many brands offer vegan options. This way, you keep all the flavor without animal products. Sure! You can add protein powder to boost the protein. Try collagen powder for joint health. Chia seeds add omega-3 fatty acids. Always check the amounts so they mix well. You’ve learned to make delicious no-bake strawberry protein bars. We covered the key ingredients, tools needed, and simple steps for preparation. I shared tips for the best texture and options for customization. You can store these bars easily and enjoy them for weeks. These snacks are not just tasty; they are also healthy. So, grab your ingredients and start making your own bars today. You’ll love the flavor and the boost they give you!

No-Bake Strawberry Protein Bars Easy and Tasty Treat

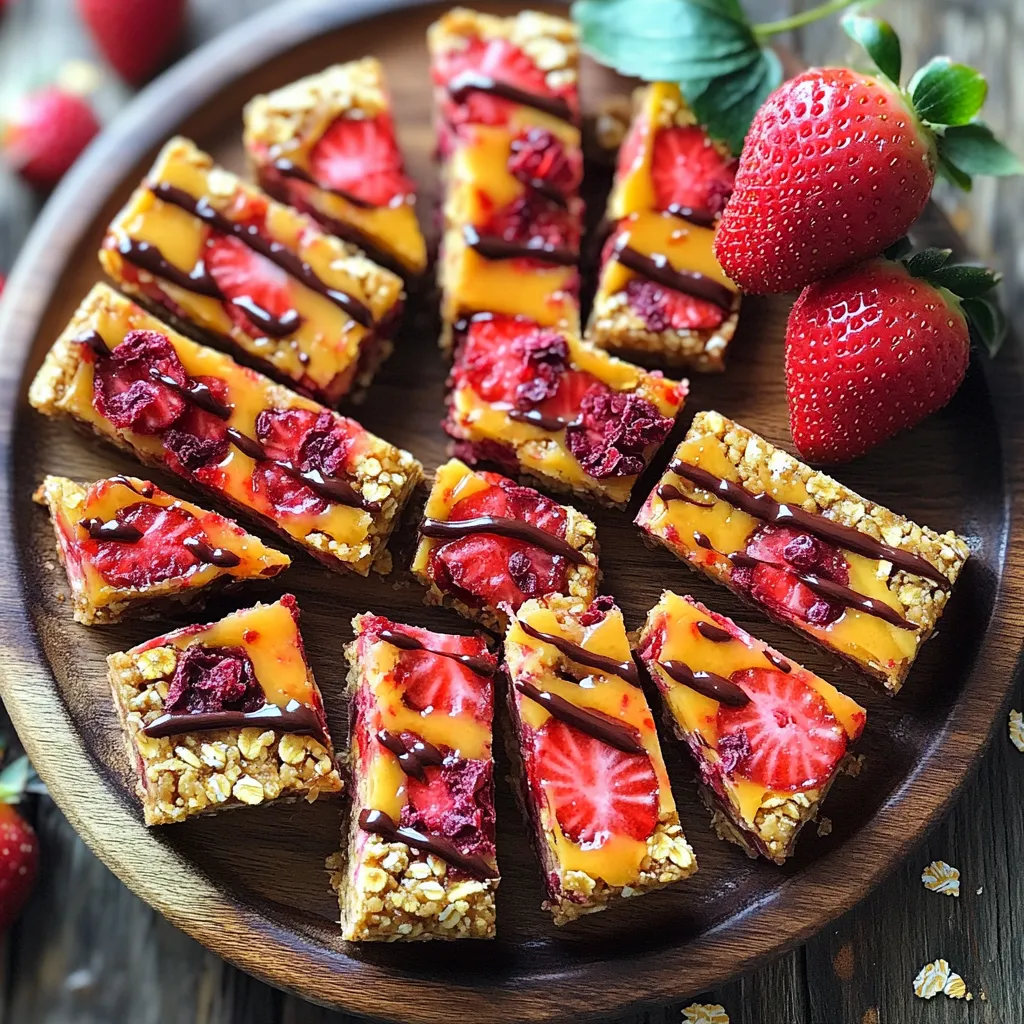
Looking for a quick, healthy snack that satisfies your sweet tooth? Look no further! These No-Bake Strawberry Protein Bars are

- 8 oz rice noodles - 1 cup shredded carrots - 1 red bell pepper, thinly sliced - 1 cucumber, julienned - 1 cup red cabbage, shredded - 1/4 cup fresh cilantro, chopped - 1/4 cup green onions, sliced - 1/4 cup peanuts, crushed (plus extra for garnish) Rice noodles are the base of this dish. They soak up the flavors very well. Next, we have fresh vegetables. Shredded carrots bring a nice crunch and sweetness. The red bell pepper adds color and flavor. Julienned cucumber offers a cool bite. Red cabbage not only looks great but also adds a hearty texture. Finally, fresh cilantro and green onions give a burst of freshness. - 1/3 cup peanut butter (smooth) - 2 tablespoons soy sauce - 1 tablespoon sesame oil - 1 tablespoon lime juice - 1 tablespoon honey or maple syrup - 1-2 teaspoons sriracha (to taste) - 1 teaspoon grated ginger - 1 clove garlic, minced For the dressing, peanut butter is key to that rich taste. Soy sauce adds depth and saltiness. Sesame oil gives a nutty flavor, while lime juice brightens the mix. Honey or maple syrup brings a touch of sweetness. Sriracha adds heat, so adjust it to your liking. Grated ginger and minced garlic enhance the overall taste, making this dressing truly special. To cook the rice noodles, start by bringing a large pot of salted water to a boil. Once it boils, add the noodles and cook according to the package instructions until they are al dente. This usually takes about 4 to 6 minutes. After cooking, drain the noodles in a colander. Rinse them under cold water. This stops the cooking and keeps the noodles from sticking together. While the noodles cook, you can prepare the vegetables. First, shred the carrots and slice the red bell pepper into thin strips. Next, julienne the cucumber for a nice crunch. Lastly, shred the red cabbage. Once all the veggies are ready, place them in a large mixing bowl. This bowl will hold all your fresh ingredients. Now it's time to make the dressing. In a small bowl, whisk together the peanut butter, soy sauce, sesame oil, lime juice, honey or maple syrup, sriracha, grated ginger, and minced garlic. Mix until everything is smooth. If the dressing seems too thick, add a tablespoon of water at a time until it reaches a good consistency. You want it pourable but not too runny. For the final assembly, add the cooled rice noodles to the bowl with the vegetables. Pour the dressing over the top. Toss everything together gently. Make sure the noodles and veggies are well coated in the dressing. Taste the salad. If needed, adjust the seasoning by adding more soy sauce, lime juice, or sriracha to suit your taste. To make the dressing just right, focus on consistency. If it feels too thick, add a bit of water. Mix in one tablespoon at a time until it flows smoothly. For flavor, balance the salty soy sauce with a bit of lime juice. It brightens the taste. If you love spice, adjust the sriracha to your liking. Start small, and taste as you go. To keep your veggies fresh, cut them right before serving. This maintains their crunch. Use a sharp knife for clean cuts. If you want variety, try adding bell peppers or snap peas. They add color and taste. You can even swap in zucchini for cucumber or use kale instead of cabbage. The options are endless. For a great presentation, serve the salad in a large bowl. This shows off the colorful veggies. You can also use individual bowls for a fun touch. Garnish with extra crushed peanuts and fresh cilantro on top. A sprinkle of sesame seeds adds texture. Lime wedges not only look nice but also offer a fresh squeeze when eating. {{image_2}} For a protein boost, you can add grilled chicken or tofu. Both options pair well with the salad's flavors. Grilled chicken adds a nice savory taste, while tofu gives a soft texture. You can also use shrimp or beef for a heartier meal. Shrimp cooks quickly and adds a sweet flavor. Beef gives the salad a rich taste. If you need gluten-free options, rice noodles are the best choice. They are naturally gluten-free and easy to work with. You can also try zucchini noodles for a fresh twist. For a vegan dressing, substitute honey with maple syrup. This keeps the dressing sweet while staying plant-based. To control the heat, you can reduce the sriracha in the dressing. For mild alternatives, use just a pinch of sriracha. This keeps the salad tasty without too much spice. If you love heat, add more sriracha or even some chili flakes. This will kick up the flavor and give a nice zing. Store the Spicy Thai Peanut Noodle Salad in an airtight container. This keeps it fresh and safe. Glass or plastic containers work well. The salad lasts up to three days in the fridge. After that, the veggies lose their crunch. The dressing may also separate. Reheating this salad is not necessary. It tastes best cold or at room temperature. If you do want to warm it, heat it gently in a pan. Avoid high heat to keep the noodles soft. For a refreshing bite, serve it cold straight from the fridge. You can also let it sit at room temperature for a short time before serving. This helps the flavors come alive. Enjoy your vibrant salad! You can use several noodle types instead of rice noodles. Here are some options: - Soba noodles: These are made from buckwheat and add a nutty flavor. - Udon noodles: Thick and chewy, they work well for a hearty salad. - Zucchini noodles: A fresh, low-carb choice that adds crunch. - Spaghetti: Regular pasta can substitute in a pinch, though it changes the flavor. Each noodle type brings a unique taste and texture. Feel free to experiment! Yes, you can prepare this salad ahead of time. Here’s how: - Prepare the noodles: Cook and cool them as directed. - Chop the veggies: Cut and store them in the fridge. - Make the dressing: Whisk the dressing and keep it in a jar. When you’re ready to serve, mix all parts together. This keeps everything fresh and tasty! The spice level can be adjusted to your taste. The base recipe includes sriracha, which adds heat. Here’s how to control it: - Mild: Use no sriracha or just a pinch. - Medium: Add 1 teaspoon of sriracha for a nice kick. - Spicy: Increase to 2 teaspoons or more for heat lovers. Taste as you go, and make it perfect for your palate! Spicy Thai Peanut Noodle Salad is fresh, tasty, and easy to make. We covered main ingredients like rice noodles, fresh veggies, and a rich peanut dressing. You learned about cooking techniques, perfecting the dressing, and creative variations. Remember, you can change protein options, spice levels, and even prep ahead to save time. Use these tips to create a salad you'll love. Enjoy your meal, share with friends, and explore the fun of Thai flavors!

Spicy Thai Peanut Noodle Salad Fresh and Flavorful Dish

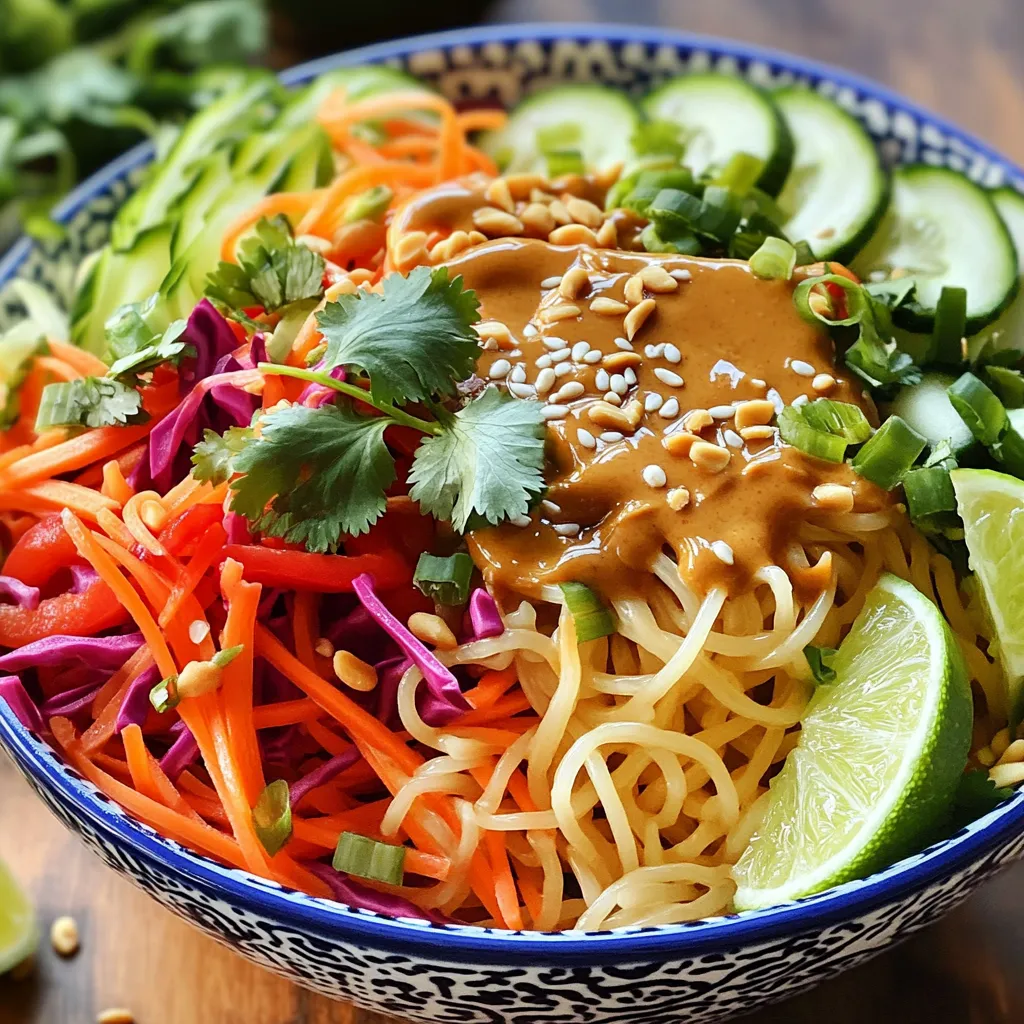
Ready to spice up your meals? This Spicy Thai Peanut Noodle Salad is fresh and flavorful, making it a perfect

For this dish, you will need fresh and vibrant ingredients. Here’s what to gather: - 1 pound large shrimp, peeled and deveined - 2 cups cherry tomatoes, halved - 1 cup kalamata olives, pitted and halved - 1 bell pepper (choose red or yellow), sliced - 1 zucchini, sliced into half-moons - 1 red onion, cut into wedges - 4 cloves garlic, minced These ingredients bring color and taste to your meal. The shrimp are the star. They add a sweet, briny flavor. The veggies add crunch and freshness. Next, you need some pantry staples to enhance your dish. These are simple yet powerful: - 1 teaspoon dried oregano - 1 teaspoon smoked paprika - 3 tablespoons olive oil - Salt and pepper to taste The oregano adds a classic Mediterranean touch. Smoked paprika gives a hint of warmth and depth. Olive oil helps everything cook perfectly while adding richness. Finally, think about garnishing your meal. Here are some great options: - Fresh parsley, chopped - Lemon wedges, for serving Chopped parsley adds a pop of color and freshness. Lemon wedges brighten the dish and bring all the flavors together. These garnishes make your meal look and taste even better. Start by gathering all your ingredients. You will need: - 1 pound large shrimp, peeled and deveined - 2 cups cherry tomatoes, halved - 1 cup kalamata olives, pitted and halved - 1 bell pepper (red or yellow), sliced - 1 zucchini, sliced into half-moons - 1 red onion, cut into wedges - 4 cloves garlic, minced - 1 teaspoon dried oregano - 1 teaspoon smoked paprika - 3 tablespoons olive oil - Salt and pepper to taste - Fresh parsley, chopped (for garnish) - Lemon wedges (for serving) Once you have everything, wash the vegetables well. Cut them into the sizes listed. This helps them cook evenly. In a large bowl, add the shrimp and all the chopped vegetables. Toss in the garlic, olives, and spices. Drizzle the olive oil over the mix. Sprinkle the oregano, smoked paprika, salt, and pepper on top. Use your hands or a spoon to mix everything well. Ensure each piece of shrimp and vegetable is coated with oil and spices. This will boost the flavor as they cook together. Preheat your oven to 400°F (200°C). Spread the shrimp and vegetable mix evenly on a sheet pan. Make sure they are not crowded. This helps them roast instead of steam. Place the pan in the oven. Roast for 15 to 20 minutes. Look for shrimp that turns pink and vegetables that become tender. Keep an eye on them to prevent burning. Once done, take the pan out and let it cool for a moment. Garnish with fresh parsley and serve with lemon wedges. Squeeze lemon over the dish for added zest. Enjoy your meal! To cook shrimp just right, watch the color. The shrimp should turn pink and opaque. This usually takes about 15 to 20 minutes in the oven. If you overcook them, they become tough. Try to keep the shrimp in a single layer on the pan. This helps them cook evenly. For best results, choose large shrimp. They hold their texture better. Want to amp up the flavor? Add a splash of lemon juice before serving. It brightens each bite. You can also toss in a pinch of red pepper flakes for heat. Fresh herbs like basil or thyme can replace parsley for a twist. If you like a smokier taste, consider adding more smoked paprika. Adjust the salt and pepper to suit your taste. Cleaning up after cooking can be a drag. To make it easier, line your sheet pan with parchment paper. This prevents sticking and makes washing a breeze. After cooking, let the pan soak while you eat. A quick rinse will remove any stubborn bits. Don't forget to use a large bowl for mixing. This way, you keep your kitchen tidy. {{image_2}} If you want a vegetarian version, try using chickpeas or tofu. Both options work well. Chickpeas add a nice texture and protein. Tofu absorbs flavors, making it a great choice. Just prepare them the same way as shrimp. Toss them with the veggies and seasonings. Feel free to mix up the vegetables! You can use asparagus, broccoli, or even artichokes. Each veggie brings its own taste. For a crunch, add snap peas or green beans. The key is to pick veggies that roast well. This way, they stay tender and flavorful. You can change the flavors with different herbs and spices. For a fresh twist, try basil or dill. If you like heat, add red pepper flakes. You can also use lemon zest for a bright touch. Each adjustment gives a new feel to the dish. Get creative and find what you love! To store your leftover Mediterranean shrimp, let it cool first. Place the shrimp and veggies in an airtight container. This keeps them fresh longer. You can store it in the fridge for up to three days. For best taste, eat it within one to two days. To reheat your shrimp, use the oven. Preheat it to 350°F (175°C). Spread the shrimp and veggies on a baking sheet. Heat for about 10 minutes or until warm. This method helps keep the shrimp juicy and the veggies tender. You can also use a microwave for quick reheating. Just cover the dish to keep moisture in. Heat for 1-2 minutes, checking often. If you want to freeze the dish, do so before cooking. Place uncooked shrimp and veggies in a freezer bag. Press out as much air as you can, then seal it. This helps prevent freezer burn. When ready to cook, thaw it in the fridge overnight. You can also use cold water for quicker thawing. Just place the sealed bag in cold water for about 30 minutes. Cook immediately after thawing for the best results. I recommend using large shrimp, ideally 16-20 per pound. They cook well and stay juicy. Fresh shrimp offers the best flavor, but frozen shrimp works too. When using fresh shrimp, look for a sweet scent and a firm texture. Yes, you can use frozen shrimp! Just be sure to thaw them first. Place the shrimp in a bowl of cold water for about 15 minutes. This quick thaw helps keep them tender. Pat them dry before adding to the pan. This recipe is naturally gluten-free! All the ingredients are safe for gluten-free diets. Just double-check the labels on your olives and any added seasonings. If you want a grain to serve, use quinoa or rice, which are both gluten-free. You learned how to make a tasty Sheet Pan Mediterranean Shrimp dish. We explored the key ingredients, step-by-step prep, and cooking methods. You have tips for great flavor and quick cleanup, plus fun variations to try. Don't forget about proper storage for leftovers. This recipe is easy and flexible for everyone. Now, you can create a meal that is healthy and delicious with simple steps. Enjoy your cooking adventure!

Sheet Pan Mediterranean Shrimp Flavorful and Easy Meal

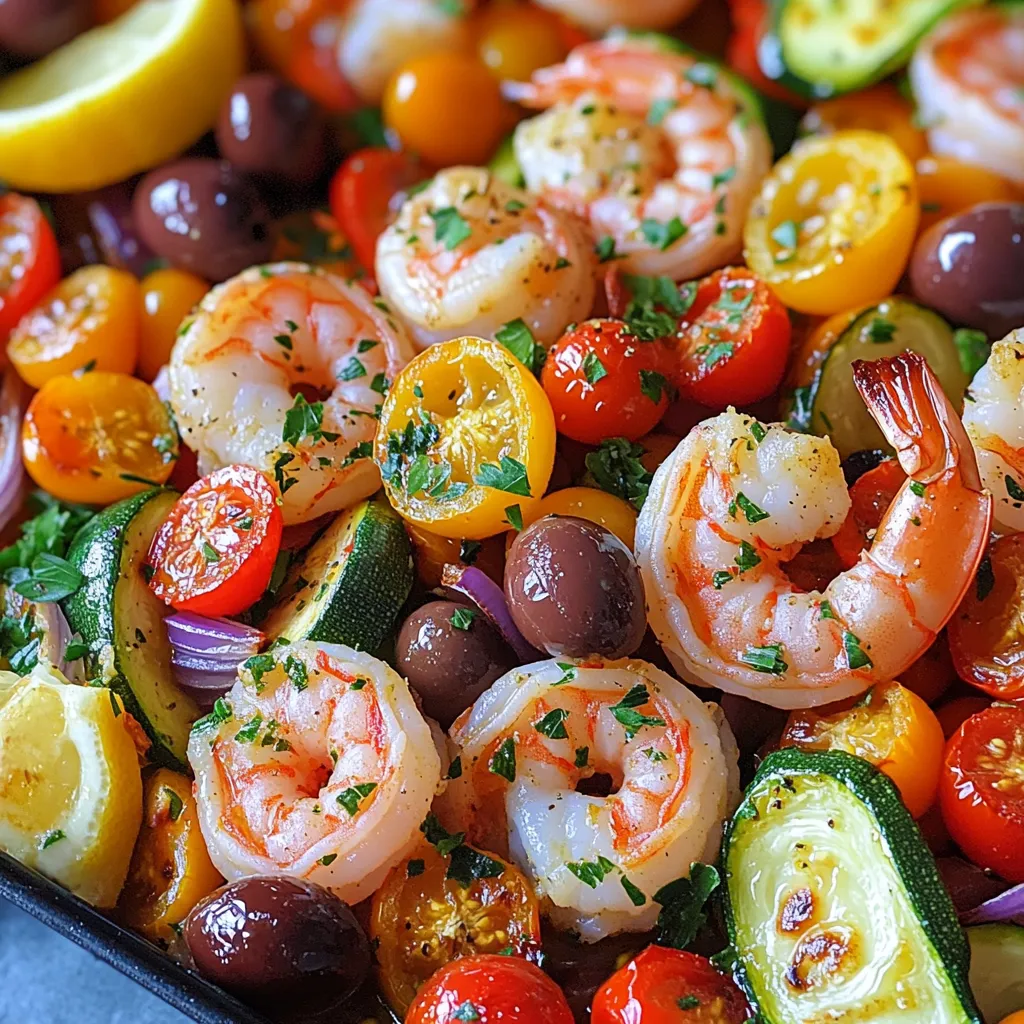
Looking for a quick and tasty meal? You’ve come to the right place! My Sheet Pan Mediterranean Shrimp recipe is

- 4 medium-sized russet potatoes - 4 tablespoons unsalted butter, melted - 4 cloves garlic, minced - 1 cup grated Parmesan cheese - 1 teaspoon fresh thyme leaves (or 1/2 teaspoon dried thyme) - 1 teaspoon salt - 1/2 teaspoon black pepper - 2 tablespoons chopped fresh parsley (for garnish) - Optional: 1 teaspoon red pepper flakes (for heat) I love using russet potatoes for this dish. Their starchy texture makes them perfect for baking. The unsalted butter adds richness, while garlic gives great flavor. Fresh thyme is my go-to herb for a hint of earthiness. Parmesan cheese is a star ingredient here. It melts and crisps up nicely. Salt and pepper enhance all the flavors. Fresh parsley adds color and freshness on top. If you enjoy a kick, add red pepper flakes. It’s all about your taste! Gather all these ingredients before you start cooking. This way, you won’t miss anything. Happy cooking! - Preheating the oven: First, preheat your oven to 425°F (220°C). This helps to ensure even cooking. - Washing and drying the potatoes: Next, wash the potatoes under cold water. Scrub away any dirt. After that, pat them dry with a kitchen towel. - Slice technique for Hasselback style: Take a sharp knife and carefully slice thin slits into each potato. Space the cuts about 1/8 inch apart. Make sure you don’t cut all the way through. The bottom should stay intact. - Mixing the garlic butter: In a small bowl, mix the melted butter, minced garlic, salt, pepper, thyme, and optional red pepper flakes. This will bring out great flavor. - Coating the potatoes with the mixture: Place the potatoes on a baking sheet lined with parchment paper. Use a brush to coat the potatoes with the garlic butter mix. Make sure it seeps into the slits. - Sprinkling Parmesan cheese: Evenly sprinkle the grated Parmesan cheese over the potatoes. Fill in the slits with cheese for extra goodness. - Baking time and temperature: Bake the potatoes in the preheated oven for about 45-50 minutes. They should be tender and the edges crispy. - Basting for extra flavor: Halfway through baking, baste the potatoes with any remaining garlic butter. This adds more flavor and keeps them moist. - Ensuring crispy edges: To get those crispy edges, keep an eye on the potatoes in the last few minutes. You can turn up the heat slightly if needed. - How to achieve the perfect crispy texture To get crispy edges, slice the potatoes thinly. Leave the bottom intact. This helps them cook evenly. Bake at a high temperature to create a nice crust. Basting with garlic butter halfway through adds more flavor and crunch. - Using fresh vs. dried herbs Fresh herbs give a bright taste. Use fresh thyme if you can. It enhances the flavors in the garlic butter. Dried thyme works too, but the taste is less bold. Adjust the amount to your liking. - Adjusting flavors with optional ingredients Want some heat? Add red pepper flakes to the garlic butter mix. This gives the potatoes a spicy kick. You can also try different cheeses. Cheddar or mozzarella can change the flavor profile. - Best sides to pair with Hasselback potatoes These potatoes go well with grilled meats. Try serving them with chicken or steak. A fresh salad adds a nice crunch too. Roasted veggies can round out the meal nicely. - Presentation ideas for serving Serve on a decorative platter. Line the platter with parchment paper for a clean look. Garnish with extra Parmesan and thyme leaves for a pop of color. This makes the dish more inviting. - Recommended sauces or dips Pair these potatoes with sour cream or ranch dip. Garlic aioli also works great. For a tangy taste, try chimichurri sauce. Each dip brings out different flavors in the potatoes. {{image_2}} You can easily switch up the taste of your Garlic Parmesan Hasselback Potatoes. Here are some fun ideas: - Adding different cheeses: Try using mozzarella for a stretchy texture or feta for a tangy kick. Cheddar also adds a rich flavor. - Incorporating vegetables between the slits: Slice in some thin pieces of onion, bell pepper, or even zucchini. This adds color and extra taste. - Spicing it up with different herbs: Fresh rosemary or basil can change the whole vibe. Experiment with your favorites! Making these potatoes fit your diet is simple: - Gluten-free options: This recipe is naturally gluten-free. Just ensure your ingredients, like butter, are gluten-free. - Vegan substitutes for butter and cheese: Use olive oil instead of butter. Nutritional yeast can replace Parmesan cheese for a cheesy flavor. - Low-carb alternatives: Swap potatoes for cauliflower. Cut the cauliflower into thick slices and follow the same method for a tasty dish. To keep your Garlic Parmesan Hasselback Potatoes fresh, store them in an airtight container. Place parchment paper between layers if you stack them. This helps keep the cheese from sticking. You can refrigerate them for up to 3 days. After that, the flavor and texture may fade. When reheating, I recommend using the oven. Preheat it to 350°F (175°C). Place the potatoes on a baking sheet and cover them with foil. This helps keep them moist. Heat for about 15-20 minutes. If you use a microwave, the potatoes can get soggy. Place them on a microwave-safe plate and cover with a damp paper towel. Heat in short bursts of 30 seconds, checking often. This keeps them warm but not crispy. What are Hasselback potatoes? Hasselback potatoes are whole potatoes sliced thinly, but not all the way through. This creates a fan-like shape. They cook well and have crispy edges while staying soft inside. You can flavor them in many ways, like with garlic and cheese. Can I use other types of potatoes? Yes, you can use other potatoes. While russet potatoes work best, Yukon Gold or red potatoes also fit. Just make sure they are firm and not too small. This gives you a nice, hearty bite. How do I know when they are done baking? Check the potatoes after 45-50 minutes at 425°F. They should be soft in the middle and crispy outside. You can test this by sticking a fork into the thickest part. If it goes in easily, they are done. Why are my potatoes not crispy? If your potatoes are not crispy, it could be due to too much moisture. Make sure they are dry before baking. Also, brush them with enough garlic butter to help crisp the edges. What to do if they are undercooked? If your potatoes are undercooked, simply put them back in the oven. Bake them for an extra 5-10 minutes. Check them often until they feel soft and tender. How to fix flavor imbalances? If your potatoes taste bland, add more salt or cheese. You can also sprinkle on more herbs or spices. For a kick, try adding red pepper flakes or a squeeze of lemon juice. Hasselback potatoes are easy and tasty. You learned how to prepare them, coat them, and bake them right. Remember, the right herbs and cooking tips make a big difference. Try adding your favorite cheeses or veggies for a twist. Store leftovers properly and reheat to keep them crispy. With these tips, you'll impress your family and friends every time. Enjoy every bite!

Garlic Parmesan Hasselback Potatoes Flavorful Delight

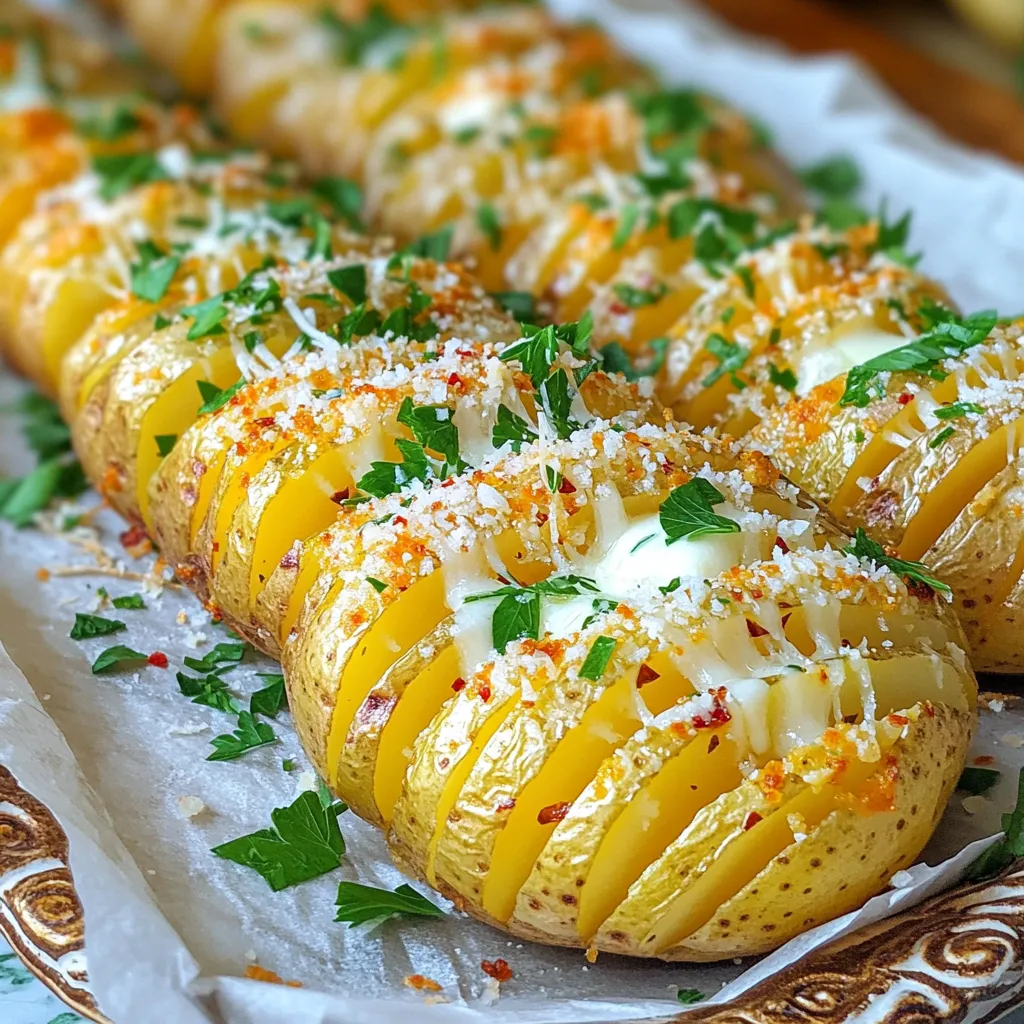
Are you ready to elevate your potato game? Garlic Parmesan Hasselback Potatoes are a tasty and impressive dish. These crispy,

Older posts
Newer posts
← Previous Page1 … Page11 Page12 Page13 … Page86 Next →

dsad

© 2026 Cooking Wells • Built with GeneratePress

Our Policies

  • Copyright Policy
  • Cookie Policy
  • GDPR Policy
  • Privacy Policy
  • Disclaimer
  • Terms Of Use

More Information

  • Home
  • About
  • Contact
  • Appetizers
  • Dessert
  • Dinner
  • Drinks
©2026, Cooking Wells About Back To Top