Skip to content
DisclaimerTerms Of UseGDPR PolicyCookie Policy

Cooking Wells

  • Home
  • Drinks
  • Appetizers
  • Dinner
  • Dessert
  • About
  • Contact
  • Privacy Policy
DisclaimerTerms Of UseGDPR PolicyCookie Policy

NO-ING-IMG

- 4 salmon fillets - 1 pound fresh green beans, trimmed - 2 lemons (1 sliced and 1 juiced) - 3 tablespoons olive oil - 2 teaspoons dried dill (or 1 tablespoon fresh dill, chopped) - 3 cloves garlic, minced - Salt and pepper to taste - Optional: 1 teaspoon red pepper flakes for a kick This dish shines with simple yet fresh ingredients. Salmon fillets provide a rich, buttery flavor. Green beans add a crisp and vibrant touch. Lemons bring a bright acidity that cuts through the richness of the salmon. Olive oil is key, adding a smooth texture. Dill gives a fragrant, herbaceous note. Garlic rounds out the flavor profile, giving it a warm depth. Seasonings like salt and pepper enhance every bite. If you enjoy spice, add red pepper flakes for heat. These ingredients come together to create a meal that's not only tasty but also quick and easy. You can enjoy it any night of the week. Start by preheating your oven to 400°F (200°C). This heat helps cook the salmon and green beans perfectly. Next, prepare your sheet pan by lining it with parchment paper. This step makes for easy cleanup and prevents sticking. For the sauce, gather these ingredients: - 3 tablespoons olive oil - Juice of 1 lemon - 3 cloves garlic, minced - 2 teaspoons dried dill (or 1 tablespoon fresh dill, chopped) - Salt and pepper to taste - Optional: 1 teaspoon red pepper flakes for a kick In a mixing bowl, whisk together the olive oil, lemon juice, minced garlic, dill, salt, and pepper. If you like some heat, add the red pepper flakes too. Whisk until everything blends well. Now, it’s time to arrange your meal. Place the salmon fillets on one side of the sheet pan. On the other side, spread the fresh green beans. Drizzle half of your lemon-dill sauce over the salmon. Use the rest of the sauce for the green beans. Gently toss the green beans to coat them in sauce. For extra flavor, lay lemon slices over the salmon fillets. Bake your sheet pan dinner in the preheated oven for 15 to 20 minutes. The salmon is done when it flakes easily with a fork. The green beans should be tender-crisp. To check for doneness, poke the thickest part of the salmon. If it’s opaque, you’re all set. Remove the pan from the oven and let it cool for a few minutes before serving. To boost the taste of your salmon and green beans, consider adding spices. Try smoked paprika for a warm flavor. If you want a spicy kick, add red pepper flakes. You can also mix in fresh herbs like parsley or thyme for a fresh twist. Adjust the zestiness by using more lemon juice. If you prefer a milder taste, reduce the lemon juice. You can also add a touch of honey to balance the tartness. To get the perfect salmon texture, cook it until it flakes easily with a fork. This usually takes about 15-20 minutes at 400°F. Use a meat thermometer to check for doneness. The internal temperature should reach 145°F. For tender-crisp green beans, do not overcook them. When they turn bright green, they are ready. Toss them gently in the lemon-dill mixture before baking to coat them evenly. Garnish your dish with fresh dill for a pop of color. It adds a lovely aroma too. Place lemon wedges on the side for an extra zesty touch. Serve the salmon and green beans on a large platter for a beautiful presentation that impresses. {{image_2}} You can switch out salmon for other fish. Cod, tilapia, or trout work great. Each fish has a mild taste, so they soak up the lemon dill flavor well. Just adjust the cooking time based on the thickness of the fish. For a vegetarian option, use firm tofu. Press the tofu to remove water, then cut it into cubes. Marinate it in the same lemon-dill mix. Bake it for about 20-25 minutes until it's golden. This adds a nice texture and flavor. Using seasonal veggies can make this dish fresh and fun. Asparagus, zucchini, or bell peppers can add color and crunch. Just chop them to a similar size as green beans. Toss them with the same lemon-dill sauce before baking. You can also mix in other greens like spinach or kale. Add these greens halfway through cooking. They cook quickly and add nutrients without losing their bright color. Exploring different herbs can add a twist. Try basil, parsley, or cilantro. Each herb brings its unique taste and aroma to the dish. Just chop fresh herbs and mix them into the sauce. If you like some heat, add red pepper flakes or even some fresh chili. For a touch of sweetness, a drizzle of honey or maple syrup will work well. Balance is key, so adjust to your taste. To store your Lemon Dill Salmon and green beans, first let them cool. Place them in an airtight container. This helps keep them fresh. You can keep the leftovers in the fridge for up to three days. Make sure you label the container with the date. This way, you know when you made it. When reheating salmon and green beans, the best method is to use the oven. Preheat your oven to 350°F (175°C). Place the salmon and green beans on a baking sheet. Cover them with aluminum foil to keep them moist. Heat for about 10-15 minutes, or until warmed through. If you want to keep the flavor and texture, avoid using the microwave. The microwave can make the salmon tough. Instead, you can use a skillet for quick reheating. Just add a splash of water, cover, and heat on low. This method keeps your meal delicious and juicy. Can I make this recipe ahead of time? Yes, you can prep this dish ahead. Chop the veggies and mix the sauce. Store them in the fridge. When ready, just place everything on the sheet pan and bake. What can I serve as a side dish? This dish pairs well with rice, quinoa, or a fresh salad. You can also serve crusty bread to soak up the lemon sauce. How do I know when the salmon is cooked? The salmon is done when it flakes easily with a fork. It should have a light pink color inside. You can also use a meat thermometer; it should read 145°F (63°C). Can I use frozen salmon for this recipe? Yes, you can use frozen salmon. Just thaw it in the fridge overnight. Pat it dry before cooking to get the best texture. Can I substitute dill if I don't have it? If you don’t have dill, try using parsley or thyme. Both add nice flavor. Fresh herbs work best, but dried herbs are fine too. What are some alternatives for olive oil? You can use avocado oil or melted butter instead of olive oil. Both will give good flavor to the dish. This recipe is simple and full of flavor. We learned about salmon, green beans, and a tasty lemon-dill sauce. You can easily swap ingredients to fit your cravings. Remember to check the cooking times for the best results. Now, you can impress your family or friends with a great meal. Enjoy cooking and have fun experimenting with your own twists on this dish!

Sheet Pan Lemon Dill Salmon Green Beans Delight

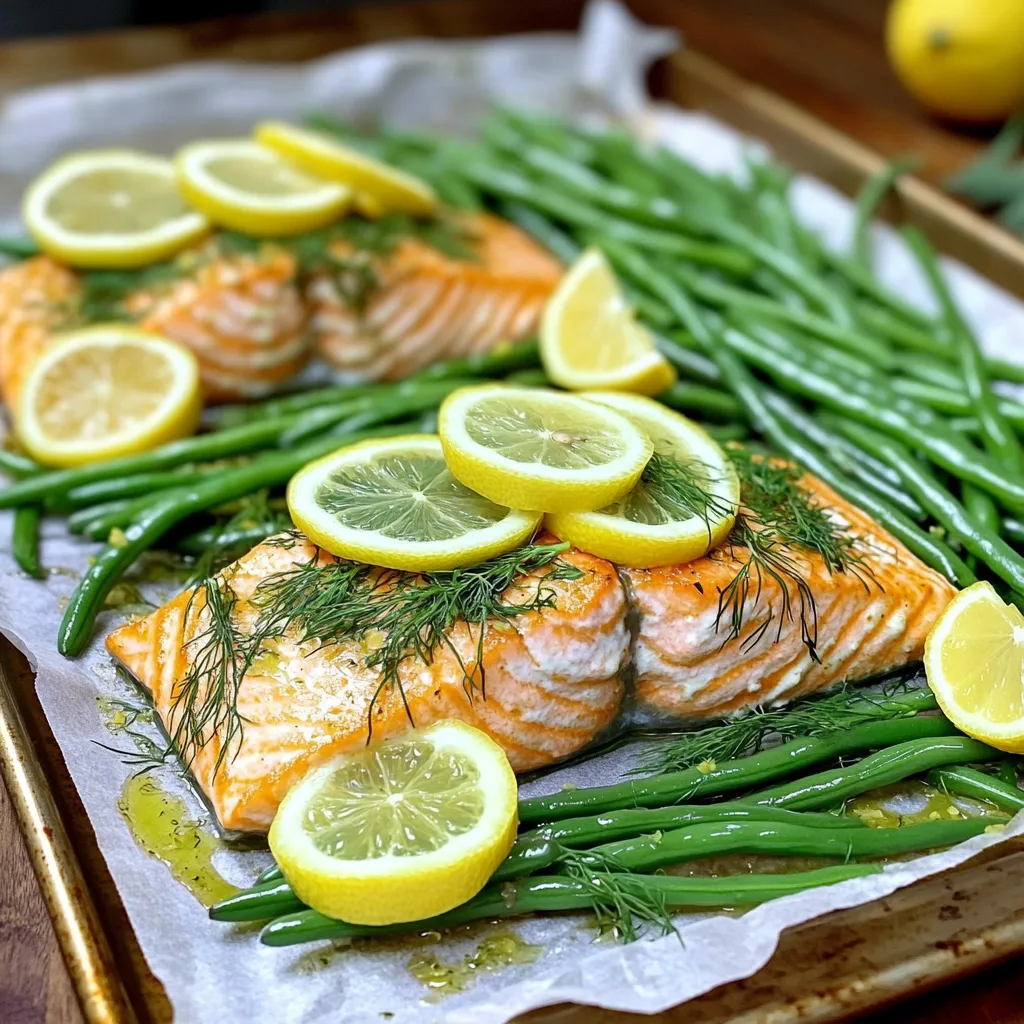
If you’re looking for a tasty, easy meal, you’re in the right spot! This Sheet Pan Lemon Dill Salmon with

- 2 ripe avocados - 1 cup panko breadcrumbs - 1 tablespoon olive oil - 1 teaspoon garlic powder - 1 teaspoon smoked paprika - ½ teaspoon salt - ½ teaspoon pepper - 8 small corn tortillas - 1 cup shredded red cabbage - ½ cup cilantro, chopped - 1 lime, cut into wedges - Your favorite hot sauce (optional) The key to great Air Fryer Crispy Avocado Tacos is using fresh and ripe avocados. They should feel slightly soft when you press them. Panko breadcrumbs give a nice crunch. The spices add flavor that makes each bite tasty. You can adjust the seasonings to fit your taste. For the tacos, small corn tortillas work best. They hold the filling well. Red cabbage adds a nice crunch and color. Fresh cilantro brightens the dish. Lime wedges add a zesty touch, and hot sauce can really spice things up. Gathering these ingredients is easy. You can find them in any grocery store. Make sure you have everything ready before you start cooking. This will help you move smoothly through the recipe. First, take your ripe avocados. Cut them in half and remove the pit. Use a spoon to scoop out the flesh carefully. Next, slice the avocado into wedges or slices. Aim for even cuts. This helps with cooking and eating. Now, let’s make the coating. In a bowl, mix one cup of panko breadcrumbs with one teaspoon of garlic powder, one teaspoon of smoked paprika, half a teaspoon of salt, and half a teaspoon of pepper. Drizzle one tablespoon of olive oil on top. Stir it well until the breadcrumbs look coated. Place the breaded avocado slices in your air fryer basket. Make sure they are in a single layer. Set your air fryer to 375°F (190°C). Cook for 8 to 10 minutes. Shake the basket halfway through. This step ensures they cook evenly. You want them golden and crispy! While the avocados cook, warm your corn tortillas. Use a dry skillet on medium heat. Heat each tortilla for about 30 seconds on each side. This makes them soft and easy to fold. Once the avocados are crispy, it's time to build your tacos. Place 2 to 3 avocado slices on each warm tortilla. Top with shredded red cabbage and chopped cilantro. This adds crunch and fresh flavor. Serve your tacos with lime wedges on the side. A drizzle of your favorite hot sauce can add a nice kick. Enjoy these tasty tacos right away for the best flavor! To get crispy avocados, cook them at 375°F (190°C). This temperature helps them fry evenly. Cook for 8 to 10 minutes. Check them halfway through and shake the basket. This step ensures they brown well. For the breadcrumb coating, use panko breadcrumbs. They are lighter and crispier than regular breadcrumbs. Mix garlic powder, smoked paprika, salt, and pepper in a bowl. Drizzle olive oil over the mix. Stir until the breadcrumbs are well coated. This gives the avocados great flavor and crunch. You can prep the avocado and coating a few hours ahead. Slice the avocados and coat them in the breadcrumb mix. Store them in the fridge until you’re ready to cook. This saves time when you want to serve them. For the tortillas, warm them just before serving. Keep them in a clean kitchen towel. This keeps them soft and warm. If you have leftovers, store them in an airtight container. They will stay fresh for one day. Reheat them in the air fryer to keep them crispy. These tacos pair well with fresh drinks. Try serving them with iced tea or a light beer. For sides, consider fresh salsa or guacamole. They add even more flavor. For a beautiful presentation, use a colorful plate. Arrange the tacos neatly. Garnish with extra cilantro and lime wedges. This not only looks nice but also adds flavor. Enjoy your tasty creation! {{image_2}} You can add protein to make your tacos heartier. Try adding black beans or grilled chicken. Both options pair well with the crispy avocado. If you want a vegetarian option, choose lentils or chickpeas. They add protein and taste great with the other taco flavors. You don't have to stick to corn tortillas. Flour tortillas are a great choice if you want a softer bite. For a low-carb option, use lettuce wraps instead. They add crunch and freshness to your dish. Spice things up with toppings. Add diced tomatoes, sliced jalapeños, or avocado crema. These will boost flavor and add color. Don't forget hot sauce! Experiment with different kinds like salsa verde or chipotle sauce. Each brings a unique kick to your tacos. To keep your leftover avocado tacos fresh, place them in an airtight container. Make sure to store them in the fridge. They will stay good for about 2 to 3 days. Freezing avocado tacos is simple. First, let the tacos cool completely. Wrap each taco in plastic wrap. Then, place them in a freezer-safe bag. They can last up to 3 months in the freezer. To reheat, let them thaw overnight in the fridge. To keep the tacos crispy, reheat them in the air fryer. Set it to 350°F (175°C) and heat for about 5 minutes. This method helps to retain the crunch. You can also use an oven for reheating, but the air fryer works best! It takes about 20 minutes to make these tacos. This includes 10 minutes for prep and 10 minutes for cooking. You can enjoy them quickly! Yes, you can use different avocados. Hass avocados work great because they are creamy. Fuerte avocados also taste good. Just make sure they are ripe for the best flavor. If you don’t have panko, you can use regular breadcrumbs. Crushed tortilla chips can also add a nice crunch. For a gluten-free option, try ground almonds or cornmeal. These Air Fryer Crispy Avocado Tacos are easy and fun to make. We explored ingredients, preparation steps, and tips to ensure your avocados turn out crispy and tasty. Remember to play with flavors and toppings to make them your own. Whether you’re cooking for family or friends, these tacos will impress. Keep experimenting with different ingredients and enjoy every bite!

Air Fryer Crispy Avocado Tacos Simple and Tasty Dish

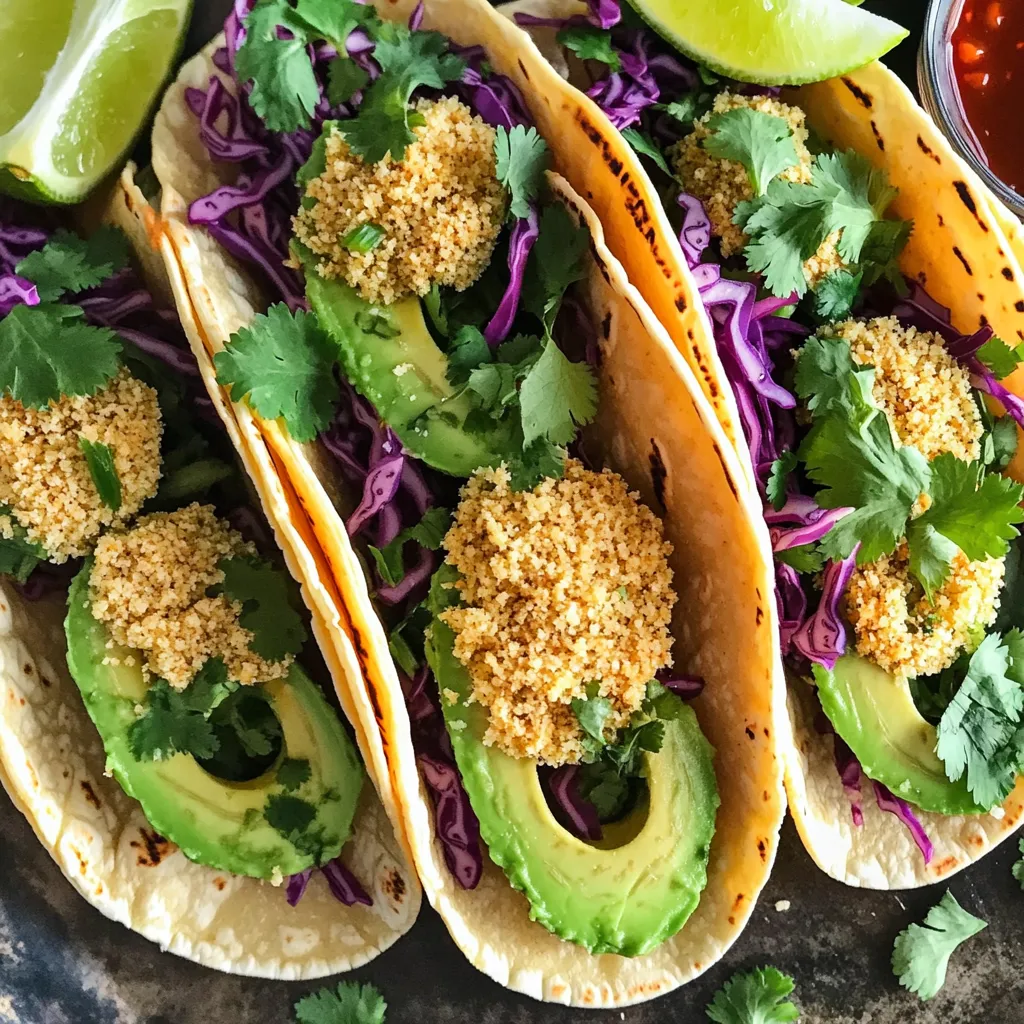
Craving something fresh, crispy, and tasty? Let me introduce you to Air Fryer Crispy Avocado Tacos! This simple dish combines

- 1 cup graham cracker crumbs - 1/4 cup unsweetened cocoa powder - 1/2 cup unsalted butter, melted - 1/2 cup powdered sugar - 8 oz cream cheese, softened - 1 cup creamy peanut butter - 1 teaspoon vanilla extract - 1/2 cup heavy whipping cream - 1/2 cup semi-sweet chocolate chips (for topping) - 1 tablespoon coconut oil (for topping) - 1 cup = 240 ml - 1/4 cup = 60 ml - 1/2 cup = 120 ml - 8 oz = 227 grams - 1 tablespoon = 15 ml - Use almond butter for a nut-free option. - Swap graham crackers for crushed cookies or gluten-free options. - Replace heavy cream with coconut cream for a dairy-free version. - Use dark chocolate chips if you prefer a richer taste. - For lower sugar, try a sugar substitute in the filling. These ingredients make the base for your no-bake chocolate peanut butter cheesecake bars. You can adjust based on what you have at home. To start, grab a mixing bowl. Add 1 cup of graham cracker crumbs and 1/4 cup of unsweetened cocoa powder. Pour in 1/2 cup of melted unsalted butter. Mix it all together. You want it to look like wet sand. Next, take a 9x9-inch baking dish. Press the mixture firmly into the bottom. Make sure it’s even and compact. Then, place the dish in the fridge to set while you prepare the filling. Now, let's make the filling. In a large bowl, take 8 oz of softened cream cheese. Use an electric mixer to beat it until smooth. Next, add in 1 cup of creamy peanut butter, 1/2 cup of powdered sugar, and 1 teaspoon of vanilla extract. Mix until everything is creamy and combined. In another bowl, whip 1/2 cup of heavy whipping cream until stiff peaks form. Gently fold the whipped cream into the peanut butter mixture. Be careful not to deflate it. Pour the filling over the crust and spread it evenly using a spatula. Place it back in the fridge for at least 4 hours to set. For the topping, take a microwave-safe bowl. Add 1/2 cup of semi-sweet chocolate chips and 1 tablespoon of coconut oil. Heat this mixture in the microwave. Do it in 30-second bursts and stir in between. Keep going until it’s melted and smooth. Once the cheesecake layer is firm, pour the melted chocolate over the top. Spread it evenly. Pop it back in the fridge for another hour to set the chocolate. Now, you’re ready to cut your bars and enjoy! To get a smooth and creamy filling, start with softened cream cheese. This makes mixing easier. Use an electric mixer to beat the cream cheese first. Then, add peanut butter, powdered sugar, and vanilla extract. Mix until everything is smooth. Next, whip heavy cream in a separate bowl until it forms stiff peaks. Gently fold this whipped cream into the peanut butter mix. Be careful not to mix too hard. This keeps the filling light and fluffy. Cutting your bars neatly will make them look great. First, chill them well in the fridge. Once set, use a sharp knife. Dip the knife in hot water, then dry it before cutting. This helps you get clean cuts. Wipe the knife between cuts to keep each piece neat. You can cut them into squares or rectangles, depending on what you like. Serve these bars chilled for the best taste. You can add extra chocolate drizzle on top for fun. Fresh berries or nuts can make a lovely garnish too. If you love ice cream, serve a scoop on the side. This adds a nice touch to your dessert. Enjoy sharing these treats with friends and family! {{image_2}} You can make these bars in many flavors. Swap the peanut butter for almond butter for a nutty twist. Use vanilla extract instead of chocolate for a lighter taste. Add cocoa powder to the filling for extra chocolate flavor. You can create layers of flavors by mixing different extracts. To make these bars gluten-free, use gluten-free graham crackers. Many brands offer tasty options that work well. You can also use almond flour as a crust base. Just mix it with melted butter and cocoa powder. This will give you a crunchy and delicious base. Get creative by adding mix-ins to your cheesecake filling. Chopped nuts add a nice crunch. You can use pecans or walnuts for more flavor. Chocolate chips mixed into the filling can make each bite sweeter. Crushed candies like peanut butter cups can also add a fun twist. Just remember to adjust the sweetness if adding candies. You should store the bars in the fridge. Keep them in an airtight container. This helps maintain their flavor and texture. If you do not have a container, wrap them tightly in plastic wrap. This prevents them from drying out and keeps them fresh. You can also freeze these bars. Cut them into squares first. Wrap each square in plastic wrap, then place them in a freezer bag. Remove as much air as you can from the bag. They can last up to three months in the freezer. When ready to eat, thaw them in the fridge overnight. These cheesecake bars stay fresh for about five days in the fridge. Keep an eye on their smell and look. If they have an off smell or change color, it’s best to discard them. To enjoy them at their best, try to eat them within the first three days. Yes, you can use crunchy peanut butter. This will add a nice texture. The bars will still taste great with crunchy bits throughout. Just keep in mind, the filling will be less smooth. These cheesecake bars need at least four hours to set. I recommend letting them chill overnight for the best results. The longer they sit, the firmer they become. Absolutely! You can make these bars a day or two ahead of time. Just store them in the fridge until you're ready to serve. They hold up well, and flavors blend nicely over time. If you don't have graham crackers, use digestive biscuits or vanilla wafers. You can even try crushed pretzels for a salty twist. Just adjust the sugar in the crust if needed. In this blog post, we explored the key ingredients for the no-bake chocolate peanut butter cheesecake bars. We covered step-by-step instructions for preparing the crust, filling, and toppings. Tips for a creamy texture and neat cuts made the process easier. You can even try different flavors or add mix-ins. Lastly, we shared storage info to keep your bars fresh. Remember, these bars are fun and simple to make. Enjoy them with friends or family!

No-Bake Chocolate Peanut Butter Cheesecake Bars Delight

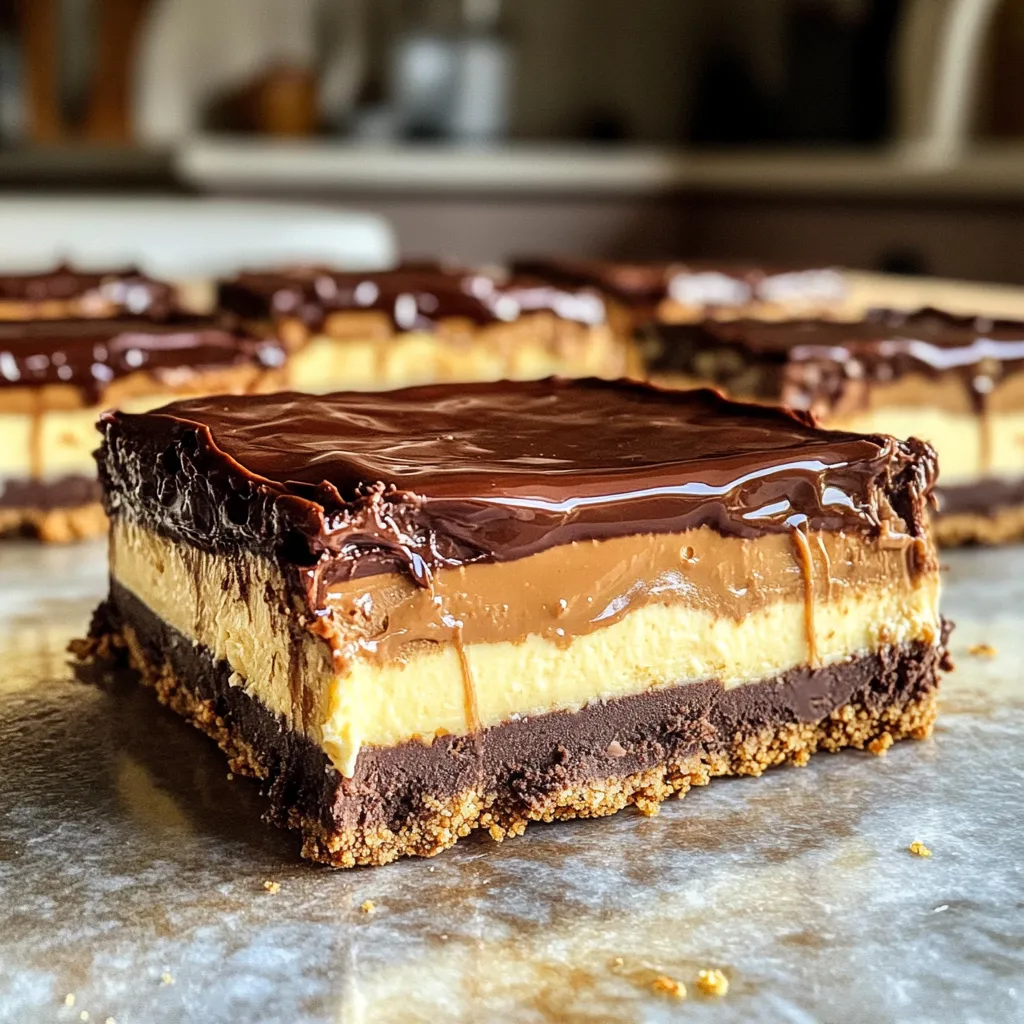
Get ready to indulge in a no-bake treat that combines two beloved flavors: chocolate and peanut butter! These No-Bake Chocolate

- 2 salmon fillets, skinless and boneless - 3 tablespoons teriyaki sauce - 1 tablespoon sesame oil These main ingredients bring rich flavors to your dish. Salmon is packed with omega-3 and is a great protein choice. The teriyaki sauce adds a sweet and savory touch. Sesame oil gives a nutty flavor that enhances the dish. - 1 avocado, diced - 1 small cucumber, thinly sliced - 1 cup shredded carrots Fresh additions add crunch and creaminess. Avocado offers healthy fats while cucumber gives a refreshing bite. Shredded carrots add a pop of color and sweetness. Together, they balance the salmon's richness. - 1 head of butter lettuce or romaine, leaves separated - 1 tablespoon sesame seeds - 2 green onions, finely chopped The lettuce serves as a crisp cup for your fillings. Use butter lettuce for its softness or romaine for a sturdy option. Sesame seeds add crunch, while green onions bring a fresh taste. These garnishes enhance both flavor and presentation. Start by making the marinade. In a medium bowl, combine 3 tablespoons of teriyaki sauce and 1 tablespoon of sesame oil. This mix gives the salmon a great flavor. Then, add 1 teaspoon of minced ginger and 1 teaspoon of minced garlic. These ingredients add a nice kick to the sauce. Next, take your 2 salmon fillets and soak them in the marinade. Make sure the salmon is well-coated. Let it soak for about 5 minutes. This short time helps the salmon absorb the flavors. Now it’s time to cook the salmon! Heat a non-stick skillet over medium-high heat. When the skillet is hot, add the marinated salmon. Cook each side for about 3–4 minutes. The salmon should flake easily when it's done. This cooking time ensures it stays juicy and tender. After cooking, remove the salmon and let it cool a bit. Use a fork to flake the salmon into bite-sized pieces. Take a leaf of butter lettuce and spoon the salmon into the center. Now, it’s time to add some toppings! Layer on diced avocado, thinly sliced cucumber, and shredded carrots. For the final touch, sprinkle sesame seeds and chopped green onions on top. If you like, add salt and pepper to taste. Fold the lettuce cups around the filling, and you’re ready to enjoy! For the best salmon, I recommend pan-searing. This method gives crispy skin and juicy meat. Start with a hot skillet. Cook the salmon for about 3 to 4 minutes on each side. This timing keeps it tender without drying it out. To avoid overcooking, check it early. Salmon is done when it flakes easily with a fork. You can boost the flavor of your salmon with spices. Try adding a pinch of cayenne for heat or a dash of smoked paprika for depth. If you want a zestier taste, squeeze some lime juice over the salmon just before serving. Fresh herbs, like cilantro or basil, also add bright notes. Serve the lettuce cups on a big platter. Arrange them neatly for a pretty display. For an extra pop, sprinkle more sesame seeds on top. Add chopped green onions for color. You can even serve lime wedges on the side. This adds a fresh touch that invites everyone to dig in. {{image_2}} You can swap salmon for chicken or tofu. Both options work well. Chicken gives a classic taste. It cooks quickly and gets nice and juicy. Tofu is great for a plant-based meal. It absorbs flavors well. Benefits of alternative proteins: - Chicken is lean and full of protein. - Tofu is low in calories and high in nutrients. - Both options are versatile for many recipes. Try different marinades to change the taste. You can use soy sauce, honey, or even spicy chili sauce. Each one adds a unique twist. Recommended substitutions for ingredients: - Instead of sesame oil, use olive oil for a milder taste. - Swap the carrots for bell peppers for added crunch. - Use lime juice instead of teriyaki sauce for a zesty kick. To make this dish gluten-free, use tamari instead of regular soy sauce. Tamari is a great choice and tastes similar. For a vegan-friendly option, replace salmon with chickpeas or mushrooms. Both options are hearty and full of flavor. Adjust these elements to suit your preferences and dietary needs. Enjoy your cooking adventure! To keep your Minute Teriyaki Salmon Lettuce Cups fresh, store the toppings and salmon separately. This method helps maintain the crispness of the veggies. For toppings like avocado and cucumber, place them in airtight containers. Adding a sprinkle of lemon juice on the avocado can slow browning. For the cooked salmon, let it cool before storing. Wrap it tightly in plastic wrap or place it in an airtight container. This keeps the salmon moist and flavorful for later use. When you're ready to enjoy the leftovers, it's best to gently reheat the salmon. The microwave works, but use low power. Heat for 30 seconds, check, and repeat until warm. Avoid overcooking, as this can dry it out. If you want a crispier texture, use a skillet. Heat it over medium-low heat, then add the salmon. Stir gently until warmed through. This method helps retain the salmon's juiciness and keeps the flavors intact. Meal prep can save time during busy days. You can prepare the salmon and toppings ahead of time. Cook the salmon in advance and let it cool. Store it in the fridge until you’re ready to assemble. Chop the vegetables and keep them in separate containers. This way, you can grab and assemble your lettuce cups in minutes. It makes for a quick, healthy meal without the fuss. Enjoy the freshness of these cups anytime! Yes, you can use frozen salmon. Just keep a few things in mind. First, thaw the salmon in the fridge overnight. This helps it stay moist. You can also use the microwave for a quick thaw, but it may lose some texture. Frozen salmon may take a bit longer to cook. Make sure it reaches an internal temperature of 145°F (63°C) for safety. If you don't have teriyaki sauce, try these options: - Soy sauce mixed with honey - A blend of soy sauce and brown sugar - Hoisin sauce for a sweeter taste These substitutes keep the dish flavorful while adding a twist. You can adjust the sweetness to your liking. Look for these signs to ensure your salmon is cooked: - The color changes from bright pink to a lighter shade. - The flesh flakes easily with a fork. - It should feel firm but not hard. Using a food thermometer is the best way to check. The internal temperature should be 145°F (63°C). Yes, you can prep lettuce cups ahead of time! Here are some tips: - Cook the salmon and cool it. Store it in the fridge for up to two days. - Prepare the toppings, like avocado and cucumber, but cut them closer to serving time to keep them fresh. - Assemble the cups just before eating to avoid sogginess. This keeps your lettuce crisp and tasty! In this blog post, I shared how to create tasty salmon lettuce cups. We covered main ingredients like salmon, teriyaki sauce, and fresh add-ons like avocado and cucumber. I provided step-by-step instructions, tips for cooking, and variations for dietary needs. Remember, you can easily customize this recipe to fit your tastes. Enjoy experimenting with different flavors and proteins. This dish is simple, fun, and a great way to eat healthy meals.

Minute Teriyaki Salmon Lettuce Cups Fresh Delight

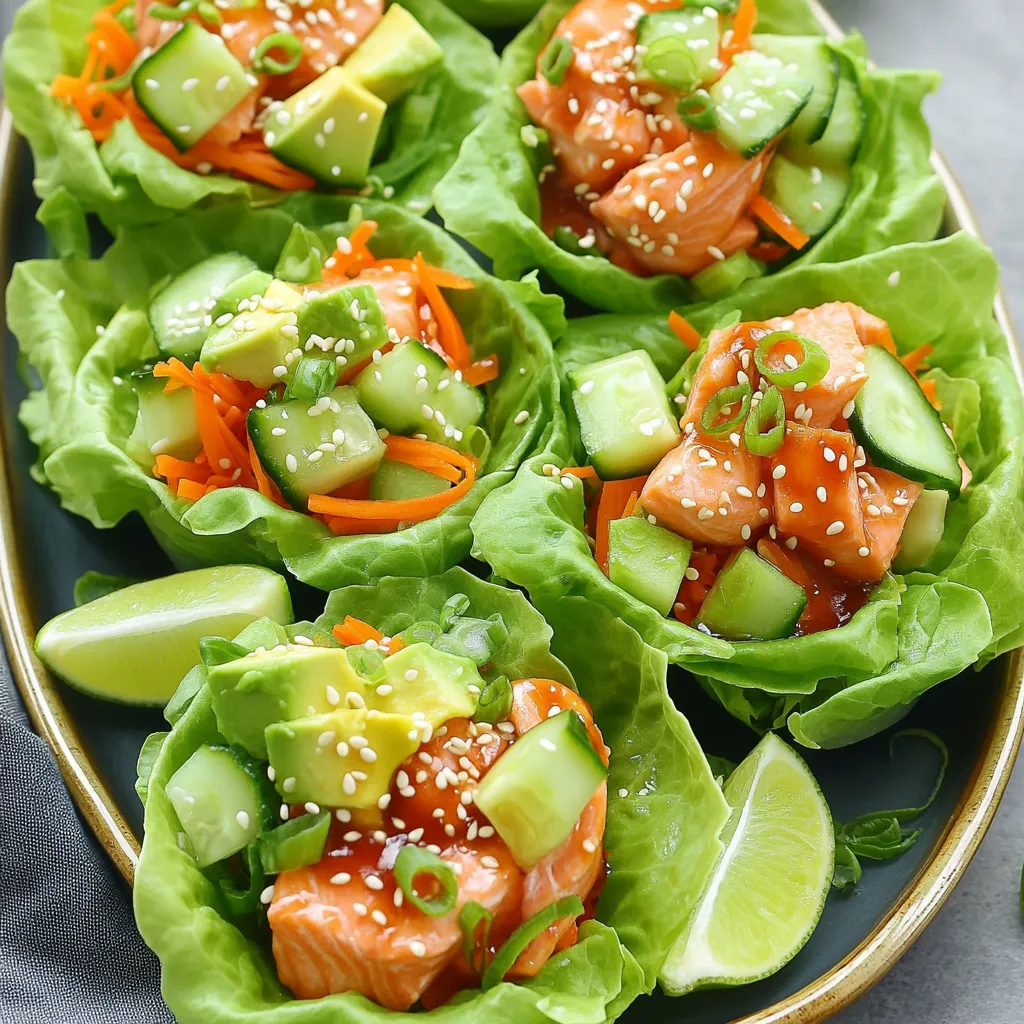
Are you ready to enjoy a fresh and tasty meal? In just minutes, you can whip up scrumptious Minute Teriyaki

- 1 cup wild rice, rinsed and drained - 8 oz cremini mushrooms, sliced - 1 cup carrots, diced - 1 cup celery, diced - 1 small onion, chopped - 4 cloves garlic, minced - 4 cups vegetable broth - 1 cup coconut milk (or heavy cream for a non-dairy option) - 1 tablespoon soy sauce (or tamari) - 1 teaspoon dried thyme - 1 teaspoon dried rosemary - Salt and pepper to taste - Fresh parsley, chopped (for garnish) Wild rice gives this soup a nutty taste and chewy texture. It pairs well with the earthy flavor of cremini mushrooms. Carrots and celery add sweetness and crunch. Onions and garlic bring depth to the dish. Coconut milk adds creaminess without dairy. Thyme and rosemary provide a warm, aromatic touch. For wild rice, I like to use Lundberg Farms. They offer quality and flavor. For mushrooms, try Organic Cremini from Whole Foods. If you need a dairy-free option, use So Delicious coconut milk. For soy sauce, Kikkoman works well, but tamari is great for gluten-free diets. You can swap coconut milk with heavy cream if you prefer a richer taste. To start, gather your ingredients. You need one cup of wild rice, eight ounces of sliced cremini mushrooms, one cup of diced carrots, one cup of diced celery, one small chopped onion, and four minced garlic cloves. Rinse the wild rice in cold water and drain it well. This step helps remove any grit. Next, chop your veggies and slice the mushrooms. This prep makes cooking easy. Add all your prepared ingredients to the slow cooker. Pour in four cups of vegetable broth. This adds flavor and moisture. Stir everything together. Now, add one cup of coconut milk for creaminess. If you prefer, you can use heavy cream. Next, add one tablespoon of soy sauce, one teaspoon of dried thyme, and one teaspoon of dried rosemary. Season with salt and pepper. Mix it well. Cover the slow cooker and set it to low. Cook for six to eight hours. The wild rice should become tender. After cooking, it’s time to check the soup. Stir it gently to loosen any rice stuck at the bottom. If you want a creamier texture, blend a part of the soup. Then return it to the slow cooker. This makes it rich and smooth. Taste the soup and adjust the seasoning if needed. If it’s too thick, add more vegetable broth or water. This will help reach your ideal consistency. Serve hot, and don’t forget to garnish with fresh parsley for added flavor. To make your soup shine, use fresh ingredients. Fresh mushrooms add a rich flavor. Rinse your wild rice well; this helps remove any grit. Try adding herbs at the end for a bright taste. If it's too thick, add broth to reach your favorite texture. Stir the soup before serving to mix flavors well. Avoid cooking on high heat. Slow cooking allows flavors to meld together. Don’t skip the garlic; it gives depth. If you use dried herbs, remember they are more potent. Taste your soup before serving. You might need more salt or pepper. Keep an eye on the rice; overcooked rice can get mushy. This soup pairs well with crusty bread. A fresh salad on the side adds crunch. Try serving it in a bread bowl for a fun twist. A sprinkle of lemon juice brightens the dish. For a hearty meal, add a protein like grilled chicken or tofu on the side. Enjoy the warmth and comfort of this creamy mushroom wild rice soup! {{image_2}} You can easily make this soup vegetarian or vegan. Start by using vegetable broth, which gives great flavor. Instead of heavy cream, use coconut milk to keep it creamy. This choice is not only vegan but also adds a nice touch of sweetness. Always check that your soy sauce is gluten-free if needed. If you want to add protein, consider chickpeas or lentils. Both options bring a hearty texture. You can toss in cooked chicken or turkey for a meatier soup. Just add any protein during the last hour of cooking, so it warms through. Feel free to switch up the veggies based on the season. In the spring, try adding fresh peas or asparagus. In the fall, sweet potatoes or butternut squash work well. These changes keep the soup fresh and bring new flavors each time you make it. Plus, it’s a great way to use what you have on hand! To store your soup, let it cool first. Use airtight containers for best results. You can store it in the fridge for up to four days. Make sure to label the containers with the date. This helps keep track of freshness. When you're ready to eat, pour the soup into a pot. Heat it on low to medium heat. Stir often until it's hot. You can also use the microwave. Transfer the soup to a microwave-safe bowl. Heat for 1-2 minutes, stirring halfway. Make sure it’s hot all the way through. You can freeze the soup for up to three months. Use freezer-safe containers or bags. Leave some space at the top for expansion. Thaw the soup in the fridge overnight before reheating. If it seems thick after freezing, add a bit of broth or water. Stir well for a smooth texture. Yes, you can use brown rice. Brown rice will change the cooking time. It takes about 2 to 3 hours on low heat. Wild rice gives a nutty taste and chewy texture. Brown rice is softer and milder. You may need to adjust the broth amount, as brown rice absorbs more liquid. To make this soup without coconut milk, use heavy cream or milk. If you want a lighter option, try almond milk or oat milk. Each option adds a different flavor. Heavy cream will give you a rich and creamy texture. For a dairy-free choice, almond milk works well too. Adjust the seasoning if needed, as some milks are sweeter. To spice up your soup, add red pepper flakes or cayenne pepper. Start with a small amount to control the heat. Fresh jalapeños or diced green chilies are great options too. You could also mix in some hot sauce for an extra kick. Stir in these ingredients during the cooking process for the best flavor. This blog post covered how to make a delicious soup step by step. We looked at key ingredients and their highlights, making it simple for you to choose the best brands. I shared tips to perfect your soup and avoid common mistakes. We also explored variations for different diets and how to store your soup properly. In closing, remember to have fun while cooking. Experiment and adjust. Your soup should reflect your taste and style. Enjoy every spoonful!

Slow Cooker Creamy Mushroom Wild Rice Soup Delight

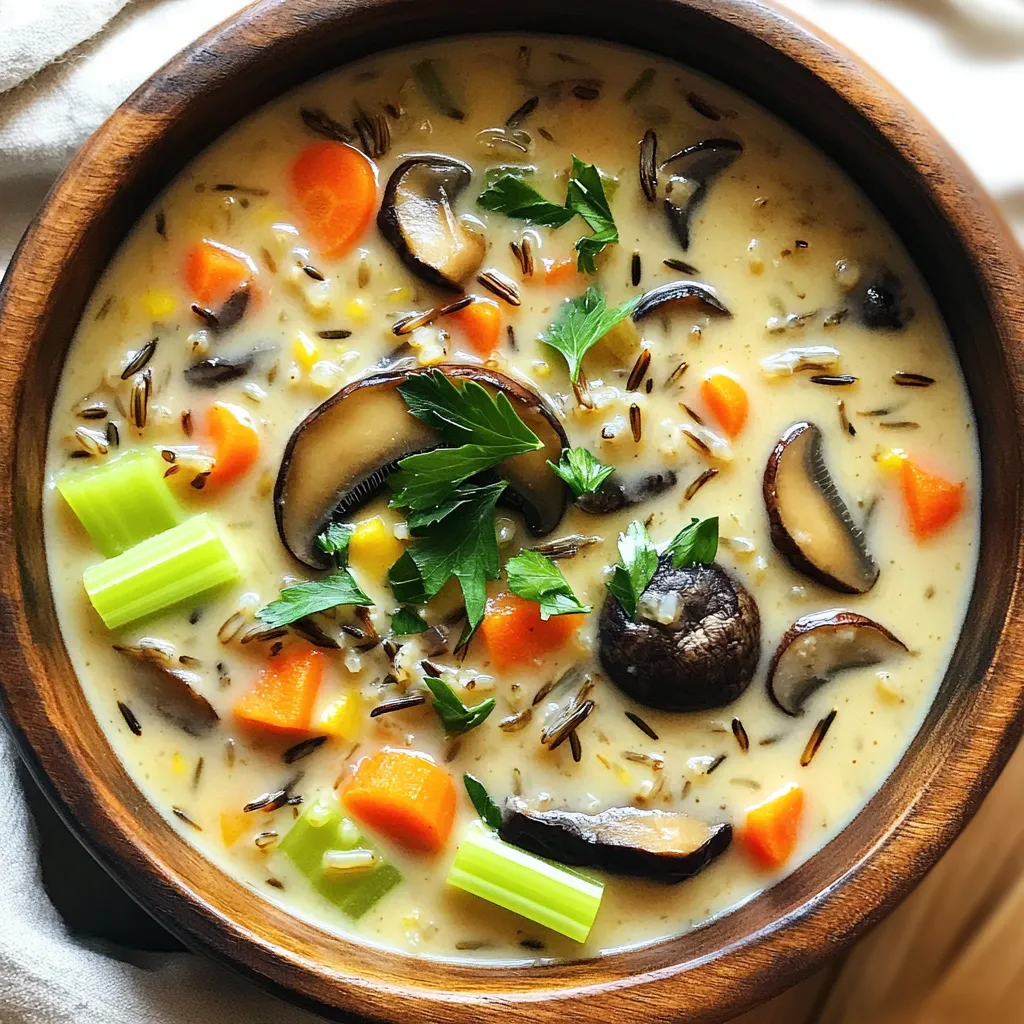
Welcome to a warm bowl of comfort! Today, I’ll guide you in making a Slow Cooker Creamy Mushroom Wild Rice

To make Air Fryer Banana Bread Donuts, gather these simple ingredients: - 2 ripe bananas, mashed - 1/2 cup granulated sugar - 1/4 cup brown sugar - 1/3 cup vegetable oil - 1/2 cup plain Greek yogurt - 2 large eggs - 1 teaspoon vanilla extract - 1 cup all-purpose flour - 1/2 teaspoon baking soda - 1/2 teaspoon baking powder - 1/4 teaspoon salt - 1/2 teaspoon ground cinnamon - 1/4 cup chopped walnuts or pecans (optional) - Cooking spray Using ripe bananas is key for flavor. They should be soft and speckled. This makes your donuts sweet and moist. The mix of sugars adds depth. Granulated sugar gives sweetness, while brown sugar brings a rich taste. Oil keeps the donuts moist. Greek yogurt adds creaminess and a slight tang. Eggs help bind everything together. Vanilla extract adds warmth and a lovely aroma. Combine the dry and wet ingredients carefully. Too much mixing can make your donuts tough. If you like nuts, add walnuts or pecans for crunch. Don’t forget the cooking spray! It helps your donuts pop out easily from the pan. With these ingredients, you are ready to create a tasty treat. Mixing wet ingredients Start by mashing the two ripe bananas in a large bowl. Add the granulated sugar, brown sugar, and vegetable oil. Mix until it is smooth and creamy. Then, add the Greek yogurt, eggs, and vanilla extract. Whisk these together well. Combining dry ingredients In another bowl, whisk together the all-purpose flour, baking soda, baking powder, salt, and ground cinnamon. This step ensures even mixing of the dry ingredients. Folding in nuts If you like nuts, fold in 1/4 cup of chopped walnuts or pecans into the batter. This adds great texture and flavor to your donuts. Preheating the air fryer Set your air fryer to preheat at 350°F (175°C). This helps your donuts cook evenly and rise nicely. Filling the donut pan Spray your donut pan with cooking spray to prevent sticking. Then, fill each cavity about two-thirds full with batter. This gives the donuts room to puff up while cooking. Cooking time and temperature Place the filled donut pan in the air fryer basket. Cook for 7-9 minutes. Check for doneness by inserting a toothpick into a donut. If it comes out clean, they are ready! Cooling the donuts Once cooked, carefully remove the donuts from the pan. Let them cool for a few minutes on a wire rack. This keeps them from becoming soggy. Optional toppings or glazes You can enjoy these donuts plain or add a glaze. A simple icing made from powdered sugar and milk works well. You can also sprinkle cinnamon sugar on top for extra sweetness. Use ripe bananas for the best flavor and moisture. They should have brown spots. The sugar in ripe bananas gives a natural sweetness and soft texture. When mixing, combine wet ingredients first. Then, gently add dry ingredients. This keeps your donuts light and fluffy. Always use cooking spray on your donut pan. This helps prevent sticking. Spray it right before adding the batter. When cooking, check for doneness around 7 minutes. Insert a toothpick; it should come out clean. If it comes out wet, cook for another minute. Add ground cinnamon for warmth and depth. You can also try nutmeg or ginger for a twist. If you want less sugar, use honey or maple syrup instead. They add unique flavors while reducing granulated sugar. {{image_2}} You can make these donuts a bit healthier. One way is by using whole wheat flour. Whole wheat flour adds fiber and nutrients. It keeps the donuts soft and tasty. Another idea is to reduce sugar. You can cut the sugar in half or use natural sweeteners. Applesauce or honey work well as substitutes. This keeps your donuts sweet without extra calories. Want to change the flavor? Consider adding chocolate chips. They give a rich taste and pair great with banana. Just fold in about half a cup before baking. You can also experiment with different nuts. Walnuts and pecans add a nice crunch. Try almonds or hazelnuts for a different twist. Just chop them up and mix them in. Seasonal flavors can make your donuts special. For fall, try pumpkin spice banana donuts. Just add pumpkin puree and some pumpkin spice to the batter. In winter, cinnamon apple banana donuts are a hit. Fold in diced apples and a bit more cinnamon. This makes a warm, cozy treat perfect for the season. You can store your air fryer banana bread donuts easily. Keep them at room temperature for one day. Place them in an airtight container. For longer storage, put them in the fridge. They can last about a week in the fridge. If you need to store them for even longer, freeze the donuts. Wrap each donut in plastic wrap and then place them in a freezer bag. This helps keep them fresh. When you're ready to enjoy your donuts again, you can reheat them in the air fryer. Set the air fryer to 300°F (150°C) and heat for about 3-4 minutes. This keeps them soft and warm. If you prefer the oven, preheat it to 350°F (175°C). Place the donuts on a baking sheet and heat for about 5-7 minutes. Both methods work well for getting that fresh-baked taste back. These air-fried donuts are best enjoyed fresh. They can last up to 3 days at room temperature. If stored in the fridge, they can last up to a week. Keep an eye out for signs of spoilage. If you see mold or notice an off smell, it's best to toss them out. Freshness is key to enjoying these tasty treats! Yes, you can use frozen bananas. Thaw them first and drain excess liquid. They will mash well and add moisture to your donuts. The donuts are done when they are golden brown. A toothpick inserted in the center should come out clean. If it has batter on it, cook for another minute or two. Yes, you can! Preheat your oven to 350°F (175°C). Bake for about 10-12 minutes in a standard donut pan. Keep an eye on them to avoid overbaking. You can use regular yogurt or sour cream as a substitute. Applesauce also works for a lower-fat option. Each will change the texture slightly but will still taste great. For gluten-free options, use a gluten-free flour blend. To make it vegan, swap eggs for flax eggs and the yogurt for plant-based yogurt. Adjust sugars if needed for dietary concerns. You learned how to make delicious air-fried banana donuts using simple ingredients. We covered each step, from mixing to cooking. I shared tips for perfect texture and flavor, plus tasty variations to try. Remember, ripe bananas and the right cooking methods make a difference. You can adjust this recipe to fit your tastes or dietary needs. Enjoy your homemade treats! Feel free to experiment, and have fun in the kitchen!

Air Fryer Banana Bread Donuts Simple and Delicious Recipe

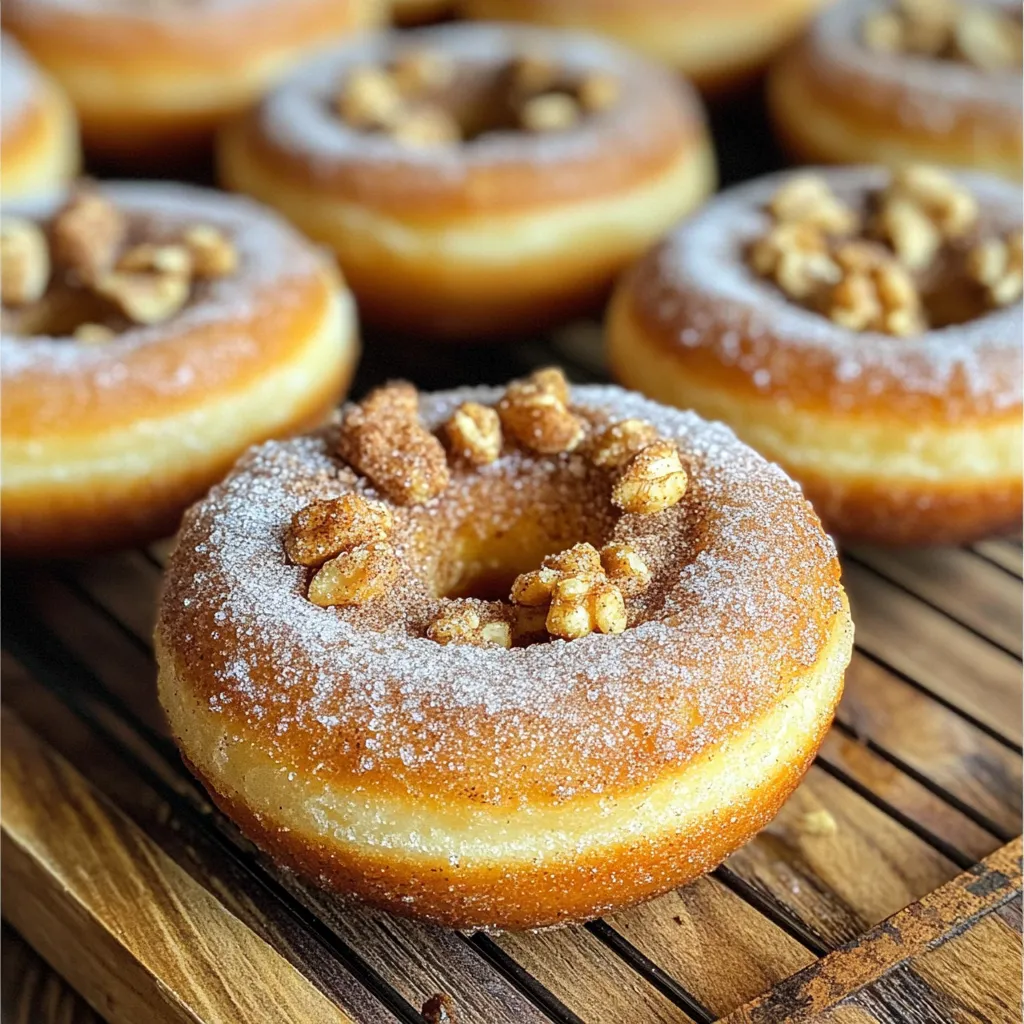
Craving a warm, sweet treat? Let’s make Air Fryer Banana Bread Donuts! This simple recipe turns ripe bananas into soft,

- 1 pound elbow macaroni - 1 tablespoon olive oil - 1 medium onion, diced - 2 cloves garlic, minced - 1 bell pepper (red or green), diced - 1 pound ground turkey or beef - 1 can (15 oz) kidney beans, drained and rinsed - 1 can (15 oz) diced tomatoes with green chilies - 2 cups chicken or vegetable broth - 1 tablespoon chili powder - 1 teaspoon cumin - 1 teaspoon smoked paprika - 1 cup heavy cream - 1 cup shredded cheddar cheese (plus more for topping) - Salt and pepper to taste - Chopped parsley or cilantro for garnish These ingredients create a rich and hearty dish. The elbow macaroni serves as the base, while the ground turkey or beef adds protein. You can choose turkey for a lighter option or beef for a richer taste. The diced tomatoes bring a nice acidity to balance the creaminess. If you can't find kidney beans, black beans work great too. The spices, like chili powder and cumin, give depth and warmth to the dish. Don't skip on the heavy cream and cheddar cheese; they make the chili mac creamy and delicious. You can top your chili mac with extra shredded cheese for a cheesy finish. Some people love adding sliced jalapeños for a spicy kick. You could also sprinkle crushed tortilla chips for crunch. Mix-ins can elevate the dish further. Consider adding corn for sweetness or diced zucchini for extra veggies. If you enjoy a smoky flavor, smoked sausage would be a tasty addition. These options let you personalize the dish to your taste. Enjoy experimenting! First, grab a large pot. Heat 1 tablespoon of olive oil over medium heat. Add 1 medium diced onion and 1 diced bell pepper. Sauté these for about 3-4 minutes. You want the onion to turn soft and see-through. Next, add 2 minced garlic cloves and cook for another minute. This step makes the dish smell amazing! Then, add 1 pound of ground turkey or beef. Cook until it turns brown. Break it up with your spoon as it cooks. If there is extra fat, drain it. Now, mix in 1 tablespoon of chili powder, 1 teaspoon of cumin, and 1 teaspoon of smoked paprika. Add salt and pepper to taste. Stir until the meat is coated with the spices. This will give it rich flavor. Pour in 2 cups of chicken or vegetable broth, then add 1 can of diced tomatoes with green chilies and 1 can of kidney beans. Stir everything together until well combined. Now, add 1 pound of elbow macaroni into the pot. Make sure it is fully covered by the liquid. Bring the pot to a boil. Once it boils, reduce the heat to low. Cover the pot and let it simmer for 10-12 minutes. Stir it occasionally. The macaroni should be cooked al dente, which means it has a little bite to it. After the macaroni is cooked, add 1 cup of heavy cream and 1 cup of shredded cheddar cheese. Stir until everything melts together and becomes creamy. Taste the chili mac and adjust the seasoning if needed. If it seems too thick, add a splash of broth to loosen it up. Serve it hot and top with extra cheddar cheese and chopped parsley or cilantro. Enjoy your creamy one-pot chili mac! You can make this dish even better by swapping some ingredients. Here are a few ideas: - Proteins: Use ground chicken or a plant-based meat for a lighter option. - Dairy: If you want less fat, try using half-and-half or a plant-based cream. Making a one-pot meal is fun and easy. Here are some tips to help you succeed: - Best Practices: Always heat the pot before adding oil. This helps the food cook evenly. - Prevent Sticking: Stir often while cooking. This keeps the pasta from sticking to the bottom. If you notice it starting to stick, add a bit more broth. {{image_2}} You can change the protein in your chili mac to fit your needs. For a vegetarian option, skip the meat. Use extra beans or lentils instead. These add protein and fiber. You can also try crumbled tofu or tempeh for a hearty texture. If you prefer meat, ground turkey or beef are great choices. Ground chicken works well too. For a twist, use chorizo for a spicy kick. Keep in mind, different meats may change the cooking time slightly. To adjust the flavors, play with the spices. If you want a milder taste, use less chili powder. You can add more cumin for earthiness. If you like a smoky flavor, increase the smoked paprika. For heat, try adding cayenne pepper or diced jalapeños. If you want it extra smoky, add some chipotle peppers in adobo sauce. Always taste as you go. This helps you find the right balance for your taste buds. To keep your Creamy One-Pot Chili Mac fresh, store it in the fridge. Use an airtight container. This way, it stays tasty for about three to four days. If you want to save it longer, freezing works great too. Just place the mac in a freezer-safe container. It can last for up to three months in the freezer. Be sure to label it with the date for easy tracking. Reheating is simple and quick. The best method is to use the stove. Add the Chili Mac to a pot and heat it over low. Stir often to keep it from sticking. You can also add a splash of broth or cream for extra moisture. This helps keep the texture creamy. If you use the microwave, heat it in short bursts. Stir between each burst to heat evenly. To boost the flavors, sprinkle in some extra cheese or spices while reheating. It brings the dish back to life, making it just as good as the first serving! I love using sharp cheddar cheese for this dish. It adds a rich flavor that balances the spices. You can also try pepper jack cheese for a little kick. Cream cheese can make it super creamy, too. Just remember to mix it in well when you add the heavy cream. Each cheese changes the taste, so feel free to experiment! Yes, you can use gluten-free pasta! Look for types made from rice or corn. They work well in this dish. Just check the cooking time, as gluten-free pasta may cook faster. Stir it often to keep it from sticking together. Add a little more broth if needed, since gluten-free pasta absorbs more liquid. Want to spice things up? You have options! Add diced jalapeños when you sauté the veggies. You can also sprinkle in some cayenne pepper or red pepper flakes while it simmers. For a smoky flavor, add chipotle powder. Taste as you go to get your perfect heat level. Enjoy the extra kick! This blog covered everything you need to make a creamy one-pot chili mac. We looked at key ingredients, optional add-ins, and step-by-step instructions. You learned tips to ensure perfect texture and flavor. We also discussed ingredient swaps and flavorful variations. Finally, I shared storage tips and answers to common questions. Now, you have the tools to create your perfect dish. Get cooking and enjoy every bite!

Creamy One-Pot Chili Mac Simple and Tasty Recipe

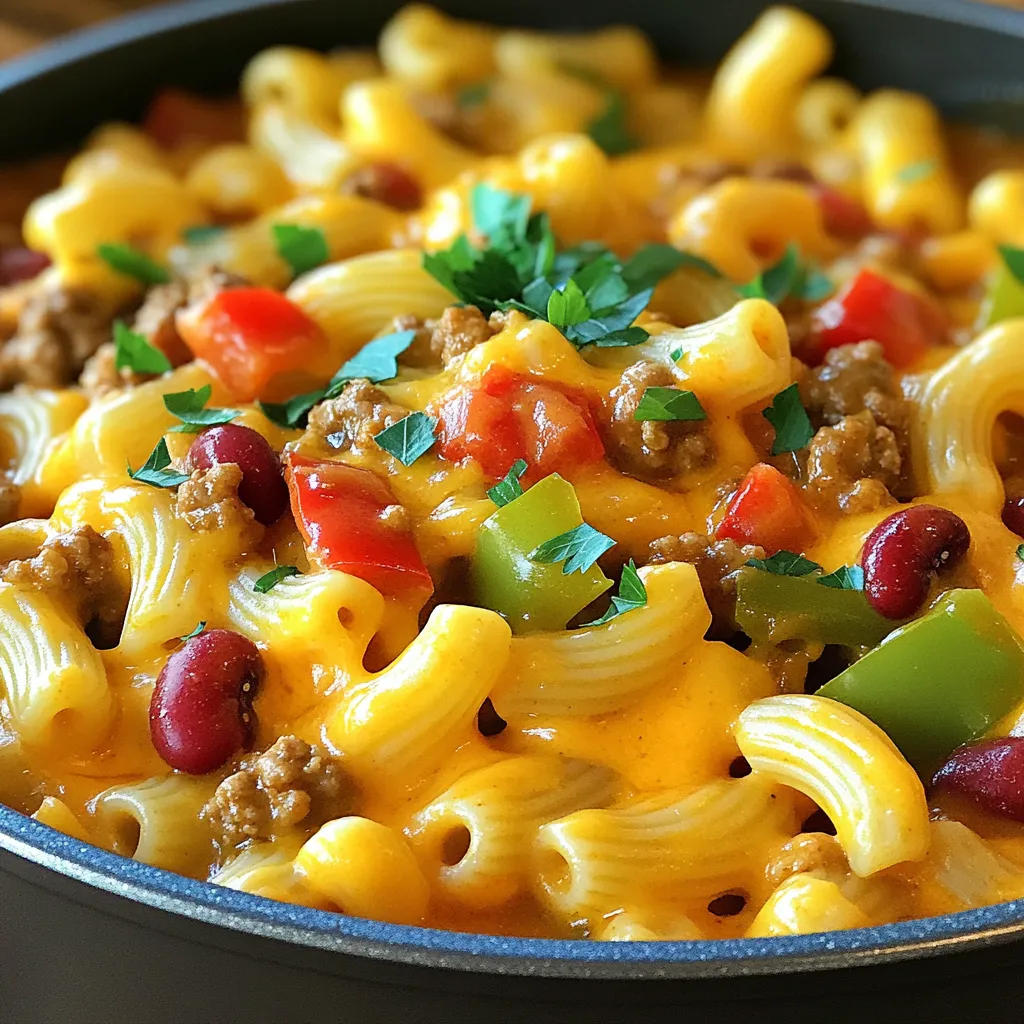
Craving a tasty, easy meal that brings warmth and comfort? Look no further! My Creamy One-Pot Chili Mac recipe combines

- 2 cups all-purpose flour - 1 cup granulated sugar - 2 teaspoons baking powder - 1 teaspoon baking soda - 1 teaspoon ground cinnamon - ¼ teaspoon salt These dry ingredients lay the base for your muffins. The flour gives structure, while sugar adds sweetness. Baking powder and baking soda help them rise. Cinnamon brings warmth, and salt enhances all flavors. - 1 cup buttermilk (or 1 cup milk mixed with 1 tablespoon vinegar) - ½ cup vegetable oil - 2 large eggs - 1 teaspoon vanilla extract The wet ingredients add moisture and rich flavor. Buttermilk makes muffins tender. If you don't have buttermilk, mix milk and vinegar. Oil keeps them soft, while eggs bind the mix. Vanilla adds a lovely aroma. - 2 cups peeled and diced apples (like Granny Smith) - ½ cup all-purpose flour - ½ cup brown sugar, packed - 1 teaspoon ground cinnamon - ¼ cup cold butter, cubed The apples bring a burst of flavor and juicy texture. I recommend Granny Smith for their tartness. The crumb topping adds crunch and sweetness. Cold butter helps create that perfect crumbly texture. Set your oven to 375°F (190°C). This helps the muffins bake evenly. Line a muffin tin with paper liners or spray it with cooking spray. This keeps the muffins from sticking. In a large bowl, mix the dry ingredients. Combine 2 cups of all-purpose flour, 1 cup of sugar, 2 teaspoons of baking powder, 1 teaspoon of baking soda, 1 teaspoon of ground cinnamon, and ¼ teaspoon of salt. In another bowl, whisk together the wet ingredients. Use 1 cup of buttermilk, ½ cup of vegetable oil, 2 large eggs, and 1 teaspoon of vanilla extract. Mix well until combined. Pour the wet mixture into the dry ingredients. Stir gently until just mixed. Do not overmix; this keeps the muffins light. Fold in 2 cups of peeled and diced apples. Make sure they are evenly spread in the batter. In a medium bowl, combine ½ cup of flour, ½ cup of packed brown sugar, and 1 teaspoon of ground cinnamon. Add ¼ cup of cold, cubed butter. Use your fingers or a pastry cutter to mix. You want the mixture to look like coarse crumbs. This gives the muffins that bakery-style topping. Fill each muffin cup about two-thirds full with the batter. Then, sprinkle the crumb topping generously over each cup. This adds a nice crunch. Bake in the preheated oven for 18-20 minutes. Check if they’re ready by inserting a toothpick into the center. If it comes out clean, they are done. Let the muffins cool in the tin for about 5 minutes. This helps them set. After that, transfer them to a wire rack. Allow them to cool completely. This ensures a perfect texture when you bite into them. To get bakery-style muffins, mix the batter properly. Start by whisking the dry ingredients first. Then, combine the wet ingredients in another bowl. Pour the wet mix into the dry mix. Stir until just combined. You want to see some flour bits. This keeps the muffins light and fluffy. Overmixing can make them dense, which is not what we want. Using cold butter for the crumb topping is key. Cold butter creates a crumbly texture. It helps form those delicious chunks on top. When mixing the topping, use your fingers or a pastry cutter. Aim for coarse crumbs. This adds a nice crunch when baked. Presentation matters for these muffins. Serve them warm for the best taste. A light dusting of powdered sugar adds charm. You can also serve them with a small bowl of apple compote. This enhances flavor and looks great on a plate. As for drinks, these muffins pair well with coffee or tea. The warmth of coffee balances the sweetness of the muffins. You can also try them with hot cocoa for a cozy treat. To boost flavor, consider adding more spices. A pinch of nutmeg or ginger can create a warm taste. You can also mix in chopped nuts like walnuts or pecans for crunch. This adds both flavor and texture. Using different apple varieties can change the taste. Granny Smith apples are tart and hold up well. Honeycrisp apples are sweet and juicy, giving a different bite. Feel free to experiment with what you have. Each apple brings a unique flavor to your muffins. {{image_2}} You can make these muffins healthier. Use whole wheat flour instead of all-purpose flour. This swap adds fiber and nutrients. You can also use unsweetened applesauce in place of some oil. This change makes the muffins moist without extra fat. Want to mix things up? Add nuts like walnuts or pecans for crunch. Raisins or dried cranberries also work well for a sweet twist. You can play with spices too. Try nutmeg or ginger for a new flavor. If you need a gluten-free option, use a gluten-free flour blend. Look for blends with xanthan gum for better texture. Almond flour or oat flour are good choices too. Just remember to adjust the liquid in the recipe as needed. To keep your muffins fresh, store them in an airtight container. This helps prevent drying out. You can also line the container with a paper towel. This absorbs moisture and stops sogginess. Keep your muffins at room temperature for up to three days. For longer freshness, put them in the fridge. Just remember, refrigerating can change the texture slightly. Freezing muffins is a great way to save them for later. To freeze, let the muffins cool completely. Wrap each muffin in plastic wrap. Then, put them in a freezer-safe bag or container. Label the bag with the date. You can freeze muffins for up to three months. When you want to enjoy one, simply take it out and let it thaw at room temperature. Reheating muffins can bring back their soft texture. The best method is to use the oven. Preheat your oven to 350°F (175°C). Place the muffins on a baking sheet and cover them with foil. Heat for about 10-15 minutes. This keeps them moist. If you're in a hurry, you can use the microwave. Heat each muffin for about 15-20 seconds. Just be careful not to overheat, as that can dry them out. Enjoy your warm muffins just like they came from the bakery! To make these muffins dairy-free, you can use almond milk or soy milk instead of buttermilk. If you want a similar tang, add one tablespoon of vinegar to the milk. Let it sit for five minutes. This will give you a great base for the muffins. Yes, you can use frozen apples. However, they may change the texture of your muffins. Frozen apples often release extra moisture. This can lead to a slightly denser muffin. Consider adding a few extra minutes to your baking time to ensure they cook through. If your muffins turn out dense, check your mixing technique. Overmixing can make muffins heavy. Try mixing until just combined. Ensure your baking powder and soda are fresh, as old leavening agents can affect rise. For perfect rise, use room temperature ingredients. Cold eggs or milk can make the batter dense. Also, fill your muffin cups about two-thirds full. This allows space for the muffins to rise without spilling over. Absolutely! You can enhance the flavor with a splash of maple syrup or add nuts for crunch. Try mixing in a teaspoon of nutmeg or ginger for warmth. You can even add raisins or dried cranberries for extra sweetness. You learned how to make delicious apple muffins from scratch. We discussed key ingredients, mixing techniques, baking tips, and variations. Remember, using cold butter and not overmixing makes a big difference. Consider different apple types for more flavor. Store muffins properly to keep them fresh, and feel free to experiment with new tastes. With these insights, your apple muffins will be a hit every time you bake. Enjoy the process, and happy baking!

Bakery-Style Apple Cinnamon Crumb Muffins Easy Treat

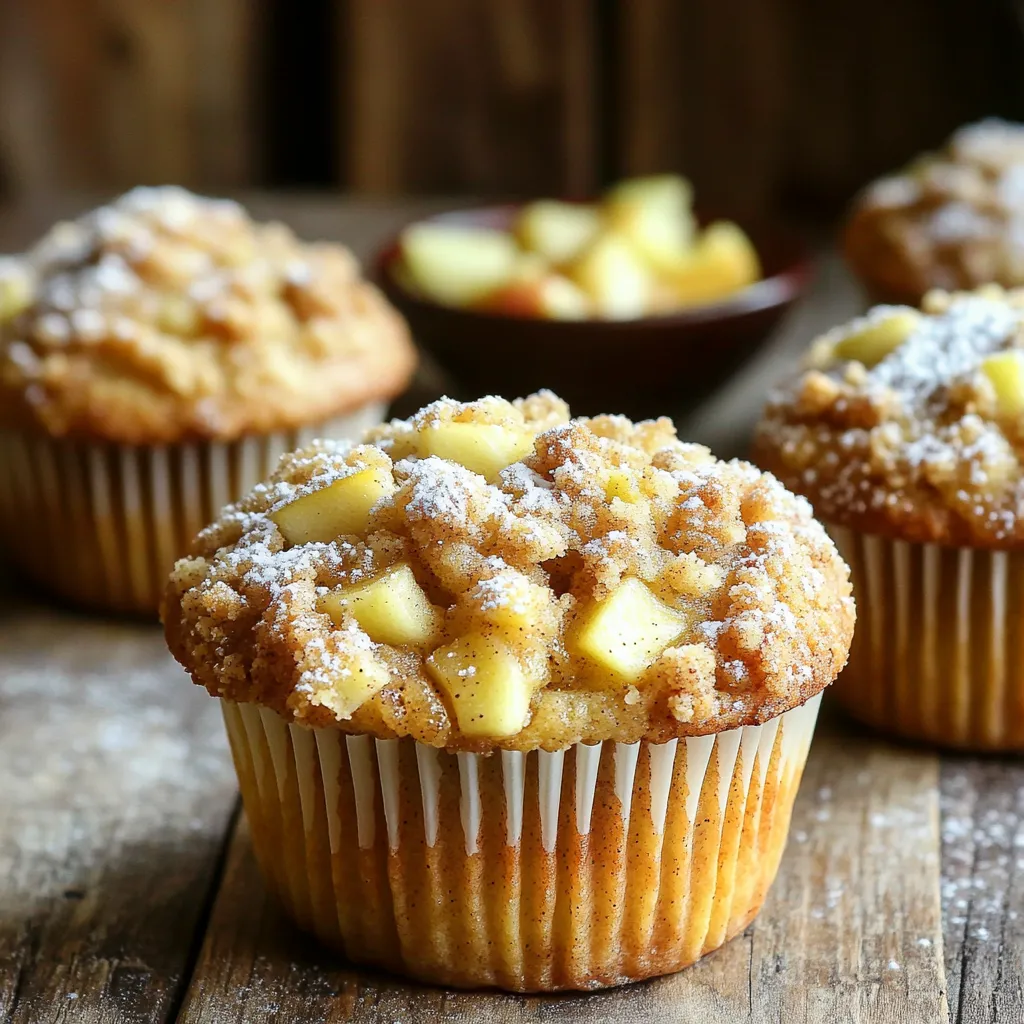
Are you ready to bake the perfect treat that tastes like it came from a bakery? These Bakery-Style Apple Cinnamon

- 1 lb ground chicken - 1/2 cup breadcrumbs - 1/4 cup grated Parmesan cheese - 1/4 cup chopped green onions - 2 cloves garlic, minced - 1 tablespoon soy sauce - 1 teaspoon ginger paste - 1/2 teaspoon black pepper - 1/2 teaspoon salt - 1 cup sweet chili sauce - 1 bell pepper, sliced - 1 zucchini, sliced - 1 tablespoon olive oil - Sesame seeds and fresh cilantro (optional) Each ingredient plays a key role in creating the flavor and texture of these meatballs. Ground chicken gives a light, tender base. Breadcrumbs add structure, while Parmesan cheese brings a rich, savory taste. Green onions and garlic add freshness and zing. For seasoning, soy sauce provides umami, and ginger paste adds warmth. Black pepper and salt enhance overall flavor. Sweet chili sauce is the star. It gives a sweet and spicy kick that coats the meatballs. For veggies, bell pepper and zucchini not only add color but also provide a crisp texture. Drizzling olive oil helps them roast well. Garnishing with sesame seeds and cilantro adds a nice touch. This combination makes the meal both tasty and visually appealing. First, preheat your oven to 400°F (200°C). This step gets the heat ready for the meatballs. Next, line a large sheet pan with parchment paper. This makes cleanup quick and easy. In a big mixing bowl, combine the following: - 1 lb ground chicken - 1/2 cup breadcrumbs - 1/4 cup grated Parmesan cheese - 1/4 cup chopped green onions - 2 cloves garlic, minced - 1 large egg - 1 tablespoon soy sauce - 1 teaspoon ginger paste - 1/2 teaspoon black pepper - 1/2 teaspoon salt Mix these ingredients well. Be careful not to overwork the meat. This keeps the meatballs tender. Now, shape the mixture into meatballs. Each should be about 1.5 inches wide. Place them on your sheet pan. Make sure there is space between each meatball. In another bowl, toss the sliced vegetables: - 1 bell pepper, sliced - 1 zucchini, sliced - 1 tablespoon olive oil Spread these veggies around the meatballs on the sheet pan. This adds color and flavor. Bake the meatballs in the preheated oven for 15 minutes. This helps them start cooking. After 15 minutes, take the pan out. Drizzle 1 cup of sweet chili sauce over the meatballs. Make sure each meatball is well-coated. Put the pan back in the oven. Bake for another 10-12 minutes, or until the meatballs reach an internal temperature of 165°F (75°C). Once done, remove the pan from the oven. Let the meatballs rest for a few minutes. If you like, sprinkle some sesame seeds and fresh cilantro on top before serving. - Avoid overworking the meat mixture. When mixing, just combine until it is mixed well. If you work it too much, the meatballs can become tough. Keep it gentle! - Ensure even spacing on the sheet pan. Place meatballs about two inches apart. This helps them cook evenly. It also allows the heat to circulate around each meatball, giving a nice brown color. - Recommended side dishes. Serve these meatballs with rice or noodles. A fresh salad pairs well too, adding a crunchy contrast. You can also serve them with steamed vegetables for extra nutrition. - Ideal garnishes for presentation. Sprinkle sesame seeds on top for crunch. Fresh cilantro adds a pop of color and freshness. These small touches make your dish look professional and appetizing. - Substitutions for ground chicken. If you want a leaner option, use ground turkey. You can also try ground pork for a richer taste. Each option brings unique flavors to the dish. - Low-sodium sweet chili sauce alternatives. Look for brands that offer low-sodium options. You can also make your own sauce using honey, vinegar, and chili flakes. This way, you control the sugar and salt. {{image_2}} You can change up the meat in this recipe. Try using ground turkey or beef instead of chicken. Both options work well with the sweet chili sauce. If you need a gluten-free option, swap regular breadcrumbs for gluten-free breadcrumbs. This small change keeps the meatballs tasty and safe for those with gluten allergies. To give your meatballs more flavor, add spices or herbs. Fresh parsley or basil can brighten the dish. You can also mix in finely chopped vegetables like carrots or spinach for extra nutrition. These additions not only add taste but also make the meal healthier. How you serve the meatballs can change the meal's feel. Place them over rice or noodles for a hearty dish. This adds a nice base that soaks up the sauce. For a fun appetizer, you can skewer the meatballs. This makes them easy to grab and eat at parties or gatherings. After cooking, let the meatballs cool down. Place them in a container with a lid. Store them in the fridge. They stay fresh for up to three days. Make sure to eat them within this time for the best taste. To freeze meatballs, first let them cool completely. Then, arrange them in a single layer on a baking sheet. Freeze them for about one hour. Once frozen, move them to a freezer bag. Remove as much air as possible before sealing. They can stay frozen for up to three months. When ready to eat, thaw them overnight in the fridge. Reheat in the oven or microwave until hot. Planning meals for the week is easy with these meatballs. You can make a big batch and store them. Use them in wraps, salads, or pasta dishes. Pair them with rice or quinoa for a full meal. They add flavor and protein to many dishes. Mix and match with your favorite veggies for variety. Enjoy the ease of meal prep with these tasty meatballs! You should cook meatballs at 400°F (200°C) for 15 minutes. After that, add the sweet chili sauce and bake for another 10-12 minutes. This total cooking time helps the meatballs get a nice texture. Always ensure the internal temperature reaches 165°F (75°C) for safety. Yes, you can make this dish ahead of time. Prepare the meatballs and veggies, then store them in the fridge for up to 24 hours. You can also freeze them for later. To reheat, bake them in the oven at 350°F (175°C) until warm. This keeps the flavors fresh and tasty. These meatballs pair well with many side dishes. Here are a few ideas: - Steamed rice or jasmine rice - Quinoa for a healthy option - A fresh green salad - Noodles tossed in soy sauce Each of these sides complements the sweet and savory flavors of the meatballs. Feel free to mix and match! This recipe for sweet chili chicken meatballs combines easy ingredients and fun steps. You learned how to mix, bake, and serve these tasty bites. The tips and variations help personalize your dish. Don't forget to explore the storage and meal prep ideas for extra convenience. Experiment with flavors or proteins to keep meals exciting. Enjoy making and sharing these delightful meatballs with family and friends. Happy cooking!

Savory Sheet-Pan Sweet Chili Chicken Meatballs Meal

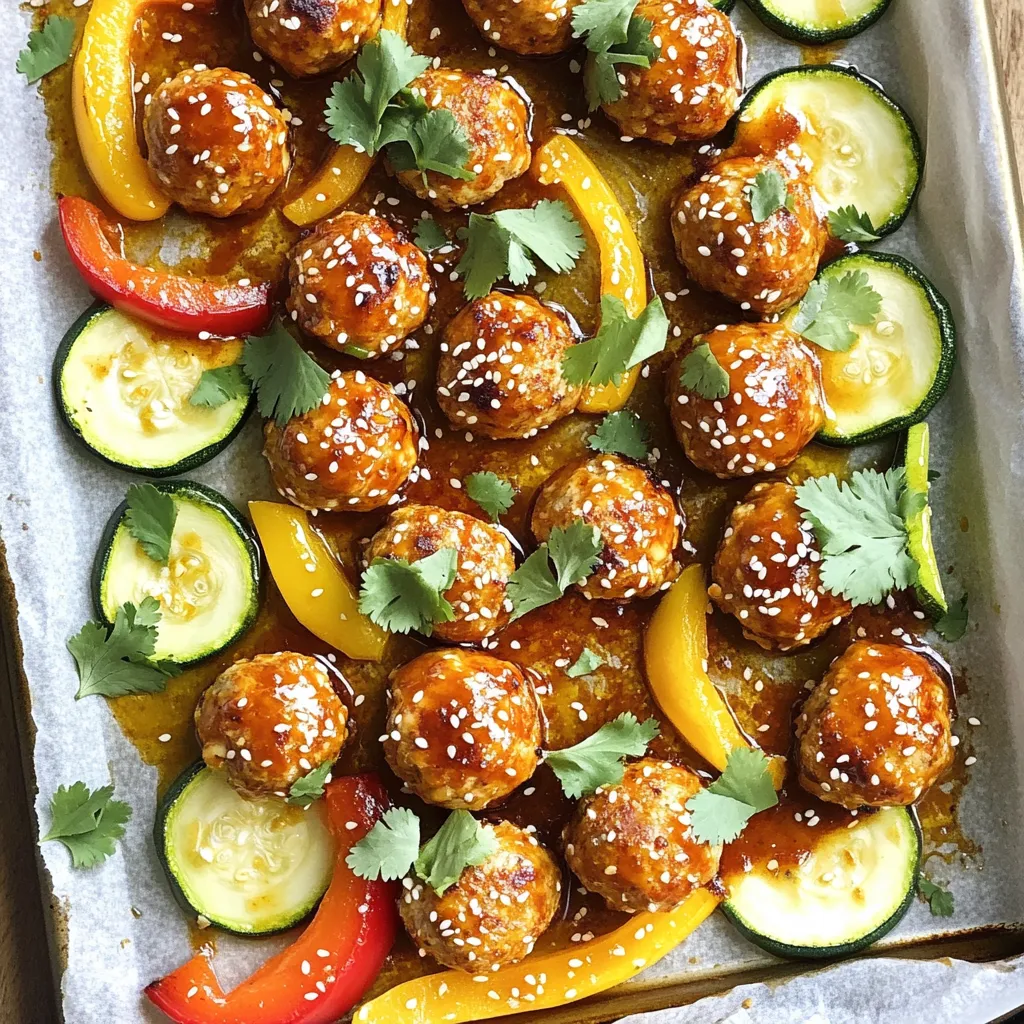
Get ready to spice up your dinner with my Savory Sheet-Pan Sweet Chili Chicken Meatballs! This dish is simple yet

To make no-bake chocolate chip granola bars, you'll need simple and wholesome ingredients. Each item plays a key role in flavor and texture. Here’s what you need: - 2 cups rolled oats - 1 cup almond butter (or peanut butter) - 1/2 cup honey (or maple syrup) - 1/2 cup mini chocolate chips - 1/2 cup chopped nuts (e.g., almonds, walnuts, or pecans) - 1/4 cup chia seeds (optional) - 1 teaspoon vanilla extract - A pinch of salt These ingredients come together to create a tasty treat. The rolled oats provide a hearty base. Nut butter adds creaminess and binds everything. Honey or maple syrup gives a touch of sweetness. Mini chocolate chips add fun bursts of flavor. Chopped nuts add crunch and nutrition, while chia seeds boost health benefits. The vanilla and salt enhance all the flavors. Feel free to mix things up. You can swap almond butter for peanut butter or use maple syrup instead of honey. Your taste buds will thank you! First, grab an 8x8 inch baking dish. Line it with parchment paper, letting some hang over the edges. This helps you lift out the bars later. For easier removal, press the paper into the corners well. This way, your bars won’t stick. Next, we will mix the wet ingredients. Take a small saucepan and add the almond butter and honey (or maple syrup). Heat it on low. Stir it gently until it melts and becomes smooth. Remove it from the heat. Now, add the vanilla extract and a pinch of salt. Stir again to combine everything. In a large mixing bowl, add the rolled oats, chopped nuts, and chia seeds if you are using them. Pour your warm almond butter mixture over these dry ingredients. Stir the mixture well until it all comes together. This is where the magic begins! Now it's time to chill the mixture. Pour it into the prepared baking dish. Use a spatula or your hands to press it down firmly. This makes sure it holds together as bars. Place the dish in the refrigerator for at least 1 hour. Once firm, lift the granola out using the parchment paper. Place it on a cutting board and cut it into bars or squares. Enjoy your delicious treat! To ensure your granola bars hold together, use the right amounts of wet and dry ingredients. The almond butter and honey act as a glue. If you feel the mix is crumbly, add a bit more almond butter. When pressing the mixture into the pan, use a spatula or your hands. Start from the center and press firmly toward the edges. This helps to compact the mixture well. A good press-down technique makes a big difference in the final bars. Get creative with how you serve your granola bars. You can drizzle melted chocolate on top for a sweet touch. Serve the bars on a wooden platter for a rustic look. For easy grab-and-go snacks, wrap each bar in parchment paper. Tie it with twine for a charming finish. This makes them perfect for lunchboxes or a quick snack on the run. {{image_2}} You can change the flavor of your bars with different nut butters. Almond butter gives a nice, creamy taste. Peanut butter adds a classic flavor. Sunflower seed butter is also a great swap if you want a nut-free option. For sweeteners, use honey or maple syrup. You can try agave syrup for a lighter taste. If you prefer less sugar, try using mashed bananas or applesauce. Each choice adds a unique twist. Adding dried fruits or seeds can enhance your bars. Consider raisins, cranberries, or apricots for a fruity kick. You can also add pumpkin seeds or sunflower seeds for extra crunch and nutrition. Adjust the mixture based on what you add. If you include more dry ingredients, you might need a little more nut butter or sweetener. This keeps your bars moist and tasty. To keep your no-bake chocolate chip granola bars fresh, store them in a cool place. Use an airtight container to keep moisture out. You can place parchment paper between layers to avoid sticking. This helps keep the bars intact and easy to grab. These granola bars last about one week at room temperature. If you want to save them longer, consider freezing. Wrap each bar in plastic wrap, then place them in a freezer bag. They can last up to three months in the freezer. To enjoy, thaw overnight in the fridge. Yes, you can easily make these granola bars vegan. To do this, swap almond butter for a nut-free option like sunflower seed butter. Use maple syrup instead of honey. The rest of the ingredients, like oats and chocolate chips, are typically vegan. For chocolate chips, look for ones labeled as dairy-free. This way, you keep all the great flavors while making the bars suitable for a vegan diet. To make these granola bars nut-free, use sunflower seed butter instead of almond or peanut butter. You can also leave out the chopped nuts. For added crunch, consider using seeds like pumpkin seeds or sunflower seeds. These will help maintain texture without using any nuts. Just ensure you check labels to avoid cross-contamination if allergies are a concern. If your mixture is too dry, add a splash of water or more almond butter. This helps everything stick together. If it feels too wet, add more rolled oats or a bit of chia seeds to absorb the extra moisture. Mix well after each addition. The goal is to have a sticky but not soggy mixture that holds together when pressed into the pan. These homemade granola bars are simple and tasty. We covered the right ingredients, step-by-step instructions, and helpful tips. You can mix flavors and customize them to your liking. Best of all, you can store them well for lasting freshness. Enjoy experimenting with these bars, and share them with friends or family. You'll create delicious snacks that everyone will love. So, get started today and make your own healthy treat!

No-Bake Chocolate Chip Granola Bars Simple Treat

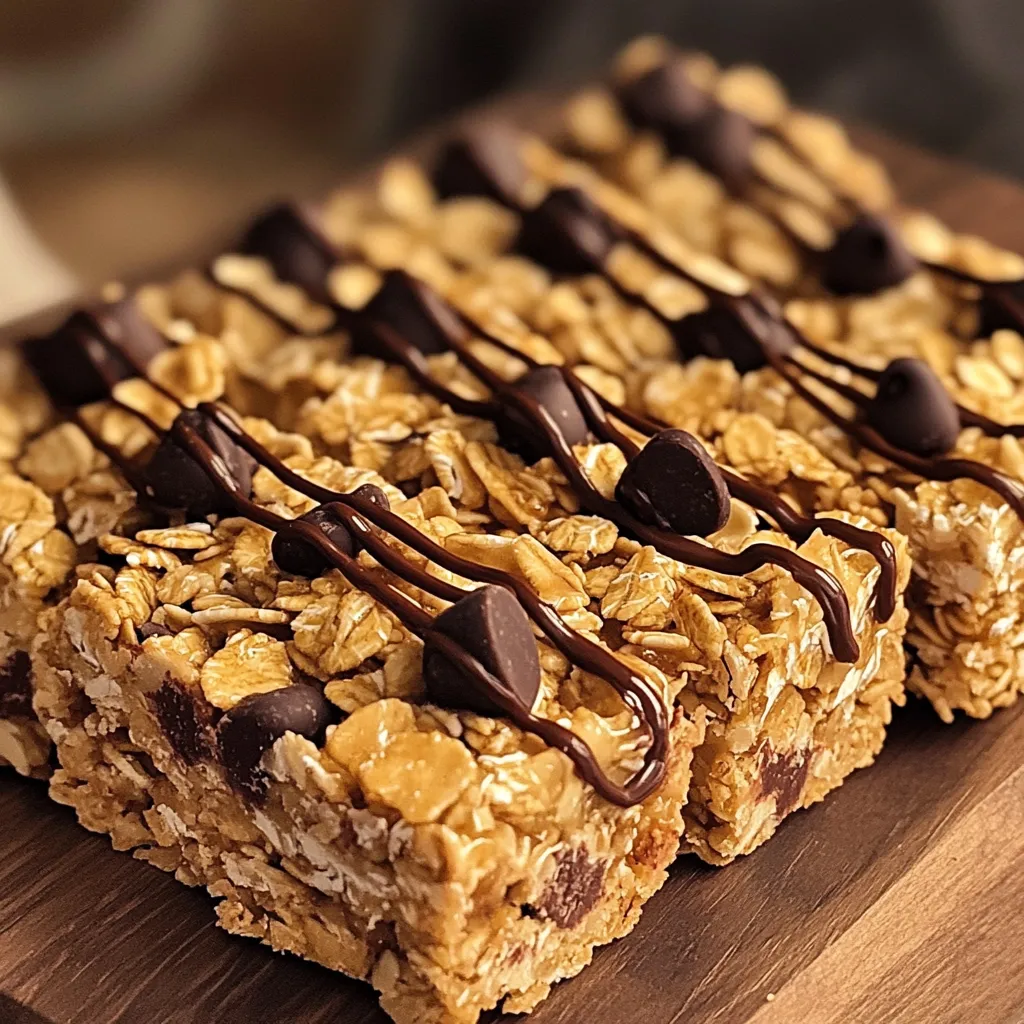
Looking for a sweet snack that’s easy and quick? No-Bake Chocolate Chip Granola Bars are your answer! You only need

Older posts
Newer posts
← Previous Page1 … Page14 Page15 Page16 … Page86 Next →

dsad

© 2026 Cooking Wells • Built with GeneratePress

Our Policies

  • Copyright Policy
  • Cookie Policy
  • GDPR Policy
  • Privacy Policy
  • Disclaimer
  • Terms Of Use

More Information

  • Home
  • About
  • Contact
  • Appetizers
  • Dessert
  • Dinner
  • Drinks
©2026, Cooking Wells About Back To Top