Skip to content
DisclaimerTerms Of UseGDPR PolicyCookie Policy

Cooking Wells

  • Home
  • Drinks
  • Appetizers
  • Dinner
  • Dessert
  • About
  • Contact
  • Privacy Policy
DisclaimerTerms Of UseGDPR PolicyCookie Policy

NO-ING-IMG

- 1 lb ground turkey or beef - 1 medium onion, diced - 2 cloves garlic, minced - 1 bell pepper (any color), diced - 1 can (15 oz) black beans, drained and rinsed - 1 can (15 oz) corn, drained - 1 can (10 oz) diced tomatoes with green chilies - 1 packet taco seasoning (or homemade) - 4 cups chicken or vegetable broth - 1 cup cream cheese (8 oz), softened - 1 cup shredded cheddar cheese - Salt and pepper to taste This creamy taco soup features simple yet tasty ingredients. I love using ground turkey or beef as my base. It adds great flavor and protein. Next, I chop up a medium onion, two cloves of garlic, and a bell pepper. These veggies add depth and a sweet taste that balances the soup. To boost nutrition, I include black beans and corn. They add fiber and texture. Diced tomatoes with green chilies give the soup a nice kick. I sprinkle in taco seasoning for that classic taco taste. You can use a packet or make your own blend at home. For richness, I add cream cheese and cheddar cheese. They make the soup creamy and delicious. I also use chicken or vegetable broth as my liquid. This choice keeps the soup hearty and comforting. Don’t forget to season with salt and pepper for the perfect taste! - Fresh cilantro - Tortilla chips To make your soup extra special, try garnishing with fresh cilantro. It adds a burst of flavor and a nice green touch. I love serving the soup with crispy tortilla chips. They add crunch and are perfect for dipping. Enjoy your creamy taco soup in a bowl, topped with your favorite garnishes! - Sautéing the meat: First, set your Instant Pot to sauté mode. Add 1 lb of ground turkey or beef. Cook until the meat is browned. Break it apart with a spoon. Drain any extra fat if needed. - Adding vegetables: Next, add 1 medium diced onion and 1 diced bell pepper to the pot. Sauté for about 3-4 minutes until the onion turns translucent. Then, stir in 2 cloves of minced garlic and cook for another minute. - Incorporating taco seasoning: Sprinkle a packet of taco seasoning over the meat and veggies. Stir well to coat everything evenly. This step adds bold flavor to your soup. - Adding remaining ingredients and broth: Now, add 1 can of drained black beans, 1 can of drained corn, and 1 can of diced tomatoes with green chilies. Pour in 4 cups of chicken or vegetable broth. Stir to mix all the ingredients well. - Pressure cooking details: Close the Instant Pot lid and set the valve to sealing. Pressure cook on high for 10 minutes. - Natural release process: After 10 minutes, let the pressure release naturally for about 10 minutes. Then, carefully switch the valve to venting to release any remaining pressure. - Stirring in cream cheese and cheddar: Open the lid and stir in 1 cup of softened cream cheese. Mix until it melts and blends smoothly. Then, add 1 cup of shredded cheddar cheese and stir again until creamy. - Adjusting seasoning: Taste your soup and add salt and pepper if needed. This small step can make a big difference in flavor. Now, your creamy taco soup is ready to enjoy! How to make homemade taco seasoning Making taco seasoning at home is easy and fun. You need these spices: - 1 tbsp chili powder - 1 tsp cumin - 1 tsp garlic powder - 1 tsp onion powder - 1 tsp paprika - 1/2 tsp salt - 1/2 tsp black pepper - 1/4 tsp cayenne pepper (optional for heat) Mix these spices in a bowl. This blend is fresh and full of flavor. You can adjust the heat to your taste. Tips for achieving creaminess To make your soup creamy, use softened cream cheese. Stir it in after cooking. It blends well and adds richness. Also, shredded cheddar cheese gives extra creaminess. Add it right after the cream cheese. Setting up your Instant Pot correctly Start by selecting the sauté mode. This helps brown the meat and veggies. Make sure to stir often. Once you add liquid, switch to pressure cooking. Always check the sealing valve before cooking. Timing adjustments for different meat types For ground turkey or beef, cook for 10 minutes. If you use chicken, adjust cooking time to 12 minutes. For larger cuts like beef chunks, increase to 15 minutes. Always let the pot release pressure naturally for best results. {{image_2}} You can switch ground turkey or beef for chicken. Just use 1 pound of diced chicken breast. The cooking time stays the same. For a veggie option, try crumbled tofu or lentils. Both add great texture and soak up flavor. Adding extra ingredients can change the soup's taste. Toss in some diced zucchini or mushrooms for a veggie boost. You can also add jalapeños for some heat. These changes keep the soup fresh and exciting. To make this soup gluten-free, check your taco seasoning. Some mixes have gluten. Pick a gluten-free brand or make your own at home. Replace regular broth with gluten-free broth. For a dairy-free version, skip the cream cheese and cheddar cheese. Use a dairy-free cream cheese and nutritional yeast for flavor. Coconut cream can also add creaminess without dairy. These swaps keep the soup rich and smooth. How long does it last in the fridge? Creamy taco soup stays fresh for about 3 to 4 days in the fridge. You can store it in an airtight container. Best practices for storing creamy soup Make sure the soup cools down before putting it in the fridge. Use a glass or plastic container with a tight lid. Label the container with the date. This helps you keep track of freshness. How to properly freeze the leftover soup To freeze creamy taco soup, let it cool first. Then, pour it into freezer-safe bags or containers. Leave some space at the top for expansion. Reheating tips for best texture When you are ready to eat, thaw it in the fridge overnight. Reheat it on the stove over low heat. Stir often to keep it creamy. If it thickens, add a splash of broth or water. This will help bring back the perfect texture. The total cooking time for this soup is about 40 minutes. You will spend 15 minutes preparing the ingredients. The Instant Pot takes about 10 minutes to cook under pressure. After cooking, allow a natural pressure release for 10 minutes. Yes, you can use frozen ingredients! If you have frozen ground turkey or beef, just add it straight to the pot. You might need to increase the cooking time by a few minutes. For frozen vegetables, toss them in with the other ingredients. They will cook well under pressure. Absolutely! To add more spice, include extra taco seasoning or diced jalapeños. You can also use spicy diced tomatoes instead of regular ones. If you want less heat, skip the spicy ingredients. Adjust according to your taste for the perfect creamy taco soup! In this post, we explored how to make creamy taco soup using simple ingredients. You learned about key components like ground turkey, beans, and cheese. We also discussed cooking steps with the Instant Pot for quick results. Tips for flavor and storage were shared too. This hearty soup is easy to adjust for your tastes. Whether you want it creamy or spicy, you can make it yours. Enjoy creating a comforting dish that warms the soul and satisfies your cravings.

Creamy Taco Soup Instant Pot Quick and Tasty Dish

Looking for a quick and tasty dish to warm your evenings? This Creamy Taco Soup made in your Instant Pot

- 2 cups all-purpose flour - 1 cup granulated sugar - ½ cup unsalted butter, melted - 1 tablespoon baking powder - 1 teaspoon baking soda - ½ teaspoon salt - 1 teaspoon ground cinnamon - 1 large apple, peeled and diced - ½ cup brown sugar, packed When you make these donuts, choose high-quality ingredients. The flour should be fresh for best results. Granulated sugar adds sweetness and helps with texture. Melted butter gives the donuts a rich taste. The baking powder and baking soda help the donuts rise. Do not skip the salt; it enhances all the flavors. Cinnamon is key for that warm, cozy taste. I love using a large apple, like a Granny Smith. Its tartness balances the sweetness. Diced apples add moisture and texture to each bite. Lastly, brown sugar brings a deep flavor and a hint of caramel. With these ingredients, you set the stage for delicious apple cinnamon coffee cake donuts. Each bite will be a delightful blend of sweet and spice. - Preheat the oven and prepare the donut pan: Start by heating your oven to 350°F (175°C). Grease your donut pan with cooking spray or butter. This helps the donuts come out easily. - Prepare dry ingredients: In a large bowl, mix together 2 cups of all-purpose flour, 1 cup of granulated sugar, 1 tablespoon of baking powder, 1 teaspoon of baking soda, 1 teaspoon of ground cinnamon, and ½ teaspoon of salt. Whisk well until everything is combined. - Combine wet ingredients and blend them into dry ingredients: In another bowl, mix ½ cup of melted unsalted butter, 1 cup of buttermilk, 2 large eggs, and 1 teaspoon of vanilla extract. Stir until the mixture is smooth. Pour the wet mix into the dry ingredients. Stir gently until just combined. Be careful not to overmix. - Fold in the diced apple: Take 1 large peeled and diced apple and gently fold it into the batter. This adds a lovely texture and flavor to the donuts. - Fill donut cavities and add topping mixture: In a small bowl, mix ½ cup of packed brown sugar with 1 teaspoon of cinnamon and ½ cup of chopped walnuts, if you like. Fill each donut cavity about halfway with the batter. Sprinkle about a teaspoon of the topping mixture on top. - Bake and cool the donuts: Top each cavity with more batter until they are about three-quarters full. Bake in the preheated oven for 10-12 minutes. Check with a toothpick; it should come out clean. Allow the donuts to cool in the pan for 5 minutes, then transfer them to a wire rack to cool completely. To make the best apple cinnamon coffee cake donuts, avoid overmixing the batter. When you mix too much, the donuts turn out dense. Stir the wet and dry ingredients until just combined. This keeps them light and fluffy. For a fluffy texture, use room-temperature ingredients. Cold butter or eggs can cause the batter to clump. When you use warm butter and eggs, the donuts rise better as they bake. Serve your donuts on a tiered cake stand. This makes a lovely display. Dust the donuts with powdered sugar for a sweet touch. Add thin apple slices around the stand for color and freshness. You can also sprinkle a bit of cinnamon on top. This adds a pop of flavor and looks great. Want to try something new? You can add different spices like nutmeg or cardamom. These flavors pair well with apples and cinnamon. If you like nuts, chop some walnuts or pecans. Fold them into the batter for extra crunch. For toppings, think about drizzling caramel or chocolate glaze. You can even use a simple vanilla glaze to change it up. {{image_2}} You can make your donuts healthier. Try using whole wheat flour instead of all-purpose flour. Whole wheat flour adds fiber and nutrients. You can also cut sugar by using natural sweeteners like honey or maple syrup. These options keep the sweet flavor without the extra calories. Seasons can inspire your baking. For fall, add pumpkin to the batter for a cozy taste. It adds moisture and flavor. You can also swap out apples for pears in the recipe. Pears bring a soft sweetness that pairs well with cinnamon. If you need a gluten-free option, substitute all-purpose flour with gluten-free flour blends. These blends often include rice flour and tapioca starch. Make sure to check for other gluten-free ingredients too. Baking soda and baking powder should be gluten-free, but always read the labels. To keep your apple cinnamon coffee cake donuts fresh for a few days, store them in an airtight container. This keeps moisture in and prevents them from drying out. You can leave them at room temperature for up to three days. If you want to store them in the fridge, they can last up to a week. However, the fridge may make them a bit dry. For long-term storage, freezing is your best option. Wrap each donut in plastic wrap and place them in a freezer bag. This helps avoid sogginess when you thaw them. To reheat, simply take one donut out and let it sit at room temperature for about 30 minutes. Then, warm it in the oven at 350°F for about 5 minutes. This keeps the texture nice and fluffy. Check for spoilage by looking for mold or a dry texture. If the donuts smell off or have changed color, it’s best to toss them. To dispose of them, seal them in a bag to prevent attracting pests. Always trust your senses when it comes to food safety! These donuts stay fresh for about 2-3 days at room temperature. Store them in an airtight container. If you want them to last longer, refrigerate them for up to a week. You can also freeze them for up to three months. Just wrap each donut well before freezing. When ready to eat, thaw them at room temperature or warm them in the oven. Yes, you can make the batter ahead of time. Mix the dry and wet ingredients separately. Keep them in the fridge for up to 24 hours. When you are ready to bake, just combine them and fold in the apples. This saves time and keeps the donuts fresh. Granny Smith apples work best for this recipe. They add a nice tartness that balances the sweetness. Other good options are Honeycrisp or Fuji apples. Both add sweetness and a great texture to the donuts. Make sure to peel and dice the apples before adding them to the batter. This article covered how to make delicious apple cinnamon coffee cake donuts. We discussed the key ingredients, step-by-step instructions, and tips to perfect your donuts. You learned about healthy and gluten-free options, plus how to store your donuts for the best taste. Remember, baking is fun and creative. Experiment with flavors and enjoy your time in the kitchen. Happy baking!

Apple Cinnamon Coffee Cake Donuts Delightful Bake

Welcome to the world of sweet indulgence! In this blog, we’ll explore how to make Apple Cinnamon Coffee Cake Donuts

To make these delightful pumpkin cheesecake swirl muffins, gather the following ingredients: - 2 cups all-purpose flour - 1 ½ teaspoons baking powder - 1 teaspoon baking soda - ½ teaspoon salt - 1 teaspoon ground cinnamon - ½ teaspoon ground nutmeg - ½ teaspoon ground ginger - 1 cup pumpkin puree - 1 cup granulated sugar - ½ cup brown sugar, packed - ½ cup vegetable oil - 2 large eggs - 1 teaspoon vanilla extract - 8 oz cream cheese, softened - 1/3 cup powdered sugar - 1 egg yolk - 1 teaspoon vanilla extract You can switch some ingredients if needed. Here are some ideas: - Use whole wheat flour instead of all-purpose flour for extra fiber. - Replace granulated sugar with coconut sugar for a lower-glycemic option. - Swap vegetable oil with melted coconut oil for a hint of flavor. - Use Greek yogurt instead of cream cheese for a lighter twist. - Replace eggs with flaxseed meal mixed with water for a vegan option. Choosing the best ingredients makes a big difference. Here are some tips: - Go for fresh pumpkin puree. It adds a rich flavor. - Check spices for freshness. Old spices lose their taste. - Use high-quality cream cheese. It gives a smooth texture to the swirl. - Look for organic eggs. They often have better flavor and nutrition. - Select unbleached flour. It is less processed and tastes better. First, preheat your oven to 350°F (175°C). While the oven heats, line a muffin tin with paper liners. You can also lightly grease the tin. This step helps the muffins come out easily after baking. In a medium bowl, whisk together the dry ingredients. Combine 2 cups of all-purpose flour, 1 ½ teaspoons of baking powder, 1 teaspoon of baking soda, ½ teaspoon of salt, and spices: 1 teaspoon of ground cinnamon, ½ teaspoon of ground nutmeg, and ½ teaspoon of ground ginger. Set this bowl aside. In a large mixing bowl, mix your wet ingredients. Combine 1 cup of pumpkin puree, 1 cup of granulated sugar, ½ cup of brown sugar, ½ cup of vegetable oil, 2 large eggs, and 1 teaspoon of vanilla extract. Stir until the mixture is smooth and well blended. Gradually add your dry mixture to the pumpkin mixture. Stir gently until just combined. Be careful not to overmix. This helps keep the muffins light and fluffy. In a separate bowl, prepare the cheesecake swirl. Beat together 8 oz of softened cream cheese, ⅓ cup of powdered sugar, 1 egg yolk, and 1 teaspoon of vanilla extract. Mix until smooth and creamy. Now, it's time to fill the muffin tins. Spoon a heaping tablespoon of the pumpkin batter into each muffin cup. Then add a tablespoon of the cheesecake mixture on top. Use a toothpick to gently swirl the cheesecake into the pumpkin batter. Place the muffin tin in the preheated oven. Bake for 18-20 minutes. Check for doneness by inserting a toothpick into the center of a muffin; it should come out clean. After baking, let the muffins cool in the tin for 5 minutes. Then, transfer them to a wire rack to cool completely before serving. To make your muffins soft and fluffy, use fresh ingredients. Always check your baking powder and baking soda; old ones can make muffins dense. When mixing, stir just until combined. Overmixing makes the muffins tough. Let the batter rest for a few minutes before scooping. This helps the gluten relax. Watch your oven temperature. An oven that’s too hot can burn the tops. Use an oven thermometer for accuracy. Fill each muffin cup only two-thirds full to avoid overflow. If you forget to preheat, your muffins may not rise well. Always preheat for the best results. Use a sturdy muffin tin to ensure even baking. Silicone spatulas help mix without damaging the bowl. A whisk is perfect for blending dry ingredients. Invest in a good set of measuring cups and spoons. They help you get accurate measurements every time. A toothpick is crucial for testing doneness. {{image_2}} You can easily make these muffins gluten-free. Use a gluten-free flour blend instead of all-purpose flour. Many blends work well, but look for one that includes xanthan gum for better texture. Follow the same steps in the recipe. You will still enjoy the same great flavor! To create a vegan version, swap the eggs and cream cheese. Use flaxseed meal mixed with water as an egg replacement. For each egg, use 1 tablespoon of flaxseed meal and 2.5 tablespoons of water. Let it sit for a few minutes to thicken. For cream cheese, use a plant-based cream cheese. This will keep your muffins creamy while being dairy-free. You can change the flavor of these muffins easily. Here are some fun ideas: - Chocolate Chips: Add ½ cup of chocolate chips to the pumpkin batter. This will give a rich chocolate flavor that pairs well with pumpkin. - Nuts: Stir in ½ cup of chopped nuts, like walnuts or pecans, for extra crunch. Nuts add a delicious depth to the muffins. Feel free to mix and match these variations to create your perfect pumpkin cheesecake swirl muffin! To keep your pumpkin cheesecake swirl muffins fresh, store them in an airtight container. Place parchment paper between layers to prevent sticking. You can keep them at room temperature for up to three days. If you want to keep them longer, consider freezing. To freeze your muffins, let them cool completely first. Wrap each muffin tightly in plastic wrap, then place them in a freezer-safe bag. This method helps to lock in moisture. They can last up to three months in the freezer without losing flavor. To enjoy the muffins warm, preheat your oven to 350°F (175°C). Unwrap the muffins and place them on a baking sheet. Heat for about 10 minutes until warm. You can also use the microwave. Heat for 15-20 seconds for a quick treat. Enjoy your muffins fresh! Yes, you can use canned pumpkin puree. It saves time and gives great flavor. Just make sure it’s 100% pumpkin with no added spices or sugars. Check the muffins after 18 minutes of baking. Insert a toothpick into the center. If it comes out clean, they are done. If it has batter on it, bake for a few more minutes. You can use Greek yogurt or mascarpone cheese as a cream cheese substitute. These options still keep that creamy texture and taste. Absolutely! Just fill the mini muffin tins with less batter. Bake them for about 10-12 minutes. Keep an eye on them to avoid overbaking. These muffins last about 3 days at room temperature. Keep them in an airtight container to stay fresh. Yes, feel free to double the recipe. Just make sure you have enough muffin tins or bake in batches. Enjoy sharing these delightful muffins! You now have all the tools to make delicious pumpkin cheesecake swirl muffins. We covered the key ingredients, step-by-step instructions, and tips for perfect muffins. You learned about gluten-free and vegan options, plus storage tips for freshness. Remember, baking is all about practice and fun. Try different flavors or share with friends. Enjoy your baking journey!

Delightful Pumpkin Cheesecake Swirl Muffins Recipe

Get ready to indulge in a cozy treat with my delightful Pumpkin Cheesecake Swirl Muffins! Perfect for fall, these muffins

- 4 boneless skinless chicken breasts - 1 cup long-grain white rice - 2 cups chicken broth - 1 cup heavy cream - 1 cup grated Parmesan cheese - 1 teaspoon garlic powder - 1 teaspoon onion powder - 1 teaspoon dried Italian herbs (oregano, basil, thyme) - Salt and pepper to taste - 1 cup frozen peas and carrots - Fresh parsley, chopped (for garnish) - Optional serving suggestions: crusty bread, extra Parmesan Gathering the right ingredients is key to making this dish a hit. I love using boneless skinless chicken breasts for their tenderness. They soak up the flavors well. Long-grain white rice is perfect because it cooks evenly and adds a nice texture. For the creamy sauce, chicken broth makes a great base. Heavy cream adds richness that makes every bite feel special. Grated Parmesan cheese brings a salty, savory depth that blends beautifully with the chicken and rice. Don't forget the seasonings! Garlic powder and onion powder give that warm, comforting flavor. Dried Italian herbs like oregano, basil, and thyme add a fresh taste. Adjust salt and pepper to make it just right for your palate. If you want to add more color and nutrition, toss in some frozen peas and carrots. They not only taste great but also brighten up the dish. A sprinkle of fresh parsley on top makes for a lovely presentation. Serve with crusty bread to scoop up that creamy goodness, and you have a meal that everyone will love! - First, place the 4 boneless, skinless chicken breasts at the bottom of the slow cooker. - Next, rinse 1 cup of long-grain white rice under cold water until it runs clear. Add the rice on top of the chicken. - Now, in a bowl, mix 2 cups of chicken broth, 1 cup of heavy cream, and 1 cup of grated Parmesan cheese. - Add 1 teaspoon of garlic powder, 1 teaspoon of onion powder, and 1 teaspoon of dried Italian herbs. Don't forget salt and pepper to taste. - Stir the creamy mixture well to combine all the flavors. - Pour this sauce over the chicken and rice, making sure the rice is fully covered. - Cover the slow cooker with a lid. You can cook on low for 4-5 hours or on high for 2-3 hours. - Check the chicken and rice around the end of the cooking time to ensure they’re tender. - About 30 minutes before serving, add 1 cup of frozen peas and carrots. Stir gently to mix them in. - When cooking is done, shred the chicken using two forks. - Mix the shredded chicken back into the creamy rice. - Taste the dish and adjust seasonings if needed. Serve hot, and enjoy this creamy delight! To get that perfect creamy texture, you need the right ratio of cream. Use one cup of heavy cream in your mix. This gives the dish its rich flavor. Make sure the rice is fully submerged in the sauce. This helps it cook evenly and soak up all that tasty goodness. Fresh herbs can elevate your dish. Try using fresh basil or parsley for a bright taste. You can also adjust spice levels. If you like it spicy, add a pinch of red pepper flakes. This will give your creamy Parmesan chicken a nice kick. Prep ahead for busy weeknights. You can cut the chicken and measure the rice earlier. Store them in the fridge. You can also make this dish ahead of time. It reheats well in the microwave or on the stove. Just add a splash of chicken broth to keep it creamy. {{image_2}} You can change the protein in this dish easily. Turkey works well in place of chicken. Tofu is a great choice for a plant-based option. It soaks up flavors and adds texture. Switching grains is just as simple. Try quinoa for a nutty taste. Brown rice adds a hearty feel. Both options provide extra nutrients. Add different veggies to switch things up. Broccoli brings a nice crunch. Mushrooms add a rich, earthy flavor. Toss in what you like for a fun twist. You can also change the herbs. Mexican spices can give it a bold kick. Cajun blends add a spicy, smoky flavor. Experiment with what you have in your spice rack. If you need a gluten-free meal, use rice and check your broth. Most chicken broths are gluten-free, but always read labels. For a dairy-free version, swap heavy cream with coconut milk. Nutritional yeast can replace Parmesan cheese for a cheesy flavor. These swaps keep the dish creamy and delicious. To keep your creamy Parmesan chicken and rice fresh, cool it down quickly. After cooking, let it sit for about 30 minutes. Then, place it in a shallow container. This helps it cool faster. Use airtight containers to store leftovers. Label them with the date before putting them in the fridge. You can freeze this dish for later. First, let it cool completely. Then, transfer it to a freezer-safe container. Make sure to leave some space at the top, as the rice may expand. When you are ready to eat, take it out and thaw it in the fridge overnight. Reheat it in the microwave or on the stovetop, adding a splash of chicken broth for moisture. For the best taste and quality, eat the leftovers within three to four days if stored in the fridge. In the freezer, it can last up to three months. Watch for signs of spoilage like an off smell or mold. If you notice these, it's best to discard the dish to stay safe. Yes, you can. Use half-and-half or sour cream instead. This will change the taste and texture a bit. If you want it thicker, add a bit more cheese. To spice it up, add red pepper flakes or diced jalapeños. You can also include a spicy seasoning blend. Mix it into the creamy sauce for an extra kick. This dish goes well with simple salads, steamed veggies, or crusty bread. You could also serve it with garlic bread for a tasty combo. Yes, you can! Sauté the chicken in a pot, then add the rice and liquid. Cook on low heat until the rice is tender and the chicken is fully cooked. Check the thickest part of the chicken. It should reach 165°F (75°C) on a meat thermometer. The chicken should be white and no longer pink inside. This blog post detailed how to prepare creamy Parmesan chicken and rice. We covered main ingredients, seasonings, and add-ins that elevate flavor. You learned step-by-step instructions for cooking and serving this dish. Tips and tricks helped ensure a creamy texture and enhanced taste. Plus, we explored variations and safe storage methods. Now, you have the tools to make a delicious meal for any occasion. Enjoy sharing this dish with family or friends, knowing it’s versatile and satisfying!

Creamy Parmesan Chicken & Rice Slow Cooker Delight

Are you ready for a meal that warms your heart and fills your belly? In this post, I will guide

- 1 cup rolled oats - 1 cup almond milk (or any preferred milk) - 1 medium apple, diced (preferably a sweet variety like Fuji or Honeycrisp) These ingredients are the heart of your cozy apple cinnamon overnight oats. Rolled oats give the dish a hearty base. Almond milk adds creaminess and flavor. Sweet apples bring a delightful crunch and taste. - 1 tablespoon chia seeds - 1 tablespoon maple syrup (adjust based on sweetness preference) - 1 teaspoon ground cinnamon Chia seeds boost nutrition and help thicken the oats. Maple syrup adds natural sweetness. Ground cinnamon gives that warm, cozy flavor we all love. - 1/2 teaspoon vanilla extract - A pinch of salt - Optional toppings: chopped nuts (like walnuts or pecans), additional apple slices, and a drizzle of honey Vanilla extract enhances the aroma and flavor. A pinch of salt brightens all the tastes. Toppings like nuts and extra apple slices add texture and flavor. You can even drizzle honey for extra sweetness if you like. 1. Mixing the base ingredients: Start by taking a mixing bowl. Add 1 cup of rolled oats and 1 cup of almond milk into the bowl. Then, sprinkle in 1 tablespoon of chia seeds. Stir well until everything combines nicely. 2. Adding flavor components: Next, chop a medium apple into small pieces. I like to use sweet apples like Fuji or Honeycrisp. Toss the diced apple into the bowl. Now, add 1 tablespoon of maple syrup, 1 teaspoon of ground cinnamon, and 1/2 teaspoon of vanilla extract. Add a pinch of salt to enhance the taste. Mix everything until you see a uniform blend. 3. Transferring to containers: Grab some mason jars or airtight containers. Spoon the oat mixture into these jars. Make sure to leave some space at the top. This helps when the oats soak and expand. 1. Sealing and chilling the mixture: After filling the jars, seal them tightly. This keeps the oats fresh and prevents spills. 2. Suggested soaking time: Place the jars in the fridge. Let them chill overnight for the best flavor. If you're in a hurry, at least four hours will work, but overnight is best. 1. Stirring before serving: When you wake up, take the jars out of the fridge. Give the oats a good stir. This helps mix the flavors again. 2. Adjusting consistency with milk: If the oats seem too thick, add a splash of almond milk. This makes them creamier and easier to eat. 3. Adding toppings for enhanced flavor: Finally, get creative with toppings! I love adding chopped nuts like walnuts or pecans. You can also add extra apple slices and a drizzle of honey on top for some added sweetness. Enjoy your cozy breakfast! When picking apples, I love to choose Fuji or Honeycrisp. These apples are sweet and crunchy. They add great flavor to your oats. Look for firm apples with smooth skin. Avoid apples with bruises or soft spots. The best time to buy apples is during fall. This is when they are at their peak ripeness. To tell if an apple is ripe, check its color. It should be bright and vibrant. Give it a gentle squeeze. If it feels hard, it’s ready to eat. If it gives in a bit, it may be overripe. To get the right thickness in your overnight oats, adjust the liquid. If your oats are too thick in the morning, add a splash of milk. Start with a little, then add more if needed. You want a creamy texture, not a soup. To avoid mushy oats, let them soak just long enough. Four hours is fine, but overnight is best. This way, the oats soften without losing their shape. You can also try using less liquid for a thicker mix. Meal prepping your overnight oats makes mornings easier. I suggest making a few jars at once. You can enjoy them throughout the week. Use mason jars or airtight containers to keep them fresh. For best results, leave some space at the top of the jar. This allows the oats to expand. Store them in the fridge for up to five days. Just remember to stir before serving. This helps blend the flavors again. {{image_2}} To make your Apple Cinnamon Overnight Oats fit different diets, consider these options: - Dairy-free alternatives: Use almond milk, coconut milk, or oat milk instead of dairy milk. These choices keep the dish creamy and tasty. - Gluten-free options: Ensure your oats are labeled gluten-free. This way, you can enjoy them without worry. You can switch up the flavors to keep things exciting: - Adding spices: Try adding nutmeg or ginger for a warm touch. Just a pinch can make a big difference. - Sweetening alternatives: Use agave syrup or stevia instead of maple syrup. These options provide a different sweetness level. Adjust the texture to suit your taste: - Incorporating yogurt or nut butter: Stir in some yogurt for creaminess or add nut butter for richness. Both options boost flavor and texture. - Substituting oats with quinoa or other grains: Swap oats for quinoa or buckwheat. These grains add a unique taste and texture to your dish. To keep your apple cinnamon overnight oats fresh, use airtight containers. Glass mason jars work great. They seal well and show off the layers. Plastic containers also work if they are airtight. Make sure to store your oats in the fridge. This keeps them safe and tasty. FAQs about refrigeration: - Can I store them in the fridge? Yes, always store them in the fridge. - How should I cover them? Use a lid or plastic wrap for best results. Your overnight oats can last up to five days in the fridge. Make sure to check them before eating. If they smell sour or have a strange look, it’s time to toss them. Signs of spoilage: - Sour smell - Unusual color or texture - Mold growth Yes, you can freeze your overnight oats! This is a good way to save extra servings. How to freeze and thaw for best results: - Freezing: Portion the oats into freezer-safe containers. Leave some space for expansion. - Thawing: To thaw, move them to the fridge overnight. You can also microwave them for a quick warm-up. Just add a splash of almond milk to restore the creamy texture. Yes, you can use quick oats. However, they change the texture and flavor. Quick oats cook faster and absorb liquid more quickly. This makes them softer and creamier. If you prefer a firmer bite, stick with rolled oats. They hold their shape better. Overnight oats stay good for about 3 to 5 days in the fridge. Store them in an airtight container. This keeps them fresh and tasty. Always check for signs of spoilage before eating. If they look or smell off, it's best to toss them. You can heat your overnight oats easily. Just put them in a bowl and microwave for about 30 to 60 seconds. Stir them well to keep the texture smooth. If they seem too thick, add a splash of almond milk. This helps maintain their creamy goodness. Overnight oats offer many health benefits. They are high in fiber, which is great for digestion. They also provide sustained energy due to their whole grain content. The chia seeds add healthy omega-3s, while apples provide vitamins. Plus, it’s a fun way to enjoy a nutritious breakfast! In this article, I covered how to make delicious overnight oats. We explored the main ingredients like rolled oats, almond milk, and diced apples. I shared ways to enhance flavor with chia seeds, maple syrup, and cinnamon. I also gave tips on choosing apples, achieving the right consistency, and making variations for different diets. Overnight oats are easy to prepare and store. You can enjoy them in many ways. Experiment with flavors and tweaks to find your favorite mix. Healthy eating can be simple and enjoyable.

Cozy Apple Cinnamon Overnight Oats Recipe Delight

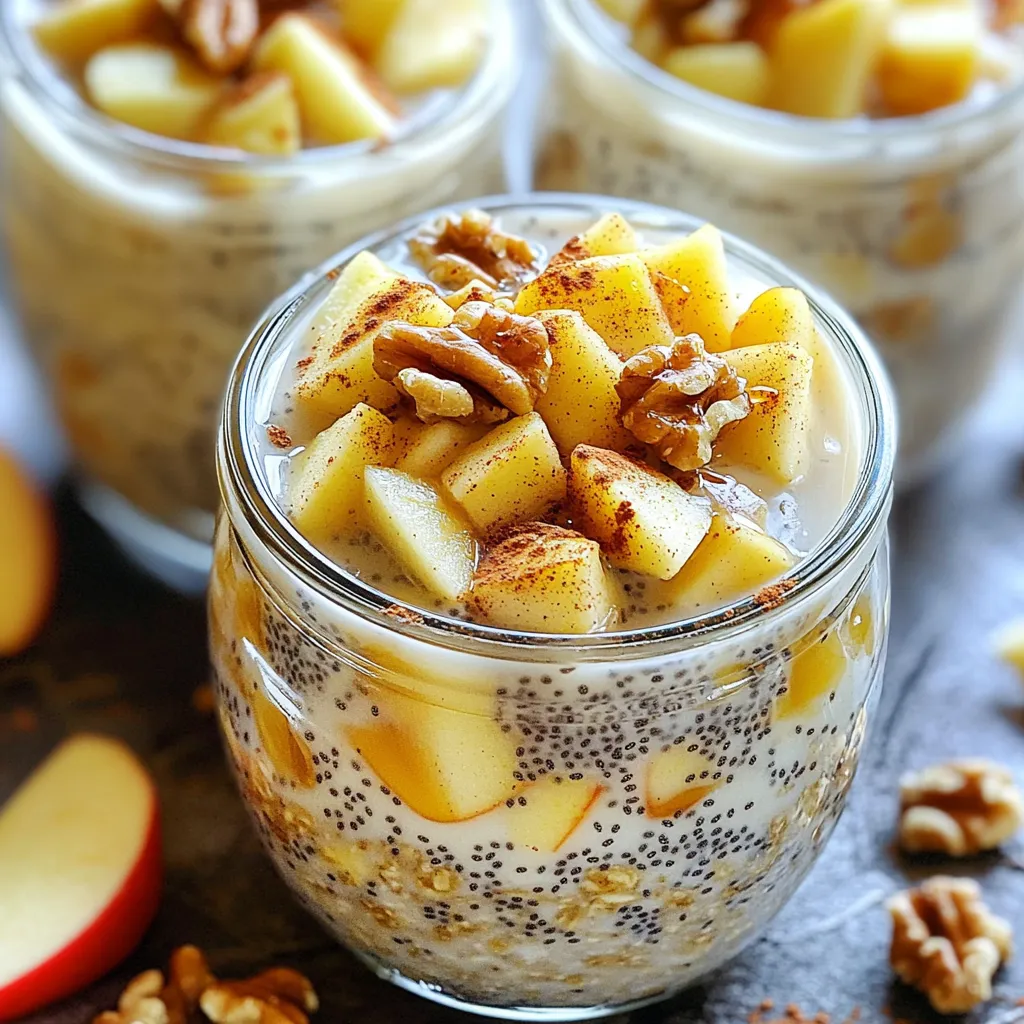
Ready for a cozy breakfast that’s warm and filling? My Cozy Apple Cinnamon Overnight Oats will make your mornings delightful

- 2 large sweet potatoes - 2 tablespoons olive oil - 2 tablespoons pure maple syrup - 1 teaspoon ground cinnamon - ½ teaspoon salt - ¼ teaspoon black pepper - Optional toppings: chopped pecans or walnuts Gather these ingredients before you start. Fresh sweet potatoes make the best fries. I choose large ones for more fries. Olive oil adds a nice flavor and helps crisp the fries. Pure maple syrup gives a sweet touch that pairs well with cinnamon. Ground cinnamon adds warmth and spice, while salt and black pepper enhance all the flavors. If you want a crunch, add chopped pecans or walnuts on top. They give a nice texture and look. You can mix and match toppings based on your taste. Each ingredient plays a key role in creating a delicious snack. So, let’s get cooking! Set the air fryer to 400°F (200°C). Preheat it for about 5 minutes. This step helps the fries cook evenly. Wash the sweet potatoes well. Peel them and cut them into thin fries. Aim for pieces no thicker than 1/4 inch. This helps them get crispy. In a large bowl, combine the fries with olive oil, maple syrup, ground cinnamon, salt, and black pepper. Toss everything together well. Make sure all the fries get coated evenly. Place the fries in the air fryer basket in a single layer. If you have a lot, cook them in batches. Air fry for 15-20 minutes. Shake the basket halfway through. This ensures even cooking. Check when they are crispy and tender. After cooking, take out the fries and let them rest for a minute. If you like, sprinkle chopped pecans or walnuts on top. For a nice look, serve the fries on a colorful plate or a rustic wooden board. Drizzle a bit of extra maple syrup on top for added sweetness. - Cut your sweet potatoes into thin fries, not thicker than 1/4 inch. This helps them cook evenly and become crispy. - Preheat your air fryer to 400°F (200°C) for about 5 minutes. This step is key. It helps the fries start cooking right away. - Try adding a pinch of nutmeg or some garlic powder for a different taste. These spices can add a nice twist to your fries. - If you want to change the sweetness, use honey or agave syrup instead of maple syrup. Each will give a unique flavor. - Avoid overcrowding the air fryer basket. If you add too many fries at once, they won’t cook properly. - To cook in batches, just divide the fries into smaller groups. This way, they will all get nice and crispy. {{image_2}} You can make your sweet potato fries even sweeter! Try using honey or agave. Both add a rich flavor. If you want, add spices like nutmeg or allspice. These spices will give your fries a warm, cozy taste. Just a pinch can change everything. If you crave something savory, garlic powder or smoked paprika works well. These spices add a kick. After cooking, sprinkle some cheese on top. Melted cheese gives a creamy texture that pairs nicely with the sweet fries. You can also try other types of potatoes. Purple or Japanese sweet potatoes add unique flavors and colors. Regular potatoes can work too, but they will taste different. Sweet potatoes are sweeter and creamier than regular ones. To store leftover fries, let them cool first. Place the fries in an airtight container. They can last in the fridge for about 3 days. When you want to reheat them, use the air fryer. Preheat it to 375°F (190°C). Place the fries in the basket and heat for about 5-7 minutes. This helps keep them crispy. If you want to freeze these fries, let them cool completely. Then, spread them on a baking sheet in a single layer. Freeze them for 1-2 hours until firm. Once frozen, transfer the fries to a freezer bag. They last for up to 3 months. To reheat from frozen, preheat the air fryer to 400°F (200°C). Cook the fries for about 10-15 minutes. Shake the basket halfway through to ensure even heating. Enjoy crispy fries even after freezing! Yes, you can! Try baking them in the oven. Preheat your oven to 425°F (220°C). Spread the fries on a baking sheet in a single layer. Bake for 25-30 minutes, flipping halfway through. This method gives a nice crunch, but air frying is quicker. You can use regular potatoes, but expect a different taste. Sweet potatoes add a natural sweetness. They are softer and creamier inside. Regular potatoes will be more starchy and less sweet. The texture will also differ. Sweet potatoes will caramelize better with maple syrup. For crispy fries, cut them thin. Aim for 1/4 inch or less. Preheat the air fryer to 400°F (200°C) first. Don’t overcrowd the basket; this helps them cook evenly. Shake the basket halfway through cooking to promote even crisping. You can reduce the maple syrup if you want less sweetness. Try using less than two tablespoons. You can also add more cinnamon for flavor without added sugar. Or, use a different sweetener like honey or agave syrup to change the taste. These Air Fryer Maple Cinnamon Sweet Potato Fries are simple and tasty. You need just a few ingredients and easy steps to make them. You can change flavors and add toppings to suit your taste. Remember to cut the fries evenly for the best crispiness. Store any leftovers properly to enjoy later. I hope you try this recipe and enjoy every bite! Enjoy your cooking journey and the delicious fries to come!

Air Fryer Maple Cinnamon Sweet Potato Fries Delight

If you’re craving a sweet and savory snack, you’ll love these Air Fryer Maple Cinnamon Sweet Potato Fries! They are

To make these tasty Peanut Butter Chocolate Oat Bars, you need: - 2 cups rolled oats - 1 cup natural peanut butter (creamy or crunchy) - 1/2 cup honey or maple syrup - 1/2 cup dark chocolate chips (dairy-free if preferred) - 1/4 teaspoon salt - 1/2 teaspoon vanilla extract These ingredients create a rich and chewy bar. The oats give texture, while the peanut butter adds flavor and healthy fats. You can enhance the bars with these optional add-ins: - 1/4 cup chopped nuts (like almonds or walnuts) - 1/4 cup dried fruit (like raisins or cranberries) These add-ins give more crunch and sweetness. You can mix them into the oat mixture for a fun twist. If you need to swap ingredients, try these options: - Use almond butter or cashew butter instead of peanut butter. - Replace honey with agave syrup or brown rice syrup for a vegan choice. - Use white chocolate chips if you prefer a sweeter taste. These substitutions keep the bars tasty while meeting your dietary needs. First, grab a large mixing bowl. Add 2 cups of rolled oats. If you like, toss in 1/4 cup of chopped nuts, like almonds or walnuts. Mix the oats and nuts together. This step gives the bars a nice crunch. Next, take a saucepan and set it on low heat. Add 1 cup of natural peanut butter, 1/2 cup of honey or maple syrup, 1/4 teaspoon of salt, and 1/2 teaspoon of vanilla extract. Stir it all together until it melts and becomes smooth. This mixture adds a rich flavor to your bars. Once the peanut butter mix is ready, pour it over the oats in your bowl. Stir well to coat all the oats. Then, fold in 1/2 cup of dark chocolate chips. The heat will start to melt them, making it extra delicious. Line an 8x8 inch baking dish with parchment paper. Pour the oat mixture into the dish and press it down firmly. This creates an even layer. Now, place the dish in the refrigerator for at least 2 hours. This helps the bars set nicely. When they are firm, lift them out using the parchment paper. Cut them into squares or bars. Enjoy your tasty peanut butter chocolate oat bars! To get the best texture, use rolled oats. They give a chewy bite. If you want a softer bar, add a little more honey or peanut butter. For a crunchier texture, mix in some chopped nuts. Almonds or walnuts work great. You can also try adding dried fruit for extra chewiness. Use parchment paper to line your dish. This makes it easy to lift the bars out. Leave some paper hanging over the sides. After the bars set, just pull up the paper to remove them. Cut them into squares right away or store them whole. Keep your bars in an airtight container. They can last up to a week in the fridge. If you want them to last longer, freeze them. Wrap each bar in plastic wrap before putting them in a freezer bag. This way, they stay fresh and tasty for later. {{image_2}} If you want to make these bars nut-free, try sun butter. It has a similar texture and flavor. You can also use seed butter like pumpkin or sesame. These options work well and keep the bars creamy. To add more flavor, consider using different extracts. Almond extract gives a nice twist. You can also mix in spices like cinnamon or nutmeg. For a fruity touch, add dried fruit like cranberries or raisins. These swaps keep the bars exciting and tasty. To make these bars gluten-free, choose certified gluten-free oats. This step ensures no cross-contamination. For vegan bars, use maple syrup instead of honey. You can also select dairy-free chocolate chips. These simple changes make the bars fit for everyone. To keep your peanut butter chocolate oat bars fresh, store them in an airtight container. I recommend placing parchment paper between layers. This keeps them from sticking together. Always store them in the refrigerator. This will help maintain their texture and flavor. These bars last about one week in the fridge. After seven days, they may lose freshness. If you notice any changes in smell or texture, it’s best to toss them. Trust your senses to guide you. You can freeze these bars for up to three months. To do this, wrap each bar tightly in plastic wrap. Then place them in a freezer-safe bag or container. Label the bag with the date for easy tracking. When you’re ready to eat one, just thaw it in the fridge overnight. Enjoy them fresh and tasty! Yes, you can use other nut butters. Almond butter or cashew butter work well too. They give a different taste but still taste great. Just keep the amount the same as peanut butter. If you don’t have honey or maple syrup, you can use agave nectar or brown rice syrup. They will add sweetness just like honey or syrup. You can even try using mashed bananas for a natural sweetness. To make these bars healthier, try using less sweetener. You can also add seeds like chia or flaxseeds. Using more nuts or dried fruits can boost the nutrition too. Swap some oats for protein-rich quinoa for an extra health kick. Yes, these bars are great for kids! They are easy to chew and full of good stuff. You can even get kids involved in making them. They will love the chocolate and peanut butter mix. Yes, adding protein powder is a great idea! You can mix in about 1/4 cup of your favorite protein powder. Just make sure to adjust the other ingredients slightly, like adding a bit more liquid to keep the texture right. You now have a clear guide to make tasty bars. We covered essential ingredients and fun add-ins. I shared simple steps to combine them perfectly. You learned tips for great texture and storage ideas to keep them fresh. Remember, there are variations for nut-free and diet needs. Feel free to experiment and find what you love. Enjoy your tasty snacks, and don’t hesitate to share your own twists!

Peanut Butter Chocolate Oat Bars No-Bake Delight

Craving a sweet treat that’s easy and quick? You’ll love these Peanut Butter Chocolate Oat Bars! No baking is required,

- 4 boneless, skinless chicken breasts - 1 pound broccoli florets - 4 cloves garlic, minced - 1 tablespoon fresh rosemary, finely chopped - 1 tablespoon fresh thyme, finely chopped The main stars of this dish are the chicken and broccoli. The chicken breasts give you protein, while the broccoli adds color and nutrients. Garlic and herbs bring great flavor to the mix. - 3 tablespoons olive oil - 1 teaspoon smoked paprika - 1/4 teaspoon red pepper flakes (optional) - Salt and pepper to taste - Zest of 1 lemon - 1 tablespoon lemon juice Using olive oil helps keep everything moist and tasty. The spices add warmth and depth. Lemon zest and juice brighten the dish, making it fresh and vibrant. You can skip the red pepper flakes if you prefer less heat. 1. First, preheat your oven to 400°F (200°C). This step is key for even cooking. 2. Next, prepare the marinade. In a small bowl, mix 2 tablespoons of olive oil, garlic, rosemary, thyme, smoked paprika, red pepper flakes, lemon zest, lemon juice, salt, and pepper. This mix adds a lot of flavor. - For effective marinating, make sure you coat the chicken well. Use a large bowl or a resealable bag. - Let the chicken marinate for at least 15 minutes. For more flavor, you can marinate it for up to 2 hours in the fridge. The longer it sits, the more the chicken absorbs the flavors. 1. While the chicken marinates, prepare the broccoli. In a separate bowl, toss the broccoli florets with the last tablespoon of olive oil, salt, and pepper. Coat them well. 2. Arrange the marinated chicken on one side of the baking sheet and the broccoli on the other side. Make sure they have space between them for even cooking. 3. Bake in the preheated oven for 25-30 minutes. Check that the chicken reaches an internal temperature of 165°F (75°C). The broccoli should be tender and slightly crisp. This process ensures you have juicy chicken and tasty broccoli in one dish. When making the marinade, you can change up the herbs. Try basil or parsley for a new twist. You can also add a dash of cumin for warmth. Use what you like to make it yours. To enhance flavor, let the chicken soak in the marinade for at least 15 minutes. If you have time, marinate it for up to 2 hours in the fridge. This helps the chicken absorb all the tasty goodness. Make sure every piece is well coated for the best flavor. Set your oven to 400°F (200°C). This high heat helps the chicken cook quickly and keeps it juicy. Line the baking sheet with parchment paper. This makes cleanup easy and helps the chicken and broccoli roast evenly. Space the chicken and broccoli apart on the sheet. This allows hot air to flow around them, cooking everything evenly. Check the chicken after 25 minutes. It should reach 165°F (75°C) for safe eating. The broccoli should be tender yet crisp. If you want a bit more color on the broccoli, broil it for a minute at the end. {{image_2}} You can mix things up with different veggies. Try adding bell peppers, carrots, or asparagus. These add color and flavor. For protein, you have choices! Instead of chicken, use turkey or firm tofu. Both options work well with the marinade. If you prefer seafood, shrimp is a tasty swap. Want to elevate your dish? Adding cheese can do the trick. Try parmesan or feta for a rich taste. Nuts like almonds or walnuts can add a nice crunch. For different spice profiles, think about changing the herbs. Use basil or oregano for a Mediterranean twist. If you like heat, add more red pepper flakes or cayenne pepper. This will give your dish a nice kick. To keep your Garlic Herb Chicken and broccoli fresh, follow these steps: - Refrigeration: Place leftovers in an airtight container. They will last in the fridge for 3-4 days. Make sure they cool down before sealing them. - Freezing: If you want to save for later, freeze them in a freezer-safe bag. Remove as much air as possible. They can stay good for up to 3 months. When you are ready to eat, thaw in the fridge overnight. You have two great options for reheating: - Microwave: This is fast and easy. Place your chicken and broccoli on a microwave-safe plate. Cover with a damp paper towel. Heat in short bursts, checking every minute. - Oven reheating: To keep it crispy, use the oven. Preheat to 350°F (175°C). Place the chicken and broccoli on a baking sheet. Heat for about 10-15 minutes until warmed through. Tips for retaining flavor and texture: - Add a splash of olive oil or a squeeze of lemon juice before reheating. This helps keep the flavors fresh. - Always check the chicken's temperature. It should be at least 165°F (75°C) to ensure it’s safe to eat. Garlic Herb Chicken and broccoli stay fresh for up to four days in the fridge. Store it in an airtight container to keep it tasty. When you reheat it, make sure to check that it is warm all the way through. This way, you can enjoy your meal over a few days without losing flavor. Yes, you can use frozen broccoli! Just note that frozen broccoli cooks faster than fresh. Add it to the pan during the last ten minutes of baking. This will help it stay bright and crisp. If you prefer, you can thaw it first. Just make sure to pat it dry to avoid excess water on your sheet pan. The chicken should reach an internal temperature of 165°F (75°C). Use a meat thermometer to check this. Insert it into the thickest part of the chicken breast. This ensures it is safe to eat and has cooked properly. Cooking it to this temperature keeps your dish safe and juicy! In this post, we covered how to make Garlic Herb Chicken and Broccoli. We discussed the main ingredients, including chicken, broccoli, garlic, and herbs. You learned how to prepare the marinade and tips for marinating. We also shared important cooking techniques for roasting. Explore variations to keep meals exciting, like ingredient swaps or flavor boosts. Remember, proper storage keeps leftovers fresh. Whether you're a beginner or a pro, this recipe is simple and tasty. Enjoy making this dish and share your results!

Garlic Herb Chicken & Broccoli Sheet Pan Delight

Ready to make dinner easy and delicious? My Garlic Herb Chicken & Broccoli Sheet Pan Delight is here to save

To create these scrumptious caramel apple cheesecake stuffed cookies, gather the following ingredients: - 1 cup unsalted butter, softened - 1 cup brown sugar, packed - 1/2 cup granulated sugar - 2 large eggs - 1 teaspoon vanilla extract - 2 1/2 cups all-purpose flour - 1 teaspoon baking soda - 1/2 teaspoon salt - 1 teaspoon ground cinnamon - 1 cup diced apples (preferably Granny Smith) - 1/2 cup cream cheese, softened - 1/4 cup powdered sugar - 1/4 cup caramel sauce (plus extra for drizzling) Each ingredient plays a role. The butter gives the cookie a rich flavor. The sugars add sweetness and help with texture. Eggs bind everything together. Vanilla adds a warm aroma. Flour forms the backbone of the dough. Baking soda makes the cookies rise. Salt enhances flavor. Cinnamon gives a hint of warmth, while diced apples add a fresh, fruity touch. Cream cheese, powdered sugar, and caramel sauce unite into a creamy filling that makes each bite heavenly. Using Granny Smith apples brings a tart contrast to the sweet filling. This balance makes the cookies more enjoyable. I always recommend using fresh, high-quality ingredients for the best flavor and texture. Happy baking! Start by preheating your oven to 350°F (175°C). Line two baking sheets with parchment paper. This step is key to prevent sticking. In a large bowl, cream together 1 cup of softened unsalted butter, 1 cup of brown sugar, and 1/2 cup of granulated sugar. Mix for about 3-4 minutes until light and fluffy. This helps create a soft cookie. Next, add 2 large eggs, one at a time. Then, mix in 1 teaspoon of vanilla extract until everything is well combined. In another bowl, whisk together 2 1/2 cups of all-purpose flour, 1 teaspoon of baking soda, 1/2 teaspoon of salt, and 1 teaspoon of ground cinnamon. Gradually add this dry mix to the wet ingredients. Stir until just combined. For the filling, take a new bowl and mix together 1/2 cup of softened cream cheese, 1/4 cup of powdered sugar, and 1/4 cup of caramel sauce. Blend until smooth. Finally, fold in 1 cup of diced apples. Granny Smith apples work best for a tart flavor. To assemble, scoop about 2 tablespoons of cookie dough. Flatten it in your palm. Place about 1 tablespoon of the cream cheese-apple filling in the center. Fold the dough around it, making a ball. Repeat this with the rest of the dough and filling. Place the stuffed cookie balls on the parchment-lined baking sheets. Space them about 2 inches apart. Bake for 12-15 minutes. Look for lightly golden edges and set centers. After baking, remove the cookies from the oven. Let them cool on the baking sheets for 5 minutes. Then, transfer them to a wire rack to cool completely. Once cooled, drizzle extra caramel sauce over the cookies for a sweet touch. Enjoy your tasty treats! To get the filling just right, start with softened cream cheese. This makes mixing easy. Add the powdered sugar and caramel sauce next. Stir until smooth. Then, fold in diced apples gently. Use Granny Smith apples for a nice tartness. This balance of flavors is key. Ensure the filling is well-mixed but still chunky. For soft and chewy cookies, be sure to cream the butter and sugars well. This step adds air and lightness. When mixing in dry ingredients, do not over-mix. Just blend until combined. The flour should not be fully smooth. This keeps your cookies from getting tough. Bake them until the edges are golden but the centers look soft. They will firm up as they cool. One big mistake is not chilling the dough. If it's too warm, it may spread too much. Another common error is using too much flour. Always measure with a light hand, spooning it into the cup. Lastly, don’t skip the cooling time. Letting cookies cool on the rack helps them set properly. Follow these tips for cookies that are a delight! {{image_2}} You can mix things up with different fillings. Try using peanut butter instead of cream cheese. This adds a nutty twist. You might also enjoy a chocolate ganache. It gives a rich, sweet taste. For a fruity option, blend in mashed bananas or berries. Each filling brings its own flavor. Feel free to explore what you love! Spices can change the whole cookie vibe. Instead of cinnamon, try nutmeg for warmth. Allspice can add a hint of spice and depth. If you want something fresh, use cardamom. Just a pinch can brighten the flavor. Experiment with your favorite spices to create unique tastes. You might find a new favorite! If you want to change the base, try oatmeal cookie dough. It adds texture and a wholesome feel. You can also use a chocolate chip cookie dough for a sweet surprise. For a healthier option, consider using almond flour dough. It helps keep the cookies gluten-free. There are many ways to tweak the dough for your taste! To keep your caramel apple cheesecake stuffed cookies fresh, store them in an airtight container. Place parchment paper between layers to avoid sticking. They can last up to a week at room temperature. If you want to keep them longer, consider refrigerating them. For long-term storage, these cookies freeze well. First, let them cool completely. Then, wrap each cookie in plastic wrap. Place the wrapped cookies in a freezer-safe bag. They will stay fresh for up to three months. When you're ready to enjoy, just thaw them in the fridge overnight. To reheat, preheat your oven to 350°F (175°C). Place the cookies on a baking sheet and heat for about 5-7 minutes. This helps restore their soft texture. For a quick fix, you can also warm them in the microwave for about 10-15 seconds. Enjoy the gooey filling! Yes, you can use different apples. Granny Smith apples are tart and work well. Fuji or Honeycrisp apples add more sweetness. Choose apples based on your taste. Look for lightly golden edges. The centers should be set but soft. A toothpick should come out clean when poked in the cookie, but it’s okay if some filling sticks. Yes, you can prepare the cookie dough ahead. Chill the dough in the fridge for up to 24 hours. Just scoop and bake when you're ready for fresh cookies! You can use a dairy-free cream cheese. Greek yogurt also works, but it may change the taste. Silken tofu blended until smooth is a great vegan option. Absolutely! Use a gluten-free all-purpose flour blend. Make sure it has xanthan gum for better texture. This way, you can enjoy these cookies gluten-free. These cookies are a delightful mix of flavors and textures. We covered all the main ingredients and steps to bake them. Remember to carefully assemble the filling and keep an eye on the baking time. Feel free to mix in alternative fillings or spices to make these cookies your own. Proper storage will keep them fresh for later enjoyment. Enjoy your baking and create sweet treats that everyone will love!

Caramel Apple Cheesecake Stuffed Cookies Delight

If you love the sweet taste of fall, you’ll adore these Caramel Apple Cheesecake Stuffed Cookies! Imagine warm, chewy cookies

- 2 cans (15 oz each) chickpeas, rinsed and drained - 4 tablespoons olive oil - 4 cloves garlic, minced - Zest of 1 lemon - 1/4 cup fresh lemon juice - 1 teaspoon dried oregano - 1/2 teaspoon cumin - 1/4 cup feta cheese, crumbled (optional) - 2 tablespoons fresh parsley or dill, chopped - Salt and pepper to taste The key to making Lemon Garlic Greek Chickpeas lies in the fresh and simple ingredients you choose. First, chickpeas serve as a hearty base. They pack protein and fiber, making them a filling option for any meal. Olive oil adds richness and depth. It helps the garlic become fragrant when sautéed. Garlic is essential for that bold flavor. The minced garlic will infuse the dish with a warm, savory note. Next, we elevate the flavor with lemon juice and zest. The zest adds a bright, tangy twist. Fresh lemon juice provides a refreshing acidity. Dried oregano and cumin bring warmth and earthiness. Together, they create a delightful Mediterranean profile. Feta cheese is optional, but it adds creaminess and a salty kick. For garnishing, fresh herbs like parsley or dill brighten the dish. Finally, salt and pepper ensure that every bite bursts with flavor. By using these ingredients, you create a dish that is not only tasty but also healthy. Each component plays a vital role in crafting a balanced and vibrant meal. {{ingredient_image_1}} - Start by rinsing and draining two cans of chickpeas. This removes extra salt and improves flavor. - Next, mince four cloves of garlic. The garlic adds a strong, tasty kick. - Prepare one lemon by zesting it and squeezing out a quarter cup of juice. Fresh lemon brightens the dish. - Heat four tablespoons of olive oil in a large skillet over medium heat. This oil will help flavor the chickpeas. - Once the oil is warm, add the minced garlic. Sauté for one to two minutes until it smells great. Be careful not to burn it, as burnt garlic can taste bitter. - Now, stir in the rinsed chickpeas. Cook them for five to seven minutes. This browning adds a nice texture. - Add the lemon zest, lemon juice, one teaspoon of dried oregano, half a teaspoon of cumin, and salt and pepper to taste. Mix well to coat the chickpeas. - Continue cooking for another three to five minutes until everything is hot and the chickpeas are crispy. - If you like, sprinkle crumbled feta cheese on top before serving. - Garnish with fresh parsley or dill for a beautiful finish. To achieve the perfect sauté, heat olive oil in your skillet over medium heat. When the oil shimmers, add the minced garlic. Sauté for 1-2 minutes until it smells great, but don’t let it burn. This will give your dish a lovely flavor. For crispy chickpeas, stir in the rinsed chickpeas after the garlic. Cook them for 5-7 minutes. Let them brown slightly, which adds texture. A little patience here helps achieve that nice crunch. Adjusting seasonings can make a big difference. Taste your dish while cooking. If it needs more zing, add salt or pepper. You can also mix in more lemon juice for a fresh taste. Customizing acidity with lemon is key. The zest adds a fragrant punch, while the juice gives a tangy kick. Feel free to tweak the amounts to match your taste. For ideal pairings, serve these chickpeas with crusty bread or a fresh salad. They make a great side dish or main course. You can even toss them in wraps for a quick meal. For presentation, serve the chickpeas warm in a shallow bowl. Drizzle with a bit more olive oil and sprinkle fresh herbs on top. This makes the dish vibrant and inviting. It’s all about making your food look as good as it tastes! Pro Tips Tip Title: Use Fresh Ingredients: Whenever possible, opt for fresh garlic and herbs to enhance the flavors of the dish. Tip Title: Adjust the Seasoning: Don't hesitate to taste and adjust the seasoning as you cook to achieve your desired flavor balance. Tip Title: Crispy Chickpeas: For extra crispiness, consider broiling the chickpeas for a couple of minutes after cooking. Tip Title: Pairing Suggestions: This dish pairs wonderfully with grilled meats or as a topping for a grain bowl. {{image_2}} You can easily change the chickpeas. Try black beans or lentils. These swaps give new flavors and textures. If you want a vegan dish, skip the feta cheese. This keeps the meal plant-based and delicious. For some heat, add red pepper flakes. They bring a nice kick to the dish. You can also use herbs like thyme or rosemary. These herbs add depth and a fresh taste to your meal. Serve these chickpeas as a salad topping. They add a hearty boost to any salad. You can also use them in wraps or with grains. They pair well with rice or quinoa, making a filling meal. To keep your Lemon Garlic Greek Chickpeas fresh, store them in an airtight container. Make sure they cool down to room temperature before sealing. This helps prevent moisture build-up. They will last in the fridge for about 3 to 5 days. If you want to enjoy them later, be sure to check for any changes in smell or texture before eating. If you want to store your chickpeas for a longer time, freezing is a great option. Place them in a freezer-safe bag or container. Remove as much air as you can to avoid freezer burn. These chickpeas can last up to 3 months in the freezer. When you're ready to eat, thaw them overnight in the fridge or use the microwave on the defrost setting for quicker results. To reheat your chickpeas, use a skillet over medium heat. Add a splash of olive oil to help them regain their crispiness. Stir occasionally to heat evenly. You can also reheat them in the oven at 350°F (175°C) for about 10-15 minutes. This method keeps them crispy and delicious, making them a perfect addition to any meal. If you don't have chickpeas, you can use other beans. Great options include black beans, cannellini beans, or lentils. Each brings a unique taste and texture. For a nutty flavor, try using edamame. Yes, you can prepare this dish ahead of time. Cook the chickpeas and let them cool. Store them in the fridge for up to three days. Reheat before serving for the best flavor. You can also serve them cold as a salad. This recipe is perfect for meal prep. You can easily double the batch. Store the chickpeas in separate containers. They pair well with rice, quinoa, or salad greens. Enjoy them throughout the week for quick meals! This recipe highlights key ingredients like chickpeas, olive oil, and garlic. You learned how to enhance flavors with lemon and spices while keeping it easy and fun. I shared tips for perfect texture and delicious serving ideas. Experiment with variations and enjoy this dish in different ways. Remember, you can adjust the flavors to fit your taste. Storing leftovers correctly keeps your meal fresh and tasty. Try it out, and enjoy making this dish your own!

Lemon Garlic Greek Chickpeas Healthy Flavor Boost

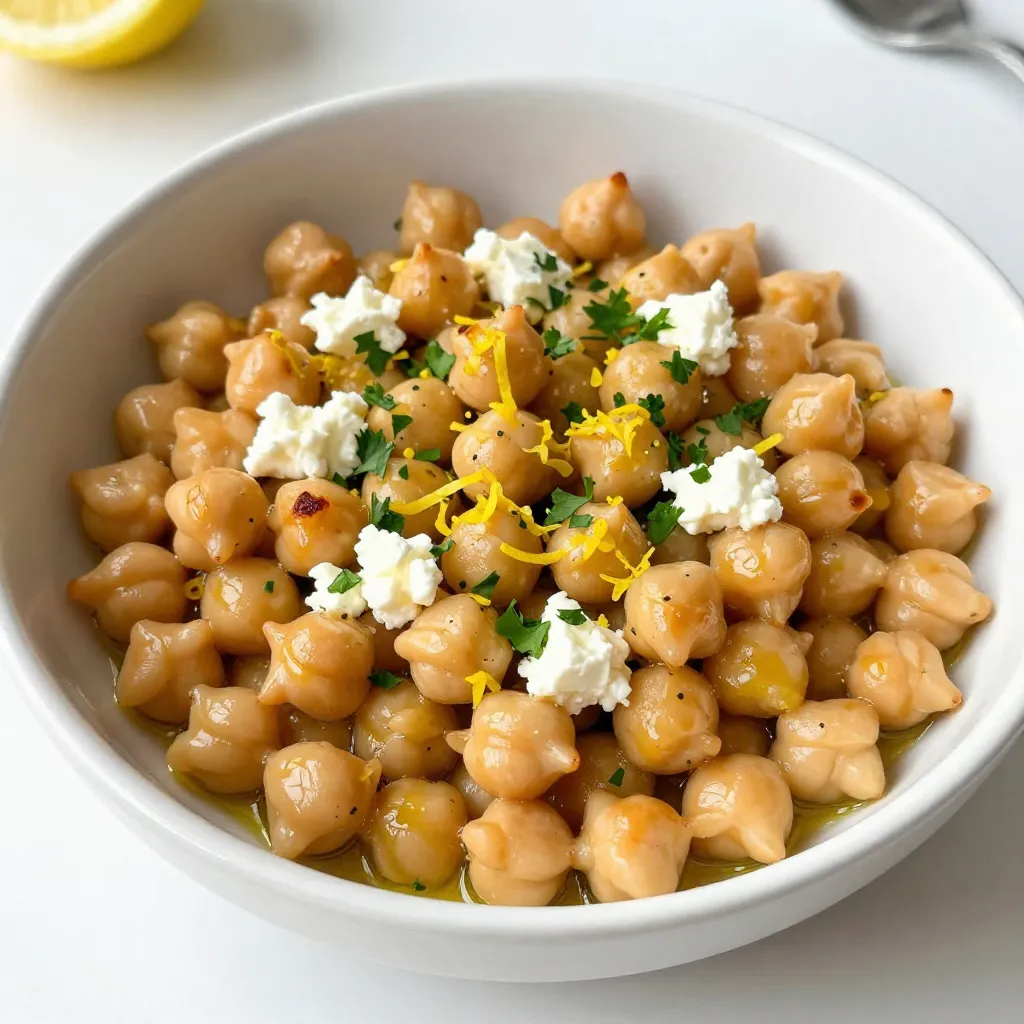
Looking to spice up your meals with healthy, bold flavors? Try my Lemon Garlic Greek Chickpeas! This easy dish is

Older posts
Newer posts
← Previous Page1 … Page16 Page17 Page18 … Page86 Next →

dsad

© 2026 Cooking Wells • Built with GeneratePress

Our Policies

  • Copyright Policy
  • Cookie Policy
  • GDPR Policy
  • Privacy Policy
  • Disclaimer
  • Terms Of Use

More Information

  • Home
  • About
  • Contact
  • Appetizers
  • Dessert
  • Dinner
  • Drinks
©2026, Cooking Wells About Back To Top