Skip to content
DisclaimerTerms Of UseGDPR PolicyCookie Policy

Cooking Wells

  • Home
  • Drinks
  • Appetizers
  • Dinner
  • Dessert
  • About
  • Contact
  • Privacy Policy
DisclaimerTerms Of UseGDPR PolicyCookie Policy

NO-ING-IMG

- 1 cup frozen pineapple chunks - 1 banana, sliced - 1 cup coconut milk (or any plant-based milk) - 1 tablespoon maple syrup (optional) - 1 tablespoon chia seeds - ¼ cup granola (for topping) - 2 tablespoons shredded coconut (for garnish) - Fresh mint leaves (for garnish) To start, you need some key ingredients for this smoothie bowl. Frozen pineapple chunks give your bowl a cool, tropical taste. A banana adds a creamy texture and natural sweetness. Coconut milk makes it rich and smooth. If you like it sweeter, you can add maple syrup. Chia seeds are great for nutrition and add a nice crunch. Granola gives a delightful topping, adding a nice bite. Shredded coconut on top brings extra flavor and texture. Finally, fresh mint leaves add a pop of color and freshness. These ingredients work together to create a vibrant, tasty dish. You can mix and match based on your taste. The pineapple and coconut make this bowl feel like a vacation in your mouth! Enjoy the bright flavors and healthy benefits with every spoonful. {{ingredient_image_1}} To start, gather your ingredients. You need frozen pineapple chunks, a sliced banana, and coconut milk. If you like sweetness, add some maple syrup. In a blender, mix the frozen pineapple, banana, coconut milk, and maple syrup. Blend this mix on high speed. Make sure it turns smooth and creamy. If it's too thick, add more coconut milk. Blend again until you get your ideal texture. Once the smoothie base is ready, pour it into a bowl. Take your time to make it look nice. Next, sprinkle chia seeds over the top. These seeds add a nice crunch and are good for you. Now comes the fun part! Sprinkle granola and shredded coconut on the smoothie. Make sure to spread them evenly for a great look. Finally, add fresh mint leaves on top. They give a nice touch and smell wonderful. Serve your smoothie bowl right away. Enjoy the fresh and tasty flavors! To get a creamy smoothie, blend frozen pineapple chunks with a sliced banana. Use one cup of coconut milk for a rich texture. If your smoothie is too thick, add more coconut milk. Blend on high speed until smooth. This helps break down the fruit well. No lumps should remain for a perfect bowl. If you want it sweeter, add maple syrup. You can also use other natural sweeteners. Honey or agave syrup works too. Start with one tablespoon and taste. Adjust to your liking. This will enhance the tropical flavor and balance the tartness of the pineapple. Serving your smoothie bowl well makes it fun. Pour the smoothie into a bowl, then sprinkle chia seeds on top. Add granola for crunch and shredded coconut for a touch of flair. Finish with fresh mint leaves for a pop of color. This makes your bowl look inviting and fresh. Enjoying your creation is part of the fun! Pro Tips Use Fresh Ingredients: For the best flavor, opt for fresh pineapple and ripe bananas when possible, as they enhance the natural sweetness and taste of your smoothie bowl. Adjust Consistency: If you prefer a thicker smoothie bowl, reduce the amount of coconut milk. For a thinner consistency, gradually add more until you reach your desired texture. Experiment with Toppings: Get creative with your toppings! Consider adding nuts, seeds, or different fruits to customize your smoothie bowl to your taste. Chill Your Bowl: For an extra refreshing experience, chill your bowl in the freezer for 10-15 minutes before serving. This keeps your smoothie bowl cold and enjoyable. {{image_2}} You can mix in other tropical fruits for fun. Try adding mango, kiwi, or papaya. Each fruit brings its own taste and color. These fruits blend well with the pineapple and banana. They also add extra vitamins and nutrients. You can even use berries for a twist. Strawberries or blueberries can add a nice tart flavor. Don't be afraid to experiment with your favorites! Toppings make your bowl special. You can use nuts like almonds, cashews, or walnuts. They add a nice crunch. Seeds like pumpkin or sunflower seeds also work well. They boost the health factor too. Dried fruits, like raisins or cranberries, add sweetness. You can mix and match to find your perfect combo. The choices are endless, so get creative! If you want to try different milks, go for it! Almond milk or oat milk can change the flavor. Coconut milk gives a rich, creamy taste. You can also try cashew milk for a nutty twist. Each milk brings its unique style. This way, you can make the smoothie bowl fit your taste. Choose what you love best! To store any leftover smoothie, pour it into a clean jar. Seal it tightly. Place it in the fridge. It keeps well for up to two days. If you want to save it longer, consider freezing. Smoothies lose some creaminess after being stored, so give it a good stir before serving. Yes, you can freeze the smoothie base! Just pour it into an ice cube tray or a freezer-safe bag. If you use a bag, flatten it for easy storage. When you want to enjoy it, thaw it in the fridge overnight. You can also blend the frozen cubes with a little coconut milk for a quick treat. The smoothie bowl stays fresh for about 24 hours in the fridge. If you freeze it, it can last up to a month. However, for the best taste and texture, enjoy it fresh! Always check for changes in smell or color before consuming leftovers. A smoothie bowl is a thick smoothie served in a bowl. You eat it with a spoon, not a straw. It has a creamy texture and is often topped with fruits, seeds, and nuts. Smoothie bowls are colorful and fun to make. They let you get creative with your toppings. You can use any fruit you like, such as bananas, berries, or mangoes. The base is usually made from blended fruits and liquids like coconut milk. Yes, you can make a smoothie bowl ahead of time. Blend your ingredients and store them in the fridge. It stays fresh for about one day. However, it’s best to top it right before serving. If you want to freeze it, pour the mixture into a freezer-safe container. It can last for a month. When you’re ready to eat, let it thaw in the fridge overnight. Blend it again to get the right texture. Yes, there are many health benefits. Pineapple is full of vitamin C, which helps your immune system. Bananas give you potassium, which is good for your heart. Coconut milk adds healthy fats that keep you full. Chia seeds are a great source of fiber and protein. They help with digestion and keep you energized. Using natural sweeteners like maple syrup can reduce added sugars in your diet. Overall, this smoothie bowl is a tasty way to eat healthy! You learned how to make a delicious smoothie bowl with easy steps. We covered key ingredients, like frozen fruits and coconut milk, for a creamy base. I shared tips to tweak sweetness and add fun toppings. You can even explore different fruits or dairy-free options. With proper storage, you can enjoy leftovers too. Embrace the creativity in making your smoothie bowl, and feel the joy of crafting your healthy treat. Enjoy your smoothie bowl adventure and keep experimenting!

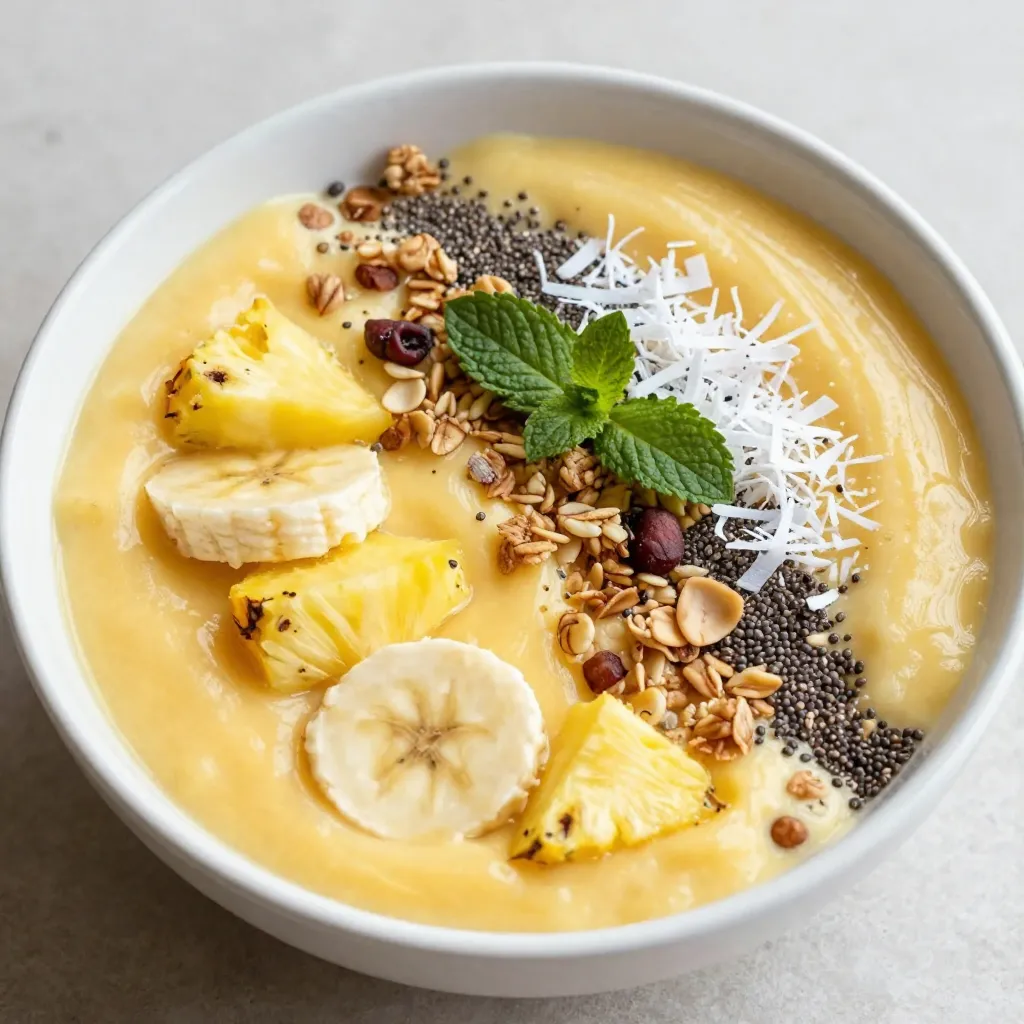
Pineapple Coconut Smoothie Bowl Refreshing and Healthy

Get ready for a tropical treat with my Pineapple Coconut Smoothie Bowl! This bowl is not only refreshing but also

To make oatmeal raisin breakfast cookies, you need simple, wholesome ingredients. Here’s what you will need: - 1 cup rolled oats - 1/2 cup whole wheat flour - 1/2 teaspoon baking soda - 1/2 teaspoon ground cinnamon - 1/4 teaspoon salt - 1/4 cup coconut oil, melted - 1/4 cup maple syrup or honey - 1/4 cup unsweetened applesauce - 1 teaspoon vanilla extract - 1/2 cup raisins - 1/4 cup chopped walnuts (optional) - 1/4 cup dark chocolate chips (optional) These ingredients work together to create a cookie that is both tasty and nutritious. The rolled oats provide fiber, while whole wheat flour adds nutrients. Baking soda helps the cookies rise, and cinnamon gives a warm flavor. The coconut oil keeps them moist, and the maple syrup or honey adds sweetness. Applesauce is a great way to keep the cookies soft. Raisins add a natural sweetness, and walnuts or chocolate chips can give a fun twist. You can mix and match these to fit your taste. Remember, the key is to enjoy the process and make these cookies your own! {{ingredient_image_1}} First, set your oven to 350°F (175°C). This temperature helps the cookies bake evenly. While the oven heats, line a baking sheet with parchment paper. This step keeps the cookies from sticking and makes for easy cleanup. Next, in a large bowl, mix the dry ingredients. Add 1 cup of rolled oats, 1/2 cup of whole wheat flour, 1/2 teaspoon of baking soda, 1/2 teaspoon of ground cinnamon, and 1/4 teaspoon of salt. Stir these together well. This mix gives your cookies structure and flavor. In a different bowl, whisk together the wet ingredients. Combine 1/4 cup of melted coconut oil, 1/4 cup of maple syrup or honey, 1/4 cup of unsweetened applesauce, and 1 teaspoon of vanilla extract. Whisk until everything blends smoothly. This mixture adds moisture and sweetness to your cookies. Now, pour the wet mixture into the dry ingredients. Mix them gently until just combined. Be careful not to over-mix. This keeps the cookies tender and chewy. Finally, scoop out tablespoon-sized portions of dough. Place them on the prepared baking sheet, leaving about 2 inches between each one. Flatten them slightly with the back of a spoon. Bake for 12-15 minutes. You want the edges to turn golden brown. Let them cool for about 5 minutes on the sheet before moving them to a wire rack. Enjoy your delicious oatmeal raisin breakfast cookies! To make chewy cookies, use rolled oats instead of instant oats. Rolled oats add a nice texture. Also, do not over-bake them. Bake until the edges are golden but the centers are soft. Let them cool on the baking sheet for a few minutes. This helps them stay chewy. When mixing, combine dry and wet ingredients gently. Over-mixing can make cookies tough. Mix until you just see the flour disappear. Add in your raisins and nuts last. Folding them in keeps the dough light and fluffy. Store your cookies in an airtight container. This keeps them soft for days. You can also place a slice of bread in the container. The bread helps maintain moisture. If you want to freeze cookies, wrap them tightly in plastic wrap. This keeps them fresh for up to three months. Pro Tips Store in an Airtight Container: To keep your cookies fresh, store them in an airtight container at room temperature for up to a week. Customize Your Add-ins: Feel free to swap out raisins for other dried fruits, or add in seeds like pumpkin or sunflower for extra nutrition. Adjust Sweetness to Taste: If you prefer sweeter cookies, increase the amount of maple syrup or honey to suit your palate. Make Ahead: You can prepare the dough in advance and refrigerate it for up to 3 days before baking for a quick breakfast option. {{image_2}} You can use different sweeteners in these cookies. Maple syrup adds a rich flavor. Honey works just as well. If you want a lower sugar option, try agave nectar or stevia. Each sweetener gives a unique taste, so experiment! Add more texture and flavor with different ingredients. Chopped nuts, like almonds or pecans, bring a nice crunch. Seeds, such as chia or flaxseeds, boost nutrition. Dried cranberries or apricots can replace raisins for a fruity twist. Dark chocolate chips add sweetness and richness. To make these cookies gluten-free, swap whole wheat flour for gluten-free flour. Almond flour or oat flour are great choices. Just ensure the oats are certified gluten-free. Your cookies will still be tasty and chewy! You can easily make these cookies vegan. Replace honey with maple syrup or agave. Use a flax egg by mixing one tablespoon of ground flaxseed with three tablespoons of water. Let it sit for five minutes to thicken. This will bind your cookies without eggs! Each oatmeal raisin breakfast cookie has about 130 calories. This makes them a great choice for a light breakfast or snack. They contain healthy fats and natural sugars, which provide energy. - Rolled oats: Packed with fiber, they help keep you full. - Whole wheat flour: Offers more nutrients than white flour. It supports heart health. - Coconut oil: Provides healthy fats that can boost energy. - Maple syrup or honey: Naturally sweetens without refined sugar. - Applesauce: Adds moisture and reduces fat in the recipe. - Raisins: A great source of iron and antioxidants. - Walnuts: Rich in omega-3 fatty acids, good for your brain. - Dark chocolate chips: Adds a touch of sweetness and antioxidants. Enjoy these cookies with a glass of cold almond milk. You can also pair them with yogurt and fresh fruit. For a fun twist, crumble them over oatmeal or a smoothie bowl. Yes, you can make these cookies without eggs. The applesauce acts as a great egg substitute. It adds moisture and helps bind the ingredients. Use 1/4 cup of applesauce to replace one egg. Store leftover cookies in an airtight container. This keeps them fresh and soft. You can keep them at room temperature for up to a week. Make sure they cool completely before storing. Yes, you can freeze these cookies! Once they cool, place them in a freezer-safe bag. They can last up to three months in the freezer. Just thaw them at room temperature when you're ready to eat. These cookies are perfect on their own. You can also pair them with yogurt or fresh fruit. For a fun twist, serve them with a glass of almond milk. They make a great grab-and-go breakfast! These cookies last about a week at room temperature. If you store them in the fridge, they may last up to ten days. For the best taste, enjoy them fresh! You now know how to make tasty oatmeal raisin cookies. We reviewed each ingredient and step, so you'll get it right. Think about the tips for extra chewiness and freshness. You can even try variations to suit your taste, like gluten-free or vegan options. These cookies are not just good; they also pack healthy benefits. Enjoy baking and sharing them with others. You’ll love how simple and fun it is to create this delicious treat!

Oatmeal Raisin Breakfast Cookies Tasty and Nutritious

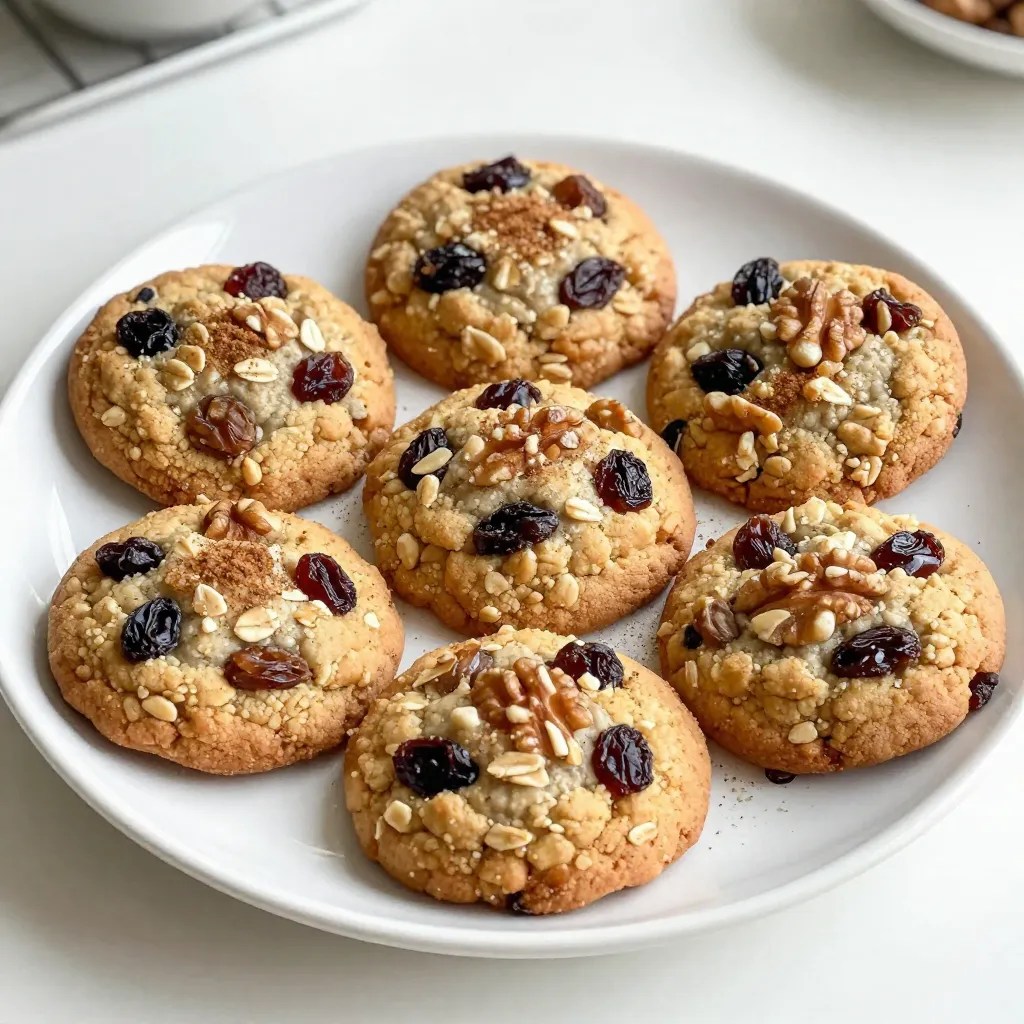
Looking for a quick breakfast that’s both tasty and good for you? Oatmeal Raisin Breakfast Cookies are the perfect solution!

- 2 chicken breasts, diced - 1 ripe mango, diced - 1 habanero pepper, finely chopped - 1 small red onion, diced - 1 tablespoon olive oil - 1 lime, juiced - 2 cloves garlic, minced - 1 teaspoon cumin - 1 teaspoon smoked paprika - Salt and pepper to taste - 8 small corn tortillas - Fresh cilantro - Avocado slices - Optional garnishes Mango Habanero Chicken Tacos are vibrant and full of flavor. They combine juicy chicken with sweet mango and spicy habanero. The red onion adds a nice crunch. For the main ingredients, I like to use fresh chicken breasts. They cook well and absorb all the flavors. A ripe mango gives the dish its sweetness. The habanero adds heat, so you can adjust it based on your taste. A small red onion brings a bit of zest and color. In the additional ingredients, olive oil helps cook the chicken nicely. The lime juice brightens up the flavors. Garlic, cumin, and smoked paprika add depth and warmth. Season with salt and pepper to taste. Finally, the suggested toppings make these tacos even better. Fresh cilantro adds a burst of freshness. Avocado slices provide creaminess. You can also add other garnishes if you like. These ingredients create a tasty meal that is quick and easy to prepare. {{ingredient_image_1}} To start, grab a bowl. You will need the diced chicken, lime juice, cumin, smoked paprika, salt, and pepper. Combine all these ingredients in the bowl. Mix them well so the chicken is coated. Let the chicken marinate for at least 30 minutes. This helps the flavors soak in. Next, heat olive oil in a skillet over medium heat. Once hot, add the marinated chicken. Cook it for about 6-8 minutes. You want it to be fully cooked and golden brown. In the last minute, add the minced garlic for extra flavor. Stir it well to mix the garlic with the chicken. Now, it’s time to make the mango habanero salsa. In a separate bowl, mix the diced mango, chopped habanero, diced red onion, and a squeeze of lime juice. Stir gently to blend all the ingredients. Let it sit for a few minutes. This allows the flavors to meld together nicely. For the tortillas, use a dry skillet. Warm them for about 1 minute on each side. This makes them pliable and slightly toasted. You want them soft but not too crispy. This way, they hold all the tasty fillings without tearing. Finally, it’s time to assemble your tacos. Take a warm tortilla and add a portion of the cooked chicken. Top it with the mango habanero salsa. For extra flavor, garnish with fresh cilantro and avocado slices. Serve the tacos on a colorful plate. Add lime wedges on the side for a zesty touch. You can change the heat of your tacos. If you want less heat, use less habanero. You can also try using jalapeños or bell peppers for a milder kick. If you crave more spice, add more habanero or sprinkle in some cayenne pepper. Garnish your tacos for a pretty look. Use fresh cilantro, avocado slices, or lime wedges. Serve on colorful plates to catch the eye. You can even add extra salsa in small bowls for dipping. This makes your meal fun and inviting! Be careful not to overcook the chicken. It should be juicy and tender, not dry. Keep an eye on it while cooking. Also, warm your tortillas properly. If they are too cold or not pliable, they may break apart. A good tortilla makes all the difference in your taco experience! Pro Tips Marination Matters: Ensure the chicken is marinated long enough to absorb the flavors. If you have time, marinate it for a few hours or even overnight for the best results. Adjust the Heat: The habanero can be quite spicy! If you're unsure about the heat level, start with half and taste the salsa before adding more. Perfect Tortilla Technique: Warming the tortillas in a skillet enhances their flavor and texture. Keep them warm in a clean kitchen towel after warming to prevent them from drying out. Fresh is Best: Use ripe mango for the salsa to ensure sweetness and juiciness. If possible, buy mangoes that smell fragrant and have a slight give when pressed. {{image_2}} You can make Mango Habanero Chicken Tacos vegetarian. Just swap the chicken for plant-based options. I love using jackfruit, tofu, or tempeh. These options soak up flavors well. They give you a tasty, meat-like bite. Use my marination mix on them. This way, you keep the sweet and spicy taste. You can also play with flavors in your tacos. Try different fruits like pineapple or peach. They add a sweet twist. For a zesty kick, add diced jalapeños or red pepper flakes. You can also mix in fresh herbs like mint or basil for a fresh taste. Experiment with spices too. Add chili powder or coriander for depth. Pair your tacos with fun sides. I suggest a fresh salad with lime dressing. You can also serve corn on the cob or black beans. For drinks, try a cold cerveza or a fruity mocktail. They balance the spice nicely. You can even add a side of creamy avocado dip for extra flavor. After enjoying your mango habanero chicken tacos, you may have leftovers. To keep them fresh, store the tacos in an airtight container. Place the chicken, salsa, and tortillas separately. This helps maintain their texture and flavor. Refrigerate them within two hours of cooking. You can safely store them for up to three days. When you’re ready to enjoy leftovers, reheating is key. For the chicken, use a skillet on low heat. This warms the chicken and keeps it juicy. Stir often to avoid burning. For the tortillas, warm them in a dry skillet for about 30 seconds on each side. This will keep them soft and pliable. Avoid using a microwave, as it can make the tortillas tough. You can freeze the chicken and salsa, but not the tortillas. Place the chicken and salsa in freezer-safe bags. Make sure to remove as much air as possible. You can freeze them for up to three months. When ready to eat, thaw them in the fridge overnight. Reheat the chicken and prepare fresh tortillas for a perfect meal. If you want less heat, try jalapeño or poblano peppers. Both offer great flavor with less spice. For more heat, consider using serrano peppers. They can add more kick without going overboard. Chicken is safe to eat when it reaches an internal temperature of 165°F. Use a meat thermometer to check the thickest part. The meat should also be white, not pink. Juices should run clear when cut. You can use pork, beef, or shrimp instead of chicken. Each option will change the taste but keep it delicious. Ground turkey or tofu works well for a lighter choice. Be sure to adjust cooking times as needed. Leftovers can stay fresh in the fridge for up to three days. Store them in an airtight container. When ready to eat, reheat thoroughly to 165°F for safety. In this blog post, we covered how to make delicious chicken tacos with mango habanero salsa. We discussed the key ingredients, from chicken breasts to fresh mango and habanero pepper. I shared tips on marinating and cooking the chicken, as well as how to prepare the salsa and warm tortillas. Remember to adjust spice levels for your taste and avoid common mistakes. Overall, these tacos are flavorful and fun. Experiment with variations and enjoy serving them with your favorite sides. Happy cooking!

Mango Habanero Chicken Tacos Flavorful and Quick Meal

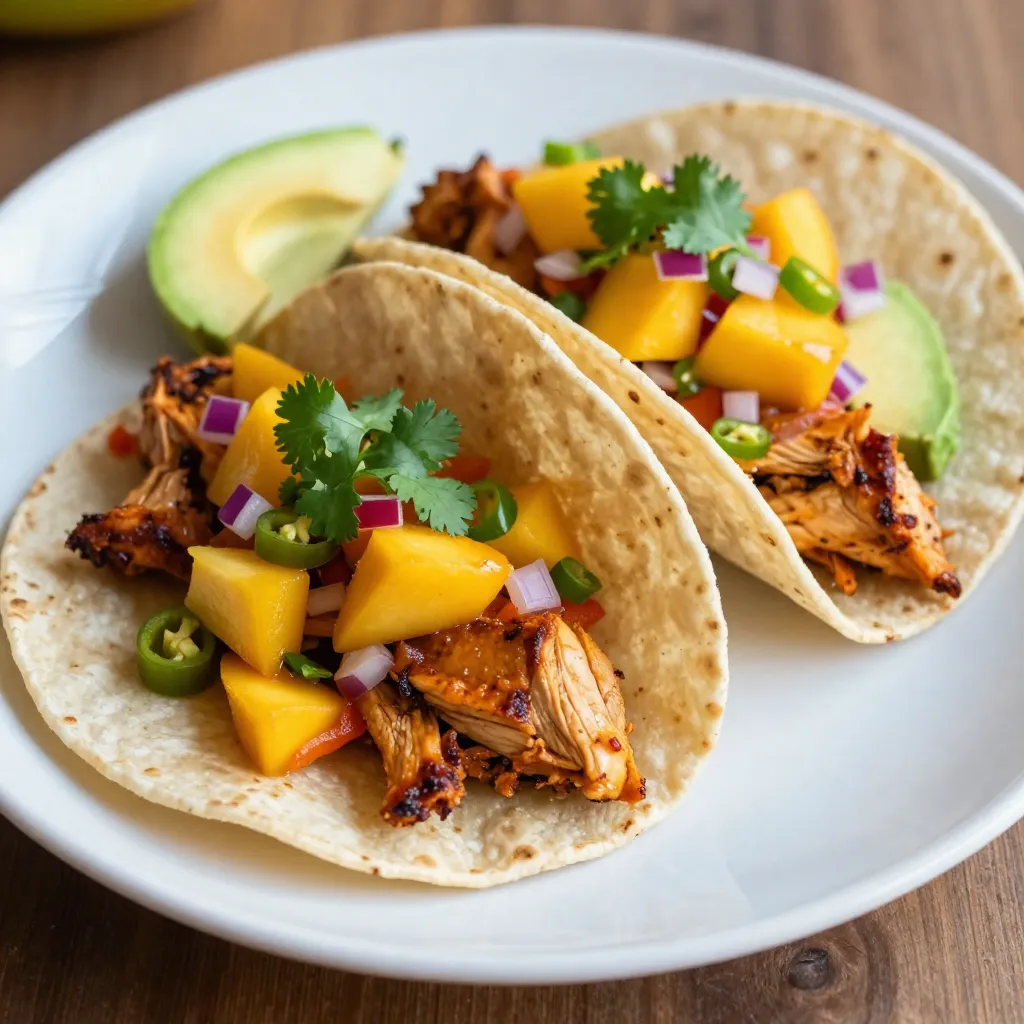
Dive into the delicious world of Mango Habanero Chicken Tacos! This meal packs a punch with juicy chicken, sweet mango,

To make the Chocolate Strawberry Icebox Cake, you need: - 1 lb fresh strawberries, sliced - 2 cups heavy whipping cream - 1/2 cup powdered sugar - 1 teaspoon pure vanilla extract - 12 ounces chocolate wafer cookies - 2 tablespoons cocoa powder - A pinch of salt - Chocolate shavings or curls, for garnish If you need to swap some ingredients, here are good options: - Heavy whipping cream: You can use coconut cream for a dairy-free option. - Powdered sugar: Granulated sugar works, but blend it to a fine powder first. - Chocolate wafer cookies: Graham crackers make a great substitute. They add a nice crunch. - Cocoa powder: You can use dark cocoa powder for a richer taste. - Vanilla extract: Almond extract can add a unique flavor twist. Fresh strawberries are key to this dessert. They provide a bright flavor and juicy texture. Using ripe, sweet strawberries makes the cake taste amazing. Look for berries that are red and firm. Avoid any that are mushy or have dark spots. Fresh strawberries also add color and make your dessert look beautiful. This cake showcases the fruit's flavor, so choose the best ones! {{ingredient_image_1}} First, grab a large mixing bowl. Add 2 cups of heavy whipping cream. Then, sprinkle in 1/2 cup of powdered sugar. Next, pour in 1 teaspoon of pure vanilla extract. Add 2 tablespoons of cocoa powder and a pinch of salt. Now, use an electric mixer on medium-high speed. Whip until stiff peaks form. This step makes a rich, chocolatey cream. Take a 9x13 inch baking dish. Spread a thin layer of the whipped chocolate cream on the bottom. Next, layer half of the chocolate wafer cookies. You will need about 6-8 cookies. Make sure they slightly overlap. Then, add half of the sliced strawberries over the cookies. Now, spoon on another layer of whipped chocolate cream. Repeat these layers: more cookies, the rest of the strawberries, and finish with the last layer of chocolate cream. Smooth the top layer with a spatula for an even finish. Cover the baking dish with plastic wrap. Put it in the refrigerator for at least 4 hours. For the best results, let it set overnight. This waiting time helps the cookies soften. It also allows the flavors to blend nicely. Before serving, add chocolate shavings or curls on top for a fancy touch. Enjoy your delicious creation! To make whipped cream with stiff peaks, start with cold ingredients. Use heavy whipping cream for the best results. Pour the cream into a mixing bowl. Add powdered sugar, vanilla extract, cocoa powder, and a pinch of salt. Mix on medium-high speed with an electric mixer. Watch closely as it thickens. Stop when you see firm peaks that hold their shape. This texture gives your cake a light and fluffy feel. When serving your cake, slice it into squares for easy portions. Place each square on individual plates. You can add extra strawberry slices on the side. A drizzle of chocolate syrup adds a nice touch. For a fancy finish, sprinkle chocolate shavings or curls on top. This makes your dessert look even more inviting. One common mistake is over-whipping the cream. If you whip too long, it can turn grainy. Keep an eye on the cream as it whips. Another mistake is not letting the cake chill long enough. Chilling helps the cookies soften and flavors meld. Make sure to refrigerate your cake for at least four hours, or better yet, overnight. This way, every bite is smooth and tasty. Pro Tips Whip to Perfect Peaks: Ensure your heavy cream is very cold before whipping, as this helps achieve stiff peaks more easily. Layering Technique: For even layers, press the cookies slightly into the whipped cream before adding the strawberries, allowing for better integration. Flavor Infusion: For an extra flavor boost, consider adding a splash of liqueur, like strawberry or chocolate, to the whipped cream mixture. Chill Time: The longer you chill the cake, the better the flavors meld together, so if possible, let it sit overnight. {{image_2}} You can switch up the fruits in your Chocolate Strawberry Icebox Cake. Raspberries add a nice tart flavor. They pair well with chocolate. Blueberries bring a sweet note and bright color. You can even mix fruits for a fun twist. Just slice them thin like the strawberries. Layer them the same way. Your cake will look and taste amazing! Don’t feel stuck with chocolate wafer cookies. Graham crackers offer a lighter, sweeter taste. They can add a fun crunch to your cake layers. Oreo cookies can give a rich, creamy twist. Just crush them a bit for better layering. Both options will keep the spirit of your cake while adding variety. You can make this cake vegan and dairy-free easily. Use coconut cream or almond milk instead of heavy cream. Both will whip up nicely. For sweetening, try maple syrup or coconut sugar. Swap the chocolate wafer cookies for dairy-free ones. Your cake will still be rich and tasty, perfect for everyone to enjoy! To keep your Chocolate Strawberry Icebox Cake fresh, store it in the fridge. Use an airtight container or cover it tightly with plastic wrap. This helps to lock in moisture and flavor. The cake needs to stay chilled until you serve it. If you leave it out for too long, it can get too soft. You can freeze this cake if you want to save some for later. First, cut the cake into slices. Wrap each slice in plastic wrap. Then, place the wrapped slices in a freezer-safe bag. Make sure to remove as much air as possible to prevent freezer burn. When you want to enjoy it again, just thaw it in the fridge overnight. In the fridge, the cake will last for about 3 to 5 days. It’s best to eat it fresh for the best taste. If you freeze it, aim to eat it within 2 months for the best flavor. There’s no need to reheat the cake. It’s best served cold, as the layers stay firm and delicious. Yes, you can make this cake a day ahead. It tastes even better after resting. The cookies soak up the flavors and soften, making each bite delightful. Just cover it well with plastic wrap to keep it fresh. The cake will last about 3 to 4 days in the fridge. Make sure it stays covered. After that, the cookies may get too soft, and the strawberries might lose their freshness. Yes, you can use store-bought whipped cream. It saves time and works well. Just make sure to choose a brand with good flavor. Homemade whipped cream gives a richer taste, but store-bought is a great shortcut. Yes, you can make a gluten-free version. Look for gluten-free chocolate wafer cookies. Many brands offer tasty options. This way, you can enjoy the cake without gluten. You can also try using gluten-free graham crackers. This post shared how to make a delicious Chocolate Strawberry Icebox Cake. We reviewed the key ingredients and even substitutions. You learned how to prepare whipped cream and layer the cake. I provided tips for stiff peaks and common mistakes to avoid. You also explored ways to personalize the cake with fruits and cookies. Finally, we discussed storage, shelf life, and answered FAQs. Enjoy your baking adventure!

Chocolate Strawberry Icebox Cake Delightful Dessert Recipe

If you’re craving a sweet treat that looks stunning and tastes even better, you’ve found it! My Chocolate Strawberry Icebox

- 1 ½ cups graham cracker crumbs - ½ cup unsweetened shredded coconut - ½ cup unsalted butter, melted - 1 cup sweetened condensed milk - 1 cup fresh raspberries (or frozen, thawed and drained) - 1 cup semi-sweet chocolate chips - ½ cup chopped walnuts or pecans (optional) - ½ teaspoon vanilla extract - A pinch of salt For this recipe, you will need precise measurements to get the best results. Use 1 ½ cups of graham cracker crumbs to form a solid base. You will also need ½ cup of unsweetened shredded coconut to add flavor and texture. Melt ½ cup of unsalted butter to bind the crust together. The sweetened condensed milk requires 1 cup to make the layers creamy and sweet. Fresh raspberries bring a burst of flavor, so make sure to use 1 cup. You will want 1 cup of semi-sweet chocolate chips for that rich taste. If you like nuts, add ½ cup of chopped walnuts or pecans. Lastly, you will need ½ teaspoon of vanilla extract and a pinch of salt to enhance the flavors. You can customize your Raspberry Coconut Magic Bars with a few optional add-ins. Consider adding: - ½ cup of chopped nuts for crunch. - A sprinkle of sea salt on top for contrast. - A few white chocolate chips for a different sweetness. - A dash of almond extract for a unique twist. Feel free to mix and match these add-ins to make the bars your own! {{ingredient_image_1}} Start by preheating your oven to 350°F (175°C). Prepare a 9x9-inch baking pan. You can grease it or line it with parchment paper. This makes it easy to remove the bars later. Next, take a medium bowl. Add 1 ½ cups of graham cracker crumbs and ½ cup of shredded coconut. Pour in ½ cup of melted unsalted butter. Add a pinch of salt. Mix everything well until it looks like wet sand. Now, press this mixture into the bottom of the pan. Use your hands or the back of a measuring cup to pack it down firmly. This will be your crust. Once your crust is ready, pour 1 cup of sweetened condensed milk evenly over it. Use a spatula to spread it out. Next, scatter 1 cup of fresh raspberries on top. You can also use thawed, frozen raspberries if fresh ones are not available. Then, sprinkle 1 cup of semi-sweet chocolate chips over the raspberries. If you like nuts, add ½ cup of chopped walnuts or pecans now. Drizzle ½ teaspoon of vanilla extract on top. Gently press the toppings into the mixture. This helps them stick better. Place the pan in the oven and bake for 25-30 minutes. Keep an eye on it. You want the edges to be golden and the center to bubble slightly. When done, take the pan out of the oven. Let it cool completely in the pan. This step is super important. It helps the layers set well. For the best results, put the bars in the fridge for at least one hour after cooling. This makes cutting them easier and cleaner. Once chilled, cut into squares. Enjoy your delicious raspberry coconut magic bars! To make the best Raspberry Coconut Magic Bars, start by greasing your pan well. This helps the bars come out easily. Use parchment paper for extra ease. Make sure to press the crust firmly. A good base holds everything together. Bake until the edges are golden. This shows they are done. Let the bars cool completely before cutting. This makes slicing easier and keeps them neat. If you don't have graham cracker crumbs, use crushed cookies or oats. For a nut-free version, skip the nuts or use seeds. Unsweetened coconut can replace sweetened coconut. If you want less sweetness, reduce the sweetened condensed milk. You can also use almond or oat milk as a base for a lighter option. Cut the bars into small squares for easy serving. They are great for parties or family snacks. To impress guests, dust them with powdered sugar. You can also top them with extra raspberries or a drizzle of chocolate. Pair these bars with a scoop of vanilla ice cream for a yummy dessert. Pro Tips Use Fresh Raspberries: For the best flavor and texture, opt for fresh raspberries when in season. If using frozen, make sure to thaw and drain them well to avoid excess moisture. Pack the Crust Tightly: Ensure that the graham cracker crust is packed tightly in the pan. This will help it hold together better when cutting into squares. Cool Completely: Allow the magic bars to cool completely in the pan before cutting. For easier slicing, refrigerate them for at least an hour after cooling. Experiment with Nuts: Feel free to mix and match nuts in the recipe. Pecans, walnuts, or even almonds can add a delightful crunch and flavor to your bars. {{image_2}} You can swap raspberries for other fruits. Try blueberries, strawberries, or chopped apples. Each fruit adds a unique taste and color. Blueberries offer a sweet burst. Strawberries give a fresh, juicy flavor. Apples add a nice crunch. Mix and match fruits for fun combinations. To make these magic bars vegan, use coconut oil instead of butter. Replace sweetened condensed milk with a vegan version made from coconut milk. For gluten-free bars, choose gluten-free graham crackers. This way, everyone can enjoy this treat, no matter their diet. Want to change the chocolate? Use milk chocolate or white chocolate chips. You can also mix in chopped dark chocolate for a richer taste. If you're feeling adventurous, try adding cocoa powder to the crust. This gives a chocolatey twist to the base. To keep your Raspberry Coconut Magic Bars fresh, store them in an airtight container. This helps keep moisture in and keeps them from drying out. You can use a glass or plastic container with a lid. If you stack the bars, place parchment paper between them. This prevents sticking and makes it easy to grab one when you want a treat. When stored properly, these bars last about one week at room temperature. If you keep them in the fridge, they can last up to two weeks. You may notice they taste even better after a day or two. The flavors meld together, making each bite more delicious. If you want to save some for later, freezing is a great option. Cut the bars into squares first. Then, wrap each piece tightly in plastic wrap. Place the wrapped bars in a freezer-safe bag or container. They can last up to three months in the freezer. To enjoy, just thaw them in the fridge overnight. Or let them sit at room temperature for a few hours. Yes, you can use frozen raspberries in this recipe. Just make sure to thaw and drain them first. Frozen berries might add extra moisture, so draining is key. It helps keep your bars from being soggy. You still get that sweet, tart flavor in every bite. To make these bars gluten-free, swap the graham cracker crumbs. Use gluten-free graham crackers or almond flour instead. Both work well and keep the texture nice. Always check the labels of your ingredients. This way, you can enjoy these sweet treats without worry. The best way to melt butter is in the microwave. Cut the butter into small pieces and place it in a microwave-safe bowl. Heat in short bursts, about 10-15 seconds at a time. Stir after each burst until it's fully melted. This method prevents splatters and keeps the butter from burning. You can also melt butter on the stove in a small saucepan over low heat. Just keep an eye on it! In this post, I shared key tips for making great bars. We covered ingredients, step-by-step instructions, and smart storage ideas. You learned about baking tips, fruit choices, and how to adapt for diets. With these insights, you can make tasty bars your way. Remember, experimenting leads to new flavors and fun. Enjoy your bar-making journey!

Raspberry Coconut Magic Bars Irresistible Treat Recipe

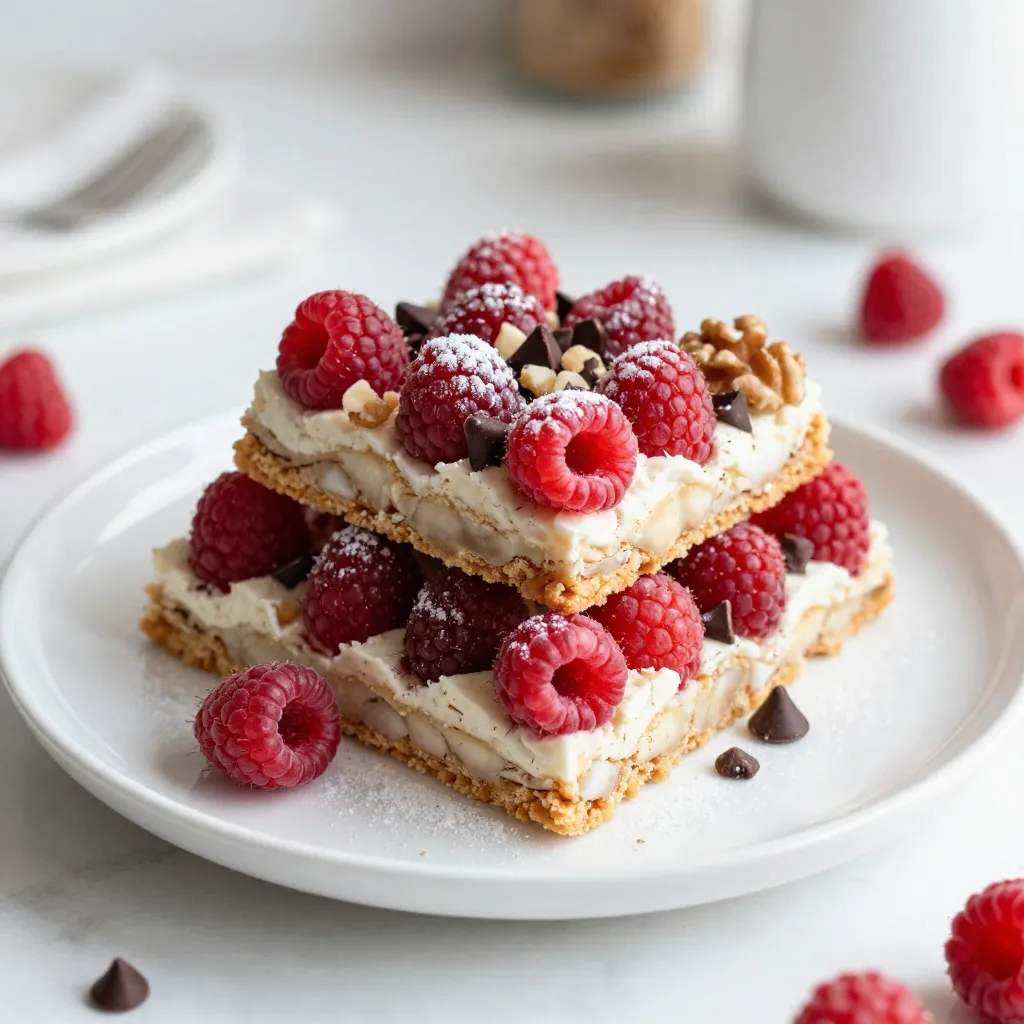
Are you ready for a treat that combines sweet and tart in every bite? My Raspberry Coconut Magic Bars will

- 2 cups rolled oats - 2 cups almond milk (or any milk of choice) - 2 large apples, peeled and diced - 1/3 cup maple syrup (or honey) - 1/4 cup brown sugar - 1 teaspoon cinnamon - 1/2 teaspoon nutmeg - 1/4 teaspoon salt - 1 teaspoon vanilla extract - 1/2 cup walnuts or pecans, chopped (optional) - 1/4 cup raisins or dried cranberries (optional) - Fresh apple slices and additional cinnamon for serving (optional) To make this Apple Cinnamon Oatmeal Bake, gather all the ingredients first. This helps you stay organized. Start with the rolled oats. They form the base of this dish. Next, choose your milk. Almond milk adds a nice flavor, but any milk works. You will need two large apples. Peel and dice them for sweetness and texture. Maple syrup adds a touch of natural sweetness. Honey is a great substitute if you prefer. Brown sugar gives a deeper flavor. Then, grab your spices. Cinnamon and nutmeg bring warmth and comfort. Don't forget the salt! It enhances all the flavors. Vanilla extract adds a lovely aroma. If you like, add nuts for crunch and dried fruit for sweetness. Raisins or cranberries work well. Finally, for serving, you can top it with fresh apple slices and a sprinkle of cinnamon. This dish is not just tasty; it also looks great! {{ingredient_image_1}} 1. Preheat your oven to 350°F (175°C). This helps the bake cook evenly. 2. Lightly grease a 9x9-inch baking dish with cooking spray or butter. This prevents sticking. 1. In a large bowl, combine the rolled oats and almond milk. Mix until smooth. 2. Add the diced apples, maple syrup, brown sugar, cinnamon, nutmeg, salt, and vanilla extract. Stir well to blend everything together. 3. If you want to add nuts or dried fruit, fold them into the mixture now. This adds great texture and flavor. 1. Pour the mixture into the prepared baking dish. Spread it out evenly with a spatula. 2. Bake in the preheated oven for 30-35 minutes. Look for a lightly golden top and a set middle. This means it's ready to eat! To ensure even baking, spread the oatmeal mixture flat in the dish. This helps it cook uniformly. You can also rotate the dish halfway through baking. This simple step prevents any hot spots in your oven. How can you tell when it’s done? Look for a lightly golden top and a firm center. You can insert a toothpick in the middle. If it comes out clean, your oatmeal bake is ready. Topping ideas for your oatmeal bake are endless. I love adding fresh apple slices on top right before serving. A sprinkle of cinnamon enhances the flavor too. You can also drizzle some maple syrup for extra sweetness. Ideal accompaniments include a side of yogurt or a scoop of ice cream. These add creaminess and balance the warm, spiced oats perfectly. Want to add more flavor? Consider adding a pinch of ginger or cloves. They give a nice twist to the classic taste. For dietary needs, you can swap ingredients easily. Use coconut milk to replace almond milk. If you need a nut-free version, leave out the nuts or use seeds instead. Pro Tips Use Fresh Apples: For the best flavor, select crisp, fresh apples. Varieties like Granny Smith or Honeycrisp work wonderfully for baking. Customize Sweetness: Adjust the sweetness of your oatmeal bake by varying the amount of maple syrup or brown sugar according to your taste preferences. Add Spices: Feel free to experiment with additional spices such as ginger or allspice to give your oatmeal bake a unique flavor profile. Store for Later: This dish can be stored in the refrigerator for up to a week. Simply reheat in the microwave for a quick breakfast option! {{image_2}} You can switch out apples for other fruits. Try pears, bananas, or berries. Each fruit adds its own flavor. Berries bring a tart taste, while bananas add creaminess. You can also mix fruits for more fun. Seasonal fruits work great too. In summer, use peaches or plums. In winter, try adding cranberries or citrus. This keeps your bake fresh and exciting all year. Maple syrup is sweet, but you can use honey or agave instead. Each sweetener gives a different touch. If you want less sugar, cut down on the syrup. You can also use mashed bananas for sweetness. This adds moisture and flavor. Consider using stevia or monk fruit for a low-calorie option. These sweeteners work well without adding sugar. Just adjust the amount to fit your taste. To make this dish gluten-free, use certified oats. Quinoa flakes or brown rice flakes can also work. They give a similar texture while keeping it gluten-free. For a vegan version, swap almond milk with soy or oat milk. Use flax eggs instead of regular eggs. Mix one tablespoon of flaxseed meal with three tablespoons of water. Let this sit for a few minutes to thicken. This substitution binds the bake just like eggs do. To keep your Apple Cinnamon Oatmeal Bake fresh, store it properly. - Refrigeration tips: Place any leftovers in an airtight container. This helps to keep moisture in and flavors fresh. You can store it in the fridge for up to five days. - Freezing for future use: If you want to save it longer, freeze it. Cut the bake into squares and wrap them tightly in plastic wrap. Then, place them in a freezer-safe bag. You can freeze it for up to three months. Just remember to label the bag with the date. When you are ready to enjoy leftovers, reheating them properly is key. - Best methods to reheat without drying out: The microwave is quick. Place a square on a plate and cover it with a damp paper towel. Heat for 30 seconds, then check. If needed, heat for another 15 seconds. For the oven, preheat to 350°F. Place the bake in an oven-safe dish, cover it with foil, and warm it for about 10-15 minutes. - Serving suggestions after reheating: You can top the warm bake with fresh apple slices or a sprinkle of cinnamon. A drizzle of maple syrup adds a sweet touch. Enjoying a scoop of yogurt or a splash of milk can also enhance the flavor and texture. Can I use quick oats instead of rolled oats? Yes, you can use quick oats. They will cook faster, but the texture may be softer. If you like a chewier bake, stick with rolled oats. How long does the oatmeal bake last in the fridge? Your oatmeal bake stays fresh for about 5 days in the fridge. Just cover it well to keep it moist. What to do if the bake is too dry? If your bake turns out too dry, try adding a splash of milk. This will help moisten it. You can also serve it with yogurt or extra fruit to add moisture. Can I make this in advance? Yes! You can prepare the mixture a day ahead. Just cover it tightly and store it in the fridge. When ready, pour it into the baking dish and bake as directed. Caloric content per serving Each serving has about 180 calories. This makes it a healthy choice to start your day. Nutritional benefits of the ingredients - Oats: Great for fiber and heart health. - Apples: Provide vitamins and antioxidants. - Nut milk: A dairy-free option, lower in calories than whole milk. - Nuts: Give healthy fats and protein. These ingredients work together for a nutritious meal! This blog post shared a simple and tasty apple cinnamon oatmeal bake. You learned about the key ingredients, easy steps, and helpful tips. You can customize it to fit your taste and dietary needs. This dish is not only delicious but also healthy and satisfying. Enjoy making it for yourself or share it with friends and family. Your kitchen will smell amazing, and you’ll have a delightful treat to enjoy!

Apple Cinnamon Oatmeal Bake Easy and Tasty Recipe

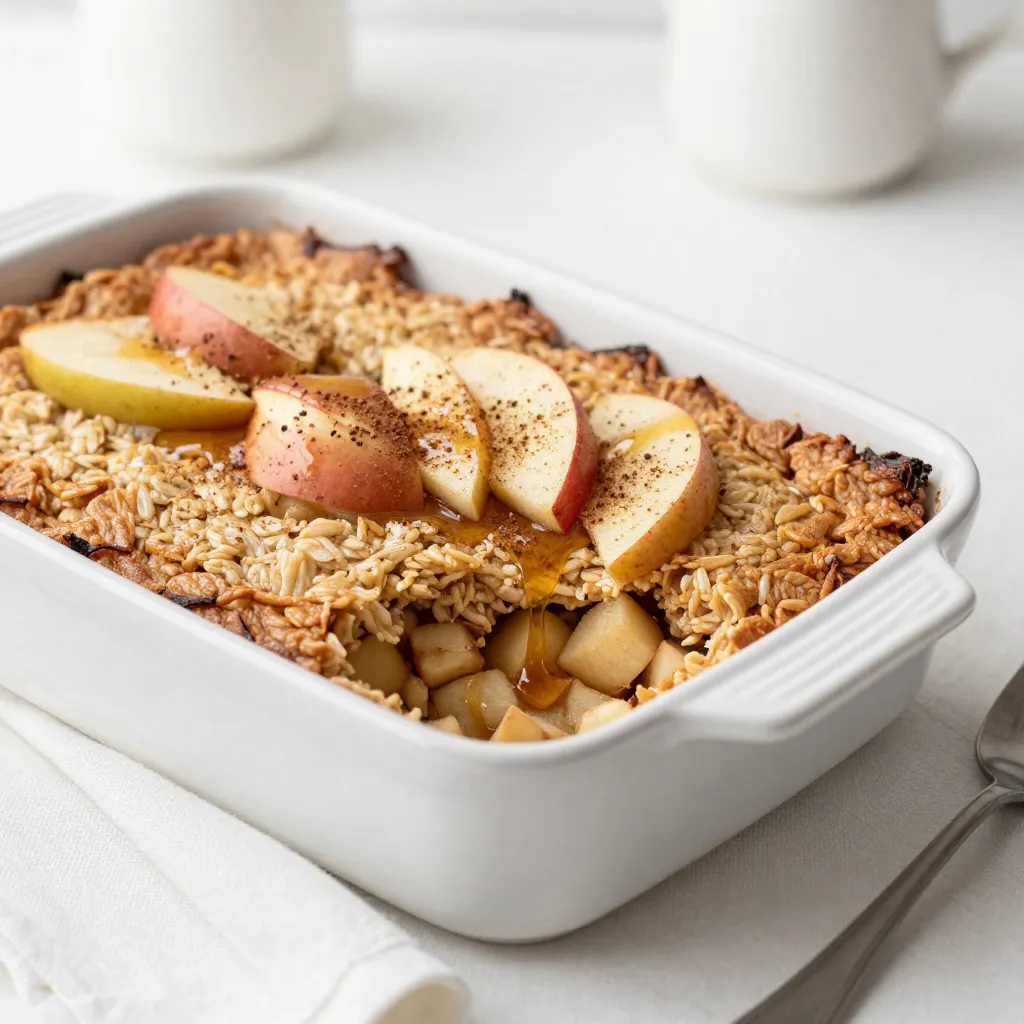
Start your mornings with my easy and tasty Apple Cinnamon Oatmeal Bake! This warm, comforting dish combines rolled oats, fresh

To make these Pumpkin Spice Cheesecake Bars, you will need: - 1 ½ cups graham cracker crumbs - ½ cup unsalted butter, melted - 1 cup cream cheese, softened - 1 cup pumpkin puree - ¾ cup granulated sugar - 2 large eggs - 1 teaspoon vanilla extract - 1 teaspoon pumpkin pie spice - ½ teaspoon cinnamon - ¼ teaspoon salt These ingredients create a rich and creamy cheesecake with a delightful pumpkin flavor. The graham cracker crust adds a nice crunch. You can enhance your cheesecake bars with some fun toppings. Here are some ideas: - Whipped cream - Chopped nuts, like pecans or walnuts - A sprinkle of cinnamon - Drizzle of caramel sauce These toppings add extra flavor and texture. Feel free to get creative! If you don’t have some ingredients, here are some easy swaps: - Use digestive biscuits instead of graham crackers. - Swap unsalted butter for coconut oil for a dairy-free option. - Replace cream cheese with a vegan cream cheese alternative. - Use maple syrup instead of granulated sugar for a natural sweetener. These substitutions work well and keep the essence of the bars intact. Enjoy experimenting! {{ingredient_image_1}} To make the crust, start by preheating your oven to 350°F (175°C). Grab a 9x9-inch baking pan and line it with parchment paper. Leave some paper hanging over the sides. This helps you lift the bars out later. In a medium bowl, mix 1 ½ cups of graham cracker crumbs with ½ cup of melted unsalted butter. Stir until it looks like wet sand. Press this mixture firmly into the bottom of the pan. Bake it for 8-10 minutes until it turns light golden. After baking, let it cool completely. For the filling, take a large mixing bowl and beat 1 cup of softened cream cheese until smooth. You can use a hand mixer or a stand mixer. Once smooth, add 1 cup of pumpkin puree, ¾ cup of granulated sugar, 2 large eggs, 1 teaspoon of vanilla extract, 1 teaspoon of pumpkin pie spice, ½ teaspoon of cinnamon, and ¼ teaspoon of salt. Mix everything on low speed until it blends well and looks creamy. Pour this pumpkin cheesecake filling over your cooled crust. Use a spatula to spread it evenly. Place the pan in the oven and bake for 25-30 minutes. The edges should be set, but the center will still jiggle a bit. After baking, take the pan out and let it cool for about 1 hour at room temperature. Then, cover it and refrigerate for at least 2 hours or overnight. This helps the flavors develop. Once chilled, lift the bars out of the pan using the parchment paper. Cut them into squares. For an extra treat, top with some whipped cream if you like! To create a great crust, use fresh graham cracker crumbs. Store-bought crumbs work too, but homemade is better. Mix the crumbs with melted butter until it looks like wet sand. Press it firmly into the pan. Bake for 8 to 10 minutes until golden. This step gives your crust a nice crunch. For a creamy filling, ensure your cream cheese is very soft. Let it sit at room temperature for about 30 minutes before mixing. Use a hand mixer to beat it smooth. Add pumpkin puree and other ingredients slowly. Mixing on low helps keep it creamy. Don't over-mix; just combine until smooth. Cut the bars into neat squares for a pretty look. Serve them chilled for the best taste. Top with whipped cream for extra flair. A sprinkle of cinnamon or extra pumpkin pie spice adds a nice touch. Use a clean knife for each cut to keep edges sharp. Pro Tips Use Room Temperature Ingredients: Ensure your cream cheese and eggs are at room temperature for a smoother batter and better incorporation. Don’t Overmix: Once you add the eggs, mix just until combined to prevent the cheesecake from cracking during baking. Check for Doneness: The bars should be set around the edges with a slight jiggle in the center; they will firm up as they cool. Chill Overnight: For the best texture and flavor, refrigerate the bars overnight before serving, allowing the flavors to meld beautifully. {{image_2}} You can make these pumpkin spice cheesecake bars a bit healthier. Here are a few swaps you can try: - Use whole wheat graham cracker crumbs instead of regular ones. - Swap unsalted butter for coconut oil. This adds healthy fat. - Try low-fat cream cheese. It still tastes great! - Use maple syrup instead of granulated sugar. It adds a nice flavor. - Substitute Greek yogurt for some of the cream cheese. This makes it creamy and adds protein. These options help cut some calories without losing flavor. You can change the taste of these bars easily. Here are some fun ideas: - Add chocolate chips into the cheesecake mix for a sweet twist. - Mix in some caramel sauce for a rich flavor. - Include nuts like pecans or walnuts for added crunch. - Experiment with different spices. Try nutmeg or ginger for a unique taste. - For a cheesecake twist, add a layer of fruit jam. These variations make each batch special and fun to create. Serving these bars is just as fun as making them! Here are some ideas: - Serve them chilled with whipped cream on top. This adds a nice touch. - Drizzle chocolate or caramel sauce for a fancy look. - Add a sprinkle of cinnamon or nutmeg for extra flavor. - Pair with a warm drink, like chai tea or spiced apple cider. - Cut into fun shapes for parties or gatherings. Kids love that! These serving ideas enhance the experience and impress your guests. To keep your Pumpkin Spice Cheesecake Bars fresh, place them in an airtight container. You can also use plastic wrap to cover them tightly. Store the bars in the fridge for up to five days. Make sure to keep them chilled to maintain their creamy texture and flavor. If you want to save some bars for later, freezing is a great option. First, cut the bars into squares. Then, wrap each square in plastic wrap. After wrapping, place them in a freezer-safe bag or container. These bars can stay frozen for up to three months. When you're ready to enjoy them, just thaw overnight in the fridge. When you're ready to eat your bars, you can serve them cold or at room temperature. If you prefer them warm, heat them gently. Use the microwave and heat for about 10-15 seconds. Be careful not to overheat them, or they may lose their creamy goodness. Enjoy your delicious bars! Yes, you can use fresh pumpkin. Start with a sugar pumpkin. Roast it until soft, then scoop out the flesh. Blend it well to make a smooth puree. This method adds a fresher taste, but it requires more work. Canned pumpkin is convenient and has a consistent flavor, so choose based on your time and taste. These cheesecake bars last about five days in the fridge. Store them in an airtight container to keep them fresh. If you notice any moisture, place a paper towel inside to absorb it. This helps maintain the texture and flavor. Just remember to serve them chilled for the best taste. Yes, you can make these bars a day or two early. They taste even better after chilling in the fridge overnight. This allows the flavors to blend well. Just cut them into squares before serving. You can also freeze them for up to three months. Thaw in the fridge when you are ready to enjoy them. This blog post covered how to make delicious pumpkin cheesecake bars. You learned about the needed ingredients and some fun toppings. The step-by-step guide made baking easy. I shared tips for a great crust and creamy filling. You also found variations for healthier choices and flavor twists. Lastly, I provided storage tips to keep your bars fresh. Enjoy your baking journey. You now have all the tools to create a tasty treat!

Pumpkin Spice Cheesecake Bars Irresistible Delight

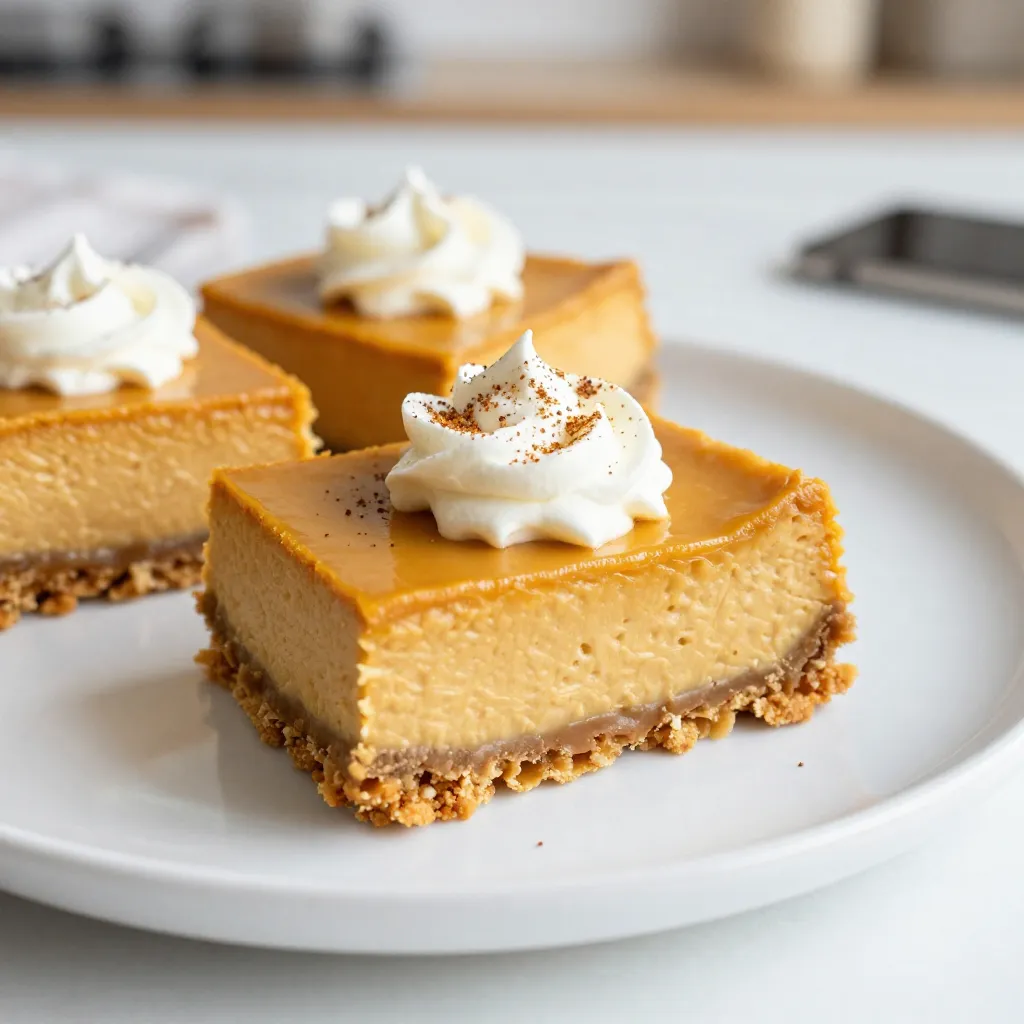
Get ready to fall in love with Pumpkin Spice Cheesecake Bars! These bars blend creamy cheesecake with warm pumpkin spice,

To make these tasty wings, gather these ingredients: - 2 pounds chicken wings - 1/4 cup honey - 1/4 cup low sodium soy sauce - 4 cloves garlic, minced - 1 tablespoon fresh ginger, grated - 1 tablespoon apple cider vinegar - 1 tablespoon sesame oil - 1 teaspoon crushed red pepper flakes (optional) - 2 green onions, chopped (for garnish) - Sesame seeds (for garnish) - Salt and pepper to taste You can swap some ingredients if needed: - For honey, use maple syrup for a different sweetness. - If you lack soy sauce, try coconut aminos for a soy-free option. - Garlic powder can replace fresh garlic if you're in a pinch. - Use ground ginger if you don’t have fresh ginger handy. - Apple cider vinegar can be replaced with rice vinegar for a milder taste. - Adjust crushed red pepper flakes based on your spice preference. Choose your chicken wings wisely to get the best flavor: - Look for wings that are plump and have a good amount of meat. - Fresh wings should not have a strong odor. - Check for a nice color; pale wings can indicate poor quality. - If possible, buy organic or free-range wings for better taste and quality. - Frozen wings work too, but make sure they are not freezer-burned. These tips and options will help you create the best honey garlic chicken wings. Enjoy the cooking process! {{ingredient_image_1}} Start with fresh chicken wings. You need about 2 pounds. Pat them dry using paper towels. This step is key for making them crispy. Then, season the wings with salt and pepper. This adds a nice base flavor. Make sure to cover all sides. Now, let's create the tasty marinade. Grab a mixing bowl. Combine 1/4 cup honey, 1/4 cup low sodium soy sauce, 4 minced garlic cloves, and 1 tablespoon grated ginger. Add 1 tablespoon apple cider vinegar and 1 tablespoon sesame oil. If you like heat, toss in 1 teaspoon crushed red pepper flakes. Whisk everything together until smooth. This marinade brings a sweet and savory kick. Preheat your oven to 400°F (200°C). Line a baking sheet with parchment paper or foil. This step helps with cleanup later. Take the marinated wings from the fridge. Let any extra marinade drip off. Spread the wings out in a single layer on the baking sheet. Bake them for 30 to 40 minutes. Flip the wings halfway through for even cooking. They should turn golden brown and crispy. While they bake, take the leftover marinade and boil it in a saucepan. Reduce the heat and let it simmer for about 5 to 7 minutes. This will thicken it up nicely. After baking, brush the wings with the thickened marinade for extra flavor. Bake them for another 5 minutes. Now, they’re ready to enjoy! To get crispy chicken wings, start by drying them. Pat them with paper towels until they feel dry. This step helps remove moisture, making them crispier. Season the wings lightly with salt and pepper. Make sure to spread them out on the baking sheet. Give them space to cook evenly. Bake them at 400°F (200°C) for 30-40 minutes. Flip them halfway to ensure both sides get crispy. For extra crunch, you can broil them for a few minutes at the end. Marinating your wings is key for great taste. Use a mix of honey, soy sauce, and garlic for a sweet and savory profile. Mix all marinade ingredients in a bowl. Coat the wings well in the marinade. You can use a resealable bag for easy mixing. Let them marinate for at least one hour. For the best flavor, try marinating them overnight. This allows the flavors to seep deep into the meat. Remember to save some marinade for glazing after baking. When serving honey garlic chicken wings, presentation matters. Use a large platter and arrange the wings neatly. Sprinkle sesame seeds and chopped green onions on top. These add color and flavor. Pair the wings with crunchy celery sticks. They provide a nice contrast and freshness. You can also serve a dipping sauce like ranch or blue cheese. This adds an extra layer of flavor. Enjoy these wings as a snack, appetizer, or part of a meal. Pro Tips Pat Dry for Crispiness: Patting the chicken wings dry before seasoning helps remove excess moisture, ensuring they become crispy when baked. Marinate Longer for Flavor: For the best flavor, marinate the wings overnight. This allows the marinade to penetrate deeply into the meat, enhancing the taste. Thicken the Sauce: Simmering the leftover marinade until thickened creates a rich glaze that clings beautifully to the wings, elevating their flavor and presentation. Use a Baking Rack: If possible, place the wings on a baking rack set over the sheet pan. This allows air to circulate around the wings, promoting even cooking and crispiness. {{image_2}} To make spicy honey garlic wings, you simply add heat. Start with the base recipe. Then, include crushed red pepper flakes. You can also use hot sauce or Sriracha for a kick. Adjust the amount based on your heat level. I love using fresh jalapeños for a fresh twist. Just slice them and toss them into the marinade. This gives you a nice blend of sweet and spicy. Baking is simple and healthier. It uses less oil, which means less fat. Your wings can become crispy without a lot of mess. Frying, on the other hand, gives wings a unique crunch. They cook fast and can be very tasty. However, frying adds more calories. It also creates a mess in the kitchen. I prefer baking for ease and a cleaner kitchen. You still get great flavor and texture. You can try different sauces and coatings for your wings. BBQ sauce gives a smoky flavor. Buffalo sauce adds a nice tang. For something unique, try teriyaki or sweet chili sauce. You can also coat wings in dry rubs. Mix spices like paprika, garlic powder, and onion powder. This adds depth and flavor without adding too much sauce. Enjoy experimenting with different tastes! When you have extra honey garlic chicken wings, store them properly to keep them fresh. First, let the wings cool down to room temperature. This prevents steam, which can make them soggy. Use an airtight container to keep them safe from air. If you have a lot, you can layer them with parchment paper between each layer. This helps keep the wings from sticking together. Store them in the fridge for up to 3 days. To enjoy your wings again, reheating is key. The best way to reheat them is in the oven. Preheat your oven to 350°F (175°C). Place the wings on a baking sheet lined with foil. Bake for about 10-15 minutes. This keeps the skin crispy and the inside warm. If you’re short on time, you can microwave them. Just use a microwave-safe plate and cover them with a damp paper towel. Heat them in 30-second bursts until warm. Freezing honey garlic chicken wings is easy but requires some care. First, cool the wings completely. Then, place them in a freezer-safe bag. Remove as much air as possible before sealing. You can also freeze them in a single layer on a baking sheet, then transfer them to a bag. This helps them stay separate. Do not freeze wings with sauce already on them. This can make them mushy when thawed. Use frozen wings within 2-3 months for the best taste. Yes, you can use frozen chicken wings. Just remember to thaw them first. Thawing helps the wings absorb the marinade better. To thaw, place them in the fridge overnight. If you’re in a hurry, you can use the microwave. Just be careful not to cook them. Marinate the chicken wings for at least one hour. For the best flavor, let them sit overnight. The longer they marinate, the more the flavors soak in. This makes them tastier when you cook them. Honey garlic chicken wings go well with many sides. Here are some great options: - Crunchy celery sticks - Fresh carrot sticks - Creamy ranch dressing - Sweet potato fries - Garlic bread These sides balance the sweet and savory taste of the wings. Enjoy your meal! This article covered everything you need for honey garlic chicken wings. We looked at the right ingredients, how to marinate, and get those wings crispy. I shared tips and tricks for perfect flavor and cooking methods. Different variations add your twist, while storage info keeps leftovers tasty. Remember, with a few simple steps, you can create a dish that everyone loves. Now, it’s your turn to try these tips and enjoy your delicious wings!

Honey Garlic Chicken Wings Flavorful Oven Delight

Are you ready to transform your dinner plans? Honey Garlic Chicken Wings are a mouthwatering treat that you can easily

To make these tasty popsicles, gather these simple ingredients: - 2 cups fresh strawberries, hulled and sliced - 1 cup coconut milk (full-fat for creaminess) - 2 tablespoons honey or maple syrup (adjust based on sweetness preference) - 1 tablespoon fresh lime juice - A pinch of salt - Optional: shredded coconut for texture You can switch out some ingredients if you need to. Here are some ideas: - Use almond milk instead of coconut milk for a nutty flavor. - Agave syrup can replace honey or maple syrup for a vegan option. - If you don’t have fresh strawberries, try frozen strawberries. They work well too! - For a zesty twist, use lemon juice instead of lime juice. Using high-quality ingredients makes a big difference in taste. Here are some tips: - Choose ripe, bright red strawberries. They should be sweet and fragrant. - Select full-fat coconut milk for a rich and creamy texture. - If possible, use raw honey or pure maple syrup for the best flavor. - Fresh lime juice gives a bright taste. Fresh is always better than bottled. These tips help you create the best strawberry coconut popsicles. Enjoy your time in the kitchen! {{ingredient_image_1}} To start, gather your ingredients. You need fresh strawberries, coconut milk, honey or maple syrup, lime juice, and a pinch of salt. First, slice your strawberries. Then, toss them into a blender. Add the coconut milk, honey, lime juice, and salt. Blend everything until it is smooth and creamy. After blending, taste the mixture. If you want it sweeter, add more honey or syrup. Blend again to mix well. Next, pour a layer of the mixture into popsicle molds. Fill them about halfway. If you like, sprinkle shredded coconut into each mold for extra texture. Now, freeze the molds for about 1 to 2 hours. You want the mixture to be slightly firm, but not hard. After that, take them out of the freezer. Pour more of the mixture into the molds to fill them completely. Insert popsicle sticks and return them to the freezer. Freeze for at least 4 to 6 hours, or until fully set. When blending, make sure to use fresh strawberries. This will give your popsicles a great taste. If your blender struggles, add a bit more coconut milk. This can help achieve a smooth texture. Always taste the mixture before freezing. Adjust the sweetness as needed. If you want a fun twist, try adding other fruits. Pineapple or mango can add a nice flavor. Just remember to balance the sweetness. Freezing is key for great popsicles. Make sure you leave enough time for them to freeze completely. After at least 4 to 6 hours, check if they are ready. To unmold, run warm water over the outside of the molds for a few seconds. This helps loosen the popsicles. Gently pull them out. If they don’t come out easily, run the water for a bit longer. Enjoy your creamy, fruity treat! To get a creamy texture, use full-fat coconut milk. It provides a rich and smooth base. Blend your ingredients until they are completely smooth. If you notice chunks, blend longer. You can also chill your coconut milk before blending. This step can enhance creaminess. Start with two tablespoons of honey or maple syrup. After blending, taste your mixture. If it’s not sweet enough, add more syrup. Blend again to mix it well. Remember, fresh strawberries can vary in sweetness. Adjust based on your taste. A high-speed blender works best for this recipe. It ensures a smooth blend of strawberries and coconut milk. If you have a hand blender, that can work too. Just make sure to blend thoroughly. For popsicle molds, choose silicone or plastic. They make it easy to remove the popsicles later. Pro Tips Use Frozen Strawberries: If fresh strawberries are not available, you can use frozen strawberries. Just make sure to let them thaw slightly before blending for the best texture. Customize the Sweetness: Adjust the amount of honey or maple syrup to suit your taste. You can also try adding a little stevia or agave syrup for a different flavor profile. Try Different Fruits: Experiment with other fruits like mango, pineapple, or blueberries for a unique twist on these popsicles! Layering Technique: For a fun presentation, create layers by alternating between the strawberry-coconut mixture and shredded coconut before freezing. {{image_2}} You can make these popsicles without dairy. Use coconut milk as the base. It adds creaminess and flavor. Almond or oat milk are great substitutes too. They keep the popsicles light and refreshing. If you want a richer taste, use full-fat coconut milk. This gives a thick and creamy texture. Get creative with your popsicles! You can add other fruits like mango or banana. They blend well with strawberries and coconut. You could even mix in blueberries or raspberries for a berry twist. Citrus fruits like orange or lemon can brighten the flavor. Just remember to balance sweetness with lime juice or honey. For a fun texture, add some mix-ins. Shredded coconut is a great choice for a chewy bite. You can also try chopped nuts like almonds or cashews. They add crunch and a healthy touch. Chocolate chips can bring a sweet surprise in every bite. Just sprinkle the mix-ins in the molds before freezing. Storing your homemade strawberry coconut popsicles is simple. Place them in an airtight container or a zip-top bag. This keeps them fresh and prevents freezer burn. If you use a bag, squeeze out as much air as possible before sealing. This helps maintain their creamy texture and flavor. These popsicles stay good for about two to three months in the freezer. After that, they may lose their taste or texture. For best results, eat them within that time frame. Always label your container with the date. This way, you know when they were made. Reusing your popsicle molds is easy and eco-friendly. After using them, wash the molds with warm, soapy water. Rinse well to remove any soap. Let them dry completely before using again. If your molds have stains, soak them in a mix of water and vinegar. This helps keep them clean and ready for your next batch of popsicles. Yes, you can. Use yogurt or almond milk instead. This will change the taste and texture. Yogurt gives a creamier feel, while almond milk is lighter. Adjust the sweetness with honey or syrup to balance the flavors. The initial freeze takes about 1-2 hours. After adding more mixture, freeze for at least 4-6 hours. The longer you freeze, the firmer they get. Plan for a total of 6 hours for best results. Strawberries are rich in vitamin C and antioxidants. They help boost your immune system. Coconut provides healthy fats that can aid digestion. Together, they make a tasty treat that also offers nutrition. Enjoying these popsicles means indulging in a treat that is both fun and good for you. You learned how to make tasty strawberry coconut popsicles today. We covered key ingredients, substitutions, and tips for the best texture. I shared step-by-step directions to blend, freeze, and unmold your treats. You now know storage tips to keep them fresh and variations to try. I hope you feel excited to make your own popsicles. They are simple and fun to create. Enjoy experimenting with flavors and sharing them with friends. You can make a healthy treat that everyone will love.

Strawberry Coconut Popsicles Delightfully Creamy Treat

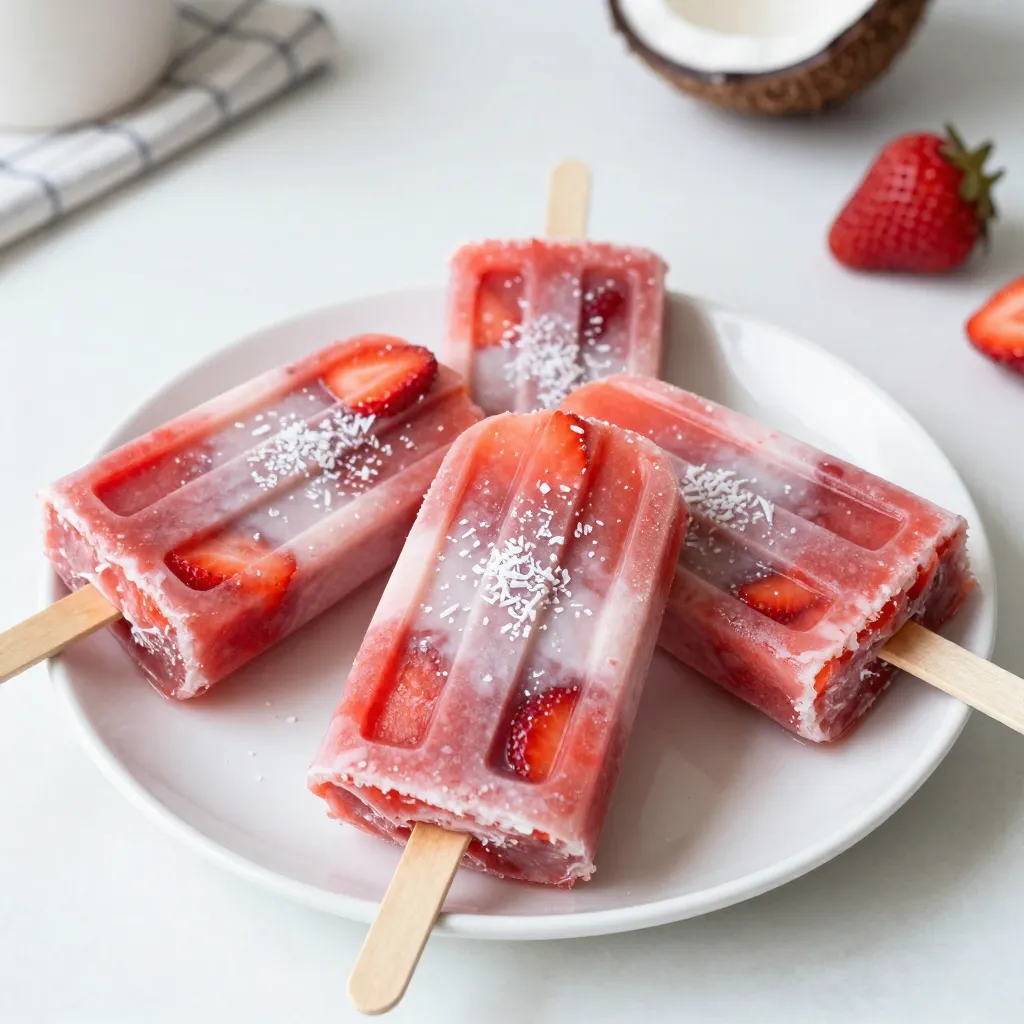
Craving a sweet, cool treat that’s easy to make? Look no further! I’ve got the perfect recipe for Strawberry Coconut

- 2 large eggplants - 1 cup cooked quinoa - 1 red bell pepper, diced - 1 small zucchini, diced - 1/2 cup cherry tomatoes, halved - 1/2 cup kalamata olives, chopped - 1/4 cup feta cheese, crumbled - 2 tablespoons olive oil - 2 tablespoons fresh parsley, chopped - 1 teaspoon dried oregano - Salt and pepper to taste - Optional: red pepper flakes for added heat To make Mediterranean stuffed eggplant, you need fresh and vibrant ingredients. First, you will want two large eggplants. They form the base of this dish. Next, cooked quinoa adds protein and texture. One diced red bell pepper gives sweetness and crunch. A small diced zucchini adds moisture and flavor. Halved cherry tomatoes brighten the dish with acidity. Chopped kalamata olives add a salty, briny bite. Crumbled feta cheese brings creaminess and tang. Olive oil is essential for roasting and flavor. Fresh parsley adds a pop of color and freshness. Dried oregano gives that classic Mediterranean taste. Finally, salt and pepper enhance all the flavors, while red pepper flakes (optional) can add some heat. Gather these ingredients to create a colorful and nutritious meal. Each component plays an important role. You can find most of these items at your local grocery store or farmer's market. Using fresh ingredients will help your dish shine. {{ingredient_image_1}} First, preheat your oven to 375°F (190°C). Take your two large eggplants and slice them in half lengthwise. Use a spoon to scoop out some flesh, leaving a half-inch shell. Set the scooped flesh aside in a bowl. Then, brush the insides of the eggplant halves with olive oil. Add a sprinkle of salt for flavor. Place them cut-side down on a baking sheet. Roast them in the oven for 20 to 25 minutes. You want them to be tender and slightly golden. While the eggplants roast, get the reserved flesh ready. Dice it into small pieces. In a skillet, heat the remaining olive oil over medium heat. Add the diced eggplant, along with the red bell pepper and zucchini. Sauté this mix for about 5 to 7 minutes. You want the veggies to soften and mix well. Next, stir in the halved cherry tomatoes, chopped kalamata olives, cooked quinoa, chopped parsley, oregano, and red pepper flakes if you want some heat. Cook for another 2 to 3 minutes. When everything is heated and combined, season with salt and pepper to taste. Now, take the roasted eggplant halves from the oven and flip them over. Spoon the filling into each half. Press down gently to pack it in. Once filled, sprinkle crumbled feta cheese on top of each stuffed eggplant. Return them to the oven. Bake for another 10 to 15 minutes. You want the feta to become slightly golden and the eggplants to be heated through. When done, carefully remove them from the oven and let them cool for a few minutes before serving. Enjoy the burst of Mediterranean flavors! To achieve the perfect roasted eggplant, slice the eggplants in half lengthwise. Scoop out the flesh, but leave about a half-inch shell. Brush the insides with olive oil and add salt. Place them cut-side down on a baking sheet. Roast at 375°F (190°C) for 20-25 minutes. This method makes the eggplant tender and flavorful. For cooking quinoa perfectly, rinse it under cold water first. This removes any bitterness. Use two cups of water for every one cup of quinoa. Bring to a boil, then lower the heat. Cover and simmer for about 15 minutes. Fluff the quinoa with a fork after cooking. This will give you light and fluffy grains. For plating, use a large platter to showcase your stuffed eggplants. Arrange them neatly, cut-side up. Drizzle with a bit of olive oil for shine. Sprinkle fresh parsley on top for a pop of color. You can also serve with lemon wedges for added zest. For garnishing, consider sprinkling extra feta cheese on top. You can also add a few kalamata olives for a touch of color. A sprinkle of red pepper flakes can bring heat and eye appeal. These small touches can elevate your dish. The key ingredients in this recipe offer many health benefits. Eggplants are low in calories and high in fiber. They help support heart health and weight management. Quinoa is a complete protein, packed with nutrients like magnesium and iron. Eating a Mediterranean diet can improve overall health. It focuses on whole foods, healthy fats, and fresh vegetables. This diet is linked to lower risks of heart disease and better brain health. The combination of flavors and nutrients in this dish is both tasty and good for you. Pro Tips Choose Firm Eggplants: Select eggplants that are firm to the touch and have a smooth skin for the best texture and flavor. Customize Your Filling: Feel free to add other vegetables or proteins like chickpeas or spinach to the quinoa mixture for added nutrition and flavor. Feta Alternatives: If you want a dairy-free option, try using vegan feta or nutritional yeast for a cheesy flavor without the dairy. Serve with a Sauce: Drizzle a tahini or yogurt sauce over the stuffed eggplants for extra creaminess and flavor contrast. {{image_2}} You can swap quinoa for other grains if needed. Try using rice or millet for a gluten-free option. If you want a low-carb choice, use cauliflower rice. When it comes to filling, feel free to add other veggies. Spinach, mushrooms, or carrots work great. You can even use black beans for extra protein and flavor. Feta adds a nice touch, but you have more options. Try goat cheese or mozzarella for a milder taste. For a bolder flavor, use aged cheddar or even blue cheese. To spice it up, add some fresh herbs like basil or mint. A drizzle of balsamic glaze can also elevate the taste. If you enjoy heat, sprinkle on some chili flakes or paprika. You can grill or bake your stuffed eggplant. Grilling gives it a smoky flavor, while baking softens the eggplant nicely. For a different texture, consider using a slow cooker. Just place the stuffed eggplants in the cooker with a bit of water. Cook on low for about four hours. This method makes them very tender and flavorful. To keep your Mediterranean stuffed eggplant fresh, store leftovers in the fridge. First, let the eggplants cool down. Then, place them in an airtight container. This keeps moisture in and prevents them from drying out. It’s best to eat them within three days. If you have extra filling, store it separately. This method helps maintain the texture and flavor. If you want to save your stuffed eggplants for later, freezing is a great option. First, let them cool completely. Wrap each stuffed eggplant tightly in plastic wrap. Then, place them in a freezer-safe bag. This prevents freezer burn and keeps them fresh. You can freeze them for up to three months. When you are ready to eat, take them out and thaw overnight in the fridge. To reheat, place them in an oven set at 350°F (175°C) for about 25 minutes. This way, they will warm up nicely without getting soggy. Enjoy your delicious meal whenever you want! How long does it take to cook stuffed eggplant? It takes about 50 minutes to cook stuffed eggplant. You spend 20-25 minutes roasting the eggplant halves. The final baking takes another 10-15 minutes. Can I make this dish vegan? Yes, you can easily make this dish vegan. Simply skip the feta cheese or use a vegan cheese alternative. The filling is already packed with flavors from the vegetables and quinoa. Where to find kalamata olives? You can find kalamata olives at most grocery stores. They are usually in the olive or Mediterranean food aisle. You can also check specialty stores or online markets. Substitutes for feta cheese in recipes? If you need a substitute for feta cheese, try using goat cheese or vegan cheese. You can also use a mix of nuts and nutritional yeast for a creamy texture. What to serve with Mediterranean stuffed eggplant? Serve the stuffed eggplant with a fresh salad or warm pita bread. A side of tzatziki sauce adds a nice touch too. Best pairings for a complete meal Pair stuffed eggplant with roasted vegetables or a grain like couscous. A glass of white wine can enhance the flavors, making it a lovely meal. In summary, this dish combines eggplants, quinoa, and colorful veggies for a tasty meal. I showed you how to prepare, roast, and stuff the eggplants with ease. We discussed tips for perfect cooking and appealing presentation. Remember, you can switch ingredients and toppings for your taste. Storing leftovers and freezing portions extends your meal's life. Enjoy this healthy dish's vibrant flavors and benefits. It’s simple, fun, and perfect for sharing with others.

Mediterranean Stuffed Eggplant Flavorful and Nutritious

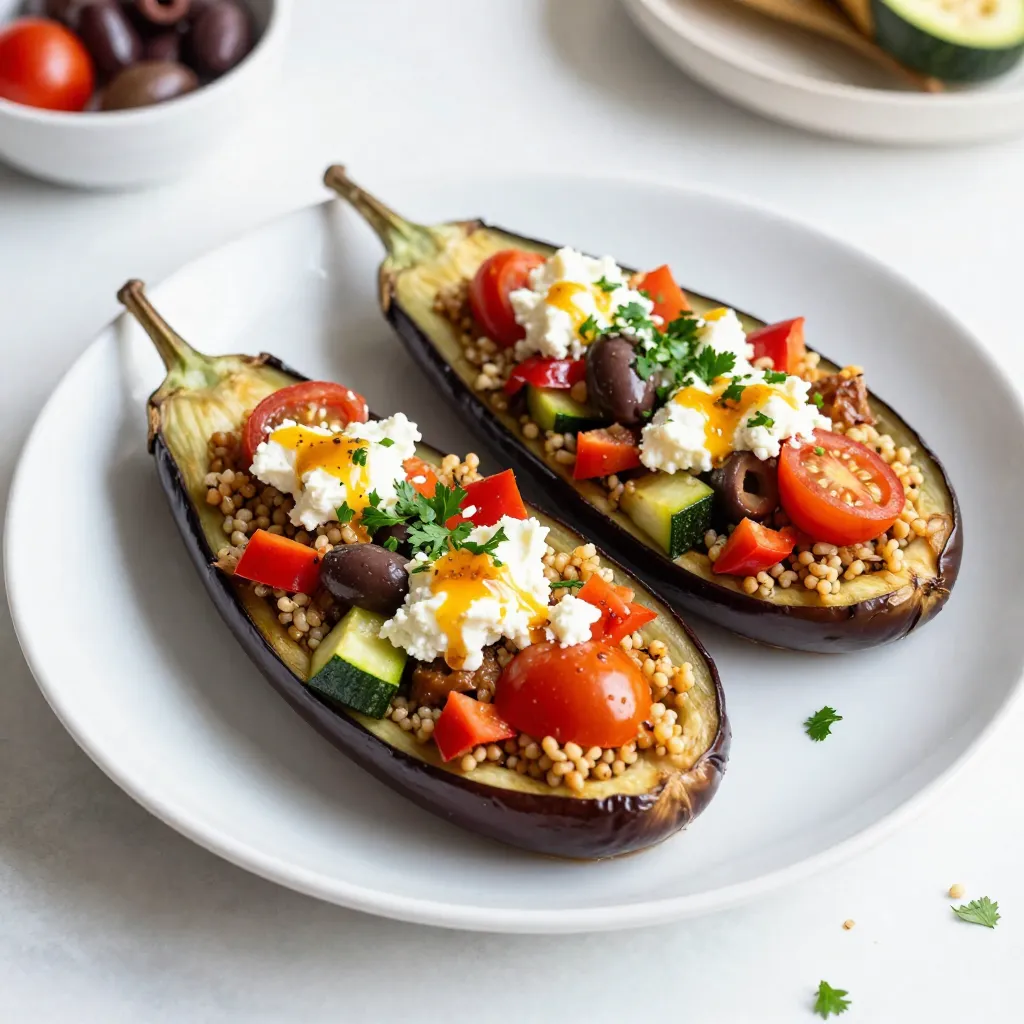
Are you ready to elevate your dinner game? Mediterranean Stuffed Eggplant is not only tasty, but it’s also packed with

Older posts
Newer posts
← Previous Page1 Page2 Page3 … Page86 Next →

dsad

© 2026 Cooking Wells • Built with GeneratePress

Our Policies

  • Copyright Policy
  • Cookie Policy
  • GDPR Policy
  • Privacy Policy
  • Disclaimer
  • Terms Of Use

More Information

  • Home
  • About
  • Contact
  • Appetizers
  • Dessert
  • Dinner
  • Drinks
©2026, Cooking Wells About Back To Top