Skip to content
DisclaimerTerms Of UseGDPR PolicyCookie Policy

Cooking Wells

  • Home
  • Drinks
  • Appetizers
  • Dinner
  • Dessert
  • About
  • Contact
  • Privacy Policy
DisclaimerTerms Of UseGDPR PolicyCookie Policy

NO-ING-IMG

Here’s what you need to make these tasty air fryer apple fritter bites: - Apples: 2 medium (Granny Smith), peeled and diced - Dry ingredients: - 1 cup all-purpose flour - 1/4 cup sugar - 1 teaspoon baking powder - 1/2 teaspoon ground cinnamon - 1/4 teaspoon nutmeg - 1/4 teaspoon salt - Wet ingredients: - 1/2 cup milk - 1 large egg - 1 teaspoon vanilla extract - 1 tablespoon lemon juice - Additional: - Cooking spray - Powdered sugar (for dusting) These ingredients blend together to create a sweet and crisp treat. The Granny Smith apples add a tart flavor that balances well with the sweetness. Mixing the right dry ingredients helps form a fluffy batter that holds the apple bits. The wet ingredients ensure the fritter bites stay moist and tender. Don't forget the powdered sugar for that finishing touch! First, peel and dice the apples into small pieces. I like using Granny Smith for their tartness. Next, combine the diced apples with one tablespoon of lemon juice in a medium bowl. This step helps keep the apples from turning brown. Set the bowl aside for about five minutes. This will allow the lemon juice to work its magic. In a large bowl, whisk together one cup of all-purpose flour, one-fourth cup of sugar, one teaspoon of baking powder, half a teaspoon of ground cinnamon, one-fourth teaspoon of nutmeg, and one-fourth teaspoon of salt. Mixing these dry ingredients well is key. It ensures even flavor in every bite. In another bowl, mix half a cup of milk, one large egg, and one teaspoon of vanilla extract. Stir these ingredients together until they blend nicely. This mixture adds moisture and flavor to the fritters. Now, pour the wet ingredients into the bowl with the dry ingredients. Gently mix them together until you see no dry flour. Be careful not to overmix! Next, fold in the diced apples. This step ensures each piece of apple gets a nice coating of batter. Before cooking, preheat your air fryer to 350°F (175°C) for about three to five minutes. While it heats up, lightly grease the air fryer basket with cooking spray. This will help the fritter bites come out easily after cooking. Using a small cookie scoop, drop small amounts of the batter into the air fryer basket. Make sure to space them out to allow them to expand. Air fry for eight to ten minutes. Halfway through, flip the fritter bites for even browning. When they turn golden brown, they are ready to enjoy! To get the best texture for your fritter bites, focus on your batter. It should be thick but not too heavy. If it's too runny, add a bit more flour. If it’s too thick, add a splash of milk. Mix gently. You want to keep air in the batter for a light bite. Flipping your fritter bites halfway is key. This ensures even cooking and browning. Aim for a golden crust on both sides to make them extra crispy. Want to spice things up? Try adding a pinch of allspice or cloves to your batter. They pair well with apples. For a twist, mix in some chopped nuts or raisins. They add texture and flavor. When choosing apples, opt for Granny Smith for tartness. However, Honeycrisp or Fuji also work well for sweetness. Each variety gives a different taste, so feel free to experiment. These fritter bites shine with a dusting of powdered sugar. Want to add a dip? Try caramel or vanilla yogurt. Both complement the sweetness of the apples. For a nice presentation, arrange the fritter bites on a plate and drizzle with sauce. Add a sprinkle of cinnamon on top for color. This makes your dish look as good as it tastes! {{image_2}} You can switch things up by using different fruits. Try pears instead of apples for a fresh twist. You can also use berries or peaches for unique flavors. If you want something savory, mix in cheese or herbs. Adding cooked bacon can create a tasty twist. These options let you customize the fritter bites to your taste. For those who need a gluten-free treat, you can use alternative flours. Almond flour or oat flour works great in this recipe. Just replace the all-purpose flour with your choice. This way, you can enjoy fritter bites without gluten. They will taste just as good! If you want a lighter version, you can reduce the sugar. Try cutting the sugar in half for less sweetness. You can also use alternative sweeteners like honey or maple syrup. These options can give you a sweeter taste without the extra sugar. Enjoy making these treats both delicious and healthier! To keep your fritter bites fresh, store them in the fridge. Place them in an airtight container. This helps keep them from drying out. You can also wrap them in plastic wrap. Make sure they cool completely before storing. This prevents moisture build-up, which can make them soggy. For the best taste, reheat fritter bites in the air fryer. Set the temperature to 350°F (175°C) and heat for 3-5 minutes. This method keeps them crispy. If using the oven, preheat to 350°F (175°C) and place them on a baking sheet. Heat for about 5-7 minutes. Avoid using the microwave, as it can make them soggy. You can freeze fritter bites before or after cooking. If freezing before cooking, scoop the batter onto parchment paper. Freeze until solid, then transfer to a freezer bag. For after cooking, let them cool completely first. Then, place them in a freezer-safe container. When ready to eat, thaw in the fridge overnight. Reheat as directed above. Yes, you can prepare the batter ahead of time. Store it in the fridge for up to 24 hours. Just remember to give it a good stir before using. For cooked fritter bites, let them cool first. Place them in an airtight container. They stay fresh in the fridge for about 2-3 days. When you're ready to enjoy them, reheat in the air fryer for 3-5 minutes. This keeps them crispy and warm. You can swap apples for many fruits. Pears are a great choice for a sweet twist. You could also try diced peaches, cherries, or mixed berries. Each fruit brings a new flavor to the fritter bites. Just make sure to adjust the sugar based on how sweet your fruit is. Air fryer apple fritter bites last about 2-3 days in the fridge. Keep them in an airtight container to stay fresh. If you want to enjoy them longer, consider freezing. They can be frozen for up to 3 months. Just make sure they are well-wrapped to avoid freezer burn. If your batter is too thick, add a little more milk. Start with a tablespoon at a time until you reach the right consistency. If it’s too runny, add a bit more flour. Mix in small amounts until the batter thickens. The goal is a batter that holds its shape but is not dry. Most air fryers work well for these fritter bites. Look for one with at least 3.5-quart capacity. Models with adjustable temperature settings are ideal. Brands like Philips, Ninja, and Cosori are popular and reliable. They offer even cooking and great results. You learned how to make tasty air fryer apple fritter bites with simple steps. We discussed key ingredients, from fresh apples to spices. I also shared tips on texture, flavor, and variations like gluten-free options. Enjoy these fritter bites as a fun treat or dessert! Try them with dips and get creative! The best part? You can make them your way. Happy cooking!

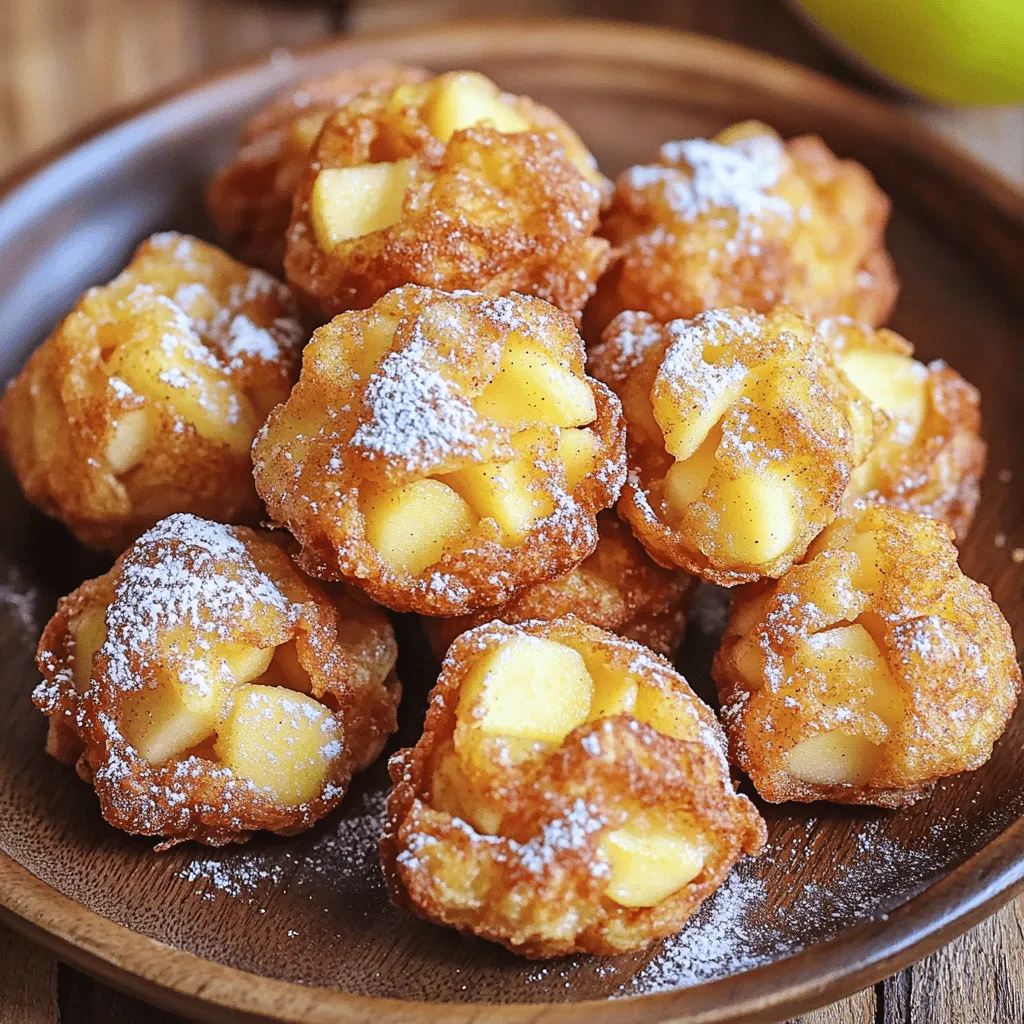
Air Fryer Apple Fritter Bites Crispy and Flavorful Treat

Craving a sweet and crispy treat? Let’s talk about Air Fryer Apple Fritter Bites! These delightful bites combine juicy apples

To make creamy sun-dried tomato shrimp, you need: - 1 pound large shrimp, peeled and deveined - 1 cup sun-dried tomatoes, chopped (in oil for richer flavor) - 1 cup heavy cream - 2 cloves garlic, minced - 1 small onion, diced - 1 cup fresh spinach - 1 teaspoon Italian seasoning - 1 tablespoon olive oil - Salt and pepper to taste - Fresh basil leaves for garnish - Grated Parmesan cheese (optional) You can swap ingredients based on what you have. Use fresh tomatoes if you can't find sun-dried ones. For a lighter sauce, use half-and-half instead of heavy cream. If you're out of shrimp, try chicken or tofu. You can also skip the cheese for a dairy-free option. Choose large shrimp for a nice bite. Fresh shrimp taste best, but frozen works fine too. Look for sun-dried tomatoes packed in oil for added flavor. Fresh spinach should be bright green and crisp. Good quality olive oil enhances the dish. Always check your spices for freshness to ensure great taste. To make creamy sun-dried tomato shrimp, gather your ingredients first. You will need shrimp, sun-dried tomatoes, heavy cream, garlic, onion, spinach, and seasonings. Prepare your workspace by chopping and measuring everything. This will help you cook smoothly and quickly. 1. Heat a large skillet over medium heat. Add one tablespoon of olive oil. 2. Once the oil is hot, add the diced onion. Sauté for 3-4 minutes until it looks clear. 3. Next, add two cloves of minced garlic. Cook for one minute until it smells great. 4. Toss in one cup of chopped sun-dried tomatoes and one teaspoon of Italian seasoning. Stir well and cook for 2-3 minutes. This lets the flavors mix nicely. 5. Now, add one pound of shrimp to the skillet. Cook for 3-4 minutes until the shrimp turn pink and opaque. 6. Pour in one cup of heavy cream. Stir it all together. Bring this to a gentle simmer for about 5 minutes. It should thicken a bit. 7. Add one cup of fresh spinach. Cook until the spinach wilts, which takes about 2 minutes. Season with salt and pepper to make it taste just right. 8. You can serve this dish over pasta or rice if you like. Garnish with fresh basil leaves and grated Parmesan cheese if desired. - Use fresh or thawed shrimp. Frozen shrimp can be watery and less flavorful. - Do not overcook shrimp. They cook fast and should be pink and firm when ready. - If you are unsure, take one shrimp out to test. It should be opaque throughout. - Always add shrimp last to keep them tender and juicy. - Keep an eye on the heat. Too high can make shrimp rubbery. To make this dish pop, use sun-dried tomatoes packed in oil. The oil adds a rich taste. You can also add a splash of white wine before the cream. This brings depth to the sauce. Fresh herbs like thyme or oregano can boost flavor too. For a creamier sauce, use full-fat cream. You can also mix in some cream cheese for extra richness. If you want a lighter version, try half-and-half instead. Adding a bit of grated Parmesan cheese at the end makes it even more indulgent. Don’t overcook the shrimp. They should be pink and opaque, about 3-4 minutes max. If you cook them too long, they will get rubbery. Also, don’t skip the garlic. It adds a lovely aroma. Lastly, taste your dish before serving. Adjust salt and pepper to your liking. {{image_2}} You can boost the flavor and nutrition of your creamy sun-dried tomato shrimp by adding vegetables. Here are some great options: - Bell Peppers: Dice red or yellow bell peppers for sweetness. - Zucchini: Chop zucchini into small pieces for a light crunch. - Mushrooms: Sautéed mushrooms add a rich, earthy flavor. - Broccoli: Florets can give a nice bite and color. Add these veggies when you cook the onion, letting them soften before adding garlic. This gives a nice blend of taste and texture. If shrimp isn’t your favorite, try other proteins. Here are some tasty swaps: - Chicken: Use diced chicken breast for a heartier dish. - Scallops: These add a sweet, delicate flavor. - Tofu: For a plant-based option, use firm tofu, cubed and sautéed. Adjust cooking time based on the protein. For chicken, cook until it reaches 165°F for safety. You can enjoy this dish gluten-free with a few simple changes: - Pasta: Use gluten-free pasta made from rice or corn. - Rice: Serve over white, brown, or cauliflower rice for a healthy option. - Zoodles: Spiralized zucchini makes a great low-carb base. Always check labels on pre-made products to ensure they are gluten-free. Enjoy your meal without worry! To keep your creamy sun-dried tomato shrimp fresh, let it cool first. Place it in an airtight container. Store it in the fridge for up to three days. Make sure to label the container with the date. This helps you remember when you made it. When you're ready to enjoy your leftovers, reheat gently. Place the shrimp mixture in a skillet over low heat. Stir often to avoid burning. You can also microwave it in a bowl. Heat it in short bursts of 30 seconds, stirring in between. This way, you keep the cream smooth and tasty. You can freeze creamy sun-dried tomato shrimp for later. Use a freezer-safe container or a zip-top bag. Remove as much air as possible to prevent freezer burn. It will keep well for up to three months. To thaw, place it in the fridge overnight before reheating. Yes, you can use frozen shrimp. Just ensure they are peeled and deveined. Thaw the shrimp first. You can do this overnight in the fridge or in cold water for about 30 minutes. Cooking times may vary slightly. Cook until the shrimp turn pink and opaque. You can serve this dish with various sides. Here are some great options: - Pasta: Choose spaghetti or fettuccine for a classic pairing. - Rice: White or brown rice soaks up the creamy sauce well. - Quinoa: A healthy alternative that adds a nice texture. - Crusty bread: Perfect for dipping in the sauce. To make this dish dairy-free, swap heavy cream for coconut cream or a dairy-free cream alternative. You can also use cashew cream for a rich taste. Be sure to check the labels to avoid dairy. Adjust the seasoning as needed to enhance the flavor. This blog post covered key elements to cook creamy sun-dried tomato shrimp. We explored the best ingredients and possible substitutions. I shared step-by-step cooking methods and tips for perfect shrimp. We also looked at how to enhance flavors and avoid common mistakes. Variations let you add veggies or change proteins based on your needs. Finally, we reviewed storage tips for leftovers. With this knowledge, you can create a delightful meal with confidence. Enjoy cooking and make it your own!

Creamy Sun Dried Tomato Shrimp Flavorful Dinner Recipe

If you’re searching for a quick, delicious dinner idea, look no further! My Creamy Sun Dried Tomato Shrimp recipe combines

- 1 cup pumpkin puree - 1/2 cup creamy peanut butter - 1/4 cup honey or maple syrup - 1 teaspoon vanilla extract - 1 teaspoon pumpkin spice These five key ingredients create the base of your No Bake Pumpkin Pie Bites. The pumpkin puree brings that lovely fall flavor. Creamy peanut butter adds richness and helps bind the mixture. Honey or maple syrup gives sweetness, while vanilla extract and pumpkin spice enhance the taste. - 1 cup crushed graham crackers - 1/2 cup crushed walnuts or pecans (optional) - Dark chocolate chips You can customize your bites with these fun add-ins. Crushed graham crackers add a nice crunch and texture. Walnuts or pecans give extra flavor and nutrients. Dark chocolate chips can be melted for drizzle if you want a sweet touch on top. - Extra pumpkin spice - Whole walnuts - Fresh pumpkin slices Garnishing makes your bites look even better. A sprinkle of extra pumpkin spice adds charm. Whole walnuts or fresh pumpkin slices can also create a festive display. These simple touches make your treats eye-catching and fun to serve. To start, mix the wet ingredients together. In a medium bowl, combine the pumpkin puree, creamy peanut butter, honey or maple syrup, vanilla extract, pumpkin spice, and a pinch of sea salt. Stir until the mix is smooth and well blended. This step ensures that all the flavors meld together perfectly. Next, incorporate the dry ingredients. Gradually fold in the crushed graham crackers and crushed nuts if you are using them. Keep mixing until everything is fully combined. The mixture should feel thick and moldable, perfect for shaping. Now comes the fun part—shaping the bites! Use your hands to scoop out small portions of the mixture. Roll them into balls about 1 inch in diameter. This size is just right for a quick treat. Place each ball on a parchment-lined baking sheet or plate. The parchment helps prevent sticking and makes cleanup easy. The final step is the refrigeration process. Chill the pumpkin pie bites for at least 30 minutes. This lets them firm up, making them easier to handle and eat. Once chilled, they will have a nice texture that holds together well. Enjoy your delightful no-bake pumpkin pie bites! To make the perfect no bake pumpkin pie bites, start with sweetness. You can adjust it by adding more or less honey. If you want a less sweet treat, use maple syrup instead. Next, think about spices. You can switch pumpkin spice for your favorites. Try adding cinnamon, nutmeg, or even a bit of ginger. Each spice brings a different flavor to your bites. When serving these bites, presentation counts. Use a nice platter and add a sprinkle of pumpkin spice. You can also place whole walnuts or slices of fresh pumpkin around the bites. For drinks, consider pairing these with warm apple cider or a nice cup of coffee. The flavors blend well together and create a cozy vibe. If your bites feel too soft, add more crushed graham crackers. This helps firm them up. If the mixture sticks to your hands, dampen your fingers with water. This simple trick makes rolling easier and keeps the mess at bay. {{image_2}} You can make these pumpkin pie bites fit your diet. For gluten-free options, use alternative crackers like almond flour or gluten-free graham crackers. These swaps keep the bites tasty and safe for everyone. For vegan substitutions, replace honey with maple syrup. This change keeps the sweetness while making it plant-based. You can also use nut butters like almond or cashew instead of peanut butter for a new twist. Want to change the flavor? Try a chocolate pumpkin pie bites recipe! Mix in cocoa powder to the base. Add dark chocolate chips to enhance the chocolate flavor. You will enjoy a rich and delicious treat. You can also add spices like chai or clove. These spices give a warm spice profile that pairs well with pumpkin. A dash of nutmeg or a hint of ginger adds another layer of flavor. Make your bites festive with holiday-themed decorations. Use colored sprinkles or edible glitter for a fun touch. You can even shape the bites into pumpkins or leaves for a seasonal look. Consider seasonal ingredient swaps too. In fall, add apple cider or cinnamon to the mix. In winter, try peppermint extract for a fresh and cool flavor. These ideas keep your bites exciting all year round. To keep your no bake pumpkin pie bites fresh, store them in an airtight container. A glass or plastic container works well. Make sure to layer parchment paper between the bites if you stack them. This prevents them from sticking together. If you want to freeze these bites, place them on a baking sheet first. Freeze them for about an hour until firm. After that, transfer them to a freezer-safe bag. Make sure to remove as much air as possible to avoid freezer burn. When you're ready to eat, take them out of the freezer. Let them thaw in the fridge for a few hours or overnight. This keeps the texture nice and creamy. You can keep these bites in the fridge for up to a week. Look for any signs of spoilage, like a sour smell or change in color. If they feel too soft or sticky, it’s best to toss them. Enjoy your tasty treats while they’re fresh! Yes, you can use fresh pumpkin. Just cook and puree it until smooth. Canned pumpkin is easier and saves time. Both options work well in this recipe. Fresh pumpkin may have a slightly different taste and texture. You can try almond butter or sunflower seed butter. These options give a similar creaminess. They also add their own unique flavor to the bites. Make sure to choose a creamy type for the best results. Yes, you can use sunflower seed butter or tahini. Both are nut-free and work well. They keep the bites creamy and tasty. If you want a nut-free treat, these are great choices. These bites last about five days in the fridge. Store them in an airtight container. This keeps them fresh and ready for snacking. If they last that long, you’re doing great! Absolutely! You can make them a day or two ahead. This saves time and stress on the event day. Just chill them in the fridge to keep them firm and tasty. You learned how to make delicious pumpkin bites with simple ingredients and steps. I shared tips to help you adjust flavors and enhance your bites for any season. Feel free to get creative with add-ins, garnishes, and dietary swaps. Remember to store them properly for the best taste. Enjoy these bites anytime, whether at a party or a quiet evening at home. With a few steps, you can make a tasty treat that everyone will love.

No Bake Pumpkin Pie Bites Easy Fall Treats

Fall is here, and what better way to celebrate than with No Bake Pumpkin Pie Bites? These easy treats pack

- 4 boneless, skinless chicken breasts - 1 cup grated Parmesan cheese - 1 cup panko breadcrumbs To make this dish, start with boneless, skinless chicken breasts. They are easy to cook and very tender. I like using grated Parmesan cheese for its rich flavor. The panko breadcrumbs give the chicken a nice crunch. You can find these items at any grocery store. - 2 teaspoons garlic powder - 1 teaspoon Italian seasoning - 2 tablespoons olive oil For seasonings, I use garlic powder and Italian seasoning. They add a wonderful taste. Olive oil helps the crust stick to the chicken and gives it a nice color. - 1 cup cherry tomatoes, halved - 1 zucchini, sliced - 1 red bell pepper, sliced I love adding cherry tomatoes for their sweetness. Zucchini and red bell pepper bring color and nutrition. You can switch these veggies based on what you have at home. Use your favorites for a personal touch. First, preheat your oven to 400°F (200°C). This helps the chicken cook evenly. Next, line a large sheet pan with parchment paper. This makes for easy cleanup later on. In a medium bowl, mix together 1 cup of grated Parmesan cheese and 1 cup of breadcrumbs. I like to use panko for extra crunch. Then, add 2 teaspoons of garlic powder, 1 teaspoon of Italian seasoning, 1/2 teaspoon of paprika, 1/2 teaspoon of black pepper, and 1/2 teaspoon of salt. Stir it all together well to make a tasty crust mixture. Pat the chicken breasts dry with paper towels. Place them on one side of the prepared sheet pan. Drizzle 2 tablespoons of olive oil over each chicken breast. Then, take the crust mixture and coat each piece generously, pressing down to help it stick. On the other side of the sheet pan, arrange 1 cup of halved cherry tomatoes, and slices of 1 zucchini and 1 red bell pepper. Drizzle the veggies with a bit of olive oil. Sprinkle a pinch of salt and pepper on top. Now, place the sheet pan in the oven and bake for 25-30 minutes. The chicken should be cooked through, reaching an internal temperature of 165°F (74°C). The crust will turn golden brown, and the veggies should be tender and slightly caramelized. After baking, remove the pan from the oven and let it rest for 5 minutes. Garnish with freshly chopped parsley before serving. To get that perfect crispy crust on your chicken, panko breadcrumbs are key. Unlike regular breadcrumbs, panko is lighter and airier. This texture helps your crust get extra crunch when baked. It holds onto the flavors, making each bite yummy. Here are some baking tips for crispiness: - Bake at a high temperature, like 400°F (200°C). - Use parchment paper on your sheet pan to avoid sticking. - Drizzle olive oil on the chicken before coating it. This helps the crust brown nicely. To boost flavor, you can add more seasonings. Try adding some: - Cayenne pepper for heat - Lemon zest for brightness - Onion powder for depth Using fresh herbs is a great way to finish your dish. After baking, sprinkle chopped parsley on top. It adds color and freshness to the plate. Prep ahead to save time. You can coat the chicken and cut the veggies in advance. Store them in the fridge until you're ready to bake. This makes it easy to whip up dinner on busy nights. To ensure even cooking: - Cut your chicken breasts to a similar size. This helps them cook at the same rate. - Arrange the vegetables evenly on the pan. They should not be too crowded, so they roast well. {{image_2}} You can switch up the chicken breasts for chicken thighs. Thighs add more flavor and stay juicy. If you want to try something new, use fish like salmon or cod. Tofu is another great choice for a plant-based version. It’s light and takes on flavors well. Feel free to mix in or swap out vegetables based on the season. Broccoli, asparagus, or carrots are great choices. Frozen veggies can save time, but fresh ones usually taste better. Just remember to adjust the cooking time if you use frozen. To change the taste, add different spices. Try cayenne for heat or lemon zest for brightness. You can also use different cheeses like mozzarella or cheddar for a twist. Sauces like BBQ or teriyaki can be brushed on before baking, adding a new layer of flavor. To keep your leftovers fresh, let the chicken cool first. Place the chicken and veggies in an airtight container. This helps keep the flavors intact. Refrigerate them within two hours of cooking. Use them within three days for the best taste. To reheat, use the oven for best results. Preheat the oven to 350°F (175°C). Place the chicken on a baking sheet. Heat for about 10-15 minutes. This keeps the crust crispy. Avoid using the microwave, as it can make the chicken soggy. If you must, use a low setting and cover the dish loosely. To freeze leftovers, wrap each piece of chicken in plastic wrap. Then, place them in a freezer bag. Remove air to prevent freezer burns. You can freeze them for up to three months. For thawing, place the chicken in the fridge overnight. Reheat in the oven as mentioned for best texture. It takes about 40 minutes to cook this dish. You will spend 10 minutes prepping and 25-30 minutes baking. Yes, you can make it gluten-free. Use gluten-free breadcrumbs or crushed nuts. Almond flour also works well as a substitute. You can serve this chicken with a fresh salad, rice, or crusty bread. Roasted potatoes or steamed veggies also pair nicely. Check the chicken's internal temperature. It should reach 165°F (74°C). Look for a golden crust and clear juices to know it’s done. This article covers how to make a tasty sheet pan Parmesan crusted chicken. We explored the main ingredients like chicken breasts, Parmesan cheese, and fresh veggies. I shared step-by-step instructions, tips for a crispy crust, and variations you can try. Remember, you can mix and match proteins and veggies. Storing leftovers and reheating them properly will help maintain flavor. Enjoy creating this simple, healthy meal in your own kitchen! Cook with confidence, and let your creativity shine.

Sheet Pan Parmesan Crusted Chicken Easy and Tasty Meal

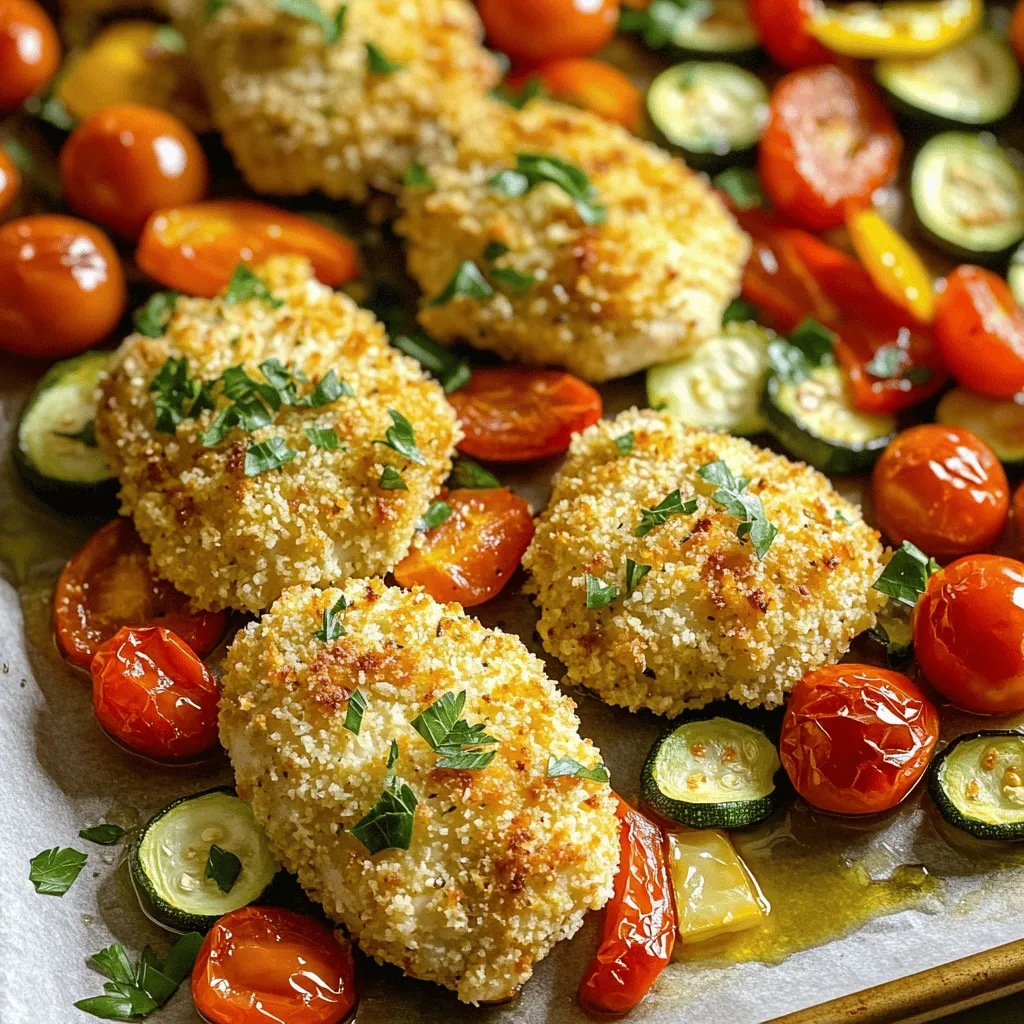
Craving a delicious meal that’s easy to make? Look no further than Sheet Pan Parmesan Crusted Chicken! This dish features

- 3 ripe bananas, mashed - 1/3 cup peanut butter (smooth or chunky) - 1/2 cup brown sugar - 1/4 cup granulated sugar - 2 large eggs - 1 teaspoon vanilla extract - 1 teaspoon baking soda - 1/4 teaspoon salt - 1 1/2 cups all-purpose flour - 1/2 cup chocolate chips (semi-sweet or dark) - 1/4 cup chopped peanuts (optional for topping) To make the best chocolate peanut butter banana bread, you need fresh, ripe bananas. They should be soft and brown for the sweetest flavor. Use smooth or chunky peanut butter based on your taste. This recipe calls for both brown and granulated sugar. The brown sugar adds moisture and depth, while granulated sugar gives a nice sweetness. You will also need two large eggs. They help bind everything together. One teaspoon of vanilla extract brings warmth to the mix. For the dry ingredients, you will use one teaspoon of baking soda and a quarter teaspoon of salt. These help the bread rise and enhance the flavor. You will also need one and a half cups of all-purpose flour. Finally, don’t forget the star of the show: half a cup of chocolate chips. You can choose semi-sweet or dark chocolate. If you want some crunch, add a quarter cup of chopped peanuts on top. Each ingredient plays a big role in making this bread moist, sweet, and full of flavor. {{ingredient_image_1}} 1. Preheat your oven to 350°F (175°C). Grease a 9x5-inch loaf pan or line it with parchment paper. 2. In a large mixing bowl, mash the ripe bananas. Add the peanut butter and mix until smooth. 3. Next, add the brown sugar and granulated sugar to the banana mix. Beat well until combined. 4. Incorporate the eggs one at a time. Mix in the vanilla extract until everything is well mixed. 1. In a separate bowl, whisk together the baking soda, salt, and all-purpose flour. This step helps to evenly distribute the leavening agent. 2. Gradually add the dry mixture to the wet mixture. Stir gently until just combined. Be careful not to overmix, as this can make the bread dense. 1. Gently fold in the chocolate chips. If you like, add chopped peanuts for extra crunch. 2. Pour the batter into your prepared loaf pan. Smooth the top with a spatula. 3. Optionally, sprinkle a few extra chocolate chips and peanuts on top for decoration. This adds a nice touch to your finished bread. - Avoiding overmixing: Mix just until the flour blends in. Overmixing makes the bread tough. You want a nice, soft texture. A few lumps are okay. They will bake out. - Choosing the right peanut butter: Use smooth peanut butter for a creamier bread. Chunky peanut butter adds fun texture. Both work well, so choose what you like best. - Knowing when the bread is done: Bake for 60 to 70 minutes. Insert a toothpick in the center. If it comes out clean, the bread is ready. If it has batter on it, bake a little longer. - Cooling recommendations: Let the bread cool in the pan for 10 minutes. Then, move it to a wire rack. This stops the bottom from getting soggy. Wait until it’s cool before slicing for the best texture. Pro Tips Choose Ripe Bananas: The riper the bananas, the sweeter and more flavorful your banana bread will be. Look for bananas with plenty of brown spots for the best results. Mix Gently: When combining the wet and dry ingredients, mix just until combined. Overmixing can lead to a dense and tough bread. Customize Your Chocolate: Feel free to experiment with different types of chocolate chips or even add some cocoa powder for an extra chocolatey flavor. Store Properly: To keep your banana bread fresh, wrap it tightly in plastic wrap and store it at room temperature for up to 3 days, or freeze it for longer storage. {{image_2}} You can change the taste of your chocolate peanut butter banana bread easily. Try using different types of chocolate chips. You can use semi-sweet, dark, or even white chocolate chips. Each type adds a unique twist to the flavor. You might also want to add nuts. Chopped walnuts or almonds can bring a nice crunch. If you like a bit of texture, mix in some chopped peanuts. This will make your banana bread even more fun to eat. If you need a gluten-free option, you can swap all-purpose flour for gluten-free flour. Almond flour or oat flour works well too. Just keep in mind that the texture may change a little. For sugar alternatives, try using honey or maple syrup instead of brown and granulated sugar. Both will keep the bread moist and add their own flavor. You can also use sugar substitutes like stevia for a lower calorie option. Be sure to adjust the amount based on the brand you choose. Store your chocolate peanut butter banana bread at room temperature. Wrap it in plastic wrap or foil. This keeps it fresh for up to three days. If you want to keep it longer, refrigeration works too. Just place it in an airtight container. It will last about a week in the fridge. Freezing is a great option for longer storage. Slice the bread first, then wrap each slice in plastic wrap. Place them in a freezer bag to prevent freezer burn. This way, you can enjoy a slice whenever you want! The banana bread lasts about five days at room temperature. In the fridge, it can stay fresh for up to a week. Look for signs of spoilage like mold or an off smell. If the bread feels very dry, it may not taste good anymore. If you freeze it, it can last for up to three months. Just thaw it in the fridge overnight before eating. Enjoy your delicious treat! Yes, you can use frozen bananas. Just thaw them first. They should be soft and easy to mash. This can add extra moisture to the bread. It’s a great way to use ripe bananas that you have stored. To make the bread less sweet, reduce the sugar. You can cut the brown sugar to 1/4 cup. You can also skip the granulated sugar. If you want more banana flavor, add an extra banana. This helps balance the taste without the extra sweetness. You can use several options for eggs. A common substitute is a flax egg. Mix one tablespoon of flaxseed meal with three tablespoons of water. Let it sit for five minutes until it thickens. Another option is unsweetened applesauce. Use 1/4 cup per egg. To make this bread vegan, switch out the eggs. Use a flax egg or applesauce as mentioned. Use a plant-based peanut butter too. Check if the chocolate chips are dairy-free before using them. These simple swaps keep the delicious flavor while making it vegan. You can make delicious banana peanut butter bread with just a few simple ingredients. We covered everything from mixing ripe bananas and peanut butter to baking tips. Remember to fold in chocolate chips for extra flavor. Choose your peanut butter wisely to get the best texture. This bread can be stored easily for days, and you can even freeze it. Try variations to suit your taste. Enjoy every bite of your homemade treat!

Chocolate Peanut Butter Banana Bread Delightful Recipe

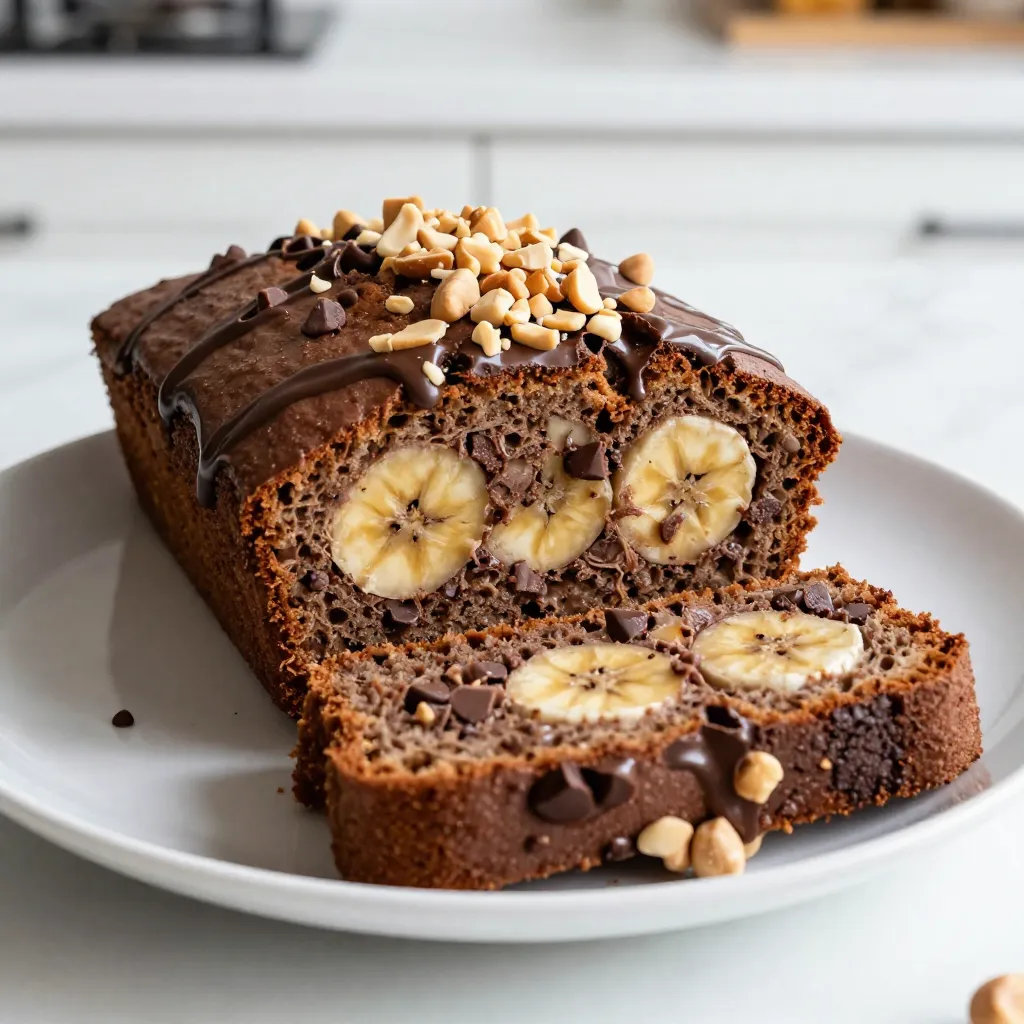
Craving a cozy treat that’s rich and satisfying? You’re in the right place! This Chocolate Peanut Butter Banana Bread is

- 12 oz (340g) pasta of your choice (penne or fettuccine) - 2 large red bell peppers, roasted and peeled - 1/2 cup (120ml) heavy cream - 1/4 cup (60ml) vegetable broth The main ingredients for creamy roasted red pepper pasta are simple yet packed with flavor. Choose your favorite pasta, either penne or fettuccine. The roasted red bell peppers give this dish its sweet, smoky taste. Heavy cream adds richness, while vegetable broth balances the flavors. - 3 cloves garlic, minced - 1 small onion, chopped - 2 tablespoons olive oil - 1 teaspoon dried basil - 1 teaspoon dried oregano - Salt and pepper to taste - Fresh parsley, chopped (for garnish) - Grated Parmesan cheese (optional, for serving) Seasoning is key to this dish. Garlic and onion bring warmth and depth to the sauce. Olive oil helps sauté these ingredients, enhancing their flavors. Dried basil and oregano add a touch of herbiness. Don’t forget salt and pepper; they bring everything together. For garnish, use fresh parsley and optional grated Parmesan for an extra layer of taste. To start, we need to roast our red bell peppers. Preheat your oven to 450°F (232°C). Place the whole peppers on a baking sheet. Roast them for 20 to 25 minutes. Turn the peppers every so often. You want the skins to char and blister. Once roasted, remove them from the oven. Let them cool down for a bit. After they cool, peel off the skins. Remove the seeds and set the peppers aside. This method gives our pasta a rich flavor. Next, we cook the pasta. Bring a large pot of salted water to a boil. Add your chosen pasta, like penne or fettuccine. Cook it according to the package instructions until it is al dente. This usually takes about 8 to 10 minutes. Once cooked, drain the pasta. Be sure to save about 1/2 cup of the pasta water. We will use this later to adjust our sauce. Now, let’s make the cream sauce. Heat olive oil in a large skillet over medium heat. Add the chopped onion and sauté it for about 3 to 4 minutes. You want the onion to be soft and a bit clear. Then, add the minced garlic and cook for another 1 to 2 minutes. Make sure the garlic does not burn. In a blender, combine the roasted peppers, heavy cream, vegetable broth, dried basil, oregano, salt, and pepper. Blend until smooth and creamy. This mixture is our flavorful sauce. Finally, we combine everything. Pour the red pepper cream sauce into the skillet with the onion and garlic. Stir gently to mix. Let this simmer for 3 to 5 minutes. If your sauce seems too thick, add some of the reserved pasta water. This helps reach the perfect consistency. Add the cooked pasta to the skillet. Toss the pasta in the sauce until it is well coated. Cook for another 2 to 3 minutes on low heat. This helps the flavors blend together nicely. Taste the dish and adjust the seasoning if needed. Enjoy your creamy roasted red pepper pasta! To enhance the taste of your creamy roasted red pepper pasta, consider adjusting the seasoning. Add more dried basil or oregano for a bolder flavor. If you like spice, try adding a pinch of red pepper flakes. Taste as you go. Timing is key; let the sauce simmer for at least three minutes. This helps the flavors blend, creating a rich taste. You’ll need a few essential tools to prepare this dish. First, use a blender or food processor to make the sauce smooth. A large skillet is ideal for sautéing the onions and garlic. Lastly, a big pot is perfect for cooking the pasta. Having the right tools makes cooking fun and easy. For a complete meal, pair your pasta with a fresh salad. A simple green salad with lemon vinaigrette works well. You might also enjoy some crusty bread on the side. It’s great for soaking up the creamy sauce. Feel free to sprinkle extra Parmesan cheese on top for added flavor. {{image_2}} You can change the pasta type to fit your taste. Penne or fettuccine works well. You can also try gluten-free pasta if you prefer. For a dairy-free option, swap heavy cream for coconut cream or cashew cream. These alternatives keep the dish creamy without dairy. Want to spice things up? Add red pepper flakes or smoked paprika for a kick. Fresh herbs like basil or thyme can brighten the dish. If you want protein, grilled chicken or shrimp works great. Simply cook them separately and add them to the pasta at the end. Short on time? Make a one-pan version. Cook the pasta in the same pot as the sauce. Just add the pasta to the sauce with enough water to cook it. This saves time and cleanup. You can also use store-bought roasted red peppers for a faster meal. To store your creamy roasted red pepper pasta, let it cool to room temperature. Transfer it to an airtight container. This helps keep it fresh and tasty. You can store it in the fridge for up to 3 days. Always check for any signs of spoilage before you eat it. If you want to freeze this dish, follow these steps. First, let the pasta cool completely. Then, put it in a freezer-safe container. Make sure to leave some space for expansion. You can freeze it for up to 2 months. To reheat frozen pasta, take it out of the freezer. Let it thaw in the fridge overnight. Then, heat it on the stove over low heat. Add a splash of water or extra cream if it seems dry. Stir until heated through. Enjoy your creamy pasta again! Yes, you can use jarred roasted red peppers. They save time and effort. They are also consistent in flavor. However, they may have added salt or preservatives. This can change the taste. If using jarred peppers, rinse them to remove excess salt. Always taste the sauce before serving. Adjust the seasoning as needed. To make this creamy roasted red pepper pasta vegan, swap the heavy cream for coconut cream or cashew cream. Use vegetable broth instead of any meat-based option. You can also omit cheese or use a vegan cheese alternative. This way, you keep the creamy texture and rich flavor without dairy. This pasta pairs well with a fresh salad. A simple green salad with lemon dressing works great. Garlic bread is another good choice. You might also enjoy grilled vegetables on the side. For a heartier meal, serve it with roasted chicken or a protein of your choice. If your sauce is too thick, add reserved pasta water a little at a time. Stir well to combine. This helps thin it out without losing flavor. You can also add more vegetable broth or a splash of plant-based milk. Adjust until you reach your desired consistency. This blog post covered everything about making creamy roasted red pepper pasta. We looked at the key ingredients, from pasta to roasted peppers. I explained the steps to cook and blend your sauce perfectly. Tips on flavors and serving made it easy to elevate your dish. You also learned about variations and storage options. Remember, cooking can be fun and flexible. Adjust recipes to suit your taste. With practice, you’ll become a pasta pro in no time!

Creamy Roasted Red Pepper Pasta Tasty Dinner Delight

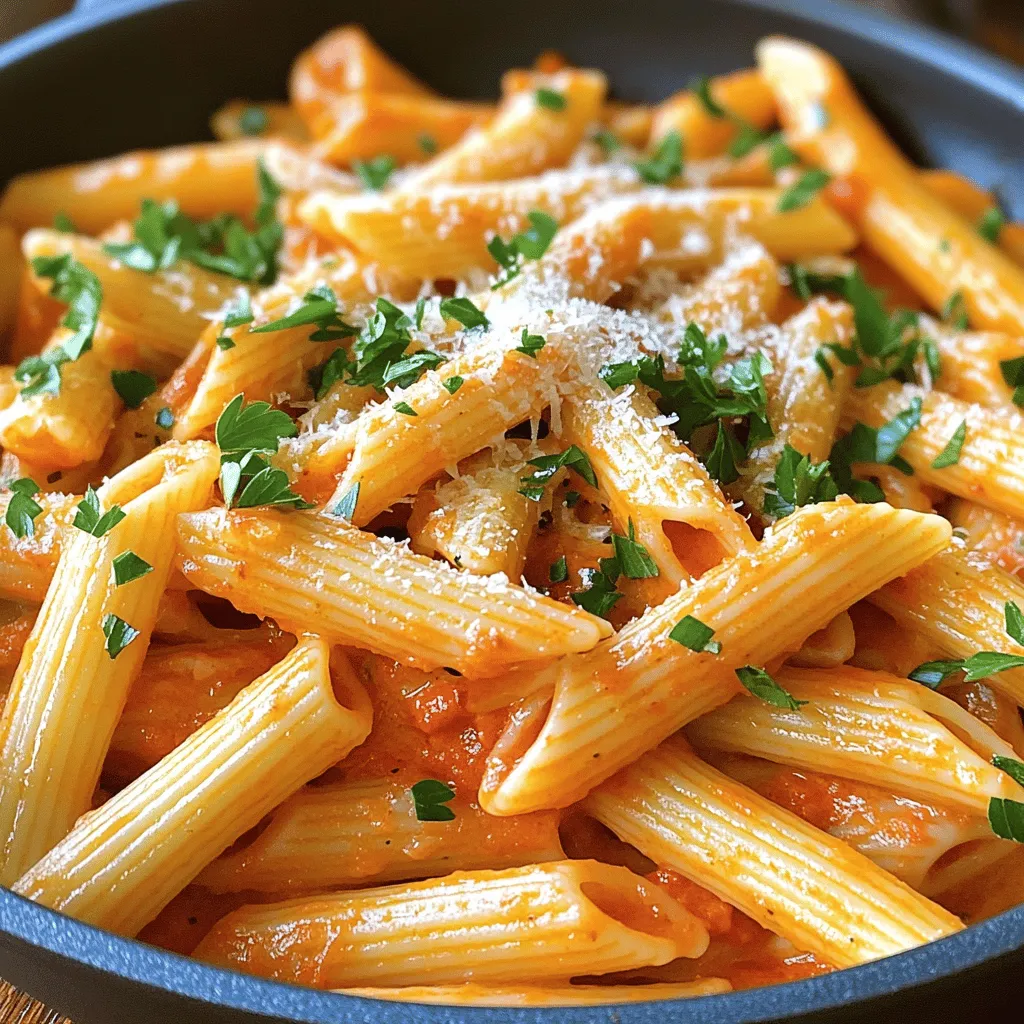
Looking for a quick and tasty dinner that impresses? Try my Creamy Roasted Red Pepper Pasta! This dish combines simple

To make the Turmeric Ginger Immunity Smoothie, you will need fresh and vibrant ingredients. Each element plays a role in boosting your health while also giving great flavor. Here’s what you will need: - Frozen Banana - Fresh Spinach - Turmeric Powder - Freshly Grated Ginger - Honey or Maple Syrup (optional) - Coconut Water or Almond Milk - Chia Seeds - Black Pepper (for absorption) - Fresh Lemon Juice The frozen banana adds creaminess and natural sweetness. Spinach provides vitamins and minerals. Turmeric and ginger are heroes for your immune system. Honey or maple syrup can sweeten your smoothie, but you can skip it if you prefer. Coconut water or almond milk serves as a base, making it smooth and hydrating. Chia seeds boost fiber and healthy fats. Black pepper helps your body absorb turmeric better, and lemon juice brightens the flavor. These ingredients come together to create a tasty drink that fuels your body and supports your health goals! - Blending Ingredients Start by adding the frozen banana and fresh spinach to your blender. The banana gives the smoothie a creamy texture. The spinach adds vitamins and minerals. Next, add in the turmeric powder and freshly grated ginger. These spices boost your immune system. If you like sweetness, pour in honey or maple syrup. Finally, add coconut water or almond milk for a smooth base. - Adjusting Consistency Blend all the ingredients on high until everything is smooth. If the smoothie seems too thick, add more coconut water or almond milk. You want a drinkable consistency. Blend again until you reach your desired texture. - Tasting and Sweetening After blending, taste your smoothie. If you want it sweeter, add more honey or maple syrup. Blend again for a few seconds. Pour your smoothie into a glass or bowl. If you fancy, sprinkle some chia seeds on top for extra crunch. Enjoy your healthy power boost! Selecting Fresh Turmeric and Ginger When picking turmeric and ginger, look for firm roots. They should feel heavy and look smooth. Fresh turmeric has a bright orange hue and a strong scent. Fresh ginger gives off a spicy aroma. Using fresh roots boosts the flavor and health benefits of your smoothie. Benefits of Using Organic Spinach I always choose organic spinach for its clean taste. Organic spinach avoids harmful pesticides. It packs more nutrients, too. These nutrients help support your immune system. Fresh spinach adds a lovely green color and a mild flavor to your smoothie. Importance of Chia Seeds Chia seeds are small but mighty. They are full of fiber, protein, and omega-3 fatty acids. Adding these tiny seeds helps keep you full longer. They also add a nice texture to your smoothie. Plus, they are great for your digestion. Tips for Thicker Smoothies To make your smoothie thicker, add more frozen banana. You can also use less liquid. This gives your drink a creamy texture. If you want a rich smoothie, blend in some ice cubes. This will make it frosty and refreshing. Enhancing Flavor Balance To balance flavors, use a squeeze of fresh lemon juice. It adds brightness and cuts through the sweetness. If your smoothie tastes too strong, try adding more coconut water. This will soften the flavors without losing the health benefits. {{image_2}} You can change your smoothie by using different leafy greens. Kale is a great option. It adds a nice green flavor and packs in more nutrients. You can also use Swiss chard for a different taste. For liquid bases, try almond milk or coconut water. Each gives a unique flavor and texture. Coconut water offers natural sweetness, while almond milk is creamy and rich. If you want a sweeter smoothie, consider using dates or agave syrup. Both options add natural sweetness without refined sugar. You can adjust the amount based on your taste. You can boost your smoothie’s taste by adding berries. Blueberries, strawberries, or raspberries work well. They add vitamins and antioxidants. Plus, they make your drink even more colorful. Including protein powders is another option. A scoop of plant-based or whey protein can help you feel full. This can be great after a workout or as a breakfast option. To keep your Turmeric Ginger Immunity Smoothie fresh, store it in a sealed jar. Use glass jars for the best results. They help avoid any strong smells from other foods. Keep the jar in the fridge right after making the smoothie. This smoothie tastes best within 24 hours. If you have leftovers, you can freeze them. Pour the smoothie into ice cube trays. Once frozen, transfer the cubes to a freezer bag. This way, you can enjoy a quick boost later. Just blend a few cubes with some almond milk for a fresh drink. Fresh smoothies usually last about one day in the fridge. After that, they can lose their flavor and nutrients. If you notice any changes in color or smell, it’s time to toss it. Signs of spoilage include a sour smell and separation of ingredients. If you see any mold, don’t eat it! Always trust your senses when checking for freshness. - Immune-Boosting Properties Turmeric and ginger are great for your immune system. Turmeric has curcumin, which helps fight germs. Ginger boosts your white blood cells, helping you stay healthy. Together, they make a strong team against colds and flu. - Anti-Inflammatory Effects Both turmeric and ginger reduce inflammation. Turmeric lowers swelling in your body. Ginger helps ease muscle pain and soreness. This smoothie packs a powerful punch to keep you feeling good. Yes, you can make this smoothie ahead! Blend it, pour it into a jar, and store it in the fridge. It stays fresh for up to 24 hours. Just give it a good shake before drinking. Absolutely! You can mix and match ingredients. Use different leafy greens like kale or add berries for extra flavor. Almond milk can replace coconut water if you prefer. Be creative with your smoothie! To make this smoothie vegan, skip the honey and use maple syrup instead. All other ingredients are already vegan-friendly. Enjoy your tasty, plant-based power boost! This smoothie is simple and packed with health benefits. You learned how to blend fresh ingredients like spinach, turmeric, and ginger for a nutritious drink. Tips for choosing top-notch ingredients and adjusting flavors help you tailor it to your taste. Remember, you can store leftovers in the fridge or freezer for later use. Enjoy experimenting with different flavors and variations. A healthy smoothie can boost your day!

Turmeric Ginger Immunity Smoothie Healthy Power Boost

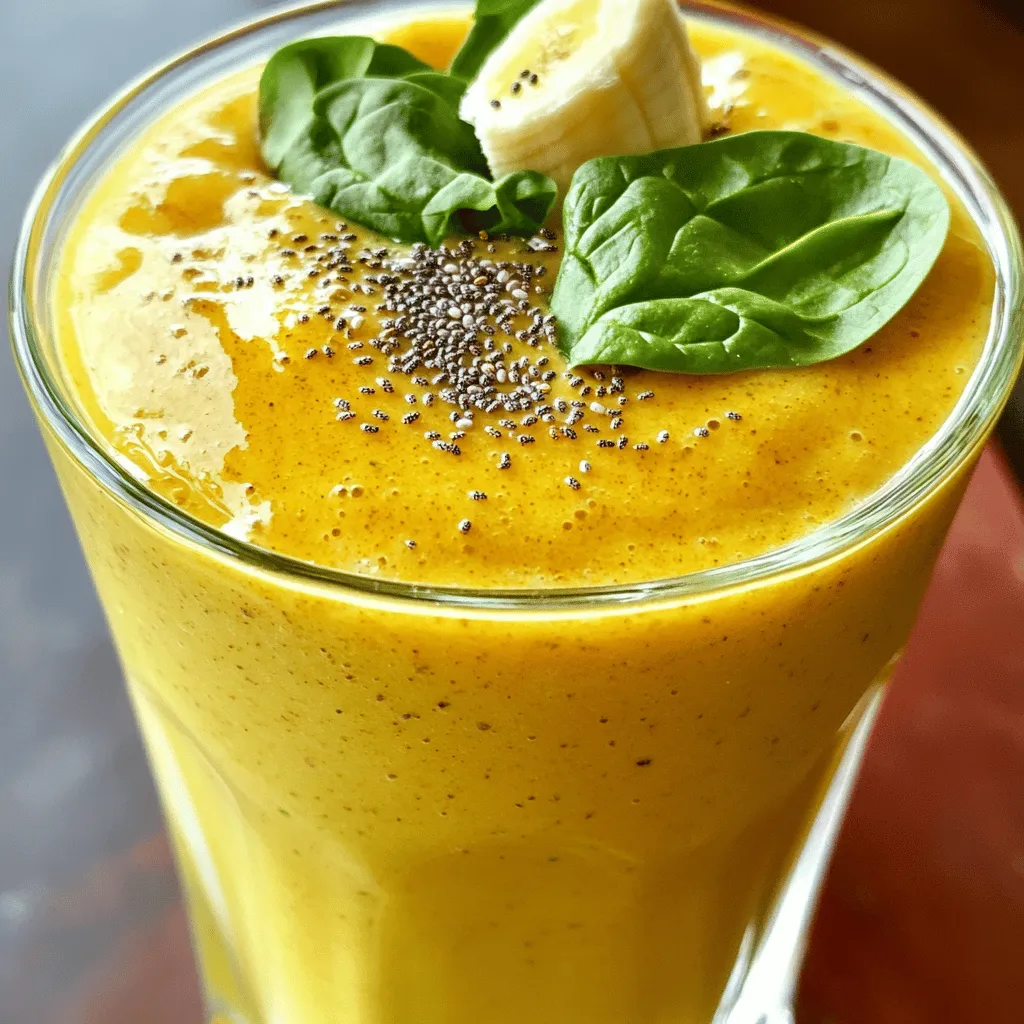
Looking for a tasty way to boost your immunity? This Turmeric Ginger Immunity Smoothie packs a powerful punch of flavor

- 1 cup rolled oats - ½ cup chopped almonds - ½ cup dried cranberries - ¼ cup honey or maple syrup - ¼ cup nut butter (almond or peanut butter) - ¼ cup chia seeds - 1 teaspoon vanilla extract - 1/2 teaspoon cinnamon - 1/4 teaspoon salt Cranberry Almond Energy Bars are easy to make and full of nutrients. Each ingredient plays a key role in flavor and texture. Rolled oats form the base. They provide fiber and energy. Chopped almonds add crunch and healthy fats. Dried cranberries bring a sweet and tart taste. You can pick honey or maple syrup for sweetness. Both options work well. Nut butter gives these bars a creamy feel. Almond butter adds a rich flavor, while peanut butter offers a classic taste. Chia seeds boost nutrition and help bind the bars. Vanilla extract enhances the overall flavor. Cinnamon adds warmth, and a pinch of salt balances the sweetness. Feel free to mix and match these ingredients. You can swap almonds for walnuts or use different dried fruits. Each change offers new tastes and benefits. - Set to 350°F (175°C) - Prepare baking dish with parchment paper Start by preheating your oven. This step is key to getting the bars nice and crispy. While the oven heats, grab your baking dish and line it with parchment paper. Leave some paper hanging over the edges. This helps you lift the bars out easily later. - Combine oats, almonds, cranberries, chia seeds, cinnamon, and salt In a large bowl, mix the dry ingredients. Add 1 cup of rolled oats, ½ cup of chopped almonds, and ½ cup of dried cranberries. Next, toss in ¼ cup of chia seeds, ½ teaspoon of cinnamon, and ¼ teaspoon of salt. Stir it well. This blend gives the bars a tasty crunch. - Heat honey/maple syrup and nut butter - Stir in vanilla extract Now, let’s make the wet mixture. Take a small saucepan and add ¼ cup of honey or maple syrup and ¼ cup of nut butter, like almond or peanut butter. Heat it on low and stir for about 2-3 minutes. You want everything to melt together smoothly. Once done, remove it from the heat and stir in 1 teaspoon of vanilla extract. - Mix wet and dry ingredients thoroughly - Transfer to baking dish and press down Pour your warm wet mixture over the dry ingredients in the bowl. Mix it all together until everything is well coated. It should feel sticky. Next, transfer this mixture to your prepared baking dish. Press it down firmly with a spatula or your hands. Make sure it’s even all around. - Bake until edges are golden - Cool completely before cutting Now, it’s time to bake. Place the dish in your preheated oven. Bake for about 15-20 minutes. Look for golden edges; that’s when you know they’re ready. After baking, let the bars cool completely in the pan. Once cool, use the parchment paper to lift them out and cut them into squares or rectangles. Enjoy your homemade energy bars! To get the right texture in your energy bars, press the mixture down firmly. Use the back of a spatula or your hands to spread it evenly. This helps the bars stick together better. Bake your bars for about 15 to 20 minutes until the edges turn golden brown. Keep an eye on them to prevent burning. A little golden color means they are just right. You can add spices like nutmeg or ginger for extra warmth. If you like more crunch, toss in different nuts like walnuts or pecans. Each nut brings a new taste. Try using different sweeteners, too. Maple syrup gives a rich flavor, while agave syrup offers a lighter touch. Experiment to find your favorite mix! When cutting your bars, use a sharp knife for clean edges. You can cut them into squares or rectangles. Smaller pieces are great for snacks, while larger ones can be a meal. Aim for serving sizes of about two inches by two inches. This size is easy to grab and eat on the go. Enjoy your tasty, healthy treats! {{image_2}} You can easily make these energy bars gluten-free. Just use gluten-free oats instead of regular ones. They have the same texture and flavor. This small change helps everyone enjoy the bars, even those with gluten sensitivities. If you're vegan, swap honey for maple syrup. Maple syrup gives the bars a sweet flavor while staying plant-based. For nut butter, almond or peanut butter works great. If you want to try something different, look for cashew or sunflower seed butter. These options keep the bars creamy and delicious. Feel free to get creative with flavors. You can add other dried fruits like apricots, raisins, or dates. These fruits add sweetness and chewiness. If you love chocolate, mix in some dark chocolate chips. Shredded coconut is also a tasty addition. It gives the bars a nice crunch and tropical twist. To keep your cranberry almond energy bars fresh, use airtight containers. These containers protect the bars from air and moisture. You can also use ziplock bags, but they may not seal as tightly. I prefer airtight containers since they offer the best protection. Make sure to store the bars in a cool, dry place. When stored at room temperature, the bars last about a week. If you want them to stay fresh longer, refrigerate them. The cold helps to maintain flavor and texture. Refrigerated bars can last up to two weeks. To freeze the energy bars, cut them into squares first. Place them in a single layer on a baking sheet. After they freeze solid, transfer them to an airtight container or ziplock bag. This way, they won’t stick together. For thawing, take a bar out and let it sit at room temperature. It only takes about 30 minutes to soften. Enjoy them as a quick snack anytime! Yes, you can swap ingredients in your energy bars. - Alternative nuts and fruits: Use walnuts or pecans instead of almonds. You can also try raisins or apricots in place of cranberries. - Sweetener options: Instead of honey, use agave syrup or maple syrup for a different taste. To check if your bars are done, look for a few signs. - The edges should turn golden brown. - The center should feel firm and not too soft. - You can also insert a toothpick; it should come out clean. These bars offer many health benefits. - Nutritional benefits overview: They are packed with fiber from oats and chia seeds. Almonds provide healthy fats and protein. Dried cranberries add antioxidants. - Caloric content per serving: Each bar has about 150 calories. This makes them a great snack option. Reducing sweetness is easy with a few tweaks. - Reducing sweeteners: Cut the honey or syrup by a tablespoon. You’ll still keep the bars moist. - Other methods to enhance flavor without added sugars: Add spices like nutmeg or more cinnamon. You could also mix in some unsweetened cocoa powder for a rich taste. In this post, we covered a tasty energy bar recipe from ingredients to storage tips. You learned how to mix dry and wet ingredients and bake them to perfection. Use my tips to customize flavors or make gluten-free and vegan options. Remember to store these bars in airtight containers for freshness. Feel free to ask questions about substitutions or baking signs. I hope you enjoy making these healthy snacks that fit your needs and taste!

Cranberry Almond Energy Bars Simple and Healthy Treat

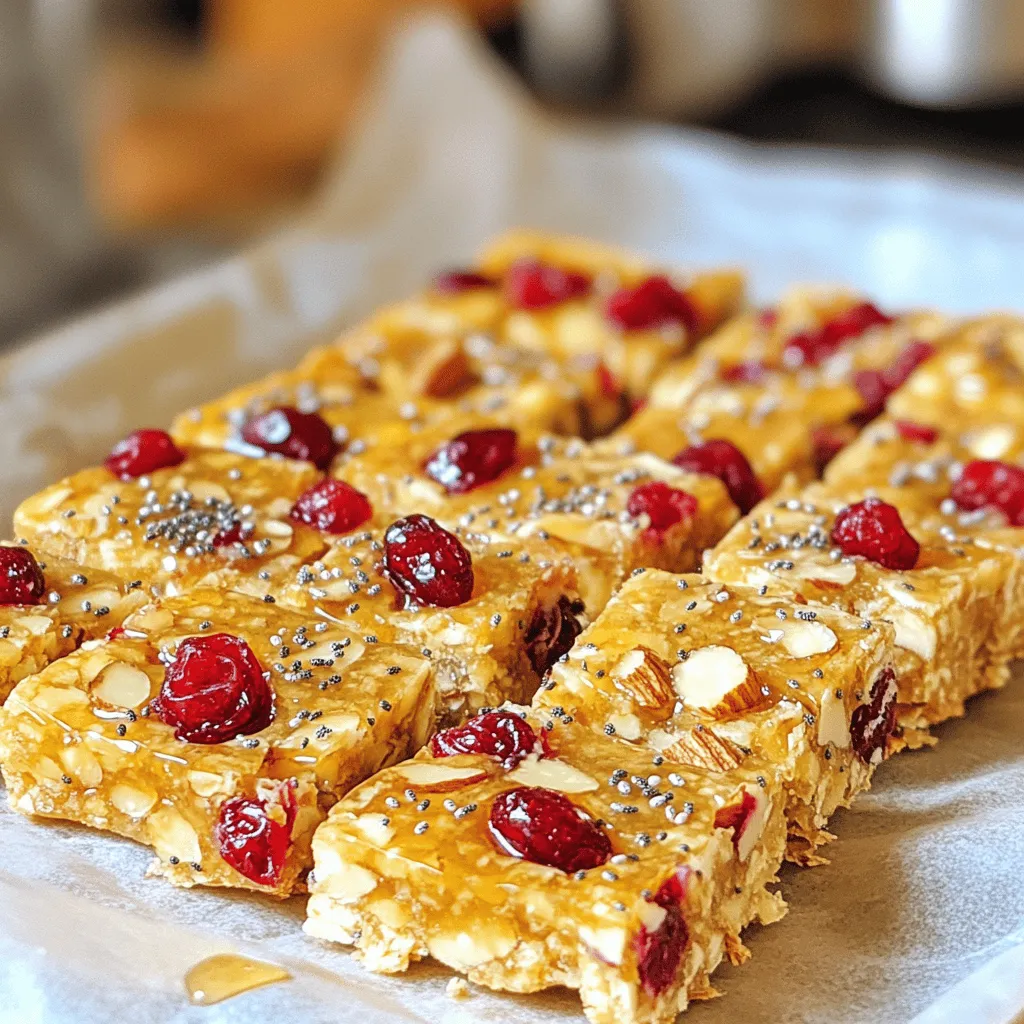
Looking for a quick and healthy snack? Let me introduce you to tasty cranberry almond energy bars! They are simple

- 4 boneless chicken thighs - 8 oz mushrooms, sliced (any variety, such as cremini or button) - 4 tablespoons unsalted butter - 4 cloves garlic, minced - 1 teaspoon dried thyme - 1 teaspoon dried parsley (plus extra for garnish) - Salt and pepper to taste - 1 cup chicken broth - Juice of 1 lemon - 2 tablespoons olive oil Using boneless chicken thighs gives you juicy meat. They stay tender during cooking. You can use any mushrooms you like. Cremini and button mushrooms both work well. Garlic adds a strong flavor that pairs nicely with the butter. Use fresh garlic for the best taste. Fresh herbs can also enhance the dish. Dried herbs are great, but fresh will give a brighter flavor. If you don't have chicken thighs, chicken breasts can work too. Just cook them a bit less, as they can dry out. For mushrooms, you can try shiitake or portobello. If you're out of chicken broth, vegetable broth is a good choice. Lemon juice brightens the dish; if needed, use white wine instead. Start by patting the chicken thighs dry with paper towels. This step helps get a nice sear. Next, season both sides with salt, pepper, and dried thyme. Use enough salt and pepper to enhance the flavor without overpowering it. Let the chicken sit for a few minutes to absorb the seasonings. This small wait makes a difference in taste. In a large skillet, heat 2 tablespoons of olive oil over medium-high heat. Once the oil is hot, add the chicken thighs. Sear them for 5-7 minutes on each side until they turn golden brown. This browning adds flavor. After searing, remove the chicken from the skillet and set it aside. In the same skillet, add the remaining butter. Once it melts, toss in the sliced mushrooms. Sauté them for 5-6 minutes until they are browned and tender. Next, add the minced garlic and cook for 1-2 minutes. Watch carefully; burned garlic tastes bitter. Pour in the chicken broth and lemon juice, scraping up any tasty bits stuck to the pan. Stir in the dried parsley. Return the chicken thighs to the skillet, spooning some sauce over them. Cover the skillet and simmer on low heat for 15-20 minutes. The chicken should reach an internal temperature of 165°F (75°C). This ensures it is safe to eat. To achieve a great sear, make sure your skillet is hot before adding the chicken. If the oil doesn't shimmer, it's not ready. Avoid overcrowding the pan; this can lower the temperature and prevent browning. If needed, cook the chicken in batches. Lastly, resist the urge to move the chicken around too much. Let it sit to form a nice crust. To get the best flavor in garlic butter mushroom chicken, use fresh ingredients. Fresh garlic and herbs make a big difference. When you cook the mushrooms, let them brown well. This adds depth and richness to the dish. Don't rush this step! Searing the chicken until golden adds a nice crust. This helps lock in juices and flavor. Finally, a splash of lemon juice brightens everything up. It balances the rich butter and mushrooms perfectly. A good skillet is key for this recipe. Use a large, heavy-bottomed skillet to heat evenly. You will also need a sharp knife for slicing mushrooms and mincing garlic. A meat thermometer helps check if the chicken is done. Aim for 165°F (75°C) inside. Don’t forget a spatula for flipping the chicken and stirring the sauce. Having these tools ready makes cooking easier and more fun! One mistake is not drying the chicken enough. Moist chicken won’t sear well. Another mistake is overcrowding the pan with mushrooms. It leads to steaming, not browning. Make sure to give them space! Also, don’t burn the garlic. It can turn bitter quickly. Lastly, don't skip the resting time after cooking. Letting the chicken rest helps keep it juicy. Remember these tips for a tasty meal! {{image_2}} You can boost your meal with more veggies. Try adding spinach or kale. These greens cook quickly and add great flavor. You can also add bell peppers or zucchini. Slice them thin so they cook fast. Toss them in while cooking the mushrooms. This way, you get a colorful dish full of vitamins. Chicken thighs are tasty, but you can switch it up. Use chicken breasts for a leaner meal. If you want a different flavor, try turkey. For a vegetarian option, use firm tofu. Cut the tofu into cubes and sauté it like the chicken. Make sure to season it well for flavor. If you love spice, there are easy ways to heat things up. Add red pepper flakes to the garlic and mushrooms. Start with a pinch and taste as you go. You can also mix in some sliced jalapeños for a fresh kick. For an even bolder flavor, try a splash of hot sauce in the sauce. This will give your dish a nice zing! To keep your Garlic Butter Mushroom Chicken fresh, place it in an airtight container. Make sure it cools down before sealing. You can store it in the fridge for up to 3 days. If you want to keep it longer, freezing is a great option. When you're ready to enjoy leftovers, reheat the chicken in a skillet. Add a splash of chicken broth to keep it moist. Heat it over medium heat for about 5-7 minutes until it's warm. You can also use a microwave. Just cover it with a microwave-safe lid and heat in 1-minute intervals until hot. To freeze the chicken, let it cool completely first. Place it in a freezer-safe bag or container. Make sure to remove as much air as possible. You can freeze it for up to 3 months. When you’re ready to eat, thaw it in the fridge overnight. Then, reheat it as mentioned above. This way, you can enjoy your flavorful meal anytime! Yes, you can use chicken breasts. Chicken breasts are leaner than thighs. They will cook faster, so watch the time. Make sure you still season them well for flavor. If you use breasts, check for doneness at 165°F. You can use any mushrooms you like. Cremini and button mushrooms work well. They add a nice richness to the dish. If you want a stronger flavor, try shiitake or portobello. Just slice them up and add them to the pan. The best way is to check the internal temperature. Use a meat thermometer. The chicken should reach 165°F. If you don’t have a thermometer, cut into the thickest part. The meat should be white, not pink. Juices should run clear, not red or pink. This blog post covered key ingredients, step-by-step cooking, and handy tips. You learned how to prepare chicken, avoid common mistakes, and explore variations. Remember to store leftovers properly and try alternative protein options. Cooking should be fun and rewarding, so use these insights to create tasty meals. Enjoy experimenting in the kitchen, and always strive for great flavor. Following these steps will help you cook with confidence and impress anyone at the table.

Garlic Butter Mushroom Chicken Simple and Flavorful Meal

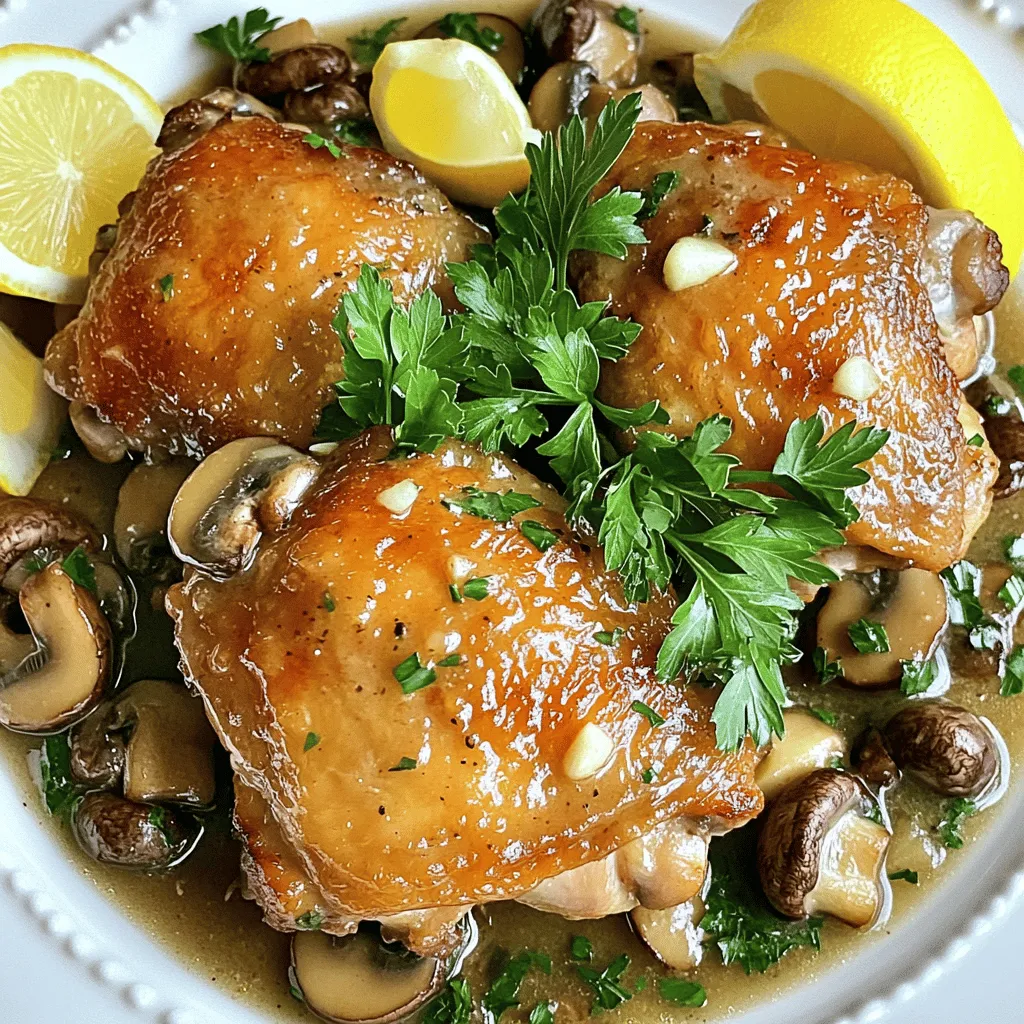
Are you ready to whip up a dish that’s both simple and rich in flavor? My Garlic Butter Mushroom Chicken

To make Fiesta Corn Salad, you need fresh and vibrant ingredients. Here’s what you’ll need: - 2 cups fresh corn kernels (or 1 can of corn, drained) - 1 cup cherry tomatoes, halved - 1 red bell pepper, diced - 1 avocado, diced - 1/4 cup red onion, finely chopped - 1/4 cup fresh cilantro, chopped - 2 tablespoons lime juice - 1 tablespoon olive oil - 1 teaspoon cumin - Salt and pepper to taste These fresh ingredients create a colorful and tasty salad. The corn adds sweetness, while the lime juice brings zesty brightness. If you don’t have fresh corn, canned corn works well. Just drain it before using. Canned corn is convenient and saves time. You can still enjoy great flavor without the fresh corn prep. Want to spice things up? Consider these optional ingredients: - 1 jalapeño, deseeded and minced Adding jalapeño gives your salad a kick. Adjust the amount based on your heat preference. Feel free to get creative and add other spices or herbs too! To start, I like to use fresh corn for the best taste. If you choose fresh corn, boil or steam the kernels for about 4-5 minutes. After that, drain the corn and let it cool. If you're short on time, you can use canned corn. Just drain it well and it’s ready to go. Now, grab a large mixing bowl. Add the fresh or canned corn, halved cherry tomatoes, diced red bell pepper, diced avocado, and finely chopped red onion. Make sure to mix these ingredients gently. You want all the colors to shine. If you love a bit of spice, this is the time to add minced jalapeño. In a small bowl, whisk together 2 tablespoons of lime juice, 1 tablespoon of olive oil, and 1 teaspoon of cumin. Add salt and pepper to taste. Whisk until everything blends well. Pour this dressing over your salad mix. Then, add in the chopped cilantro. Gently toss the salad so each piece gets a nice coating of the dressing. After that, let it sit for 10-15 minutes. This allows the flavors to mix and become even tastier. To make your Fiesta Corn Salad shine, mix and match flavors. I love adding diced mango or pineapple for extra sweetness. A sprinkle of feta cheese brings a nice salty bite. Fresh herbs like parsley or mint also add a new twist. You can even switch lime juice for lemon juice for a different zing. Serve your salad in a colorful bowl. Garnish with extra cilantro leaves and lime wedges. This makes it look inviting and fresh. Pair it with grilled chicken or fish for a full meal. You can also use it as a dip with tortilla chips. It’s perfect for a picnic or barbecue. Want more heat? Add minced jalapeño to the salad. Start with half and taste it first. You can always add more if you like it spicy. For less heat, skip the jalapeño entirely. You can also use a pinch of cayenne pepper for a milder kick. Adjusting the spice makes this salad perfect for everyone. {{image_2}} You can easily make Fiesta Corn Salad vegan. All the ingredients are plant-based. Just skip the jalapeño if you want less heat. This salad is fresh, light, and perfect for everyone. It’s a great side dish for picnics or barbecues. You can even add black beans for extra protein. This will make the salad heartier without losing its fun vibe. Feel free to change up the ingredients. If you don’t like red bell pepper, use green or yellow. You can swap avocado for diced cucumber for a crunchy twist. Don't have cilantro? Try parsley or mint for a different flavor. Lime juice can be replaced with lemon juice in a pinch. Each swap adds a new taste to this salad while keeping it bright and fresh. Change the ingredients based on the season. In summer, use juicy peaches for sweetness. In fall, add roasted butternut squash for warmth. During winter, pomegranate seeds can give a nice pop of color and flavor. Each season brings new flavors to explore. This keeps the salad exciting and allows you to enjoy fresh, local ingredients all year round. To store leftovers, place the salad in an airtight container. This keeps it fresh. You can store it in the fridge for up to three days. If you notice any extra liquid, drain it before serving again. For the best taste, eat the salad soon after you make it. If you need to store it, keep ingredients separate. For example, store the dressing in a small jar. Mix it in just before you eat. This keeps your salad crisp and bright. I do not recommend freezing Fiesta Corn Salad. The texture changes, especially for tomatoes and avocado. If you freeze it, use a freezer-safe container. To thaw, place it in the fridge overnight. Use it in cooked dishes or soups if it loses its crunch. Yes, you can use frozen corn. Just thaw it first. Frozen corn is sweet and tasty. It saves time, too. You can add it directly to your salad after thawing. You can add many veggies! Try diced cucumbers for crunch. Chopped green onions will add flavor. Black beans make it hearty. You can even add corn salsa for a twist! Feel free to be creative with your choices. Fiesta Corn Salad stays fresh for about 3 days in the fridge. Store it in an airtight container. If it sits too long, the veggies may get soggy. Enjoy it cold or at room temperature! In this blog post, we explored how to make a delicious Fiesta Corn Salad. We covered fresh and canned ingredients, plus optional items for added taste. You learned step-by-step instructions for preparing the salad and tips to enhance flavors. I shared ideas for variations, storage tips, and answered common questions. Now, you have all the tools to create your own tasty salad that suits your taste. Enjoy your cooking!

Fiesta Corn Salad With Lime Tasty and Fresh Recipe

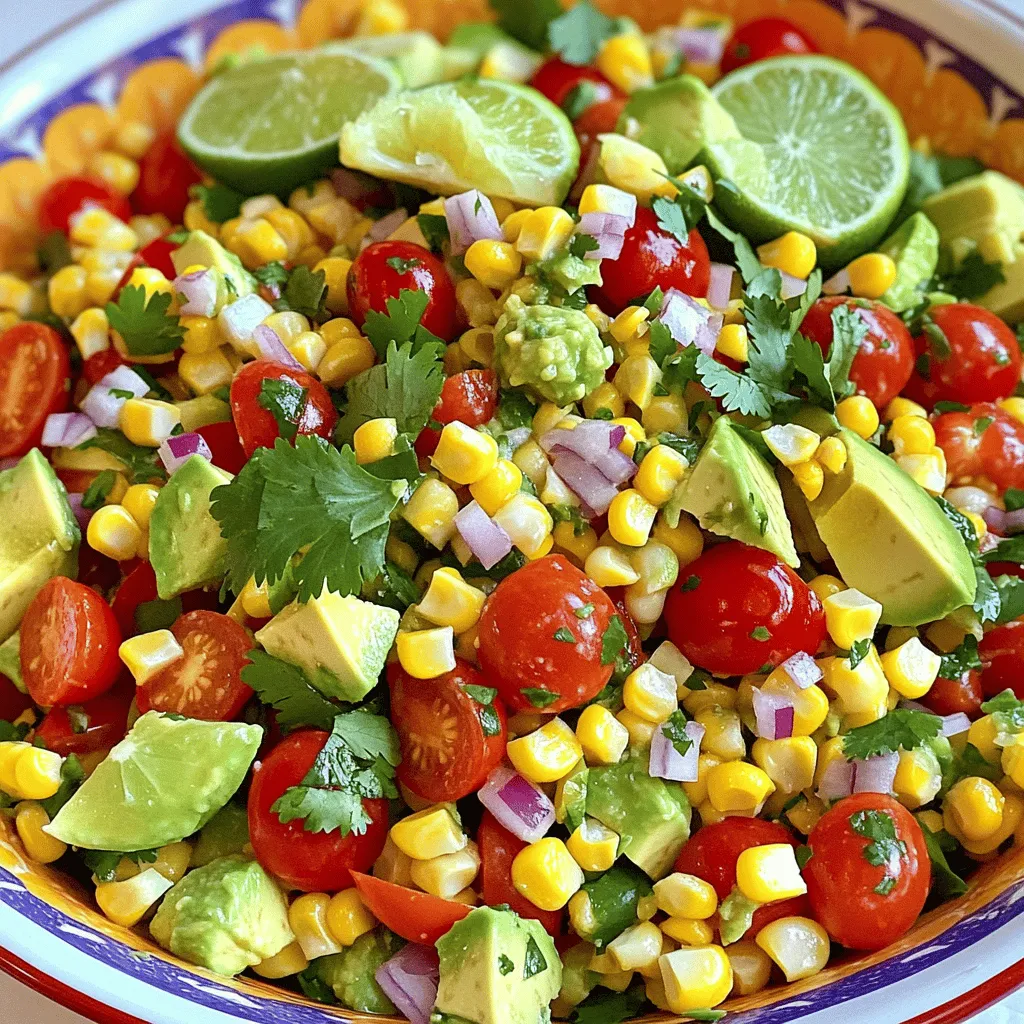
Looking for a vibrant and tasty dish? Let me introduce you to Fiesta Corn Salad with Lime! This salad is

Older posts
Newer posts
← Previous Page1 … Page19 Page20 Page21 … Page86 Next →

dsad

© 2026 Cooking Wells • Built with GeneratePress

Our Policies

  • Copyright Policy
  • Cookie Policy
  • GDPR Policy
  • Privacy Policy
  • Disclaimer
  • Terms Of Use

More Information

  • Home
  • About
  • Contact
  • Appetizers
  • Dessert
  • Dinner
  • Drinks
©2026, Cooking Wells About Back To Top