Skip to content
DisclaimerTerms Of UseGDPR PolicyCookie Policy

Cooking Wells

  • Home
  • Drinks
  • Appetizers
  • Dinner
  • Dessert
  • About
  • Contact
  • Privacy Policy
DisclaimerTerms Of UseGDPR PolicyCookie Policy

NO-ING-IMG

- 14 oz firm tofu, pressed and cubed - 3 tablespoons sesame oil - 2 tablespoons soy sauce - 1 tablespoon sriracha (adjust to taste) - 4 cups vegetable broth - 4 oz ramen noodles - 1 cup broccoli florets - 1 cup sliced bell peppers (use a mix of colors) - 2 green onions, sliced - 2 cloves garlic, minced - 1 tablespoon ginger, grated - 2 teaspoons sesame seeds - Fresh cilantro for garnish - Salt and pepper to taste Fresh ingredients make a huge difference. Always choose firm tofu for a nice texture. Look for bright, crisp vegetables. Your broccoli should be deep green, and bell peppers should be firm. Check the garlic for dryness. Fresh garlic gives the best flavor. Use high-quality soy sauce for richer taste. You can swap tofu for tempeh or chicken. Try using whole grain ramen noodles for added fiber. If you want more spice, add chili flakes or extra sriracha. Use different vegetables like carrots or snap peas for variety. Don’t have cilantro? You can use parsley or basil instead. Adjust the recipe to your taste! Start by pressing the tofu to remove extra water. This step is key for a nice texture. Once pressed, cut the tofu into small cubes. Aim for about 1-inch pieces for even cooking. Heat 1 tablespoon of sesame oil in a large skillet over medium heat. Add the cubed tofu and cook it for 8-10 minutes. You want the tofu to turn golden brown on all sides. Once crispy, stir in the soy sauce and sriracha. Cook for 2-3 more minutes. This adds great flavor. After that, take the tofu out of the skillet and set it aside. In the same skillet, add the remaining 2 tablespoons of sesame oil. Throw in minced garlic and grated ginger. Sauté these for about 30 seconds, just until you smell their aroma. Next, pour in 4 cups of vegetable broth and bring it to a simmer. Add 1 cup of broccoli florets and 1 cup of sliced bell peppers. Cook for 3-5 minutes. The vegetables should be tender but still bright. While the broth simmers, cook 4 oz of ramen noodles in another pot. Follow the package instructions for the best results. Drain the noodles and set them aside. Once the broth is ready, add the cooked noodles and the crispy tofu to the broth. Stir well to combine everything. Taste the broth and adjust with salt, pepper, and more sriracha if you want more heat. Serve hot, finishing with green onions, sesame seeds, and fresh cilantro on top. To make the tofu crispy, start with firm tofu. Press it to remove water. This helps it fry better. Cut the tofu into cubes after pressing. Heat sesame oil in a skillet over medium heat. Add the tofu cubes and let them cook without stirring for a few minutes. This browns the tofu nicely. Flip the cubes to brown all sides. Cook for about 8-10 minutes total. When golden, add soy sauce and sriracha. This adds flavor and keeps them crispy. If you like spice, add more sriracha. Start with one tablespoon. Taste the broth after adding it. You can always add more if needed. For milder spice, use less sriracha. You can also use sweet chili sauce instead. This adds flavor without too much heat. Try adding a dash of chili flakes for more heat or a hint of smokiness. This recipe is already vegan, but you can customize it. Use tamari instead of soy sauce for a gluten-free option. Swap the vegetable broth for homemade broth for more flavor. You can add more vegetables, like mushrooms or spinach, to boost nutrition. Fresh herbs like basil or mint can add a unique twist. Enjoy experimenting with different flavors! {{image_2}} You can boost flavor and nutrition by adding more vegetables. Try adding carrots, snap peas, or baby bok choy. These veggies cook quickly and add a lovely crunch. You can also toss in mushrooms for a savory taste. Just remember to adjust cooking times based on the vegetable you choose. For instance, add softer veggies like spinach at the end to keep them fresh. Ramen noodles are great, but other noodles work well too. You can use soba noodles for a nutty flavor. Rice noodles are a gluten-free option that cooks fast. Even whole wheat noodles can add a hearty touch to your dish. Just ensure to follow the cooking time on the package to keep your noodles al dente. Tofu is a fantastic choice, but you can easily swap it out. For a meaty flavor, try chicken or shrimp. These proteins cook quickly and add a different texture. If you want a plant-based option but don’t have tofu, chickpeas work well too. They add protein and a nice bite to your ramen. To store leftovers, let the ramen cool to room temperature. Place it in an airtight container. This keeps the flavors fresh and prevents spills. You can store it in the fridge for up to three days. If you notice the noodles becoming soggy, it’s best to separate them from the broth. When you’re ready to eat, reheat the ramen on the stove. Pour the ramen into a pot over medium heat. Add a splash of water or broth to keep it from drying out. Stir gently and heat until warm. You can also use a microwave if you prefer. Just heat it in short bursts, stirring in between, until hot. You can freeze Spicy Sesame Tofu Ramen, but it’s best to freeze the broth and tofu separately from the noodles. Use freezer-safe containers for the broth and tofu. They can last up to three months in the freezer. When ready to eat, thaw them overnight in the fridge. Cook fresh noodles to serve with the reheated broth and tofu. This keeps the dish fresh and tasty! Spicy sesame tofu ramen is a tasty noodle dish. It combines soft tofu and fresh veggies in a savory broth. The broth uses vegetable stock, garlic, and ginger for depth. You can customize the spice with sriracha. This dish is great for lunch or dinner. Yes, you can make this dish gluten-free. Use gluten-free ramen noodles instead of regular ones. Also, choose a gluten-free soy sauce. These swaps keep the flavors while meeting gluten-free needs. To make a richer broth, add extra ingredients. You can mix in miso paste for umami. A splash of coconut milk adds creaminess. You can also use a homemade broth for more depth. Let the broth simmer longer to enhance the flavors. This ramen pairs well with many sides. You can serve it with a side salad for freshness. Edamame is another great option for protein. You could also add pickled vegetables for a tangy crunch. This blog post covered how to make Spicy Sesame Tofu Ramen. We explored the key ingredients, tips for freshness, and alternatives to fit your taste. I shared clear steps on preparing and cooking tofu, simmering broth, and making the perfect noodle mix. Remember, you can customize this dish by adding different veggies or proteins. Store leftovers properly to enjoy your meal later. Feel free to revisit the FAQs for extra guidance. Now, go ahead and enjoy creating your tasty ramen!

Spicy Sesame Tofu Ramen Flavorful and Easy Recipe

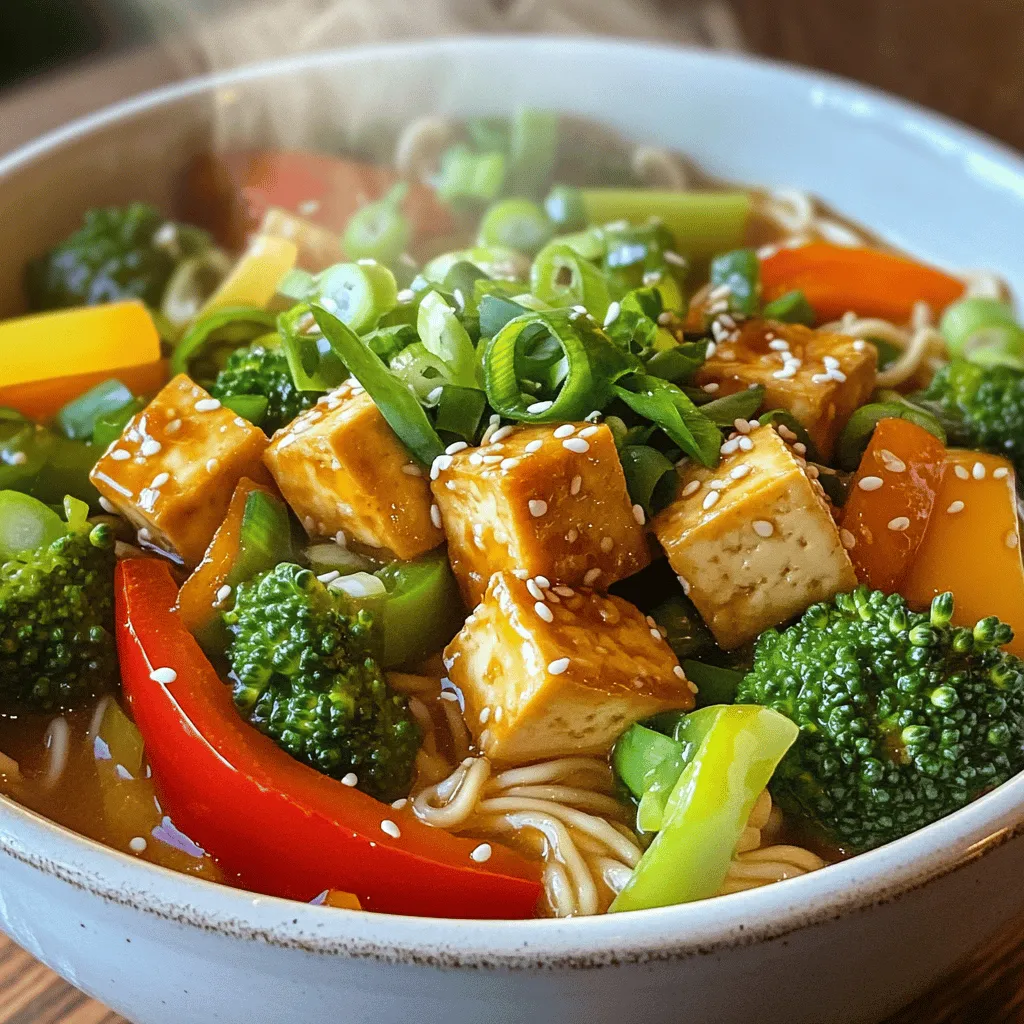
Looking for a dish that bursts with flavor and is easy to make? My Spicy Sesame Tofu Ramen will hit

- 1 cup quinoa, rinsed - 2 cups vegetable broth - 2 cups fresh broccoli florets - 1 cup shredded sharp cheddar cheese - 1 cup cream cheese, softened - 1/2 cup Greek yogurt - 1/2 teaspoon garlic powder - 1/2 teaspoon onion powder - 1/4 teaspoon red pepper flakes (optional) - Salt and pepper to taste - 1/4 cup breadcrumbs (for topping) - 2 tablespoons olive oil When picking fresh broccoli, look for bright green color. The florets should be tight and firm. Avoid any yellowing or wilting. Fresh broccoli smells sweet and earthy. If it feels rubbery or has dark spots, skip it. Always choose broccoli that feels heavy for its size. This means it is fresh and full of water. If you want to swap quinoa, use brown rice or couscous. Both give a nice texture. For cheese, you can try mozzarella or gouda. These options melt well and taste great. If you need a dairy-free choice, use cashew cream. It adds creaminess without dairy. Start by rinsing one cup of quinoa under cold water. This helps remove bitterness. In a medium pot, combine the rinsed quinoa with two cups of vegetable broth. Bring this to a boil, then lower the heat. Cover the pot and let it simmer for around 15 minutes. The quinoa will absorb all the liquid. Afterward, remove it from heat and fluff it gently with a fork. Next, take two cups of fresh broccoli florets and cut them into small pieces. This makes them easy to mix and eat. In a big mixing bowl, add one cup of softened cream cheese. To this, mix in half a cup of Greek yogurt. Stir until you have a smooth, creamy blend. Now, add the cooked quinoa to this creamy mix. Make sure to stir well so everything combines nicely. Next, fold in the broccoli florets you prepared earlier. Add half a cup of shredded sharp cheddar cheese, half a teaspoon of garlic powder, and half a teaspoon of onion powder. If you like some heat, sprinkle in a quarter teaspoon of red pepper flakes. Season this mixture with salt and pepper to taste. Grab a greased casserole dish, preferably around 9x9 inches. Pour the creamy quinoa and broccoli mixture into it. Spread it evenly. Now, sprinkle the remaining cheddar cheese on top. For a crispy finish, add a quarter cup of breadcrumbs and drizzle two tablespoons of olive oil over everything. Preheat your oven to 350°F (175°C). Bake the casserole for 25 to 30 minutes. You want the top to be golden and bubbly. After baking, let it cool for a few minutes before serving. This helps everything set nicely. Enjoy your creamy broccoli cheddar quinoa casserole! To make your casserole extra creamy, use full-fat cream cheese. This gives a rich base. Mixing in Greek yogurt adds tang and creaminess too. If you want it even smoother, add a splash of vegetable broth. Stir well to blend everything. Make sure to preheat your oven to 350°F (175°C). This helps the casserole bake evenly. Use a greased 9x9-inch dish for easy serving. Bake for 25-30 minutes until the top is golden and bubbly. Let it cool for a few minutes before serving. This helps it set nicely. Serve the casserole warm for the best taste. Top it with fresh broccoli florets for color. A sprinkle of herbs like parsley or chives adds freshness. You can also add a dollop of Greek yogurt as a garnish. This gives a nice touch and extra creaminess. {{image_2}} You can boost the protein in this dish easily. Adding cooked chicken or tofu makes it heartier. For chicken, use shredded rotisserie or grilled pieces. For tofu, choose firm tofu, press it to remove water, and cube it before mixing. Both options blend well with the creamy texture and provide flavor. To make this casserole vegan, swap out the cheese and cream. Use cashew cream or a store-bought vegan cream cheese. Nutritional yeast adds a cheesy flavor. For the Greek yogurt, replace it with almond or coconut yogurt. These choices keep the dish rich and creamy without animal products. Give your casserole a flavor boost with herbs and spices. Try adding thyme or basil for a fresh taste. If you like heat, increase the red pepper flakes or add cayenne pepper. A touch of smoked paprika can add depth. Experiment with these spices to find your perfect mix! To keep your creamy broccoli cheddar quinoa casserole fresh, let it cool completely. Then, transfer it to an airtight container. This will help keep it moist and tasty. Store it in the fridge for up to four days. If you want to save it longer, freezing is a great option. Just make sure it is fully cooled before you freeze. When you're ready to enjoy your leftovers, reheat them in the oven. Set your oven to 350°F (175°C). Place the casserole in a baking dish. Cover it with foil to keep it from drying out. Heat for about 20 minutes or until it's warmed through. You can also microwave it. Just cover it and heat in short bursts, checking often to avoid overcooking. To freeze the casserole, cut it into portions. Wrap each piece tightly in plastic wrap. Then, place them in a freezer-safe bag or container. Label the bags with the date. This makes it easy to know how long they’ve been frozen. Your casserole can stay good for up to three months in the freezer. When you’re ready to eat, thaw it in the fridge overnight before reheating. Yes, you can prepare this casserole ahead of time. Just follow the recipe steps but do not bake it. Cover the dish and store it in the fridge for up to two days. When ready to eat, bake it straight from the fridge. You might need to add a few extra minutes to the cooking time. If you want to replace cream cheese, try using Greek yogurt or cottage cheese. Both options add creaminess and a bit of tang. You can also use a dairy-free cream cheese for a vegan option. Yes, quinoa is a great substitute for rice. It is packed with protein and fiber. Plus, quinoa cooks faster than rice. It gives a nice texture and absorbs flavors well, making your casserole even tastier. To keep this dish gluten-free, use gluten-free breadcrumbs for the topping. Make sure your vegetable broth is also gluten-free. All other ingredients in this recipe are naturally gluten-free. Absolutely! Frozen broccoli works well in this casserole. Just make sure to thaw and drain it before mixing. This will help keep the casserole from being too watery. This blog post covered how to make a delicious casserole with broccoli, quinoa, and cream cheese. We discussed ingredient selection, preparation steps, and tips for a creamier texture. You can modify the dish with proteins and spices, and learn to store leftovers effectively. Whether you’re cooking for yourself or friends, these tips will help you craft a tasty meal. Remember, cooking should be fun and creative, so feel free to make this recipe your own!

Creamy Broccoli Cheddar Quinoa Casserole Delight

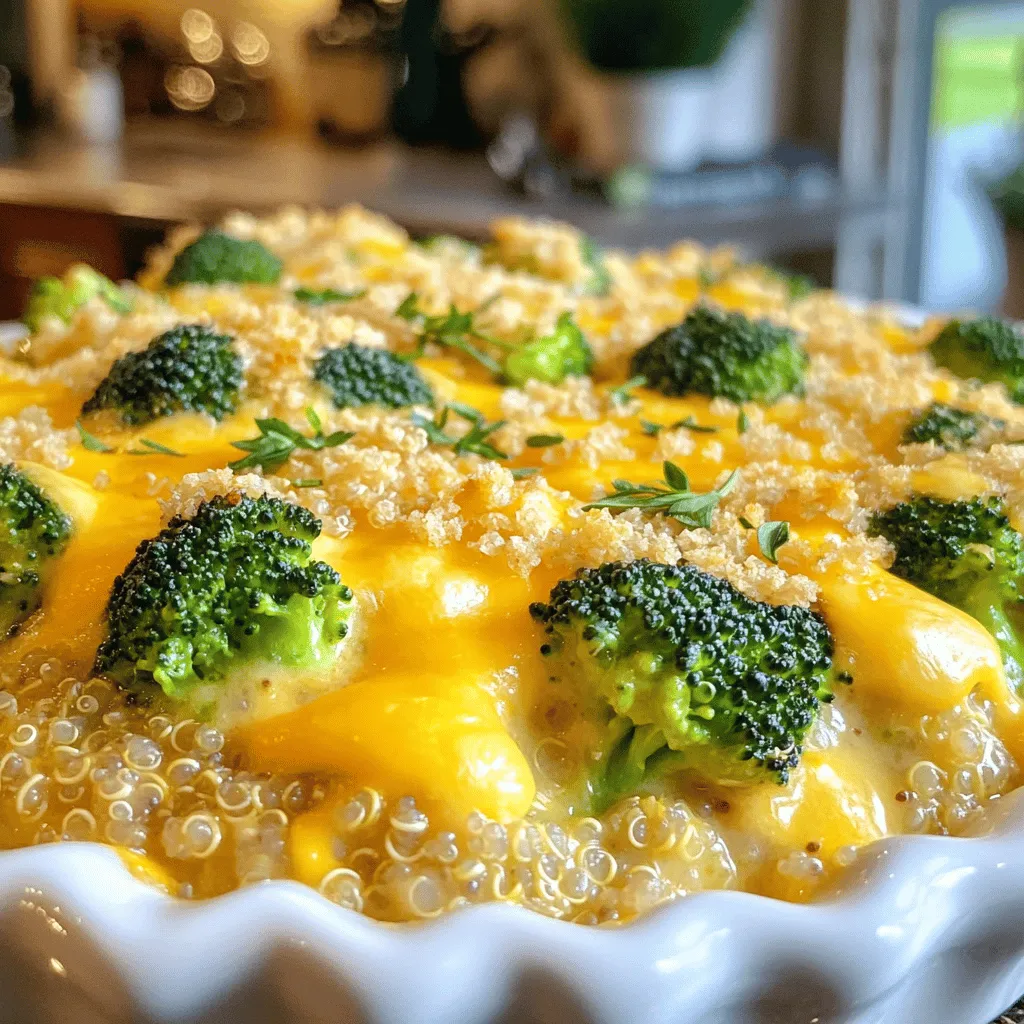
Are you craving a dish that’s both creamy and nutritious? Look no further! My Creamy Broccoli Cheddar Quinoa Casserole Delight

Here’s what you need to make Maple Dijon Brussels Sprouts: - 1 lb Brussels sprouts, trimmed and halved - 2 tablespoons olive oil - 2 tablespoons pure maple syrup - 1 tablespoon Dijon mustard - 1 teaspoon garlic powder - Salt and pepper to taste - Optional: 1/4 cup walnuts, chopped - Optional: Fresh parsley, chopped for garnish Each ingredient plays a key role. The Brussels sprouts provide a hearty base. The olive oil helps with roasting, giving them a nice crisp. Maple syrup adds a sweet touch while the Dijon mustard adds tang. Garlic powder enhances the flavor, and salt and pepper bring balance. If you want some crunch, toss in walnuts. For a fresh finish, sprinkle parsley on top. These ingredients create a dish that is both tasty and fun! {{ingredient_image_1}} First, we need to preheat the oven. Set it to 400°F (200°C). This heat will help our Brussels sprouts become nice and crispy. Next, we prepare the Brussels sprouts. Trim the ends and cut them in half. This helps them cook evenly and absorb all the flavors. In a large mixing bowl, add the halved Brussels sprouts. Pour in 2 tablespoons of olive oil. Then, add 2 tablespoons of pure maple syrup and 1 tablespoon of Dijon mustard. Sprinkle in 1 teaspoon of garlic powder, along with salt and pepper to taste. Now, mix everything well. You want the sprouts to be fully coated in this tasty mixture. Take a baking sheet and spread the Brussels sprouts in a single layer. If you like a little crunch, add 1/4 cup of chopped walnuts on top. Now, place the baking sheet in the oven. Roast for 25-30 minutes. Halfway through, give the pan a good shake. This ensures even cooking. Your Brussels sprouts should turn golden brown and have crispy edges. Once done, take them out and let them cool for a few minutes. You can garnish with fresh parsley if you want before serving. Enjoy! To get those Brussels sprouts nice and crispy, start by cutting them in half. This helps them cook evenly. Make sure to space them out on the baking sheet. If they are too close, they will steam instead of roast. For even browning, shake the pan halfway through cooking. This flips them around and helps them crisp up. Place the baking sheet in the middle of the oven. This position allows hot air to circulate around the sprouts, giving them a nice golden color. You can play with the seasonings to find what you love. Try adding a pinch of cayenne pepper for heat. Smoked paprika gives a nice, rich flavor too. For a zestier touch, consider adding lemon zest or a splash of balsamic vinegar. Both add a burst of taste that pairs well with the sweetness of maple syrup. Garnishing can make your dish pop. Fresh parsley adds a lovely green touch and a hint of freshness. Try sprinkling some toasted nuts on top for crunch. If you want to impress, serve the Brussels sprouts in a beautiful bowl. The vibrant colors will catch everyone’s eye, making the dish even more inviting. Pro Tips Choose Fresh Brussels Sprouts: Look for bright green sprouts that are firm and tightly packed. Avoid any that are yellowing or have blemishes for the best flavor and texture. Don't Overcrowd the Baking Sheet: Make sure the Brussels sprouts are in a single layer with some space between them. This allows for proper roasting and helps them get crispy. Experiment with Flavor: Feel free to add other spices or ingredients like red pepper flakes for heat or balsamic vinegar for tanginess. This recipe is versatile! Serve Immediately: For the best texture, serve the Brussels sprouts right after roasting. They are most crispy and delicious when fresh out of the oven. {{image_2}} If you want to skip the walnuts, that’s easy. Just leave them out. You can still enjoy great texture. Try adding sunflower seeds or pumpkin seeds instead. These seeds give a nice crunch without nuts. To keep this recipe vegan, check your maple syrup and Dijon mustard. Most brands are vegan-friendly. Make sure there are no hidden animal products. This way, you can enjoy the dish without worry. Brussels sprouts are great, but you can add other veggies too! Try carrots or sweet potatoes in the mix. They add color and taste. You can also use kale or butternut squash for a fall twist. Just chop them up and roast them with the sprouts. Enjoy the changing flavors of the season! Store your leftover Maple Dijon Brussels sprouts in an airtight container. This keeps them fresh. Place them in the fridge. They should stay good for 3 to 4 days. If you want to add a twist, save some of the maple syrup mixture for drizzling later. This can boost the flavor when you eat them again. To reheat, use the oven if you want crispness. Preheat it to 350°F (175°C). Spread the sprouts on a baking sheet. Bake for about 10 to 15 minutes. This helps regain their crispy edges. If you are in a hurry, use the microwave. Just remember, they may not be as crispy. Heat them in short bursts, checking often. You can freeze Maple Dijon Brussels sprouts for later use. First, cool them completely. Place them in a freezer bag. Remove as much air as you can before sealing. They will stay fresh for up to 3 months. When you are ready to eat them, thaw them in the fridge overnight. Reheat as noted above. Enjoy the flavor even after freezing! Yes, you can use frozen Brussels sprouts. However, they may not taste as fresh. Frozen sprouts often lose some crunch. When thawed, they may become mushy. If you use frozen, roast them longer to help regain some texture. Just keep an eye on them to avoid overcooking. You can prep the Brussels sprouts ahead of time. Trim and halve the sprouts a day before. Store them in an airtight container in the fridge. You can mix the olive oil, maple syrup, Dijon mustard, garlic powder, salt, and pepper in another bowl. Combine them when you're ready to cook. This saves time and keeps your meal fresh. Maple Dijon Brussels sprouts work well with many dishes. They are great with roasted chicken or grilled salmon. You can also serve them alongside quinoa or a hearty grain salad. For a vegetarian meal, pair them with a sweet potato dish. The flavors blend nicely and make for a colorful plate. This article covered everything you need to make Maple Dijon Brussels sprouts. You learned the ingredients, step-by-step instructions, and useful tips. I shared ways to enhance flavors and options for variations. Proper storage and reheating methods ensure your leftovers stay tasty. Remember, cooking is about fun and creativity, so feel free to adjust the recipe to match your taste. Enjoy making this dish and sharing it with friends and family!

Maple Dijon Brussels Sprouts Flavorful and Easy Recipe

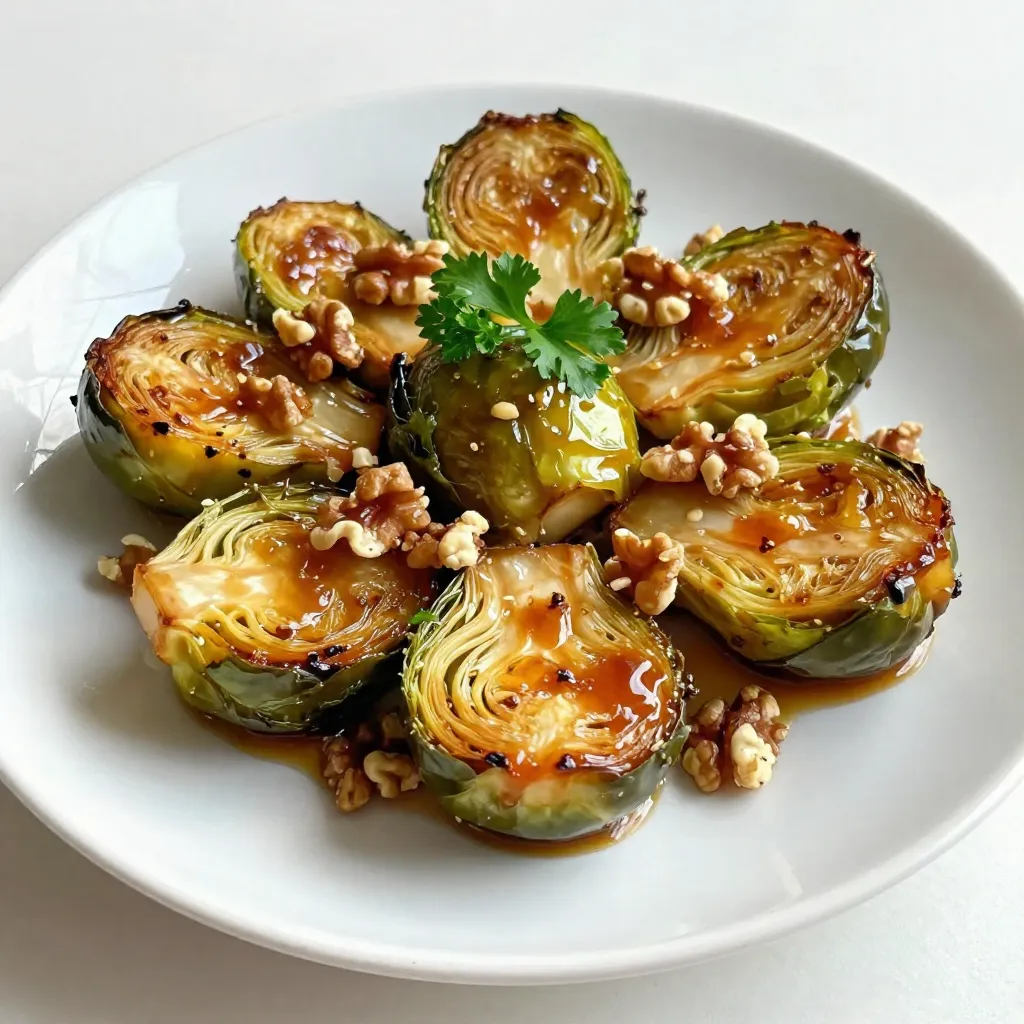
If you’re looking for a quick, tasty side dish, Maple Dijon Brussels Sprouts are the answer. This recipe combines sweet

To make this delicious lemon ricotta pasta with peas, you will need: - 12 oz spaghetti or your choice of pasta - 1 cup ricotta cheese - Zest of 1 lemon - 1/4 cup fresh lemon juice - 1 cup fresh or frozen peas - 2 tablespoons olive oil - 2 cloves garlic, minced - 1/2 teaspoon red pepper flakes (optional) - Salt and pepper, to taste - 1/2 cup freshly grated Parmesan cheese - Fresh basil or parsley for garnish You can customize your dish in fun ways by adding: - Cooked chicken or shrimp for protein - Fresh spinach or arugula for extra greens - A squeeze of lime for a twist on flavor - Other herbs like tarragon or dill for variety Gather these tools to make your cooking easy: - Large pot for boiling pasta - Large skillet for sautéing - Mixing bowl for the ricotta sauce - Measuring cups and spoons - Wooden spoon or spatula for mixing - Grater for Parmesan cheese With these ingredients and tools, you're all set to create a creamy, flavorful lemon ricotta pasta with peas that will impress everyone at the table! Start by boiling a large pot of salted water. Add your pasta to the pot. Cook it according to the package instructions until it is al dente. This means it should be firm but not hard. Before draining, save 1 cup of pasta water. This water has starch that helps make the sauce creamy. In a large skillet, heat 2 tablespoons of olive oil over medium heat. Add 2 minced garlic cloves and red pepper flakes if you like some spice. Sauté for about 1 minute until the garlic smells good. Then, add 1 cup of peas. Cook for 2-3 minutes until the peas are warm. In a mixing bowl, combine 1 cup of ricotta cheese, the zest of 1 lemon, and 1/4 cup of fresh lemon juice. Add salt and pepper to taste. If the mixture is thick, stir in a bit of the reserved pasta water. This will help make the sauce smoother and creamier. Once the pasta is drained, add it to the skillet with the peas and garlic. Pour the ricotta sauce over the pasta. Gently toss everything together until the pasta is coated. If it looks dry, add more reserved pasta water until you reach the desired creaminess. Remove the skillet from heat and mix in 1/2 cup of freshly grated Parmesan cheese. Taste the pasta and add more salt or pepper if needed. Serve the dish warm. You can garnish it with fresh basil or parsley and sprinkle some extra Parmesan on top for a nice touch. Enjoy your meal! Cooking pasta well is key. I always use a large pot with salted water. The salt helps add flavor. Bring the water to a rolling boil before adding your pasta. Stir the pasta often. This keeps it from sticking. Cook it until it's al dente, which means it should be firm but not hard. Save a cup of the pasta water. This water helps make the sauce smooth. Fresh herbs can take this dish to the next level. I love using basil or parsley for a fresh touch. Chop them finely and sprinkle them on top right before serving. You can also mix them into the sauce for a stronger flavor. This adds color and makes the dish even more appealing. If you like a bit of spice, try adding some red pepper flakes. They can give your pasta a nice kick. The ricotta cheese gives this pasta its creamy base. If you want it creamier, add more ricotta. If it seems too thick, stir in some of the reserved pasta water. This water has starch, which helps the sauce cling to the pasta. Keep mixing until you get the texture you like. You can also add more lemon juice for a zesty taste. Just remember to taste as you go. This way, you can adjust the flavors to your liking. {{image_2}} You can add protein to your Lemon Ricotta Pasta for a heartier meal. Chicken and shrimp are great choices. For chicken, grill or sauté it in a pan. Cut it into bite-sized pieces and mix it in with the pasta. If you use shrimp, sauté it in the same pan with garlic. Add the shrimp once it turns pink. This adds flavor and makes the dish more filling. If you want a vegetarian twist, try adding spinach. Fresh spinach wilts down nicely and adds color. Add it to the skillet when you cook the peas. Cook until it wilts, then combine it with the pasta. You can also use other veggies like zucchini or asparagus. Just sauté them until tender before mixing with the pasta. For a gluten-free option, choose gluten-free pasta. Many brands offer great pasta that tastes similar to regular pasta. You can find options made from rice, quinoa, or chickpeas. Cook it just like regular pasta, following the package instructions. This way, everyone can enjoy this creamy and delicious dish! To keep your Lemon Ricotta Pasta with Peas fresh, place it in an airtight container. Use a clean spoon to scoop it out. This helps avoid bacteria. Store it in the fridge for up to three days. If you notice any off smells or changes in texture, it’s best to throw it away. When you’re ready to enjoy the leftovers, reheat gently. Use a pan on low heat and add a splash of water or olive oil. This helps revive the creamy sauce. Stir often to avoid burning. You can also use the microwave. Heat in short bursts of 30 seconds, stirring in between, until warmed through. Freezing your Lemon Ricotta Pasta with Peas is a great option! Let the dish cool completely first. Then, portion it into freezer-safe bags or containers. Squeeze out excess air before sealing. Label the bags with the date. You can freeze it for up to three months. When ready to eat, thaw it in the fridge overnight before reheating. I recommend spaghetti for this dish. It holds the creamy sauce very well. You can also use fettuccine or penne. Each type brings a unique texture. Just ensure you cook it until al dente for the best bite. Yes, you can make this dish ahead of time. I suggest cooking the pasta and sauce separately. Store them in airtight containers in the fridge. When you’re ready to eat, combine them in a skillet. Heat gently and add some reserved pasta water to bring it back to life. If you need a ricotta substitute, try cottage cheese. Blend it until smooth for a creamier texture. You can also use Greek yogurt for a tangy flavor. Both options work well in this recipe. To check for al dente pasta, taste it a minute or two before the package says. It should be firm but not hard. If there’s a slight bite, it’s ready to drain. Perfectly cooked pasta enhances every dish, especially this creamy one. This blog post offers a clear guide on making a delicious pasta dish. We covered key ingredients, cooking techniques, and useful kitchen tools. You learned how to sauté peas and garlic for flavor, and how to mix everything for a creamy sauce. Remember, you can tweak the recipe to fit your taste. Try adding proteins or herbs for extra flavor. Enjoying your dish fresh or stored for later is easy with proper tips. Let your creativity shine as you cook!

Lemon Ricotta Pasta with Peas Creamy Flavor Boost

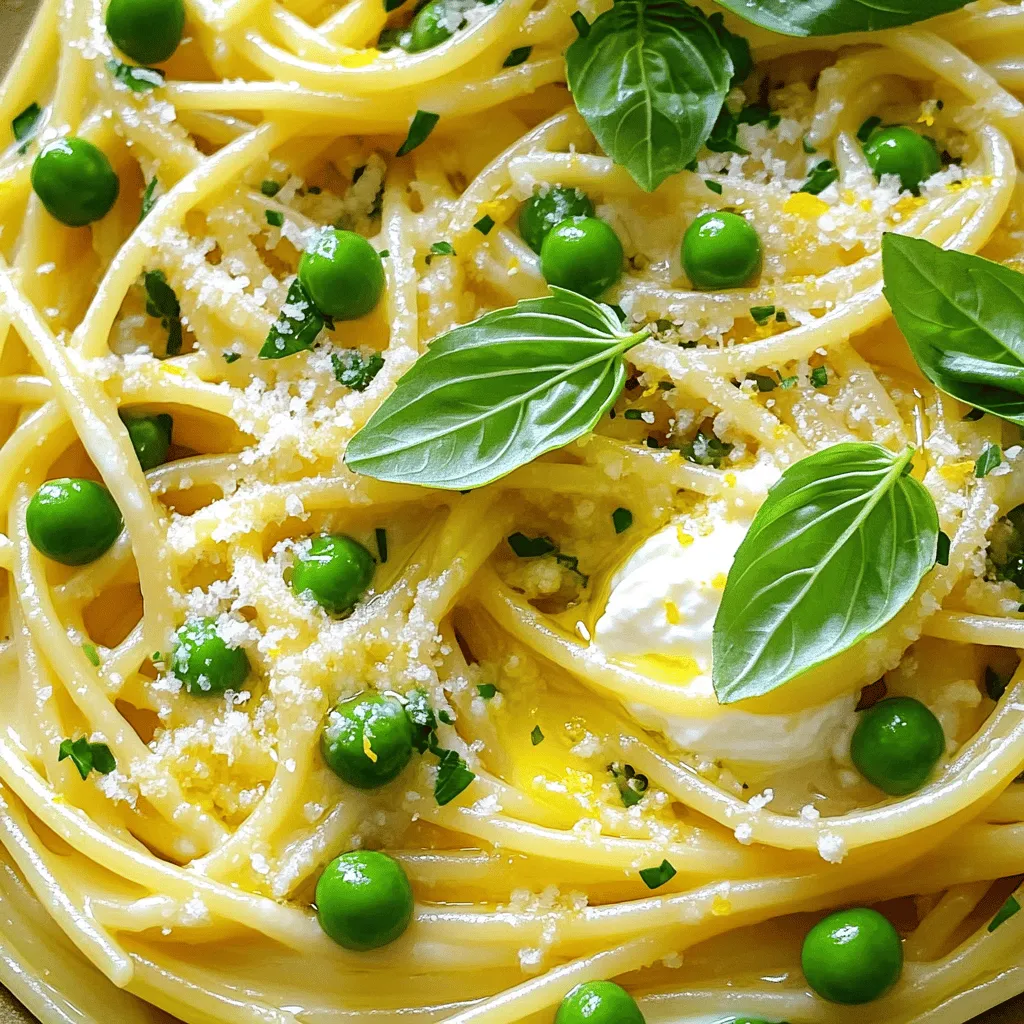
Are you ready to elevate your weeknight meals? This Lemon Ricotta Pasta with Peas recipe combines fresh flavors and creamy

- 1 lb ground chicken - 1 tablespoon vegetable oil - 3 cloves garlic, minced - 1 inch fresh ginger, grated - 1 bell pepper, finely chopped (red or yellow) - 1 cup carrots, grated - ¼ cup green onions, chopped - 1 cup chopped peanuts (or cashews) - 1 tablespoon soy sauce (or tamari for gluten-free) - 2 tablespoons peanut butter - 1 tablespoon honey (or maple syrup) - 1 tablespoon lime juice - 1 teaspoon sesame oil - Salt and pepper to taste - 1 head of Bibb or Romaine lettuce, leaves separated Gather these ingredients before you start. The ground chicken gives the wraps a nice base. You can use either red or yellow bell pepper for a pop of color. Grated carrots add sweetness and crunch. Don’t forget the garlic and ginger; they pack a flavor punch. The sauce mixes peanut butter with soy sauce and honey for a sweet and salty taste. Use fresh lime juice for zing. Lastly, Bibb or Romaine lettuce holds everything together. Enjoy the process of picking fresh ingredients; it's key to great flavor! Sautéing Garlic and Ginger Start by heating vegetable oil in a large skillet over medium heat. Add minced garlic and grated ginger. Sauté for about one minute. You want it fragrant but not burnt. Browning the Chicken Next, add the ground chicken to the skillet. Use a wooden spoon to break it apart. Cook until the chicken is brown and no longer pink. This should take about five to seven minutes. Adding Vegetables Now, stir in the chopped bell pepper and grated carrots. Cook for an additional three to four minutes. The veggies should be tender but still crisp. Whisking Ingredients Together In a small bowl, whisk together soy sauce, peanut butter, honey, lime juice, and sesame oil. Mix until smooth and well-combined. This sauce adds a rich flavor to the dish. Combining Sauce with Chicken Mixture Pour the peanut sauce over the cooked chicken mixture. Stir until everything is evenly coated. Season with salt and pepper to taste. Spoon Filling into Lettuce To serve, take a lettuce leaf and spoon a generous amount of the chicken mixture into it. This is your filling. Wrapping Technique Now, wrap the leaf around the filling like a taco. Hold it together with your hands. Enjoy these wraps fresh for the best taste! - Achieving Perfectly Cooked Chicken To cook chicken well, use medium heat. This helps it brown nicely without burning. Break the chicken apart with a wooden spoon as it cooks. Make sure it turns a nice golden color. Cook for about 5 to 7 minutes until it’s no longer pink. - Enhancing Flavor with Additional Seasonings To boost flavor, add a pinch of salt and pepper during cooking. Fresh herbs like basil or cilantro can make a big difference. You can also mix in a dash of chili flakes for heat. If you like tang, squeeze in more lime juice before serving. - Presentation Tips for Lettuce Wraps For a beautiful display, arrange the filled lettuce wraps on a big platter. Drizzle a bit of extra peanut sauce on top for color. Add some chopped peanuts and lime wedges around the wraps. This makes the dish look fresh and inviting. - Recommended Sides to Accompany Dish Serve your wraps with a side of jasmine rice or a light salad. You might also enjoy a bowl of fresh fruit. Mango or pineapple adds sweetness that pairs well. For extra crunch, add cucumber slices or carrot sticks on the side. {{image_2}} If you want to switch up the protein, ground turkey works great. It has a similar texture and flavor. Just follow the same steps. You can also try using a plant-based ground meat. This option is perfect for a vegetarian meal. Look for brands that mimic the taste of meat. You can adjust the spice level to fit your taste. Add some red pepper flakes for heat. If you prefer less spice, skip the flakes. You can also swap nuts in the recipe. Use cashews instead of peanuts for a different crunch. Almonds can also be a tasty choice. To store leftover Thai peanut chicken lettuce wraps, follow these steps: - Wrapped Lettuce: Place any filled lettuce wraps in an airtight container. Line the container with paper towels to absorb moisture. This keeps the lettuce crisp. - Separated Filling: If you have leftover filling, store it in a separate container. This helps keep the lettuce fresh longer. For best results, eat leftovers within two days. Choose the right containers to keep your food fresh: - Airtight Containers: Use glass or plastic containers with tight lids. They prevent air from getting in and causing spoilage. - Bento Boxes: These work well for separating the chicken mixture from the lettuce. To reheat the chicken mixture, follow these methods: - Stovetop Method: Place the chicken mixture in a skillet over medium heat. Stir it often until it warms up completely. This usually takes about 5 minutes. - Microwave Method: Put the chicken in a microwave-safe bowl. Cover it loosely with a lid or microwave-safe wrap. Heat on medium power for 1-2 minutes, stirring halfway through. For the best taste, avoid reheating the lettuce. Enjoy your wraps fresh! Yes, you can prepare the chicken mixture ahead. Cook it and let it cool. Store it in the fridge in an airtight container. When you're ready to eat, just reheat it gently. Assemble the wraps with fresh lettuce just before serving for the best taste. You can try different sauces like teriyaki or sweet chili sauce. For a spicy kick, add sriracha or chili sauce. Mix and match to find what you love best! Yes, but make sure to use tamari instead of soy sauce. Tamari is a gluten-free alternative. Always check the labels to confirm there are no hidden gluten ingredients. Absolutely! Let the chicken mixture cool completely. Place it in a freezer-safe container. It can last in the freezer for up to three months. Thaw it in the fridge overnight before reheating. Enjoy your wraps anytime! In this blog post, we explored making delicious lettuce wraps with ground chicken. We covered all the key ingredients, from fresh veggies to tasty sauces. You learned the step-by-step process, tips for perfect cooking, and ways to customize your wraps. Remember, you can always adapt flavors and protein choices to fit your taste. Keep leftovers fresh and know how to reheat them properly. Enjoy making and sharing these tasty wraps with friends and family.

Thai Peanut Chicken Lettuce Wraps Easy and Tasty Meal

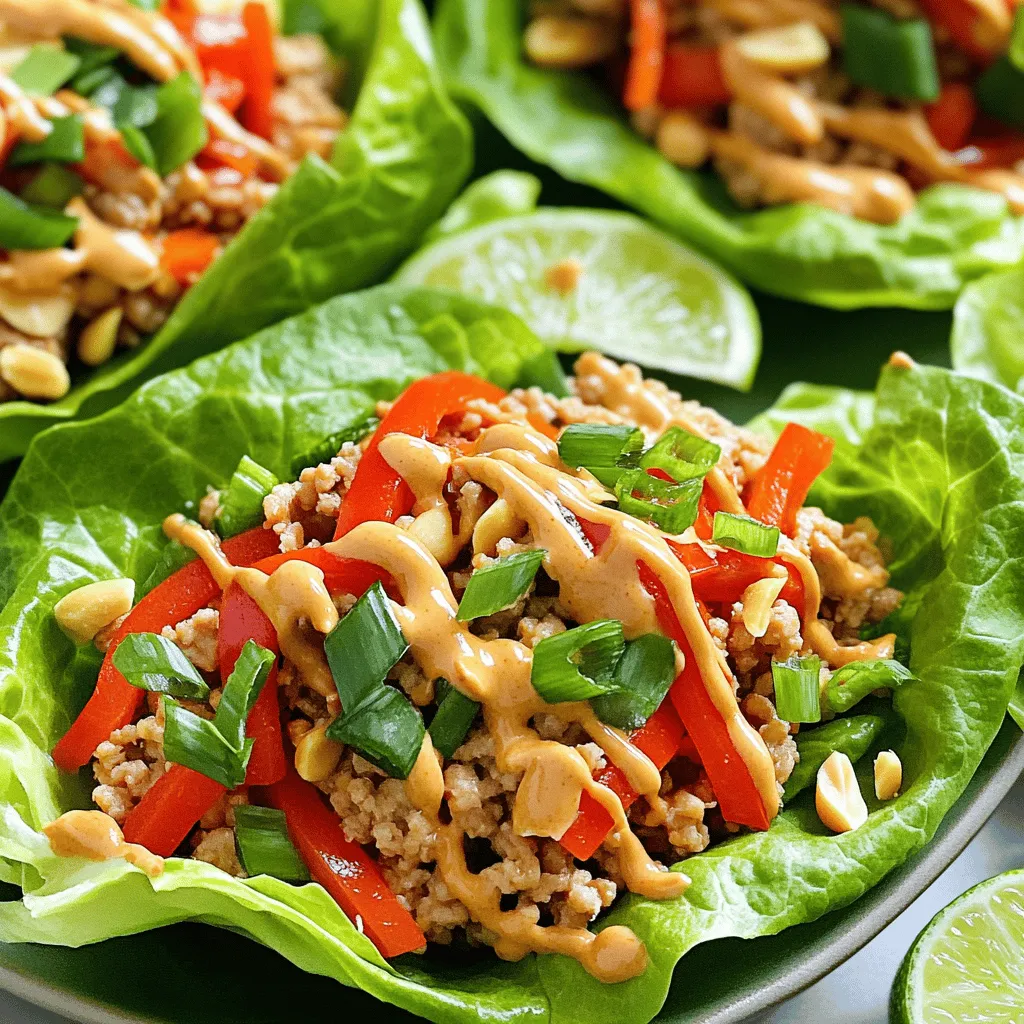
Looking for a quick and tasty meal? Thai Peanut Chicken Lettuce Wraps are the answer! These wraps burst with flavor

- 4 large carrots - 2 tablespoons olive oil - 3 tablespoons pure maple syrup - 1 teaspoon cinnamon - 1/2 teaspoon nutmeg - Salt and pepper to taste The main ingredients for Maple Glazed Carrot Fries are simple but full of flavor. You start with large carrots. They should be fresh and firm. Olive oil adds richness. Maple syrup gives a sweet touch. Cinnamon and nutmeg bring warmth. Salt and pepper enhance the taste. Together, they create a tasty snack. - Fresh parsley, chopped To make the dish pop, garnish with fresh parsley. This adds color and freshness. It also brightens the sweet flavors in the fries. Chopped parsley is easy to add. Just sprinkle it on right before serving. This small step makes a big difference in appearance and taste. First, preheat your oven to 425°F (220°C). This heat will make the fries crispy. Next, take your large carrots. Peel them and then cut them into fry shapes. Aim for uniform sizes to cook evenly. In a large bowl, add the carrot fries. Pour in 2 tablespoons of olive oil. This oil helps the fries cook well. Now, drizzle 3 tablespoons of pure maple syrup over the carrots. This syrup gives a sweet flavor. Next, add 1 teaspoon of cinnamon and 1/2 teaspoon of nutmeg. Sprinkle some salt and pepper to taste. Toss everything well to coat the fries evenly. Spread the carrot fries on a baking sheet. Make sure to arrange them in a single layer. This spacing helps them cook evenly. Place the baking sheet in the oven. Bake for about 20-25 minutes. Flip the fries halfway through. This helps them brown nicely. Once they are tender and caramelized, take them out. Let them cool for a minute. Finally, garnish with freshly chopped parsley before serving. Enjoy your savory and sweet carrot fries! To get the best fries, spacing is key. I always lay the carrot fries in a single layer. If they touch, they may steam instead of crisp. This can make them soggy. I also recommend flipping them halfway through cooking. This helps them brown evenly on all sides. Use a spatula to flip them gently. This keeps them intact and perfect! You can boost the flavor of your carrot fries easily. Try adding a pinch of chili powder for some heat. Garlic powder also works great if you like a savory touch. Fresh herbs are another good option. Pair the fries with a yogurt dip or a tangy sauce. A simple garlic aioli can elevate your snack. These additions will make your Maple Glazed Carrot Fries stand out! {{image_2}} You can switch maple syrup for honey or agave syrup. Both add a nice sweetness. Honey brings a rich flavor, while agave is mild and smooth. Each choice gives a unique twist to the fries. Try them and see which one you like best! Adding chili powder can give your carrot fries a kick. It adds heat that balances the sweetness. You can also mix in garlic powder for a savory touch. Garlic and maple make a great pair! Don't forget to try different herbs, too. Fresh thyme or rosemary can bring new flavors to your dish. Experiment with what you have at home. Each spice can change the taste in fun ways. Enjoy being creative! To store leftover carrot fries, let them cool first. Place them in an airtight container. Make sure to separate layers with parchment paper. This helps avoid sticking. Store them in the fridge for up to three days. If you want to keep them longer, consider freezing them. The best way to reheat carrot fries is in the oven. Preheat your oven to 375°F (190°C). Place the fries on a baking sheet. Bake for about 10 minutes. This method keeps them crispy. You can also use an air fryer. Set it to 350°F (175°C) and heat for about 5 minutes. Avoid using the microwave. It makes the fries soggy and soft. If you must use it, heat them in short bursts. Check often to prevent them from losing texture. Enjoy your tasty maple glazed carrot fries again! Yes, you can use baby carrots. They are smaller and may not need cutting. Just keep in mind that they may cook faster. Check for doneness a few minutes early. If you want more flavor, slice them in half lengthwise. This helps the glaze stick better. To make crispy carrot fries, follow these tips: - Make sure the oven is hot before baking. - Space the fries out on the baking sheet. This allows air to circulate. - Flip the fries halfway through cooking. This helps them brown evenly. - Bake them longer if needed. Keep an eye on them to avoid burning. Yes, Maple Glazed Carrot Fries are a healthy snack. Carrots are high in vitamins and fiber. The olive oil adds healthy fats. Maple syrup gives a touch of sweetness without added chemicals. You can enjoy these fries guilt-free! In this blog post, we explored how to make tasty maple glazed carrot fries. We covered the main ingredients, step-by-step instructions, and helpful tips to ensure even cooking. You learned about flavor variations and how to store leftovers properly. Creating these fries is fun and easy. They taste great and add color to any meal. So, try this recipe and enjoy a healthy twist on fries! You won't be disappointed.

Maple Glazed Carrot Fries Savory and Simple Snack

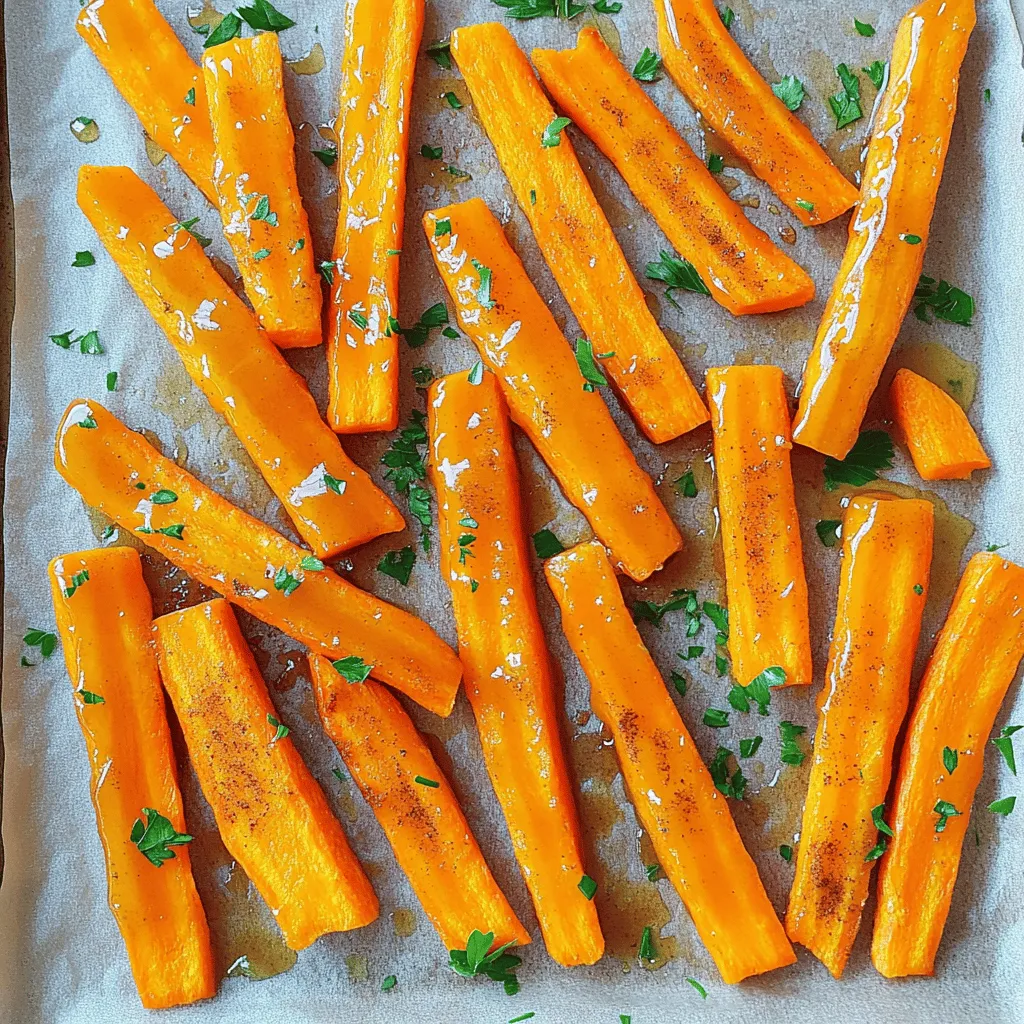
Looking for a tasty and healthy snack? Try my Maple Glazed Carrot Fries! These fries are sweet, savory, and easy

To make Chocolate Chip Banana Protein Muffins, you need these main ingredients: - 2 ripe bananas, mashed - 1 cup rolled oats - 1/4 cup natural peanut butter - 1/2 cup vanilla protein powder - 1/3 cup honey or maple syrup - 1/2 cup almond milk (or any milk of choice) - 1 teaspoon baking powder - 1/2 teaspoon baking soda - 1/4 teaspoon salt - 1/2 cup dark chocolate chips (dairy-free if desired) - 1/2 teaspoon vanilla extract These muffins can fit many diets. You can make them gluten-free by choosing gluten-free oats. If you want a vegan option, use maple syrup and dairy-free chocolate chips. For extra flavor and texture, consider these optional mix-ins: - Chopped nuts, like walnuts or pecans - Seeds, such as chia or flaxseed - Shredded coconut These add-ins can make your muffins even more delicious and nutritious. To whip up these muffins, gather these kitchen tools: - A large mixing bowl for combining ingredients - A muffin tin for baking - Muffin liners or non-stick cooking spray for easy removal - A fork or potato masher for mashing bananas With these tools, you’ll be ready to create a tasty treat that packs a protein punch! First, you need ripe bananas. They should be soft and sweet. In a large bowl, mash the bananas until they are smooth. You can use a fork or a potato masher for this. Once mashed, add the rolled oats, peanut butter, protein powder, honey or maple syrup, almond milk, baking powder, baking soda, salt, and vanilla extract. Mix everything together well. Make sure all the ingredients are combined smoothly. This batter is packed with flavor and nutrients. After preparing the wet mixture, it’s time to mix in the dry ingredients. Start with the oats and protein powder. Stir them into the wet mix until you see no dry spots. Next, add the baking powder, baking soda, and salt. These ingredients help the muffins rise. Stir gently, so you do not overmix. Overmixing can lead to tough muffins. Once combined, fold in the dark chocolate chips, saving a few for the tops if you like. This adds a special touch. Now, it’s time to bake your muffins. Grab a muffin tin and line it with paper liners or spray it with cooking spray. Use a scoop or a spoon to fill each cup about three-quarters full with batter. If you want, sprinkle the reserved chocolate chips on top. Place the muffin tin in your preheated oven at 350°F (175°C). Bake for 18 to 20 minutes. To check if they are done, insert a toothpick into the center. If it comes out clean, they are ready. Let the muffins cool in the tin for five minutes, then move them to a wire rack to cool completely. Enjoy your tasty treats! To make moist and fluffy muffins, start with ripe bananas. Ripe bananas are sweeter and softer. Mash them well to avoid lumps. Use rolled oats for a hearty texture. They add fiber and help with moisture. Do not overmix the batter. Mix just until combined. This keeps the muffins light. Baking soda and baking powder help them rise. Make sure they are fresh for best results. Store muffins in an airtight container. This keeps them soft and fresh. You can also wrap them in plastic wrap. If you want to keep them longer, freeze them. Just place them in a freezer bag. They can last up to three months in the freezer. Thaw them at room temperature before eating. Serve muffins warm for the best taste. Drizzle some honey on top for sweetness. You can also add fresh banana slices. A sprinkle of chocolate chips makes them extra special. For a crunch, top with chopped nuts or seeds. This adds texture and flavor to each bite. Enjoy your muffins with coffee or tea for a perfect snack! {{image_2}} You can change the taste of these muffins easily. Try adding spices like cinnamon or nutmeg for warmth. You could also mix in some cocoa powder for a rich chocolate flavor. If you want a nutty taste, swap peanut butter with almond or cashew butter. Each choice brings a new twist to your muffins. Do you need nut-free options? You can replace peanut butter with sun butter or soy nut butter. For a dairy-free muffin, use almond milk or oat milk. If you want to avoid gluten, use gluten-free oats. These swaps keep the muffins tasty while fitting your needs. Want more protein? You can add Greek yogurt to the batter. This makes the muffins extra moist and boosts the protein. You can also mix in hemp seeds or chia seeds for added nutrition. Finally, consider using different protein powders like pea or hemp protein to change the flavor and nutrition. Store your muffins at room temperature in an airtight container. This keeps them fresh for about 2-3 days. If you want to keep them longer, consider placing a slice of bread in the container. The bread helps keep the muffins moist. To freeze your muffins, let them cool completely. Wrap each muffin tightly in plastic wrap or foil. Place the wrapped muffins in a freezer-safe bag. They can last up to 3 months in the freezer. When you're ready to enjoy, simply take out the desired number. Reheat your muffins in the microwave for about 15-20 seconds. This warms them through and makes them soft. For a crispier texture, pop them in the oven at 350°F (175°C) for 5-10 minutes. Enjoy them warm to appreciate the chocolatey goodness! Yes, you can use frozen bananas in this recipe. Just let them thaw first. Once they are soft, peel and mash them in a bowl. If they have extra liquid, drain some out before mixing it in. This helps keep the muffins from being too wet. Frozen bananas work well and add great flavor. To make these muffins gluten-free, use gluten-free rolled oats. You can also pick a gluten-free protein powder. Check that the other ingredients, like baking powder, are gluten-free too. This way, everyone can enjoy these tasty muffins without worry. Yes, you can add more chocolate chips! If you want extra chocolatey flavor, just add a bit more. You can go up to 1 cup of chocolate chips. Just be careful not to make the batter too wet. More chocolate adds fun but balance is key. This blog post showcased a simple and tasty muffin recipe. We covered the key ingredients, essential kitchen tools, and step-by-step baking instructions. I shared tips for perfect texture and storage. You can add your favorite mix-ins for personalization and explore flavor variations for fun twists. In the end, these muffins are easy to make and adaptable. Enjoy trying this recipe, and make it your own with each batch! Happy baking!

Chocolate Chip Banana Protein Muffins Simple Treat

Are you ready to whip up a delicious and healthy snack? These Chocolate Chip Banana Protein Muffins are simple to

For this tasty dish, you will need: - 2 lbs chicken wings - 1 ripe mango, peeled and diced - 2 fresh habanero peppers, deseeded and minced - 2 tablespoons honey - 1 tablespoon soy sauce - 2 tablespoons lime juice - 1 teaspoon smoked paprika - 1 teaspoon garlic powder - 1 teaspoon onion powder - Salt and black pepper to taste These main ingredients make the wings sweet, spicy, and full of flavor. The mango gives a fruity taste that balances the heat from the habanero. The marinade combines all the flavors into one smooth sauce. You will blend the diced mango, minced habaneros, honey, soy sauce, lime juice, smoked paprika, garlic powder, onion powder, salt, and black pepper. This mix brings out the best in the chicken wings. Letting the wings soak in this sauce makes them extra tasty. Garnishing adds a fresh touch to your dish. I suggest using fresh cilantro, chopped finely. You can also serve lime wedges on the side. This adds a pop of color and a zesty kick. If you like, pair the wings with cooling ranch or blue cheese dressing. This helps calm the heat from the habaneros. Enjoy your delicious Mango Habanero Chicken Wings! Start by gathering all your ingredients. You will need a ripe mango, fresh habanero peppers, honey, soy sauce, lime juice, smoked paprika, garlic powder, onion powder, salt, and black pepper. Peel and dice the mango, then chop the habaneros. Place all these items into a blender. Blend until the mix is smooth. This creates a tasty sauce that packs a punch. Take your chicken wings and place them in a large bowl or a zip-top bag. Pour half of your mango habanero sauce over the wings. Make sure each wing gets covered well. Seal the bag or cover the bowl tightly. For the best flavor, let the wings marinate in the fridge for at least one hour. If you can, let them sit overnight. This helps the flavors soak in deeply. Preheat your oven to 400°F (200°C). While it heats up, line a baking sheet with parchment paper or foil. This makes cleanup easy. Spread the marinated wings out in a single layer on the baking sheet. Bake for about 30-35 minutes. Halfway through, turn the wings to get them crispy on all sides. In the last five minutes, brush the reserved sauce over the wings for extra flavor. After baking, let them cool for a couple of minutes and enjoy! To get the best flavor, mix sweet and spicy well. Use just the right amount of honey and habanero. The ripe mango gives a nice sweetness. Habaneros add heat, so be aware! You can taste the sauce before marinating the wings. If it’s too spicy, add more mango or honey. If it’s not spicy enough, add more habanero. This balance makes each bite exciting. To make your wings crispy, start with dry wings. Pat them with paper towels to remove moisture. Marinate them, but don’t soak them too long. When baking, make sure they are in a single layer. Use parchment paper to help with crispiness. Baking at 400°F helps them cook well. Turn them halfway through for even cooking. For the last few minutes, brush on extra sauce for a sticky finish. Preheat your oven to 400°F (200°C) for the best results. Bake the wings for 30-35 minutes. Use a meat thermometer to check the wings. They should reach 165°F (74°C) to be safe. If you want them crispier, bake them a bit longer. Just watch them closely to avoid burning. The last 5 minutes are perfect for glazing with sauce. This keeps them moist and flavorful. {{image_2}} You can change the heat by adding or removing habaneros. If you prefer mild flavors, use one habanero. For more spice, add an extra one. Remember to taste the marinade before using it. This way, you can find the heat that fits you best. You can swap some ingredients for different tastes. Instead of honey, try maple syrup for a twist. If you want a vegan option, use tofu wings. Soy sauce can be replaced with tamari for a gluten-free diet. Feel free to mix and match to create your perfect wing recipe. These wings are great on their own but pair well with many sides. Serve with a fresh salad or crispy coleslaw for crunch. Cool ranch or blue cheese dressing helps balance the heat. You can also add fresh lime wedges for a zesty touch. These options make your meal more fun and enjoyable. Store leftover wings in an airtight container. Let them cool first. This keeps them fresh. Place a paper towel inside to absorb moisture. You can keep them in the fridge for up to four days. To reheat, use the oven for the best taste. Preheat your oven to 350°F (175°C). Place wings on a baking sheet. Heat for 10 to 15 minutes. You can also microwave them, but they may get soggy. You can freeze wings for future meals. Place them in a freezer-safe bag. Remove as much air as possible. They stay good for up to three months. When ready to eat, thaw in the fridge overnight before reheating. To marinate chicken wings well, start with a flavorful mix. Use a blend of fruits, spices, and sauces. I often use a mix of mango, soy sauce, and spices. This gives the wings a sweet and spicy taste. For best results, coat the wings well in the marinade. Let them sit in the fridge for at least one hour. If you can, marinate overnight. This allows the flavors to soak in deeply. Yes, you can use other peppers if you want. Habanero gives a strong heat, but you might try jalapeño for less heat. If you want more spice, use ghost peppers. Each pepper brings its own flavor. Just remember to adjust the amount based on your spice level. Taste as you go to find what you like best. For great wings, bake them at 400°F (200°C) for 30 to 35 minutes. This makes them crispy and fully cooked. Flip the wings halfway through cooking for even browning. If you want them extra crispy, bake a bit longer. Just keep an eye on them to avoid burning. Mango Habanero Chicken Wings are fun and tasty. You learned about the best ingredients, making the marinade, and baking to crispy perfection. We covered tips for sweet and spicy blends, plus ideas for variations to suit your taste. Remember, proper storage keeps the wings fresh. Use these steps next time you cook, and enjoy every bite. Get ready to impress family and friends with this simple, delicious dish!

Mango Habanero Chicken Wings Spicy and Flavorful Treat

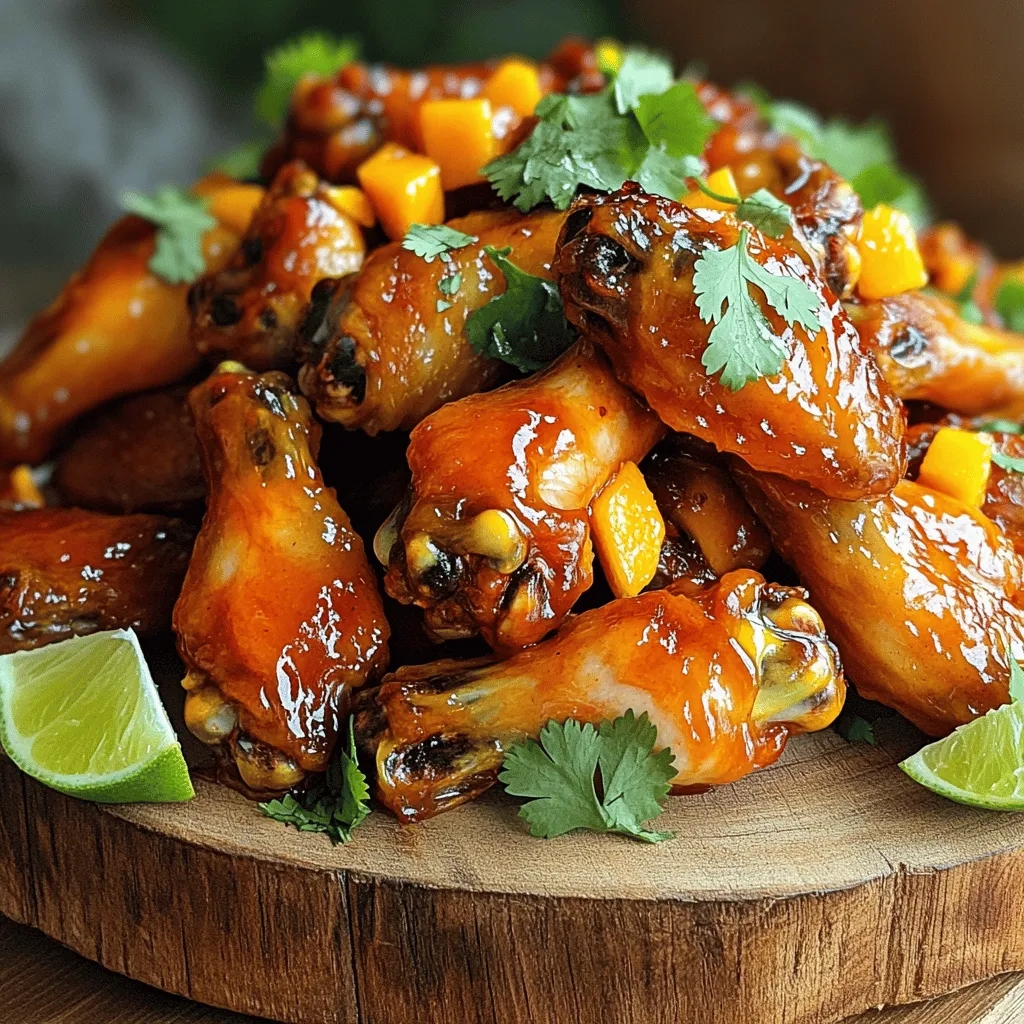
Are you ready to spice up your game-day snacks? These Mango Habanero Chicken Wings will take your taste buds on

For this Sheet-Pan Mediterranean Shrimp and Veggies dish, gather these key items: - 1 pound large shrimp, peeled and deveined - 1 red bell pepper, sliced - 1 yellow bell pepper, sliced - 1 zucchini, sliced - 1 red onion, sliced - 2 cups cherry tomatoes, halved - 3 cloves garlic, minced - 1 teaspoon dried oregano - 1 teaspoon smoked paprika - 3 tablespoons olive oil - Salt and pepper to taste These ingredients come together to create a colorful and tasty meal. The shrimp give a nice protein boost and the veggies add crunch and freshness. You can enhance your dish with these optional ingredients: - 1/2 teaspoon crushed red pepper flakes - Fresh parsley, chopped, for garnish - Lemon wedges, for serving The crushed red pepper adds a bit of heat. Parsley brightens the dish and the lemon gives it a zesty finish. Feel free to add any of these for extra flavor and flair. Prepping the shrimp and veggies Start by rinsing the shrimp under cold water. Peel and devein them if needed. Next, wash the bell peppers, zucchini, and red onion. Slice them into bite-sized pieces. Halve the cherry tomatoes. This mix will add color and taste to your dish. Combining ingredients In a large bowl, add the shrimp and sliced veggies. Toss in minced garlic, dried oregano, and smoked paprika. If you like a kick, add crushed red pepper flakes. Pour in olive oil and sprinkle with salt and pepper. Mix everything well to coat the shrimp and veggies evenly. Preparing the baking sheet Preheat your oven to 425°F (220°C). Line a large baking sheet with parchment paper. This helps prevent sticking and makes cleanup easy. Spread the shrimp and veggie mix evenly on the baking sheet, keeping it in a single layer. Baking and checking doneness Place the baking sheet in your hot oven. Bake for 15 to 20 minutes. Check the shrimp; they should turn pink and opaque. The veggies should be tender. Once done, take it out of the oven and let it cool for a couple of minutes. To ensure shrimp are cooked perfectly, look for a pink color and firm texture. Overcooked shrimp can become tough. Aim for about 15 to 20 minutes in the oven. Check them at the 15-minute mark. If they look pink and curl slightly, they are ready. For the best seasoning combinations, I love using dried oregano and smoked paprika. These add a warm, earthy flavor. You can also add crushed red pepper flakes for a little heat. Adjust the amount based on your taste. Don’t forget to sprinkle salt and pepper for balance. Garnishing adds visual appeal to your dish. I recommend topping the finished shrimp and veggies with chopped fresh parsley. The bright green color pops against the red and yellow of the veggies. You can also add lemon wedges for a nice touch. They add freshness and brightness to the plate. When serving suggestions with sides, consider pairing this dish with couscous or rice. These absorb the flavorful juices well. A simple green salad also complements the meal nicely. Enjoy the vibrant colors and tastes on your table! {{image_2}} You can switch up the veggies in this dish. Try using asparagus, broccoli, or carrots. These vegetables add different textures and flavors. They also keep the meal colorful and fun. For proteins, you can choose chicken or firm tofu. Chicken thighs work well and add a rich taste. Tofu absorbs flavors well, making it a great vegetarian choice. Just make sure to adjust cooking times. Adding fresh herbs can elevate your dish. Basil, dill, or cilantro bring bright flavors. Just sprinkle them on before serving for a fresh touch. You can also mix chopped herbs into the shrimp and veggies before baking. Different spices can change the flavor profile. Try adding cumin for warmth or lemon zest for brightness. You can also switch the smoked paprika for regular paprika, which gives a milder taste. Each change offers a new experience. To store leftovers, place them in an airtight container. Make sure to let the dish cool first. You can keep it in the fridge for up to three days. When it’s time to eat, take out what you need. To reheat, use a microwave or oven. If using a microwave, heat in short bursts. Stir after each burst to ensure even heating. If using an oven, set it to 350°F (175°C). Heat for about 10 minutes or until warm. You can freeze this dish if you want to save it for later. First, allow it to cool completely. Then, transfer it to a freezer-safe container. Label the container with the date. It can last in the freezer for up to three months. When you’re ready to eat, remove the container from the freezer. Thaw it in the fridge overnight. To reheat, follow the same steps as above for the oven or microwave. Enjoy your tasty meal! How long to bake shrimp? Bake shrimp for 15 to 20 minutes at 425°F. They turn pink and opaque when done. Keep an eye on them to avoid overcooking. Overcooked shrimp can become tough and chewy. Can I use frozen shrimp? Yes, you can use frozen shrimp. Just make sure to thaw them first. Thaw shrimp in the fridge overnight or place them in a bowl of cold water for quick thawing. Once thawed, follow the same steps in the recipe. What to serve with Mediterranean shrimp? I love serving Mediterranean shrimp with rice or quinoa. A fresh salad pairs well too. You can also enjoy it with crusty bread to soak up the juices. Try a light pasta for a fun twist. How to adjust the recipe for fewer servings? To adjust for fewer servings, simply cut the ingredient amounts in half. Use ½ pound of shrimp and half of each veggie. You can still follow the same baking time. Just make sure everything fits on the pan in a single layer. In this blog post, we explored how to create a delicious Mediterranean shrimp dish. We discussed key ingredients and shared easy steps for baking shrimp to perfection. I offered tips to enhance flavor and improve presentation. We also covered variations and storage methods to keep your meal fresh. You can enjoy this dish with confidence, knowing you have the tools to make it right. Experiment with your favorite veggies and spices for a unique twist. Happy cooking!

Sheet-Pan Mediterranean Shrimp and Veggies Delight

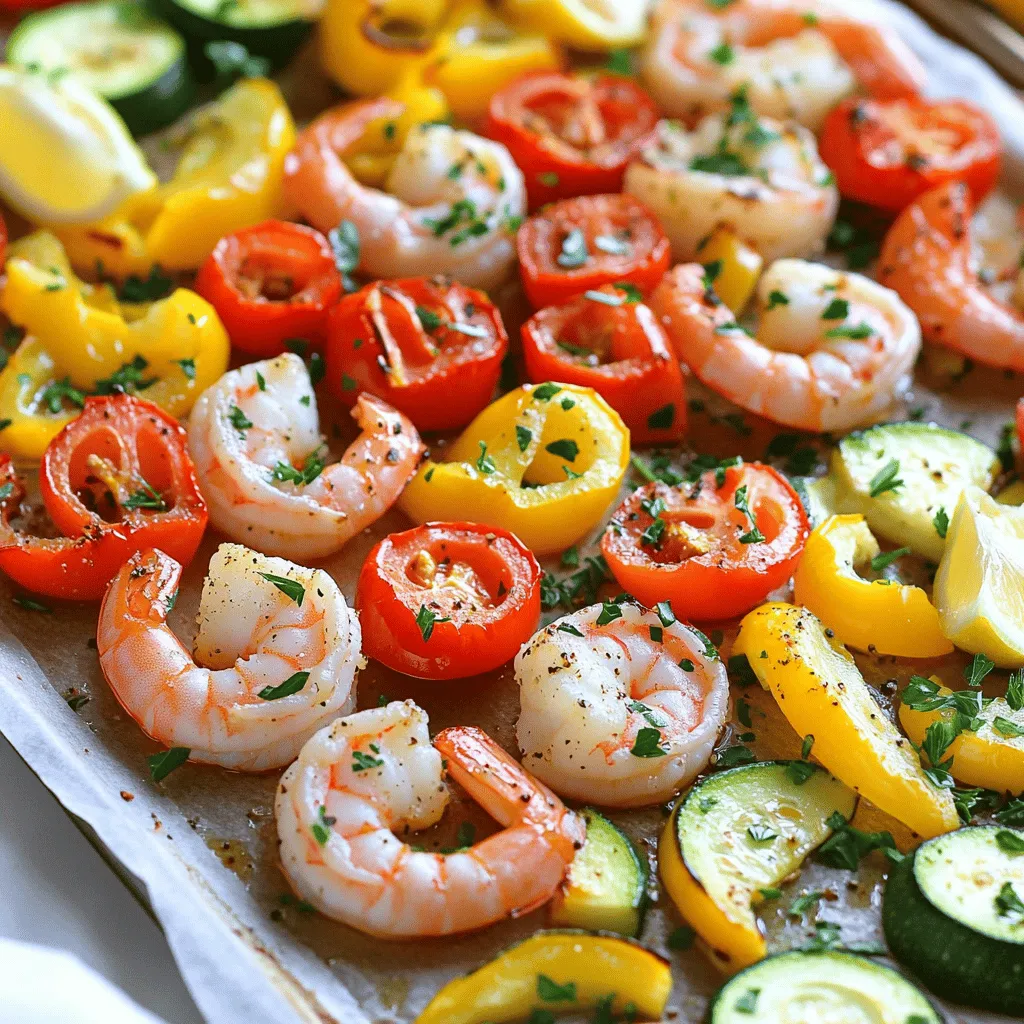
Looking for a quick and tasty dinner? My Sheet-Pan Mediterranean Shrimp and Veggies Delight is your answer! This dish combines

To make a tasty Air Fryer Crispy Chickpea Caesar Salad, gather these ingredients: - 1 can (15 oz) chickpeas, rinsed and drained - 1 tablespoon olive oil - 1 teaspoon garlic powder - 1 teaspoon smoked paprika - Salt and pepper to taste - 4 cups romaine lettuce, chopped - ½ cup cherry tomatoes, halved - ¼ cup parmesan cheese, grated - ½ cup Caesar dressing - Croutons (optional) These ingredients work well together. The chickpeas add protein and crunch. The olive oil helps the spices stick to the chickpeas. Garlic powder and smoked paprika give a warm, rich flavor. Romaine lettuce serves as the perfect base. Cherry tomatoes add a fresh bite. Parmesan cheese gives a tangy touch, while Caesar dressing brings it all together. Lastly, croutons add extra crunch, but they are optional. This salad is easy to make and full of flavor. You can adjust the ingredients to fit your taste. For example, use more tomatoes if you like them. Enjoy crafting this delightful dish! - Preheat the air fryer to 400°F (200°C). - In a bowl, toss the drained chickpeas with: - 1 tablespoon olive oil - 1 teaspoon garlic powder - 1 teaspoon smoked paprika - Salt and pepper to taste - Place the seasoned chickpeas in the air fryer basket. Air fry for about 15 minutes, shaking the basket halfway through. The chickpeas should turn golden and crispy. - While the chickpeas are cooking, prepare the salad base. In a large bowl, combine: - 4 cups chopped romaine lettuce - ½ cup halved cherry tomatoes - ¼ cup grated parmesan cheese - Once the chickpeas are done, let them cool for a few minutes. Add them to the salad and toss everything gently. - Drizzle your desired amount of Caesar dressing over the salad. - If you like, add croutons for extra crunch. - Serve immediately for the best taste and texture! To get really crispy chickpeas, shake the basket in the air fryer halfway through cooking. This helps them cook evenly. If you overcrowd the basket, some chickpeas will remain soft. Cook them in a single layer for the best crunch. You can make a quick homemade Caesar dressing. Just mix ½ cup mayonnaise, 2 tablespoons lemon juice, 1 teaspoon Worcestershire sauce, and 1 clove minced garlic. Blend until smooth. Store any leftover dressing in a sealed jar in the fridge for up to a week. Want to boost flavor? Try adding some cayenne pepper for heat or a sprinkle of Italian herbs. You can swap the parmesan cheese for feta or even nutritional yeast for a vegan twist. Each choice adds its own delicious taste, so feel free to experiment! {{image_2}} You can add grilled chicken or shrimp to this salad. These proteins make the dish more filling. Simply grill your choice of protein and slice it before adding. For a vegetarian twist, try adding tofu or tempeh. Both options soak up flavors well and add a nice texture. If you want to mix things up, use kale or spinach instead of romaine. Both greens bring their own taste to the salad. You can also add other veggies like cucumber or bell peppers. These veggies add crunch and color, making your salad pop. Feel free to switch up the dressing. You can use other types of store-bought dressings like ranch or balsamic vinaigrette. Want to get creative? Try making your own dressing with yogurt, lemon juice, and herbs. This way, you can customize flavors to match your style. To keep your salad fresh, use an airtight container. Glass or plastic containers work well. Store the salad in the fridge. It stays good for about 2 days. After that, the lettuce may wilt. If you have leftover chickpeas, store them in a separate container. This keeps them crunchy. They stay fresh for about 3 days. To reheat, use the air fryer again. Heat at 400°F for about 5 minutes. This brings back the crispiness. Enjoy your salad’s crunch with every bite! To make crispy chickpeas, rinse and drain one can of chickpeas. Toss them in a bowl with one tablespoon of olive oil, one teaspoon of garlic powder, one teaspoon of smoked paprika, salt, and pepper. Mix well until they are coated. Place the chickpeas in the air fryer basket in a single layer. Air fry them at 400°F (200°C) for about 15 minutes. Shake the basket halfway through to ensure even cooking. They should turn golden and crunchy. Yes, you can use canned chickpeas. They save time and are very convenient. Just make sure to rinse and drain them well before using. This step removes excess sodium and makes them crispier when cooked. You can find many healthy Caesar dressing options. Look for dressings made with yogurt instead of mayonnaise. You can also make your own by mixing Greek yogurt, garlic, lemon juice, and parmesan cheese. This adds flavor without too many calories. Absolutely! You can customize this salad to your taste. Add other veggies like cucumbers, bell peppers, or even avocado. You can also swap out the romaine for spinach or kale. Let your creativity shine by trying different ingredients. To add more protein, include grilled chicken, shrimp, or tofu. You can also sprinkle some chickpeas on top for extra crunch. Another option is to add hard-boiled eggs. They make the salad more filling and nutritious. This salad is simple yet packed with flavor. You learned how to prepare crispy chickpeas and toss them into a fresh salad. We covered important tips for perfect texture and flavor. You can customize ingredients and dressings to suit your taste. Remember, storing leftovers properly keeps your meal fresh. Enjoy trying these variations and making it your own. Dive in and savor each bite.

Air Fryer Crispy Chickpea Caesar Salad Delight

Do you crave a salad that’s both healthy and delicious? Look no further! My Air Fryer Crispy Chickpea Caesar Salad

Older posts
Newer posts
← Previous Page1 … Page27 Page28 Page29 … Page86 Next →

dsad

© 2026 Cooking Wells • Built with GeneratePress

Our Policies

  • Copyright Policy
  • Cookie Policy
  • GDPR Policy
  • Privacy Policy
  • Disclaimer
  • Terms Of Use

More Information

  • Home
  • About
  • Contact
  • Appetizers
  • Dessert
  • Dinner
  • Drinks
©2026, Cooking Wells About Back To Top