Skip to content
DisclaimerTerms Of UseGDPR PolicyCookie Policy

Cooking Wells

  • Home
  • Drinks
  • Appetizers
  • Dinner
  • Dessert
  • About
  • Contact
  • Privacy Policy
DisclaimerTerms Of UseGDPR PolicyCookie Policy

NO-ING-IMG

To make Creamy Spinach Artichoke Stuffed Shells, you will need: - 12 large pasta shells - 1 cup ricotta cheese - 1 cup frozen spinach, thawed and excess moisture squeezed out - 1 cup canned artichoke hearts, drained and chopped - 1 cup cream cheese, softened - 1 cup shredded mozzarella cheese, divided - ½ cup grated Parmesan cheese - 2 cloves garlic, minced - 1 teaspoon Italian seasoning - Salt and pepper to taste - 1 cup marinara sauce If you don’t have some ingredients, don’t worry! Here are some swaps: - Use cottage cheese instead of ricotta for a lighter filling. - Fresh spinach can replace frozen spinach. Just sauté it first. - Swap artichokes for sautéed mushrooms for a different taste. - If you want a vegan option, use tofu cream cheese and vegan mozzarella. - Use any pasta sauce you prefer if marinara isn’t available. You will need a few tools to make this dish: - A large pot for boiling pasta - A large mixing bowl for the filling - A spoon or piping bag to fill the shells - A 9x13-inch baking dish for baking - Aluminum foil to cover the dish while baking - A spatula for serving the stuffed shells This list makes it easy to gather what you need. Now, you're ready to create a delicious meal! Start by cooking your pasta shells. Boil water in a large pot. Once it bubbles, add the shells. Cook them until they are just firm, or al dente. This usually takes about 9 to 11 minutes. Drain the shells well and let them cool. Make sure to set them aside gently. In a big bowl, mix ricotta cheese, thawed spinach, and chopped artichokes. Add cream cheese for extra richness. Next, toss in half the mozzarella cheese, Parmesan cheese, minced garlic, and Italian seasoning. Season with salt and pepper. Stir until everything blends well. Now it’s time to fill the shells. Take a spoon or a piping bag, and carefully stuff each shell with your creamy mixture. It can get a bit messy, but that’s okay! Spread half of the marinara sauce in a 9x13-inch baking dish. Place the stuffed shells on top in a single layer. Pour the rest of the marinara sauce over them, then sprinkle the remaining mozzarella cheese on top. Cover your baking dish with foil. Bake in a preheated oven at 350°F (175°C) for 25 minutes. After that, take off the foil and bake for another 10 to 15 minutes. Look for bubbly and golden cheese on top. Once done, let the shells cool for a few minutes before serving. Enjoy your creamy spinach artichoke stuffed shells! To get the creamiest filling, use fresh ingredients. Make sure the cream cheese is very soft. This helps it mix well with the ricotta. Combine the cheeses with the spinach and artichokes smoothly. If you want extra creaminess, add a splash of milk. This little trick makes a big difference. Many people overcook the pasta shells. This makes them mushy and hard to fill. Cook the shells just until al dente. Also, avoid skipping the step of squeezing out excess moisture from the spinach. This keeps the filling from getting too watery. Lastly, don’t forget to season well with salt and pepper. A little taste test helps! Serve the stuffed shells hot from the oven. I love garnishing with fresh basil or parsley. This adds color and flavor. You can also sprinkle extra Parmesan cheese on top. For a complete meal, pair these shells with a crisp salad or garlic bread. Enjoy every bite! {{image_2}} You can add many tasty ingredients to these stuffed shells. Try adding cooked chicken or shrimp for protein. You can also mix in sun-dried tomatoes for a tangy kick. If you enjoy a little heat, chopped jalapeños work well. For a touch of sweetness, consider adding caramelized onions. Fresh herbs like basil or parsley can brighten the dish with flavor. For a vegetarian option, ensure all cheeses are rennet-free. You can swap the cream cheese for cashew cream or tofu for a vegan twist. Nutritional yeast adds a cheesy flavor without dairy. Coconut cream can also be a rich alternative. For the pasta, use whole grain or gluten-free shells if needed. While marinara is classic, you can explore other sauce options. A creamy Alfredo sauce can add richness. You might also try a pesto sauce for a fresh taste. For a spicy kick, consider a spicy tomato sauce. Experimenting with different sauces can change the whole flavor of the dish. Don’t be afraid to mix and match! To store leftover stuffed shells, let them cool first. Place them in an airtight container. Make sure to cover them well to keep moisture in. You can keep them in the fridge for up to three days. To reheat the stuffed shells, preheat your oven to 350°F (175°C). Place the shells in an oven-safe dish. Add a splash of marinara sauce on top to keep them moist. Cover the dish with foil and bake for about 20 minutes. Check if they are heated through before serving. You can freeze stuffed shells for later use. First, prepare them as usual but do not bake. Let them cool completely. Then, place them in a freezer-safe container. Seal tightly to avoid freezer burn. You can freeze them for up to three months. When ready to eat, thaw overnight in the fridge, then bake at 350°F (175°C) until hot. Yes, you can make these stuffed shells ahead of time. Prepare them up to the baking step, then cover and refrigerate. When you are ready to bake, just add 10-15 minutes to the cooking time. This makes it easy to serve a warm meal on busy days. Stuffed shells pair well with many sides. Here are some great options: - A fresh green salad - Garlic bread - Roasted vegetables - Steamed broccoli These sides add color and flavor to your meal and create a balanced plate. You can tell the stuffed shells are done when the cheese is bubbly and golden. Check the internal temperature with a food thermometer; it should be at least 165°F (74°C). Let them cool a few minutes before serving. This helps the filling set, making it easier to enjoy. Absolutely! You can use different cheeses based on your taste. Try using feta for a tangy kick or gouda for a smoky flavor. You can mix and match cheeses to create your perfect blend. Just keep the same amounts to ensure the right texture in the filling. We covered how to make delicious creamy spinach artichoke stuffed shells. You learned the best ingredients, their substitutes, and the tools you need. I shared simple steps for cooking, filling, and baking. You now have tips to make your filling creamy and avoid common mistakes. We explored fun variations and how to store or reheat leftovers. Remember, cooking is about trying new things and having fun. Enjoy your meals!

Creamy Spinach Artichoke Stuffed Shells Delight

Get ready to dive into a world of flavor with my Creamy Spinach Artichoke Stuffed Shells Delight! This dish combines

- 1 pound boneless chicken thighs - 1 cup jasmine rice - 1 cup chicken broth - 1/4 cup low sodium soy sauce - 1/4 cup honey - 2 tablespoons rice vinegar - 1 tablespoon sesame oil - 2 cloves garlic, minced - 1 tablespoon fresh ginger, minced - 1 cup frozen mixed vegetables (like peas, carrots, and corn) - 2 green onions, sliced for garnish - Sesame seeds for garnish To make these Instant Pot Teriyaki Chicken Rice Bowls, gather the main ingredients first. Boneless chicken thighs are juicy and tender. Jasmine rice adds a nice fragrance. Chicken broth boosts the flavor of the rice. Next, for the sauce, low sodium soy sauce gives a savory taste. Honey adds sweetness, while rice vinegar brings a tangy note. These three make a perfect teriyaki sauce. Finally, we have some extra ingredients. Sesame oil gives a nutty flavor. Garlic and ginger add depth and warmth. Frozen mixed vegetables add color and nutrition. Garnishes like green onions and sesame seeds make the dish pop. This combo creates a balanced meal that is both tasty and satisfying. - Setting up the Instant Pot First, plug in your Instant Pot. Choose a flat surface to keep it steady. Make sure the lid is clean and ready to use. - Preparing the ingredients Gather all your ingredients. Cut the chicken thighs into bite-sized pieces. Rinse the jasmine rice under cold water until the water runs clear. Mince the garlic and ginger finely for the best flavor. - Sautéing garlic and ginger Set the Instant Pot to sauté mode. Add the sesame oil and let it heat up. Once hot, add the minced garlic and ginger. Sauté for about 30 seconds until it smells great. - Browning chicken pieces Add the chicken pieces to the pot. Season with a pinch of salt and pepper. Sauté for about 3-4 minutes until the chicken is slightly browned. This step adds nice flavor. - Mixing and adding sauce In a medium bowl, mix together the soy sauce, honey, and rice vinegar. Pour this mixture over the chicken in the pot. Stir well to coat all the pieces. - Layering rice and broth Spread the rinsed jasmine rice evenly over the chicken. Pour the chicken broth on top of the rice. Do not stir; just let it sit on top. - Cooking under pressure Seal the Instant Pot lid and set it to cook on high pressure for 10 minutes. Make sure the valve is set to sealing. This will cook everything perfectly. - Adding mixed vegetables After cooking, let the pressure release naturally for 5 minutes. Then, do a quick release for any remaining pressure. Open the lid and add the frozen mixed vegetables, stirring to combine. Let it sit for about 2 minutes to warm up the veggies. To prevent burning, always add liquid before cooking. For this recipe, the chicken broth helps. Make sure you layer the rice on top and do not stir it with the chicken. This keeps the rice moist and fluffy. To ensure even cooking, cut the chicken into equal pieces. This way, all pieces cook at the same time. Adjusting sauce ingredients can change the taste. If you want it sweeter, add more honey. For a tangy kick, increase the rice vinegar. You can also try using different garnishes. Chopped cilantro or sliced radishes can add freshness. A sprinkle of chili flakes gives it some heat. Prepping ingredients in advance saves time. You can cut chicken and measure sauces the night before. Store them in the fridge until you’re ready to cook. Using frozen vegetables is another great time-saver. They cook quickly and add color to your meal. Just toss them in at the end, and they’ll warm up perfectly. {{image_2}} You can use different cuts of chicken for this dish. Chicken breasts work well too. They cook quickly and taste great with teriyaki sauce. If you want to try something new, substitute with turkey. Ground turkey is a fun choice. For a plant-based option, tofu shines in this recipe. Just press and cube it before cooking. Switching up the rice can change the whole meal. Quinoa is a healthy swap and adds protein. Brown rice offers a nutty flavor and more fiber. If you’re low-carb, use cauliflower rice. It cooks fast and soaks up the sauce nicely. Feel free to swap in seasonal vegetables. Broccoli, bell peppers, or snap peas fit well. You can also mix in leafy greens like spinach or kale. They boost nutrition without changing the taste too much. Just toss them in with the mixed veggies to heat through. To store leftovers, let the dish cool first. Place the Teriyaki chicken and rice in an airtight container. Make sure to seal it well to keep the flavors fresh. The best containers are glass or BPA-free plastic. These materials help maintain taste and texture. For meal prep, you can freeze the chicken and rice. Let it cool completely before putting it in freezer-safe bags or containers. Make sure to remove as much air as possible. For reheating, thaw in the fridge overnight. You can also use the microwave. Heat until warm, stirring often to avoid cold spots. In the fridge, the Teriyaki chicken can last 3 to 4 days. When frozen, it can stay good for up to 3 months. Check for signs of spoilage, like a strange smell or change in color. If you see mold, discard it right away. Always trust your senses when it comes to food safety. Can I make this recipe without an Instant Pot? Yes, you can make this dish on the stove. Simply follow the same steps. Use a pot with a lid. Cook on low heat for about 20-25 minutes. Stir often to prevent sticking. Ensure the chicken is fully cooked before serving. What can I serve with Teriyaki Chicken Rice Bowls? These bowls pair well with many sides. Try a simple salad for crunch. Steamed broccoli adds color and texture. You can also serve pickled vegetables for a tangy kick. How to make it gluten-free? To make this dish gluten-free, swap soy sauce for tamari. Tamari has a similar taste and is gluten-free. Use a gluten-free rice vinegar as well. Always check labels to ensure all ingredients are safe. Vegetarian substitutions available? You can easily make this dish vegetarian. Replace chicken with firm tofu or tempeh. Use vegetable broth instead of chicken broth. The rest of the recipe stays the same for great flavor. Can I use brown rice instead of jasmine rice? You can use brown rice, but cooking times change. Brown rice takes longer to cook. Adjust the time to about 22-25 minutes on high pressure. Add extra liquid if needed. What other seasonings can I add for extra flavor? You can add a splash of chili sauce for heat. A few drops of sesame oil enhance the taste. Feel free to sprinkle in some crushed red pepper flakes too. These small changes can make a big difference! You’ve learned how to make a delicious Teriyaki Chicken Rice Bowl in the Instant Pot. We covered all the key ingredients, from the main chicken and rice to tasty sauces and veggies. You now have tips on flavor and cooking too. Remember, you can switch up ingredients to suit your taste or diet. With a bit of prep, you can enjoy this meal anytime. Try it out and enjoy a tasty dish that’s easy to make!

Instant Pot Teriyaki Chicken Rice Bowls Yummy Meal

Are you ready to impress your taste buds? In this post, I’ll guide you through making delicious Instant Pot Teriyaki

- 1 cup chocolate cookie crumbs - 4 tablespoons unsalted butter, melted - 8 oz cream cheese, softened - 1/2 cup powdered sugar - 1/2 teaspoon peppermint extract - 1 cup heavy whipping cream - 1/4 cup cocoa powder - 1/4 cup mini chocolate chips (plus more for topping) - Crushed peppermint candies (for garnish) Each ingredient plays a key role in the flavor and texture of the No-Bake Chocolate Peppermint Cheesecake Cups. 1. Chocolate cookie crumbs: These form the yummy crust. They provide a sweet, crunchy base. You can use any chocolate cookie you like. 2. Unsalted butter: Melted butter binds the cookie crumbs. It helps the crust hold together. 3. Cream cheese: This gives the cheesecake its rich and creamy texture. Make sure it’s softened for easy mixing. 4. Powdered sugar: This sweetens the cheesecake filling. It blends easily and gives a smooth finish. 5. Peppermint extract: This adds that fresh minty flavor. A little goes a long way, so don’t add too much! 6. Heavy whipping cream: Whipped cream makes the filling light and fluffy. It adds volume and richness. 7. Cocoa powder: This deepens the chocolate flavor. It balances well with the sweetness. 8. Mini chocolate chips: These add little bursts of chocolate in each bite. They make the dessert even more fun. 9. Crushed peppermint candies: These are for garnish. They add crunch and a festive touch to the cups. Using these ingredients, you create a dessert that is both delightful and easy to prepare. The combination of flavors and textures makes each bite special. To start, grab a medium bowl. Combine 1 cup of chocolate cookie crumbs with 4 tablespoons of melted butter. Mix well until the crumbs are fully coated in butter. This gives your crust a rich flavor. Next, take about 2 tablespoons of this mixture and press it firmly into the bottom of each serving cup. This step forms the base of your cheesecake. Now, place the cups in the refrigerator while you prepare the filling. In a large bowl, beat 8 ounces of softened cream cheese with 1/2 cup of powdered sugar. Use an electric mixer to ensure a smooth and creamy texture. Once combined, add 1/2 teaspoon of peppermint extract. This gives your filling that refreshing minty taste. Make sure to mix until everything is fully blended. Now, it’s time to whip the cream. In a separate bowl, whip 1 cup of heavy whipping cream until stiff peaks form. This will create a light texture for your cheesecake. Gently fold the whipped cream into the cream cheese mixture. Be careful not to overmix; you want to keep that airy feel. After that, sift in 1/4 cup of cocoa powder and fold it in until fully combined. Next, stir in 1/4 cup of mini chocolate chips. Reserve a few for topping later. Now, spoon the cheesecake mixture into the cups over the crust. Fill them almost to the top. Use a spatula to smooth the surface; this helps your cups look neat. To set the cheesecake cups, refrigerate them for at least 4 hours. This step is crucial for getting that perfect texture. Once chilled, it’s time to add some flair. Sprinkle the tops with the reserved chocolate chips and some crushed peppermint candies. This adds a festive touch and enhances the flavor. Enjoy your delicious No-Bake Chocolate Peppermint Cheesecake Cups! Using room temperature ingredients is key. Cold cream cheese can make lumps. Let it sit out for about 30 minutes. This helps it mix smoothly with the sugar. To avoid lumps, blend the cream cheese first. Use an electric mixer at medium speed. Mix until it is creamy and smooth before adding the sugar. This step makes a big difference in the final texture. To keep your cheesecake cups fresh, store them in the fridge. Use an airtight container. This prevents the cups from drying out or absorbing odors. If you want to freeze them, place each cup in a freezer-safe container. Cover it well. They can last up to three months in the freezer. Just remember to thaw them in the fridge before serving. Make serving fun and creative. You can layer the cheesecake in clear cups to show off the colors. This makes it look special. For garnish, sprinkle crushed peppermint candies on top. Add some mini chocolate chips too. This not only looks pretty but also adds great flavor. {{image_2}} You can switch things up with flavor. If you love caramel, add a layer of caramel sauce. This adds a sweet twist to your cheesecake cups. Butterscotch is another great option. Just drizzle some on top or mix it in. It creates a rich taste that pairs well with chocolate. You can also try different flavored extracts. Instead of peppermint, use vanilla or almond extract. Each one brings a unique taste. You might find a new favorite! If you need gluten-free options, no problem! Use gluten-free chocolate cookies for your crust. They work just as well and keep the taste amazing. Brands like gluten-free Oreo or any chocolate-flavored gluten-free cookie will do. For the filling, swap regular cream cheese with a dairy-free option. You can find cashew cream cheese as a great alternative. It still gives you that creamy texture we all love. Pair your cheesecake cups with drinks for extra fun. A warm cup of hot cocoa goes perfectly with these treats. Or serve them with peppermint tea to enhance the holiday spirit. You can create a dessert platter too. Arrange your cheesecake cups alongside fresh fruit or cookies. This makes for a beautiful presentation that impresses your guests. Add some whipped cream or chocolate sauce for a finishing touch! To keep your No-Bake Chocolate Peppermint Cheesecake Cups fresh, store them in the refrigerator. Use an airtight container to block out air and moisture. This helps to maintain their rich flavor and creamy texture. If you don’t have an airtight container, cover the cups tightly with plastic wrap. This also works well. These cheesecake cups will stay good in the fridge for up to five days. After that, you may notice a change in taste or texture. Signs of spoilage include an off smell or a change in color. If you see any mold, it's best to throw them away. No need to reheat these cheesecake cups, as they are best served cold. If you have leftovers, just grab a spoon and enjoy them straight from the fridge. They make a perfect sweet treat anytime! Yes, you can make these cheesecake cups ahead of time. This recipe is perfect for meal prep. Just store them in the fridge. Use airtight containers to keep them fresh. You can make them up to two days in advance. This way, you save time and still enjoy a tasty dessert. If you need a cream cheese alternative, try using silken tofu. It gives a similar texture. You can also use dairy-free cream cheese. These options keep your cheesecake creamy and delicious. Always check for flavor as it may change slightly. To reduce sweetness, cut back on powdered sugar. Start with a quarter cup instead of half. You can also add a pinch of salt. This helps balance the sweetness without losing flavor. Taste as you go to find your perfect mix. Yes, you can use regular chocolate. Melt it first, then mix it into the filling. This will change the taste and texture slightly. Use less chocolate than cocoa powder. Start with two ounces of melted chocolate for a rich flavor. To keep whipped cream fluffy, start with chilled equipment. Use a cold bowl and beaters. Whip the cream until stiff peaks form. Avoid overwhipping, as this can make it grainy. Gently fold it into the cream cheese mixture to keep it light. In this article, we covered the delicious steps to make No-Bake Chocolate Peppermint Cheesecake Cups. We discussed key ingredients like chocolate cookie crumbs and cream cheese. You now have simple steps to prepare, assemble, and chill these treats. Remember, use room temperature ingredients for the best texture. Don’t forget the fun variations, like adding caramel or trying gluten-free options. Keep your leftovers fresh with proper storage. Enjoy these cheesecake cups with friends or as a treat for yourself! Happy baking!

No-Bake Chocolate Peppermint Cheesecake Cups Delight

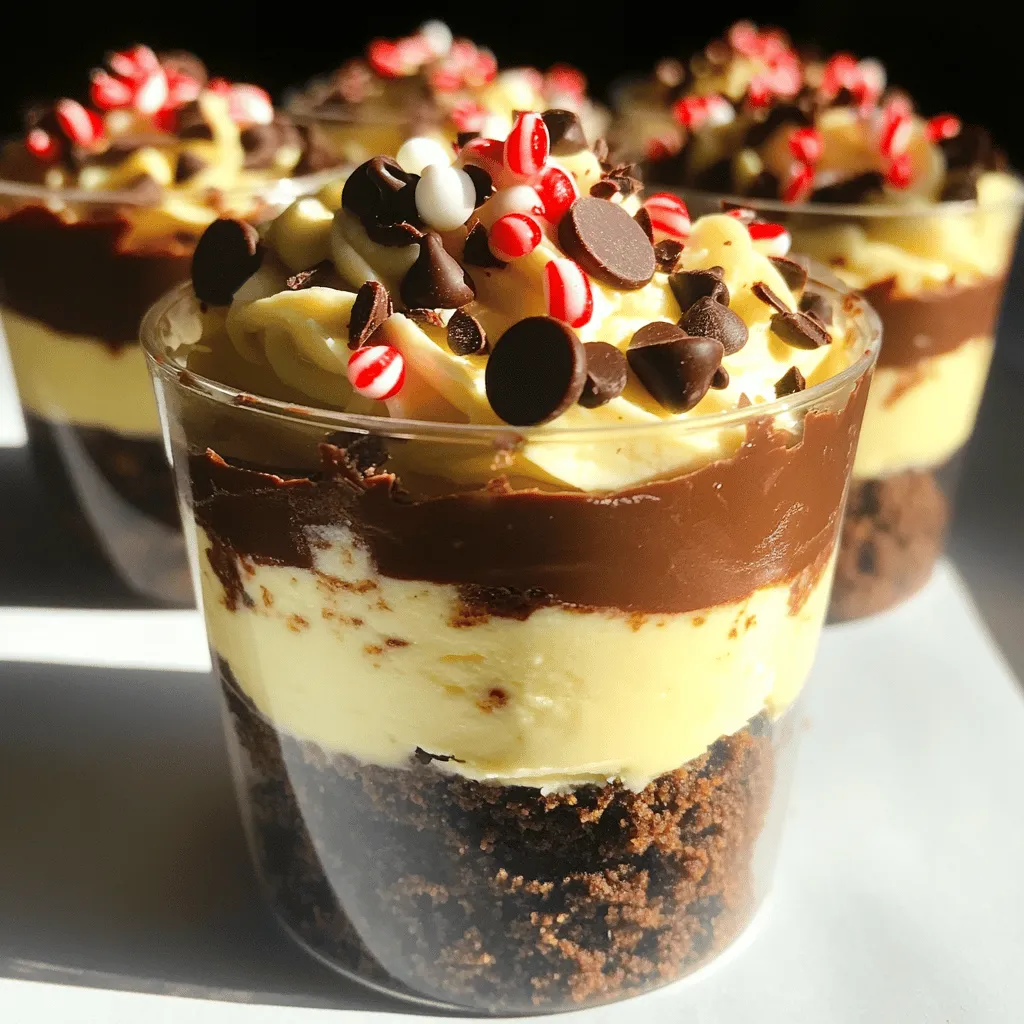
Looking for a fun and easy dessert? Let’s dive into making No-Bake Chocolate Peppermint Cheesecake Cups. These tasty treats are

- 1 cup pumpkin puree - 1/2 cup unsalted butter, melted - 1 cup brown sugar - 1/2 cup granulated sugar - 2 large eggs - 1 teaspoon vanilla extract - 1 cup all-purpose flour These main ingredients create the base for your brownies. Pumpkin puree gives a lovely flavor and moisture. The butter adds richness, while the sugars provide sweetness. Eggs bind everything together, and flour gives the brownies their structure. - 1/2 cup unsweetened cocoa powder - 1 teaspoon pumpkin pie spice - 1/2 teaspoon baking powder - 1/4 teaspoon salt These flavor enhancers are key to making the brownies taste amazing. Cocoa powder adds a deep chocolate flavor. Pumpkin pie spice brings warmth and cozy notes. Baking powder helps the brownies rise, while salt balances the sweetness. - 1 cup mini marshmallows - 1/2 cup graham cracker crumbs - 1/2 cup chocolate chips (semi-sweet or dark) Mix-ins make these brownies a true treat. Mini marshmallows give that classic s’mores texture. Graham cracker crumbs add crunch and flavor. Chocolate chips melt into pockets of goodness. Together, they create a delightful experience in every bite! 1. Preheat your oven to 350°F (175°C). This warms the oven for even baking. 2. Grease a 9x9 inch baking pan with butter. You can also use parchment paper for easy removal. 1. In a large bowl, combine 1/2 cup melted butter, 1 cup pumpkin puree, 1 cup brown sugar, and 1/2 cup granulated sugar. Whisk until smooth. 2. Add 2 large eggs, one at a time. Mix well after each egg. Then, stir in 1 teaspoon vanilla extract. 1. In a separate bowl, mix 1 cup all-purpose flour, 1/2 cup unsweetened cocoa powder, 1 teaspoon pumpkin pie spice, 1/2 teaspoon baking powder, and 1/4 teaspoon salt. 2. Gradually add the dry mix to the wet ingredients. Stir until just combined. Do not overmix. 1. Gently fold in 1 cup mini marshmallows, 1/2 cup graham cracker crumbs, and 1/2 cup chocolate chips. Make sure they are evenly distributed. 1. Pour the brownie batter into the prepared pan. Spread it evenly. 2. Bake in the preheated oven for 30-35 minutes. Use a toothpick to check. It should come out with a few moist crumbs. 1. Once baked, let the brownies cool in the pan for 10-15 minutes. 2. Carefully lift them out and cut into squares. Serve warm for the best taste. To get fudgy brownies, focus on mixing. Mix just enough to blend the dry and wet ingredients. If you overmix, your brownies will become tough. You want a smooth batter with some lumps of chocolate chips and marshmallows. This will keep them soft and gooey. Toppings can elevate your brownies. I suggest adding graham cracker crumbs on top. This gives a nice crunch and classic s’mores vibe. A dollop of whipped cream makes each bite feel special. Using quality chocolate chips is key too. Semi-sweet or dark chips add rich flavor. They melt beautifully, enhancing the overall treat. If you live in a high-altitude area, you may need to adjust your baking time. At higher altitudes, baked goods can rise too fast and fall. You might need to bake them a bit longer. Always check your brownies by inserting a toothpick. If it comes out with a few moist crumbs, they are ready. Also, ensure your oven is calibrated. An oven that runs hot or cold can change baking times. A reliable oven thermometer can help you bake perfectly every time. {{image_2}} You can make these brownies gluten-free. Use gluten-free flour in place of all-purpose flour. This swap keeps the texture and taste great. For a vegan version, replace eggs and butter. Use flax eggs and coconut oil instead. These changes still give rich, delicious brownies. You can boost flavors by adding spices. Try cinnamon or nutmeg for extra warmth. You can also switch the chocolate for white chocolate or caramel chips. These swaps create a fun twist on the classic taste. Each variation adds a unique touch to your brownies. For special occasions, add a festive touch. Serve your brownies warm with extra graham cracker crumbs on top. A drizzle of chocolate or caramel sauce makes them look fancy. Use colorful plates or garnish with fresh herbs for a fun look. Creative plating ideas make your brownies stand out at any gathering. You can store your brownies in two ways: at room temperature or in the fridge. If you plan to eat them soon, keep them at room temperature. Place them in an airtight container. This keeps them soft for about three days. If you want them to last longer, put them in the fridge. They can stay fresh for up to a week this way. Just remember to let them warm up a bit before eating. To reheat brownies, you have a few good options. The microwave is the quickest. Heat them in 10-second bursts until warm. This keeps them soft, but don’t overdo it. You can also use the oven. Preheat it to 350°F, wrap your brownies in foil, and heat for about 5-10 minutes. This method helps keep the texture great. Freezing brownies is a smart way to save some for later. First, let them cool completely. Then, cut them into squares. Wrap each piece tightly in plastic wrap. Place the wrapped brownies in a freezer-safe bag or container. They can stay frozen for up to three months. When you want to eat one, take it out and let it sit at room temperature for about 30 minutes. For a quick thaw, you can microwave it in 10-second bursts. This helps keep the taste and texture just right. Yes, you can use fresh pumpkin! Just cook and mash it first. This gives a bright flavor. Use the same amount as canned pumpkin. Fresh pumpkin may add a bit more moisture. Check the brownies at 30 minutes. Insert a toothpick in the center. If it comes out with a few moist crumbs, they are done. If it has wet batter, bake for a few more minutes. You can use large marshmallows, cut them into smaller pieces. Another option is using marshmallow fluff. Both will give that sweet, gooey texture. Yes, you can! Make the brownies a day in advance. Store them in an airtight container at room temperature. This allows the flavors to blend nicely. To lower sugar, cut the brown and granulated sugar by 25%. You can also use alternatives like coconut sugar or stevia. Just make sure to adjust for taste. These Pumpkin Spice S’mores Brownies blend rich flavors with warm spices. You start by mixing pumpkin puree, sugars, and eggs. Then, add cocoa powder, pumpkin pie spice, and fun mix-ins like marshmallows and chocolate chips. Use my tips for perfect texture and explore fun variations. Store leftovers properly, and enjoy warm or cooled. Baking these brownies is simple and rewarding, bringing joy to any gathering. Try them, and savor each delicious bite!

Pumpkin Spice S’mores Brownies Irresistible Fall Treat

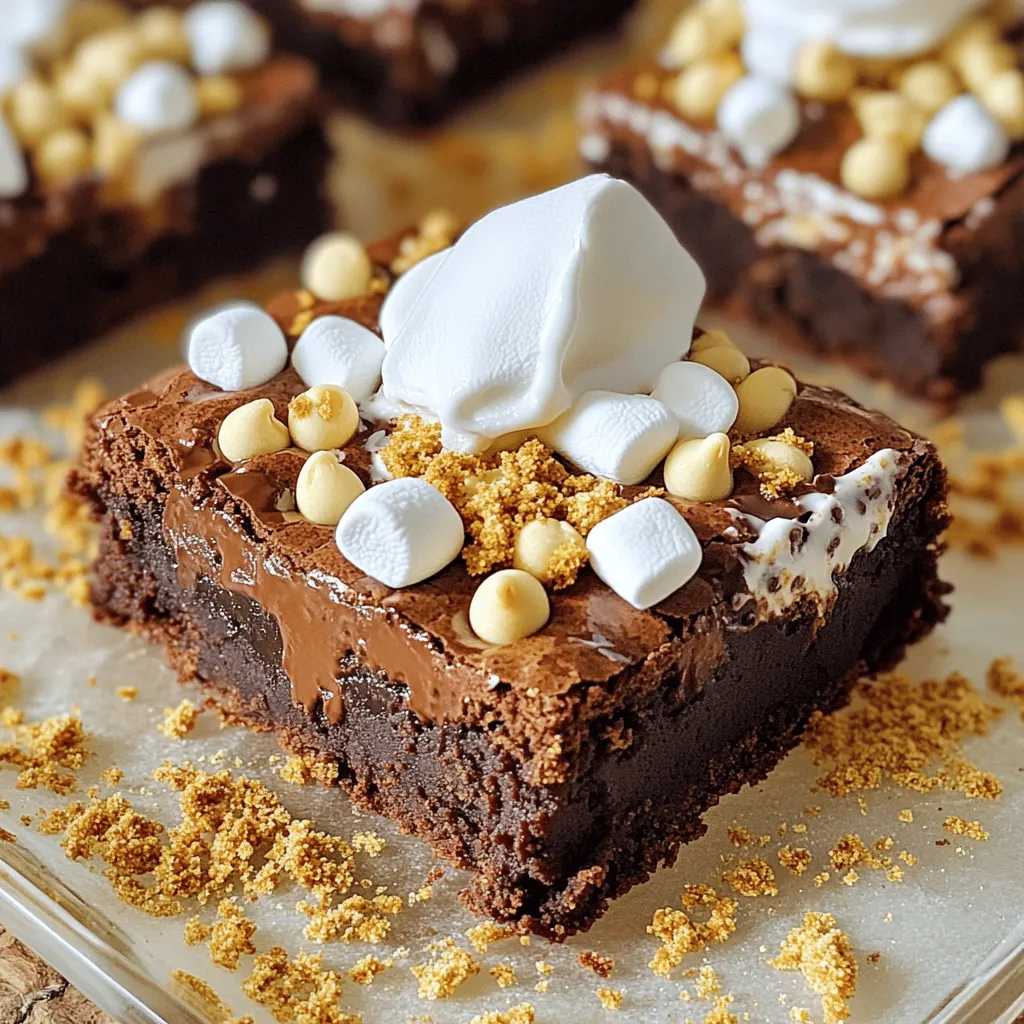
Fall is here, and it’s time to indulge in the cozy flavors of the season! If you love pumpkin spice

To make Air Fryer Cinnamon Sugar Pretzel Bites, you need a few simple ingredients. Here’s what you will need: - 1 cup warm water (110°F) - 2 ¼ teaspoons active dry yeast - 2 tablespoons granulated sugar - 2 ½ cups all-purpose flour - 1 teaspoon salt - 2/3 cup baking soda (for the boiling solution) - ½ cup unsalted butter, melted - ½ cup granulated sugar (for coating) - 2 teaspoons ground cinnamon - Coarse sea salt (for sprinkling) These ingredients come together to create soft, warm bites that are crispy on the outside. The warm water activates the yeast, which helps the dough rise. The sugar adds sweetness to both the dough and the coating. The baking soda is key for that classic pretzel flavor and texture. When you mix the cinnamon and sugar, you get a delightful topping that makes these pretzel bites irresistible. The coarse sea salt gives a perfect salty contrast to the sweet coating. Each ingredient plays a role, working together for a delicious treat. 1. Mix warm water, yeast, and sugar: Start with 1 cup of warm water at 110°F. In a bowl, add 2 ¼ teaspoons of active dry yeast and 2 tablespoons of sugar. Stir gently and let it sit for about 5 minutes. You want it to be foamy. 2. Knead the dough: Once the yeast is ready, add 2 ½ cups of all-purpose flour and 1 teaspoon of salt. Mix until a dough forms. Knead the dough on a floured surface for about 5 minutes. The dough should feel smooth and elastic. 3. Letting the dough rise: Place the kneaded dough in a lightly oiled bowl. Cover it with a damp towel. Let it rise for about 1 hour or until doubled in size. This helps make the pretzel bites fluffy. 1. Preparing the baking soda solution: In a large pot, bring 8 cups of water to a boil. Stir in 2/3 cup of baking soda. This solution gives pretzels their unique flavor and texture. 2. Forming pretzel bites: Once your dough has risen, divide it into small pieces, about 1-inch balls. Carefully boil each pretzel bite in the baking soda solution for about 30 seconds. After boiling, use a slotted spoon to remove them and place them on a parchment-lined plate. 3. Cooking in the air fryer: Brush each boiled pretzel bite with melted butter. Sprinkle with coarse sea salt. Place them in the air fryer in a single layer. Air fry at 320°F for 8-10 minutes. Flip them halfway for even cooking. They should be golden brown. 1. Preparing cinnamon sugar mixture: While the pretzel bites cook, mix ½ cup of granulated sugar with 2 teaspoons of ground cinnamon in a bowl. This will coat the warm pretzel bites. 2. Coating the pretzel bites: Once the bites are cooked, toss them in the cinnamon sugar mixture. Make sure each one is well coated. This adds a sweet finish to your warm pretzel bites. Now, enjoy your tasty Air Fryer Cinnamon Sugar Pretzel Bites! Kneading the dough well is key. Use a floured surface. Push down with the heel of your hand. Fold the dough over, and repeat. Knead for about five minutes. You want it smooth and elastic. Watch for the dough to rise. It should double in size. This takes about one hour. If it rises, it’s ready to shape into bites. Set your air fryer to 320°F (160°C). This temperature helps the bites cook evenly. Cook for 8 to 10 minutes. Flip them halfway through for even browning. Check for a golden brown color. This shows they are cooked just right. For dips, try melted chocolate or caramel sauce. Both add a sweet touch. You can also use cream cheese frosting for a fun twist. For presentation, serve the bites warm on a wooden board. Add a small bowl for dipping. Dust with extra cinnamon sugar on top. This makes them look even more tempting! {{image_2}} You can have fun by adding different flavors to your pretzel bites. For a cheesy twist, mix in shredded cheese or fresh herbs. Cheddar cheese gives a nice, savory touch. Herbs like rosemary or thyme can add a lovely aroma. If you want something sweet, consider chocolate-covered pretzel bites. After air frying, dip the warm bites in melted chocolate. Let them cool so the chocolate hardens. You’ll get a great mix of sweet and salty. If you need gluten-free options, swap all-purpose flour for a gluten-free blend. Look for a blend with xanthan gum for the best texture. This way, everyone can enjoy your pretzel bites. For a vegan version, you can replace butter with coconut oil or vegan margarine. Use plant-based milk and skip the egg wash. These small changes keep your pretzels tasty and cruelty-free. Store your Air Fryer Cinnamon Sugar Pretzel Bites in a container with a lid. A glass or plastic container works well. Make sure the bites cool before you store them. This helps keep them fresh. Place a paper towel inside the container to absorb moisture. This tip keeps your pretzel bites from getting soggy. For best taste, keep them in the fridge. They stay good for about 3 days. If you want to save them longer, freeze them. Use freezer-safe bags to prevent freezer burn. To enjoy your pretzel bites again, reheating is key. The oven is the best option. Preheat your oven to 350°F. Place the bites on a baking sheet. Heat them for about 5-7 minutes. This keeps them crispy and warm. If you use a microwave, the bites may get soft. If you choose this method, heat them for 10-15 seconds. Check to see if they are warm enough. You can also microwave with a damp paper towel. This helps them stay moist. Can I make the dough ahead of time? Yes, you can make the dough ahead. After kneading, let it rise. Then, cover it and store it in the fridge for up to 24 hours. When ready, let it sit at room temperature for 30 minutes before boiling. How do I know when the pretzel bites are done cooking? Look for a golden brown color. The pretzel bites should be firm and slightly crisp on the outside. If you press one lightly, it should spring back. What can I serve with Air Fryer Cinnamon Sugar Pretzel Bites? These bites are great with dipping sauces! Try melted chocolate, caramel sauce, or even cream cheese frosting. Serve them on a wooden board for a fun snack. What to do if the dough doesn’t rise? If your dough doesn't rise, check the yeast. It should be fresh and active. Try warming the water a bit more. Too cold water can stop yeast growth. Fixing overcooked pretzel bites If your pretzel bites are overcooked, they might be tough. You can brush them with melted butter or dip them in warm sauce. This will help soften them a bit. Can I use instant yeast instead? Yes, you can use instant yeast. Use the same amount, and you can skip the proofing step. Just mix it right in with the dry ingredients. Alternatives for sugar and butter For sugar, you can use coconut sugar or honey. If you need a butter substitute, try coconut oil or vegan butter. These will work well in the recipe. This post covered how to make Air Fryer Cinnamon Sugar Pretzel Bites, from simple ingredients to easy steps. I walked you through preparing the dough, cooking the pretzels, and adding delicious toppings. Remember, practice makes perfect, whether you’re kneading the dough or air frying. Keep these tips in mind to enhance your pretzel game. With a few variations, you can impress your friends and family. Enjoy making these tasty bites and experimenting with flavors!

Air Fryer Cinnamon Sugar Pretzel Bites Delight

Craving a sweet and salty snack? Let’s make Air Fryer Cinnamon Sugar Pretzel Bites that are so easy! With just

- 1 cup rolled oats - 1 cup almond milk (or your choice of milk) - 2 tablespoons natural peanut butter - 1 scoop protein powder (chocolate or vanilla) - 1 tablespoon chia seeds - 1 tablespoon honey or maple syrup (optional for sweetness) - 2 tablespoons dark chocolate chips - 1/2 banana, sliced - Pinch of salt Each ingredient in this recipe has great health benefits. Rolled oats provide fiber and keep you full. Almond milk is low in calories and rich in vitamins. Peanut butter gives protein and healthy fats. Protein powder adds extra protein for muscle repair. Chia seeds are high in omega-3 and fiber. Honey or maple syrup can add natural sweetness. Dark chocolate chips bring antioxidants and flavor. Bananas give potassium and energy. A pinch of salt enhances all the flavors. When picking oats, choose organic rolled oats for the best texture. Look for unsweetened almond milk to avoid added sugars. Go for natural peanut butter with only peanuts and maybe salt. Select a protein powder that fits your diet and has no fillers. When buying chia seeds, ensure they are fresh and whole. Choose dark chocolate chips with at least 70% cocoa for health benefits. Pick ripe bananas for the best taste. Always check dates on packaged items to ensure freshness. To make these high-protein peanut butter cup overnight oats, start with a medium bowl. Add 1 cup of rolled oats, 1 cup of almond milk, and 2 tablespoons of natural peanut butter. Next, scoop in 1 scoop of protein powder. You can use chocolate or vanilla based on your taste. Add 1 tablespoon of chia seeds and a pinch of salt. Mix everything well until smooth and free of lumps. If you like it sweeter, pour in 1 tablespoon of honey or maple syrup and stir again. Now, fold in 2 tablespoons of dark chocolate chips for a treat. When mixing, make sure all ingredients blend thoroughly. This helps the oats absorb flavor. Use jars or airtight containers for layering. Divide the mixture evenly into two jars. After that, layer sliced banana on top. This adds freshness and taste. Reserve some chocolate chips for topping later. Sealing the jars keeps the oats fresh and allows for easy storage. After soaking overnight, you may want to adjust your oats. If they seem too thick, add a splash of milk in the morning. Stir well to mix in the milk. Adjust sweetness by adding more honey or syrup if needed. This recipe is flexible, so feel free to make it just how you like! Make these overnight oats in batches. This way, you save time during busy mornings. Mix up two or more servings at once. Each jar can hold a new flavor. Just follow the recipe for the base, then split it into jars. You can also change toppings for each jar. Want to change the taste? You can add different toppings. Try berries, nuts, or seeds. You can also swap peanut butter for almond or cashew butter. For a fun twist, mix in some cinnamon or vanilla extract. If you like crunch, add granola on top before serving. Store your jars in the fridge. Keep them sealed with lids to stay fresh. They can last up to three days. If you don’t finish them, add more almond milk before eating. This helps keep them creamy. Enjoy your tasty oats any time! {{image_2}} You can swap the protein powder for other sources. Greek yogurt adds creaminess and protein. Cottage cheese also works well. For a vegan option, use pea protein or hemp protein. These keep the dish high in protein while changing the flavor. Get creative with flavors! Instead of peanut butter, try almond butter or sunflower seed butter. You can also add spices like cinnamon or vanilla extract. For a fruity twist, mix in berries or diced apples. These changes make every bowl unique and enjoyable. If you're gluten-free, choose certified gluten-free oats. For nut allergies, use sunflower butter or soy nut butter. You can also swap almond milk for oat milk or coconut milk. These options ensure everyone can enjoy this delicious breakfast. To keep your High-Protein Peanut Butter Cup Overnight Oats fresh, store them in the fridge. Use airtight containers or mason jars to prevent air from getting in. Make sure the lids are tightly sealed. This helps keep the oats moist and the flavors bright. These oats last for about 3 to 5 days in the fridge. They taste best within the first few days. The oats will continue to soften as they sit. If you notice any strange smells or colors, it's best to toss them out. You can freeze these oats if you want to save them for later. Just follow these steps: - Portion the oats into freezer-safe containers. - Label each container with the date. - Freeze for up to 3 months. To enjoy frozen oats, thaw them in the fridge overnight. You can also warm them in the microwave. Add a splash of milk to help with the texture after thawing. Yes, you can use quick oats. They will cook faster and make the oats softer. This option changes the texture. Quick oats absorb liquid quickly, so your overnight oats may be thicker. If you like a creamier mix, adjust the liquid slightly. You may need a bit more almond milk for the right consistency. The best protein powder depends on your taste. I recommend chocolate or vanilla to match the peanut butter flavor. Plant-based protein powders are great for a vegan option. Whey protein also works well if you are not vegan. Choose a brand with few added sugars for a healthier choice. To make this recipe vegan, use almond milk and plant-based protein powder. Replace honey with maple syrup for sweetness. Check if your peanut butter is vegan-friendly. Many brands are, but some have added ingredients. With these changes, you can enjoy tasty vegan overnight oats! This blog post covers how to choose and prepare healthy recipes. We explored the ingredients, their benefits, and how to pick the best quality. I gave step-by-step instructions for preparation, mixing, and adjusting flavors. You now have meal prep tips, storing advice, and ideas for tasty variations. Follow these guidelines, and you'll enjoy delicious meals that fit your needs. Dive in, experiment, and make these recipes your own. Trust the process, and you'll see great results!

High-Protein Peanut Butter Cup Overnight Oats Recipe

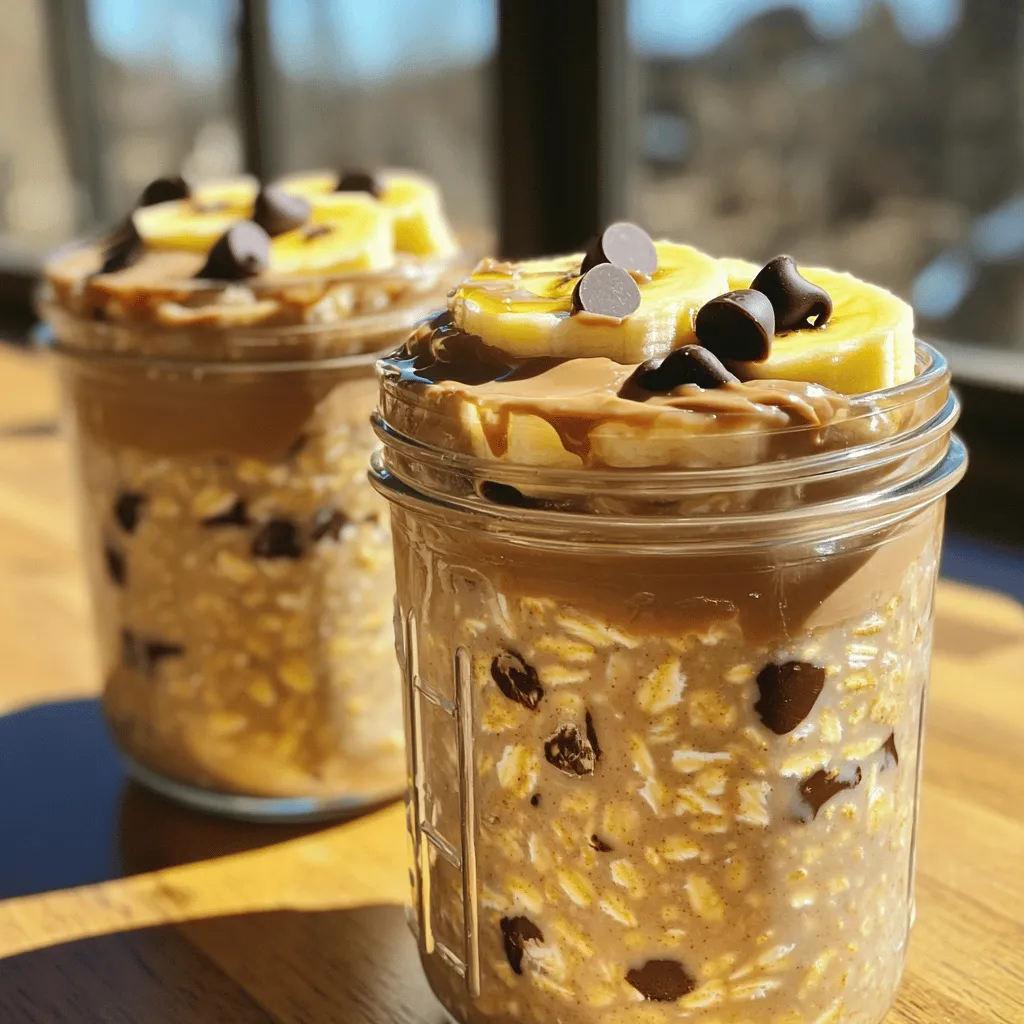
Rise and shine with my High-Protein Peanut Butter Cup Overnight Oats! This tasty breakfast packs a punch of flavor and

- Gnocchi You need 1 pound of potato gnocchi. This soft pasta adds a nice texture. - Vegetables Use 2 cups of broccoli florets, 1 cup of halved cherry tomatoes, and 1 cup of sliced bell peppers. Feel free to mix colors for a vibrant look. - Garlic Butter Mixture Combine 4 tablespoons of melted unsalted butter with 4 cloves of minced garlic. This mixture adds rich flavor. - Seasonings Add 1 teaspoon of dried oregano, 1 teaspoon of salt, and ½ teaspoon of black pepper. These spices enhance the taste. - Garnish Fresh parsley, chopped, is great for garnish. It adds a pop of color and freshness. Each ingredient plays a key role in making this dish a hit. The gnocchi absorbs the garlic butter flavor well. The veggies offer crunch and color. Together, they create a tasty and hearty meal. Start by preheating your oven to 400°F (200°C). This step is key for crisping the gnocchi and veggies. A hot oven ensures even cooking and a nice golden finish. Next, gather your ingredients. In a big mixing bowl, combine 1 pound of potato gnocchi, 2 cups of broccoli florets, 1 cup of halved cherry tomatoes, and 1 cup of sliced bell peppers. Using fresh vegetables adds color and taste. Make sure to mix them well so they combine nicely. In a small bowl, mix 4 tablespoons of melted unsalted butter, 4 minced garlic cloves, 1 teaspoon of dried oregano, 1 teaspoon of salt, and ½ teaspoon of black pepper. Whisk these together until you see a smooth blend. This garlic butter sauce will bring all the flavors together. Pour the garlic butter mixture over the gnocchi and veggies. Gently toss to make sure each piece is coated. Spread everything in a single layer on a parchment-lined baking sheet. Bake it in your preheated oven for 20 to 25 minutes. Remember to stir halfway through for even cooking. The veggies should be tender, and the gnocchi should turn a light golden color. Once out of the oven, let it cool for a few minutes. Serve it hot, and don’t forget to garnish with freshly chopped parsley. This adds a burst of color and freshness to your dish. Enjoy your savory garlic butter gnocchi and veggies! To get golden gnocchi, start with dry potato gnocchi. Fresh gnocchi can be too soft. When mixing the gnocchi with the veggies, make sure they are well-coated with the garlic butter. This helps them crisp up. Spread them out on the baking sheet in a single layer. Crowding them will cause steaming, not browning. Halfway through baking, give them a stir. This ensures even browning and flavor. For this dish, I love using broccoli, cherry tomatoes, and bell peppers. Broccoli adds a nice crunch, while cherry tomatoes give a burst of sweetness. Bell peppers bring a vibrant color and a sweet taste. You can mix and match veggies based on what you like. Just keep in mind that denser veggies, like carrots, take longer to cook. Softer veggies, like zucchini, will cook faster. Timing is key for even cooking. Set your oven to 400°F (200°C) and bake for 20-25 minutes. Stir the pan halfway through. This helps everything cook evenly. You want the veggies tender and the gnocchi golden, but not mushy. If you notice some parts browning too fast, rotate the pan or stir a bit more. This step ensures every bite is delicious. {{image_2}} You can swap out veggies based on your taste. Try zucchini, asparagus, or carrots. Cauliflower also works well. Each veggie adds its own flavor. You can mix and match to find your favorite combo. Just remember to cut them into similar sizes for even cooking. If you want a vegan version, use olive oil instead of butter. You can also use vegan butter. For the garlic butter flavor, add a squeeze of lemon juice. Nutritional yeast can give a cheesy taste too. These swaps keep the dish rich and tasty. Herbs and spices can elevate your dish. Fresh basil or thyme adds a nice touch. A pinch of red pepper flakes gives heat. You can also sprinkle paprika for smokiness. Experimenting with flavors can make the dish truly yours. To keep your sheet-pan garlic butter gnocchi and veggies fresh, store them in an airtight container. Let the dish cool completely before sealing it. This will prevent moisture buildup. Place the container in the fridge and use it within three days. If you want to keep it longer, freezing is a great option. When you're ready to enjoy leftovers, reheat them in the oven for the best results. Preheat your oven to 350°F (175°C). Spread the gnocchi and veggies on a baking sheet. Cover with foil to keep them moist. Heat for about 15-20 minutes, or until warmed through. You can also use a microwave, but the oven keeps the gnocchi crispy. To freeze your dish, portion it into smaller containers. Make sure to label each container with the date. When you're ready to eat, take a container from the freezer and let it thaw overnight in the fridge. You can then reheat it in the oven or microwave. This method helps maintain the texture and flavor of the dish. Yes, you can use frozen gnocchi. There is no need to thaw it first. Just toss the frozen gnocchi with the veggies and garlic butter mixture. Frozen gnocchi cooks well in the oven. It will turn out soft and tasty, just like fresh gnocchi. You can add many veggies! Try zucchini, asparagus, or carrots. Cauliflower and green beans also work great. Mix and match your favorites for color and flavor. Each vegetable brings a unique taste and texture to the dish. This keeps your meal fun and fresh. To make it gluten-free, choose gluten-free gnocchi. Many brands offer great options made from rice or potatoes. Check the packaging to ensure it meets your needs. The rest of the recipe is already gluten-free, making it easy to adapt. You can serve this dish with a salad or garlic bread. A simple green salad pairs well. You might also enjoy a side of roasted chicken or fish. This adds protein and makes the meal more filling. Consider a glass of white wine or sparkling water to drink. These options elevate your dining experience. This blog post covered a simple and tasty garlic butter gnocchi dish. We looked at key ingredients like gnocchi, veggies, and seasonings. You learned step-by-step how to prepare and bake. I shared tips for golden gnocchi and tasty vegetable choices. We explored variations and storage tips as well. In the end, this dish is easy to make and fun to customize. Enjoy making it your own!

Savory Sheet-Pan Garlic Butter Gnocchi and Veggies

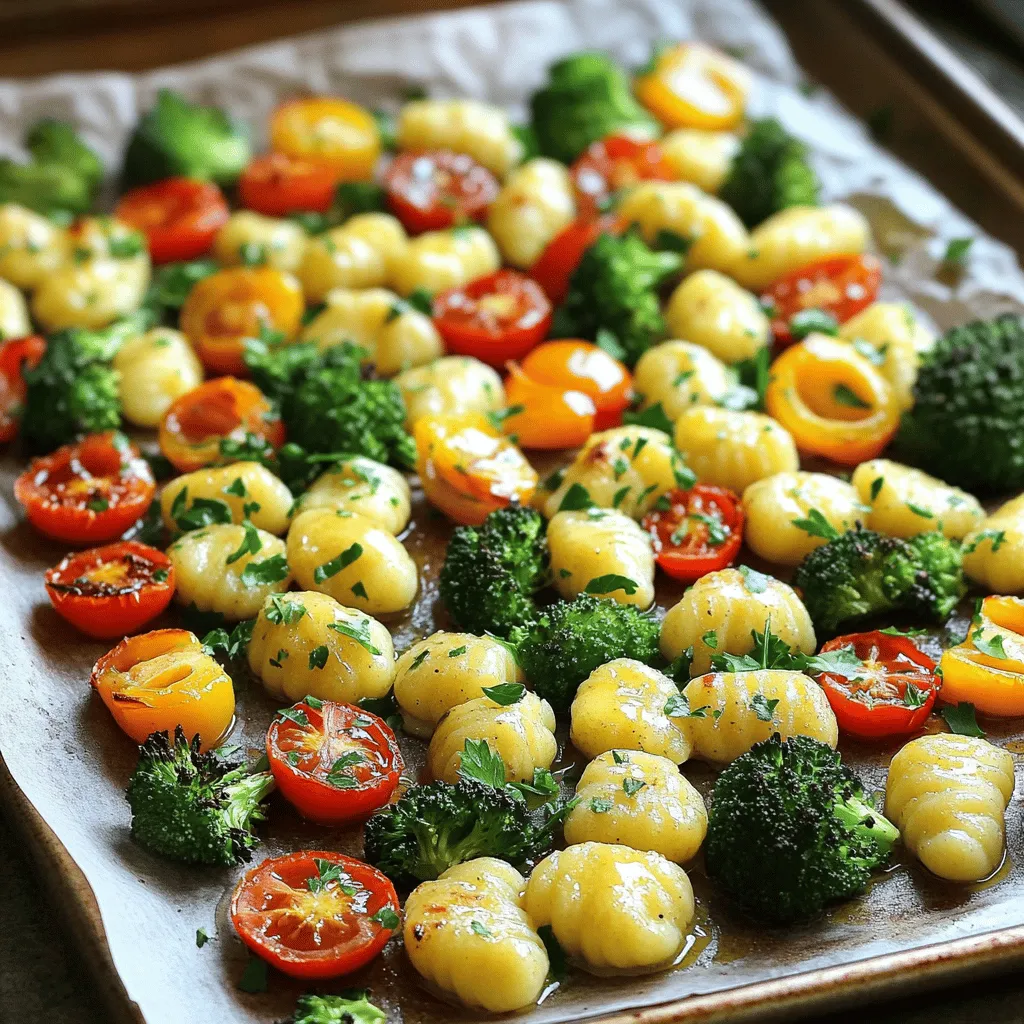
Welcome to a world of flavor with my Savory Sheet-Pan Garlic Butter Gnocchi and Veggies! This dish is simple and

- 1 pound boneless, skinless chicken thighs - 4 cups chicken broth - 1 cup water - 3 cloves garlic, minced - 1/3 cup honey - 2 tablespoons soy sauce (or tamari for gluten-free) - 1 teaspoon ground ginger - 1 carrot, sliced - 1 stalk celery, chopped - 1 small onion, diced - 1 cup egg noodles - 2 cups fresh spinach - Salt and pepper, to taste - Fresh parsley, for garnishing To make Slow Cooker Honey Garlic Chicken Noodle Soup, gather these key ingredients. The chicken thighs give it a rich flavor. Chicken broth and water create the soup base. Garlic adds depth. Honey brings a sweet touch, while soy sauce gives it a savory note. Ground ginger adds warmth. Carrots, celery, and onion add texture and nutrition. Egg noodles soak up the broth and make the soup hearty. Fresh spinach adds color and nutrients. Finally, season with salt and pepper to taste. Fresh parsley makes a lovely garnish. - Alternatives to egg noodles - Spices for additional flavoring - Vegetables to add for nutrition If you're feeling creative, try alternatives to egg noodles, like rice noodles or quinoa. You can also add spices like chili flakes or curry powder for a kick. Want more veggies? Toss in peas, bell peppers, or mushrooms for added nutrition and flavor. Feel free to adjust based on your taste! - First, place 1 pound of boneless, skinless chicken thighs in the slow cooker. - Next, mix 4 cups of chicken broth, 1 cup of water, 3 cloves of minced garlic, 1/3 cup of honey, 2 tablespoons of soy sauce, and 1 teaspoon of ground ginger in a bowl. This broth mixture adds a sweet and savory flavor to the chicken. Pour it over the chicken in the slow cooker. - Now, add 1 sliced carrot, 1 chopped stalk of celery, and 1 diced small onion to the pot. - Season with salt and pepper, then stir gently to combine all the ingredients. Cover the slow cooker and set it to cook on low for 6-7 hours or on high for 3-4 hours. The chicken should be fully cooked and tender. - Once the chicken is ready, remove the thighs from the cooker. Shred them using two forks. - Return the shredded chicken to the slow cooker. Add 1 cup of egg noodles and 2 cups of fresh spinach, then stir. Cover the pot and cook on high for another 15-20 minutes, until the noodles are tender. Taste the soup and adjust the seasoning if needed. Serve hot and garnish with fresh parsley for a lovely touch. Enjoy the warm, comforting flavors! Using fresh herbs can make a big difference in flavor. I love adding fresh parsley at the end. It brightens up the soup and adds a nice touch. You can also try fresh thyme or basil for a different twist. Seasoning is key, too. Always taste the soup before serving. A little more salt or pepper can really enhance the dish. Remember, you can adjust the flavors as you cook. Slow cooking chicken thighs is easy. They stay moist and tender. Place them at the bottom of the slow cooker, where they soak up all the juices. When it comes to cooking noodles, timing is important. Add them near the end of cooking. This keeps them from getting mushy. Cook them for about 15 to 20 minutes on high. Overcooking chicken is a common mistake. It can become dry and tough. Always check for doneness before shredding. Not stirring the ingredients can lead to uneven cooking. I always give it a gentle stir halfway through. This helps all the flavors blend well. {{image_2}} You can switch up the chicken for different proteins. If you want a vegetarian option, try tofu. It soaks up flavors well. For a leaner choice, use turkey. You can also use low-sodium broth. This helps cut back on salt without losing taste. Change the sauce to spice things up! Add some hot sauce for heat. You can also mix in a splash of citrus juice. Lemon or lime gives a bright, tangy twist. Try adding fresh herbs like basil or cilantro for extra flavor. Serve the soup with warm bread or a fresh side salad. This makes a hearty meal. If you have leftovers, store them in airtight containers. The soup lasts about three days in the fridge. You can reheat it on the stove or in the microwave. Add a splash of broth to keep it moist. To store your soup, use airtight containers. This keeps the soup fresh and safe. In the fridge, it lasts about three to four days. Make sure to cool it before sealing. You can freeze the soup for later. Pour it into freezer-safe containers. Leave some space at the top for expansion. To thaw, place it in the fridge overnight. For quick thawing, use the microwave. When reheating, warm it on the stove until hot. When reheating, do so on low heat. Stir often to avoid sticking. After warming, taste the soup. You may want to add more salt, pepper, or fresh herbs. Adding a squeeze of lemon or lime gives a nice kick! Cooking chicken in a slow cooker can vary. On the low setting, it takes about 6 to 7 hours. On high, it cooks in 3 to 4 hours. The key is to check that the chicken is tender and fully cooked. Yes, you can use frozen chicken. Just be aware that it will take longer to cook. If using frozen chicken, increase the cooking time by 1 to 2 hours on low. Always ensure the chicken reaches a safe internal temperature. If you need a substitute for honey, you can use maple syrup or agave nectar. Both options work well and will add a nice sweetness. Adjust the amount to your taste, as some sweeteners are stronger than honey. Yes, this recipe can be gluten-free. Just use tamari instead of soy sauce. Tamari is a great option that gives the same flavor without gluten. Always check labels to ensure all ingredients are gluten-free. This recipe is a great way to make a warm, tasty soup. You learned about key ingredients like chicken, broth, and noodles. I shared step-by-step instructions to help you cook perfectly. Remember to avoid common mistakes to get the best flavor. Feel free to customize the soup with your favorite seasonal veggies or spices. Store leftovers right for easy meals later. With this guide, you can create a delicious dish that suits your taste. Enjoy your cooking adventure!

Slow Cooker Honey Garlic Chicken Noodle Soup Delight

Craving a warm bowl of comfort? My Slow Cooker Honey Garlic Chicken Noodle Soup is the answer! This easy recipe

To make Cheddar Broccoli Tots in the air fryer, gather these simple ingredients: - 2 cups broccoli florets, steamed and finely chopped - 1 cup shredded cheddar cheese - 1 cup grated potatoes (about 2 medium-sized) - 1/2 cup breadcrumbs (panko for extra crunch) - 1 large egg, beaten - 1/2 teaspoon garlic powder - 1/2 teaspoon onion powder - Salt and pepper to taste - Olive oil spray Each ingredient plays a key role in creating a tasty and crispy snack. The broccoli provides fiber and nutrients, while the cheese adds a rich flavor. Grated potatoes help bind the mixture and give it a nice texture. I recommend using panko breadcrumbs. They create a crunchier exterior that makes each bite delightful. The egg acts as a binder, holding everything together perfectly. Don’t forget to season with garlic powder, onion powder, salt, and pepper for extra flavor. This combination of ingredients makes your Cheddar Broccoli Tots not only delicious but also fun to eat. Enjoy experimenting with these elements to find your ideal mix! First, you need to steam the broccoli. Use about 2 cups of broccoli florets. Steam them until they are tender. Then, chop them finely. This helps the tots hold together. Next, add the chopped broccoli to a large bowl. Now, mix in 1 cup of shredded cheddar cheese and 1 cup of grated potatoes. Make sure to combine everything well. Now, it's time to enhance the flavor. Add 1/2 cup of breadcrumbs to the mixture. I recommend using panko breadcrumbs for extra crunch. Sprinkle in 1/2 teaspoon of garlic powder and 1/2 teaspoon of onion powder. Add salt and pepper to taste. Finally, pour in 1 beaten egg. This helps bind the mixture together. Stir until all the ingredients mix well. Before cooking, preheat your air fryer to 400°F (200°C). While it heats up, shape the mixture into tots. Use your hands to take small portions and form them into balls the size of golf balls. Then, flatten them slightly. Lightly spray the air fryer basket with olive oil to prevent sticking. Place the tots in a single layer, leaving space between each. Air fry the tots for 10 to 12 minutes. Shake the basket halfway through to ensure even cooking. They should turn golden brown and crispy. Once done, let them cool for a few minutes before serving. Getting the right texture for your tots is key. The balance of ingredients matters. Use two cups of steamed broccoli, one cup of shredded cheddar cheese, and one cup of grated potatoes. This mix gives a great base. If you want more crunch, use panko breadcrumbs. They are light and crispy. You can also add more breadcrumbs if you like. This helps hold everything together and gives that perfect bite. To cook the tots evenly, use the shaking the basket technique. Halfway through cooking, shake the basket. This helps all sides crisp up well. If your air fryer has different settings, watch the time. Some models cook faster than others. Start with 10 minutes and check for golden brown color. Adjust as needed. Each air fryer is unique, so trust your eyes and nose. Enjoy those crispy bites of goodness! {{image_2}} You can switch up your cheddar broccoli tots by using different cheeses. Try mozzarella for a gooey texture or pepper jack for a spicy kick. Each cheese will give the tots a unique flavor. You can also substitute vegetables in the recipe. Cauliflower works great if you want a milder taste. Just steam and chop it like you do with broccoli. You can mix and match to find your favorite combo. Want to add more flavor to your tots? Consider adding spices like chili powder or paprika. Just a pinch can bring warmth and depth to your snack. Adding fresh herbs is another way to boost flavor. Try parsley or chives for a bright and fresh taste. Mix them in with the other ingredients for that extra pop. To keep your Cheddar Broccoli Tots fresh, store them in the fridge. Place them in an airtight container. This will help maintain their flavor and texture. Make sure to cool them to room temperature before sealing. They will stay good for about three days. For longer storage, you can freeze them. Use a freezer-safe bag or container and label it. This way, you can enjoy them later! The best way to reheat your tots is in the air fryer. Preheat your air fryer to 350°F (175°C). Place the tots in the basket in a single layer. Heat them for about 5-7 minutes. This will bring back their crispiness. If you want to check, shake the basket halfway through. For extra crispiness, you can lightly spray them with olive oil before reheating. Enjoy your snack just like it was fresh! Yes, you can make these tots ahead of time. You can store uncooked tots in the fridge for up to 24 hours. This lets the flavors blend. To do this, form the tots and place them on a tray. Cover them with plastic wrap. If you want to store cooked tots, let them cool first. Then, put them in a sealed container. They last for 3 to 4 days in the fridge. The right sauce makes these tots even better! Here are some popular options: - Ranch dressing - Spicy mustard - Ketchup - Honey mustard - Garlic aioli Feel free to mix and match these sauces to find your favorite! To get crispy tots, follow these tips: - Use panko breadcrumbs. They add extra crunch. - Make sure the tots are not too big. Smaller sizes cook better. - Preheat the air fryer to 400°F (200°C) before adding the tots. - Space the tots in the basket. This helps them cook evenly. - Shake the basket halfway through cooking. This ensures all sides get crispy. With these tips, you’ll have perfect, crispy cheddar broccoli tots every time! You learned how to make delicious broccoli tots from scratch. We covered the ingredients you need, like cheese and breadcrumbs. I shared step-by-step instructions for preparing and cooking the tots in an air fryer. You now have tips for the perfect texture, cooking techniques, and even tasty variations. Remember to store leftovers properly and know how to reheat them for the best taste. Enjoy your new snack idea, and feel free to get creative with flavors!

Cheddar Broccoli Tots Air Fryer Crispy Snack Delight

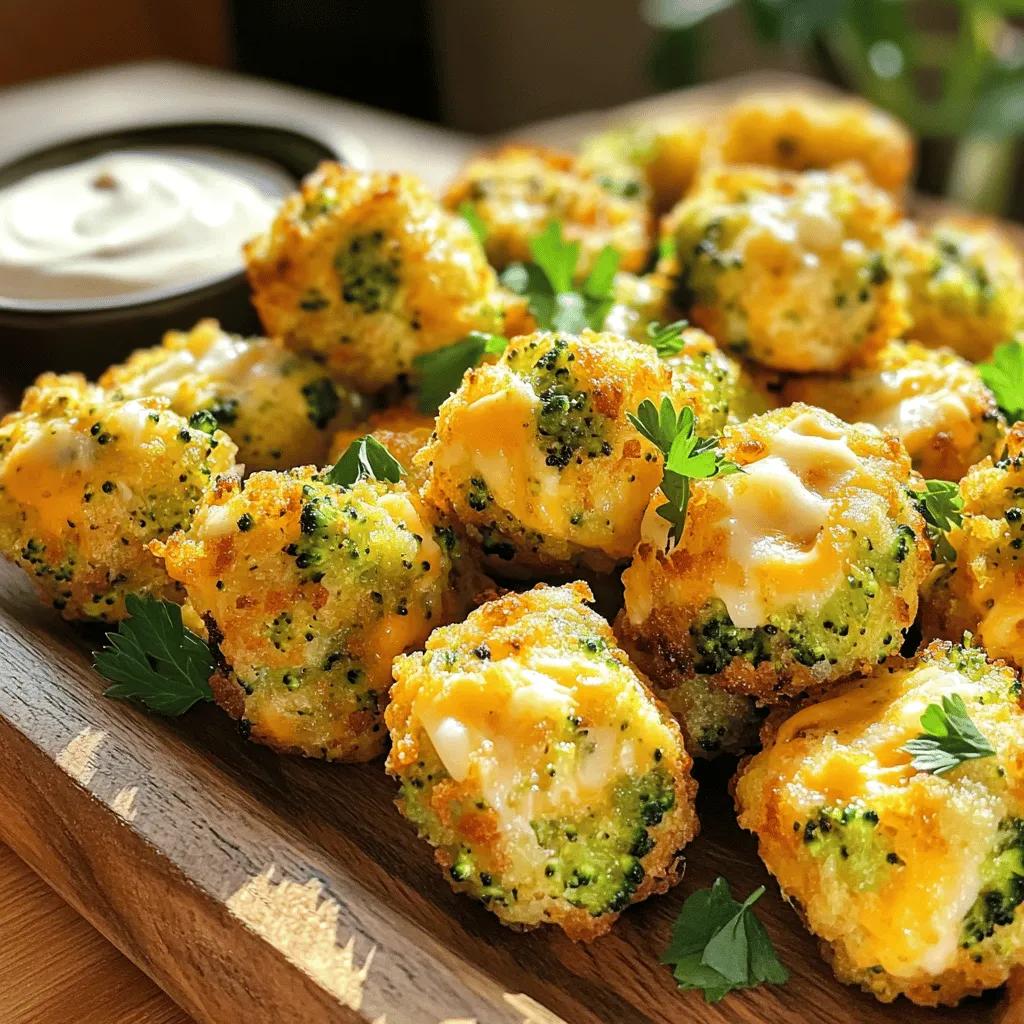
Are you ready for a snack that’s both crispy and packed with nutrition? In this post, we’ll explore how to

To create a tasty orange tofu stir-fry, you need the following: - 1 block (14 oz) firm tofu, drained and pressed - 2 tablespoons cornstarch - 3 tablespoons vegetable oil - 1 bell pepper (red or yellow), sliced - 1 cup snap peas, trimmed - 1 carrot, julienned - 3 green onions, chopped - 2 cloves garlic, minced - 1 tablespoon fresh ginger, minced - 1/3 cup fresh orange juice (about 1-2 oranges) - 2 tablespoons soy sauce (low sodium) - 1 tablespoon honey (or maple syrup) - 1 teaspoon sesame oil Each of these ingredients plays a role. The tofu gives protein, while the veggies add crunch and color. You can enhance your dish with these garnishes: - Sesame seeds - Fresh cilantro These add flavor and a nice look to your meal. They make your dish feel special. For the best flavor, I suggest using: - Vegetable oil - Sesame oil Vegetable oil works for frying, while sesame oil gives a nice taste at the end. Each oil helps the dish shine. Start with firm tofu. Drain it well and press it to remove excess water. This step is key for getting a crispy texture. Cut the tofu into bite-sized cubes. Next, coat the tofu pieces evenly with cornstarch. This will help the tofu crisp up nicely when cooked. Heat 2 tablespoons of vegetable oil in a large skillet or wok over medium-high heat. Once the oil is hot, add the tofu cubes in a single layer. Cook for about 5-7 minutes, turning them occasionally. You want them golden brown on all sides. When done, remove the tofu from the skillet and set it aside. In the same skillet, add the last tablespoon of vegetable oil. Now, toss in the sliced bell pepper, snap peas, and julienned carrot. Stir-fry these veggies for about 3-4 minutes. Cook until they are bright and tender-crisp. This keeps them fresh and crunchy. In a small bowl, mix the fresh orange juice, soy sauce, honey or maple syrup, and sesame oil. Stir well to combine all the flavors. This sauce will add a sweet and tangy kick to your stir-fry. Return the cooked tofu to the skillet. Pour the orange sauce mixture over everything. Toss gently to coat all the ingredients well. Cook for another 2-3 minutes until everything is heated through. Finally, remove the skillet from the heat. Sprinkle sesame seeds and chopped green onions on top. Serve the stir-fry warm over rice or quinoa, and add fresh cilantro as a garnish. Enjoy your homemade meal! To get crispy tofu, start with firm tofu. Press it well to remove water. Then, cut it into bite-sized cubes. Coat these cubes in cornstarch. This coating helps form a nice crust. Use a hot skillet and enough oil. Cook the tofu in a single layer. Don’t crowd the pan; it will steam instead of crisp. Flip the cubes often for even browning. Cook until they turn golden and crunchy. Marinades boost the flavor of tofu. A simple mix of soy sauce, orange juice, and honey works great. Let the tofu soak for at least 30 minutes. If you have time, marinate overnight for deeper flavor. You can also add spices or herbs to your marinade. Experiment with garlic, ginger, or even chili flakes for heat. This extra step takes your dish to the next level. Feel free to swap out vegetables in this stir-fry. Use broccoli, zucchini, or even mushrooms. Each veggie adds a unique taste and texture. Frozen vegetables can work, too, if you’re short on time. Just remember to adjust cooking times. Cook harder vegetables first and add softer ones later. This way, everything stays crisp and fresh. {{image_2}} If you want to make this dish vegan, skip the honey. Instead, use maple syrup. It gives a nice sweetness and works well with orange juice. You can also add more veggies like broccoli or mushrooms for extra taste and color. Tempeh and seitan are great protein choices. Tempeh has a nutty taste. Cut it into cubes like the tofu. Cook it the same way. Seitan, made from wheat, has a chewy texture. Slice it thin and stir-fry until golden. Both will add more depth to your meal. For a gluten-free option, use gluten-free soy sauce. This keeps the dish flavorful without the gluten. Also, make sure to check your cornstarch. Most brands are gluten-free, but it's good to check. You can still enjoy this tasty stir-fry while avoiding gluten. After enjoying your orange tofu stir-fry, cool it down before storing. Place leftovers in an airtight container. The stir-fry stays fresh in the fridge for up to three days. Make sure to keep it sealed to prevent odors from other foods. You can freeze the stir-fry for later use. First, let it cool completely. Then, transfer it to a freezer-safe container. It can last for about two months in the freezer. When you are ready to eat, thaw it overnight in the fridge. Reheat it in a skillet over medium heat. Add a splash of water or broth to keep it moist. To keep your orange tofu stir-fry fresh, store the sauce separately if possible. This way, the tofu and veggies won’t get soggy. When you reheat, add fresh vegetables or herbs for an extra boost of flavor. Enjoy your tasty meal even days later! Yes, you can use other types of tofu! Soft or silken tofu works, but the texture changes. Firm tofu holds its shape well. Extra-firm tofu gives a better crunch. If you want a softer stir-fry, go with soft tofu. Just handle it gently. To add spice, try these tips: - Add red pepper flakes while cooking the veggies. - Mix in sliced jalapeño or serrano peppers. - Use spicy chili sauce in the orange sauce mix. - Drizzle sriracha on top before serving. These steps bring heat without overpowering the orange flavor. This stir-fry pairs well with many sides: - Serve it over cooked rice or quinoa for a filling meal. - Pair it with steamed broccoli or bok choy for extra greens. - Add fried rice for a fun twist. - Enjoy it with a simple salad for freshness. These options make your meal more balanced and tasty! This blog post covered how to make a tasty orange tofu stir-fry. We explored key ingredients, cooking steps, and variations. I shared tips to make tofu crispy and flavorful. You can add your favorite veggies for variety or try vegan proteins. Remember, this dish is easy to store and reheat. Use these ideas to create a meal that suits your taste. Enjoy the process and make it your own!

Orange Tofu Stir-Fry Simple Yet Better Than Takeout

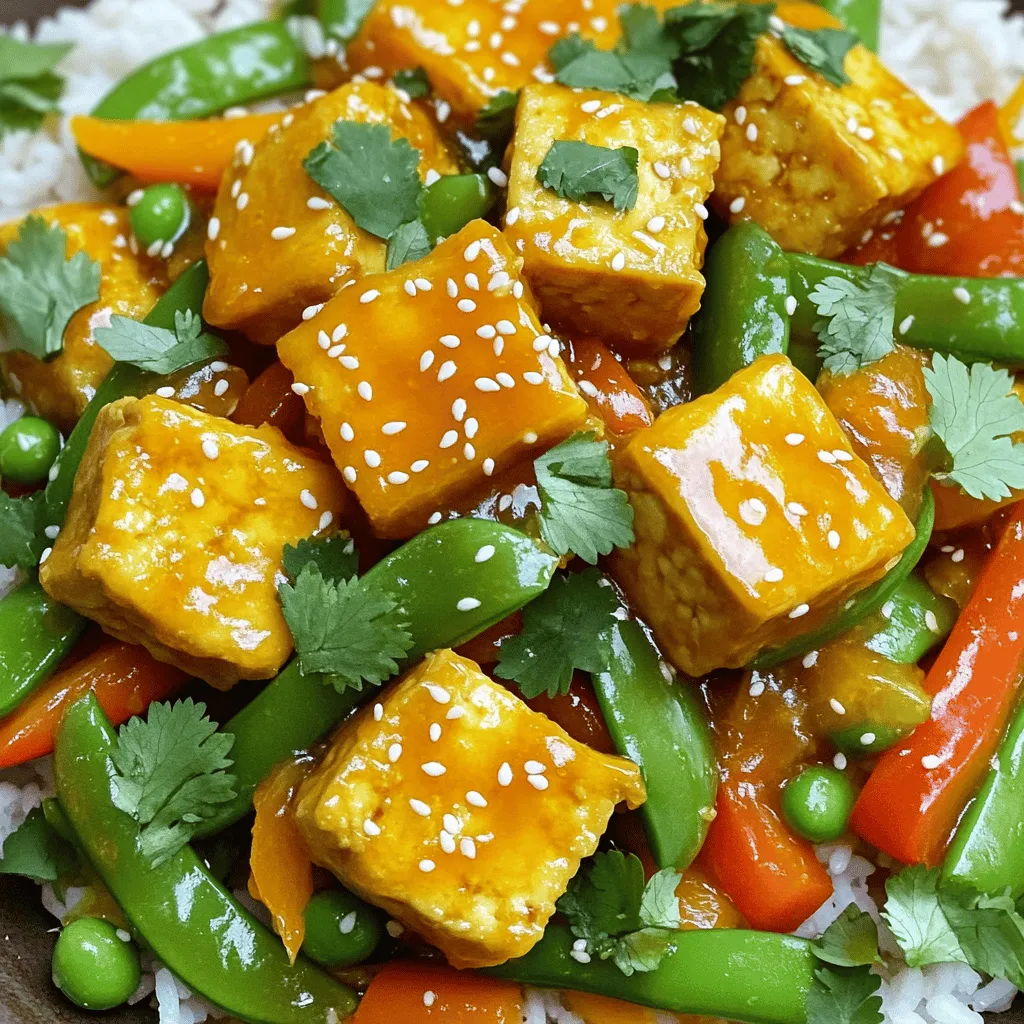
Looking for a quick, tasty meal that beats takeout? My Orange Tofu Stir-Fry is simple and packed with flavor. With

Older posts
Newer posts
← Previous Page1 … Page28 Page29 Page30 … Page86 Next →

dsad

© 2026 Cooking Wells • Built with GeneratePress

Our Policies

  • Copyright Policy
  • Cookie Policy
  • GDPR Policy
  • Privacy Policy
  • Disclaimer
  • Terms Of Use

More Information

  • Home
  • About
  • Contact
  • Appetizers
  • Dessert
  • Dinner
  • Drinks
©2026, Cooking Wells About Back To Top