Skip to content
DisclaimerTerms Of UseGDPR PolicyCookie Policy

Cooking Wells

  • Home
  • Drinks
  • Appetizers
  • Dinner
  • Dessert
  • About
  • Contact
  • Privacy Policy
DisclaimerTerms Of UseGDPR PolicyCookie Policy

NO-ING-IMG

To make cozy pumpkin spice latte muffins, you need these basic ingredients: - 1 cup all-purpose flour - 1 cup whole wheat flour - 1 teaspoon baking soda - 1 teaspoon baking powder - 1 teaspoon ground cinnamon - 1 teaspoon ground nutmeg - 1 teaspoon ground ginger - 1/2 teaspoon ground cloves - 1/2 teaspoon salt - 1 cup pure pumpkin puree - 1/2 cup brown sugar, packed - 1/2 cup granulated sugar - 2 large eggs - 1/2 cup brewed coffee, cooled - 1/3 cup vegetable oil - 1 teaspoon vanilla extract These ingredients blend to create a warm, inviting flavor that screams fall. You can add extra treats to enhance your muffins: - 1/2 cup chocolate chips - Whipped cream for topping These add-ins give your muffins a fun twist. Chocolate chips melt into gooey pockets. Whipped cream adds a delightful finish. I love using pure pumpkin puree in this recipe. It brings rich flavor and moisture to the muffins. Plus, pumpkin is packed with vitamins and fiber. Brewed coffee is another star in this recipe. It deepens the flavor and gives a gentle boost. The coffee blends well with spices. It makes each bite feel like a cozy hug. First, you need to prep the muffin tin. Preheat your oven to 350°F (175°C). Line your muffin tin with paper liners or grease it well. This helps the muffins pop out easily after baking. Next, let’s mix the dry ingredients. In a large bowl, whisk together these items: - 1 cup all-purpose flour - 1 cup whole wheat flour - 1 teaspoon baking soda - 1 teaspoon baking powder - 1 teaspoon ground cinnamon - 1 teaspoon ground nutmeg - 1 teaspoon ground ginger - 1/2 teaspoon ground cloves - 1/2 teaspoon salt Make sure everything is well combined. This step is key for a uniform flavor. Now it’s time to blend the wet ingredients. In another bowl, mix these together until smooth: - 1 cup pure pumpkin puree - 1/2 cup brown sugar, packed - 1/2 cup granulated sugar - 2 large eggs Once smooth, stir in these items: - 1/2 cup brewed coffee, cooled - 1/3 cup vegetable oil - 1 teaspoon vanilla extract Mix until everything is fully combined. When combining the dry and wet components, add the dry mixture to the wet mixture gradually. Mix gently until just combined. Be careful not to overmix; this keeps the muffins soft and fluffy. If you want chocolate chips, fold in 1/2 cup now. Spoon the batter into the prepared muffin tin. Fill each cup about 3/4 full. This allows room for the muffins to rise. Bake in the oven for 18-22 minutes. Check for doneness by inserting a toothpick in the center. If it comes out clean, your muffins are ready. After baking, let the muffins cool in the pan for 5 minutes. Then, transfer them to a wire rack to cool completely. If you like, top each muffin with whipped cream and a sprinkle of pumpkin spice before serving. To avoid overmixing, blend your wet and dry ingredients gently. Mix until just combined. If you stir too much, your muffins may turn out dense. Keep an eye on the batter; a few lumps are okay. For even baking, fill each muffin cup about three-quarters full. This helps them rise uniformly. Also, rotate your muffin tin halfway through baking for consistent heat. Serve your muffins warm for the best flavor. They taste great straight from the oven but cool muffins are still yummy. Pair them with a hot cup of coffee or tea. The flavors mix well and create a cozy vibe. Set up a warm, inviting space to enjoy your muffins. Use soft blankets and comfy chairs. Add some candles for a warm glow. Share your muffins with friends or family for a fun time. Enjoying food together adds to the cozy feeling. {{image_2}} You can add your own twist to these muffins. Nuts like walnuts or pecans add crunch. Dried fruits like cranberries or raisins bring extra sweetness. Feel free to mix and match your favorites. You can also try different spice blends. If you love cardamom, add a pinch. Want more warmth? Use a bit more cinnamon or ginger. Personalize these muffins to fit your taste. If you need gluten-free muffins, swap the all-purpose flour for a gluten-free blend. Make sure it has a good mix of starches and flours. This can help keep the texture light and fluffy. For a vegan version, replace eggs with flax eggs. Mix one tablespoon of ground flaxseed with three tablespoons of water. Let it sit for five minutes to thicken. Use plant-based milk instead of brewed coffee for a lighter flavor. You can adapt these muffins for different seasons. In winter, try adding peppermint extract or cocoa powder for a festive touch. In summer, consider using fresh berries or citrus zest to brighten the flavor. Using other seasonal ingredients can also enhance the muffins. Apples or pears can replace some pumpkin. This gives a new taste while keeping the cozy feel. Enjoy experimenting with what you have on hand! To keep your pumpkin spice latte muffins fresh, store them in an airtight container. Place a paper towel at the bottom of the container to absorb moisture. This helps keep them soft. You can also use a plastic bag, but ensure to squeeze out the air before sealing. For long-term storage, freeze the muffins. Wrap each muffin in plastic wrap, then place them in a freezer bag. This way, they stay fresh for up to three months. Enjoy your muffins warm by reheating them. If you use the microwave, heat each muffin for about 15-20 seconds. This method keeps them moist. For a crispy outside, use the oven. Preheat it to 350°F (175°C) and bake the muffins for about 10 minutes. This method brings back that fresh-baked taste. These muffins can last for about a week at room temperature. Keep them in a cool, dry place. If you freeze them, they will last for three months. Watch for signs of spoilage, like mold or an off smell. If they feel dry or crumbly, it’s time to toss them. These muffins bring warmth with their rich flavors. The blend of spices like cinnamon, nutmeg, ginger, and cloves creates a comforting aroma. The pumpkin puree adds moisture, making each bite soft and tender. When you take a bite, the flavors wrap around you like a cozy blanket. The hint of coffee boosts the taste, making it perfect for fall. Yes, you can make these muffins ahead of time. They store well in an airtight container at room temperature for about 3 days. If you want to keep them longer, freeze them! Wrap each muffin tightly in plastic wrap and place them in a freezer-safe bag. They will stay fresh for up to 3 months. To enjoy them later, just thaw them overnight in the fridge or warm them in the microwave. To keep your muffins moist, avoid overmixing the batter. Mix just until the dry ingredients are combined. Adding enough pumpkin puree and oil also helps keep them soft. Make sure to measure accurately. Too much flour can lead to dryness. Lastly, don't bake them for too long. Take them out when a toothpick comes out clean. Yes, you can use alternative sweeteners. Try coconut sugar or maple syrup instead of brown sugar. If you use liquid sweeteners, reduce the amount of other liquids in your recipe. For granulated sweeteners, stick to the same amount as sugar. Always taste the batter and adjust if needed. In this post, we explored how to make delicious muffins. We covered essential ingredients, preparation, and baking steps. I shared tips to perfect your muffins and creative variations. Fresh muffins should bring comfort and joy to any setting. Whether you're baking for yourself or with friends, use these ideas to create special moments. Enjoy every bite and customize these treats to fit your taste. Happy baking!

Cozy Pumpkin Spice Latte Muffins for Fall Flavor

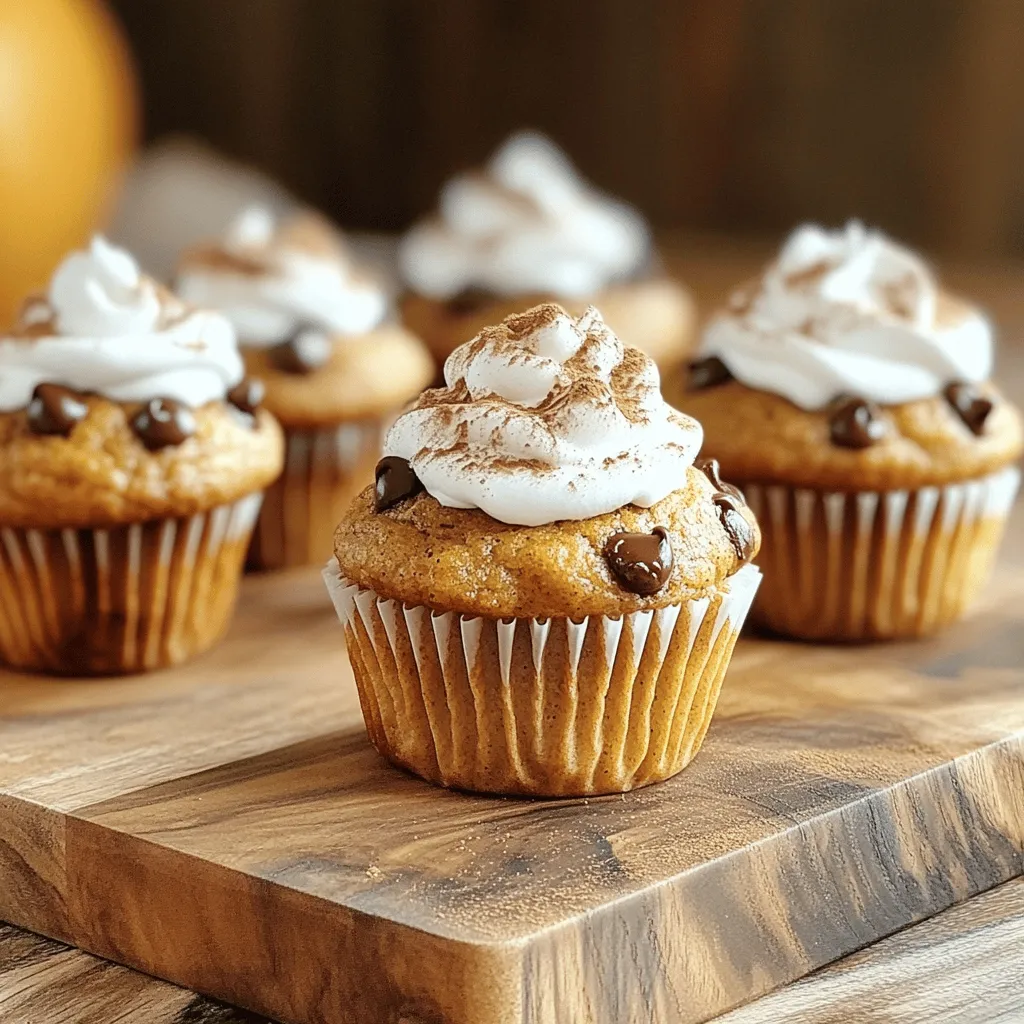
Fall is the perfect time to warm your kitchen with the rich flavors of pumpkin spice! My Cozy Pumpkin Spice

For the Peanut Butter Cookie Dough Smoothie, you need simple, tasty ingredients. Here’s what you’ll need: - 1 frozen banana - 2 tablespoons natural peanut butter - 1 scoop vanilla protein powder - 1 cup unsweetened almond milk (or milk of choice) - 2 tablespoons rolled oats - 1 tablespoon maple syrup (optional) - 1 teaspoon vanilla extract - Pinch of salt - 1 tablespoon chocolate chips (for garnish) Each ingredient plays a key role. The frozen banana gives a creamy texture and natural sweetness. Natural peanut butter adds a rich, nutty flavor. The vanilla protein powder boosts protein and helps keep you full. Almond milk makes it smooth and light. Rolled oats add fiber, which is great for digestion. Maple syrup is optional, but it can make your smoothie sweeter if you like. The vanilla extract brings warmth and depth. A pinch of salt enhances all the flavors. Finally, chocolate chips add a fun touch on top, making it more like cookie dough. Gather these ingredients, and you’ll be ready to blend a delicious, nutritious drink! - Step 1: Combine ingredients in a blender. Start your smoothie by adding one frozen banana, two tablespoons of natural peanut butter, and one scoop of vanilla protein powder into your blender. Next, pour in one cup of unsweetened almond milk. Add two tablespoons of rolled oats, one tablespoon of maple syrup if you want extra sweetness, and one teaspoon of vanilla extract. Don’t forget a pinch of salt! - Step 2: Blend until smooth and creamy. Blend the mixture on high for about 30 to 60 seconds. You want a nice, smooth texture. If the smoothie is too thick, add a little more almond milk. This will help you get that perfect creamy consistency. - Step 3: Adjust sweetness and pour into glass. After blending, taste your smoothie. If you want it sweeter, add a bit more maple syrup. Then, pour the smoothie into a tall glass. It should look thick and inviting. - Step 4: Garnish and serve. To make your smoothie even more appealing, garnish the top with a tablespoon of chocolate chips. You can add an extra drizzle of peanut butter if you like. Enjoy your delicious peanut butter cookie dough smoothie! To get the right consistency, start with a frozen banana. This gives the smoothie that creamy feel. If it feels too thick, just add more almond milk. Mix until you reach your desired texture. When blending frozen ingredients, always add your liquid first. This helps the blades move smoothly. If you blend frozen items first, they can get stuck. Use a tamper or stop to scrape down the sides if needed. To adjust sweetness, taste as you go. Start with one tablespoon of maple syrup. If you want it sweeter, add more a little at a time. Remember, the banana adds natural sweetness too. These tips will help you create a perfect Peanut Butter Cookie Dough Smoothie every time. Enjoy your tasty and healthy treat! {{image_2}} You can have fun with your smoothie. Start by trying different nut butters. Almond and cashew butters add unique flavors. They also change the texture. If you want, mix in chocolate or hazelnut butter. Each nut butter brings its own taste. Next, switch up your protein powder. Vanilla is great, but chocolate or plant-based options work too. Each type of powder gives a different flavor and protein boost. Try a scoop of chocolate protein for a richer taste. You can also add extra mix-ins to boost nutrients. Chia seeds pack a punch of fiber and omega-3s. Toss in a handful of spinach for added vitamins. You won’t even taste it, but your smoothie will be healthier. Feel free to get creative! The options are endless. Each change makes your smoothie unique and fun. You may have extra smoothie after enjoying your tasty treat. Here are some easy tips for storage. - Freezing Smoothie: Pour leftover smoothie into an ice cube tray. Once frozen, transfer cubes to a freezer bag. This makes it easy to blend later. - Refrigerator Storage: If you plan to drink it soon, store it in a sealed jar. It keeps well for up to 24 hours in the fridge. - Re-blending or Consuming: If the smoothie thickens in the fridge, add a splash of almond milk when you blend it again. This will bring back its creamy texture. Enjoy your smoothie anytime! Yes, you can use any milk you like. Almond milk works well, but try oat, soy, or coconut milk too. Each will change the flavor a bit, but all are tasty. Yes, it can be vegan! Just use a plant-based protein powder instead of whey. Also, check that the peanut butter has no added dairy. To lower calories, skip the maple syrup. You can also reduce the peanut butter to one tablespoon. This keeps the flavor but cuts some calories. You can blend this smoothie ahead of time. Store it in the fridge for up to 24 hours. Just be sure to shake or stir before drinking. This blog post showed you how to make a tasty and healthy smoothie. We covered the simple ingredients, step-by-step instructions, and tips for a smooth blend. You learned how to customize your drink and store leftovers for later. With these ideas, you can enjoy a nutritious treat any time. Get creative with flavors and ingredients. Enjoy your smoothie adventure!

Peanut Butter Cookie Dough Smoothie Protein Power Boost

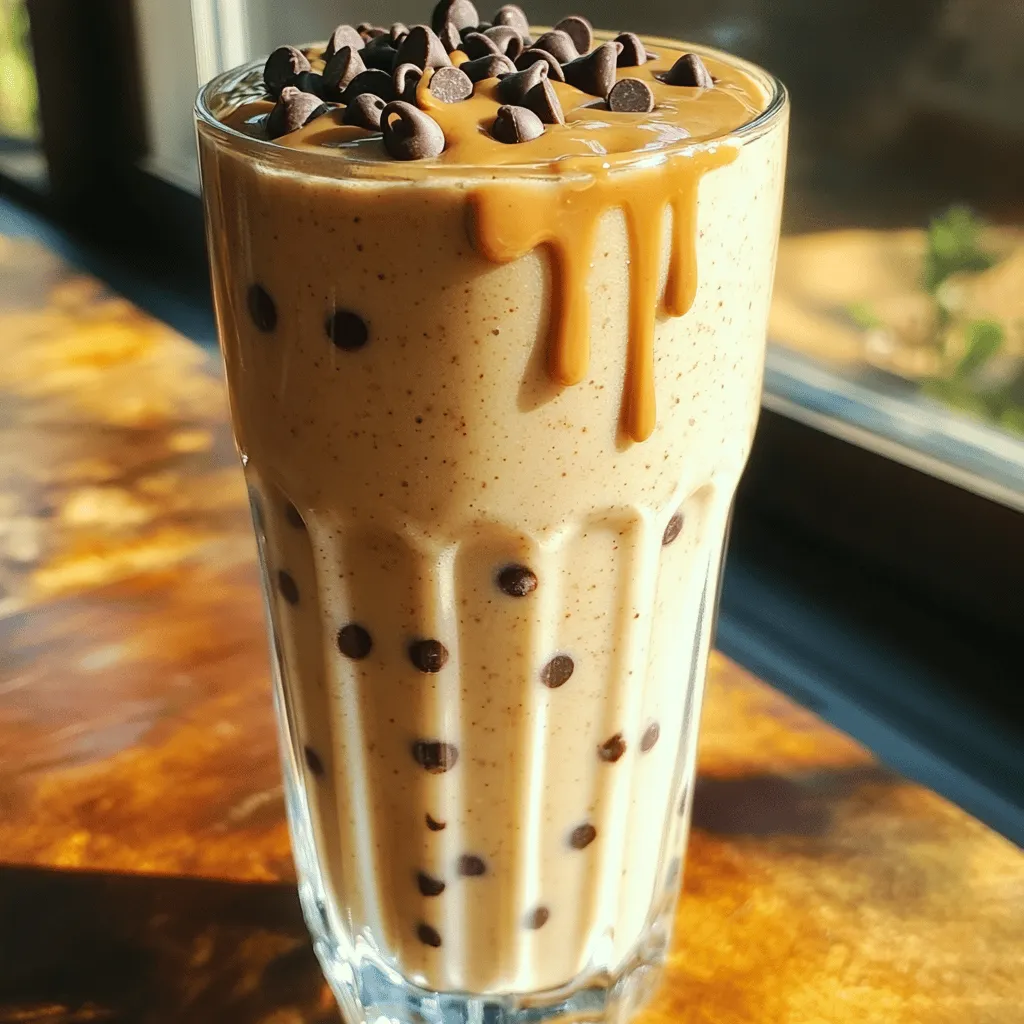
If you love the taste of peanut butter cookie dough, you’re in for a treat! This Peanut Butter Cookie Dough

- 1 cup rolled oats - 1/2 cup creamy almond butter or peanut butter - 1/4 cup honey or maple syrup - 1/4 cup cocoa powder - 1/3 cup dark chocolate chips - 1/4 cup mini chocolate chips - 1/4 cup shredded coconut (unsweetened) - 1 teaspoon vanilla extract - Pinch of salt Measuring accurately helps your energy bites turn out great. Use dry measuring cups for oats and cocoa powder. For sticky items like nut butter and honey, use a liquid measuring cup. Spray the cup with cooking oil first. This makes it easier to pour. Use a kitchen scale for precision if you have one. It helps you get the right amounts, especially for small quantities. You can swap out ingredients to suit your tastes. If you don't like almond butter, use peanut butter. For a vegan option, use maple syrup instead of honey. You can also use agave syrup for sweetness. If you don’t have dark chocolate chips, try semi-sweet or milk chocolate chips. For a nut-free option, use sun butter instead of nut butter. Feel free to get creative with these bites! Start by gathering all your ingredients. You will need rolled oats, almond butter, honey, cocoa powder, dark chocolate chips, mini chocolate chips, shredded coconut, vanilla extract, and a pinch of salt. Measure out each ingredient carefully. This helps your energy bites taste the best. In a large bowl, combine 1 cup of rolled oats, 1/4 cup of cocoa powder, and a pinch of salt. Stir this mixture well. In another bowl, mix 1/2 cup of almond butter, 1/4 cup of honey, and 1 teaspoon of vanilla extract. Make sure this mixture is smooth and creamy. Pour the wet mix into the dry mix. Stir until everything blends well. Next, fold in 1/3 cup of dark chocolate chips, 1/4 cup of mini chocolate chips, and 1/4 cup of shredded coconut. Ensure even distribution of all these yummy flavors. Now it's time to roll your mixture into bites. Scoop small portions and roll them into balls about 1 inch in size. Place these bites on a baking sheet lined with parchment paper. After rolling all the bites, refrigerate them for at least 30 minutes. This step helps them firm up. Enjoy your energy bites right away or store them in an airtight container in the fridge for up to one week. Mixing is key for tasty energy bites. I always start with dry ingredients. Combine rolled oats, cocoa powder, and salt in a big bowl. Stir well until they blend nicely. Next, I mix wet ingredients in another bowl. I use creamy almond butter, honey, and vanilla extract. Stir until it’s smooth. Then, I pour the wet mix into the dry mix. This helps keep the texture just right. Stir until every bit is combined. Don't rush this step; it makes a big difference. These bites are perfect for snacks or treats. I love serving them at parties. You can place them on a nice platter for guests. They’re great for lunch boxes too. Just grab a few and go! You can also pair them with fruits like bananas or apples. If you want a drink, a glass of milk works well. These bites are not just tasty; they are filling too. To make these energy bites even better, try adding nuts. Chopped almonds or walnuts add a nice crunch. I also enjoy a sprinkle of cinnamon for warmth. If you like a bit of heat, add a pinch of cayenne pepper. For extra sweetness, use more honey or maple syrup. You can switch up the chocolate chips too. Try using white chocolate or milk chocolate. Each change brings a new twist to the recipe, keeping it fun! {{image_2}} You can easily swap out some ingredients for a new taste. If you don't have almond butter, peanut butter works great. You can also try sunflower seed butter for a nut-free option. Instead of honey, use maple syrup for a vegan choice. For the oats, quick oats can replace rolled oats, but the texture might change a bit. Want to change the flavor? Add a teaspoon of cinnamon for warmth. You can use different types of chocolate, like white chocolate chips, for a sweeter bite. If you love spice, try adding a pinch of cayenne pepper. This will give your bites a fun kick. You can also include dried fruits like raisins or cranberries for a fruity touch. If you're looking for healthier choices, use less sweetener. You can cut the honey or maple syrup to 2 tablespoons. If you're gluten-free, make sure your oats are certified gluten-free. For a higher protein option, add protein powder to the mix. Just reduce the oats slightly to keep the ratio right. These easy swaps let you enjoy energy bites while meeting your dietary needs. You can keep your Triple Chocolate Energy Bites in the fridge. Place them in an airtight container. They stay fresh for about one week. This way, you have a tasty snack ready to grab. If you want to save them longer, freeze the energy bites. First, let them chill in the fridge for 30 minutes. Then, place them in a freezer bag. Make sure to squeeze out the air to prevent freezer burn. They can last up to three months in the freezer. Use glass or plastic containers with tight lids. This helps keep moisture out. If you freeze them, use freezer bags or safe containers. Label each bag with a date. This helps you track how long they have been stored. Yes, you can use different nut butters. Almond butter works well, but so does peanut butter. Cashew butter will also give a nice flavor. Just pick your favorite! These energy bites last about one week in the fridge. Store them in an airtight container. If you want them to last longer, you can freeze them. Yes, for nut allergies, try sunflower seed butter. It has a similar texture and taste. You can also skip the chocolate chips for a simpler option. Yes, you can make these vegan easily. Just swap honey for maple syrup. Choose dairy-free chocolate chips to keep it vegan-friendly. You can add many fun ingredients! Try chia seeds for extra fiber. Dried fruits like cranberries or raisins add sweetness. You could even mix in protein powder for a boost. This post detailed key ingredients and how to mix them for energy bites. We discussed measuring tips, substitutions, and storage options. Remember, experimenting with flavors can make your bites unique. Use this guide to make energy bites that fit your needs. Explore swaps and modifications to get the most from your recipe. Keep these energy bites in the right containers, and enjoy them for weeks. Use the FAQ section to solve common questions as you bake. Enjoy your delicious, healthy treats!

Triple Chocolate Energy Bites No Bake Tasty Treat

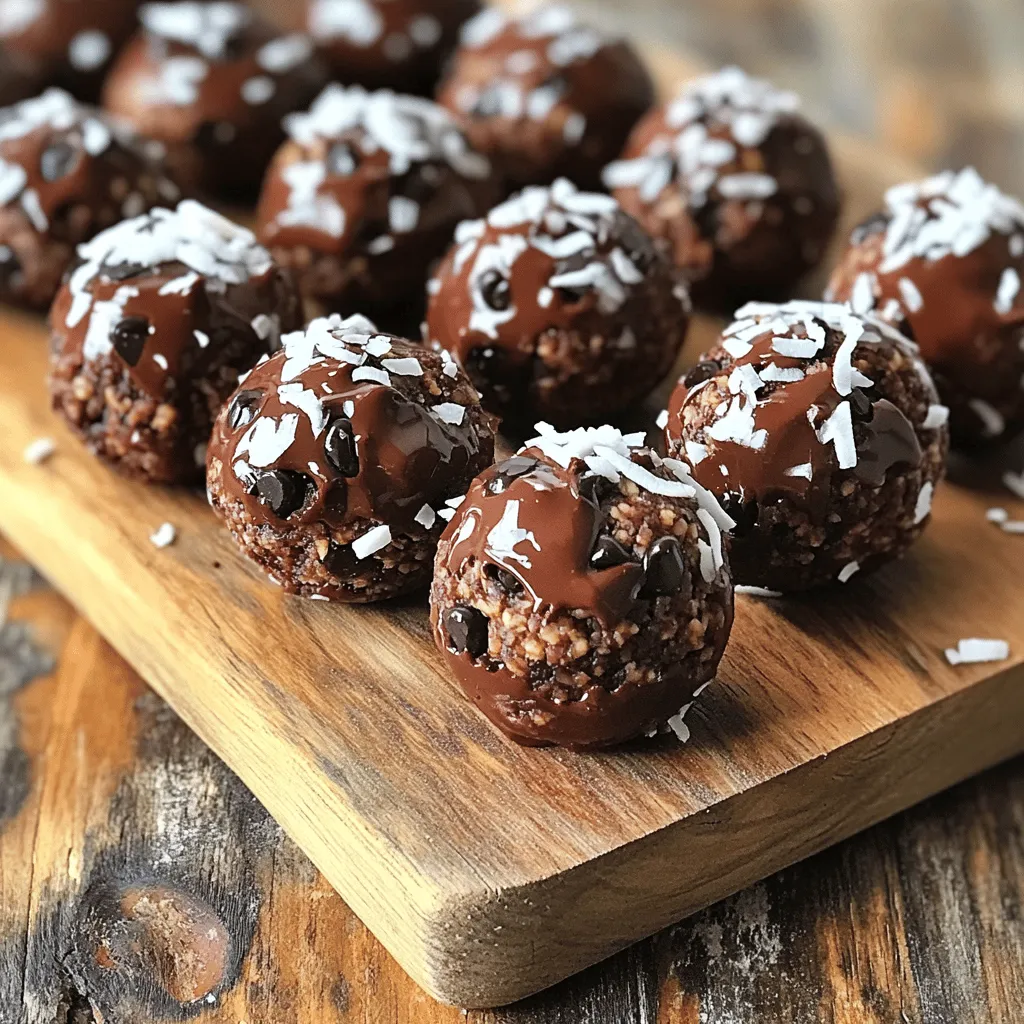
Looking for a sweet and quick snack? You’ll love these Triple Chocolate Energy Bites! They’re no-bake, easy to make, and

Here's what you need for the creamy spinach sun-dried tomato orzo. Gather these ingredients before you start: - 1 cup orzo pasta - 2 cups vegetable broth - 1 cup fresh spinach, chopped - 1/2 cup sun-dried tomatoes, chopped (in oil for added flavor) - 1/2 cup heavy cream or coconut cream (for a dairy-free choice) - 1/2 cup grated Parmesan cheese (or nutritional yeast for a vegan option) - 2 cloves garlic, minced - 1 small onion, finely chopped - 1 tablespoon olive oil - Salt and pepper to taste - Fresh basil leaves for garnish Each ingredient plays a key role in this dish. The orzo creates a hearty base. The vegetable broth enhances the flavor. Fresh spinach adds color and nutrients. Sun-dried tomatoes bring a sweet, tangy punch. Heavy cream or coconut cream gives the dish its creamy texture. Parmesan cheese or nutritional yeast adds a savory depth. Garlic and onion provide aromatic notes. Olive oil helps everything cook smoothly. Finally, salt and pepper season the dish just right. Don't forget the fresh basil leaves for a lovely finish! - Heat olive oil in the skillet. - Sauté onion until translucent. - Add garlic and cook until fragrant. Begin by heating olive oil in a large skillet over medium heat. I use about one tablespoon. This oil gives a nice base for flavor. Next, add the finely chopped onion. Cook it until it turns translucent, which takes about three to four minutes. This step adds sweetness to the dish. Once the onion looks good, stir in two minced garlic cloves. Let it cook for about one minute. The smell will be amazing! - Toast orzo in the skillet. - Add vegetable broth and simmer. - Stir in sun-dried tomatoes and spinach. Now, add one cup of orzo pasta to the skillet. Stir it well to coat it in the oil. Toast the orzo for about two minutes while stirring often. This step brings out a nutty flavor. Next, pour in two cups of vegetable broth. Bring it to a boil. Once it's boiling, reduce the heat to low and cover the pan. Let it simmer for about ten to twelve minutes. The orzo should absorb most of the liquid and become al dente. After that, mix in half a cup of chopped sun-dried tomatoes and one cup of chopped fresh spinach. Stir until everything is combined and the spinach wilts down. - Incorporate cream and cheese. - Season and let flavors meld. - Serve with basil garnish. Now, reduce the heat to low again and stir in half a cup of heavy cream or coconut cream. Add half a cup of grated Parmesan cheese for richness. Mix until it becomes creamy and smooth. Taste the dish and season with salt and pepper as needed. Remove it from the heat and let it sit covered for a few minutes. This resting time helps the flavors meld together beautifully. Serve the dish warm, garnished with fresh basil leaves. Enjoy your creamy spinach sun-dried tomato orzo! To get the right creaminess in your orzo, use heavy cream or coconut cream. Both work well, but the coconut cream is great for a dairy-free option. Stir in the cream slowly for a smooth texture. Toasting the orzo adds depth to the flavor. When you add it to the oil, stir it for two minutes. This simple step makes a huge difference. For seasoning, salt and pepper are key. Add them in stages. Taste as you go along. You can also sprinkle in some fresh herbs for extra flavor. Do not overcook the orzo. Keep an eye on it while it simmers. You want it al dente, not mushy. Be careful with your ingredient swaps. If you use sun-dried tomatoes packed in oil, it adds flavor. Using the dried version may not give you the same taste. Resting time is important. Let the dish sit for a few minutes after cooking. This helps all the flavors mix well together. {{image_2}} Adding protein to your creamy spinach sun-dried tomato orzo can make it heartier. Here are some great options to consider: - Grilled chicken or shrimp: Both add a nice touch. They pair well with the creamy sauce and add flavor. - Chickpeas for a vegetarian option: Chickpeas boost protein while keeping the dish plant-based. They also add a nice texture. - Tofu for a vegan alternative: Tofu is a great way to add protein. It soaks up flavors and adds creaminess. Now, let’s enhance the flavor even more! - Adding lemon juice or zest: A splash of lemon brightens the dish. It adds a fresh taste that balances the creaminess. - Incorporating different herbs: Try basil, thyme, or oregano. They add depth and a lovely aroma. - Using roasted garlic: Roasted garlic gives a sweet and rich flavor. It’s a great twist on the standard garlic taste. Feel free to mix and match these options. They will help you create a dish that suits your taste perfectly! To store your creamy spinach sun-dried tomato orzo, place it in an airtight container. This will keep the flavors fresh and prevent drying out. It's best to store it in the fridge if you plan to eat it within three days. When you want to reheat, use a skillet over low heat. Add a splash of vegetable broth or cream to help keep it creamy. Stir gently to warm it through without burning. You can freeze this dish for longer storage. To do this, let it cool completely before transferring it to a freezer-safe container. Seal it tightly to avoid freezer burn. The orzo will last about three months in the freezer. When you're ready to eat, move it to the fridge to thaw overnight. Reheat in a skillet with a bit of broth or cream for the best texture. Can I use whole wheat orzo instead? Yes, you can use whole wheat orzo. It adds fiber and a nutty flavor. Just watch the cooking time, as it may take longer to cook. Is the dish gluten-free? No, this dish is not gluten-free. Orzo is made from wheat. For a gluten-free option, use rice or quinoa. What can I substitute for sun-dried tomatoes? You can use fresh tomatoes or roasted red peppers. They add a nice flavor and keep the dish fresh. How to make it spicier? Add red pepper flakes or cayenne pepper. Start with a small amount and adjust to your taste. Can I make this dish ahead of time? Yes, you can. Cook it and let it cool. Store it in the fridge for up to three days. Reheat it on the stove with a splash of broth. Best serving suggestions with orzo? Serve it with a side salad or garlic bread. A sprinkle of extra cheese on top is always a hit! In this blog post, we explored a tasty orzo dish made with fresh ingredients. You learned about each ingredient, from orzo pasta to sun-dried tomatoes. We also discussed how to prepare and cook the dish step by step. Tips helped you avoid common mistakes and perfect your recipe. Remember, you can add proteins or change flavors to fit your taste. Store leftovers properly to enjoy later. This dish is versatile and easy to make, perfect for any meal. Enjoy creating and sharing it with family and friends!

Creamy Spinach Sun-Dried Tomato Orzo One Pan Delight

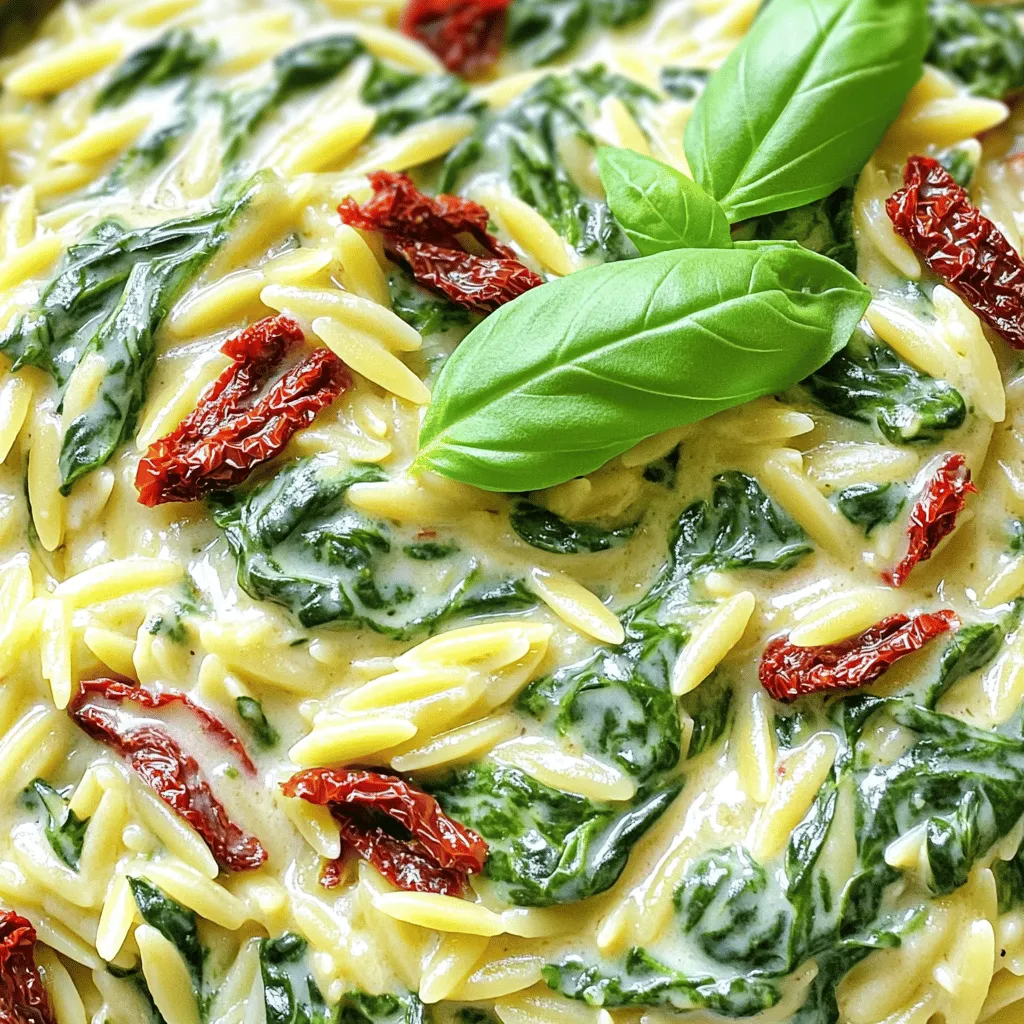
Welcome to Creamy Spinach Sun-Dried Tomato Orzo One Pan Delight! If you love easy, comforting meals, this dish is for

To make a Lemon Blueberry Dutch Baby, gather these key ingredients: - 1/2 cup all-purpose flour - 1/2 cup milk - 2 large eggs - 1/4 cup granulated sugar - 1 teaspoon vanilla extract - 1 tablespoon lemon juice - Zest of 1 lemon - 1/4 teaspoon salt - 2 tablespoons unsalted butter - 1 cup fresh blueberries - Powdered sugar for dusting These ingredients create a fluffy and flavorful breakfast. The lemon juice and zest add a bright taste. The blueberries bring sweetness and color. Some tasty toppings can enhance your Dutch Baby: - Whipped cream - Fresh mint leaves - More fresh blueberries - A drizzle of honey or maple syrup These toppings can make your dish even more special. They add creaminess and extra sweetness. If you need to change any ingredients, here are some ideas: - Use almond milk instead of regular milk. - Swap granulated sugar for coconut sugar. - Replace all-purpose flour with a gluten-free blend. - Use a dairy-free butter for a vegan option. These substitutions keep the dish delicious while fitting your needs. Enjoy your cooking with these tips! {{ingredient_image_1}} Start by preheating your oven to 425°F (220°C). This high heat helps the Dutch baby puff up. Gather your ingredients: all-purpose flour, milk, eggs, granulated sugar, vanilla extract, lemon juice, lemon zest, salt, and blueberries. Don't forget the unsalted butter for the pan. In a bowl, whisk together the flour, milk, eggs, granulated sugar, vanilla, lemon juice, lemon zest, and salt. Make sure the mixture is smooth and slightly frothy. This helps create a light texture. In a 10-inch cast-iron skillet, melt the butter on medium heat. Swirl the butter to coat the pan. Once bubbling, pour in the batter. Sprinkle the fresh blueberries over the top. Carefully place the skillet in the oven. Bake for 20 to 25 minutes. Look for puffed edges and a golden brown top. After baking, remove it from the oven. It will deflate a bit. Dust the top with powdered sugar. Serve warm, and add whipped cream if you like. Enjoy your flavorful breakfast! To get that perfect puff, preheat your oven well. Use a cast-iron skillet; it holds heat well. When you pour the batter, make sure to add the blueberries evenly. This way, they help create a beautiful rise. Don’t open the oven door while it bakes. This keeps the heat steady and helps it rise. One common mistake is not whisking the batter enough. The batter needs to be smooth and slightly frothy. If it is too thick, the Dutch baby may not rise well. Another mistake is not using enough butter in the pan. The butter adds flavor and helps the puff cook evenly. I love serving this dish warm from the skillet. Dust it with powdered sugar for a sweet touch. You can also add a dollop of whipped cream for extra creaminess. Fresh lemon zest on top brightens the flavor. Pair it with a side of crispy bacon or sausage for a hearty breakfast. Enjoy it with a cup of coffee or tea to complete the meal. Pro Tips Use Room Temperature Eggs: For a fluffier Dutch baby, make sure your eggs are at room temperature before mixing them into the batter. Don’t Open the Oven: Avoid opening the oven door while the Dutch baby is baking, as this can cause it to deflate prematurely. Experiment with Berries: Feel free to swap out blueberries for other berries like raspberries or strawberries for a different flavor profile. Serve Immediately: Dutch babies are best enjoyed straight from the oven while they are still puffed and warm, so have your toppings ready to go! {{image_2}} You can swap blueberries for other fruits. Try sliced strawberries or raspberries. Peaches add a sweet twist. Just keep the amount around one cup. Mix and match for fun flavors. Each fruit brings its own taste. This keeps breakfast exciting and fresh. To make this dish gluten-free, use a gluten-free flour blend. Look for blends that substitute one-to-one for all-purpose flour. The texture will change slightly, but the taste stays great. You can enjoy this dish without worry. It’s a tasty option for everyone. Spices can enhance the flavor of your Dutch baby. A pinch of cinnamon adds warmth. Nutmeg can bring a cozy taste. You might also try cardamom for a unique twist. Just remember, less is more with spices. A little goes a long way. Experiment to find your favorite mix! To store your leftover Lemon Blueberry Dutch Baby, let it cool first. Once cool, cover it tightly with plastic wrap or foil. You can also use an airtight container. Keep it in the fridge for up to three days. This way, you can enjoy your tasty breakfast later. To reheat, place the Dutch baby in an oven-safe dish. Preheat your oven to 350°F (175°C). Heat for about 10-15 minutes. You want it warm but not dry. If you prefer a quicker method, you can use the microwave. Heat in 30-second intervals until warm. You can freeze the Dutch baby too! Once it has cooled completely, slice it into portions. Wrap each piece in plastic wrap, then place in a freezer bag. Squeeze out any air before sealing. Store it in the freezer for up to two months. When you're ready to eat, thaw it in the fridge overnight and reheat as mentioned above. A Dutch baby is a fluffy pancake baked in the oven. It puffs up tall and has a light, airy texture. This dish often has a base of eggs, flour, and milk. You can top it with fruits, like blueberries or apples, and dust it with powdered sugar. It's perfect for breakfast or brunch. You can prepare the batter ahead of time. Mix the ingredients and store them in the fridge for up to 2 hours. When you're ready, just pour it into the skillet and bake. However, I recommend baking it fresh for the best rise and fluffiness. Check for a golden brown color around the edges. The center should be slightly puffed and set. If it jiggles, give it a few more minutes. It will deflate a bit once you take it out of the oven. Yes, you can use frozen blueberries! Just toss them in a bit of flour to help them stay suspended in the batter. They may release some juice, which adds flavor. However, fresh blueberries give the best texture and taste. You learned about making a Dutch Baby, from the ingredients to storage. We covered required items, easy swaps, and toppings. I shared tips for a perfect puff and common mistakes. You found variations to try and how to store leftovers. Enjoy making your Dutch Baby! Experiment with flavors, and have fun serving it. This recipe is forgiving and versatile, making it great for any meal. Happy cooking!

Lemon Blueberry Dutch Baby Flavorful Breakfast Dish

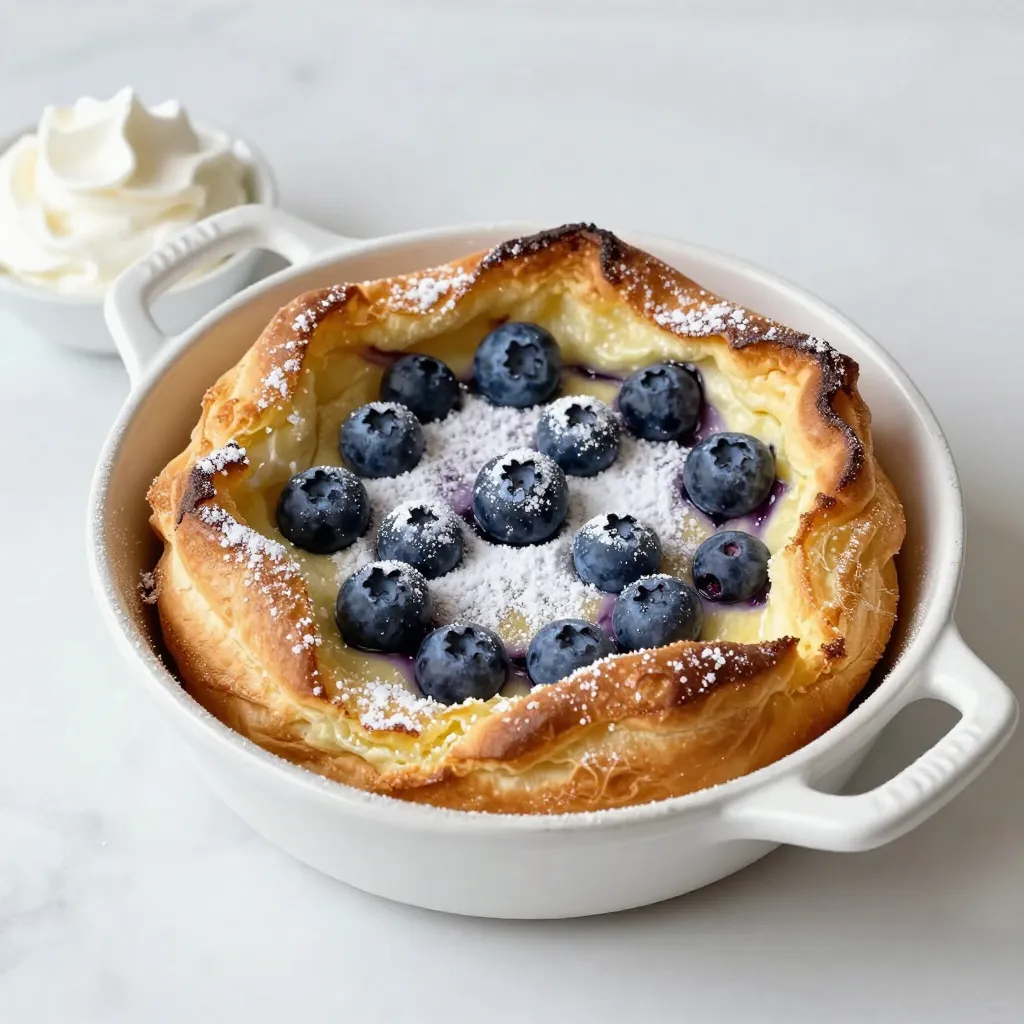
Rise and shine! If you’re looking for a bright and tasty breakfast, the Lemon Blueberry Dutch Baby is the dish

To make a perfect Caramel Apple Chai Latte, gather these ingredients: - 2 cups almond milk (or any milk of choice) - 1 chai tea bag - 1 tablespoon caramel sauce (plus extra for drizzling) - 1 medium apple, peeled and finely chopped - 1 teaspoon cinnamon - 1 tablespoon honey (or maple syrup for a vegan option) - 1/2 teaspoon vanilla extract - Whipped cream (optional) - Pinch of nutmeg You can switch ingredients for more variety. Use any milk, such as oat or coconut. If you want a dairy-free option, almond or soy milk works great. You can also swap caramel sauce with chocolate syrup for a different twist. For sweetness, maple syrup is a good choice if you prefer vegan options. Choose fresh apples for the best flavor. Look for firm apples with smooth skin. For milk, select a brand with no additives or preservatives. When buying chai tea, look for full-leaf options as they have rich flavor. If using honey, pick high-quality, raw honey for its natural taste. Always check the expiration dates on your ingredients to ensure freshness. 1. Start by heating 2 cups of almond milk in a small saucepan. Keep it on medium heat. 2. When the milk is steaming, add 1 chai tea bag. Let it steep for 5 minutes. This step helps the chai flavor come out strong. 3. While the tea steeps, take a second small pan. Sauté 1 medium apple, peeled and chopped, with 1/2 teaspoon of cinnamon. Cook this for about 3 to 4 minutes until the apple softens. Then, set it aside. 4. After 5 minutes, remove the chai tea bag from the milk. Stir in 1 tablespoon of caramel sauce, 1 tablespoon of honey (or maple syrup), and 1/2 teaspoon of vanilla extract. Mix well until everything blends. 5. Pour the chai mixture into a large cup or mug. 6. Add the sautéed apples on top of your latte. Sprinkle some extra cinnamon and a pinch of nutmeg to enhance the flavor. 7. If you like, add whipped cream on top. Drizzle some extra caramel sauce for a sweet touch. 8. Serve the latte hot and enjoy the cozy flavors of fall. For the best chai latte, keep these tips in mind: - Heat the milk slowly. This way, it warms up without boiling. - Let the chai steep fully. This ensures you get all the rich flavors. - Sauté the apples gently. This helps them soften while keeping some crunch. - Use fresh spices like cinnamon and nutmeg for a strong aroma. To make your caramel apple chai latte look great: - Use clear mugs to show off the layers. - Top with a generous dollop of whipped cream for a creamy texture. - Add a drizzle of caramel sauce on top for a sweet finish. - Garnish with a sprinkle of cinnamon or a slice of apple for a pop of color. Enjoy serving this drink at gatherings or cozy nights in! To make the best Caramel Apple Chai Latte, use fresh ingredients. Start with good quality chai tea. This tea gives the drink its warm spice. Use almond milk or your favorite milk. Heat the milk slowly. Don’t let it boil, or it can curdle. Steep the tea bag for five minutes. This helps the flavors bloom. Stir in the caramel sauce well. This adds sweetness and creaminess. Top it off with whipped cream if you like. Finish with a drizzle of caramel for a pretty touch. One mistake is using cold milk. Cold milk won't create the rich flavor you want. Another pitfall is overcooking the apples. Cook them just enough to soften. If you skip the cinnamon or nutmeg, the drink won't have that cozy fall vibe. Don’t forget to remove the tea bag after steeping. Leaving it too long makes the drink bitter. To boost the flavor, add more spices. Try a pinch of ginger or cloves for extra warmth. You can also switch honey for maple syrup. Maple syrup gives a unique twist. For a creamier texture, blend the milk before adding it to the tea. If you want a fun twist, top it with crushed nuts or caramel popcorn. This adds texture and makes it even more delightful! {{image_2}} To make a vegan version of the Caramel Apple Chai Latte, swap out the honey for maple syrup. This simple change keeps the sweetness while staying plant-based. Also, skip the whipped cream or use a vegan version made from coconut or almond milk. These swaps make it creamy and delicious without any animal products. You can use any milk you like for this latte. Almond milk adds a nice nutty flavor. Oat milk makes it creamy and thick, perfect for lattes. Soy milk is also a great choice, as it froths well. If you prefer dairy, whole milk or 2% milk works just fine. Each type of milk will give your drink a unique taste. Pumpkin spice is a fun fall twist to add. Just mix in a teaspoon of pumpkin puree and some pumpkin spice. You can also try a touch of maple syrup for extra sweetness. For winter, add a dash of peppermint extract. These seasonal flavors create a festive vibe in your Caramel Apple Chai Latte. Don't be afraid to experiment and find your favorite! Storing leftover ingredients is easy. For almond milk, keep it in the fridge in a sealed container. Use it within a week for the best taste. Store chopped apples in an airtight container with a bit of lemon juice to prevent browning. This keeps them fresh for about two days. To keep your ingredients fresh, check dates often. Buy milk with the latest expiration date. For apples, choose firm ones without bruises. Store them in a cool, dark place or in the fridge. Caramel sauce lasts long in the pantry. Just ensure the lid is tight. To reheat your Caramel Apple Chai Latte, pour it into a pot. Warm it over low heat. Stir gently to avoid burning. If you use a microwave, heat it in short bursts. Stir in between to warm evenly. Add whipped cream and caramel again for a fresh taste. Yes, you can use regular tea instead of chai. However, chai has special spices that give it a unique taste. Regular tea will change the flavor, making it less spicy and warm. If you want a similar taste, look for a spiced tea. You might miss the rich flavor that chai provides. To make this drink dairy-free, use almond milk or any plant-based milk. Almond milk is creamy and works well. Other options include oat milk or coconut milk. Just swap the regular milk for your choice. This way, you can enjoy the caramel apple chai latte without dairy. You can find a Caramel Apple Chai Latte at some coffee shops in the fall. Many coffee chains offer seasonal drinks, and they may have this latte. If you want to enjoy it at home, follow the recipe above. Making it at home is fun and lets you control the flavors. In this blog post, I shared how to make the perfect Caramel Apple Chai Latte. We covered the best ingredients, step-by-step instructions, and valuable tips to avoid common mistakes. You learned about variations, including vegan options and seasonal flavors. Remember, quality ingredients make all the difference. Enjoy experimenting with flavors and techniques. Make this drink your own! Whether you savor it warm or chilled, your homemade latte will impress everyone.

Caramel Apple Chai Latte Delectable Fall Treat

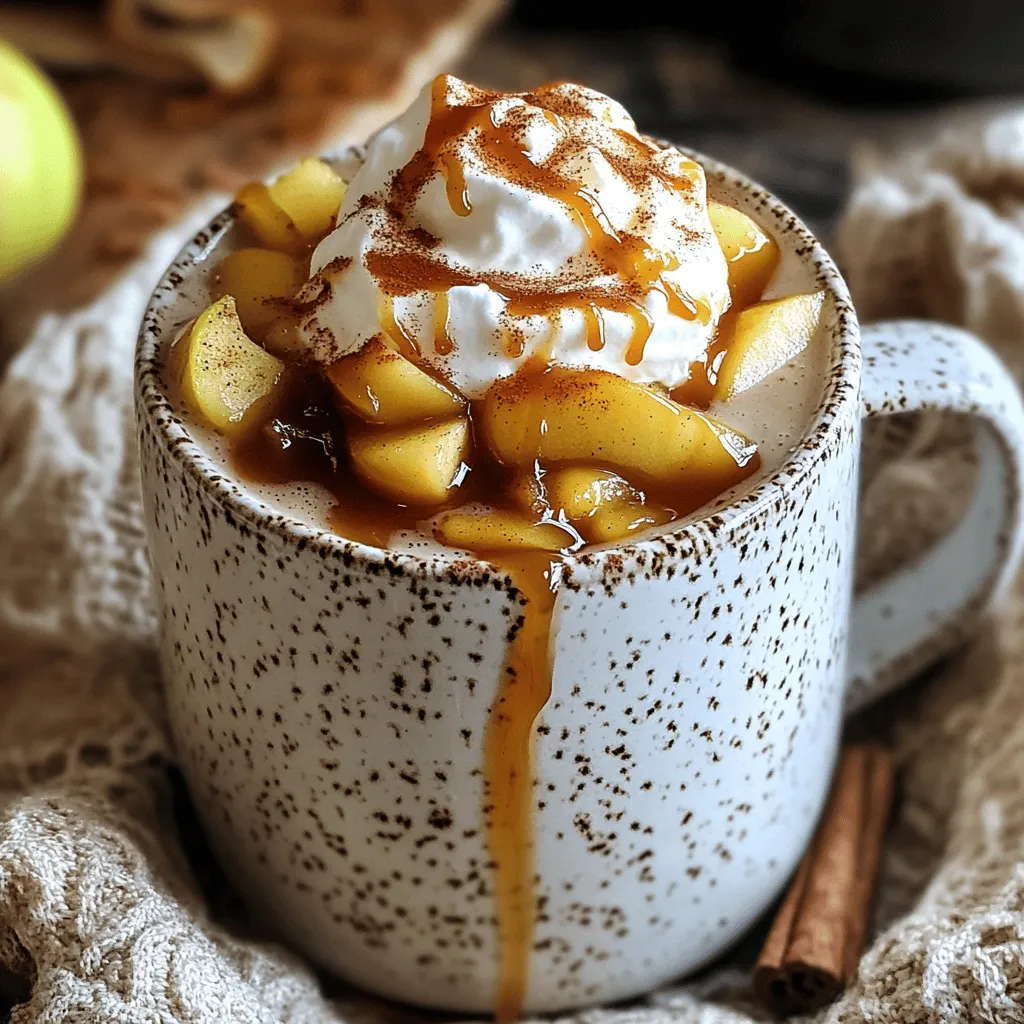
Fall is here, and there’s nothing better than a Caramel Apple Chai Latte to celebrate! This cozy drink blends warm

- 2 cups all-purpose flour - 1/3 cup granulated sugar - 1 tablespoon baking powder - 1/2 teaspoon salt - 1/2 cup cold unsalted butter, cubed - 1/2 cup heavy cream - 1 large egg - 1 teaspoon vanilla extract - 1 cup fresh raspberries - 1/2 cup white chocolate chips - Extra cream for brushing - Additional sugar for sprinkling To make these scones, you need key ingredients. Start with all-purpose flour for the base. Granulated sugar gives sweetness, while baking powder helps them rise. Salt enhances flavor and balances the sweetness. Use cold unsalted butter. This keeps the scones flaky. Heavy cream adds richness, and the large egg binds everything together. Vanilla extract brings a lovely aroma. Fresh raspberries add tartness, and white chocolate chips offer creamy sweetness. You will also need extra cream to brush on top. This helps the sugar stick, creating a delightful crunch. Sprinkle a little sugar before baking for added sweetness. Each ingredient plays a role in making your scones perfect. Preheat your oven to 400°F (200°C). This hot temperature helps scones rise well. Line a baking sheet with parchment paper or a silicone mat. This step makes cleaning easier. In a large mixing bowl, whisk together the following dry ingredients: - 2 cups all-purpose flour - 1/3 cup granulated sugar - 1 tablespoon baking powder - 1/2 teaspoon salt Mix these ingredients well. This ensures an even taste in your scones. Add the cold, cubed butter (1/2 cup) into the flour mixture. Use a pastry cutter or your fingers. Work the butter into the flour until it looks like coarse crumbs. You want small chunks of butter, like peas. This keeps your scones flaky. In a separate bowl, whisk together the wet ingredients: - 1/2 cup heavy cream - 1 large egg - 1 teaspoon vanilla extract Pour this mixture into the flour mixture. Stir gently until just combined. Do not over-mix, or your scones may turn tough. Carefully fold in the fresh raspberries (1 cup) and white chocolate chips (1/2 cup). Use a spatula to be gentle. You want to keep the raspberries whole for bursts of flavor. Lightly flour a clean surface. Turn the dough out onto it. Knead the dough gently until it comes together. Pat or roll it into a circle about 1 inch thick. This shape helps the scones bake evenly. Use a sharp knife or a pizza cutter to cut the dough into 8 equal wedges. Place the scones on the prepared baking sheet, leaving a couple of inches between them. This space helps them rise without sticking together. Brush the tops of the scones with a little heavy cream. Then, sprinkle with extra sugar. This gives a nice crunch and adds sweetness. Bake in the preheated oven for 15-20 minutes. Look for golden brown tops. A toothpick inserted into the center should come out clean. This indicates they are ready to enjoy. Allow the scones to cool for a few minutes on the baking sheet. Then, transfer them to a wire rack. Serve them warm or at room temperature for the best taste. - Importance of butter temperature: Use cold unsalted butter. Cold butter creates flaky layers. It keeps its shape while baking, leading to light scones. If the butter is warm, the scones may become dense. - Kneading techniques: Knead the dough gently. Over-kneading makes the scones tough. Just fold and turn the dough until it holds together. Aim for a soft but slightly sticky dough. - Issues with dough consistency: If the dough feels too dry, add a splash of cream. If it’s too wet, sprinkle in a little flour. Adjusting in small amounts helps you find the right balance. - How to avoid dry scones: Don't overbake the scones. Keep an eye on them in the oven. The edges should be golden brown, but the centers should remain soft. - Oven positioning tips: Place your baking sheet in the center of the oven. This helps with even heat distribution. If you bake too close to the heating element, the bottoms may burn. - How to avoid over-baking: Set a timer for 15 minutes. Check for doneness by inserting a toothpick. If it comes out clean, they are ready. Always err on the side of caution; you can always bake a bit longer if needed. {{image_2}} You can swap raspberries for other fruits. Blueberries and strawberries work well. Blueberries give a burst of sweetness. Strawberries add a nice touch of freshness. You can even mix fruits. Try a blend of blueberries and strawberries for a colorful scone. If you prefer dark chocolate, use that instead of white chocolate. Dark chocolate adds a rich flavor. It balances well with the fruit's tartness. You can also mix dark and white chocolate for a fun twist. Feel free to add extra flavors. A splash of almond extract can enhance the scone's taste. You can also try a pinch of cinnamon for warmth. Experimenting with different spices can lead to exciting results. Store your scones at room temperature. Place them in an airtight container. This keeps them fresh for about two days. If you want to keep them longer, you can wrap them in plastic wrap. This helps prevent them from drying out. For long-term storage, freeze the scones. First, let them cool completely. Then, place them in a freezer-safe bag. Remove as much air as possible before sealing. You can freeze them for up to three months. When you need them, just take out what you want. Reheat your scones in the oven for the best taste. Preheat your oven to 350°F (175°C). Place the scones on a baking sheet. Heat them for about 10-15 minutes. You can also use a microwave, but they may become soft. If you prefer a crisp outer layer, stick with the oven. Enjoy your warm scones! Yes, you can use frozen raspberries. They work well in scones. However, frozen raspberries may release more juice. This can make the dough a bit wetter. To reduce this, add them straight from the freezer. This way, they won't break down too much during mixing. If you need a substitute for heavy cream, use whole milk or half-and-half. They will change the texture slightly, but they still work. If you want a thicker substitute, try plain yogurt. This will make your scones moist and tasty. To increase the sweetness, add more sugar to the dough. You can also sprinkle sugar on top before baking. Another option is to add a drizzle of sweet icing after baking. This will give your scones a nice sweet touch without changing the texture. Yes, you can leave out the white chocolate. However, it adds a nice creaminess and sweetness. If you skip it, consider adding more raspberries or a different type of chocolate. This will help keep the flavor interesting without the white chocolate. You learned how to make scrumptious raspberry white chocolate scones. We covered ingredients, step-by-step baking, and valuable tips. Remember, perfect butter temperature and gentle kneading are key. Try different fruits or chocolates for fun variations. Store extras at room temp or freeze for later. Enjoy fresh scones warm and with your favorite drink. Baking is simple and rewarding, so keep practicing! You’ll impress everyone with your scone skills.

Bakery-Style Raspberry White Chocolate Scones Delight

If you love warm, buttery scones bursting with flavor, you’re in for a treat! In this article, I’ll show you

- 2 lbs boneless, skinless chicken thighs - 1 cup peanut butter (creamy or chunky) - 1 cup coconut milk - 1/4 cup soy sauce (or tamari for gluten-free) - 2 tablespoons brown sugar - 3 cloves garlic, minced - 1 tablespoon fresh ginger, grated - 1 teaspoon red pepper flakes (adjust to taste) - 1 bell pepper, sliced (any color) - 1 cup snap peas, trimmed - Fresh cilantro, chopped (for garnish) - Lime wedges (for serving) I love using these simple ingredients to make Slow Cooker Thai Peanut Chicken a true delight. The chicken thighs are the star here. They stay juicy and tender during cooking. You can use creamy or chunky peanut butter, depending on your taste. Coconut milk adds a rich creaminess that really brings the dish together. Brown sugar gives a hint of sweetness. The garlic and ginger add depth and flavor. Red pepper flakes let you control the heat. You can adjust it based on what you like. The vegetables add crunch and color. Bell pepper brings sweetness, while snap peas add a nice snap. The fresh cilantro and lime wedges are perfect for garnish. They brighten the dish and add a fresh taste. This mix of ingredients creates a meal that is both simple and tasty. It’s perfect for busy days when you want something special. To make the peanut sauce, start by gathering your ingredients. You need peanut butter, coconut milk, soy sauce, brown sugar, minced garlic, grated ginger, and red pepper flakes. In a large bowl, combine all these ingredients. Use a whisk to mix them until smooth. This sauce will give your chicken a rich and tasty flavor. Next, it's time to layer the chicken in the slow cooker. Take 2 lbs of boneless, skinless chicken thighs and place them at the bottom. Pour the peanut sauce over the chicken, making sure it covers each piece well. Then, add sliced bell pepper and snap peas on top of the chicken and sauce. This adds great color and crunch. Now, cover the slow cooker with its lid. Set it to low for 6-7 hours or high for 3-4 hours. This will cook the chicken until it's tender. After cooking, use two forks to shred the chicken. Return the shredded chicken back into the sauce and stir well. Your meal is now ready to serve! - You can adjust red pepper flakes for your spice preference. If you like heat, add more. If not, use less. - For a richer sauce, add extra peanut butter. It makes the sauce creamier and more delicious. - Use a meat thermometer to check the chicken. It should reach 165°F to be safe. - Keep the lid sealed during cooking. This helps the dish stay moist and full of flavor. - Serve the meal in a deep bowl. Place jasmine rice at the bottom and drizzle sauce on top. - Add fresh cilantro for a pop of color and extra flavor. It makes the dish look great! {{image_2}} You can switch the chicken thighs for chicken breasts. This makes the dish leaner. If you want a vegetarian option, use tofu or tempeh instead. Both will soak up the sauce well. You can add more veggies for better nutrition. Broccoli, carrots, or zucchini work great. They add color and crunch. You can also try different bell pepper colors. This makes your dish look more vibrant and fun. Feel free to tweak the sauce to your taste. For a nut-free version, swap peanut butter for almond butter. You can also add lime juice to the sauce. This gives it a nice tangy twist that brightens the dish. Store your Thai peanut chicken in an airtight container. It will stay fresh in the fridge for up to 4 days. Make sure to cool it down before sealing the container. This helps keep the chicken tasty and safe to eat. You can freeze the leftovers too! Divide them into portions and store in freezer-safe bags. They will last for up to 3 months. When you're ready to eat, thaw the chicken overnight in the fridge before reheating. This will help keep the texture nice. To reheat, you can use either the stove or the microwave. If using the stove, warm it on low heat. Stir it often to prevent sticking. In the microwave, heat in short bursts. If the sauce is too thick, add a splash of water. This keeps the meal juicy and delicious. Yes, the flavors develop more if made ahead and stored. Making this dish a day before can boost the taste. Just let it cool and keep it in the fridge. When you're ready to eat, reheat it gently. Yes, just use tamari instead of soy sauce for gluten-free compliance. Tamari tastes similar to soy sauce but has no wheat. This swap keeps your meal tasty and safe for those with gluten issues. Best served with rice, noodles, or even over a bed of greens. Jasmine rice pairs well, soaking up the sauce. Noodles add a fun twist, and greens make it fresh. Choose what you like best! Add more red pepper flakes or a splash of sriracha to the sauce. These options let you control the heat. Start small, taste, and adjust to your liking. Enjoy the kick! This recipe brings together simple ingredients for a delicious slow cooker meal. You learned how to make a rich peanut sauce and create a flavor-packed dish. Adjust spices to fit your taste and try new veggies for fun. Remember, leftovers can be stored easily, enhancing future meals. Whether for a family dinner or meal prep, this dish satisfies. Enjoy experimenting with variations to make it your own!

Slow Cooker Thai Peanut Chicken Simple and Tasty Meal

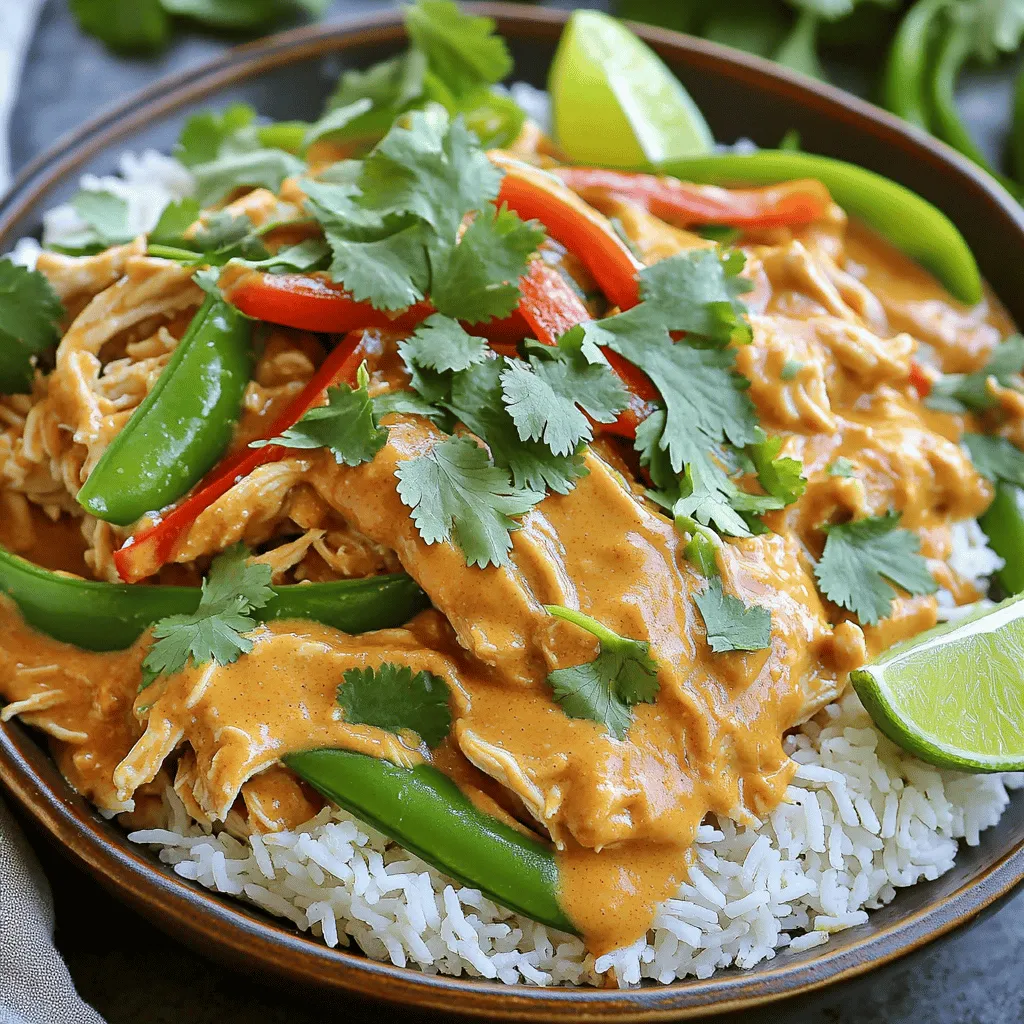
Do you crave a dish that is both simple and bursting with flavor? Look no further than Slow Cooker Thai

To make One-Pot Creamy Alfredo Gnocchi, gather these ingredients: - 1 package (16 oz) potato gnocchi - 2 cups heavy cream - 1 cup grated Parmesan cheese - 2 tablespoons unsalted butter - 3 cloves garlic, minced - 1 cup fresh spinach, roughly chopped - 1 teaspoon Italian seasoning - Salt and pepper to taste - Chopped parsley for garnish These simple ingredients come together for a rich and creamy dish. If you need to swap some ingredients, here are a few ideas: - Potato gnocchi: You can use any type of gnocchi, like cauliflower. - Heavy cream: Substitute with half-and-half for a lighter option. - Parmesan cheese: Grated Pecorino Romano works well too. - Fresh spinach: Kale or arugula can replace spinach for a different taste. - Unsalted butter: Olive oil can be used for a lighter flavor. These swaps can help you customize the dish to your taste. One serving of this creamy delight contains: - Calories: 570 - Fat: 42g - Carbohydrates: 40g - Protein: 12g - Fiber: 2g This meal is rich and filling, perfect for a cozy dinner. Enjoy this creamy dish while keeping an eye on your nutrition! Start by melting two tablespoons of unsalted butter in a large pot over medium heat. Once melted, add three cloves of minced garlic. Sauté the garlic for about one minute. You want it fragrant, not browned. The garlic gives the dish a nice flavor base. Next, pour in two cups of heavy cream. Bring it to a gentle simmer. Stir it occasionally to keep it from sticking. Now, add one package of potato gnocchi to the pot. Cook them for three to four minutes. You will know they are ready when they start to float. After the gnocchi floats, stir in one cup of grated Parmesan cheese. Add one teaspoon of Italian seasoning and one cup of roughly chopped spinach. Mix it all well until the cheese melts and the sauce turns creamy. Season with salt and pepper to taste. Let it simmer for two more minutes to soak in the flavors. This step makes the dish rich and tasty. To make a super creamy sauce, use full-fat heavy cream. It gives the best texture. Stir the sauce often while it simmers. This helps mix the flavors well. You can add more cheese too! Mixing in extra Parmesan makes it richer. If you want a hint of nutty flavor, try adding a little cream cheese. This trick boosts creaminess and adds depth. Cooking time can change based on the brand of gnocchi. Most brands take about 3-4 minutes to float. Always check the package for specific times. If your gnocchi floats quickly, taste one to check for doneness. If it’s chewy, cook for another minute. Remember, overcooking can make gnocchi too soft. So, keep an eye on them! Serve your creamy Alfredo gnocchi in shallow bowls. This makes it look nice and inviting. Top each bowl with chopped parsley for color. It adds a fresh taste too. For an extra touch, sprinkle some Parmesan shavings on top. This small step makes your dish look gourmet. A drizzle of olive oil can add shine and flavor, making it even more appealing. {{image_2}} You can easily add protein to your One-Pot Creamy Alfredo Gnocchi. Chicken and shrimp work great. For chicken, use cooked, diced pieces. Add them when you stir in the cheese. If you prefer shrimp, sauté them in the pot before adding the cream. Cook until they turn pink. This keeps the dish exciting and filling. If you want a vegetarian option, just skip the meat. You can keep the creamy sauce and spinach. For a vegan version, swap heavy cream for coconut milk. Use nutritional yeast instead of Parmesan for a cheesy flavor. This way, everyone can enjoy a tasty meal that fits their diet. To change up the flavor, try adding different herbs or spices. Fresh basil or thyme can brighten up the dish. For a kick, add red pepper flakes. You can also use garlic powder for more garlic flavor. These small tweaks can make a big difference, making your meal unique every time you cook it. To store your creamy Alfredo gnocchi, let it cool first. Then, place it in an airtight container. You can keep it in the fridge for up to three days. Make sure to label the container with the date. This helps you remember when you made it! When you are ready to eat your leftovers, reheat them gently. Place the gnocchi in a pot over medium heat. Add a splash of cream or water to keep it creamy. Stir often to prevent sticking. Heat until it's warm all the way through. This keeps the flavors fresh and delicious. You can freeze this dish, but it may change the texture. To freeze, let the gnocchi cool completely. Then, place it in a freezer-safe container. It can last for up to three months in the freezer. When ready to eat, thaw it in the fridge overnight. Reheat it on the stove with a little cream, just like before. Enjoy your tasty meal! Yes, you can use other cheeses. Mozzarella gives a nice stretch. Fontina adds a rich taste. You can mix cheeses for a unique flavor. Just remember, each cheese melts differently. This can change the sauce's texture. You can serve this dish with a simple salad. A side of garlic bread pairs well too. Roasted veggies add color and crunch. Grilled chicken or shrimp can boost protein. Choose what you enjoy most! The prep time is about 10 minutes. Cooking the gnocchi takes around 10 more minutes. So, you can have this meal ready in 20 minutes. It’s quick and perfect for busy nights! This blog post covered how to make One-Pot Creamy Alfredo Gnocchi. We talked about the ingredients, how to prepare them, and tips for making the meal even better. You learned about variations and how to store leftovers. Enjoy this dish with your favorite protein or vegetables. It’s quick, tasty, and sure to please. With these steps, you can create a creamy meal that everyone loves. Happy cooking!

One-Pot Creamy Alfredo Gnocchi Easy Dinner Delight

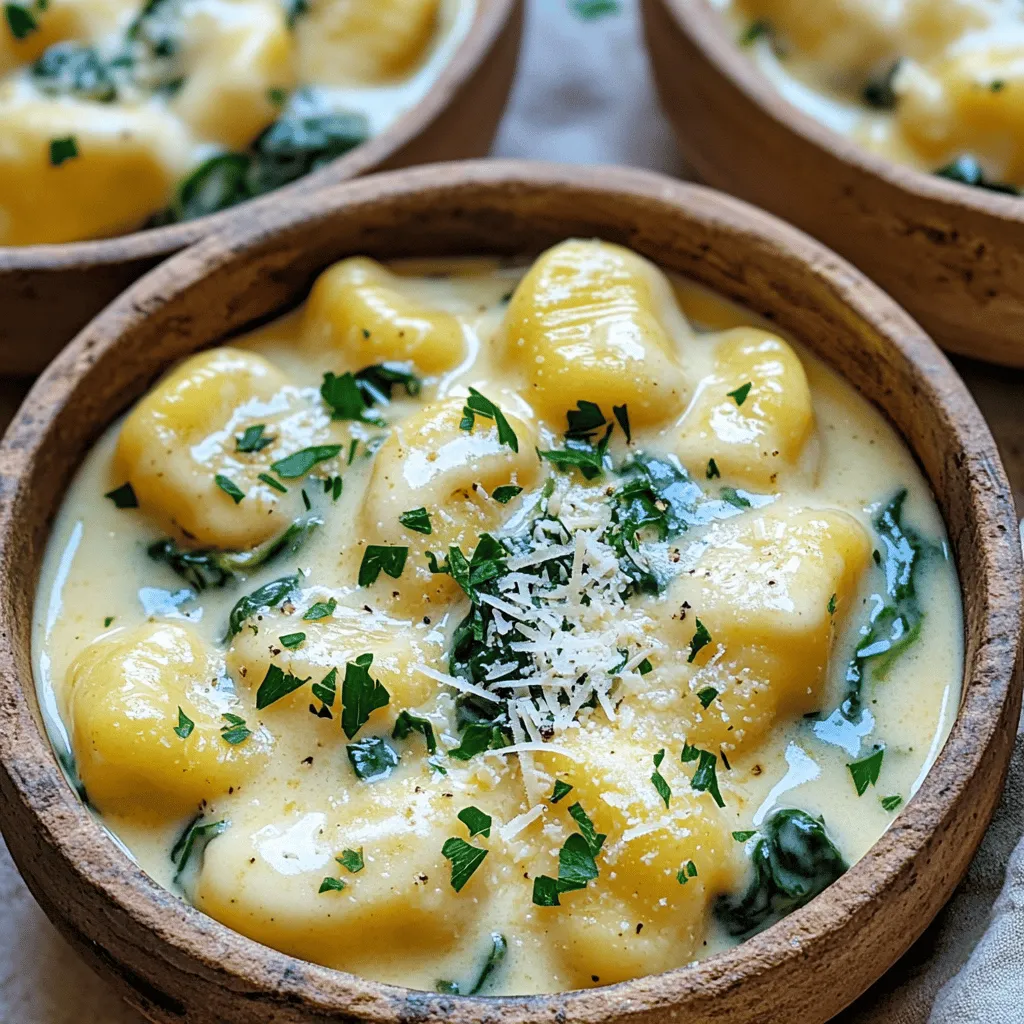
Welcome to your new go-to dinner recipe: One-Pot Creamy Alfredo Gnocchi! This dish combines soft gnocchi with rich, creamy sauce,

- 1 lb white fish fillets (cod or tilapia) - 1 cup panko breadcrumbs - 1/2 cup all-purpose flour - 2 large eggs, beaten - 1 teaspoon garlic powder - 1 teaspoon paprika - Salt and pepper to taste - 1 cup shredded green cabbage - 1/2 cup diced tomatoes - 1/4 cup fresh cilantro, chopped - 1 lime, cut into wedges - 8 small corn or flour tortillas - 1/2 cup crema or sour cream To make crispy panko crusted fish tacos, you need fresh ingredients. Start with one pound of white fish fillets, like cod or tilapia. Both types of fish work well and have a mild taste. Next, gather one cup of panko breadcrumbs. These will give the fish a crunchy texture. You will also need half a cup of all-purpose flour. This helps the breadcrumbs stick to the fish. For flavor, add two large eggs, beaten. Then, use one teaspoon each of garlic powder and paprika. These spices add a nice kick. Don’t forget to season with salt and pepper to taste. Now for the toppings! You will want one cup of shredded green cabbage for crunch. Half a cup of diced tomatoes adds freshness. A quarter cup of chopped fresh cilantro gives it a burst of flavor. Finally, cut one lime into wedges for serving. You will also need eight small corn or flour tortillas and half a cup of crema or sour cream. This creamy topping balances the fish's crunch. With these ingredients, you're ready to create a flavorful dish that will impress everyone! First, rinse the fish fillets under cold water. This step helps remove any debris. After rinsing, pat the fish dry with a paper towel. Drying the fish is key for getting a crispy texture. Now, cut the fish into strips about 2-3 inches wide. This size works perfectly for tacos. Next, set up your breading station. In a shallow dish, mix the flour with garlic powder, paprika, salt, and pepper. This blend adds great flavor to the fish. In a second dish, beat the two large eggs. This egg wash helps the breadcrumbs stick. In a third dish, prepare the panko breadcrumbs. Make sure they are ready for coating. Now, it’s time to bread the fish. Take each fish strip and coat it in the seasoned flour. Shake off any excess flour. Then, dip the strip into the beaten eggs, covering it well. Finally, roll the fish in panko breadcrumbs until fully coated. This step gives the fish its crunch. Heat a frying pan over medium-high heat with enough oil to cover the bottom. Once the oil is hot, add the fish strips carefully. Fry them for 3-4 minutes on each side until they turn golden brown and crispy. Remove the fish and place it on a paper towel-lined plate to drain excess oil. While the fish fries, warm the tortillas. Use a separate skillet over medium heat. Warm each tortilla for about 30 seconds on each side until they are pliable. This helps the tortillas hold the filling better. Now, it’s time to assemble the tacos. On each tortilla, layer a handful of shredded cabbage. Next, add 2-3 pieces of the crispy fish. Top it with diced tomatoes and chopped cilantro. To finish, drizzle some crema or sour cream on top. Serve the tacos with lime wedges on the side. Squeezing fresh lime juice on the tacos adds a zesty kick. Enjoy every bite of this delicious meal! To get that perfect crispy crust on your fish, focus on oil temperature. Heat the oil until it shimmers but isn't smoking. This usually means medium-high heat. If the oil is too cool, the fish will absorb too much oil and become soggy. Also, avoid overcrowding the pan. If you add too many fish strips at once, the temperature will drop. Fry in batches to keep the oil hot. This helps ensure each piece gets golden and crispy. You can adjust the seasoning to suit your taste. Try adding a pinch of cayenne for heat or some lime zest for brightness. Don't be afraid to mix it up! For toppings, think beyond the usual. You could add avocado slices or pickled red onions for a twist. Fresh mango salsa adds a sweet touch, too. Get creative and make it your own! Prep your ingredients before you start cooking. Cut the fish and veggies ahead of time. This saves you from rushing around while frying. For frying, use a shallow pan and keep the oil at the right temperature. This method cooks the fish faster and makes it crispier. You’ll spend less time in the kitchen and more time enjoying your tacos! {{image_2}} What are the best fish options for tacos? I recommend using white fish like cod or tilapia. Both have mild flavors and flaky textures. These fish fry up nicely and soak up seasonings well. You can also try mahi-mahi or snapper for a different twist. Are there healthier fish alternatives? Yes, you can use salmon or trout. These fish have richer flavors and are packed with healthy fats. They still work well with the crispy panko crust. What are gluten-free options? If you need gluten-free, swap all-purpose flour for a gluten-free blend. Use gluten-free panko for the breading. This way, you keep the crunch without gluten. What vegetarian preparation ideas do you have? For a vegetarian version, try crispy cauliflower or eggplant. Cut them into strips and follow the same breading and frying steps. They are tasty and satisfying. What different seasoning mixes can I use? You can spice things up with chili powder, cumin, or even lemon zest. Just blend your favorite spices into the flour before breading the fish. This adds depth and flavor to each bite. What unique salsa options work well for topping? Try mango salsa for a sweet twist. A spicy pico de gallo or a tangy avocado salsa also pairs nicely. These toppings bring freshness and excitement to your tacos. After enjoying your crispy panko crusted fish tacos, store any leftovers carefully. Use an airtight container to keep them fresh. It’s best to eat them within three days. This way, the fish stays tasty and the toppings remain crisp. To keep your tacos crispy, reheating is key. For the fish, use an oven or an air fryer. Preheat the oven to 375°F and place the fish on a baking sheet. Bake for about 10 minutes until hot. This method helps the fish stay crunchy. For the tortillas, warm them on a skillet for about 30 seconds on each side. This makes them soft and pliable again. If you want to save fish for later, you can freeze it before cooking. Wrap fish tightly in plastic wrap and place it in a freezer bag. This keeps the fish good for up to three months. Cooked leftovers can also be frozen, but they may lose some crispiness when thawed. If you freeze them, make sure to eat them within a month for the best taste. The best fish for crispy tacos includes cod and tilapia. These fish have a mild flavor and a firm texture. Cod has a nice flaky quality, while tilapia is tender and easy to cook. Both fish hold up well to frying, giving you that perfect crunch. You can also try halibut or haddock for a different taste. To keep your fish tacos crispy, follow these tips: - Use fresh tortillas. Warm them just before serving. - Drain fried fish on paper towels. This removes excess oil. - Add toppings right before eating. This keeps everything fresh. - Serve lime wedges on the side. Squeeze them just before you bite in. Yes, you can prep the fish ahead of time! Just bread the fish and store it in the fridge for a few hours. When you’re ready, simply fry the fish. This will save you time and keep your tacos crispy when served. Avoid pre-cooking the fish, as it may lose its crunch. Here are some great sides to serve with fish tacos: - Mexican rice for a hearty complement. - Black beans for added protein and fiber. - Fresh salsa or pico de gallo for a zesty kick. - Guacamole for a creamy touch. - A simple green salad for freshness. These crispy fish tacos are a simple yet delicious meal. We covered ingredients, step-by-step cooking, and tips to keep the fish crunchy. I shared ways to customize flavors and make it fit your diet. Don't forget how to store and reheat leftovers to enjoy later. Now you can whip up these tasty tacos with confidence, knowing you have all the tools you need. Dive in and enjoy your cooking adventure!

Crispy Panko Crusted Fish Tacos Flavorful Delight

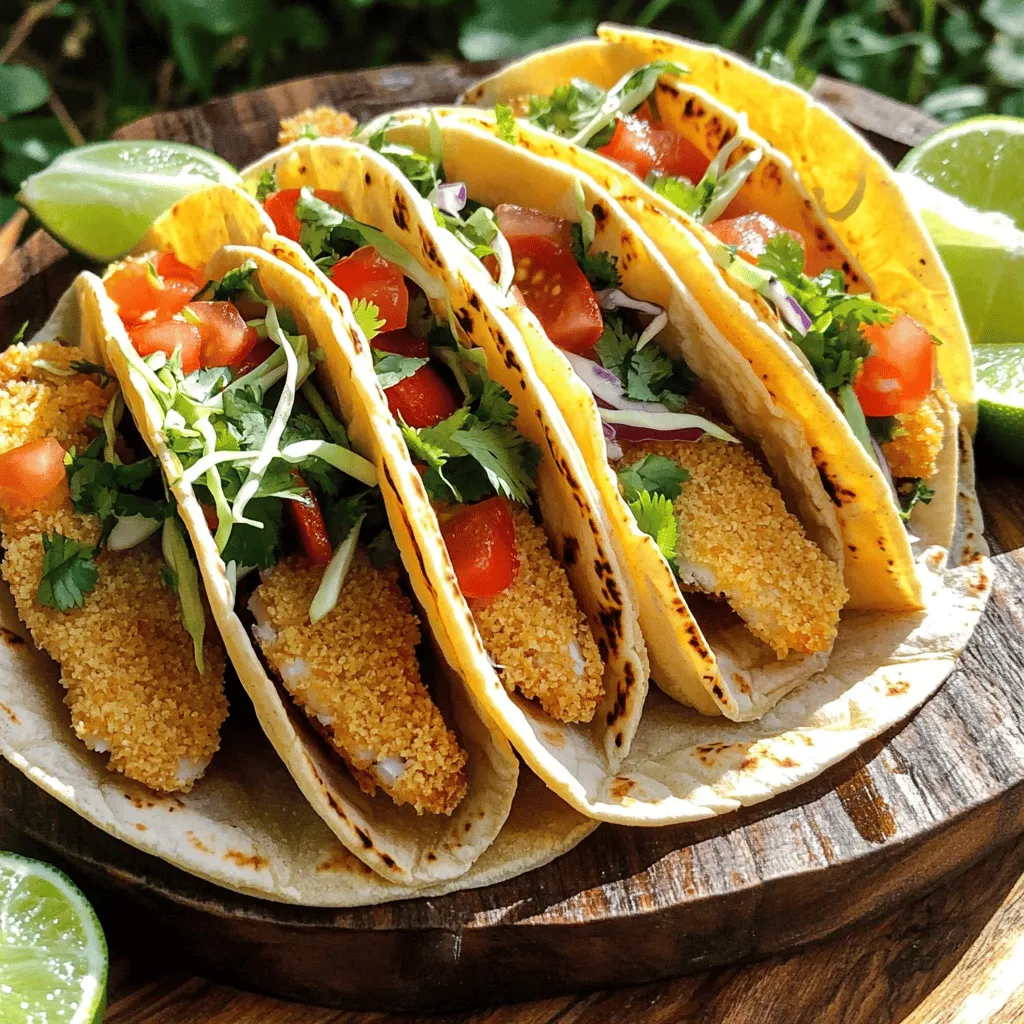
Get ready for a burst of flavor with my Crispy Panko Crusted Fish Tacos! This dish takes white fish to

Older posts
Newer posts
← Previous Page1 … Page29 Page30 Page31 … Page86 Next →

dsad

© 2026 Cooking Wells • Built with GeneratePress

Our Policies

  • Copyright Policy
  • Cookie Policy
  • GDPR Policy
  • Privacy Policy
  • Disclaimer
  • Terms Of Use

More Information

  • Home
  • About
  • Contact
  • Appetizers
  • Dessert
  • Dinner
  • Drinks
©2026, Cooking Wells About Back To Top