Skip to content
DisclaimerTerms Of UseGDPR PolicyCookie Policy

Cooking Wells

  • Home
  • Drinks
  • Appetizers
  • Dinner
  • Dessert
  • About
  • Contact
  • Privacy Policy
DisclaimerTerms Of UseGDPR PolicyCookie Policy

NO-ING-IMG

To make these tasty danish, you need: - 1 sheet of puff pastry, thawed - 8 oz cream cheese, softened - 1/2 cup pumpkin puree - 1/4 cup powdered sugar - 1 teaspoon vanilla extract - 1 teaspoon pumpkin spice blend - 1 egg, beaten (for egg wash) - 1 tablespoon coarse sugar (for topping) Using quality ingredients makes a big difference in flavor. Fresh cream cheese gives a rich taste. Pure pumpkin puree adds sweetness and moisture. Look for a good brand of pumpkin spice blend. This will enhance the warm, cozy flavor of the danish. Fresh puff pastry puffs up beautifully, creating a flaky texture. Always choose the best you can find for the best results. If you have allergies or dietary needs, there are some easy swaps. You can try dairy-free cream cheese for a vegan option. Use almond or oat milk in place of egg wash if you avoid eggs. For gluten-free options, look for gluten-free puff pastry. Pumpkin puree can be swapped with apple or sweet potato puree for a twist. Just remember, these swaps may change the taste or texture a bit. To make your Pumpkin Spice Cream Cheese Danish, start with easy steps. First, preheat your oven to 375°F (190°C). This temperature helps the pastry puff up nicely. Next, line a baking sheet with parchment paper, which keeps the danish from sticking. Now, take your puff pastry sheet. Roll it out on a floured surface. This smooths out any creases. Cut the pastry into six equal rectangles, each about 4x6 inches. In a bowl, mix together the cream cheese, pumpkin puree, powdered sugar, vanilla extract, and pumpkin spice blend. Stir until the mixture is smooth and creamy. Place a generous tablespoon of this pumpkin cream cheese filling in the center of each pastry rectangle. Leave some space around the edges. Fold the edges over the filling and pinch the corners to seal them well. Brush the tops with the beaten egg for a shiny look. Then, sprinkle coarse sugar on top for a crunchy finish. Arrange the filled pastries on the lined baking sheet. Now it's time to bake! Put them in the preheated oven and bake for 15-20 minutes. Look for a golden brown color and a puffed shape. Once done, take them out and let them cool slightly. Enjoy your delicious Pumpkin Spice Cream Cheese Danish warm! Puff pastry can be a bit tricky. Here are some tips to help you. - Keep it cold: Ensure the puff pastry stays cold. Warm dough does not puff well. - Flour your surface: Dust your work surface lightly with flour. This helps prevent sticking. - Roll gently: When rolling out, apply light pressure. You want to stretch, not flatten. - Seal properly: Pinch the edges well after filling. This keeps the filling from leaking out. A great filling makes all the difference. Follow these steps for a smooth blend. - Softened cream cheese: Always start with cream cheese at room temperature. This makes mixing easy. - Mix thoroughly: Combine cream cheese, pumpkin puree, powdered sugar, vanilla, and pumpkin spice well. - Taste test: After mixing, take a small taste. Adjust sweetness or spice to your liking. - Use a generous amount: Don’t be shy with the filling. A tablespoon in each pastry works best. Timing is key for the best results. Here are some essential tips. - Preheat your oven: Always preheat to 375°F (190°C). This ensures even baking. - Watch the clock: Bake for 15-20 minutes, but check at 15. Look for golden brown color. - Cooling time: Let the danish cool for 5 minutes before serving. This helps the filling set. - Serve warm: These pastries taste best warm. Consider serving with coffee or tea for a cozy treat. {{image_2}} You can be creative with fillings for your danish. Instead of pumpkin cream cheese, try these options: - Apple Pie Filling: Use canned or homemade apple pie filling. It adds a sweet and tart taste. - Maple Cream Cheese: Mix cream cheese with maple syrup for a rich flavor. - Cherry or Berry Jam: Spread some jam in the center for a fruity twist. - Nutella: For chocolate lovers, Nutella is a great choice. It adds richness and sweetness. These fillings change the taste while keeping the same flaky pastry. Feel free to mix and match for fun! Not a fan of pumpkin spice? No problem! Here are some alternatives: - Cinnamon Sugar: Use a mix of cinnamon and sugar for a warm flavor. - Ginger Spice: Add ground ginger to give a zesty touch. - Chai Spice: This mix of spices can bring a different dimension to your danish. - Vanilla Bean: For a simple twist, add vanilla bean paste to your filling. These options let you enjoy the danish all year. You can create your own flavor profile without pumpkin spice. When serving your pumpkin spice cream cheese danish, consider these ideas: - Coffee or Tea: A warm cup pairs well with the sweet danish. - Whipped Cream: A dollop of whipped cream can add a light and fluffy touch. - Fresh Fruit: Serve with sliced apples, pears, or berries for extra freshness. - Ice Cream: A scoop of vanilla ice cream makes it a dessert treat. These pairings enhance the overall experience. You can impress your guests with a great flavor balance! To keep your pumpkin spice cream cheese danish fresh, place it in an airtight container. This method keeps the danish moist and tasty. Store it in the fridge for up to three days. If you notice a change in texture or smell, it’s best to toss it. You can freeze the danish for later enjoyment. Wrap each danish tightly in plastic wrap. Then, place them in a freezer-safe bag. This way, they won’t get freezer burn. They can stay in the freezer for up to three months. When you’re ready to eat them, just thaw in the fridge overnight. To reheat your danish and keep it fresh, preheat your oven to 350°F (175°C). Place the danish on a baking sheet. Heat for about 10-15 minutes, or until warm. This method helps restore the crispness of the pastry. You can also use a microwave for quick heating, but the pastry may soften. Enjoy your danish warm for the best taste! People often ask about the best way to enjoy pumpkin spice cream cheese danish. These treats shine during fall, but you can enjoy them anytime! The mix of pumpkin and cream cheese makes a rich and sweet filling. The puff pastry adds a delightful crunch. Each bite is cozy and warm, perfect for chilly days. Yes, you can make these danishes ahead of time. Prepare the filling and pastries, then store them in the fridge. Just assemble them before baking. You can also freeze the unbaked danishes. Wrap them well in plastic wrap and foil. When ready, bake them straight from the freezer. This way, you save time and still enjoy fresh danishes. These danishes pair well with many treats. A warm cup of coffee or tea complements their sweetness. You can also serve them with whipped cream or a scoop of vanilla ice cream. Adding fresh fruit or a drizzle of caramel sauce can enhance the flavor. Enjoy them at breakfast or as a delightful snack. This blog post covered how to make Pumpkin Spice Cream Cheese Danish. We discussed quality ingredients and explored substitutes for allergens. The step-by-step instructions ensured you can create it with ease. I shared tips for perfect puff pastry and creamy filling. We also looked at fun variations and storage tips. Making this treat is simple and rewarding. You can impress friends and family with your tasty creation. Enjoy every bite and get creative with your own ideas!

Pumpkin Spice Cream Cheese Danish Perfect for Fall

Fall is here, which means it’s time for cozy treats! If you love pumpkin spice as much as I do,

- 1 can (14 oz) artichoke hearts, drained and rinsed - 2 tablespoons olive oil - 1 teaspoon garlic powder - 1 teaspoon onion powder - 1/2 teaspoon Italian seasoning - 1/4 teaspoon crushed red pepper flakes (optional) - 1/4 cup grated Parmesan cheese - Salt and pepper to taste - Fresh parsley, chopped (for garnish) Gather these ingredients before you start. The artichoke hearts give a nice base. Olive oil adds moisture and flavor. Garlic powder and onion powder boost taste. Italian seasoning brings an herb touch. Red pepper flakes add a kick if you like spice. Parmesan cheese adds a rich, savory crunch. Don't forget salt and pepper for balance. Fresh parsley adds color and freshness. - Air fryer - Mixing bowl - Paper towels - Serving dish These tools will make your cooking easy. An air fryer cooks the artichokes perfectly. A mixing bowl helps you combine the marinade. Paper towels help dry the artichokes well. A serving dish makes your meal look good. This setup ensures a fun cooking experience. - Preheat the air fryer to 375°F (190°C). - Drain and rinse the artichoke hearts in cold water. Preheating is key. It helps the artichoke hearts cook evenly. Rinsing removes any brine taste. This makes them fresh and ready. - In a bowl, mix olive oil, garlic powder, onion powder, Italian seasoning, salt, and pepper. - Toss the artichoke hearts in the marinade until coated. Creating the marinade is easy. Olive oil adds richness. Garlic and onion powders give depth. Italian seasoning brings a lovely herb flavor. Tossing the artichoke hearts ensures they soak up all those tasty flavors. - Place the artichoke hearts in a single layer in the air fryer basket. - Cook for 12-15 minutes, shaking the basket halfway through. Air frying makes them crispy. Single-layer cooking avoids steaming. Shaking helps them brown evenly. You'll know they are ready when they turn golden brown and smell amazing. Enjoy them warm for the best taste! To get that perfect crispiness, do not overcrowd the air fryer basket. If you pile the artichoke hearts too high, they will steam instead of crisp. This means they won’t get that nice crunch we all want. Also, make sure to pat the artichoke hearts dry before cooking. Moisture can lead to soggy bites, and we want them to be crispy! Feel free to mix up the spices! You can add paprika or lemon zest for extra flavor. Try a bit of dill or oregano for a fresh twist. For cheese, you can swap out Parmesan. Try using Pecorino Romano or even a sharp cheddar. Each choice gives a new taste and keeps things interesting. These artichoke hearts taste great with dipping sauces. Try a tangy aioli or a spicy ranch. You can also serve them with other appetizers like bruschetta or cheese boards. They make a great side dish too! Pair them with grilled chicken or fish for a tasty meal that impresses. {{image_2}} You can switch up the cheese in this recipe. Parmesan is great, but other cheese types work well too. Try using Pecorino Romano for a sharper taste. If you prefer a milder flavor, go for mozzarella. For those who want a vegan option, use nutritional yeast. It adds a cheesy taste without dairy. Vegan cheeses made from nuts also melt nicely. Just make sure they are suitable for air frying. If you love heat, spice things up! Add more crushed red pepper or use cayenne pepper. Start with a little, then add more to taste. This gives a nice kick to the dish. You can also mix in a spicy garlic sauce. Look for sauces that have a strong garlic flavor. This adds depth and extra heat to the artichoke hearts. How do you store leftover artichoke hearts? First, let them cool. Then, place them in an airtight container. This helps keep them fresh. You can store them in the fridge for up to three days. If you have too many, consider freezing them. What are the best containers for storing? Use glass or plastic containers with tight lids. These keep moisture out and flavor in. Avoid using metal, as it can affect the taste. How do you reheat in the air fryer? Preheat the air fryer to 350°F (175°C). Place the artichoke hearts in a single layer. Heat them for about 5-7 minutes. This keeps them crispy and warm. What are alternative methods for reheating? You can also use a microwave. Place them on a microwave-safe plate. Heat for 30 seconds at a time until warm. However, this may make them less crispy. You could also use a skillet on low heat. This method helps keep their texture. Yes, you can use frozen artichoke hearts. Just thaw them first. Drain and rinse them well. Pat them dry to remove excess moisture. This step helps them crisp up in the air fryer. Garlic Parmesan artichoke hearts pair well with many dishes. Serve them as a snack or appetizer. They go great with dips like ranch or garlic aioli. You can also serve them with grilled chicken or fish for a nice meal. They add a tasty twist to salads and pasta dishes too. To keep artichoke hearts crispy, start with draining and rinsing them well. Always pat them dry with a paper towel. This removes moisture that can cause sogginess. Avoid overcrowding the air fryer basket to let air circulate. This ensures even cooking and crispiness. We covered how to make delicious garlic Parmesan artichoke hearts in the air fryer. With simple ingredients and tools, you can whip up a tasty snack or side dish. Remember to adjust spices to your taste and serve them with your favorite dips. These artichoke hearts are easy to store and reheat, so enjoy them anytime. Try different cheeses or spice levels for your twist. Happy cooking!

Air Fryer Garlic Parmesan Artichoke Hearts Delight

Are you ready to elevate your appetizer game? I’m excited to share my recipe for Air Fryer Garlic Parmesan Artichoke

- 4 chicken thighs, skin-on and bone-in - 1 lb baby potatoes, halved - 1 red onion, cut into wedges - 1 cup cherry tomatoes, halved You start with chicken thighs, which give a juicy, rich flavor. The skin adds extra crispiness. Baby potatoes are perfect because they cook well and absorb flavors. Red onion adds sweetness and depth. Cherry tomatoes burst with juice, adding freshness. - 3 cloves garlic, minced - Juice of 1 lemon - 3 tablespoons olive oil - 1 teaspoon dried oregano - 1 teaspoon dried thyme - 1 teaspoon smoked paprika - Salt and pepper to taste The marinade is key to flavor. Garlic gives a strong, tasty kick. Lemon juice brightens every bite. Olive oil keeps everything moist. Dried oregano and thyme add that Mediterranean touch. Smoked paprika gives warmth and a hint of smoke. Don’t forget salt and pepper for balance. - Fresh parsley, chopped Fresh parsley makes a great garnish. It adds color and a fresh taste. Just chop it up and sprinkle it on right before serving. It looks pretty and tastes great too! 1. Preheating the oven: Start by preheating your oven to 425°F (220°C). This heat gets the chicken and potatoes nice and crispy. 2. Marinating the chicken and vegetables: In a large bowl, mix your chicken thighs, halved baby potatoes, red onion wedges, and cherry tomatoes. In a smaller bowl, whisk together minced garlic, lemon juice, olive oil, oregano, thyme, smoked paprika, salt, and pepper. Pour this marinade over your chicken and veggies. Make sure every piece gets coated well. This helps infuse great flavor. 3. Arranging on the sheet pan: Next, spread the marinated chicken and vegetables on a large baking sheet. Make sure they are in a single layer. This helps them cook evenly. 1. Roasting in the oven: Place the sheet pan in your preheated oven. Roast everything for about 30-35 minutes. Check that the chicken reaches an internal temperature of 165°F (75°C). The potatoes should be golden and tender. 2. Broiling for extra crispiness: If you like a crispy skin, turn on the broiler for an extra 2-3 minutes. Keep an eye on it so it doesn’t burn. This step gives you that perfect crunch. 3. Resting before serving: Once done, take the sheet pan out of the oven. Let the dish rest for a few minutes. This helps the juices settle in the chicken. 1. Garnishing with parsley: Before serving, sprinkle freshly chopped parsley over the chicken and potatoes. This adds a touch of color and fresh flavor. Enjoy your meal! - For the best taste, marinate the chicken for at least 30 minutes. - If you have time, let it sit overnight in the fridge. This helps the flavors soak in. - Use fresh herbs if you can. They add bright notes to the dish. - Don’t skip the lemon juice. It gives a zesty kick. - Always check the chicken’s internal temperature. It should be 165°F (75°C). - Ovens can vary, so keep an eye on cooking time. Start checking at 30 minutes. - If your oven runs hot, reduce the temperature slightly. - Serve the chicken and potatoes right from the pan for a rustic look. - Add a sprinkle of fresh parsley for color. It brightens up the dish nicely. - Pair with a simple salad or crusty bread. These sides balance the meal well. - For a complete feast, try serving with tzatziki sauce on the side. It adds creaminess. {{image_2}} Chicken alternatives If you want to switch up the protein, try using chicken breasts or even drumsticks. Boneless chicken cooks faster. For a lighter option, consider turkey thighs. They add a nice flavor that pairs well with potatoes. Vegetable options You can mix in or replace the veggies. Carrots, bell peppers, or zucchini are great choices. These add color and flavor while keeping the dish balanced. Feel free to use what you have on hand! Adding feta cheese Feta cheese can make this dish even more delightful. Sprinkle it on top during the last few minutes of baking. The warm feta melts and gives a creamy texture. It adds a nice tang that enhances the Greek flavors. Using different herbs If you want to try something new, switch up the herbs. Fresh basil, dill, or rosemary can work well. Each herb brings its own unique flavor. Mixing herbs can keep your meal exciting and fresh. Gluten-free version This recipe is gluten-free as is. Just ensure all your ingredients, like spices and oils, are gluten-free. This way, everyone can enjoy this tasty dinner without worries. Low-carb adaptations For a low-carb twist, skip the potatoes. Instead, add cauliflower florets or broccoli. These veggies provide a nice crunch and are low in carbs. This keeps the meal hearty but lighter. After enjoying your meal, let the leftovers cool. Place them in an airtight container. Store them in the fridge. They will stay good for about 3 to 4 days. This helps keep the chicken and potatoes fresh. To reheat, use your oven or a microwave. In the oven, preheat to 350°F (175°C). Place the dish in for around 15-20 minutes. This warms it evenly and keeps it crispy. If using a microwave, cover the dish. Heat for 2-3 minutes, checking often. This helps keep the chicken juicy and potatoes tender. Freezing is a great option too. Portion the leftovers into smaller containers. Make sure to label them with the date. You can freeze them for up to 3 months. When ready to eat, thaw in the fridge overnight. Reheat as mentioned above for the best taste and texture. You should marinate the chicken for at least 30 minutes. This time lets the flavors soak in. If you have more time, marinate it for up to 2 hours. The longer it sits, the better the taste. Just keep it in the fridge while it marinates. Yes, you can use boneless chicken. Just remember, boneless chicken cooks faster. Cut the cooking time by about 10 minutes. Check the internal temperature to ensure it reaches 165°F (75°C). The texture may be a bit different, but it will still be tasty. You can serve many things with this dish. A fresh Greek salad pairs well with it. You might also enjoy some warm pita bread. Roasted vegetables or a side of tzatziki sauce are great options, too. These sides add flavor and balance to your meal. This blog post shared a simple recipe for sheet-pan Greek chicken and potatoes. We covered the main ingredients, marinade components, and how to cook everything to perfection. Remember to marinate well for flavor and check cooking times. Get creative with ingredient swaps or dietary adjustments. Store your leftovers properly for later enjoyment. Cooking this dish not only fills your plate but also brings friends and family together. Enjoy the tasty results and good times!

Sheet-Pan Greek Chicken and Potatoes Tasty Dinner

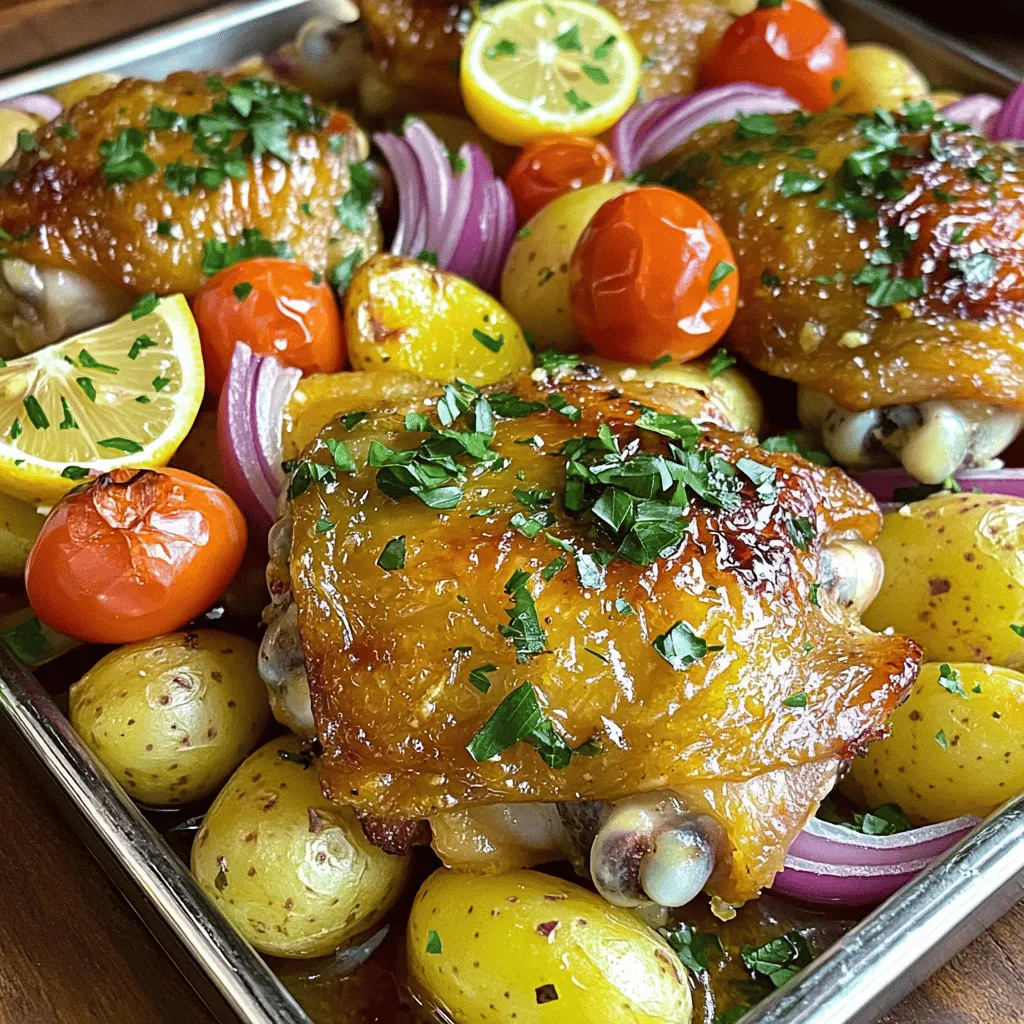
Looking for a quick and tasty dinner? Look no further! This Sheet-Pan Greek Chicken and Potatoes recipe packs flavor without

- 1 cup rolled oats - ½ cup natural almond butter (or any nut butter of choice) - ¼ cup honey or maple syrup - ½ cup vanilla protein powder - ½ cup mini chocolate chips - 1 teaspoon vanilla extract - ¼ teaspoon salt - 2 tablespoons chia seeds (optional for extra nutrients) To make No-Bake Cookie Dough Protein Bites, gather these ingredients. Rolled oats give texture. Almond butter adds creaminess. Honey or maple syrup sweetens the mix. Vanilla protein powder boosts nutrition. Mini chocolate chips add fun! Vanilla extract provides great flavor. A pinch of salt enhances everything. You can add chia seeds for extra nutrients. Each serving has about 100 calories. You get around 5 grams of protein, 10 grams of carbs, and 5 grams of fat. These bites pack a good punch of energy. They are great for a quick snack or post-workout fuel. With a balance of protein and carbs, they help keep you satisfied. 1. In a large bowl, combine the rolled oats, protein powder, and salt. Mix them well. This forms a strong base for your bites. 2. In another bowl, whisk together the almond butter, honey, and vanilla extract until it is smooth. This sweet mix adds great flavor. 3. Gradually add the wet mix to your dry mix. Stir with a spatula or wooden spoon until it is fully combined. The mixture may feel thick, but that’s okay! 1. Use your hands to shape small balls from the mixture. Aim for about 1 inch in diameter. These should be easy to pop in your mouth. 2. If the mixture is sticky, dampen your hands a bit. This helps you handle the mixture without too much mess. 1. Place the formed protein bites on a baking sheet lined with parchment paper. 2. Refrigerate for about 30 minutes. This helps them set and makes them firmer. 3. Enjoy the bites right away or store them in an airtight container in the fridge. They stay fresh for up to a week! To get the right texture for your protein bites, focus on the mixture. Use rolled oats as the base. They give a nice chew and help hold everything together. If your batter feels too dry, add a bit more nut butter or honey. If it's too wet, add more oats or protein powder. For flavor, try different nut butters. Almond butter is great, but peanut or cashew butter work too. Each nut butter gives a unique taste. If you want something fun, add a sprinkle of cinnamon or even cocoa powder. One big mistake is overmixing the ingredients. If you mix too much, the bites can turn tough. Just mix until everything is combined, and then stop. Another common mistake is not refrigerating long enough. These bites need at least 30 minutes in the fridge. This helps them set and makes them easier to eat. If you skip this step, they may fall apart when you try to grab one. {{image_2}} You can switch up the flavor with different nut butters. Try peanut butter for a classic taste. Sunflower seed butter works well for nut-free bites. Each nut butter brings its own taste and texture. Adding spices can also enhance flavor. A pinch of cinnamon can add warmth. Nutmeg offers a cozy, sweet kick. Experiment with different spices to find your favorite blend. To make these bites vegan, swap honey with maple syrup. This keeps the sweetness without animal products. You can also use agave nectar for a similar effect. For gluten-free options, choose certified gluten-free oats. This small change ensures everyone can enjoy these bites. Always check labels to avoid gluten cross-contamination. To keep your No-Bake Cookie Dough Protein Bites fresh, use an airtight container. This helps prevent them from drying out and keeps them tasty. You can store them in the fridge or the freezer. If you choose the fridge, they will be ready to eat anytime. For longer storage, freezing is best. These protein bites last about one week in the fridge. After that, they may lose their taste and texture. If you freeze them, they can last for up to three months. Just thaw them in the fridge overnight before enjoying. This way, you always have a healthy snack on hand! To make these tasty bites, follow these steps: 1. Mix dry ingredients: In a large bowl, combine 1 cup of rolled oats, ½ cup of vanilla protein powder, and ¼ teaspoon of salt. Stir well. 2. Prepare wet mix: In another bowl, whisk together ½ cup of almond butter, ¼ cup of honey (or maple syrup), and 1 teaspoon of vanilla extract. Make it smooth. 3. Combine mixtures: Gradually mix the wet ingredients into the dry mix. Stir until everything blends well. It may feel thick, but that’s fine! 4. Add chocolate chips: Fold in ½ cup of mini chocolate chips and 2 tablespoons of chia seeds (if using) until evenly mixed. 5. Shape the bites: Use your hands to form the mixture into small balls, about 1 inch wide. If it’s sticky, dampen your hands slightly. 6. Refrigerate: Place the balls on a parchment-lined baking sheet. Chill them for about 30 minutes to firm up. 7. Serve: Enjoy right away or store in an airtight container in the fridge for up to a week. Yes, you can use several types of protein powders. Here are some options: - Whey protein: A popular choice with a smooth texture. - Pea protein: Great for plant-based diets, offers a mild taste. - Soy protein: Another plant-based option with a good amino acid profile. - Hemp protein: Adds a nutty flavor and contains healthy fats. Feel free to experiment with different flavors to find your favorite! Absolutely! These protein bites are packed with nutrients. Here are some benefits: - Protein: Helps kids grow strong and stay active. - Fiber: From oats and chia seeds, it aids digestion. - Healthy fats: Found in almond butter, these fats support brain health. Serve them as an after-school snack or a fun treat. Kids love their sweet taste and chewy texture! These protein bites are simple to make and packed with nutrients. We covered the key ingredients, step-by-step instructions, and storage tips. You can easily customize flavors and adjust for dietary needs. Remember to avoid common mistakes, like overmixing and not chilling enough. With these bites, you get a nutritious snack that's great for kids and adults alike. Enjoy your healthy treat anytime!

No-Bake Cookie Dough Protein Bites Tasty Snack Idea

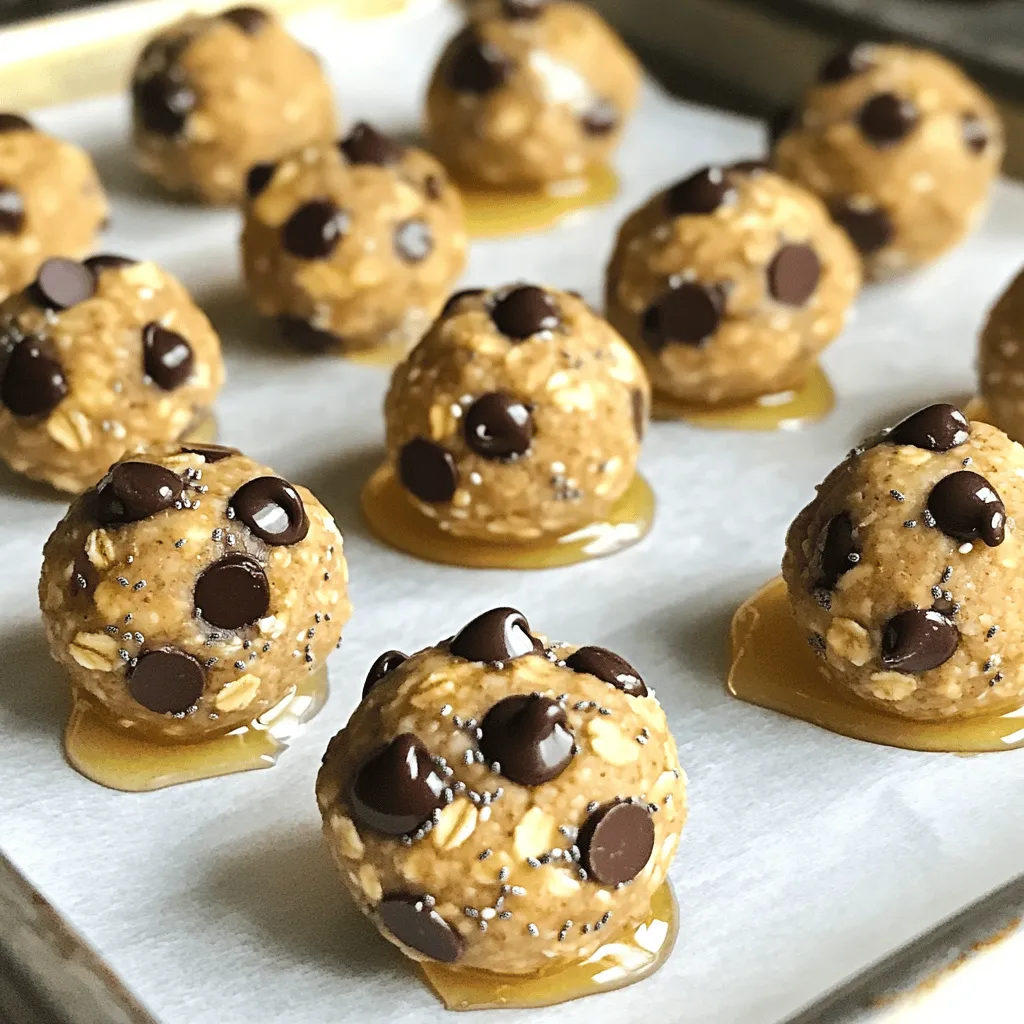
Looking for a tasty and healthy snack? Try these No-Bake Cookie Dough Protein Bites! They are simple to make and

- 2 boneless, skinless chicken breasts - 4 oz cream cheese, softened - 1 cup shredded sharp cheddar cheese - 1/4 cup diced jalapeños (fresh or pickled, adjust to taste) - 1/2 teaspoon garlic powder - 1/2 teaspoon onion powder - Salt and pepper to taste - 1/2 cup crushed cornflakes (for coating) - Cooking spray These ingredients create a tasty blend. The cream cheese and cheddar give a rich flavor. The jalapeños add a nice kick. You can adjust the heat by using fresh or pickled jalapeños. - Bacon bits for extra crunch - Green onions for a fresh taste - Different types of cheese, like pepper jack or mozzarella Adding bacon bits gives a smoky flavor. Green onions bring a fresh crunch. Feel free to mix in your favorite cheeses for more variety. - Greek yogurt instead of cream cheese for a lighter option - Panko breadcrumbs instead of cornflakes for a different texture - Chicken thighs instead of breasts for juiciness Greek yogurt cuts calories but keeps creaminess. Panko breadcrumbs can give a lighter crunch. Chicken thighs often stay juicier and add flavor. Use these substitutes to fit your taste and dietary needs. Start by preheating your air fryer to 375°F (190°C). This step is key for even cooking. While it heats, take two boneless, skinless chicken breasts. Butterfly them by cutting horizontally but not all the way through. This creates pockets for your filling. In a mixing bowl, combine 4 oz of softened cream cheese with 1 cup of shredded sharp cheddar cheese. Next, add 1/4 cup of diced jalapeños. You can use fresh or pickled jalapeños, depending on your taste. Add 1/2 teaspoon of garlic powder and 1/2 teaspoon of onion powder. Season with salt and pepper. Mix everything until well blended. Open the butterflied chicken breasts. Divide the cheese mixture evenly between them. Carefully fold the chicken back over the filling and press gently to keep it in place. Now, prepare to coat the chicken. Place crushed cornflakes in a shallow dish. Spray the stuffed chicken with cooking spray. Then, press each side into the cornflakes to create a crunchy layer. Place the coated chicken breasts in the air fryer basket. Make sure to arrange them in a single layer. This helps them cook evenly. Cook for about 15-18 minutes. The chicken should be fully cooked and the coating should be golden brown and crispy. Check that the internal temperature reaches 165°F (75°C). After cooking, carefully remove the chicken from the air fryer. Let it rest for about 5 minutes. This step helps the juices redistribute, making the chicken juicy. Slice the chicken or serve it whole. For a nice touch, serve on a rustic wooden board. Garnish with fresh cilantro or parsley and add a side of ranch dipping sauce. Enjoy! To make the best crunchy coating, start with crushed cornflakes. They create a great texture. After you coat the chicken with cooking spray, press it firmly into the cornflakes. This step helps the coating stick well. Remember to coat all sides for even crunchiness. If you want an extra crunch, you can double coat the chicken. Just spray, dip, and repeat! You can control how spicy your dish is. If you like it mild, use fewer jalapeños. You can also remove the seeds. For more heat, add extra jalapeños or try spicy cheese. Mixing in pepper jack cheese can add a nice kick. Always taste your cheese mixture before stuffing the chicken. This way, you can adjust the heat to your liking. Cooking chicken to the right temperature is key. Use a meat thermometer to check. The chicken should reach 165°F (75°C) inside. This ensures it is safe to eat. Air frying usually takes about 15-18 minutes, but all air fryers vary. If your chicken is thick, it may need extra time. Always let the chicken rest for 5 minutes after cooking. This helps keep the juices inside, making the chicken juicy and tender. {{image_2}} You can mix the cheese in many fun ways. Instead of sharp cheddar, try pepper jack for a spicy twist. You can also use mozzarella for a gooey texture. Cream cheese is a must for that smooth filling, but feel free to add a little feta for a tangy kick. Each cheese brings its own flavor, so experiment to find your favorite blend! You don’t have to stick with chicken. Turkey breast works well for a leaner option. If you want a heartier meal, try pork chops. Fish like salmon can add a unique taste. Just remember to adjust your cooking time based on the protein you choose. Your air fryer will still make it crispy and delicious! Want a meat-free option? Stuff bell peppers with the cheese mix instead. You can also use large mushrooms, like portobellos, for a hearty bite. Eggplant slices can be another great base, giving you that savory flavor. Each of these options will let you enjoy the same spicy, cheesy filling without meat. To store leftovers, let the chicken cool first. Place it in an airtight container. You can keep it in the fridge for up to 3 days. Make sure to seal it well to avoid drying out. To reheat, you can use the air fryer again. Preheat it to 350°F (175°C). Place the chicken in the basket and heat for 6-8 minutes. This will keep the coating crispy and warm the filling. If you want to freeze, wrap each piece tightly in plastic wrap. Then, place them in a freezer bag. They will stay fresh for up to 2 months. To cook from frozen, add a few extra minutes to the air fryer time. Yes, you can use frozen chicken breasts. Just remember, they will take longer to cook. It’s best to thaw them first for even cooking. You can use the fridge or microwave to thaw. If you cook them frozen, check the chicken’s internal temperature. It should reach 165°F (75°C) for safe eating. You can serve this dish with many sides. Here are a few ideas: - Rice: White or brown rice pairs well. - Salad: A fresh salad adds a nice crunch. - Vegetables: Roasted or steamed veggies work great. - Dipping Sauce: Ranch or blue cheese dressing adds flavor. These options will make your meal more filling and fun! To check if the chicken is done, use a meat thermometer. Insert it into the thickest part of the chicken. The temperature should be 165°F (75°C). If you don’t have a thermometer, cut into the chicken. The meat should be white, not pink, and juices should run clear. Yes, you can skip the cornflake coating. If you prefer a lighter dish, just stuff the chicken and cook. You can also use breadcrumbs or crushed nuts for a different texture. These options provide a tasty crunch without cornflakes. You learned about the tasty Air Fryer Jalapeño Popper Chicken. We covered the key ingredients, cooking steps, and smart tips for the best results. You can even explore fun variations and safe storage methods. Remember, making this dish is easy and can fit anyone's taste. Enjoy your cooking and impress friends with your new skills. Happy cooking!

Air Fryer Jalapeño Popper Chicken Tasty and Easy Meal

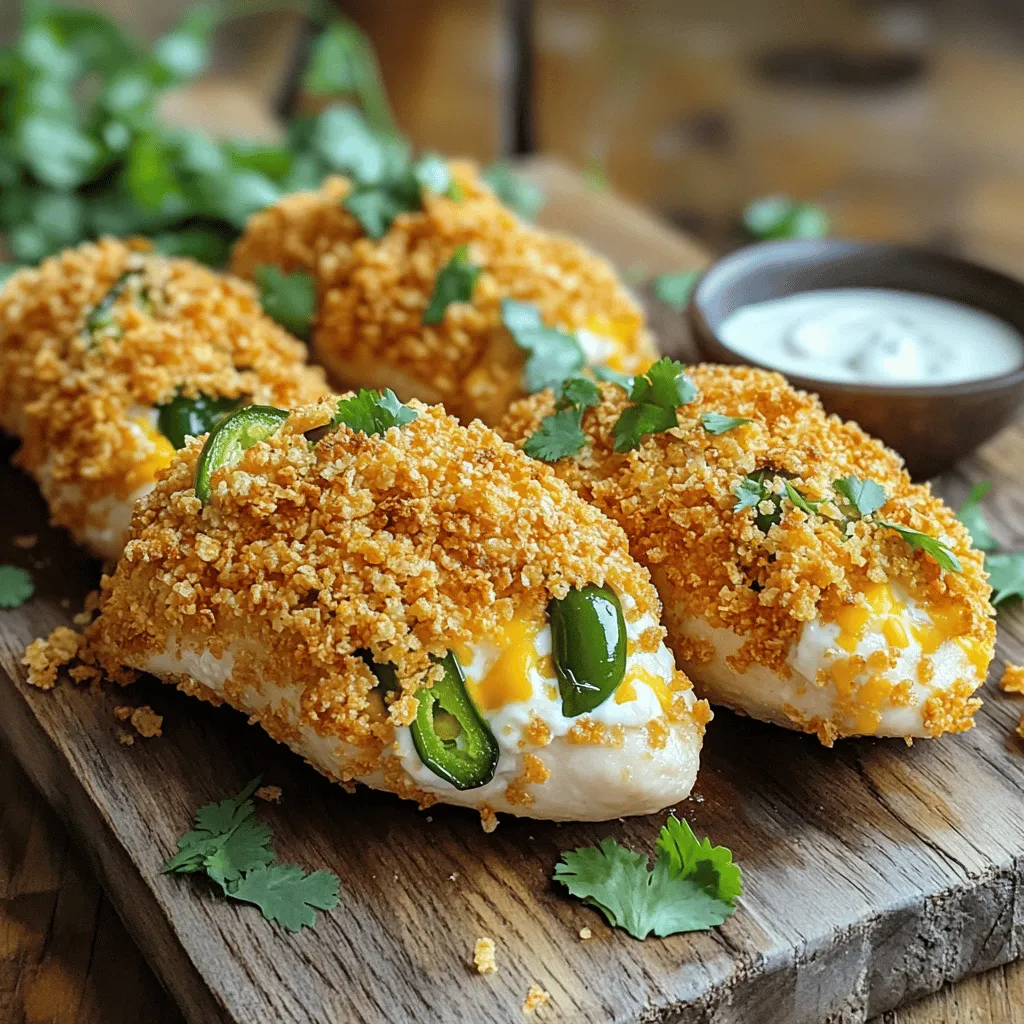
Looking for a quick meal that packs a flavorful punch? You’ve landed in the right spot! My Air Fryer Jalapeño

To make these tasty salted caramel apple mini pies, you need the following ingredients: - 2 cups all-purpose flour - 1 teaspoon salt - 1 tablespoon sugar - 1 cup unsalted butter, chilled and cubed - 6-8 tablespoons ice water - 3 medium apples (like Granny Smith or Honeycrisp), peeled, cored, and diced - 1/2 cup brown sugar - 1 teaspoon ground cinnamon - 1/4 teaspoon nutmeg - 1 tablespoon lemon juice - 1/2 cup salted caramel sauce (homemade or store-bought) - Sea salt crystals for garnish These ingredients create a perfect blend of sweet and salty. You can enhance the taste of your mini pies with these optional ingredients: - Chopped nuts (like pecans or walnuts) for crunch - A splash of vanilla extract for added depth - Dried cranberries or raisins for a fruity twist Adding these ingredients can elevate the flavor profile. If you don't have some ingredients, here are some easy swaps: - Use whole wheat flour instead of all-purpose flour for a nutty taste. - Swap brown sugar with maple syrup or honey for a different sweetness. - Replace unsalted butter with coconut oil for a dairy-free option. These substitutions can help you adapt the recipe to your needs. To make the pie crust, start with a mixing bowl. Add 2 cups of all-purpose flour, 1 teaspoon of salt, and 1 tablespoon of sugar. Mix these dry ingredients well. Next, add 1 cup of chilled, cubed unsalted butter to the bowl. Use a pastry cutter or your fingers to mix until the blend looks like coarse crumbs. Now, it's time to add water. Pour in 6 to 8 tablespoons of ice water, one tablespoon at a time. Mix until the dough barely comes together. Then, divide the dough into two disks. Wrap each disk in plastic wrap and place them in the fridge for at least 30 minutes. This chilling helps the crust stay flaky. While the dough chills, prepare the apple filling. In a large bowl, combine 3 medium apples, peeled, cored, and diced. You can use Granny Smith or Honeycrisp apples for the best flavor. Add 1/2 cup of brown sugar, 1 teaspoon of ground cinnamon, 1/4 teaspoon of nutmeg, and 1 tablespoon of lemon juice. Stir the mixture until the apples are well coated. Let it sit for a few minutes. This helps the flavors mix and makes the filling even tastier. Preheat your oven to 375°F (190°C). Now, roll out one disk of dough on a floured surface to about 1/8 inch thick. Use a round cutter, about 4 inches in diameter, to cut out circles of dough. Repeat this step with the second disk. Take half of the dough circles and place them in a greased muffin tin. Spoon the apple mixture into each circle. Then, drizzle a bit of salted caramel sauce over the apples. Top each mini pie with another dough circle. Press the edges to seal them well. Don't forget to cut small slits in the top crust, so steam can escape. Bake the mini pies in the preheated oven for 20 to 25 minutes. Look for a golden brown crust and bubbling filling. Once done, allow the mini pies to cool for a few minutes in the tin. Drizzle more salted caramel sauce on top and sprinkle sea salt crystals before you serve. Enjoy your delightful mini pies! To make a flaky pie crust, start with cold butter. Cut it into small cubes and chill it. Mix the flour, salt, and sugar well. When you add the butter, use a pastry cutter or your fingers. You want small pieces of butter in the mix. This creates layers when you bake. Also, don't overwork the dough. Just mix until it holds together. Chill the dough before rolling it out. This helps keep the crust flaky. For the best flavor, pick tart apples. Granny Smith and Honeycrisp work great. They hold their shape when baked. Tart apples balance the sweetness of the caramel. If you like a sweeter pie, mix in some Fuji or Gala apples. Always peel and core your apples before dicing them. This step makes the filling smooth and easy to eat. You can make your own salted caramel or buy it. If you make it, heat sugar until it melts and turns golden. Then add butter and cream. Stir until smooth. Add a pinch of sea salt to taste. For a quick option, store-bought works too. Just heat it slightly before using. This makes it easy to drizzle. Top your mini pies with the caramel once they cool a bit. This keeps the drizzle from melting away. {{image_2}} You can switch up the apples for other fruits. Pears add a sweet, soft touch. Cherries bring a tart flavor that pairs well with caramel. Peaches offer a juicy bite, perfect for summer. Just make sure to adjust the sugar based on the fruit's sweetness. If you want a lighter pie, try using whole wheat flour. This gives the crust more fiber. You can swap the brown sugar for coconut sugar. It adds a nice flavor and cuts refined sugars. For the filling, reduce the caramel sauce or use a sugar-free option. This way, you can enjoy your mini pies guilt-free. Mix and match flavors for fun twists. Add a bit of almond extract to the apple filling for a nutty taste. Try mixing apples with cranberries for a tart contrast. For a spicier kick, add ginger or cardamom to the filling. These small changes make each mini pie unique and exciting. To keep your salted caramel apple mini pies fresh, store them in a sealed container. Place them in the fridge. They stay good for about three days. If you want to enjoy them later, follow the freezing tips below. You can freeze these mini pies for up to three months. First, let them cool completely. Then, wrap each pie in plastic wrap. Place the wrapped pies in a freezer-safe bag or container. Label the bag with the date. This way, you’ll know when you made them. To reheat, take the mini pies out of the fridge or freezer. For fridge-stored pies, place them in a 350°F (175°C) oven for about 10 minutes. If they are frozen, let them thaw in the fridge overnight first. Then, reheat as above. Enjoy the warm, gooey filling and flaky crust! Yes, you can use store-bought caramel sauce. It saves time and still tastes great. Look for a brand that has a rich flavor and a smooth texture. If you want to boost the taste, warm the sauce slightly before using it. This makes it pour easily over the apple filling. To prevent soggy crusts, make sure your dough is cold. After mixing, chill it for at least 30 minutes. When you roll out the dough, keep your work surface floured. You can also blind bake the crusts for a few minutes before adding the filling. This helps create a barrier, keeping moisture out. Serve the mini pies warm for the best taste. Drizzle more salted caramel sauce on top. A sprinkle of sea salt adds a nice touch. You can also pair them with a scoop of vanilla ice cream. This perfect combo makes for a delightful dessert experience. You’ve learned about the key ingredients and steps to make mini pies. We covered filling options, pie crust tips, and storage best practices. Remember, fresh apples and a flaky crust can make a big difference. Don’t forget to try different fruit flavors and healthy swaps. These mini pies are easy to enjoy today or save for later. With these tips, you can create delightful treats that impress everyone. Happy baking, and may your mini pies turn out perfectly every time!

Salted Caramel Apple Mini Pies Delightful and Easy

If you love the sweet taste of fall, you’re in for a treat! Salted caramel apple mini pies are not

To make this delightful dip, gather these key items: - 8 oz cream cheese, softened - 1 cup powdered sugar - 1 cup pumpkin puree (canned or roasted) - 1 teaspoon vanilla extract - 1 teaspoon pumpkin pie spice - 1/2 teaspoon cinnamon - 1 cup cool whip (or whipped cream) These ingredients create a creamy, sweet, and spiced flavor. The cream cheese and cool whip give it a light texture. Pumpkin puree adds a rich taste, while the spices bring warmth. For a fun touch, consider these garnishes: - Crushed pecans - Crushed walnuts These add crunch and enhance the dip's flavor. You can sprinkle them on top before serving. They also look pretty and make the dip more inviting. You can swap some ingredients if needed. For a lower-fat option, use low-fat cream cheese. If you want a sweeter dip, add more powdered sugar. You can also use whipped coconut cream instead of cool whip for a dairy-free version. Each change will still keep the dip tasty. To start, grab a large mixing bowl. Add 8 oz of softened cream cheese. This makes the dip rich and smooth. Then, mix in 1 cup of powdered sugar. It adds sweetness to balance the pumpkin. Next, add 1 cup of pumpkin puree. You can use canned or roasted pumpkin. Sprinkle in 1 teaspoon of vanilla extract and 1 teaspoon of pumpkin pie spice. These flavors blend perfectly with the pumpkin. Finally, add 1/2 teaspoon of cinnamon for that warm, cozy taste. Now, it's time to mix everything. Use an electric mixer or a whisk. Blend the ingredients together until smooth and creamy. Make sure there are no lumps. This step is key for a great texture. Once smooth, gently fold in 1 cup of cool whip or whipped cream. This gives the dip a light and fluffy feel. Taste your dip. If it needs more sweetness, add a little more powdered sugar. Transfer your dip to a serving bowl. Use a spatula to smooth the top. For extra flair, sprinkle crushed pecans or walnuts on top. This adds a nice crunch. Now, serve it with graham crackers, apple slices, or pretzels. Arrange them around the bowl for a pretty display. If you want, chill the dip for an hour. This lets the flavors blend even better. Enjoy your delightful treat! Taste is key in making the dip perfect. Start with one cup of powdered sugar. If you want it sweeter, add more sugar little by little. Mix well after each addition. You can also try adding a pinch of extra cinnamon or pumpkin pie spice. This adds flavor without making it too sweet. To achieve a creamy dip, ensure your cream cheese is very soft. Take it out of the fridge an hour before you start. Mix it well with the other ingredients. Gently fold in the cool whip, so it stays fluffy. If you like a thicker dip, you can add more cream cheese. How you serve this dip makes a big difference. Use a nice bowl to hold the dip. Surround it with graham crackers, apple slices, and pretzels. You can use a fall-themed dish to match the season. For a fun touch, sprinkle crushed pecans or walnuts on top. This adds a nice crunch and looks appealing. {{image_2}} You can change the taste of the dip easily. Add more spices for depth. Try adding a pinch of nutmeg or ginger for warmth. If you love chocolate, mix in a few tablespoons of cocoa powder. For a caramel twist, drizzle some caramel sauce into the dip. Each choice adds a new layer of flavor. This dip is fun to serve in many ways. You can use graham crackers, apple slices, or pretzels for dipping. For an extra crunch, serve with crushed nuts on top. Another fun idea is to serve it in small cups for individual portions. You can also use mini pumpkins as serving bowls for a festive touch. Want a healthier dip? Swap the cream cheese for Greek yogurt. It gives you the same creamy texture with less fat. You can also use natural sweeteners like honey or maple syrup. For dairy-free options, try coconut cream or a dairy-free cream cheese. These swaps keep the flavor while making it lighter. You should store your no-bake pumpkin spice cheesecake dip in the fridge. Place it in an airtight container. This keeps it fresh and tasty. Make sure to cover it well. If you keep it covered, it will stay good longer. You can serve it right after making it or chill it for an hour. Chilling helps the flavors mix better. You can freeze this dip, but it may change its texture. To freeze, put the dip in a freezer-safe container. Leave some space at the top, as it will expand. When you want to eat it, let it thaw in the fridge. This way, it will stay safe to eat. I recommend using it within a month for the best taste. This dip stays fresh in the fridge for about 5 days. If you freeze it, use it in a month. After that, the flavor may fade. Always check for any off smells or changes in color before serving. If it looks or smells strange, it’s best to throw it out. Enjoy your dip while it’s at its best! Yes, you can make this dip ahead. It tastes even better after chilling. Prepare the dip, then cover it tightly. Store it in the fridge for up to two days. Take it out about 30 minutes before serving. This allows the dip to soften slightly. You have many fun options for dipping. Here are some ideas: - Graham crackers - Apple slices - Pretzels - Vanilla wafers - Biscotti Each choice adds a nice crunch and flavor. Try a mix for fun! Absolutely, you can go gluten-free! Choose gluten-free graham crackers or pretzels. Fresh fruit like apple slices is also a great choice. These options keep the dip tasty for all diets. Enjoy it without worry! In this post, we explored the key ingredients and steps to create a tasty dip. We also discussed essential tips for sweetness, creaminess, and presentation. Variations let you customize flavors and serve it in fun ways. Remember, you can store the dip safely for later use. With the right knowledge, you can make this dip work for any occasion. Enjoy experimenting and sharing your dip with friends and family!

No-Bake Pumpkin Spice Cheesecake Dip Delightful Treat

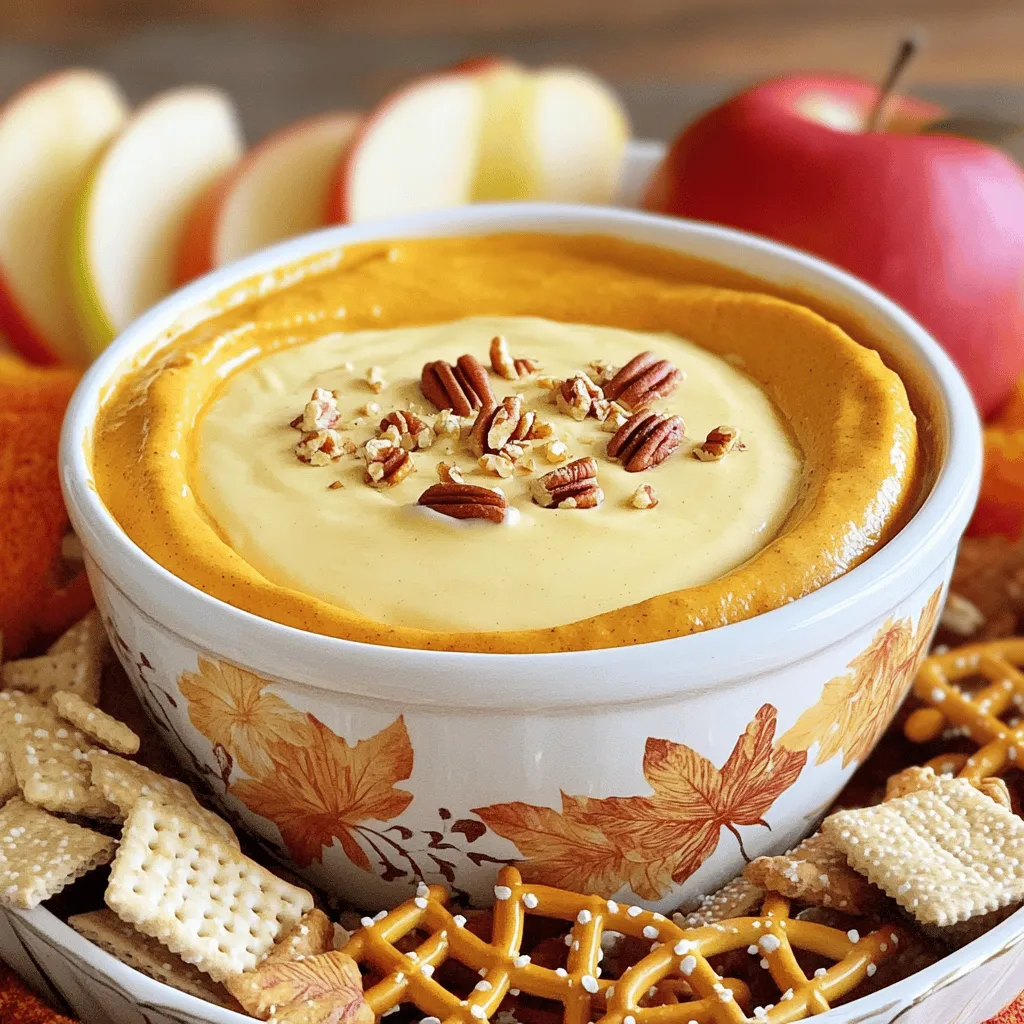
Craving a sweet fall treat? Let me introduce you to my No-Bake Pumpkin Spice Cheesecake Dip! This creamy delight is

To make Minute Honey Sriracha Noodles, you will need fresh and tasty ingredients. Here’s a complete list: - 8 oz rice noodles - 3 tablespoons honey - 2 tablespoons Sriracha sauce - 1 tablespoon soy sauce - 2 tablespoons sesame oil - 1 clove garlic, minced - 1 inch ginger, grated - 1 cup mixed bell peppers, finely sliced (red, yellow, green) - 1/2 cup snap peas, trimmed - 2 green onions, chopped - Sesame seeds for garnish - Fresh cilantro (optional) for garnish These ingredients come together to create a simple, quick, and flavorful meal. The rice noodles provide a nice base. Honey adds sweetness, while Sriracha brings a spicy kick. Soy sauce gives depth, and sesame oil adds a nutty flavor. Garlic and ginger enhance the taste of the dish. The bell peppers add color and crunch, and snap peas give a fresh bite. Green onions provide a mild onion flavor, while sesame seeds and cilantro make perfect garnishes. Each element plays an important role in building layers of flavor. So gather these ingredients to whip up this delightful meal in no time! - Boiling water: Start by bringing a large pot of water to a rolling boil. This step is key for cooking the rice noodles right. - Cooking time: Add 8 oz of rice noodles to the boiling water. Cook them for about 3 to 4 minutes, or until they are soft but not mushy. - Rinsing noodles: Drain the noodles in a colander and rinse them under cold water. This stops the cooking and keeps the noodles from sticking. - Combining ingredients: In a small bowl, combine 3 tablespoons of honey, 2 tablespoons of Sriracha sauce, 1 tablespoon of soy sauce, 2 tablespoons of sesame oil, 1 clove of minced garlic, and 1 inch of grated ginger. - Whisking method: Whisk these ingredients together until they blend well. You want a smooth sauce that coats the noodles nicely. - Heat settings: In a large skillet or wok, heat a teaspoon of sesame oil over medium-high heat. This helps the veggies cook fast and stay crisp. - Cooking time for vegetables: Add 1 cup of mixed bell peppers and 1/2 cup of snap peas to the pan. Stir-fry them for about 2 to 3 minutes. They should be tender but still bright and crisp. - Tossing technique: Now, add the cooked rice noodles to the skillet with the sautéed vegetables. Pour the honey Sriracha sauce over everything. - Heating through: Toss everything together to coat the noodles and veggies. Heat this mixture for another 2 to 3 minutes until it's warm and fragrant. - Serving suggestions: Once done, remove the skillet from heat. Serve the noodles hot, garnished with chopped green onions, sesame seeds, and fresh cilantro if you like. Enjoy your quick and tasty meal! To make these noodles as spicy as you like, adjust the Sriracha. Start with one tablespoon if you prefer it mild. If you crave heat, add more! You can also try fresh chili peppers or chili flakes for a different kick. If you want to make this dish vegan, swap honey with maple syrup or agave nectar. These will give you that sweet taste without using animal products. You can also use tamari instead of soy sauce for gluten-free options. Save time by cooking in batches. You can make a larger amount of noodles and sauce ahead. Keep them in the fridge for easy meals later. Another time-saving hack is to prep your veggies in advance. This way, you can just toss them in the pan when you're ready to cook. {{image_2}} You can easily add protein to your Minute Honey Sriracha Noodles. Chicken, shrimp, or tofu work great. If you use chicken, cut it into small pieces. Cook it in the pan before adding the veggies. Shrimp cooks fast, so add it after the vegetables. Tofu is a nice option for vegans. Press it to remove water, then cube it. Sauté it until golden before mixing in. Adjust cooking times based on the protein you use. Chicken needs about 5-7 minutes, shrimp just 3-4 minutes, and tofu about 5 minutes. Feel free to swap out the vegetables. Broccoli, carrots, or zucchini are tasty choices. You can also use seasonal veggies. In spring, add asparagus or snap peas. In summer, cherry tomatoes or corn are nice. This keeps your meal fresh and fun. Try mixing different colors for a vibrant look. You’ll enjoy the different flavors and textures. If you want to change the noodles, many options exist. You can use whole wheat, soba, or udon noodles. Each type adds a unique taste. For gluten-free options, rice noodles are a perfect choice. You can also find gluten-free pasta. Just cook them according to package directions. This way, you can enjoy the dish no matter your dietary needs. To keep your Minute Honey Sriracha Noodles fresh, use airtight containers. Glass or plastic containers work well. Store leftovers in the fridge. The ideal temperature is below 40°F (4°C). This helps keep the flavors strong and the noodles safe to eat. When it's time to enjoy leftovers, you have a few options. The best method is to use a skillet. Heat it over medium heat and add a splash of water or oil. Stir the noodles often to warm them evenly. This way, you avoid sogginess. You can also use the microwave, but be careful. Heat in short bursts and stir in between. If you want to save some for later, freezing is a great option. First, let the noodles cool completely. Then, place them in freezer-safe bags or containers. Squeeze out as much air as possible. This helps prevent freezer burn. When you're ready to eat, thaw them overnight in the fridge. You can also use the microwave for quick thawing. Just remember to reheat them properly to keep the texture nice. Minute Honey Sriracha Noodles can last about 3 to 5 days in the fridge. Store them in an airtight container. This keeps the noodles fresh and tasty. Always check for any signs of spoilage before eating. Yes, you can use other noodles. Try udon, soba, or even spaghetti. Just adjust the cooking time based on the noodle type. Rice noodles give a nice texture, but feel free to experiment for your taste. These noodles pair well with many dishes. Try serving them with grilled chicken or shrimp. You can also add a side salad for crunch. These options balance the spicy flavors of the dish. This recipe can be gluten-free. Use gluten-free soy sauce instead of regular soy sauce. Be sure to check the labels on all ingredients. Rice noodles are naturally gluten-free, so you’re off to a good start! To prepare ahead, cook the noodles and sauce separately. Store them in the fridge until you’re ready to eat. When it's time, just heat them together in a pan. This keeps them fresh and delicious. This blog post showed how to make delicious Honey Sriracha Noodles. We covered the key ingredients, cooking steps, and expert tips. You can customize the dish with spice levels and protein options. Storing and reheating leftovers is easy too. Cooking this meal is simple and tasty. You now have all the tools to impress your friends and family with your cooking. Enjoy your flavorful noodles!

Minute Honey Sriracha Noodles Quick and Tasty Meal

Are you ready to spice up your dinner routine? In this blog post, I’ll show you how to make Minute

For this tasty slow cooker lemon garlic orzo soup, you will need: - 1 cup orzo pasta - 1 medium onion, diced - 3 cloves garlic, minced - 2 carrots, diced - 2 celery stalks, diced - 6 cups vegetable broth - 1 cup baby spinach - 1 lemon (juiced and zested) - 1 teaspoon dried thyme - 1 teaspoon dried oregano - Salt and pepper to taste - Fresh parsley, chopped (for garnish) These ingredients create a bright and zesty soup. The orzo adds a nice chew, while the lemon brings in a burst of flavor. You can swap some ingredients if needed. Here are a few ideas: - Orzo pasta: Use rice or quinoa if you want a gluten-free option. - Vegetable broth: Chicken broth works well for added flavor. - Baby spinach: Kale or Swiss chard can be great substitutes. - Dried herbs: Fresh thyme or oregano can replace dried herbs for a fresher taste. Make these changes to suit your taste or what you have on hand. Using fresh herbs gives a bright flavor. They can enhance the soup's taste. However, dried herbs are more convenient and still work well. - Fresh herbs: Use three times more fresh herbs than dried. For example, use 3 teaspoons of fresh thyme for 1 teaspoon of dried thyme. - Dried herbs: They have a strong flavor, so be cautious with the amount. Both options will make your soup delicious. Choose based on what you prefer or have in your pantry. First, gather all your ingredients. You need: - 1 cup orzo pasta - 1 medium onion, diced - 3 cloves garlic, minced - 2 carrots, diced - 2 celery stalks, diced - 6 cups vegetable broth - 1 cup baby spinach - 1 lemon (juiced and zested) - 1 teaspoon dried thyme - 1 teaspoon dried oregano - Salt and pepper to taste - Fresh parsley, chopped (for garnish) Next, take your slow cooker. Add the diced onion and minced garlic. Then, toss in the carrots and celery. This mix gives the soup a nice base. Now, pour in the vegetable broth. After that, add the orzo pasta, dried thyme, and dried oregano. Don’t forget to add salt and pepper for taste. Stir everything well. Cover your slow cooker. You can set it to low for 6-8 hours or high for 3-4 hours. The orzo should be tender when it's ready. About 15 minutes before you serve, stir in the baby spinach, lemon juice, and lemon zest. This step brightens the soup. It adds a fresh taste. Before serving, taste the soup. Adjust the seasoning if needed. When ready, ladle the soup into bowls. Garnish with fresh parsley. Enjoy the vibrant colors and flavors! To boost the taste of your Slow Cooker Lemon Garlic Orzo Soup, focus on fresh flavors. Use fresh lemon juice and zest for a bright kick. Fresh herbs like parsley add a nice touch. You can also try adding a splash of white wine before cooking. This adds depth and richness to the broth. For a bit of heat, add red pepper flakes. They give the soup a nice bite without overpowering it. One common mistake is overcooking the orzo. It can get mushy if cooked too long. To prevent this, add the orzo early but check it often. Stir the soup occasionally to keep everything mixed well. Another mistake is using old herbs. Fresh herbs have more flavor than dried ones. If you use dried herbs, make sure they are not past their prime. Lastly, don’t forget to taste the soup before serving. Adjust the salt and pepper to get the perfect flavor. This soup pairs well with simple sides. A fresh green salad complements the soup's rich flavors. You can also serve it with crusty bread for dipping. Garlic bread or a warm baguette works great too. For a heartier meal, try a grilled cheese sandwich. The creamy cheese balances the soup's brightness. Enjoy these side dishes to enhance your meal experience! {{image_2}} You can make this soup heartier by adding proteins. Chicken works great here. Use cooked, shredded chicken for a quick option. Just stir it in near the end of cooking. If you prefer plant-based, try cubed tofu. Add it in with the spinach for a warm finish. Both options boost the flavor and nutrition. This soup is naturally vegetarian and can easily become vegan. Use vegetable broth to keep it meat-free. For a vegan touch, skip any dairy toppings. You can add cashew cream or a splash of coconut milk instead. These additions give a creamy texture without animal products. Using seasonal ingredients can change the soup's vibe. In spring, add fresh peas or asparagus for a bright taste. Summer brings ripe tomatoes; toss some diced ones in for sweetness. In fall, try using pumpkin or squash for a cozy touch. Winter means hearty greens like kale or Swiss chard. Each season offers new flavors to explore. After enjoying your Slow Cooker Lemon Garlic Orzo Soup, store any leftovers in an airtight container. Let the soup cool before sealing it. This helps keep the flavors fresh. You can keep it in the fridge for up to three days. If you want to enjoy it later, freezing is a great option. To freeze the soup, use freezer-safe containers. Leave a little space at the top, as the soup may expand. Label the container with the date. The soup can last up to three months in the freezer. When you're ready to eat it, thaw it in the fridge overnight. Reheat it on the stove over low heat, stirring often. Add a splash of broth or water if it seems thick. Meal prep makes life easier. Chop the onions, carrots, and celery ahead of time. Store them in the fridge for up to two days. You can also measure the orzo and spices in advance. This way, you can toss everything into the slow cooker quickly. Make a big batch of soup and freeze extra portions. It’s a great way to have a quick meal ready when life gets busy. Yes, you can make this soup ahead of time. I often prepare it the night before. Just store it in the fridge once it cools. When you're ready to serve, just reheat it on the stove. This soup tastes even better the next day as the flavors blend. To prevent orzo from getting mushy, watch the cooking time. The orzo cooks quickly, so check it after three hours on high or six hours on low. You can also add the orzo halfway through cooking. This way, it stays firm and delicious. The best toppings for lemon garlic orzo soup include fresh parsley and lemon wedges. Chopped parsley adds color and freshness. Lemon wedges let you add more zing to each bowl. You can also sprinkle some grated cheese for extra flavor. This blog post covered the essential ingredients and step-by-step instructions for making lemon garlic orzo soup. I shared tips on enhancing flavors and avoiding common mistakes. You also learned about variations, like adding proteins and making vegan swaps. Finally, I provided storage tips to keep leftovers fresh. Remember, cooking is fun! Don't hesitate to try new ingredients. Experiment with flavors and techniques, and make this soup your own. Enjoy your cooking journey!

Slow Cooker Lemon Garlic Orzo Soup Flavorful Delight

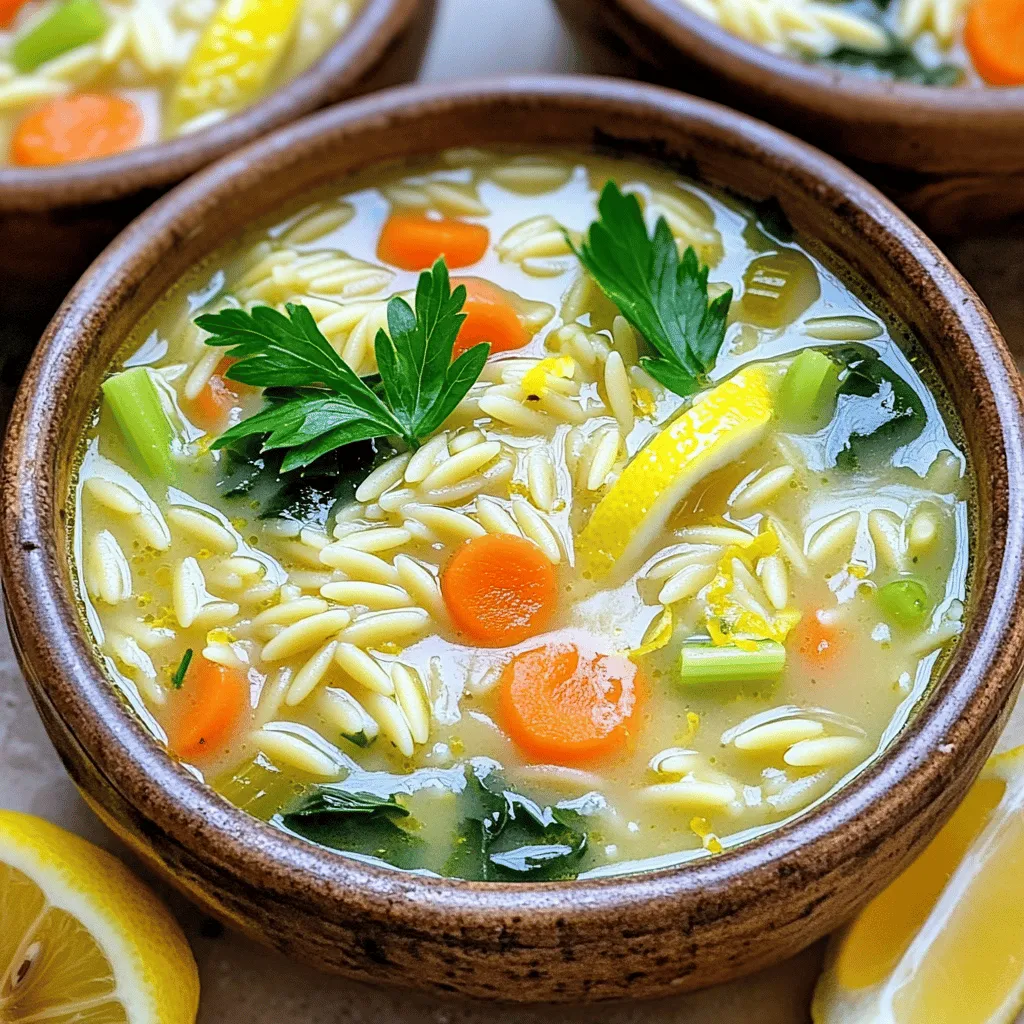
Welcome to your new favorite meal! Slow Cooker Lemon Garlic Orzo Soup is a cozy delight that’s easy to make.

For my Sheet Pan Cajun Shrimp & Sausage, you need fresh and vibrant ingredients. Here’s what you will use: - 1 lb large shrimp, peeled and deveined - 12 oz smoked sausage, sliced into rounds - 2 cups bell peppers, mixed colors, diced - 1 cup red onion, sliced - 4 cloves garlic, minced - 3 tablespoons olive oil - 2 tablespoons Cajun seasoning - 1 teaspoon paprika - Salt and pepper to taste - Fresh parsley, chopped (for garnish) - Lemon wedges (for serving) Each ingredient adds a layer of taste and color. The shrimp brings a sweet flavor, while the sausage gives a smoky kick. The bell peppers and onion add crunch and vibrant color. Garlic enhances the overall aroma and taste. The olive oil helps everything cook evenly, while the spices bring the Cajun flair. Fresh parsley and lemon wedges finish the dish with zest and brightness. Gather these items, and you're ready to create a flavorful delight! First, preheat your oven to 400°F (200°C). This step gets your oven ready for cooking. A hot oven helps cook the shrimp and sausage evenly. Next, take a large baking sheet. Line it with parchment paper. This makes cleanup easy. You can also spray it lightly with cooking spray. In a large mixing bowl, add the shrimp, sausage, bell peppers, onion, and garlic. Mix them well. In a small bowl, combine olive oil, Cajun seasoning, paprika, salt, and pepper. Pour this mix over the shrimp and sausage. Toss everything so it gets coated evenly. Transfer your mixture to the prepared sheet pan. Spread it out in a single layer. This helps everything cook evenly and get that nice caramelization. Place the sheet pan in your preheated oven. Bake for 15-20 minutes. The shrimp should turn pink and opaque, and the sausage should be warm throughout. Check it at 15 minutes to see if it’s done. Once baked, remove the pan from the oven. Let it cool for a minute. Garnish with fresh parsley and add lemon wedges on the side. The lemon gives a nice zing. Enjoy this flavorful delight with family or friends! To cook shrimp just right, watch the time closely. Shrimp cooks fast. They turn pink when ready. Check them after 10 minutes. If they look pink and opaque, they are done. Overcooked shrimp get tough. Use a timer to help you. For the best flavor, use fresh spices. Cajun seasoning brings a spicy kick. Mix it well with olive oil. This helps the spices stick to the food. Toss everything in the bowl. Make sure each piece gets coated. Add lemon juice before serving for a fresh taste. After cooking, let the pan cool. Use a non-abrasive sponge to clean it. Soak it in warm, soapy water if needed. Avoid harsh scrubbing pads. They can scratch the surface. A well-maintained sheet pan lasts longer and cooks better. Store it in a dry place. {{image_2}} If you want to swap the sausage, you have great choices. Chicken sausage works well. It is lean and offers a mild taste. Turkey sausage is another option. It is lower in fat but still tasty. For a meatless dish, try plant-based sausage. It adds flavor while keeping the dish vegetarian. Each option brings its own twist while keeping the dish fun. You can add many veggies to boost nutrition. Zucchini slices add a nice crunch. Cherry tomatoes burst with flavor and color. Broccoli florets bring great texture and vitamins. Carrots add sweetness and a lovely hue. Feel free to mix in whatever you enjoy. The more colors, the better your meal looks and tastes. Want more heat? Use cayenne pepper or red pepper flakes. These spices can give your dish an extra kick. For a smoky flavor, add chipotle powder. It pairs nicely with shrimp and sausage. If you prefer milder spices, consider using Italian herbs. Basil or oregano can create a different yet delicious taste. Try mixing and matching your favorites to find the perfect blend. To keep your Sheet Pan Cajun Shrimp & Sausage fresh, let it cool first. Once cool, place it in an airtight container. This will keep the flavors intact. You can store it in the fridge for up to three days. If you want to save it longer, freeze it. Just make sure to use freezer-safe containers. When you are ready to enjoy leftovers, reheating is simple. You can use the microwave or the oven. For the microwave, place the dish in a bowl and cover it. Heat in short bursts, stirring in between. For the oven, preheat it to 350°F (175°C). Spread the dish on a baking sheet and heat for about 10-15 minutes. This helps keep the shrimp and sausage juicy. Using the right container helps maintain taste and texture. Glass containers with lids are great options. They are safe for both the fridge and the freezer. If you prefer plastic, choose BPA-free containers. Make sure they are airtight to prevent any freezer burn. Yes, you can use frozen shrimp. Just make sure to thaw them first. Place them in cold water for about 15 minutes. Drain and pat dry before mixing with other ingredients. This ensures the dish cooks evenly. Cajun Shrimp & Sausage goes well with several sides. Here are some great options: - Rice or quinoa for a hearty base - Garlic bread for a nice crunch - Coleslaw for a fresh, crisp contrast - Corn on the cob for a sweet touch These sides add variety and balance to your meal. To make it spicier, add more Cajun seasoning or include diced jalapeños. You can also sprinkle some cayenne pepper. If you want it milder, reduce the Cajun seasoning. You can also add more vegetables like bell peppers to tone down the heat. Yes, this recipe is great for meal prep. You can cook it in advance and store it in containers. It keeps well in the fridge for up to three days. Just reheat in the microwave or oven when you're ready to eat. This post covered a tasty Cajun shrimp and sausage dish. We looked at the ingredients, step-by-step instructions, and helpful tips. You can add veggies or change the sausage for your taste. Proper storage keeps the leftovers fresh, and reheating is easy. In closing, this recipe offers flavor, ease, and fun. Enjoy making it your own!

Sheet Pan Cajun Shrimp & Sausage Flavorful Delight

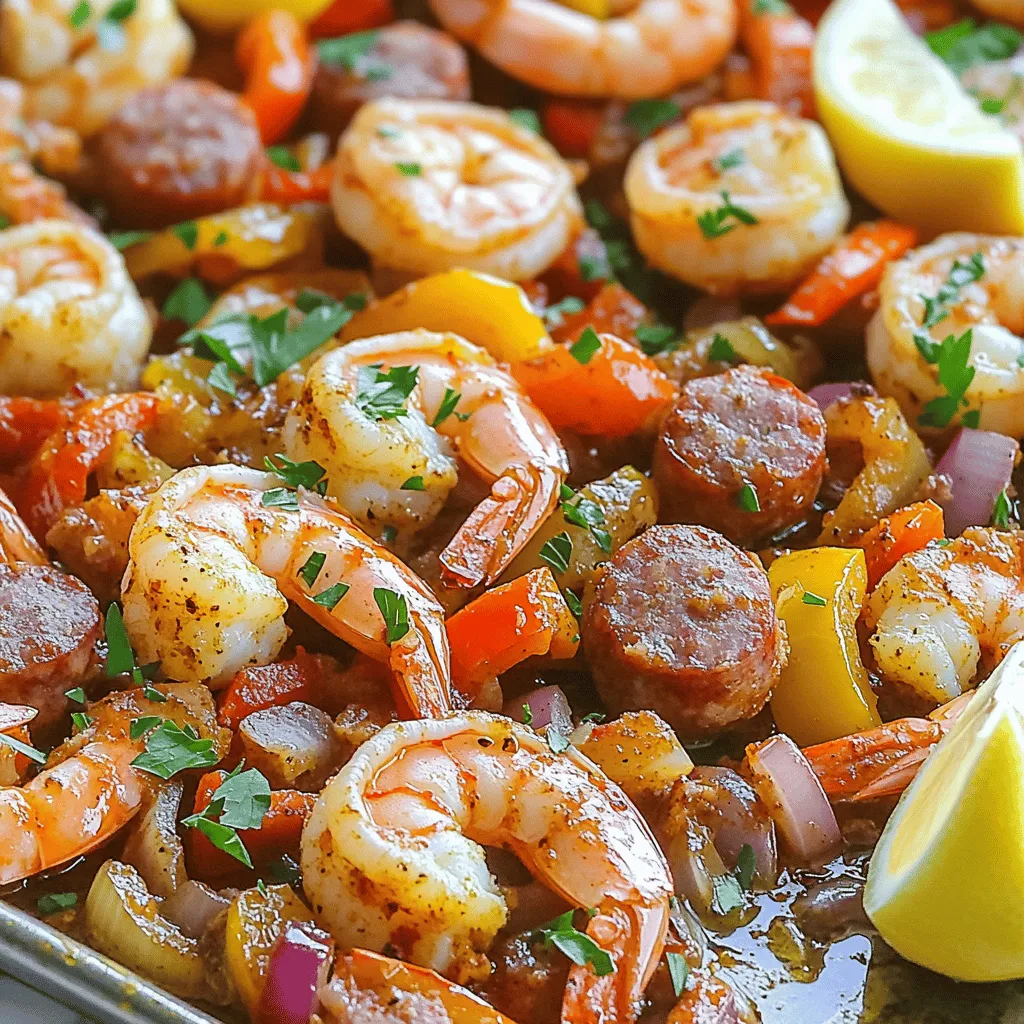
If you crave a meal that’s easy, tasty, and packed with flavor, you need this Sheet Pan Cajun Shrimp &

Older posts
Newer posts
← Previous Page1 … Page30 Page31 Page32 … Page86 Next →

dsad

© 2026 Cooking Wells • Built with GeneratePress

Our Policies

  • Copyright Policy
  • Cookie Policy
  • GDPR Policy
  • Privacy Policy
  • Disclaimer
  • Terms Of Use

More Information

  • Home
  • About
  • Contact
  • Appetizers
  • Dessert
  • Dinner
  • Drinks
©2026, Cooking Wells About Back To Top