Skip to content
DisclaimerTerms Of UseGDPR PolicyCookie Policy

Cooking Wells

  • Home
  • Drinks
  • Appetizers
  • Dinner
  • Dessert
  • About
  • Contact
  • Privacy Policy
DisclaimerTerms Of UseGDPR PolicyCookie Policy

NO-ING-IMG

To make Air Fryer Nashville Hot Chicken Nuggets, you will need: - 1 lb chicken breast, cut into bite-sized pieces - 1 cup buttermilk - 1 teaspoon hot sauce (like Frank's RedHot) - 1 cup all-purpose flour - 1 teaspoon paprika - 1 teaspoon garlic powder - 1 teaspoon onion powder - 1 teaspoon cayenne pepper - Salt and pepper to taste - 2 tablespoons coconut oil, melted (for basting) - 1 tablespoon brown sugar (for the hot sauce mixture) - 1 tablespoon additional hot sauce (for the hot sauce mixture) If you need alternatives, here are some great options: - For chicken breast, you can use chicken thighs. They stay juicy. - Instead of buttermilk, mix milk with a bit of vinegar. Let it sit for 5 minutes. - You can swap all-purpose flour with almond flour for a gluten-free version. - If you don't have cayenne pepper, use crushed red pepper flakes for heat. Quality matters in cooking! Use fresh chicken for the best taste. Look for buttermilk that is creamy and not too watery. Fresh spices, like paprika and garlic powder, will make your nuggets pop with flavor. Check that your hot sauce has a good balance of heat and flavor. This ensures your Nashville hot chicken nuggets will be a crunchy treat everyone loves! To start, grab a bowl and mix 1 cup of buttermilk with 1 teaspoon of hot sauce. This gives the chicken a nice kick. Cut 1 pound of chicken breast into bite-sized pieces. Add the chicken to the bowl and stir well. Make sure each piece is covered. Cover the bowl and place it in the fridge for at least 1 hour. For even better flavor, marinate overnight. The longer, the better! In another bowl, combine 1 cup of all-purpose flour with 1 teaspoon of paprika, 1 teaspoon of garlic powder, 1 teaspoon of onion powder, and 1 teaspoon of cayenne pepper. Add salt and pepper to taste. Mix this well. This blend will give your chicken nuggets a tasty crust. First, preheat your air fryer to 400°F (200°C) for about 5 minutes. While it heats, take each chicken piece from the buttermilk mixture. Let any extra liquid drip off. Then, coat it in the flour mixture. Make sure it’s well-covered. Shake off any extra flour before placing the nuggets on a plate. Next, lightly spray or brush your air fryer basket with oil. Arrange the chicken nuggets in a single layer. You may have to cook them in batches. Spray the tops with a bit of cooking spray to help them crisp up. Cook the nuggets at 400°F (200°C) for 10 to 12 minutes. Flip them halfway through for even cooking. They should turn golden brown and be fully cooked. When they are done, take them out and prepare the hot sauce mixture. In a small bowl, whisk together 2 tablespoons of melted coconut oil, 1 tablespoon of brown sugar, and 1 tablespoon of extra hot sauce. Once the chicken nuggets are out, toss them in this hot sauce mix until they are well-coated. Enjoy your crunchy, spicy treat! To get that perfect crunch, start with the right coating. Use a mix of flour and spices. Make sure each nugget is well-coated. Shake off any extra flour before cooking. This helps keep the texture light. Also, spray the nuggets with a little oil before air frying. This step is key for crispiness. Nashville hot chicken is known for its heat. If you like it spicy, add more cayenne pepper to the flour mix. For a milder version, reduce the cayenne. You can also mix in smoked paprika for a unique flavor. Experiment with different hot sauces in the marinade too. Each sauce has its own heat level and flavor profile. Dipping sauces can take your nuggets to the next level. Here are some great pairings: - Ranch dressing - Blue cheese dressing - Honey mustard - BBQ sauce - Extra hot sauce These sauces balance the heat and add more taste. Serve them on the side for a fun treat. {{image_2}} You can make these nuggets in the oven if you want. Preheat your oven to 425°F (220°C). Line a baking sheet with parchment paper for easy cleanup. After coating the chicken, place the nuggets on the sheet in a single layer. Spray them lightly with cooking spray. Bake for about 20-25 minutes, flipping halfway through. This method gives you a slightly different texture but keeps them tasty. Want to make these nuggets gluten-free? Swap the all-purpose flour with a gluten-free blend. Many great options are available at stores. Also, check your hot sauce to ensure it’s gluten-free. This way, everyone can enjoy the crunchy goodness without worry. Feel free to customize your nuggets! You can add unique spices for a twist. Try these options: - Smoked paprika for a richer flavor - Cumin for a warm, earthy note - Chili powder for extra heat These spices can enhance the taste and make your nuggets stand out. Don't be afraid to experiment! After enjoying your Air Fryer Nashville Hot Chicken Nuggets, you may have some leftovers. To keep them fresh, place the nuggets in an airtight container. This step helps lock in moisture and flavor. Store them in the fridge for up to three days. If they sit longer, they may lose their crunch and taste. To enjoy your nuggets again, reheating is key. The best way is to use the air fryer. Set it to 375°F (190°C) and cook for about 5-7 minutes. This method brings back the crispy texture. You can also use an oven. Preheat to 375°F (190°C) and bake for 10-12 minutes. Flip them halfway to heat evenly. Avoid the microwave, as it can make them soggy. If you want to save some nuggets for later, freezing works well. Place the cooled nuggets on a baking sheet in a single layer. Freeze them for about an hour. Once solid, transfer them to a freezer bag. This keeps them fresh for up to three months. When you're ready to eat, reheat directly from frozen using the air fryer or oven. - How to maintain flavor and texture: - For flavor, add a touch of hot sauce to the marinade before freezing. - For texture, ensure they are fully cooled before freezing to prevent ice crystals. - Always reheat to a high temperature for that perfect crunch. Yes, you can use frozen chicken. Thaw it first in the fridge. This will help the chicken absorb the buttermilk and hot sauce mix. Once thawed, follow the same steps for marinating and cooking. The nuggets will still turn out crispy and tasty. To adjust the spice level, change the cayenne pepper. For less heat, use less cayenne. You can also add more hot sauce to the buttermilk for extra kick. For mild nuggets, skip the cayenne entirely. You can always serve extra hot sauce on the side for those who like it hot. Nashville hot chicken nuggets go great with many sides. Here are some ideas: - Coleslaw: Its cool crunch balances the heat. - Mac and cheese: Creamy cheese pairs well with spicy chicken. - French fries: Crispy fries are a classic match. - Pickles: Their tangy crunch adds a nice contrast. - Drinks: Sweet tea or lemonade cools the spice and refreshes. These sides will make your meal more fun and tasty! This blog post covered all you need for making Nashville hot chicken nuggets. We explored ingredients, cooking steps, and helpful tips for great taste. Remember, quality counts in both ingredients and cooking methods. Try different spices and sauces to find your perfect flavor. Store leftovers properly to keep them tasty. With these easy steps, you’ll impress everyone with your cooking. Enjoy your delicious, homemade chicken nuggets!

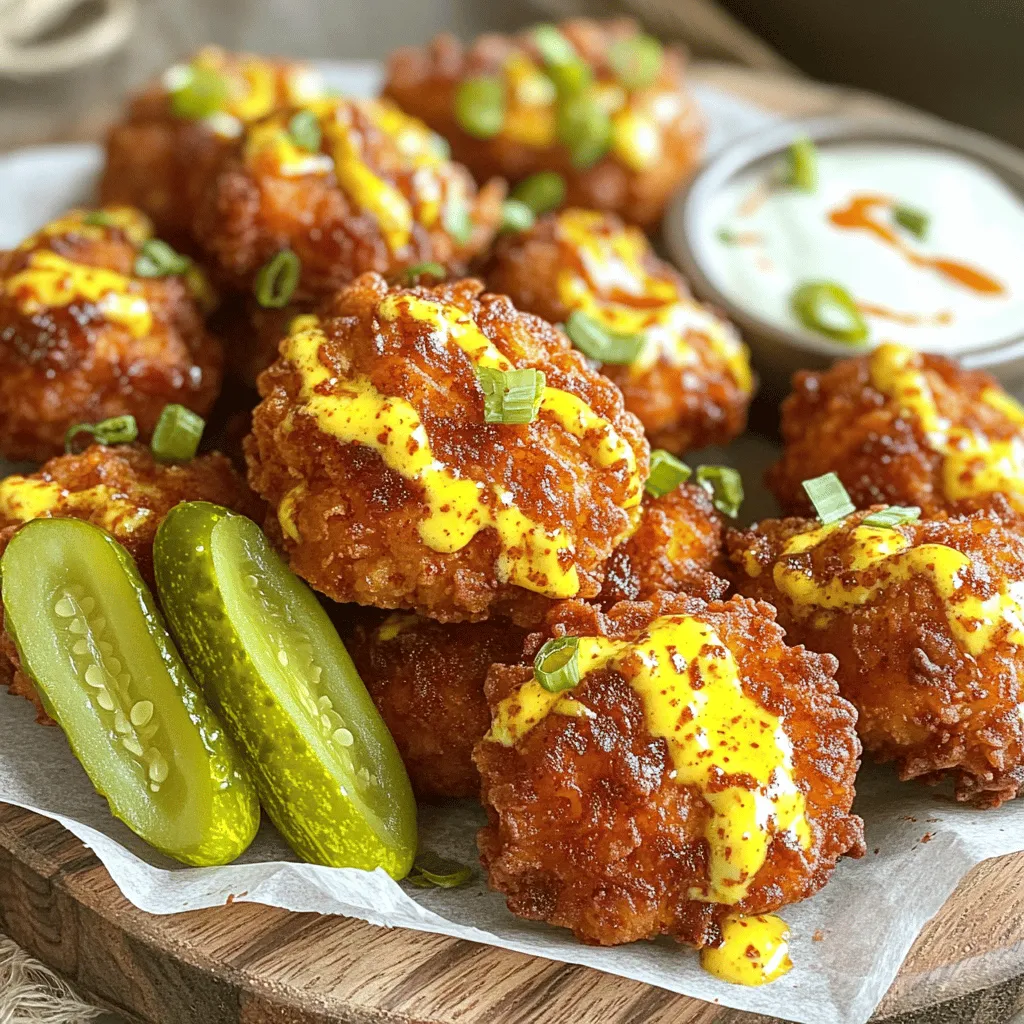
Air Fryer Nashville Hot Chicken Nuggets Crunchy Treat

Are you ready to spice up your snack game? These Air Fryer Nashville Hot Chicken Nuggets are a crunchy treat

To make baked feta pasta, gather these key ingredients: - 200g pasta (penne, rigatoni, or your choice) - 200g feta cheese, block - 300g cherry tomatoes, halved - 1 red bell pepper, diced - 3 cloves garlic, minced - 4 tablespoons olive oil - 1 teaspoon dried oregano - 1 teaspoon red pepper flakes (optional for spice) - Salt and pepper to taste - Fresh basil leaves for garnish - Grated Parmesan cheese for serving (optional) You can add some extra touches to enhance the taste: - A splash of balsamic vinegar for sweetness - A handful of olives for briny goodness - Chopped spinach for added greens - A squeeze of lemon juice for brightness The type of pasta can change your dish’s texture and taste. Here are some great options: - Penne: Its tubular shape holds the sauce well. - Rigatoni: Larger and great for catching chunks of feta. - Fusilli: Twists that grab onto the creamy sauce perfectly. - Farfalle: Bow-tie shapes add a fun look and texture. Choose your pasta based on what you love. Each will make your baked feta pasta unique and delicious! Start by preheating your oven to 200°C (400°F). This step is key for even cooking. Grab a large baking dish and add your cherry tomatoes, diced red bell pepper, and minced garlic. The colors will make your dish look bright. Drizzle 2 tablespoons of olive oil over the veggies. Sprinkle salt, pepper, oregano, and red pepper flakes if you like some heat. Toss everything well. Make sure the veggies are coated with oil and spices. This will help them roast nicely. Now, make a little space in the middle of the veggie mix. Place the block of feta cheese right in that space. Drizzle the remaining olive oil over the feta. This helps it get creamy as it bakes. Put the baking dish in the oven and bake for 25-30 minutes. You want the tomatoes to get blistered and the feta to turn soft and golden. The smell will fill your kitchen, and you’ll know it’s time to check. While the feta and veggies are baking, cook your pasta. Use the package instructions to get it just right. Aim for al dente, so it has a bit of bite. Once cooked, drain the pasta and set it aside. When the baking dish is out of the oven, gently mash the feta with a fork. Mix it with the baked tomatoes and peppers to create a creamy sauce. Then, add the cooked pasta to the dish. Toss everything together until it's well mixed. Adjust the seasoning if needed. Now, you’re ready to serve this tasty dish! To make a creamy sauce, use soft feta. As it bakes, it melts into a rich blend. After baking, mash the feta with the tomatoes and peppers. This mixing creates a smooth sauce. If it feels too thick, add a splash of pasta water. This small step helps blend everything well. Store leftover baked feta pasta in an airtight container. This keeps it fresh for up to three days. When you want to eat it again, reheat it in the oven or microwave. Add a bit of olive oil or water to help it stay moist. This way, every bite remains tasty. Pair your baked feta pasta with a fresh salad. A simple green salad with lemon dressing works well. Garlic bread is another great choice. It adds crunch and flavor to your meal. You can also serve it with roasted vegetables. They bring more color and nutrition to your plate. {{image_2}} You can easily make this dish vegetarian. Simply skip the cheese or use a plant-based feta. This keeps the creamy texture but makes it vegan. You can also add more veggies, like spinach or zucchini. These add color and nutrients. Want more nutrition? Add some cooked chickpeas or lentils. These boost protein and fiber. You can also toss in some fresh spinach or kale. They wilt down nicely and add health benefits. For a crunch, try adding toasted nuts or seeds before serving. If you love spice, add more red pepper flakes. You can also mix in some diced jalapeños for a kick. For extra flavor, try a splash of balsamic vinegar or lemon juice after baking. This brightens the dish and makes it even tastier. To store your baked feta pasta, let it cool completely. Then, place it in an airtight container. This helps keep it fresh. You can keep it in the fridge for up to three days. Make sure to cover it tightly to prevent drying out. When you're ready to eat, reheating is easy. You can use the microwave or the oven. For the microwave, place a portion in a bowl and heat for 1-2 minutes. Stir halfway through. If using the oven, preheat to 180°C (350°F) and bake for about 15-20 minutes. Cover with foil to keep it moist. If you want to save some for later, you can freeze it. First, let the dish cool completely. Then, portion it into freezer-safe containers. It should last up to three months in the freezer. When you want to eat it, thaw it in the fridge overnight. Then, reheat as mentioned earlier. Leftovers of baked feta pasta last about 3 to 5 days in the fridge. Be sure to store it in an airtight container. This keeps the dish fresh and tasty. If you want to enjoy it later, make sure it cools down first. Yes, you can use different cheeses! Creamy goat cheese or even ricotta works well. Each cheese brings a unique taste. Just remember that the texture may change a bit. Feta gives a salty kick, while goat cheese adds a tangy flavor. Absolutely! Baked feta pasta is perfect for meal prep. It is easy to store and reheat. You can make a big batch and divide it into portions for the week. Just keep the sauce and pasta together for the best flavor. This blog discussed baked feta pasta, covering its ingredients, steps, and tips. You learned how to preheat, bake, and mix pasta for the best results. I also shared tricks for storing and reheating leftovers, ensuring you enjoy every bite. You can customize the dish with various flavors and dietary choices, making it your own. Remember, cooking should be fun and delicious. Enjoy experimenting with this simple recipe. It’s a great way to delight your taste buds while making meals that work for you.

Baked Feta Pasta Simple and Flavorful Dish

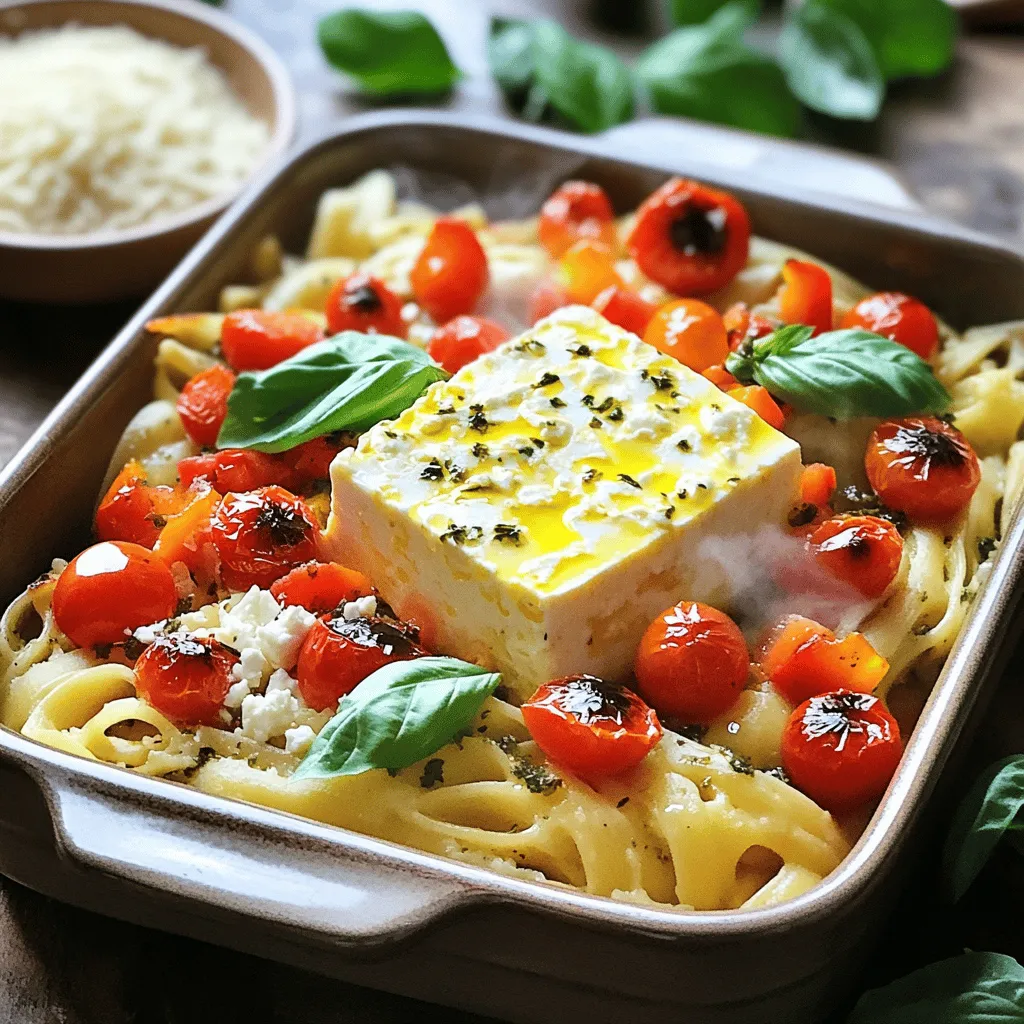
If you’re craving a simple yet tasty meal, you’re in for a treat! Baked Feta Pasta is my go-to dish

- 2 cans chickpeas, rinsed and drained - 1 onion, diced - 3 cloves garlic, minced - 1 red bell pepper, diced - 1 zucchini, sliced - 1 cup cherry tomatoes, halved - 1 teaspoon dried oregano - 1 teaspoon dried basil - 1/2 teaspoon smoked paprika - Salt and pepper to taste - 1 cup vegetable broth - 1 cup heavy cream or coconut milk (non-dairy option) - 1/4 cup feta cheese (optional) - 2 tablespoons olive oil - Fresh parsley for garnish Each ingredient plays a key role in the dish. The chickpeas provide protein and fiber. The onion and garlic add depth and aroma. The red bell pepper and zucchini bring color and texture. Cherry tomatoes offer sweetness and acidity. For spices, oregano and basil give classic Mediterranean flavor. Smoked paprika adds warmth and a hint of smokiness. Salt and pepper enhance all the tastes. The creamy base is what makes this dish truly special. Vegetable broth adds flavor and richness. Heavy cream or coconut milk gives it a velvety texture. Feta cheese, if used, provides a salty finish. Olive oil helps cook the veggies and adds healthy fat. Fresh parsley brightens the dish and makes it look beautiful. When you gather these ingredients, you set the stage for a meal that is hearty, creamy, and full of flavor. - Heat olive oil in a large skillet over medium heat. - Add the diced onion and sauté until it turns translucent, about 3-4 minutes. - Stir in the minced garlic and cook for one minute until fragrant. - Incorporate the diced red bell pepper and sliced zucchini into the skillet. - Stir in the halved cherry tomatoes and rinsed chickpeas. - Mix in the dried oregano, dried basil, and smoked paprika. - Pour in the vegetable broth and bring the mixture to a gentle simmer. - Stir in the heavy cream or coconut milk and let it thicken for about 5 minutes. - If using, sprinkle in the crumbled feta cheese and fold it gently. Season with salt and pepper to taste. - Cut your vegetables evenly. This helps them cook at the same time. - Simmer the dish longer if you want it thicker. Adjust to your taste. - Serve this dish with warm pita bread or fluffy quinoa. Both make great sides. - For a lovely look, add extra parsley and feta on top before serving. - Try using light cream or a non-dairy option like coconut milk. This keeps it creamy. - Feel free to add more veggies, like spinach or kale, for added nutrition. {{image_2}} You can make this dish your own. Try swapping feta cheese for nutritional yeast to keep it vegan. Nutritional yeast adds a cheesy taste without any dairy. You can also mix in other legumes. Black beans or lentils work well and add great texture. Want to brighten the dish? Add a squeeze of fresh lemon juice. It lifts the flavors beautifully. You can also experiment with herbs. Fresh parsley or cilantro can change the taste and make it more vibrant. Feeling adventurous? Make it a stew by adding more vegetable broth. This gives it a nice, hearty feel. If you want convenience, use a slow cooker. Just add all your ingredients, set it, and let it do the work for you. Store leftovers in an airtight container. This keeps your chickpea skillet fresh. Consume within 3-4 days for best quality. The flavors stay rich and delicious during this time. This dish is suitable for freezing. Use freezer-safe containers to store it well. When you want to eat it, thaw overnight in the fridge before reheating. This keeps the texture just right. Reheat on the stovetop for the best texture. The skillet will regain its creamy nature this way. If it thickens too much, add a splash of broth or water. This helps to restore its smooth, creamy consistency. Yes, soak and cook them first before using. Dried chickpeas need to soak overnight. After soaking, boil them until soft. This makes them tender and ready for your skillet dish. Coconut milk or cashew cream works well. Both options add a creamy texture without dairy. Coconut milk gives a slight sweetness, while cashew cream adds a nutty flavor. Yes, it's naturally gluten-free! Chickpeas, veggies, and spices do not contain gluten. Enjoy this dish without worrying about gluten. Add red pepper flakes or diced jalapeños. Both options bring heat and flavor. Start with a small amount and adjust to your taste. Yes, you can prep the ingredients in advance. Chop the veggies and store them in the fridge. This saves time when you’re ready to cook. This blog post covers a tasty chickpea dish. You learned about the main ingredients, cooking steps, and tips to enhance your meal. I shared how to store leftovers and offered ideas for variations. This recipe is flexible and can fit any diet. So grab your ingredients and try this easy dish. Enjoy a meal that is both hearty and healthy!

Creamy Mediterranean Chickpea Skillet Delight

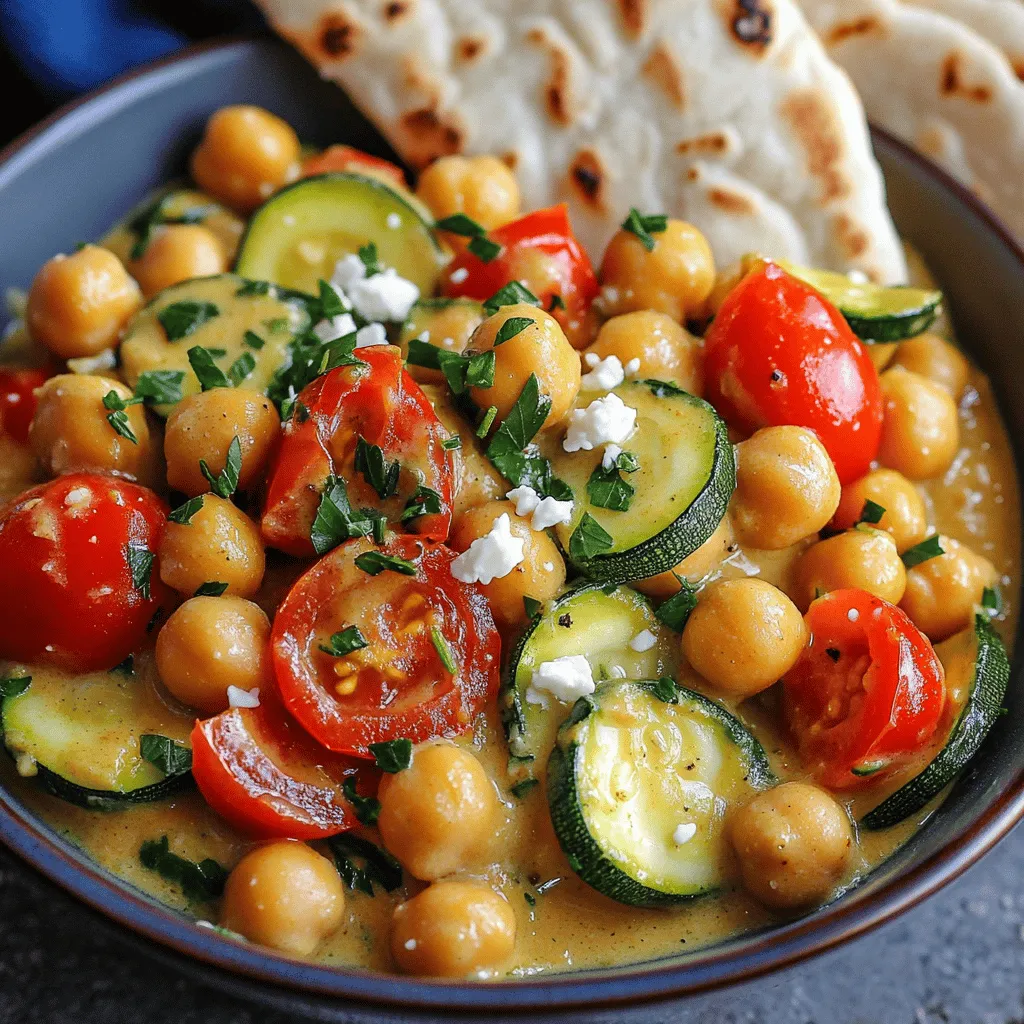
Get ready to enjoy a Creamy Mediterranean Chickpea Skillet Delight that’s both tasty and easy to make! Packed with vibrant

To make this No Bake White Chocolate Peppermint Cheesecake, you will need the following ingredients: - 8 oz cream cheese, softened - 1 cup white chocolate chips - 1 cup heavy whipping cream - 1/2 cup powdered sugar - 1 teaspoon peppermint extract - 1 teaspoon vanilla extract - 1 cup crushed peppermint candies (reserve some for garnish) - 1 pre-made graham cracker crust These ingredients create a rich and creamy cheesecake with a refreshing peppermint flavor. You might want to add some fun and festive touches to your cheesecake. Here are a few ideas: - Extra crushed peppermint candies on top - Whipped cream dollops - Chocolate shavings - Mini candy canes for decoration These garnishes can make your cheesecake look even more appealing and festive. If you need to make changes to the recipe, here are some easy swaps: - Use mascarpone cheese instead of cream cheese for a different flavor. - Swap white chocolate chips with milk chocolate chips for a sweeter taste. - Replace heavy cream with coconut cream for a dairy-free version. - Use granulated sugar in place of powdered sugar if needed. These substitutions can help you customize the cheesecake to fit your taste or dietary needs. Start by melting the white chocolate chips. Use a microwave-safe bowl. Heat the chips in 30-second bursts. Stir the chocolate every time you check it. Keep doing this until it is smooth. Once melted, set it aside to cool a bit. This helps keep your cheesecake creamy. Next, take a mixing bowl and add the softened cream cheese. Beat it for about 2-3 minutes. You want it to be creamy and smooth. Slowly add the powdered sugar, peppermint extract, and vanilla extract. Mix everything together until it is well combined. The mixture should be smooth and ready for the next step. In a separate bowl, whip the heavy cream until stiff peaks form. This usually takes about 3-5 minutes. Be careful not to over-whip it. Gently fold the melted white chocolate into the cream cheese mixture. Make sure it is fully mixed in. Now, carefully fold the whipped cream into this mixture. Use a gentle hand to keep it light and fluffy. Finally, add the crushed peppermint candies, saving some for later. Gently mix them in. Now, your cheesecake mixture is ready for the crust! To get the best texture, start with room temperature cream cheese. This makes mixing easy. When you melt the white chocolate, let it cool a bit before adding it to the cream cheese. If it's too hot, it can make the cream cheese melt. For the whipped cream, beat it until you see stiff peaks. This helps keep your cheesecake airy and light. Serve your cheesecake chilled. You can slice it into neat pieces or use a spoon for a scoop. Add some crushed peppermint candies on top for a pretty look. You can also drizzle some chocolate or caramel sauce for extra fun. If you want to make it more festive, add a sprig of mint or a sprinkle of edible glitter. Do not rush the chilling process. If you serve it too soon, it may fall apart. Make sure to fold the whipped cream gently. If you mix too hard, the cheesecake can lose its fluffiness. Also, remember to reserve some peppermint candy for the top. This small step makes a big difference in how it looks! {{image_2}} You can mix it up with flavors. Try adding raspberry puree for a fruity twist. A dash of orange zest can brighten the taste. For a richer flavor, use dark chocolate instead of white chocolate. You can even add a splash of coffee for a mocha touch. Each change gives a new spin to this treat! Want to make this cheesecake gluten-free? Use a gluten-free graham cracker crust. Many brands offer this option. Check the label to ensure it meets your needs. You can also make a crust from ground nuts or oats. This keeps it tasty and safe for gluten-free guests. Making individual servings is fun and easy! Use small cups or jars for each portion. Just layer the cheesecake mixture like a parfait. This way, everyone gets their own treat. Plus, it looks pretty on a table. You can also serve them at parties or gatherings for a cute touch. Store any leftover cheesecake in the fridge. Use an airtight container for best results. You can also cover it tightly with plastic wrap. This keeps the cheesecake fresh and tasty. Always refrigerate within two hours of serving. You can freeze this cheesecake for later use. First, slice the cheesecake into portions. Wrap each slice in plastic wrap, then place in a freezer bag. Remove as much air as you can. This prevents freezer burn. Enjoy within two months for the best taste. In the fridge, this cheesecake lasts about five days. If you freeze it, the shelf life extends to two months. Always check for signs of spoilage before eating. If it looks or smells off, it's best to discard it. Yes, you can use milk chocolate or dark chocolate. Each type brings a unique taste. Milk chocolate will make it sweeter. Dark chocolate will add a rich, bold flavor. Adjust the amount of sugar if you switch chocolate types. Keep in mind, the peppermint flavor shines best with white chocolate. The cheesecake needs at least 4 hours to set in the refrigerator. For the best taste, I recommend letting it chill overnight. This helps the flavors meld and the texture firm up nicely. A longer chill time makes slicing easier and gives you a smooth, creamy bite. You can try using Greek yogurt or mascarpone cheese. Both add creaminess, but the flavor will change. Greek yogurt gives a tangy taste, while mascarpone is mild and rich. If you choose these options, adjust the sugar to balance their flavors. This way, you can still enjoy a delicious cheesecake. This blog post covers all you need for a delicious cheesecake. You learned about key ingredients and fun garnishes. I shared step-by-step instructions, tips for the best texture, and potential mistakes to avoid. We explored various flavor options and how to store your treat. Finally, I answered common questions about substitutions and setting time. Now you have everything to create your perfect cheesecake. Enjoy your baking and let your creativity shine!

No Bake White Chocolate Peppermint Cheesecake Delight

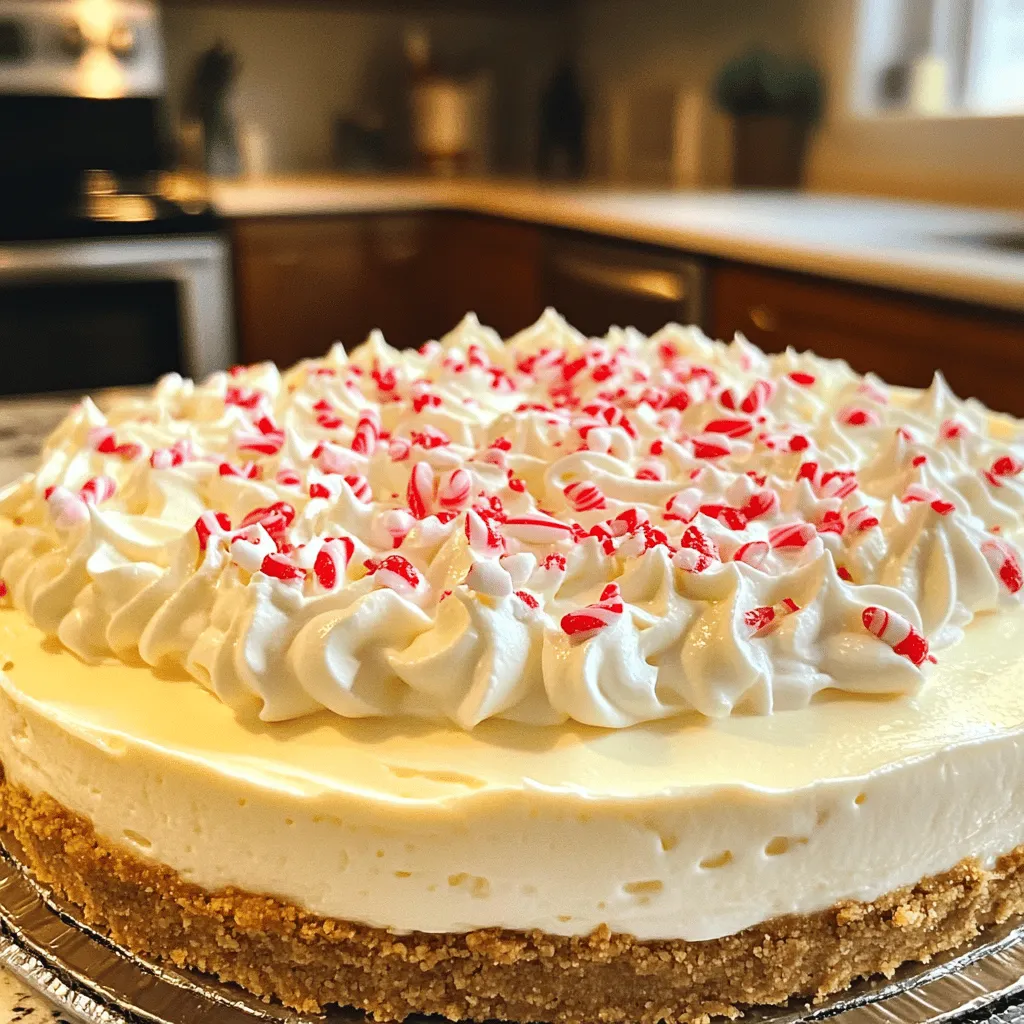
If you love dessert but want something easy, try my No Bake White Chocolate Peppermint Cheesecake Delight! This recipe is

To make Minute Creamy Cajun Sausage Skillet, gather these ingredients: - 12 ounces smoked sausage, sliced (try chicken or turkey for a lighter dish) - 1 tablespoon olive oil - 1 medium onion, chopped - 3 cloves garlic, minced - 1 bell pepper, diced (any color) - 1 cup cherry tomatoes, halved - 1 cup heavy cream - 1 teaspoon Cajun seasoning - 1/2 teaspoon smoked paprika - Salt and pepper to taste - 3 cups cooked penne pasta - 1/4 cup fresh parsley, chopped (for garnish) - Grated Parmesan cheese (for serving) You can swap some ingredients if needed: - Sausage: Use any type of sausage. Chicken or turkey keeps it light. - Cream: For a lighter version, use half-and-half or coconut cream. - Pasta: Any pasta works. Try gluten-free or whole wheat for a healthier choice. - Vegetables: Add zucchini or spinach for extra color and nutrition. - Spices: If you like it spicy, add cayenne pepper or a dash of hot sauce. Fresh ingredients make a huge difference in flavor: - Sausage: Choose sausages with no fillers. Look for natural ingredients. - Vegetables: Pick fresh, firm vegetables. Avoid any that are soft or bruised. - Tomatoes: Look for bright, plump cherry tomatoes. They should smell sweet. - Cream: Use heavy cream for richness. Check the date for freshness. - Parsley: Fresh parsley should look vibrant and green. Avoid wilted leaves. Using quality ingredients leads to a tastier dish. Your Cajun skillet will shine with fresh, flavorful components! Start by gathering all your ingredients. This makes cooking smoother and fun. You will need: - 12 ounces smoked sausage, sliced - 1 tablespoon olive oil - 1 medium onion, chopped - 3 cloves garlic, minced - 1 bell pepper, diced - 1 cup cherry tomatoes, halved - 1 cup heavy cream - 1 teaspoon Cajun seasoning - 1/2 teaspoon smoked paprika - Salt and pepper to taste - 3 cups cooked penne pasta - 1/4 cup fresh parsley, chopped - Grated Parmesan cheese Chop the onion, garlic, and bell pepper. Slice the sausage and halve the cherry tomatoes. Set them aside. This prep helps the dish come together fast. Heat your large skillet over medium heat. Pour in the olive oil. Once hot, add the sliced sausage. Cook it until it turns brown, about 4-5 minutes. Stir often to get even color. Next, toss in the chopped onion, minced garlic, and bell pepper. Sauté these for 3-4 minutes. You want the veggies soft but not mushy. Then, add the cherry tomatoes. Cook for another 2-3 minutes until they start to burst. This adds a sweet touch to your dish. Now it’s time to make it creamy! Pour in the heavy cream. Add the Cajun seasoning, smoked paprika, salt, and pepper. Mix everything well. Bring it to a gentle simmer. The sauce should thicken just a bit. This creamy base is what makes the dish special. It’s almost done! Take your cooked penne pasta and add it to the skillet. Stir to coat the pasta evenly in the sauce. Heat everything through for about 2 minutes. This helps the pasta soak up all the flavors. Once heated, remove the skillet from the heat. Sprinkle fresh parsley on top and adjust the seasoning if needed. Serve hot with grated Parmesan cheese. Enjoy your Cajun goodness! To get the best flavor from your sausage, slice it into even pieces. This helps it cook evenly. Heat your skillet before adding the sausage. Cooking it for about 4-5 minutes gives it a nice brown color. This adds great taste to your dish. You can use chicken or turkey sausage for a lighter meal. A creamy sauce should be smooth and rich. To prevent it from becoming grainy, avoid boiling the heavy cream too rapidly. Always stir gently while adding the cream. This keeps the sauce silky. Mixing in the Cajun seasoning slowly also helps blend the flavors. Serve your Cajun sausage skillet hot for the best taste. Sprinkle fresh parsley on top for color and flavor. Grated Parmesan cheese adds a nice touch, too. For a complete meal, pair it with a fresh salad or crusty bread. This makes each bite more enjoyable! {{image_2}} You can switch out the smoked sausage for chicken or turkey sausage. This change cuts down on fat and calories while keeping flavor. You can also use light cream instead of heavy cream. It makes the dish lighter but still creamy. Fresh veggies are a great addition, too. Think spinach or zucchini for extra nutrients. If you like it spicy, add more Cajun seasoning. You can also try crushed red pepper flakes for a kick. For a milder dish, use less seasoning at first. You can always add more as you go. This way, you control the heat to fit your taste. Penne pasta works great, but feel free to try other options. Fusilli or farfalle can add fun shapes and textures. If you want a grain, quinoa or brown rice can work too. Both give a nutty flavor and can make this dish gluten-free. To keep your creamy Cajun sausage dish fresh, store leftovers in a sealed container. Place it in the fridge within two hours of cooking. It will stay good for up to three days. If you want to enjoy it later, let it cool completely before sealing. This helps keep the dish from getting soggy. When it's time to enjoy your leftovers, reheating is simple. Heat a skillet over medium heat. Add the leftover dish and a splash of water or cream to help it stay creamy. Stir often until it's hot throughout. You can also use a microwave. Place it in a microwave-safe bowl, cover it with a lid, and heat in short bursts. Stir in between to ensure even heating. If you want to store the dish for longer, freezing is a great option. First, let the dish cool completely. Then, place it in a freezer-safe container or bag. Make sure to remove as much air as possible. Label it with the date. You can freeze it for up to three months. When ready to eat, thaw it overnight in the fridge. Reheat it on the stove or in the microwave as mentioned. Yes, you can use different types of sausage. I often use smoked sausage, but chicken or turkey sausage works well too. These options are healthier and still give great flavor. Feel free to experiment with spicy sausage for an extra kick. Each type of sausage adds its own taste to the dish. Try to choose one that you enjoy! To make this dish dairy-free, swap heavy cream for a dairy-free alternative. Coconut cream or cashew cream are good choices. These options keep the dish creamy without using dairy. Make sure to check the labels for added sugars or preservatives. This way, you can enjoy the creamy texture without dairy! You can serve Cajun sausage skillet with various sides. A simple green salad pairs nicely. Rice is another great option to soak up the creamy sauce. You could also serve it with crusty bread for dipping. If you want more veggies, try steamed broccoli or green beans. Each option adds a nice balance to the meal! This blog post covered all you need for a great Cajun sausage skillet. I shared key ingredients and their swaps, plus tips for picking fresh ones. You learned step-by-step how to prep, cook, and pair flavors for a creamy sauce. I also included tips to avoid common mistakes and variations for a personal touch. Remember, you can customize your dish to fit your tastes. Now go ahead and try this recipe. You’ll impress your family or friends with your cooking skills!

Minute Creamy Cajun Sausage Skillet Easy and Delicious

Looking for a quick and tasty meal? Try my Minute Creamy Cajun Sausage Skillet! This dish combines spicy sausage, creamy

- 12 ounces pasta (like penne or rotini) - 4 cups chicken broth - 1 cup cream cheese, softened - 1 cup shredded sharp cheddar cheese - 1 cup shredded mozzarella cheese - 2 fresh jalapeños, diced (remove seeds for less heat) - 1 small yellow onion, diced - 3 cloves garlic, minced - 1 teaspoon smoked paprika - 1/2 teaspoon salt - 1/2 teaspoon black pepper - 1/4 cup green onions, chopped (for garnish) - 1/4 cup crispy fried onions (optional, for garnish) I use a kitchen scale for accuracy. Weigh the pasta to ensure you use 12 ounces. For liquids, measuring cups work well. Use a standard cup for the chicken broth and cheese. Diced veggies can be measured in a cup, too. Feel free to adjust based on your taste. You can add more heat with extra jalapeños. Try using pepper jack cheese for a spicy kick. If you want a crunch, add crispy bacon bits. For a fresh taste, toss in some cherry tomatoes. Each option lets you make this dish your own! First, grab a large pot or deep skillet. Add the diced onion, minced garlic, and jalapeños. Heat the pot over medium heat. Sauté for about 3 to 4 minutes. You want the onion to soften and smell good. This step builds flavor. Now, it's time to add the pasta. Stir in the uncooked pasta along with the chicken broth. Add smoked paprika, salt, and black pepper. Bring this mix to a boil. Once boiling, reduce the heat to a simmer. Cover the pot and cook for about 10 to 12 minutes. Stir occasionally. The pasta should be tender and most liquid should be gone. Once the pasta is cooked, it's cheese time! Add the cream cheese, shredded cheddar, and mozzarella cheese to the pot. Stir until the cheeses melt into a creamy sauce. If it seems too thick, add a splash of chicken broth. Taste and adjust the seasoning. You can add more salt or pepper if needed. Serve hot! Top with chopped green onions and crispy fried onions for a nice crunch. Enjoy your delicious dish! To make your pasta super creamy, you need the right cheeses. Use full-fat cream cheese for the best texture. Mix in sharp cheddar and mozzarella. They melt well and give great flavor. If the sauce is too thick, add a splash of chicken broth. This extra liquid helps it become smooth and rich. Stir the cheese in while the pasta is hot. This helps it melt quickly and evenly. Want to change the heat? You can easily adjust spice levels with jalapeños. For less heat, remove the seeds before chopping. If you want more heat, add extra diced jalapeños or keep some seeds in. Another option is to add a pinch of cayenne pepper. This gives it a nice kick. Always taste before serving to find the right balance of spice for you. Cooking time can vary based on your stove and pot. After adding pasta to the broth, check it around 10 minutes. Stir often to make sure it cooks evenly. If the pasta is still too firm, let it cook a few more minutes. Be careful not to overcook it, as it can become mushy. The pasta should be al dente, meaning it has a slight bite. This keeps it perfect in the creamy sauce. {{image_2}} You can easily make this dish vegetarian. Just skip the chicken broth. Use vegetable broth instead. This keeps all the flavor while making it meat-free. You can add more veggies too. Try bell peppers, spinach, or zucchini. They add color and nutrients. If you want to add meat, chicken or bacon works great. For chicken, cook diced pieces in the pot before adding the other ingredients. This adds a nice flavor. For bacon, cook it crisp first, then mix it in at the end. It gives a smoky taste that pairs well with cheese. Looking for gluten-free options? Use gluten-free pasta made from rice or quinoa. Cook it just like regular pasta, but check the package for timing. This ensures it stays tender. You won't lose any flavor, and everyone can enjoy the dish together! Store your One Pot Cheesy Jalapeño Popper Pasta in an airtight container. Let it cool to room temperature first. Then, place it in the fridge. This dish stays fresh for about 3 to 5 days. Make sure to label the container with the date. This way, you will know when you made it. To reheat, use a microwave or a stovetop. If using a microwave, place a single serving in a bowl. Heat it for 1 to 2 minutes, stirring halfway. On the stovetop, put the pasta in a pan over low heat. Add a splash of chicken broth for moisture. Stir until heated through. This keeps the pasta creamy and tasty. You can freeze this pasta for later. Use a freezer-safe container to store it. Make sure to leave some space at the top, as food expands when frozen. It lasts about 2 to 3 months in the freezer. To enjoy, thaw it in the fridge overnight. Then, reheat as mentioned above. Yes, you can make this pasta ahead. Cook it, let it cool, and store it in the fridge. It stays fresh for up to three days. When you are ready to eat, reheat it in a pot. Add a splash of chicken broth to help with creaminess. If you want a swap, use sour cream or Greek yogurt. Both will add creaminess. You can also try ricotta cheese for a lighter texture. Just keep in mind that flavor may change slightly. To add more heat, use extra jalapeños. You can keep the seeds for more spice. Try adding a dash of cayenne pepper or hot sauce. Both will kick up the heat level. Adjust to your taste for the perfect spicy bite! In this post, we explored key ingredients for a tasty pasta dish, including optional tweaks for your taste. I shared easy steps to sauté veggies, cook pasta, and add cheese for a creamy finish. You now have tips to adjust spice levels and cooking times, plus ways to make it vegetarian or gluten-free. Lastly, I provided storage advice for leftovers and answered common questions. With these insights, you can create a delicious meal that suits your needs. Enjoy the cooking process and have fun experimenting!

One Pot Cheesy Jalapeño Popper Pasta Delight

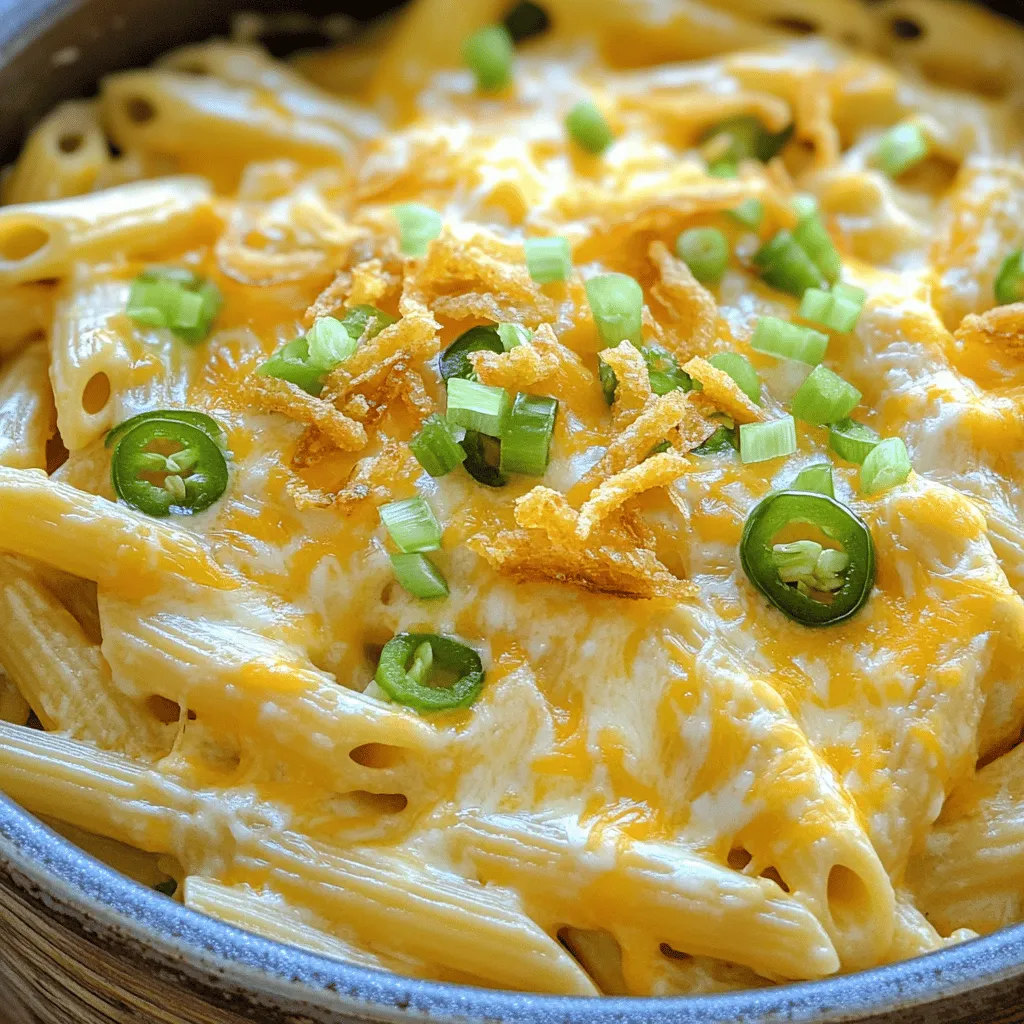
Welcome to a dish that brings the bold flavor of jalapeño poppers to your dinner table! In this One Pot

For your Air Fryer Honey Garlic Tofu Nuggets, you will need: - 1 block (14 oz) firm tofu, drained and pressed - ¼ cup honey (or maple syrup for vegan option) - 2 tablespoons soy sauce - 1 tablespoon minced garlic - 1 teaspoon grated fresh ginger - 2 tablespoons cornstarch - 1 teaspoon paprika - ½ teaspoon salt - ½ teaspoon black pepper - Cooking spray These ingredients come together to create a sweet and savory flavor that pairs well with the crispy tofu. If you're looking to make this dish vegan, simply swap honey for maple syrup. This keeps the sweetness while fitting a vegan diet. To make your dish even better, try adding these garnishes and sauces: - Sliced green onions for freshness - Sesame seeds for crunch - Sweet chili sauce for a spicy kick - Sriracha for extra heat These additions not only enhance the look but also elevate the taste of your tofu nuggets. Enjoy experimenting with these options! First, you need a block of firm tofu. Start by draining it well and pressing it. This helps remove excess water, making the tofu crispier. Cut the tofu into bite-sized cubes and place them in a large bowl. Next, let’s make the marinade. In another bowl, whisk together ¼ cup honey (or maple syrup for a vegan option), 2 tablespoons soy sauce, 1 tablespoon minced garlic, and 1 teaspoon grated fresh ginger. This mixture brings sweet and savory flavors to the tofu. Pour this marinade over the tofu cubes. Gently toss to coat them evenly. Allow the tofu to marinate for at least 10 minutes. This step helps it soak up all that yummy flavor. Now, it’s time to coat the tofu. In a separate bowl, combine 2 tablespoons cornstarch, 1 teaspoon paprika, ½ teaspoon salt, and ½ teaspoon black pepper. Mix it well. Take the marinated tofu and add it to the cornstarch mixture. Toss until every piece is coated. Preheat your air fryer to 375°F (190°C) for about 5 minutes. While it heats, lightly spray the air fryer basket with cooking spray. This helps prevent sticking. Place the coated tofu nuggets in the basket in a single layer. Avoid overcrowding, as this can stop them from getting crispy. Air fry the tofu at 375°F (190°C) for 15-20 minutes. Shake the basket halfway through to make sure they cook evenly. Keep an eye on them. You want them golden and crispy. Once the tofu nuggets are cooked, carefully remove them from the air fryer. Serve them hot, and if you like, drizzle some extra honey on top for added sweetness. Presentation matters, so place the nuggets on a platter. You can garnish with sliced green onions and sesame seeds for a pop of color and flavor. These nuggets pair well with dipping sauces like sweet chili or sriracha. Enjoy this crispy delight! To get your tofu nice and crispy, use firm tofu. Press the tofu well to remove extra water. Cut it into cubes. Coat the cubes in cornstarch. This helps create a crunchy crust when cooked. Don't skip the cornstarch! It makes a big difference in texture. Make sure to space out the tofu in the air fryer. Crowding the basket can lead to soggy nuggets. Marinating tofu is key for great taste. Use a mix of honey, soy sauce, garlic, and ginger. This mix gives a sweet and savory flavor. Let the tofu soak for at least 10 minutes. If you have more time, marinate it longer. You can even do this overnight! The longer it soaks, the better the flavor. Preheat your air fryer to 375°F (190°C). This helps the tofu cook evenly. Arrange the nuggets in a single layer. Shaking the basket halfway through cooking helps them brown evenly. Cook for about 15-20 minutes. Keep an eye out for a golden color. Each air fryer is different, so adjust the time as needed. For added crunch, lightly spray the tofu with cooking spray before frying. {{image_2}} To give your tofu nuggets a kick, add some heat! A spicy honey garlic version is simple to create. Start by mixing in 1 to 2 teaspoons of red pepper flakes into your marinade. You can also use sriracha or chili paste for a deeper flavor. This adds heat without losing the sweet and savory taste. The spicy version pairs well with a cooling dip like yogurt-based sauce. If you need a gluten-free option, swap soy sauce for tamari. Tamari has a similar taste but is made without wheat. You can also check labels on all your ingredients. Ensure they are gluten-free. This way, everyone can enjoy these tasty nuggets without worry! No air fryer? No problem! You can bake or pan-fry these tofu nuggets. For baking, preheat your oven to 400°F (200°C). Spread the tofu nuggets on a baking sheet lined with parchment paper. Bake for 25-30 minutes, flipping halfway, until golden brown. If pan-frying, heat oil in a skillet over medium heat. Fry the nuggets in batches until crispy on all sides. Both methods yield delicious results! To store your honey garlic tofu nuggets, let them cool first. Place them in an airtight container. Make sure to layer parchment paper between the nuggets to keep them from sticking. You can store them in the fridge for up to 4 days. To reheat, use your air fryer for the best results. Set it to 350°F (175°C). Heat the nuggets for about 5-7 minutes. This helps them regain their crispiness. You can also use a microwave, but they won't be as crunchy. Just heat them for about 1-2 minutes. If you want to freeze the nuggets, place them in a single layer on a baking sheet. Freeze them for a few hours until solid. Then transfer them to a freezer-safe bag. They can last up to 3 months in the freezer. When ready to eat, thaw them overnight in the fridge. Then reheat them in the air fryer as mentioned above. No, soft tofu will not work well here. It breaks apart too easily. Firm tofu holds its shape better when you cook it. It gives you that nice, crispy texture you want in these nuggets. Stick with firm tofu for the best results. Cooked tofu nuggets can last about 3 to 5 days in the fridge. Store them in an airtight container to keep them fresh. Just reheat them in the air fryer or oven when you're ready to eat. This keeps them crispy and tasty. You can use maple syrup as a great substitute for honey. It gives you that sweet taste without using honey. Agave nectar also works well if you need a vegan option. Both of these will keep your nuggets sweet and delicious. In this post, we covered how to make tasty tofu nuggets from start to finish. We started with the right ingredients, including options for vegan substitutes. I shared step-by-step instructions on prepping, cooking, and serving. You learned tips for crispy texture and marinating for flavor. We also discussed variations and best practices for storage. Tofu nuggets can be both fun and satisfying. Enjoy experimenting with flavors and cooking methods!

Air Fryer Honey Garlic Tofu Nuggets Crispy Delight

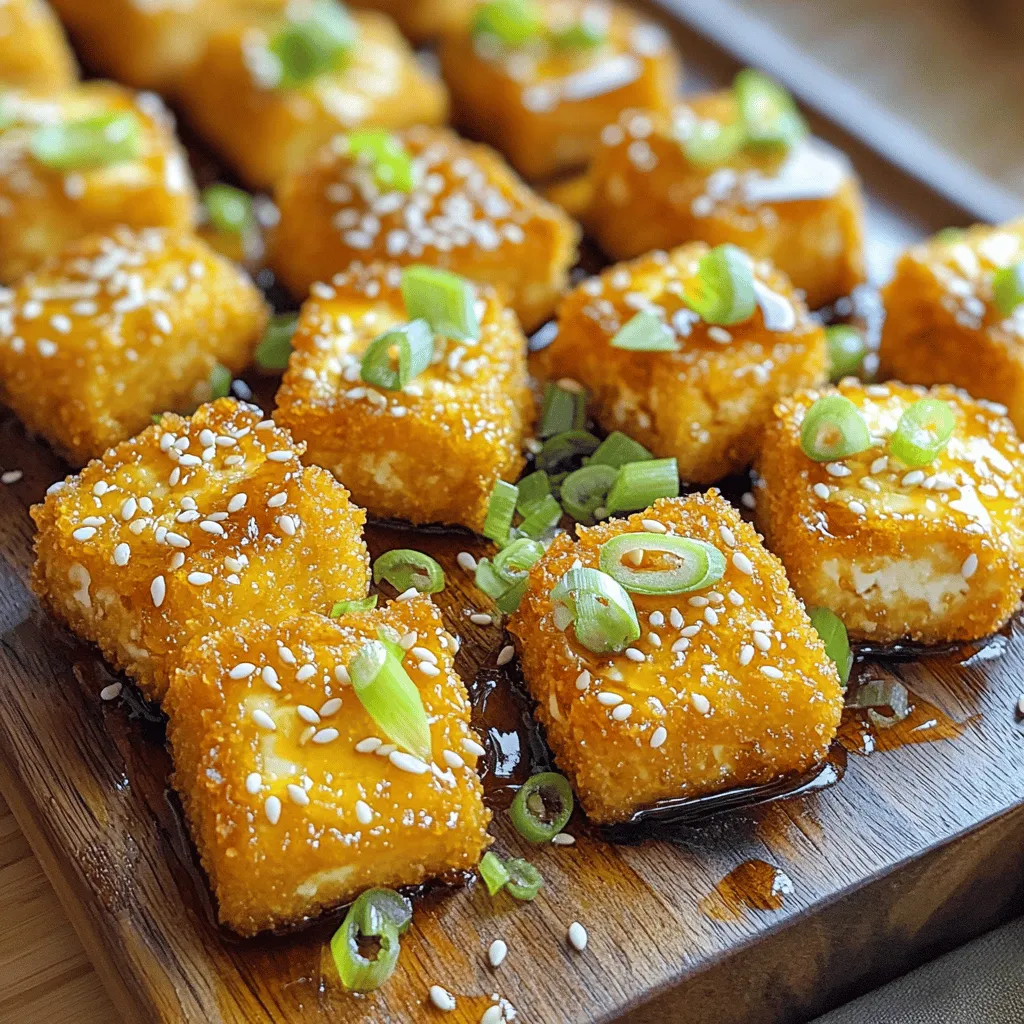
Are you ready to whip up a tasty treat that’s crispy and full of flavor? Air Fryer Honey Garlic Tofu

To make Pumpkin Spice Hot Chocolate Bombs, you need some key ingredients. Each one adds a special touch to the flavor. Here’s what you’ll need: - 1 cup semi-sweet chocolate chips - 1/2 cup white chocolate chips - 1/2 cup hot cocoa mix - 1/4 cup pumpkin puree - 1 teaspoon pumpkin pie spice - 1/4 cup mini marshmallows - A pinch of sea salt - Silicone mold for shaping the bombs Gather these items before you start. The semi-sweet chocolate chips form the base. They melt beautifully and give a rich chocolate taste. The white chocolate chips add a nice drizzle on top, making it pretty. Next, the hot cocoa mix is key for that creamy flavor. Pumpkin puree brings in the fall vibe, while pumpkin pie spice gives that cozy aroma. The mini marshmallows make each sip fun and sweet. A pinch of sea salt enhances all the flavors, making the chocolate taste even better. Finally, the silicone mold helps shape the bombs easily. It’s a fun way to create these treats. With these ingredients, you’re on your way to making a delicious and festive drink! To melt semi-sweet chocolate chips, use a microwave-safe bowl. Place the bowl in the microwave and heat the chocolate in 30-second bursts. Stir between each burst. This helps avoid burning. When the chocolate is smooth, it's ready to use. For coating the silicone mold, take a spoon and scoop some melted chocolate. Spread a thick layer inside each cavity. Make sure the layer is even. This helps the bombs hold their shape. After coating, place the mold in the fridge for about 10 minutes. This will let the chocolate harden. For the pumpkin spice filling, gather these ingredients: - 1/2 cup hot cocoa mix - 1/4 cup pumpkin puree - 1 teaspoon pumpkin pie spice - 1/4 cup mini marshmallows - A pinch of sea salt In a separate bowl, mix the hot cocoa mix, pumpkin puree, pumpkin pie spice, mini marshmallows, and sea salt. Stir well until the mix is smooth. This filling adds a rich flavor to your bombs. Once the chocolate in the mold is hard, carefully take it out. Fill half of the chocolate shells with the pumpkin spice mix. Use about a tablespoon for each shell. This ensures a good amount of filling. To seal the bombs, warm a plate in the microwave for a few seconds. Take the unused chocolate shells and press the open side against the warm plate. Do this just until they start to melt. Quickly press them onto the filled shells. Make sure the edges stick together well. This keeps your filling safe inside. For a decorative touch, melt the white chocolate chips. Use a spoon or a piping bag to drizzle the melted chocolate over the tops of the bombs. This adds a nice look. You can also sprinkle a bit of pumpkin pie spice on top before the chocolate sets. After decorating, place the finished bombs in the fridge. Let them chill for about 15 minutes. This sets everything in place. For best results, check that they feel firm when you touch them. Firmness means they are ready to enjoy! - Use a microwave-safe bowl for melting chocolate. - Melt semi-sweet chocolate chips in 30-second bursts. - Stir between each interval to avoid burning. - Aim for a smooth finish by ensuring no lumps remain. - Try adding caramel or vanilla to your filling for a twist. - Use crushed candy canes or nuts for a different texture. - Get creative with toppings, like drizzled white chocolate. - Add a sprinkle of cinnamon or nutmeg on top for extra flavor. - Serve your hot chocolate bombs in a mug of hot milk. - Watch them melt into a creamy delight! - Top with whipped cream for a rich taste. - A dusting of cinnamon or chocolate shavings makes a nice touch. {{image_2}} You can easily change up the flavor of your pumpkin spice hot chocolate bombs. Try adding caramel or vanilla to the filling for a sweet twist. These flavors blend well with pumpkin spice. You might also want to explore seasonal flavors. Consider adding peppermint for winter or cinnamon for a cozy fall vibe. If you need vegan or dairy-free options, you can use dairy-free chocolate chips. Replace the hot cocoa mix with a vegan version. For a gluten-free treat, check that your cocoa mix is gluten-free. These small changes let everyone enjoy these tasty bombs. Making mini hot chocolate bombs is simple and fun. Use a smaller silicone mold to create bite-sized treats. You will need to reduce the filling amount to fit these smaller shells. Also, adjust the cooking time. They may only need about 5 to 10 minutes in the fridge to set. This way, you can enjoy a sweet treat without feeling too full! To keep your hot chocolate bombs fresh, store them at room temperature. Place them in an airtight container. This way, they will stay safe from moisture. Avoid direct sunlight to prevent melting. If you live in a warm area, consider refrigeration. But, let them sit at room temp for a bit before serving. These homemade treats taste best within two weeks. After that, they may lose flavor. Look for signs of spoilage, like a dull surface or off smell. If they look or smell strange, it’s best to toss them. Make your hot chocolate bombs gift-ready with fun wrapping! Use clear bags tied with ribbons for a nice touch. A cute box with some tissue paper also works well. You can even add a tag with serving tips. This makes your gift special and personal! Pumpkin spice hot chocolate bombs are fun, round treats. They hold rich hot cocoa mix and pumpkin flavor. When you drop them in hot milk, they melt and create a cozy drink. Each bomb is filled with mini marshmallows and spices. They bring the warmth of fall to your cup. Yes, you can find pre-made pumpkin spice hot chocolate bombs online and in stores. Many local shops sell them during fall. Big retailers may also have them in their seasonal section. Look for them in specialty candy stores or bakeries too. You can personalize your hot chocolate bombs in many ways. Try adding your favorite flavors to the filling, like caramel or hazelnut. You can also switch out the mini marshmallows for other treats, like crushed cookies or nuts. For a fun twist, use different colors of chocolate for coating. To enjoy a hot chocolate bomb, follow these simple steps: 1. Heat milk in a pot or microwave until hot but not boiling. 2. Place a hot chocolate bomb in a mug. 3. Pour the hot milk over the bomb. 4. Watch as it melts and mixes. Stir well before drinking. Yes, you can freeze hot chocolate bombs to keep them fresh. Wrap each bomb in plastic wrap and place them in an airtight container. When ready to use, thaw them in the fridge. Freezing may slightly change the texture, but the taste remains delicious. Making pumpkin spice hot chocolate bombs is fun and easy. You’ve learned the key ingredients and steps needed to create these tasty treats. We covered melting chocolate, preparing the filling, and sealing each bomb tightly. You can even customize flavors and decorate them! In the end, these bombs aren't just fun to make; they add joy to chilly days. Remember to store them properly for maximum freshness. Enjoy sharing these delicious bombs with family and friends! Happy crafting!

Pumpkin Spice Hot Chocolate Bombs Irresistible Treat

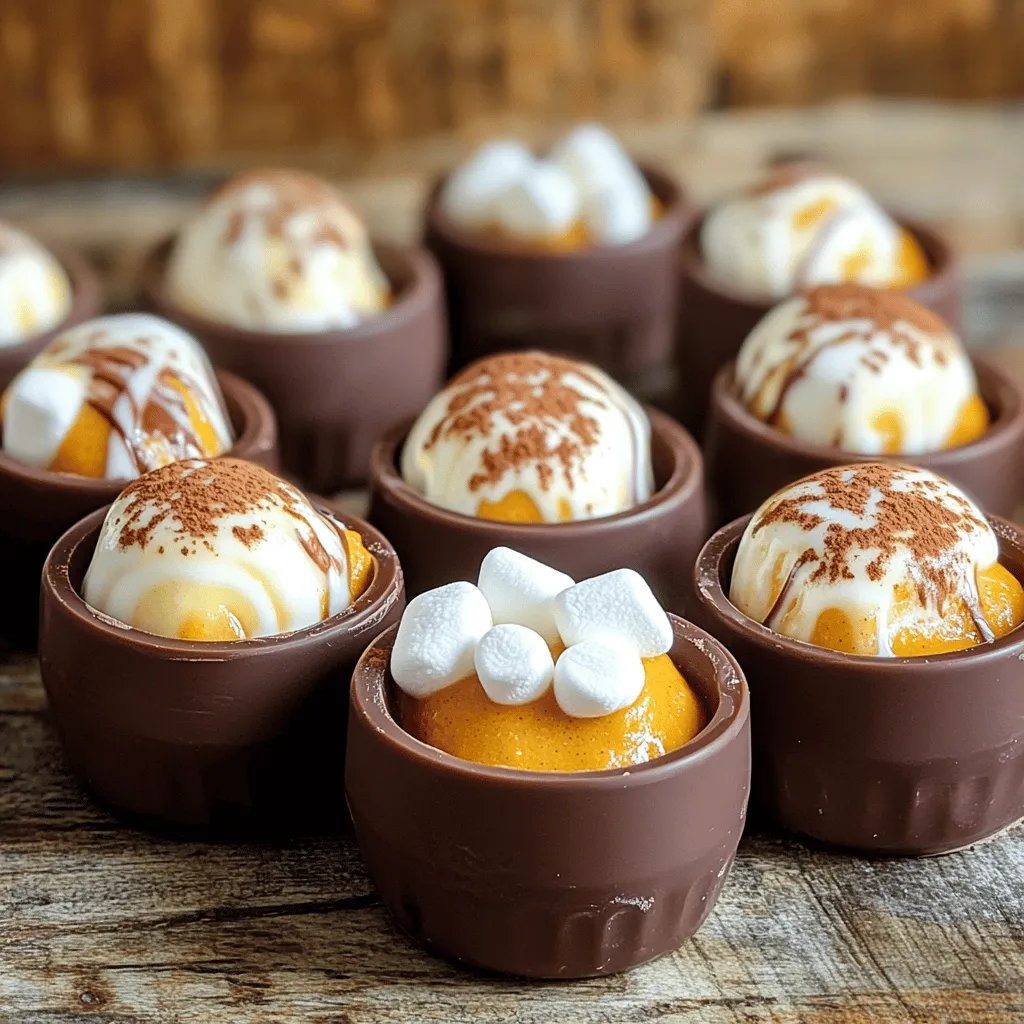
Fall is here, and it’s time to indulge in a cozy treat! Pumpkin Spice Hot Chocolate Bombs blend warm flavors

- 8 slices of thick bread (challah or brioche) - 2 large apples (Granny Smith or Honeycrisp) - 4 large eggs - 1 cup milk - 1/2 cup brown sugar (packed) - 1 teaspoon vanilla extract - 1 teaspoon ground cinnamon - 1/4 teaspoon nutmeg - 1/4 teaspoon salt - 2 tablespoons butter (melted) - Optional: Powdered sugar for dusting, maple syrup for serving Gathering the right ingredients is key. You'll want thick slices of bread. Challah or brioche works best for a soft and rich taste. Next, choose two large apples. Granny Smith or Honeycrisp adds a nice sweet and tart flavor. Make sure you have four large eggs, which create a rich custard. One cup of milk adds creaminess. The brown sugar gives sweetness and depth. Use half a cup, packed tightly. Add one teaspoon of vanilla extract for warmth and flavor. Ground cinnamon brings a familiar taste, so use one teaspoon. A quarter teaspoon of nutmeg adds a subtle spice. Don’t forget a quarter teaspoon of salt to balance the sweetness. Finally, melt two tablespoons of butter to drizzle on top before baking. If you like, have powdered sugar ready for dusting. Maple syrup is a great choice for serving, adding that sweet touch. Preheat your oven to 350°F (175°C). Grease a 9x13 inch baking dish with butter. Cut each slice of thick bread into cubes. Make sure the cubes are even for good baking. In a bowl, combine the diced apples, 1/4 cup of brown sugar, 1/2 teaspoon of cinnamon, and a pinch of salt. Toss the apples well to coat them. Pour the apple mixture over the bread cubes. Distribute the apples evenly so every bite has some fruit. In a large bowl, whisk together the eggs, milk, the remaining 1/4 cup of brown sugar, vanilla extract, cinnamon, nutmeg, and salt. Make sure the mixture is smooth and all ingredients blend well. Pour the egg mixture evenly over the bread and apple mix. Press down gently with a spatula to help the bread soak up the custard. Drizzle the melted butter over the top for added richness. Cover the baking dish with foil. Bake for 30 minutes. After that, remove the foil and bake for an extra 15-20 minutes. Look for a golden brown color and a set custard. Let the French toast bake cool for a few minutes before slicing. For a sweet touch, sprinkle with powdered sugar if you like. Serve warm with maple syrup drizzled on top. Enjoy every bite! When making a French toast bake, the type of bread matters. Thick bread works best. I love using challah or brioche. They soak up the custard well and get soft. If you need gluten-free bread, try a good gluten-free loaf. Whole grain bread is also a great choice for added fiber. For baking, I suggest using tart apples, like Granny Smith or Honeycrisp. These apples hold their shape and add great flavor. When preparing apples, start by peeling them. A simple vegetable peeler works best. Next, cut the apples into quarters, remove the core, and slice them into small pieces. This makes them easy to mix into your dish. To avoid soggy bread, don’t soak the bread for too long. Pour the custard over the bread and apples, then press down gently. This helps the bread absorb just enough liquid. For a golden crust, bake covered for the first part. Uncover it towards the end to allow the top to brown nicely. This gives you a tasty, crunchy top. {{image_2}} You can boost the flavor of your Brown Sugar Cinnamon Apple French Toast Bake. Adding spices like cardamom or ginger brings warmth and depth. You could also mix in some berries or raisins for a fruity twist. These flavors add a new layer of taste, making each bite exciting. If you want to cut back on sugar or fat, there are easy swaps. Use less brown sugar or substitute with a natural sweetener. For a lighter version, consider using almond milk or oat milk instead of regular milk. You can also replace eggs with flaxseed meal or chia seeds mixed with water for a vegan option. These changes keep the dish tasty while being gentle on your diet. Think about serving this dish in different ways. You can make it savory by adding cheese or fresh herbs, like basil or thyme. This gives your bake a unique flavor profile. You can also serve it as a breakfast casserole or a dessert option. With a scoop of ice cream or whipped cream, it can be a sweet treat anytime! To keep your Brown Sugar Cinnamon Apple French Toast Bake fresh, store it in the fridge. Place it in an airtight container or cover it tightly with plastic wrap. This dish lasts about 3 to 4 days in the fridge. For longer storage, you can freeze it. Wrap individual portions in plastic wrap, then place them in a freezer bag. It can stay good for 2 to 3 months in the freezer. When it's time to enjoy leftovers, reheating is key. The best way to warm it up is in the oven. Preheat the oven to 350°F (175°C). Place the dish in for about 15-20 minutes. This method keeps the texture nice. If you need a quick option, use the microwave. Heat it on medium power for 1-2 minutes. Be careful not to overheat, as it can become soggy. Prep is easy with this dish! You can assemble it the night before. Just cover it and let it sit in the fridge overnight. This way, it’s ready to bake in the morning. You can also freeze it before baking. Just prepare it as usual, cover it well, and freeze. When you’re ready, bake it straight from the freezer, but add a few extra minutes to the cooking time. You can prepare your French toast bake the night before. Just follow these steps: - After assembling the bread and apple mixture, cover it with foil. - Place it in the fridge overnight. - In the morning, just bake it straight from the fridge. You may need to add a few extra minutes to the baking time. This way, you save time and enjoy a warm breakfast with ease. Yes, you can use different apples. Granny Smith and Honeycrisp are great choices. They add a nice tartness and firmness. Here are some other options: - Fuji apples for sweetness. - Gala apples for a softer texture. - Braeburn apples for a mix of sweet and tart. Feel free to mix different kinds for added flavor! This French toast bake is tasty on its own, but you can enhance your meal. Here are some great sides: - Bacon or sausage for a savory touch. - Fresh fruit like berries or bananas for brightness. - Whipped cream for a creamy texture. - Nuts like pecans or walnuts for crunch. Maple syrup is a must for drizzling! Cooking your French toast bake takes about 45 to 50 minutes. Here's the breakdown: - Prep time is about 15 minutes. - The initial bake takes 30 minutes covered with foil. - Then, bake uncovered for another 15 to 20 minutes until golden brown. This timing ensures a delicious, custardy bake. Enjoy! This blog post covered everything you need for a delicious Brown Sugar Cinnamon Apple French Toast Bake. You learned about ingredients, step-by-step instructions, and tips for perfect texture. We explored variations and provided storage tips to keep your leftovers fresh. In the end, I hope you feel inspired to try this recipe. It’s simple, tasty, and perfect for gatherings. Enjoy cooking and sharing this delightful dish with friends and family. Happy baking!

Brown Sugar Cinnamon Apple French Toast Bake Delight

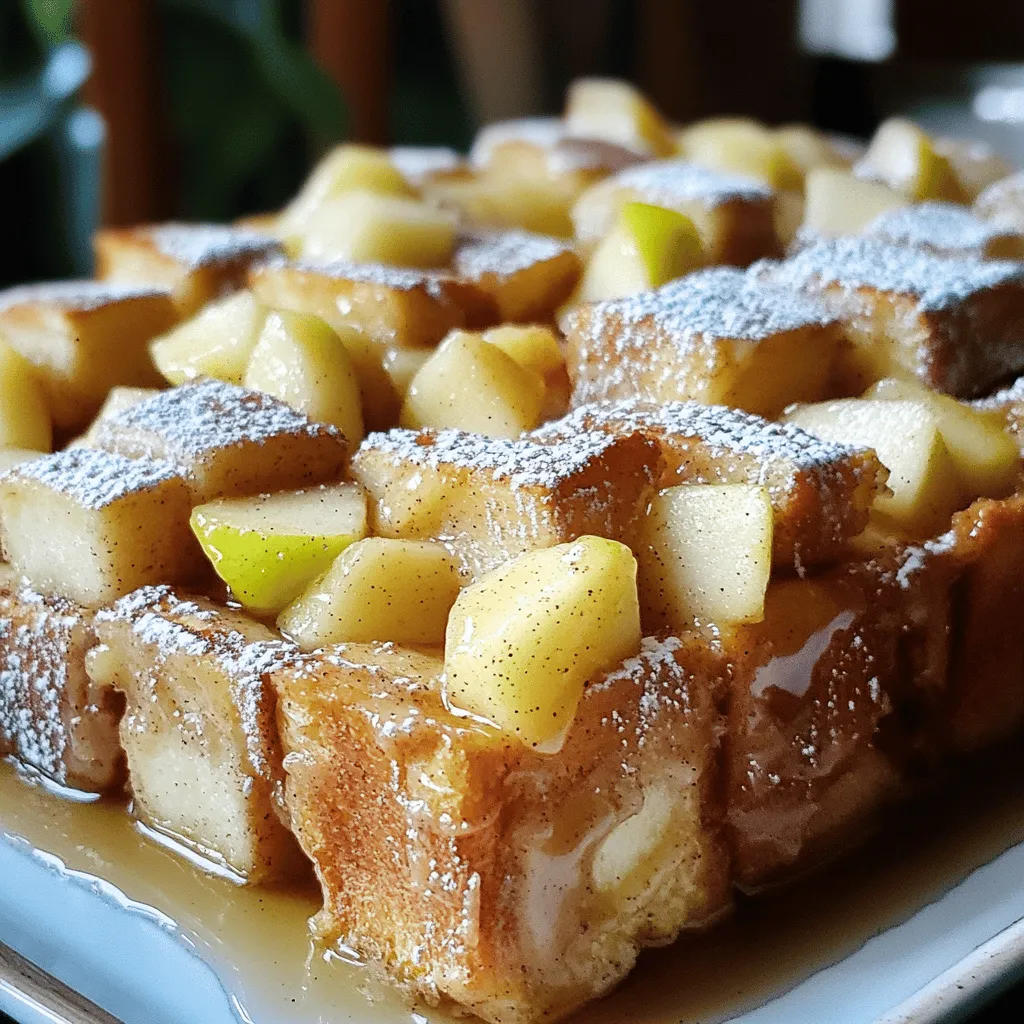
Indulge in the warm comfort of my Brown Sugar Cinnamon Apple French Toast Bake Delight! This delightful dish combines thick

To make Slow Cooker Spicy Black Bean Soup, gather these simple ingredients: - 2 cups dried black beans, rinsed and sorted - 1 medium onion, diced - 3 cloves garlic, minced - 1 red bell pepper, chopped - 1 green bell pepper, chopped - 2 jalapeño peppers, minced (seeds removed for less heat) - 4 cups vegetable broth - 1 can (14 oz) diced tomatoes with green chilies - 2 tablespoons tomato paste - 1 tablespoon ground cumin - 1 tablespoon chili powder - 1 teaspoon smoked paprika - Salt and pepper to taste - Fresh cilantro for garnish - Avocado slices for serving - Lime wedges for serving Each ingredient plays a key role. The black beans are the star, providing protein and fiber. The vegetables add fresh flavor and texture. Broth and tomatoes create a rich base. Spices infuse warmth and depth. The garnishes bring brightness and creaminess to each bowl. Using fresh ingredients makes a big difference. I always recommend choosing ripe tomatoes and fresh herbs. They enhance the soup's flavor and make it more vibrant. This soup not only warms you up but also fills you with wholesome goodness. Each bite is a flavor explosion that delights the senses. - Start with 2 cups of dried black beans. Rinse them well in cold water. Remove any debris or damaged beans. This step is key for a clean soup. - Next, dice 1 medium onion and mince 3 cloves of garlic. Chop 1 red bell pepper and 1 green bell pepper. For heat, mince 2 jalapeño peppers. Remove the seeds for less spice. - In a slow cooker, combine the black beans, onion, garlic, bell peppers, and jalapeños. - Pour in 4 cups of vegetable broth. Add 1 can of diced tomatoes with green chilies and 2 tablespoons of tomato paste. - Stir in 1 tablespoon of ground cumin, 1 tablespoon of chili powder, 1 teaspoon of smoked paprika, and salt and pepper to taste. Mix everything well. - Cover the slow cooker. Cook on low for 8 hours or high for 4 hours. The beans should become tender. - After cooking, use an immersion blender to blend the soup slightly. This gives it a creamier texture. Leave some beans whole for heartiness if you like that. - Taste the soup. Adjust the seasoning as needed. Add more salt, pepper, or spices to match your flavor preference. - Ensuring bean tenderness: Start with good quality dried black beans. Rinse and sort them well. Soaking beans overnight helps them cook faster. However, you can skip soaking if you use a slow cooker. Cook them on low for about eight hours or on high for four hours. Check them for tenderness before you blend. - Blending techniques for texture: For the best texture, use an immersion blender. Blend just enough to create a creamy soup while keeping some beans whole. This adds heartiness and depth. If you don’t have an immersion blender, transfer a portion to a regular blender. Just be careful with hot liquids. - Recommended spices and herbs: This soup shines with cumin, chili powder, and smoked paprika. These spices bring warmth and depth. For a fresh kick, add chopped cilantro before serving. You can also experiment with a pinch of cayenne if you want more heat. - Suggestions for serving accompaniments: Serve the soup with creamy avocado slices and lime wedges. These toppings add richness and brightness. Warm tortilla chips are great for dipping, too! - What to do if soup is too thick/thin: If your soup is too thick, add a bit of vegetable broth or water. Stir well and heat until blended. If it’s too thin, let it cook longer uncovered to thicken up. You can also mash some beans against the side of the slow cooker for a thicker texture. {{image_2}} You can change beans based on what you have. Canned beans save time. Just rinse and drain them before adding to the pot. Dried beans need more care. You must soak them overnight and rinse well. For veggies, feel free to swap. Use corn for sweetness. Carrots add crunch. Spinach or kale boosts color and nutrition. Get creative with what you like! This soup fits many diets. It’s vegan by nature, as it only uses plant-based ingredients. For gluten-free, check the broth label. Most brands are safe, but it's best to be sure. Want low-sodium? Use low-sodium broth and skip added salt at first. You can always adjust the flavor later! Spice level is key for enjoyment. If you want less heat, take out the seeds from jalapeños. You can also reduce the number of peppers. For more heat, add a dash of cayenne pepper or a splash of hot sauce. Always taste as you go! Store leftover spicy black bean soup in an airtight container. Let it cool for about 30 minutes before sealing. This helps keep the flavor fresh. You can keep it in the fridge for up to five days. For freezing, use a freezer-safe container or freezer bag. Leave some space at the top for expansion. The soup can stay good in the freezer for up to three months. When you are ready to enjoy it, thaw it overnight in the fridge. To reheat the soup, use the stove for best results. Pour the soup into a pot and heat it on low. Stir often to keep it from sticking. You can also use a microwave. Place the soup in a microwave-safe bowl and cover it loosely. Heat in short bursts, stirring in between. This keeps the flavor strong and the texture nice. Can I use canned black beans instead of dried? Yes, you can use canned black beans. Drain and rinse them before adding. Use 3 cans instead of dried beans. This saves cooking time and makes the soup quicker to prepare. How to make this soup more or less spicy? To increase spice, add more jalapeños or use spicy chili powder. For less heat, remove the seeds from jalapeños. You can also use fewer jalapeños or replace them with sweet bell peppers. What can I serve with spicy black bean soup? This soup pairs well with rice or cornbread. You can also enjoy it with tortilla chips. A simple salad or avocado slices on top adds freshness. Each serving has about 250 calories. It contains 12 grams of protein, 40 grams of carbs, and 5 grams of fat. The soup is rich in fiber, thanks to the black beans and vegetables. The soup lasts in the fridge for about 5 days. Make sure to store it in an airtight container. If you want to keep it longer, freeze it for up to 3 months. Always reheat it until hot before eating. This blog post covered making a delicious black bean soup. We explored the key ingredients, from dried black beans to fresh veggies and spices. The step-by-step instructions made cooking easy, ensuring great results. I shared useful tips for flavor and texture, plus storage and variation ideas. With these details, you can now create a tasty soup that fits your needs. Enjoy your cooking and the wonderful flavors in every bowl!

Slow Cooker Spicy Black Bean Soup Flavor Explosion

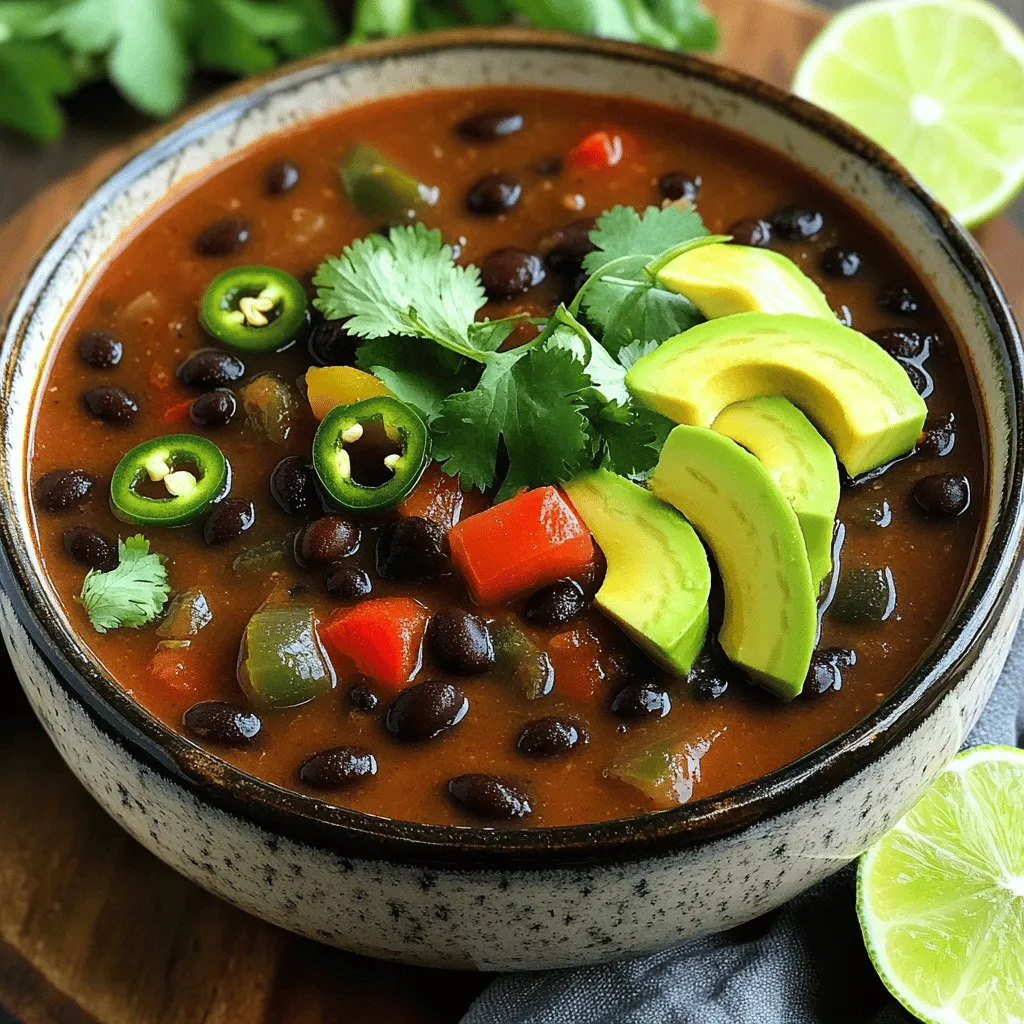
Are you ready to take your taste buds on a thrilling ride? This Slow Cooker Spicy Black Bean Soup offers

Older posts
Newer posts
← Previous Page1 … Page31 Page32 Page33 … Page86 Next →

dsad

© 2026 Cooking Wells • Built with GeneratePress

Our Policies

  • Copyright Policy
  • Cookie Policy
  • GDPR Policy
  • Privacy Policy
  • Disclaimer
  • Terms Of Use

More Information

  • Home
  • About
  • Contact
  • Appetizers
  • Dessert
  • Dinner
  • Drinks
©2026, Cooking Wells About Back To Top