Skip to content
DisclaimerTerms Of UseGDPR PolicyCookie Policy

Cooking Wells

  • Home
  • Drinks
  • Appetizers
  • Dinner
  • Dessert
  • About
  • Contact
  • Privacy Policy
DisclaimerTerms Of UseGDPR PolicyCookie Policy

NO-ING-IMG

- 1 lb large shrimp, peeled and deveined - 8 small corn tortillas - 1 tablespoon olive oil - 1/4 cup sweet chili sauce - 1 teaspoon lime zest - 2 tablespoons fresh lime juice - 1 teaspoon garlic powder - 1/2 teaspoon ground cumin - 1 cup shredded red cabbage - 1 avocado, sliced - Fresh cilantro leaves for garnish - Lime wedges for serving For these sweet chili shrimp tacos, you need a few key ingredients. First, use large shrimp. They give you a nice bite. Next, grab some corn tortillas. They add texture and flavor. The marinade makes the shrimp shine. You’ll need olive oil to help blend flavors. Sweet chili sauce brings a kick of sweetness. Lime zest and juice add brightness. Garlic powder gives depth, while ground cumin adds warmth. Toppings are where you can get creative. Shredded red cabbage adds crunch. Avocado gives creaminess. Fresh cilantro brightens each bite. Don't forget lime wedges. They add a tangy punch when squeezed on top. Gather these ingredients, and you're ready to start cooking! First, gather your marinade ingredients. In a bowl, mix the sweet chili sauce, lime zest, lime juice, garlic powder, and ground cumin. This mix will give your shrimp a tasty kick. Next, add the shrimp to the bowl. Stir well to coat each shrimp evenly. Let the shrimp marinate for 15 to 20 minutes. This time allows the shrimp to soak up all those great flavors. Now it’s time to cook the shrimp. Heat the olive oil in a skillet over medium-high heat. Once the oil is hot, add the marinated shrimp. Cook the shrimp for about 2-3 minutes on each side. You want them to turn pink and opaque. Keep an eye on them to avoid overcooking, as this can make them tough. While the shrimp cook, warm your corn tortillas. Use a separate skillet on low heat. Flip them until they’re soft and pliable. Once the shrimp are done, it’s time to assemble your tacos. Place a few shrimp in the center of each tortilla. Top with shredded cabbage, avocado slices, and finish with fresh cilantro. Enjoy your flavorful sweet chili shrimp tacos! To get the best flavor and texture, do not overcook the shrimp. When shrimp cook, they turn pink and opaque. If you cook them too long, they become tough. Cook the shrimp for about 2-3 minutes on each side. Keep an eye on them and remove them from the heat as soon as they are done. This way, they will remain juicy and tender. Warming corn tortillas is simple and adds great taste to your tacos. The best way is to use a skillet on low heat. Place the tortillas in the skillet for about 30 seconds on each side. Flip them carefully to avoid tearing. You can also wrap them in a damp paper towel and microwave for about 20 seconds. This method keeps them soft and pliable. Making your tacos look good can make them taste better. Start with a clean plate. Stack the shrimp nicely in the center of each tortilla. Add a generous amount of shredded red cabbage for color. Place a few avocado slices on top for a creamy touch. Finish with fresh cilantro leaves for a pop of green. Serve with lime wedges on the side for an extra zing. This makes for a beautiful taco platter that will impress anyone! {{image_2}} You can switch up the flavor by using different sauces. If you want a spicy kick, try sriracha or chipotle sauce. For a tangy twist, use a mango salsa. You can also mix in some soy sauce for an Asian flair. Each sauce brings its own unique taste to the shrimp. Experimenting with these options can create fun meals. While avocado and cabbage are great, don’t stop there! You can add fresh diced tomatoes for a juicy burst. Crumbled queso fresco gives a creamy texture. Pickled red onions add a nice zing. You might also enjoy some sliced jalapeños for heat. These toppings can help you make a taco that suits your taste. If you want a gluten-free meal, try lettuce wraps instead of corn tortillas. Butter lettuce or romaine works well. They give a nice crunch and hold the shrimp well. Simply place the shrimp and toppings inside the leaves. This option is light and fresh, perfect for those avoiding gluten. To store leftover shrimp, first cool them down. Place the shrimp in an airtight container. You can keep them in the fridge for up to three days. If you want to store them longer, freeze the shrimp. Just put them in a freezer-safe bag. Make sure to remove as much air as possible to prevent freezer burn. When you reheat shrimp, do it gently. You can use a skillet on low heat. This keeps the shrimp moist. Stir them often to heat evenly. If you have leftover tortillas, warm them in a skillet too. This makes them soft and tasty again. You can also use the microwave, but be careful. Heat in short bursts to avoid overcooking. For meal prep, you can marinate shrimp in advance. Just store the shrimp in the marinade in the fridge for a few hours. This adds flavor and saves time. You can also chop veggies like cabbage and avocado ahead of time. Store them in separate containers. This way, you can assemble tacos quickly during the week. You can use several healthy swaps. Choose whole grain tortillas instead of corn. They add fiber and nutrients. Use less sweet chili sauce. You can mix in a little Greek yogurt for creaminess. Add more veggies like bell peppers or radishes. They boost the nutrition and crunch. Using grilled shrimp instead of pan-fried can also cut down on oil. Yes, you can use frozen shrimp. Just make sure to thaw them first. Place them in cold water for about 15 minutes. This keeps them juicy. Frozen shrimp can save time, but fresh shrimp often taste better. If you use frozen, check the package for cooking times. They may need a bit longer to cook. A few tasty sides go well with these tacos. Try a fresh mango salsa. It adds sweetness and brightness. A side of black beans is another great choice. They provide protein and fiber. You can also serve a simple green salad with lime vinaigrette. It complements the flavors of the tacos well. Sweet chili shrimp tacos are easy to make and full of flavor. You can marinate fresh shrimp and cook it quickly. Warm corn tortillas hold all the tasty toppings well. Remember to avoid overcooking shrimp for the best taste. Feel free to explore different sauces and toppings. Store leftovers correctly to enjoy later. With meal prep tips, you can make this dish fast. Enjoy your delicious tacos and share them with friends!

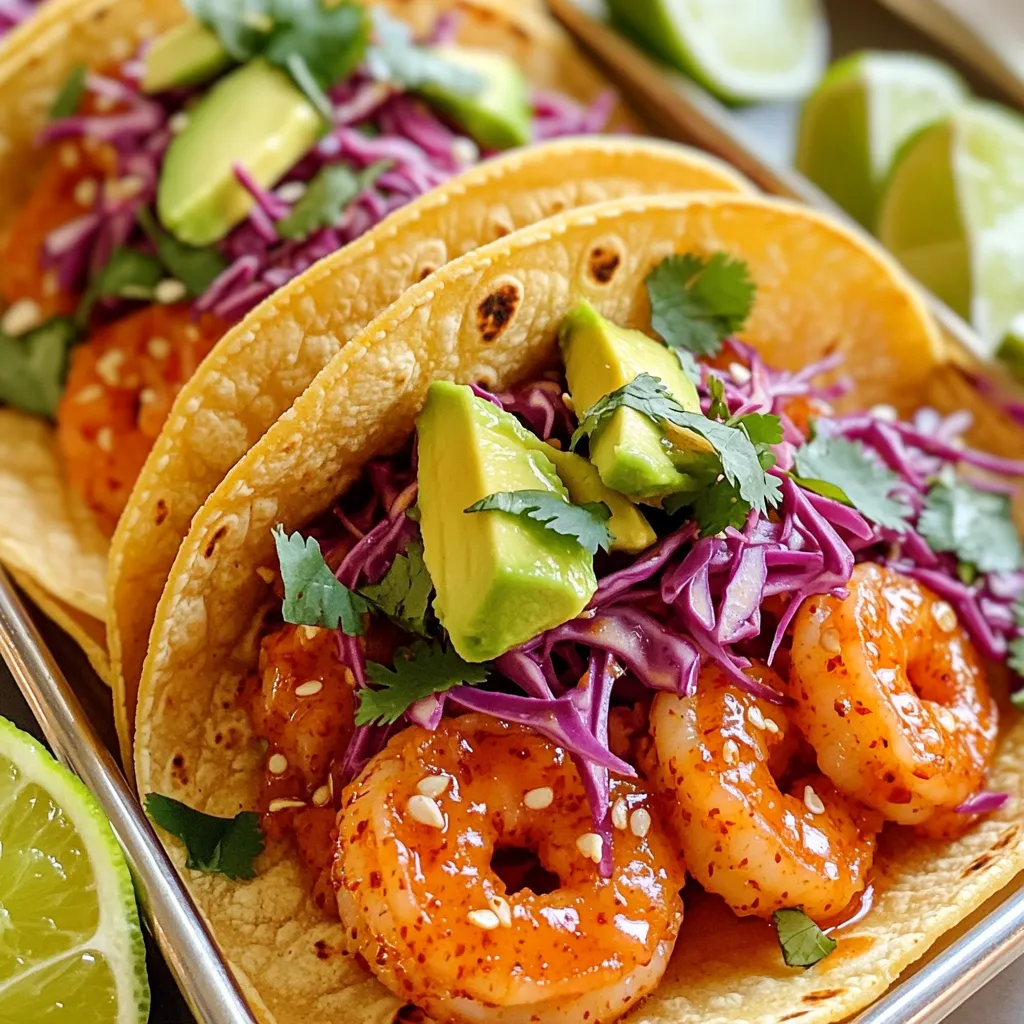
Sweet Chili Shrimp Tacos Flavorful and Quick Recipe

Looking for a quick and tasty meal? Sweet Chili Shrimp Tacos are here to save the day! With just a

- 2 ripe avocados, pitted and peeled - 2 cloves garlic, minced - 1 tablespoon fresh lemon juice The main ingredients are key to this dish. Ripe avocados give a rich, creamy base. Garlic adds a punch of flavor. Fresh lemon juice brightens the taste and keeps avocados from browning. - 1/4 cup fresh basil leaves - 1/4 cup Greek yogurt or plant-based yogurt - 1/4 teaspoon red pepper flakes (optional) Fresh basil brings a lovely herbal note. Greek yogurt adds creaminess and tang. Red pepper flakes give a hint of heat but are optional. - 8 ounces whole wheat spaghetti or your choice of pasta - Salt and pepper to taste - 1/4 cup cherry tomatoes, halved (for garnish) - Fresh basil leaves for garnish Whole wheat spaghetti makes this dish a bit healthier. Season with salt and pepper to enhance flavors. Cherry tomatoes add color and sweetness, while fresh basil leaves provide a fresh finish. Gather all these ingredients for a simple yet delicious meal that feels gourmet! 1. Boiling water and salt: Start by filling a large pot with water. Add a good pinch of salt. Heat the pot on high until the water boils. 2. Cooking spaghetti until al dente: Once the water is boiling, add 8 ounces of spaghetti. Cook it according to the package instructions. You want it to be al dente, which means it should still have a little bite to it. 3. Reserving pasta water: Before draining the spaghetti, take out 1/2 cup of the pasta water. This will help adjust the sauce later. Drain the spaghetti and set it aside. 1. Combining ingredients in a food processor: Take 2 ripe avocados, 2 minced garlic cloves, 1 tablespoon of fresh lemon juice, and 1/4 cup of fresh basil leaves. Add 1/4 cup of Greek yogurt too. If you like a little heat, add 1/4 teaspoon of red pepper flakes. 2. Achieving smooth and creamy consistency: Place all these ingredients in your food processor. Blend them until the mixture is smooth and creamy. If it feels too thick, slowly add some reserved pasta water until you get the right texture. 1. Mixing the drained spaghetti with avocado sauce: In a large bowl, place the drained spaghetti. Pour your creamy avocado sauce over the pasta. 2. Adjusting texture with reserved pasta water: Toss the spaghetti gently to coat it with the sauce. If it seems dry, add a bit of the reserved pasta water. This helps make it silky and smooth. To make the sauce taste great, start with salt and pepper. Add a little, mix, and taste. If it needs more flavor, add more salt or pepper. You can also adjust the sauce's thickness. If it feels too thick, add some reserved pasta water. This will help make it smooth and creamy. When you serve the pasta, use a large bowl. Twirl the pasta for a neat look. This makes it more fun to eat. For extra flavor and color, sprinkle halved cherry tomatoes on top. Fresh basil leaves also add a nice touch. They brighten up the dish and add a fresh taste. Avocados are packed with healthy fats. They help keep your heart healthy. Whole wheat pasta gives you fiber, which is good for digestion. If you want a dairy-free option, use plant-based yogurt. It keeps the creaminess while making the dish vegan-friendly. Enjoy this tasty meal while knowing it's good for you! {{image_2}} You can get creative with your pasta choice. Instead of whole wheat spaghetti, try: - Zucchini noodles for a low-carb option. - Gluten-free pasta if you need to avoid gluten. - Chickpea or lentil pasta for added protein. Switching herbs can change the flavor. Experiment with: - Fresh cilantro for a zesty kick. - Parsley for a mild, fresh taste. - Oregano for a warm, earthy note. Adding protein makes this dish heartier. For a meat option, consider: - Grilled chicken for a classic pairing. - Shrimp for a seafood twist that adds flavor. If you prefer a vegetarian approach, try: - Chickpeas for a protein-rich addition. - Tofu for a creamy texture and extra nutrients. - Edamame for added crunch and protein. You can easily adjust this recipe for dietary needs. If gluten-free is a must, choose: - Brown rice pasta for a similar texture. - Quinoa pasta that packs a nutritional punch. For a vegan version, skip the yogurt and use: - Silken tofu blended for creaminess. - Coconut cream for a rich texture without dairy. After enjoying your creamy avocado pasta, store any leftovers in the fridge. First, place the pasta in an airtight container to keep it fresh. The creamy avocado sauce stays good for about 2 days. If you notice browning, it's just the avocado's natural reaction. A splash of lemon juice can help slow that down. To reheat your pasta, use a gentle method to keep the texture nice. You can warm it on the stove over low heat. Add a splash of water to keep it creamy. Stir often to prevent sticking. If you want to refresh the flavors, add a bit more lemon juice or fresh basil before serving. You can freeze the avocado sauce, but it may change in texture. To freeze, place it in a freezer-safe bag or container. Remove as much air as possible to prevent freezer burn. When you’re ready to use it, defrost it in the fridge overnight. Blend again to smooth it out before mixing with pasta. You can use many types of pasta for creamy avocado pasta. I recommend whole wheat spaghetti for its nutty flavor. You can also try gluten-free pasta or even zoodles for a lighter option. Each type brings its own taste and texture, so feel free to experiment. Just choose a pasta shape that holds sauce well, like fusilli or penne. Making creamy avocado pasta is quick and easy. It takes about 10 minutes to prep the ingredients. Cooking the pasta adds another 10 minutes. So, in total, you need about 20 minutes from start to finish. This makes it a perfect dish for busy weeknights or last-minute gatherings. Yes, you can prepare creamy avocado pasta ahead of time. Cook the pasta and store it separately from the sauce. You can blend the avocado sauce a few hours before serving. Just keep it in the fridge. When you're ready to eat, mix them together. If the sauce thickens, add a bit of reserved pasta water to loosen it up. This way, you still get that creamy goodness! This blog post covered how to make delicious creamy avocado pasta. You learned about key ingredients like ripe avocados, garlic, and fresh lemon juice. We walked through cooking methods and tips for perfect sauce texture. You discovered variations, protein options, and storage tips to keep your dish fresh. Enjoy experimenting with this easy recipe. It's not just tasty; it's healthy too! Now, you can impress anyone with a simple, flavorful meal.

Creamy Avocado Pasta Delicious and Simple Recipe

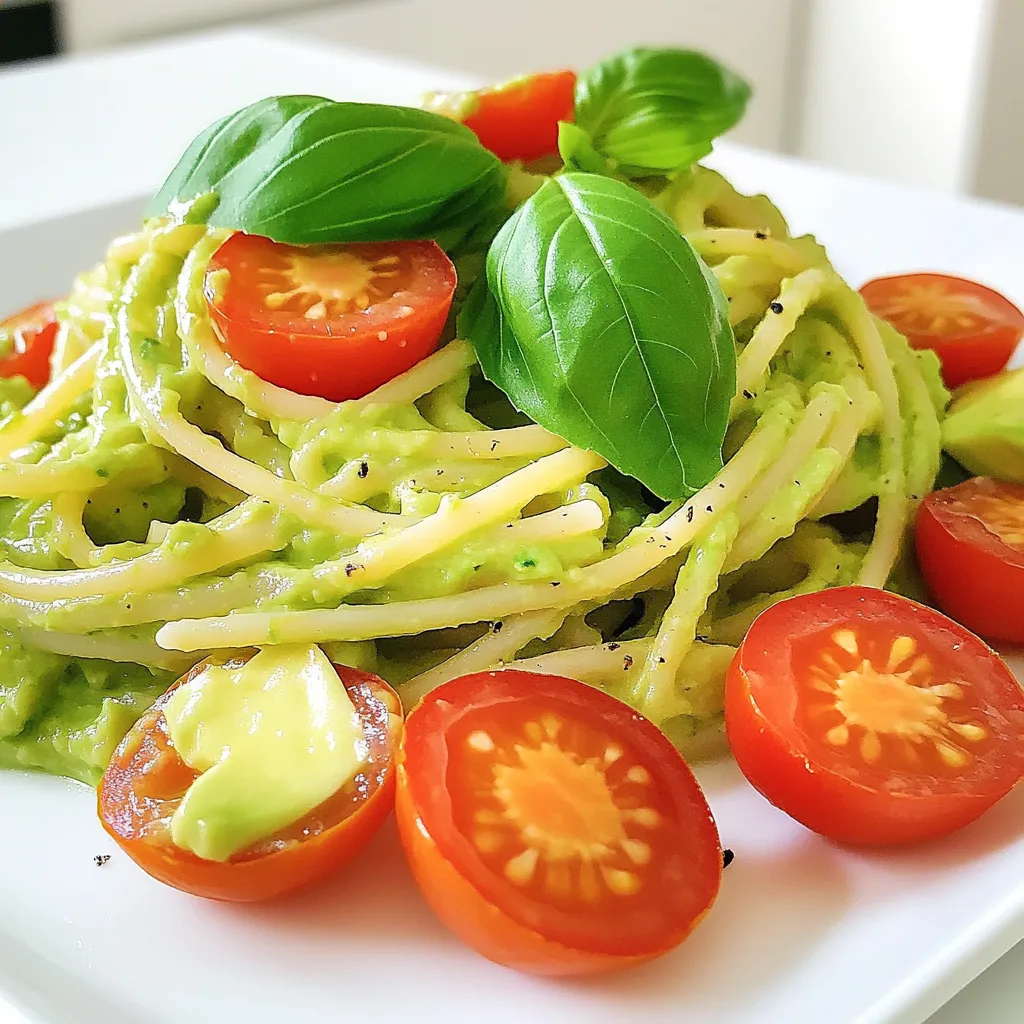
Are you craving a dish that’s both easy and delicious? Look no further than this creamy avocado pasta! With ripe

- 2 cups fresh strawberries, hulled and sliced - 1 cup heavy whipping cream - 1 cup sweetened condensed milk Fresh ingredients make this dessert shine. Strawberries are juicy and sweet. Heavy whipping cream adds a rich texture. Sweetened condensed milk gives the cake depth and sweetness. - 1 package (14 ounces) of graham crackers - 1/4 cup powdered sugar - 1 teaspoon vanilla extract - 1 tablespoon lemon juice Graham crackers are the base of the cake. They provide a crunchy layer. Powdered sugar sweetens the cream. Vanilla extract adds flavor. Lemon juice brightens the taste of the strawberries. - Fresh mint leaves for garnish - Sugar for macerating strawberries Fresh mint leaves make a nice touch. They add color and flavor. You can sprinkle sugar on the strawberries to enhance their sweetness. This step is optional but can make a tasty difference. - In a medium bowl, combine 2 cups of sliced strawberries with 1 tablespoon of lemon juice. - If you like, add 1 tablespoon of sugar to sweeten them. - Let the mixture sit for about 10-15 minutes. This helps the strawberries release their tasty juices. - In a large bowl, beat 1 cup of heavy whipping cream until it gets thick. - Slowly add 1 cup of sweetened condensed milk and 1 teaspoon of vanilla extract. - Keep beating until soft peaks form. This mixture will be creamy and light. - Start with a layer of graham crackers in a 9x13 inch baking dish. - Use a spatula to spread a layer of the cream mixture over the crackers. - Next, spoon a layer of the prepared strawberries on top of the cream. - Repeat these layers until you reach the top. Finish with a layer of cream and a few strawberries for a pretty touch. - Cover the dish with plastic wrap. - Place it in the fridge for at least 4 hours, or better yet, overnight. - Chilling is key. It helps the flavors mix and makes the graham crackers soft and tasty. Layering is key to the success of your Strawberry Shortcake Icebox Cake. Start with a clean baking dish. Use a 9x13 inch dish for the best fit. Place the graham crackers flat to cover the bottom. Ensure the cream mixture is spread evenly. Use a spatula to smooth the cream so it coats the crackers well. When adding strawberries, spoon them gently. This way, you keep their juices in the cream. The cream texture matters for this recipe. Whip the heavy cream until it forms soft peaks. Soft peaks mean the cream holds shape but is still fluffy. This gives your cake a light texture. Chill the cake for at least 4 hours, but overnight is best. This time allows the flavors to mix and the crackers to soften nicely. Involve your kids in making this cake. Let them help layer the graham crackers and cream. They can even arrange the strawberries on top. This makes cooking fun and teaches them about food. For a twist, use cookie cutters to shape the strawberries. This adds a playful touch to the layers. Enjoy the time together while making this tasty treat! {{image_2}} You can change up the fruit in this cake. While strawberries shine, other fruits work well, too. Try blueberries, raspberries, or peaches. Seasonal fruits are great choices. In summer, use fresh peaches. In fall, swap in apples or pears. Each fruit adds its own taste and color. If you want a lighter option, use whipped topping. It is easy and quick. Yogurt is another great choice. Greek yogurt adds creaminess and protein. For a vegan twist, try coconut cream or almond whipped cream. These options keep the cake rich and tasty without dairy. Add a splash of flavor to your cake. Vanilla extract is classic, but you can mix it up. Add almond or coconut extract for fun twists. Zest from lemons or oranges adds brightness. If you like chocolate, fold in mini chocolate chips or cocoa powder. These touches make the cake even more special. To keep the cake fresh, cover it with plastic wrap. This helps stop air from making it dry. Store it in the fridge for up to three days. If you want to keep the layers nice, avoid pressing down on the cake when wrapping it. To maintain texture, try not to let the cake sit too long in the fridge. The graham crackers will get mushy if left too long. If you see any extra juices from the strawberries, you can gently drain them before serving. This will keep the cake from getting too soggy. Can you freeze Icebox Cake? Yes, you can! Just slice the cake into squares and wrap each piece tightly in plastic wrap. Then, place the wrapped pieces in a freezer-safe bag. This way, you can enjoy a slice later. When you want to serve it, take the cake out of the freezer. Let it thaw in the fridge for about two hours. If you need it faster, you can thaw it at room temperature for about 30 minutes. Serve it chilled for the best taste and texture. For pairing ideas, I love to serve this cake with a scoop of vanilla ice cream. It adds a nice creaminess. You can also drizzle some chocolate sauce on top for a fun twist. For presentation, cut the cake into neat squares. Place them on a colorful plate and add some fresh mint leaves on top. This adds a splash of color and makes it look special. You can also sprinkle some extra strawberries around the plate for a fresh touch. Strawberry Shortcake Icebox Cake lasts about 3 to 5 days in the fridge. To store it, cover the dish tightly with plastic wrap. This keeps it fresh and prevents it from absorbing odors from other foods. I always recommend eating it within this time for the best taste and texture. Yes, you can make this recipe a day ahead. It tastes great when made early. Just let it chill in the fridge overnight. This extra time helps the flavors blend. I often prepare it the night before a gathering. It makes serving so easy. Yes, there are gluten-free graham cracker options available. Brands like Kinnikinnick and Schär offer gluten-free versions. You can also use gluten-free cookies like almond flour or coconut cookies. Just be sure to check the packaging to ensure they fit your diet. To cut the cake, use a sharp knife. Dip it into hot water, then wipe it dry before slicing. This technique helps create clean cuts. Make sure to cut through all layers, including the strawberries. Serve it in squares for a nice presentation. This blog post walks you through making a Strawberry Shortcake Icebox Cake. You learned about the right fresh and pantry ingredients. The step-by-step guide made it simple to prepare the cake. Tips helped with layering and texture. We also explored variations and storage options. In closing, this dessert is a fun treat for all. You can customize it to your taste. Enjoy making it with family and friends!

Strawberry Shortcake Icebox Cake Delightfully Simple Recipe

If you love strawberries and need a quick dessert, I have just the thing for you: Strawberry Shortcake Icebox Cake.

To make this tasty dish, gather these key ingredients: - 1 lb boneless, skinless chicken breast, cut into bite-sized pieces - 1 cup broccoli florets - 1 bell pepper (red or yellow), sliced - 1 carrot, julienned - 1/2 cup snap peas - 3 tablespoons honey - 2 tablespoons soy sauce (low sodium) - 1 tablespoon sesame oil - 1 tablespoon cornstarch - 2 cloves garlic, minced - 1 inch ginger, minced - 2 tablespoons sesame seeds - Green onions, chopped (for garnish) - Cooked rice or noodles (for serving) These ingredients blend well for a sweet and savory flavor. The chicken gives protein, while the veggies add crunch and color. Honey and soy sauce create a sticky, delicious glaze. You can mix in other veggies if you like. Try bell peppers, zucchini, or even mushrooms. For a twist, use maple syrup instead of honey. If you want less salt, pick a low-sodium soy sauce. To make this dish, you will need: - A large pan or wok for stir-frying - A whisk for mixing the sauce - A cutting board and knife for prep - Measuring spoons for accuracy Using these tools makes cooking easy and fun. A wok helps heat evenly, giving your meal the best flavor. To start, we need to make the sauce. In a bowl, mix together the following ingredients: - 3 tablespoons honey - 2 tablespoons soy sauce - 1 tablespoon sesame oil - 1 tablespoon cornstarch - 2 cloves garlic, minced - 1 inch ginger, minced Whisk these together until smooth. This sauce will give our dish its sweet and savory flavor. Next, heat a large pan or wok over medium-high heat. Add a splash of vegetable oil. Once it’s hot, add in 1 pound of chicken breast, cut into small pieces. Cook the chicken for about 5 to 7 minutes. Stir it often until the chicken turns golden brown and is fully cooked. Once done, remove the chicken from the pan and set it aside. Now, in the same pan, add a bit more oil if needed. Toss in the veggies: - 1 cup broccoli florets - 1 sliced bell pepper (red or yellow) - 1 julienned carrot - 1/2 cup snap peas Stir-fry these for about 3 to 4 minutes. You want them to be tender but still crisp. This keeps the veggies bright and fresh. After the veggies are ready, return the chicken to the pan. Pour the sauce over everything. Mix it well, and cook for an additional 2 to 3 minutes. This helps the sauce thicken and coat all the bits. Finally, sprinkle in 2 tablespoons of sesame seeds. Serve your stir fry over cooked rice or noodles. Don’t forget to add some chopped green onions on top for a fresh finish! To make your sauce just right, mix the honey, soy sauce, sesame oil, cornstarch, garlic, and ginger in a bowl. Whisk until smooth. The cornstarch helps the sauce thicken as it cooks. If you want it thicker, add more cornstarch mixed with water. For a thinner sauce, add a bit more soy sauce. Use a large pan or wok for the best results. Heat the oil over medium-high heat before adding the chicken. This helps the chicken brown nicely. Sauté the chicken for 5-7 minutes until it is fully cooked. Remove the chicken to keep it juicy while you cook the veggies. Then, return it to the pan for the final mix. To boost flavor, add fresh ginger and garlic to your sauce. These ingredients bring depth and warmth. You can also sprinkle in sesame seeds while cooking. For a kick, try adding a dash of red pepper flakes or a splash of rice vinegar. These small changes make a big impact on taste. {{image_2}} You can make a great vegetarian version of honey sesame stir fry. Use tofu instead of chicken. Firm tofu works best. Press the tofu to remove extra water. Cut it into bite-sized pieces. Sauté it until it's golden brown. You can also add tempeh for a nutty flavor. Use the same sauce for a tasty meal. Swap veggies as you like. Broccoli, bell peppers, and snap peas work well. If you want to try different proteins, use shrimp or beef. For shrimp, cook them until they turn pink. This takes about 3-4 minutes. For beef, cut it into thin strips. Sauté until it’s browned and cooked through. You can also use turkey or pork. Adjust cooking times to ensure everything cooks well. Seasonal veggies can change the taste of your dish. In spring, add asparagus or peas. In summer, use zucchini or bell peppers. In fall, try butternut squash or Brussels sprouts. In winter, use hearty greens like kale or bok choy. These swaps keep your meal fresh and exciting. Plus, they make use of what’s in season. Enjoy experimenting with colors and flavors! To store leftovers, let the dish cool first. Place the Honey Sesame Chicken Stir Fry in an airtight container. This keeps it fresh. You can store it in the fridge for up to three days. Make sure to label the container with the date. This way, you know when it was made. When you're ready to eat, take out the stir fry. You can reheat it in a pan over medium heat. Stir it often to heat it evenly. This helps keep the chicken tender. You can also use the microwave. Heat it in a bowl for 1-2 minutes, stirring halfway through. If you want to freeze it, place it in a freezer-safe container. Make sure to remove as much air as possible. This helps prevent freezer burn. You can freeze it for up to three months. When you’re ready to eat, thaw it in the fridge overnight. Then, reheat it in a pan or microwave. Enjoy your meal again! Yes, you can make this dish ahead. Just cook the chicken and veggies separately. Store them in the fridge for up to three days. When ready to eat, reheat and add the sauce. You can serve this dish with cooked rice or noodles. It pairs well with a simple salad. You could also add some spring rolls for a complete meal. Absolutely! This recipe is great for meal prep. The chicken and veggies store well. You can easily pack them for lunch or dinner during the week. This dish is not spicy at all. It has sweet and savory flavors from honey and soy sauce. If you like heat, add some chili flakes or sriracha. Yes, you can use bottled sauces. Look for honey soy sauce or teriyaki sauce. Just skip the homemade sauce step, and pour the bottled sauce over the chicken and veggies. This blog post covered all you need for Honey Sesame Chicken Stir Fry. We explored key ingredients, cooking steps, and tips for the best flavor. I also shared healthy variations for different diets. Lastly, I provided storage tips to keep leftovers fresh. With these insights, you can create a delicious meal that fits your needs. Enjoy making this dish and experimenting with your own twists! Happy cooking!

Honey Sesame Chicken Stir Fry Tasty and Quick Meal

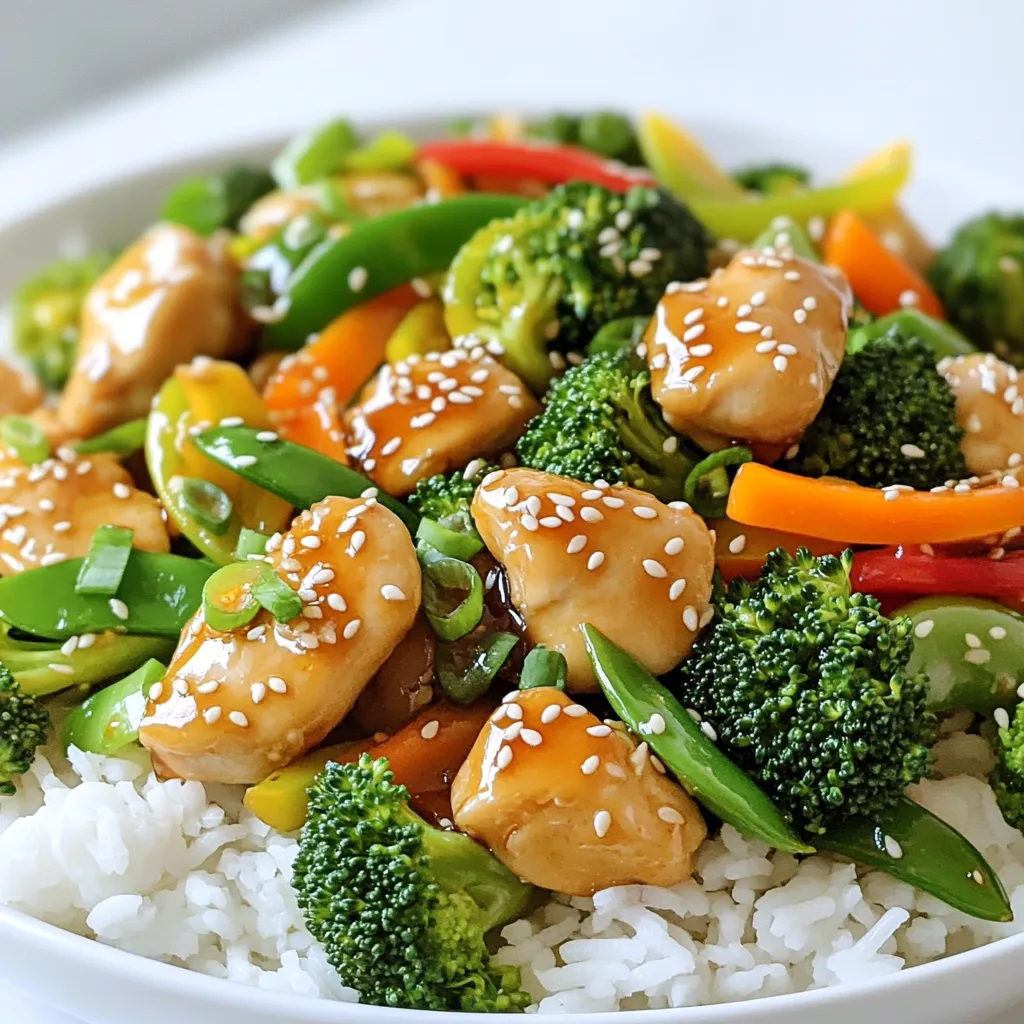
If you’re craving a quick and tasty meal, look no further than Honey Sesame Chicken Stir Fry! This dish is

To make a perfect Lemon Poppy Seed Loaf, you need these ingredients: - 1 ½ cups all-purpose flour - 1 tablespoon poppy seeds - 1 teaspoon baking powder - ½ teaspoon baking soda - ¼ teaspoon salt - ½ cup unsalted butter, softened - 1 cup granulated sugar - 2 large eggs - Zest of 1 large lemon - ¼ cup fresh lemon juice - ½ cup plain yogurt - 1 teaspoon vanilla extract - Powdered sugar for dusting (optional) You can make this loaf suit your needs. Here are some options: - For gluten-free, use a gluten-free flour blend. - Swap yogurt with applesauce for a lighter loaf. - Use coconut oil instead of butter for a dairy-free version. - If you want to cut sugar, try using a sugar substitute. This loaf serves about 8 to 10 people. Each slice has: - Calories: 200 - Fat: 8g - Carbohydrates: 30g - Protein: 3g - Fiber: 1g This recipe gives you a treat that is tasty and satisfying! To make this lemon poppy seed loaf, gather your ingredients first. You need flour, poppy seeds, baking powder, baking soda, salt, butter, sugar, eggs, lemon zest, lemon juice, yogurt, and vanilla. Preheat your oven to 350°F (175°C). Grease or line a 9x5 inch loaf pan. This will help your loaf come out easily. 1. In a medium bowl, whisk together the flour, poppy seeds, baking powder, baking soda, and salt. Set this bowl aside. 2. In a large bowl, beat the softened butter and sugar together. Use an electric mixer on medium speed for about 3 minutes. The mixture should be light and fluffy. 3. Add the eggs one at a time. Mix well after each egg. Then, add the lemon zest, lemon juice, yogurt, and vanilla extract. Mix until all is combined. 4. Gradually add the dry mix to the wet mix. Use low speed to combine. Do not overmix; a few lumps are fine. 5. Pour the batter into your prepared loaf pan. Smooth the top with a spatula. 6. Place the loaf pan in the oven. Bake for 50-60 minutes. To check if your loaf is done, insert a toothpick into the center. If it comes out clean, your loaf is ready. If it has batter on it, bake a little longer. Once baked, remove the loaf from the oven. Let it cool in the pan for about 10 minutes. Then, transfer it to a wire rack to cool completely. If you like, dust the top with powdered sugar before slicing. Enjoy your moist, fresh lemon poppy seed loaf! To make a great lemon poppy seed loaf, watch out for a few common mistakes. - Overmixing the batter: This can lead to a tough loaf. Mix until just combined. - Skipping the lemon zest: Zest adds a bright flavor. Don’t leave it out! - Not measuring ingredients: Use measuring cups for accuracy. This helps the loaf rise well. - Ignoring oven temp: Always preheat your oven. A cold oven can ruin your bake. Keeping your loaf moist is key for a tasty treat. Here are some tips: - Use yogurt: The yogurt in the recipe adds moisture and richness. - Check doneness early: Start checking at 50 minutes. Overbaking dries it out. - Cool properly: Let it cool in the pan for a bit. This helps keep moisture in. - Wrap well: If you have leftovers, wrap them in plastic wrap. This keeps the loaf moist. Serving your lemon poppy seed loaf can be fun and creative. Here are some ideas: - With tea or coffee: It pairs well with a warm drink. - Top with glaze: Mix lemon juice and powdered sugar for a sweet glaze. - Add fruit: Serve with fresh berries for a colorful plate. - Dust with powdered sugar: A light dusting adds a nice touch. {{image_2}} To make a gluten-free version, swap regular flour for gluten-free all-purpose flour. Ensure the blend has xanthan gum, as it helps bind the loaf. This change keeps the texture light and moist. Follow the same instructions as listed in the original recipe. You won’t miss the gluten! For a vegan option, replace eggs with flax eggs. Mix one tablespoon of ground flaxseed with three tablespoons of water. Let it sit for a few minutes until it thickens. Use plant-based butter and dairy-free yogurt. These swaps keep the loaf moist and delicious without any animal products. You can add unique flavors to your loaf. Consider mixing in blueberries or raspberries for a fruity twist. A teaspoon of almond extract adds a nice touch. You can also fold in chopped nuts, like walnuts or pecans, for crunch. If you love a sweeter loaf, add a bit more sugar or a glaze made of lemon juice and powdered sugar. Each variation offers a new experience! To keep your lemon poppy seed loaf fresh, wrap it tightly in plastic wrap. This keeps air out and moisture in. You can also place it in an airtight container. Store it at room temperature for up to three days. If you want it to last longer, the fridge is a good option. Just note that refrigeration may slightly dry it out. You can freeze your lemon poppy seed loaf for up to three months. First, let the loaf cool completely. Then, wrap it in plastic wrap and aluminum foil. This will prevent freezer burn. When you are ready to enjoy it again, thaw it overnight in the fridge. You can also leave it at room temperature for a few hours. To reheat your loaf, slice it first. This helps heat it evenly. Preheat your oven to 350°F (175°C). Place the slices on a baking sheet. Heat for about 10 to 15 minutes. Alternatively, use a microwave. Heat each slice for about 15 to 20 seconds. Just be careful not to overheat it, as it can become dry. Enjoy your moist and tasty loaf! Yes, you can! Orange and lime work well. They add a fresh twist. Just use the same amount of zest and juice. Adjust the sugar if needed. This change gives new flavor notes. You can even mix citrus for fun. If you don't have yogurt, use sour cream. It gives a similar tang. Buttermilk is another option. You can also try unsweetened applesauce. Each will keep your loaf moist. Just use the same amount as the yogurt in the recipe. Check the loaf after 50 minutes. Insert a toothpick into the center. If it comes out clean, the loaf is ready. If there’s wet batter, bake a bit longer. The top should be golden brown too. Let it cool for 10 minutes before removing. This blog post explored how to make a delicious Lemon Poppy Seed Loaf. We covered ingredients, substitutions, and nutrition details. You now have step-by-step instructions to bake it perfectly. I also shared tips to avoid common mistakes and keep your loaf moist. You learned about gluten-free and vegan options, plus smart storage methods. Finally, the FAQs answered your key questions. Use this guide to bake and enjoy your loaf with confidence. Happy baking!

Lemon Poppy Seed Loaf Fresh and Moist Recipe

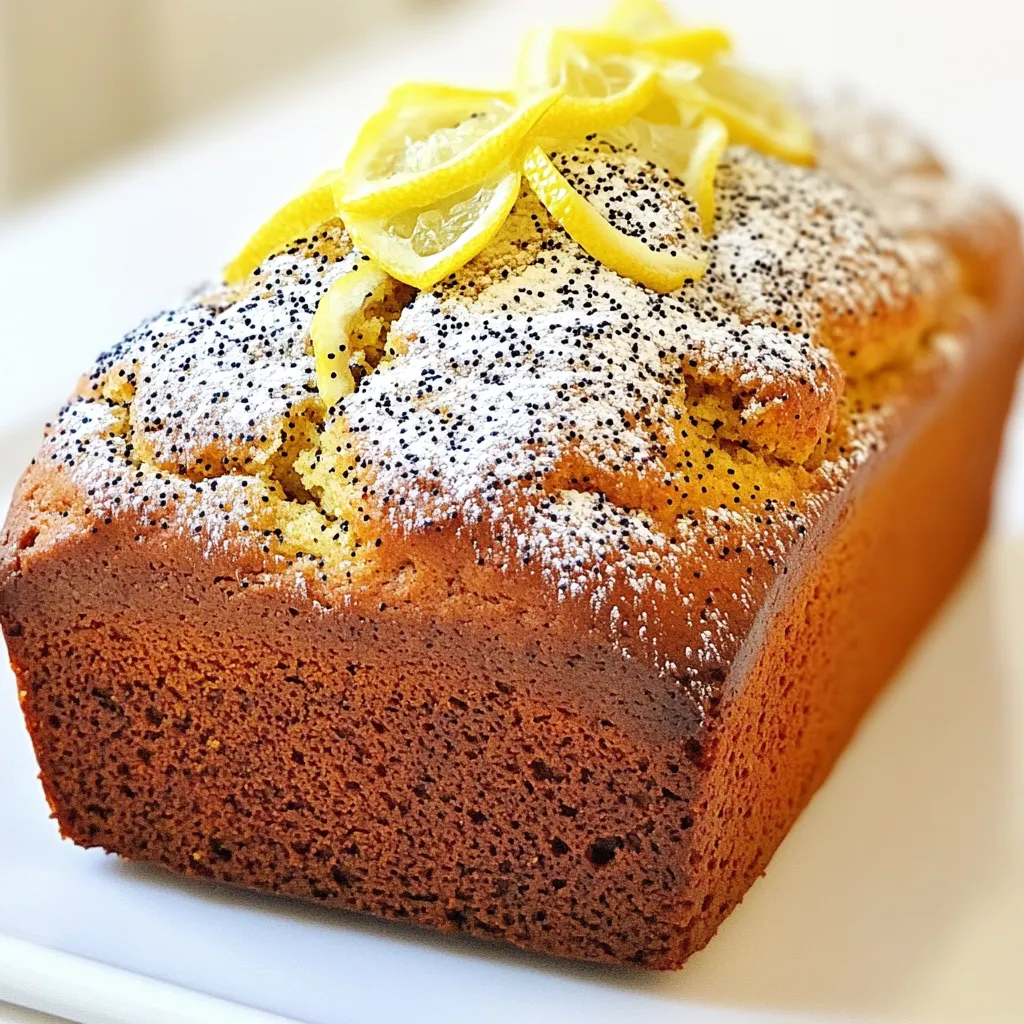
Ready to bake a Lemon Poppy Seed Loaf that’s fresh and moist? This simple recipe combines zesty lemon and crunchy

- 4 boneless, skinless chicken breasts - 1 cup all-purpose flour - 2 large eggs - 1 cup breadcrumbs (preferably Italian seasoned) - 1 cup grated Parmesan cheese - 1 teaspoon garlic powder - 1 teaspoon onion powder - 1 teaspoon paprika - Salt and pepper to taste - 1/4 cup fresh parsley, chopped (for garnish) - Olive oil, for frying For crispy Parmesan chicken cutlets, you need fresh and simple ingredients. The chicken breasts are the star of the dish. Use thin, boneless, skinless pieces for easy cooking. Next, you need flour, eggs, and breadcrumbs for the coating. The breadcrumbs add crunch, while the Parmesan gives a rich flavor. Add seasoning with garlic powder, onion powder, and paprika. These spices enhance the taste without being too strong. Don’t forget salt and pepper; they bring everything together. Lastly, fresh parsley brightens up your dish. It adds color and a hint of freshness as a garnish. With these ingredients, you will create a delightful meal that’s crispy and full of flavor. To start, you need to tenderize the chicken breasts. Place each chicken breast between two sheets of plastic wrap. Use a meat mallet to pound them to an even thickness of about 1/2 inch. This step helps the chicken cook evenly. Next, set up your breading station. You will need three shallow bowls. In the first bowl, add 1 cup of all-purpose flour. Season it with salt and pepper. In the second bowl, beat two large eggs until they are well mixed. In the third bowl, mix 1 cup of breadcrumbs with 1 cup of grated Parmesan cheese. Add 1 teaspoon each of garlic powder, onion powder, and paprika. Don’t forget a pinch of salt and pepper to season. Now, it's time for the dredging and coating process. Take each chicken breast and first dredge it in the flour, shaking off any extra. Then, dip the floured chicken into the beaten eggs. Make sure it is fully coated. Finally, coat the chicken in the breadcrumb mixture, pressing it onto the chicken to make it stick well. Next, heat a generous amount of olive oil in a large skillet over medium heat. You want the oil hot but not smoking. Carefully place the breaded chicken cutlets in the skillet. Cook them in batches to avoid overcrowding. Fry the chicken cutlets for about 4 to 5 minutes on each side. They should turn golden brown and be cooked through. To check if they are done, the internal temperature should reach 165°F (75°C). Once the cutlets are cooked, transfer them to a plate lined with paper towels. This will help drain any excess oil. You can now garnish the crispy chicken cutlets with fresh parsley and serve them hot. Enjoy your meal! To get that perfect crisp on your chicken cutlets, start with the right coatings. The flour and egg layers are key. - First, coat the chicken in flour. This helps the egg stick. - Next, dip it in beaten eggs. Make sure it's fully covered. - Finally, press the chicken into the breadcrumb mix. This gives it that nice crunch. Avoid overcrowding your skillet. If you add too many cutlets at once, the oil cools down. This leads to soggy chicken. Cook in batches to keep the oil hot. Keep an eye on the oil temperature. It should be medium heat. A hot skillet helps the cutlets fry evenly. If it’s too low, they will soak up oil. This makes them greasy instead of crispy. If you want a healthier option, try baking. Preheat your oven to 400°F (200°C). Place the breaded cutlets on a baking sheet. Lightly spray them with olive oil. Bake for about 20-25 minutes. Flip halfway through for even cooking. Air frying is another great choice. It still gives you that crisp texture but uses less oil. Set your air fryer to 375°F (190°C). Cook the cutlets for about 12-15 minutes, flipping halfway. This method is quick and easy! {{image_2}} You can change up the taste of your crispy Parmesan chicken cutlets. Start by adding fresh herbs like basil or thyme. These herbs bring a fresh flavor to your dish. You can also add a pinch of red pepper flakes for some heat. Next, think about flavoring the breadcrumbs. Mix in some Italian seasoning or lemon zest. This adds depth to your breading. You can even use different types of cheese. Try using pecorino or cheddar for a twist on flavor. Pair your chicken cutlets with tasty sauces. A simple marinara or a creamy garlic sauce works well. You can also drizzle some balsamic glaze for a sweet touch. When it comes to side dishes, think about fresh salads or roasted veggies. A crisp Caesar salad complements the cutlets nicely. For a heartier option, serve with mashed potatoes or garlic bread. These sides round out the meal perfectly. To keep your crispy Parmesan chicken cutlets fresh, use proper storage containers. Airtight containers work best. This prevents moisture from making the cutlets soggy. Layer parchment paper between the cutlets if you stack them. This helps keep them crispy. Store your chicken cutlets in the refrigerator. They stay fresh for about 3 to 4 days. If you want to keep them longer, consider freezing. Wrap each cutlet in plastic wrap and place them in a freezer bag. They will last for up to 2 months in the freezer. When it’s time to enjoy your leftovers, reheating is key. The best way to reheat cutlets is in the oven. Preheat your oven to 375°F (190°C). Place the cutlets on a baking sheet. Bake for about 10-15 minutes, or until heated through. For extra crispiness, use a skillet. Heat a little olive oil over medium heat. Add the cutlets and cook for 3-4 minutes on each side. This method keeps them crispy and delicious. Avoid the microwave, as it can make the cutlets soggy. I recommend using boneless, skinless chicken breasts. They cook evenly and stay juicy. You can also use chicken thighs if you prefer darker meat. Thighs add more flavor and remain tender. Yes, you can use gluten-free flour and gluten-free breadcrumbs. Look for certified gluten-free options to ensure safety. The texture might change slightly, but the cutlets will still taste great. To check doneness, use a meat thermometer. The internal temperature should reach 165°F (75°C). If you don't have a thermometer, cut the chicken and look for clear juices. There should be no pink meat. Absolutely! You can bread the chicken cutlets and store them in the fridge for a few hours. This helps the coating stick better. Just fry them when you're ready to eat. They cook quickly and taste fresh! In this blog post, I covered how to make delicious chicken cutlets from start to finish. You learned about the key ingredients, step-by-step cooking methods, and helpful tips for the best results. I also shared tasty variations and proper storage techniques. Remember, the secret to great cutlets lies in the details. Use the tips to make them crispy and flavorful. Now you’re ready to impress your friends and family with your skills in the kitchen! Enjoy your cooking adventure!

Crispy Parmesan Chicken Cutlets Quick and Easy Recipe

Are you ready to make delicious Crispy Parmesan Chicken Cutlets at home? This quick and easy recipe transforms simple chicken

To make this soup, gather these ingredients: - 2 tablespoons olive oil - 1 medium onion, diced - 3 cloves garlic, minced - 1 carrot, diced - 1 can (28 oz) crushed tomatoes - 4 cups vegetable broth - 1 teaspoon dried basil - 1 teaspoon dried oregano - Salt and pepper to taste - 1 package (9 oz) cheese tortellini (fresh or frozen) - 1 cup heavy cream (or coconut cream for a dairy-free option) - Fresh basil leaves for garnish - Parmesan cheese for serving (optional) You can swap ingredients if you need to. Here are some great options: - Olive oil: Use butter or avocado oil for different flavors. - Onion: Shallots or leeks work well too. - Vegetable broth: Chicken broth adds more depth. - Heavy cream: Coconut cream gives it a dairy-free twist. - Tortellini: Try gnocchi or any pasta you have on hand. Choosing fresh produce makes your soup better. Here are some tips: - Onions: Pick firm ones, with no soft spots. - Garlic: Look for heads that are dry and tight. - Carrots: Choose crisp, bright orange carrots. Avoid soft or wrinkled ones. - Basil: Fresh basil should smell strong and have vibrant green leaves. These fresh ingredients will enhance your creamy tomato tortellini soup, making it delicious and satisfying. Enjoy cooking! 1. Begin by heating the olive oil in a large pot over medium heat. 2. Add the diced onion and sauté for about 4-5 minutes until it is soft and clear. 3. Next, stir in the minced garlic and diced carrot. Cook for 2-3 minutes until you smell the garlic. 4. Pour in the crushed tomatoes and vegetable broth. Stir well and bring it to a soft boil. 5. Add the dried basil, oregano, salt, and pepper. Reduce the heat and let the soup cook for about 10 minutes. 6. After that, increase the heat and add the cheese tortellini. Cook them according to the package, usually about 3-5 minutes. 7. Lower the heat again and slowly mix in the heavy cream. Stir well for a rich creamy texture. 8. Heat through for about 2 more minutes, then taste and add more salt or pepper if you need it. 9. Serve hot, topping with fresh basil leaves and parmesan cheese if you like. - Use fresh tortellini if you can. They cook faster and taste better. - Do not overcook the tortellini. They should be tender but still firm. - If using frozen tortellini, add them straight to the soup without thawing. - Stir gently to avoid breaking the tortellini in the soup. - Use heavy cream for the richest flavor. Coconut cream is a great dairy-free choice. - Add the cream slowly. This helps it mix well with the soup. - For a thicker soup, let it simmer a bit longer after adding the cream. - Blend a small portion of the soup if you want it extra smooth. Just use a blender and then mix it back in. To make your creamy tomato tortellini soup taste amazing, use fresh herbs. Fresh basil adds a bright, vibrant flavor. You can also add a splash of balsamic vinegar for a sweet tang. If you want a hint of heat, sprinkle in some red pepper flakes. These small changes can boost the flavor a lot. Store your soup in an airtight container. It keeps well in the fridge for up to three days. When reheating, use a pot over low heat. Stir often to prevent sticking. You can also use the microwave, but cover the bowl to keep the soup moist. Add a splash of broth or cream if it thickens too much. You need just a few tools for this recipe. A large pot is essential for cooking the soup. A wooden spoon helps mix the ingredients well. A sharp knife makes chopping easy and quick. If you have a ladle, use it for serving. These simple tools make cooking smooth and fun. {{image_2}} You can make this soup dairy-free easily. Swap heavy cream for coconut cream. This change keeps the soup creamy while adding a hint of sweetness. You can also use almond milk or cashew cream for a lighter touch. Both options work well and taste great. Want to boost nutrients? Here are some easy add-ins: - Spinach: Stir in fresh spinach just before serving. It wilts quickly and adds color. - Kale: Chop and add kale for extra fiber. Cook it a few minutes longer for softness. - Beans: Add white beans for protein. They make the soup heartier and more filling. These simple choices make your soup more nutritious and tasty. If you need gluten-free options, look for gluten-free tortellini. Many brands offer these alternatives made from rice or chickpeas. You can also use gluten-free pasta shapes like shells or bowties. Just adjust cooking time to match package instructions. Enjoy the same great taste without the gluten! Creamy Tomato Tortellini Soup is rich and hearty. It pairs well with simple sides. Here are my top picks: - Garlic Bread: The crunch of garlic bread complements the soup's smoothness. - Mixed Green Salad: A fresh salad adds a light touch. Use a vinaigrette to balance the creaminess. - Grilled Cheese Sandwich: This classic combo never fails. The melted cheese works beautifully with the soup. Garnishing can elevate your soup's look and taste. Here are some fun ideas: - Fresh Basil Leaves: They add a pop of color and flavor. Just a few leaves on top make a big difference. - Shredded Parmesan Cheese: Sprinkle it on for added richness and a savory touch. - Croutons: Add crunchy croutons for texture. You can make them from leftover bread. This soup is perfect for meal prep. Here’s how to serve it later: - Individual Containers: Store the soup in single servings. This makes it easy to grab and go. - Freezer-Friendly: You can freeze the soup for later. Just leave out the cream until you heat it up. - Tortellini on the Side: If you prep the tortellini separately, they stay firm. Mix them in just before serving for the best texture. Yes, you can freeze Creamy Tomato Tortellini Soup. First, let it cool completely. Then, pour it into freezer-safe containers. Leave some space at the top for expansion. It stays fresh for about three months. When you want to eat it, thaw it overnight in the fridge. Then, reheat it on the stove or in the microwave. To make Creamy Tomato Tortellini Soup vegetarian, use vegetable broth instead of chicken broth. The rest of the ingredients, like tomatoes and tortellini, are already vegetarian. You can also add more veggies, like spinach or zucchini, for extra flavor and nutrients. This makes the soup even heartier and more colorful. If you need a substitute for heavy cream, try coconut cream. It adds a rich, creamy texture and flavor. You can also use half-and-half or whole milk mixed with a bit of flour for thickness. Silken tofu blended until smooth is another great option for a dairy-free choice. Each alternative gives the soup a different twist while keeping it creamy. In this blog post, we explored creamy tomato tortellini soup. We covered key ingredients and substitutions. I shared tips for picking fresh produce and cooking tortellini perfectly. You learned how to enhance flavor and store leftovers. Also, we discussed variations like dairy-free and gluten-free options. Now, you can make this tasty soup your own. Try different add-ins and serve it your way. Enjoy your cooking journey!

Creamy Tomato Tortellini Soup Quick and Easy Recipe

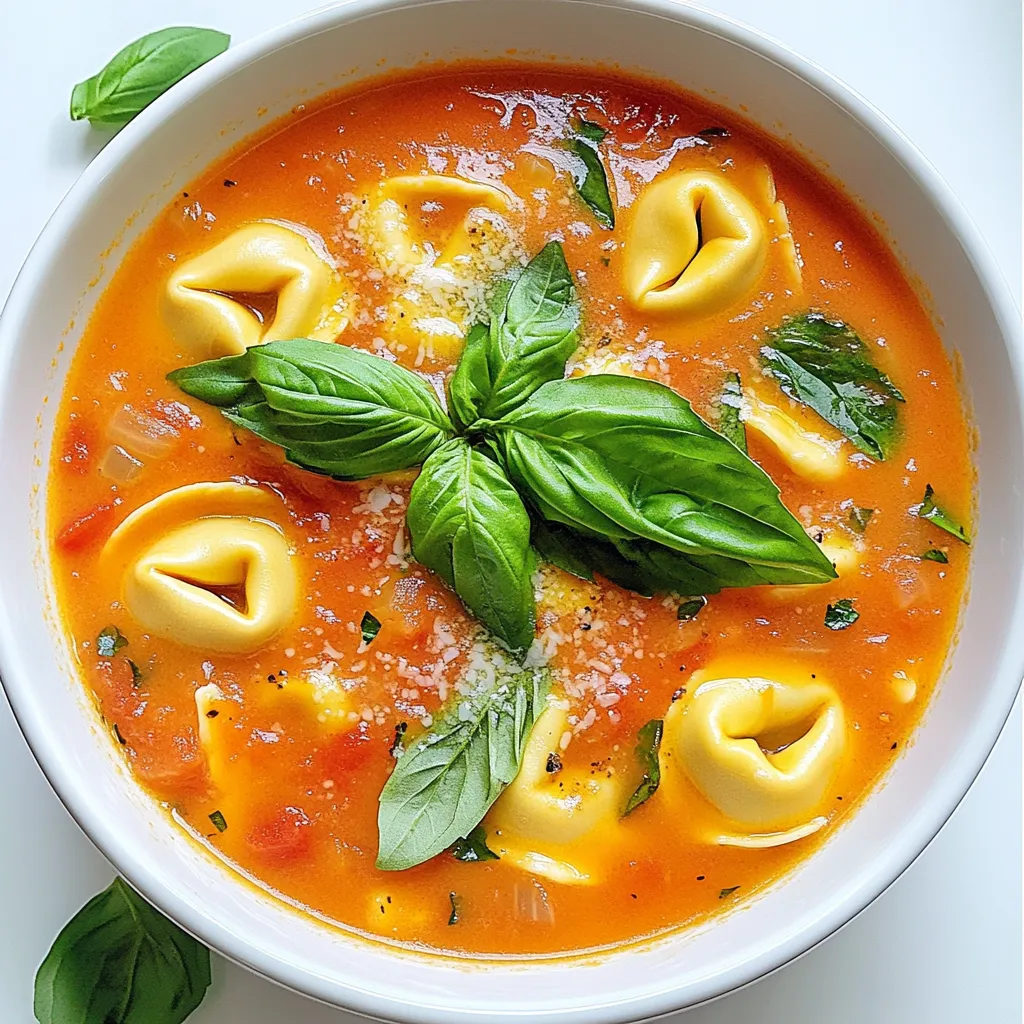
If you’re craving a warm, comforting bowl of soup, I’ve got the perfect recipe for you—Creamy Tomato Tortellini Soup! This

- 1 ripe mango, peeled and diced - 1 cup dragonfruit (fresh or frozen), cubed - 1 banana, sliced To start, you need fresh fruit. First, pick a ripe mango. It should feel soft when you press it gently. A bright yellow skin signals ripeness. Next, choose dragonfruit. You can use fresh or frozen. If using fresh, cut it in half and scoop out the flesh. Finally, grab a banana. A ripe banana adds sweetness and creaminess to your smoothie. - 1 cup coconut milk (or your preferred milk) - 1 tablespoon honey or agave syrup (optional) Now it’s time for the liquids. Coconut milk gives a rich flavor. You can swap it for any milk you like. Next, add honey or agave syrup if you want a sweeter taste. This step is optional, but it can enhance the flavor. - 1 tablespoon chia seeds - Ice cubes (optional, for a thicker smoothie) For a nutrition boost, add chia seeds. They are tiny but packed with health benefits. If you like your smoothie thick, toss in some ice cubes. This trick makes it cold and refreshing. You can adjust these ingredients to fit your taste. - Prepare the ingredients: Start by peeling and dicing the ripe mango. Next, cut the dragonfruit in half, scoop out the flesh, and chop it into cubes. Then, slice the banana. - Blend the base mixture: In a blender, combine the coconut milk, diced mango, dragonfruit cubes, and banana slices. Blend these ingredients until they form a smooth mixture. - Add sweetness to the blend: If you like your smoothie sweeter, drizzle in honey or agave syrup. Start with one tablespoon and add more if needed. - Incorporate superfoods: For a boost in nutrition, add chia seeds to the blender. These tiny seeds pack a punch of fiber and omega-3s. - Blend until smooth: Continue blending at high speed until the mixture is creamy. If you want a thicker smoothie, toss in a few ice cubes and blend again. - Taste and adjust consistency: After blending, taste your smoothie. Add more coconut milk if it’s too thick. Adjust sweetness to your liking. - Serve in chilled glasses: Pour the smoothie into chilled glasses. Enjoy it right away for the best flavor! Choosing ripe mangoes and dragonfruit is key. Look for mangoes that are slightly soft to the touch. This shows they are ripe and full of flavor. For dragonfruit, pick ones with bright pink skin. They should feel slightly soft, too. Both fruits should smell sweet. This means they are ready to eat. For milk alternatives, coconut milk works well. It adds a creamy texture and rich taste. You can also use almond milk or oat milk. Both are great options for a lighter feel. To achieve your desired thickness, add ice cubes. They help make the smoothie cold and thick. If you want a creamier texture, use less ice and more fruit. Freezing fruit is another smart tip. Freeze your mangoes and bananas ahead of time. This can make your smoothie colder and thicker. Just chop them first and store in bags. For the perfect glassware, choose tall, clear glasses. This shows off the bright colors of your smoothie. Garnishing ideas can elevate your drink. Try adding a slice of fresh mango on the rim. You can also sprinkle chia seeds on top. This adds a nice touch and a bit of crunch. {{image_2}} You can swap mango and dragonfruit for other fruits. Berries, peaches, or even pineapples work great. Each fruit brings its unique taste and color, making your smoothie fun. Seasonal fruits add freshness too. In summer, use ripe peaches. In winter, try frozen berries. Each choice creates a new flavor adventure. Want a dairy-free smoothie? Use almond milk or oat milk instead of coconut milk. This makes it creamy without dairy. If you follow a vegan diet, skip the honey. Use agave syrup for sweetness. For those watching sugar, try reducing the honey or using a natural sweetener like stevia. You can enjoy a tasty smoothie that fits your diet. Adding spices can make your smoothie extra special. A pinch of ginger gives a nice kick, while cinnamon adds warmth. These spices also boost health benefits. Want some greens? Toss in a handful of spinach or kale. They blend well and add nutrients without changing the taste. Your smoothie stays vibrant and delicious while packing a nutritious punch! To store leftovers in the fridge, pour the smoothie into a sealed glass or plastic container. Make sure to cover it well. This keeps air out and helps maintain freshness. Store it in the fridge for up to 24 hours. To keep your smoothie tasting fresh, give it a good shake or stir before drinking. The ingredients may separate, but it’s normal. You can freeze smoothie portions for later. Pour your smoothie into ice cube trays or silicone molds. This makes it easy to use just what you need. Freeze for up to three months. When you’re ready to enjoy, thaw your smoothie overnight in the fridge. You can also thaw it in the microwave on low power. Blend it up again if needed to get that creamy texture back. There are fun ways to use leftover smoothie! You can make popsicles by pouring the smoothie into molds and freezing them. This is a tasty treat for hot days. Another idea is to mix leftover smoothie into oatmeal or yogurt. This adds flavor and nutrients to your breakfast. You can even drizzle it over pancakes for a fruity kick. Enjoy being creative with your leftovers! A Mango Dragonfruit Smoothie is a bright, tasty drink. It combines ripe mango, dragonfruit, and banana. You blend these fruits with coconut milk to make a creamy base. Some people add honey for sweetness. This smoothie is not just pretty; it's packed with flavor. Mangoes are full of vitamins A and C. They help boost your immune system and skin health. Dragonfruit is low in calories but high in fiber. This fruit can aid digestion and help you feel full. Bananas add potassium, which is good for heart health. Together, these fruits make a healthy drink that tastes great. Yes, you can make this smoothie ahead of time. Blend all the ingredients and store it in the fridge. It’s best to drink it within 24 hours. If you want to keep it longer, freeze it in portions. Just blend again after thawing for a fresh taste. This blog post explored making a delicious mango dragonfruit smoothie. We covered fresh ingredients like mango, dragonfruit, and banana, along with creamy coconut milk and sweeteners. You learned the steps to blend and enhance flavors, plus tips for texture and serving. We also discussed variations, storage tips, and answered common questions. Enjoy creating your own smoothie masterpiece! Remember, experimenting with flavors can lead to delightful surprises. Happy blending!

Mango Dragonfruit Smoothie Fresh and Flavorful Treat

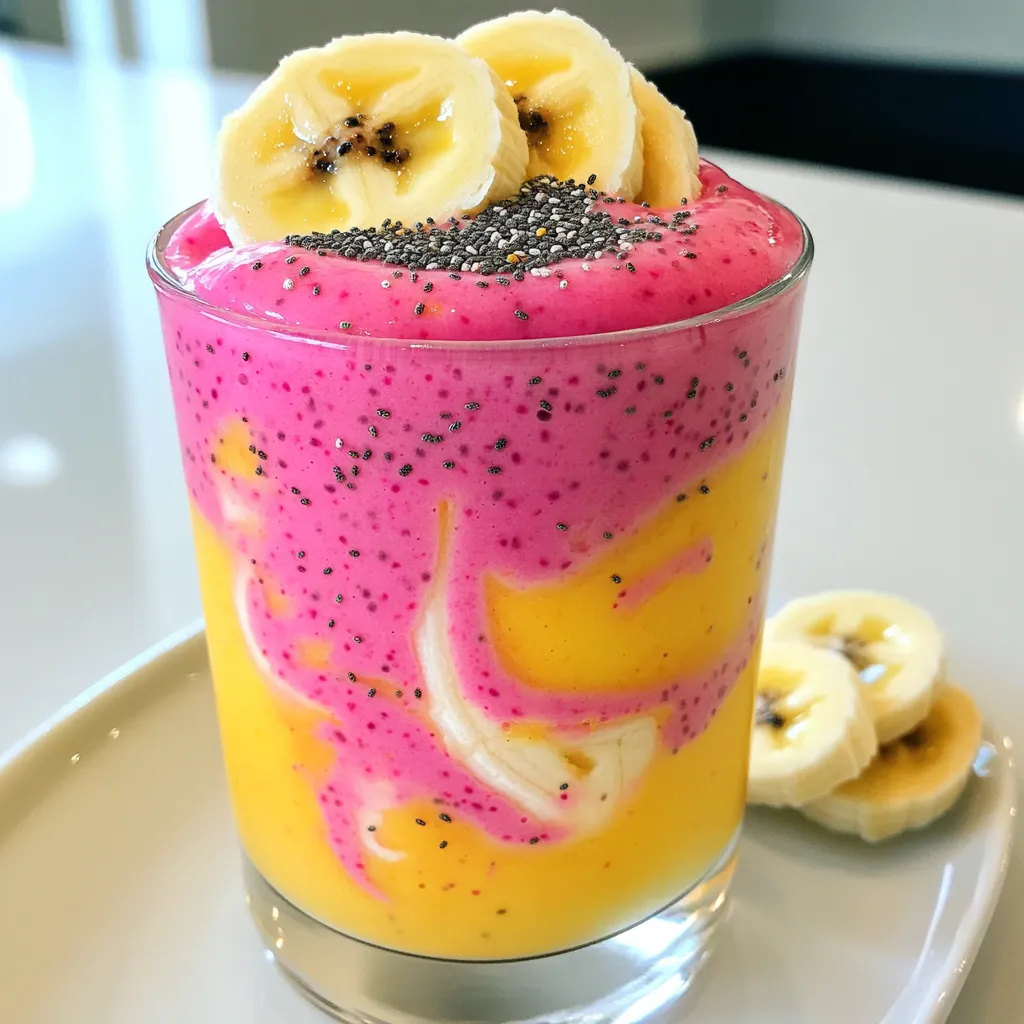
Are you looking for a tasty and refreshing way to boost your day? You’ll love my Mango Dragonfruit Smoothie! Packed

To make a Teriyaki Tofu Stir Fry, gather these ingredients: - 14 oz firm tofu, pressed and cubed - 2 tablespoons cornstarch - 2 tablespoons vegetable oil - 1 bell pepper (red or yellow), sliced - 1 cup broccoli florets - 1 cup snap peas - 3 green onions, sliced - 2 garlic cloves, minced - 1 tablespoon fresh ginger, grated - 1/4 cup low-sodium soy sauce - 2 tablespoons pure maple syrup - 1 tablespoon rice vinegar - 1 teaspoon sesame oil - 1 tablespoon sesame seeds (for garnish) - Cooked rice or noodles (for serving) You can swap some ingredients for different flavors or dietary needs: - Use extra-firm tofu for a firmer texture. - Replace vegetable oil with olive oil or coconut oil. - Try different veggies like carrots, mushrooms, or zucchini. - Use tamari instead of soy sauce for a gluten-free option. - Maple syrup can be switched with agave syrup or honey. Having the right tools makes cooking easier: - A sharp knife for slicing veggies. - A cutting board for safe chopping. - A large skillet or wok for stir-frying. - A spatula for flipping tofu and mixing veggies. - Measuring spoons for precise ingredient amounts. - A small bowl for mixing the sauce. {{ingredient_image_1}} Start by pressing the tofu. This step is key to making it crispy. Wrap the tofu in a clean kitchen towel. Then place a weight on top. Let it sit for about 15-20 minutes. This process removes extra moisture. After pressing, cut the tofu into small cubes. Toss these cubes in cornstarch. This coating helps achieve a golden color when cooked. Heat vegetable oil in a large skillet or wok. Set the heat to medium-high. Once the oil is hot, add the tofu cubes. Cook them until they turn crispy and golden, about 5-7 minutes. Remember to flip them often for even browning. Once done, take the tofu out and set it aside. This step gives your dish texture and flavor. In the same skillet, add your sliced bell pepper, broccoli florets, and snap peas. Toss in sliced green onions, minced garlic, and grated ginger. Stir-fry these vegetables for about 3-4 minutes. You want them to look vibrant and be just tender. This quick cooking keeps their crunch and nutrients intact. In a small bowl, whisk together soy sauce, maple syrup, rice vinegar, and sesame oil. Pour this sauce over the cooked vegetables. Mix well to coat everything. Then, add the crispy tofu back into the skillet. Toss everything together, ensuring it’s coated in sauce. Let it cook for 2-3 more minutes. Once heated through, remove from heat and sprinkle with sesame seeds. Your stir-fry is now ready to serve! Pressing tofu helps remove water. Water can make it soggy. Wrap the tofu in a clean towel. Place a heavy object on top. A cast iron skillet works well. Let it sit for 15-20 minutes. This makes the tofu firmer and better for cooking. Tofu needs a light coating to get crispy. Toss the pressed cubes in cornstarch. This helps form a nice crust. Make sure each piece is coated evenly. Cook the tofu in hot oil. A large skillet or wok is best. Keep the heat at medium-high. Flip the tofu for even browning. Cook until golden, about 5-7 minutes. Use fresh, vibrant vegetables for a great stir fry. Bell peppers add sweetness and color. Broccoli gives a nice crunch. Snap peas bring a fresh taste. Green onions add a mild onion flavor. Garlic and ginger enhance the dish's aroma. These veggies cook quickly and look great on the plate. Pro Tips Press Tofu Thoroughly: Ensure you press the tofu long enough to remove excess moisture, which helps it absorb flavors and achieve a crispy texture when cooked. Use High Heat: Cooking the tofu and vegetables over medium-high heat allows for better caramelization and enhances the overall flavor of the stir fry. Customize Your Veggies: Feel free to add or substitute any vegetables you have on hand, such as carrots, zucchini, or bok choy, for a personalized touch. Serve with Fresh Herbs: Garnish the stir fry with fresh cilantro or basil for an extra layer of flavor and freshness to the dish. {{image_2}} You can change up the protein in this stir fry. Instead of tofu, you can use tempeh or seitan. Both options add great texture and flavor. If you eat meat, try chicken or shrimp. Cook them the same way as tofu for a tasty meal. To make this dish gluten-free, swap low-sodium soy sauce for tamari. Tamari is a gluten-free soy sauce that tastes awesome. Check the labels of other ingredients too, like rice vinegar, to ensure they are gluten-free. This way, everyone can enjoy the stir fry! Want to boost the flavor? Add a splash of sriracha for heat. You can also mix in different spices like five-spice powder for a unique taste. Fresh herbs like cilantro or basil can brighten the dish. Experiment with what you love for a personal touch! After enjoying your teriyaki tofu stir fry, you may have some leftovers. Store them in an airtight container. Make sure to let the stir fry cool down first. This helps keep the flavors fresh and prevents sogginess. Place the container in the fridge. Your leftovers will stay good for 3 to 4 days. When you're ready to eat your leftovers, you can reheat them easily. Use a microwave-safe dish if you prefer the microwave. Heat for about 1-2 minutes, stirring halfway. You can also reheat in a skillet on medium heat. Add a splash of water or soy sauce to keep it moist. Heat until everything is warm and steamy. If you want to save your stir fry for later, freezing is a great option. First, let the stir fry cool completely. Then, transfer it to a freezer-safe bag or container. Squeeze out any air before sealing. Your teriyaki tofu stir fry will last in the freezer for up to 3 months. When you’re ready to enjoy it, thaw in the fridge overnight before reheating. To make teriyaki sauce, mix these ingredients in a bowl: - 1/4 cup low-sodium soy sauce - 2 tablespoons pure maple syrup - 1 tablespoon rice vinegar - 1 teaspoon sesame oil Whisk them well. This sauce adds great flavor to your stir fry. You can adjust sweetness or saltiness by changing the maple syrup or soy sauce. Yes, you can use different types of tofu. Firm tofu works best in this recipe. Silken tofu may not hold up well when stir-fried. You can try extra-firm tofu for more texture. Just remember to press it to remove moisture. You can serve this stir fry over cooked rice or noodles. Both options pair well with the flavors. Add some extra green onions or sesame seeds on top for a nice touch. You can also add a side salad for freshness. The stir fry lasts for about 3-4 days in the fridge. Store it in an airtight container. To reheat, use a skillet or microwave. This way, you can enjoy the tasty meal again! In this post, we covered essential ingredients, step-by-step instructions, and useful tips for making teriyaki tofu stir fry. I shared ways to press tofu, achieve crispiness, and select the best veggies. You can also explore variations like gluten-free options and protein add-ins. Don't forget about storage info for your leftovers. Now you have a simple guide to create a delicious meal. Enjoy cooking and experimenting with flavors!

Teriyaki Tofu Stir Fry Flavorful and Quick Meal

Looking for a quick and tasty meal? You’ve found it! My Teriyaki Tofu Stir Fry is packed with flavor and

- 1 lb boneless, skinless chicken breasts, sliced into thin strips - 1 red bell pepper, sliced - 1 yellow bell pepper, sliced - 1 green bell pepper, sliced - 1 medium red onion, sliced - 3 tablespoons olive oil - 2 teaspoons chili powder - 1 teaspoon cumin - 1 teaspoon smoked paprika - 1 teaspoon garlic powder - Salt and pepper, to taste - 1 cup cooked quinoa or rice (for serving) - Fresh cilantro, chopped (for garnish) - Lime wedges (for serving) The spice mix in this dish gives it a vibrant taste. Each spice has a role. - Chili powder adds heat and depth. - Cumin brings a warm, earthy flavor. - Smoked paprika adds a hint of smokiness. - Garlic powder gives a savory touch. Together, they create a bold, exciting flavor profile. Adjust spice amounts to fit your taste. You can serve this dish in many ways. Here are some ideas: - Serve over a bed of cooked quinoa or rice for a hearty meal. - Top with fresh cilantro for brightness. - Squeeze lime over the bowls for a zesty kick. - Pair with a side of avocado or black beans for extra nutrition. These simple touches will elevate your sheet pan chicken fajita bowls. Enjoy! Start by gathering all your ingredients. You need: - 1 lb boneless, skinless chicken breasts, sliced into thin strips - 1 red bell pepper, sliced - 1 yellow bell pepper, sliced - 1 green bell pepper, sliced - 1 medium red onion, sliced - 3 tablespoons olive oil - 2 teaspoons chili powder - 1 teaspoon cumin - 1 teaspoon smoked paprika - 1 teaspoon garlic powder - Salt and pepper, to taste - 1 cup cooked quinoa or rice (for serving) - Fresh cilantro, chopped (for garnish) - Lime wedges (for serving) Preheat your oven to 400°F (200°C). Line a large baking sheet with parchment paper. This makes cleanup easy. In a large bowl, combine the sliced chicken, bell peppers, and onion. Drizzle 3 tablespoons of olive oil over the chicken and veggies. Add 2 teaspoons of chili powder, 1 teaspoon of cumin, 1 teaspoon of smoked paprika, and 1 teaspoon of garlic powder. Season with salt and pepper to taste. Toss everything well until the chicken and vegetables are coated with the spices and oil. Spread them evenly on the baking sheet in a single layer. Bake for 20-25 minutes. The chicken must reach an internal temperature of 165°F. The vegetables should be tender and slightly caramelized. While the chicken and veggies bake, cook your quinoa or rice according to the package instructions. After you take the sheet pan out of the oven, let it cool for a few minutes. Serve the chicken and vegetables over a bed of quinoa or rice in bowls. Garnish with fresh cilantro. Add lime wedges on the side for squeezing over the bowls. Enjoy your colorful and tasty meal! To get perfectly cooked chicken, slice it thin. This helps it cook faster and evenly. Make sure your oven is preheated to 400°F. Cook the chicken until it reaches 165°F inside. Use a meat thermometer for the best results. Let the chicken rest for a few minutes after baking. This keeps it juicy. You can add more flavor by mixing in other veggies. Consider corn, zucchini, or black beans. These add color and taste to your dish. For spice lovers, add jalapeños or cayenne pepper. Fresh herbs like parsley or basil can also boost flavor. Squeeze lime juice over the top for a bright finish. Use a large, rimmed baking sheet to fit all your ingredients. Line it with parchment paper for easy cleanup. Spread your chicken and veggies out in a single layer. This helps them cook evenly and get some nice caramelization. Don’t overcrowd the pan; this keeps things crisp. Check on them halfway through cooking to stir or rearrange if needed. {{image_2}} You can easily make a vegetarian version of these fajita bowls. Instead of chicken, use black beans or chickpeas. They add protein and fiber. Simply toss the beans with the same spices. You can also add more colorful veggies, like zucchini or corn. This makes the dish vibrant and tasty. If you want to switch up the protein, try using shrimp or tofu. Shrimp cooks fast and adds a nice flavor. Tofu is great for a plant-based meal. Just marinate the tofu in the spice mix before baking. This way, it soaks up all the yummy flavors. While quinoa or rice is a great base, you can try other grains. Consider using farro or barley for a nutty taste. They add texture and depth to your meal. Cauliflower rice is a low-carb option if you want something lighter. Each grain brings its own flair to the dish. After your meal, let the chicken fajita bowls cool down. Place leftover food in an airtight container. You can store it in the fridge for up to three days. This keeps the flavors fresh and the food safe. If you plan to eat it later, store the chicken and veggies separate from the grain. This prevents sogginess. When you’re ready to enjoy your leftovers, reheat them in the oven for best results. Preheat your oven to 350°F (175°C). Place the chicken and veggies on a baking sheet. Heat them for about 10-15 minutes, or until warm. You can also use the microwave. Just heat in short bursts, stirring in between, to avoid hot spots. If you want to save your fajita bowls for a long time, freezing is a great option. Let the chicken and veggies cool completely before freezing. Place them in a freezer-safe container or bag. Squeeze out any air to prevent freezer burn. You can freeze them for up to three months. When ready to eat, thaw in the fridge overnight before reheating. Yes, you can use frozen chicken. However, it’s best to thaw the chicken first. Cooking frozen chicken may lead to uneven cooking. If you must use it frozen, increase the baking time. Make sure to check the internal temperature to reach 165°F. You can use several substitutes for quinoa or rice. Try couscous, farro, or even cauliflower rice. Each option brings a different texture. Make sure to cook it according to package directions before serving. Check the chicken's internal temperature with a meat thermometer. It should read 165°F. The chicken should also be white, not pink, in the center. Cut into a piece to ensure it’s cooked through. If it looks juicy and firm, you’re good to go! This article covered key ingredients and easy steps to make a tasty dish. You learned how to prep your ingredients and cook chicken perfectly. I also shared tips on storing leftovers and exploring variations like vegetarian options. Cooking can be fun and rewarding. Use these methods to create your own delicious meals. Enjoy sharing your tasty results with friends and family!

Sheet Pan Chicken Fajita Bowls Flavorful and Easy Meal

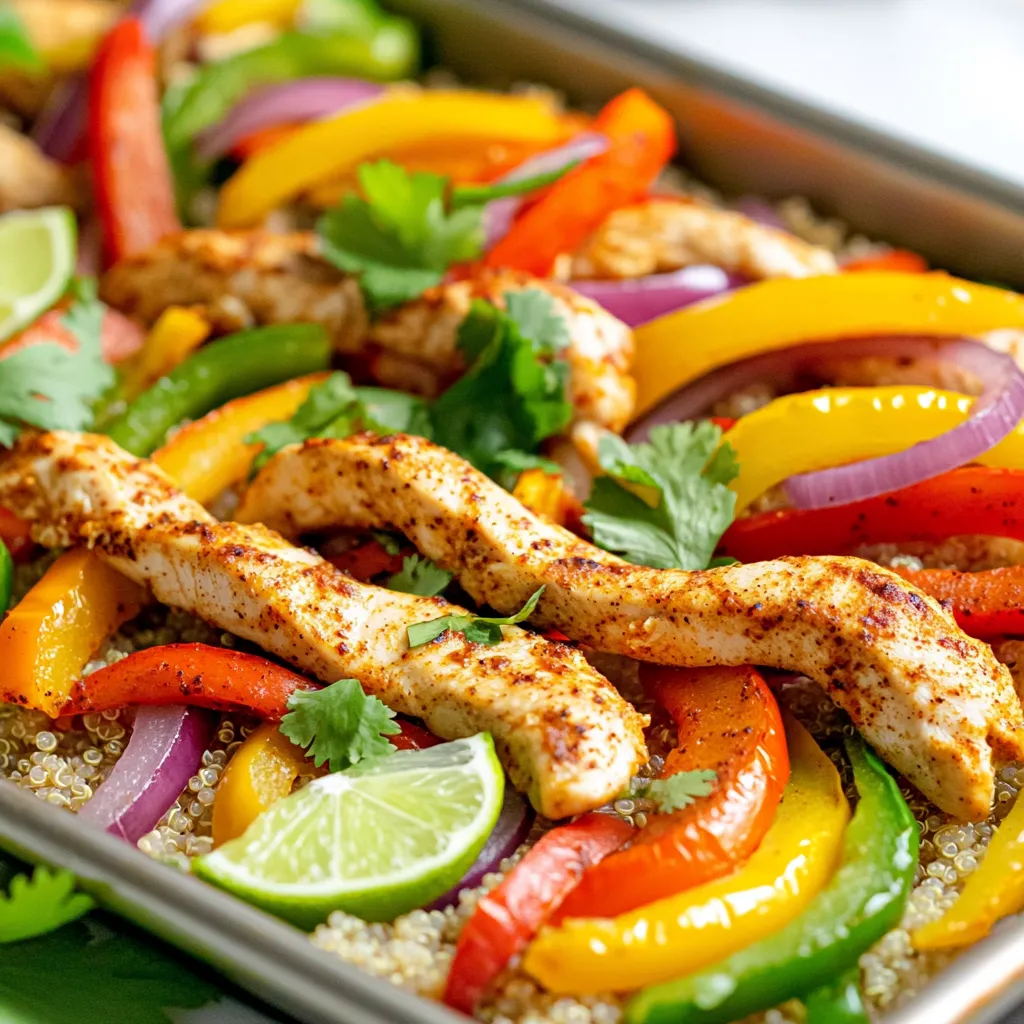
Looking for a meal that’s quick, easy, and packed with flavor? Sheet Pan Chicken Fajita Bowls are your answer! With

Older posts
Newer posts
← Previous Page1 … Page3 Page4 Page5 … Page86 Next →

dsad

© 2026 Cooking Wells • Built with GeneratePress

Our Policies

  • Copyright Policy
  • Cookie Policy
  • GDPR Policy
  • Privacy Policy
  • Disclaimer
  • Terms Of Use

More Information

  • Home
  • About
  • Contact
  • Appetizers
  • Dessert
  • Dinner
  • Drinks
©2026, Cooking Wells About Back To Top