Skip to content
DisclaimerTerms Of UseGDPR PolicyCookie Policy

Cooking Wells

  • Home
  • Drinks
  • Appetizers
  • Dinner
  • Dessert
  • About
  • Contact
  • Privacy Policy
DisclaimerTerms Of UseGDPR PolicyCookie Policy

NO-ING-IMG

- 2 ripe peaches, sliced - 200g burrata cheese, torn into pieces - 100g arugula (rocket) When making this salad, fresh ingredients are key. Start with ripe peaches. They should feel soft but not mushy. Next, grab some burrata cheese. This creamy cheese adds a rich texture. Finally, use fresh arugula. Its peppery flavor balances the sweet peaches. - ¼ cup prosciutto, thinly sliced - Fresh basil leaves, for garnish Adding prosciutto brings a salty kick. It pairs well with the sweet peaches. Fresh basil leaves add a burst of flavor. They also make the salad look pretty. - 2 tablespoons honey - 1 tablespoon balsamic glaze - 1 tablespoon extra-virgin olive oil - Salt and pepper, to taste For the dressing, mix honey, balsamic glaze, and olive oil. This mix gives a sweet and tangy flavor. Season with salt and pepper to enhance the taste. You can adjust these to fit your liking. This salad is all about balance. The sweet peaches, creamy burrata, and peppery arugula come together beautifully. You can find the Full Recipe for more details on how to bring this salad to life. First, wash your peaches well. Use cold water to get them nice and clean. After that, slice the peaches into thin wedges. Aim for about eight slices per peach. The slices should be juicy and sweet. Next, grab a large serving dish. Arrange a bed of fresh arugula in the dish. This peppery green will give your salad a great base. Spread the arugula evenly to cover the bottom. Now, it's time to layer the salad. Take your peach slices and arrange them on top of the arugula. You want to spread them out nicely for a pretty look. Then, take your burrata cheese and tear it into pieces. Scatter the cheese over the peach slices. Burrata adds a creamy touch that balances the sweet peaches. If you like, add thin slices of prosciutto on top for extra flavor. In a small bowl, whisk together honey, balsamic glaze, and olive oil. This mixture will be your dressing. Drizzle it over the salad, making sure to cover the peaches and cheese. Season the salad with salt and pepper to taste. Finally, add fresh basil leaves for garnish. This adds a nice pop of color. Serve your beautiful Peach Burrata Salad right away for the best taste and texture. Enjoy this fresh and flavorful delight! For the full recipe, check out the details above. Choose peaches that are ripe and firm. Ripe peaches feel slightly soft when you press them. Their color should be vibrant, showing hints of yellow and red. Smell the peach too; a sweet aroma means it is ripe. If you find hard peaches, leave them at room temperature for a few days. They will ripen nicely. When you get burrata, treat it gently. Use your hands to tear the cheese into pieces. This avoids squishing it too much. The creamy center will ooze out, adding richness to your salad. Use burrata right away for the best taste. Pair your Peach Burrata Salad with a light white wine. A crisp Sauvignon Blanc works well. You can also serve it with grilled chicken or fish for a full meal. Try adding toasted bread on the side for a crunchy bite. These pairings enhance the fresh flavors of the salad. For the full recipe, check out the details above. {{image_2}} You can make this salad vegetarian by swapping the prosciutto. Try using roasted chickpeas or crispy tofu. These add texture and protein. For cheese, if you want a dairy-free option, use cashew cheese. It has a creamy texture that works well with the peaches. One great way to change up this dish is to add other fruits. Try strawberries in spring or figs in late summer. Both pair nicely with the creaminess of burrata. You can also mix in greens like spinach or kale for extra crunch and nutrition. To elevate the taste, add fresh herbs. Basil works well, but try mint for a refreshing twist. You could also sprinkle some crushed red pepper for a bit of heat. A touch of lemon zest brightens the salad and ties the flavors together. Use these tips from the Full Recipe to create your perfect Peach Burrata Salad! To keep your Peach Burrata Salad fresh, store it in an airtight container. This helps prevent moisture loss. Make sure to keep it in the fridge. Eat the salad within two days for the best taste. If you have extra dressing, store it separately. This keeps the salad crisp and fresh. I do not recommend freezing this salad. The peaches and burrata can lose their texture. Freezing may make the peaches mushy and the cheese watery. If you want to save ingredients, freeze sliced peaches separately. You can use them later in smoothies or other dishes. You should not reheat the salad. It is best served cold. If you have leftovers, enjoy them right from the fridge. If you want to warm it slightly, let it sit at room temperature for about 10 minutes. This will take the chill off without cooking it. Enjoy the fresh flavors as you dive into this delightful dish! Yes, you can make this salad ahead. To keep it fresh, prepare the ingredients separately. Slice the peaches and store them in a bowl with a bit of lemon juice. This will stop them from browning. Keep the burrata and arugula in different containers. Add the dressing just before serving. This way, the salad stays crisp and tasty. There are many fun twists to this salad. You can swap peaches for nectarines or plums. If you don't have burrata, try fresh mozzarella or feta cheese. For a crunch, add nuts like walnuts or almonds. You can also toss in some berries for a pop of color and flavor. The options are endless! To choose ripe peaches, look for a warm color. They should be golden-yellow, not green. Gently squeeze the peach; it should give a little. If it feels hard, it is not ripe yet. Smell the peach; ripe ones have a sweet scent. Picking the right peaches makes all the difference for this salad. This Peach Burrata Salad is fresh, tasty, and easy to make. We discussed key ingredients like ripe peaches, creamy burrata, and peppery arugula. You also learned how to assemble it with simple steps for a beautiful finish. Don’t forget about the tips for picking the best peaches and storing leftovers. You can even try variations based on your mood or season. Enjoy creating this dish; it's a delightful way to celebrate summer flavors!

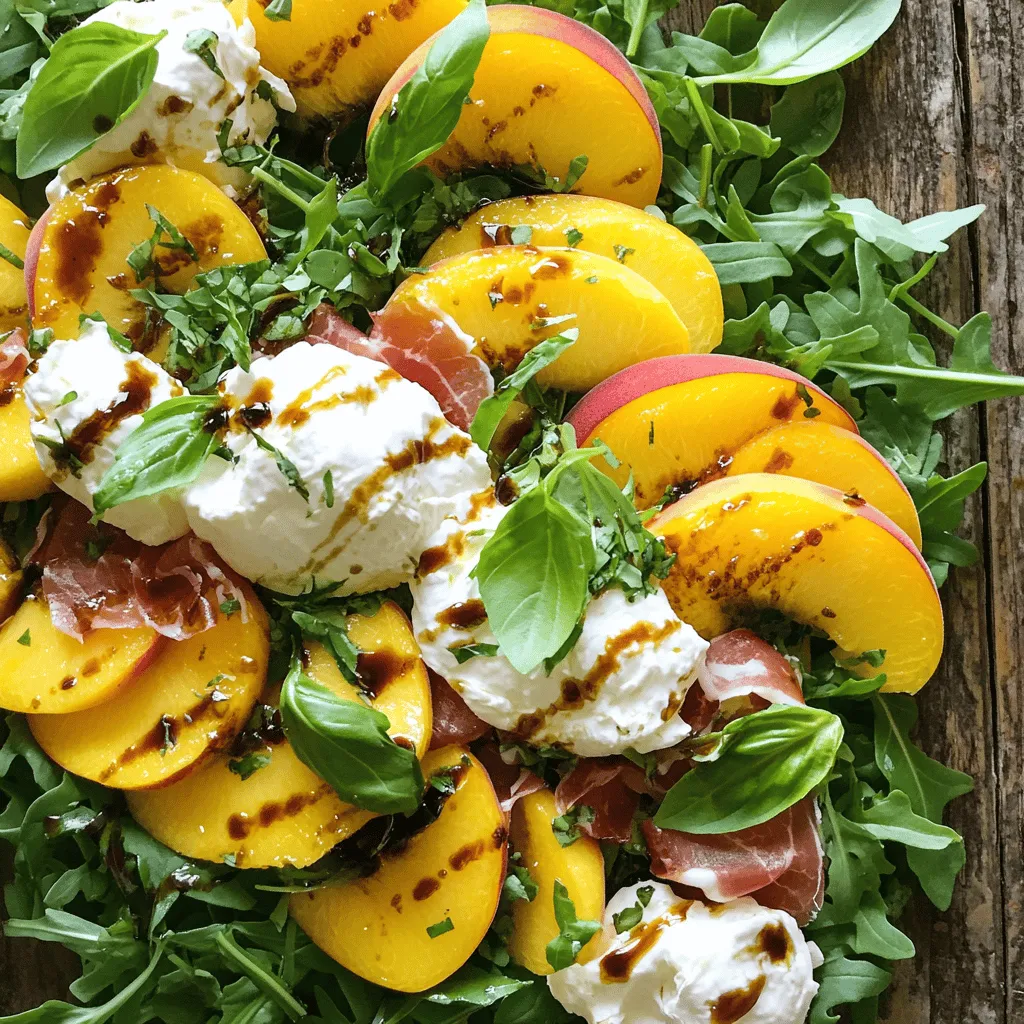
Peach Burrata Salad Fresh and Flavorful Delight

Looking for a fresh and tasty treat? This Peach Burrata Salad is just what you need! With ripe peaches, creamy

- 4 cups fresh spinach, washed and dried - 1 cup strawberries, hulled and sliced - 1/2 cup sliced almonds, toasted - 1/4 cup feta cheese, crumbled - 1/4 cup red onion, thinly sliced - 1/4 cup balsamic vinaigrette - 1 tablespoon honey - Salt and pepper to taste When making this salad, focus on freshness. Fresh spinach acts as the base, giving the salad a crisp texture. The strawberries add a sweet burst of flavor. You can choose ripe, juicy strawberries to enhance the taste. The toasted almonds bring a nice crunch, while feta cheese adds a creamy, tangy element. Red onion gives a slight bite that pairs well with the other flavors. For the dressing, balsamic vinaigrette and honey create a perfect balance of sweet and tangy. You can adjust the honey to taste. This salad is simple yet packed with flavors. You can find the full recipe at the end of this article. Enjoy these fresh ingredients in your next meal! Start by washing and drying 4 cups of fresh spinach. Spinach adds a nice crunch and bright color. Next, hull and slice 1 cup of strawberries. Their sweet flavor shines in this salad. In a large bowl, combine the spinach and strawberries. Now it’s time to add some texture. Toss in 1/2 cup of sliced almonds that are toasted. They add a nice crunch. Next, crumble 1/4 cup of feta cheese on top. Feta brings a creamy tang that balances the sweetness of the strawberries. For a bit of bite, add 1/4 cup of thinly sliced red onion. This mix makes a colorful and tasty base. For the dressing, take a small bowl. Whisk together 1/4 cup of balsamic vinaigrette and 1 tablespoon of honey. This combination gives a sweet and tangy flavor. Make sure to blend them well until smooth. If the dressing seems too thick, you can add a tiny bit of water. This helps get the right consistency. You want it to coat the salad without being too runny. Now it's time to bring it all together. Drizzle the dressing over your salad base. Gently toss the ingredients to coat them evenly. Be careful not to squish the strawberries. Finally, season the salad with salt and pepper to taste. Give it one last gentle toss. This step enhances the flavors and makes the salad shine. Serve immediately to enjoy the freshness of your Strawberry Spinach Bliss Salad. You can find the full recipe above. To enjoy your strawberry spinach salad, start with fresh ingredients. Store your spinach in a cool, dry place. Place it in a container lined with a paper towel. This helps absorb excess moisture. For strawberries, keep them in the fridge. Store them in a single layer to avoid bruising. Check them often for any signs of spoilage. When choosing strawberries, look for bright red color. They should feel firm, not mushy. Check the green tops; they should be fresh and green. Avoid strawberries with white or green spots. This means they are not ripe. To boost the flavor of your salad, consider adding toppings. Walnuts or pecans add a nice crunch. Dried cranberries or blueberries can add sweetness. You can also try avocado for creaminess. If you want extra flavor, try goat cheese instead of feta. It gives a tangy taste that pairs well with strawberries. For dressings, balsamic vinaigrette is classic, but feel free to experiment. Try a honey mustard dressing for a sweet twist. A citrus vinaigrette can add a fresh zing. Mix and match to find your favorite flavor combinations. For the full recipe, check out the Strawberry Spinach Bliss Salad. {{image_2}} You can easily switch nuts for seeds in this salad. If you like sunflower seeds or pumpkin seeds, they work great. They add crunch and flavor. Simply sprinkle them on top like you would with nuts. Different dressings can also change the taste. Instead of balsamic vinaigrette, try a honey mustard or citrus dressing. Each dressing brings a new twist. So, feel free to mix and match to find your favorite. Using seasonal fruits makes this salad even better. In summer, add peaches or blueberries. In fall, try apples or pears. Each fruit brings its own special taste. You can adjust the salad based on what you find fresh at the market. Incorporating seasonal vegetables is another great idea. For spring, add snap peas or radishes. In winter, consider roasted beets or kale. These changes keep your salad fresh and exciting all year long. For the full recipe, check out the details above. To keep your strawberry spinach salad fresh, use an airtight container. This method helps keep the salad crisp and tasty. If you have extra salad, store it in the fridge right away. You can enjoy it for up to three days. After that, the spinach may wilt, and the strawberries may lose their sweet flavor. Can salad be frozen? No, I do not recommend freezing the whole salad. Freezing changes the texture of fresh ingredients like spinach and strawberries. However, you can freeze some parts. For instance, you can freeze sliced strawberries. Place them on a baking sheet first to prevent clumping. Once frozen, transfer them to a freezer bag. This way, you can enjoy them later in smoothies or other dishes. Just remember to keep the dressing separate. It’s best fresh! For the full recipe, check out the main article. Can I make the salad ahead of time? Yes, you can make this salad ahead. However, I suggest keeping the dressing separate. Mix it in just before serving. This keeps the spinach fresh and crisp. If you mix too early, the leaves may wilt. How long does the salad last? You can store the salad in the fridge for up to two days. The spinach will lose its texture after that. If you notice any slimy leaves, it's best to toss it out. Calories per serving Each serving has about 200 calories. This number may change based on the dressing amount used. If you add more cheese or nuts, the calories will go up. Benefits of the ingredients used Spinach is full of vitamins A and K. Strawberries add antioxidants and vitamin C. Almonds provide healthy fats and protein. Feta cheese offers calcium. Balsamic vinaigrette adds flavor without too many calories. This salad is a tasty way to eat healthy. Pairing options for complementary dishes This salad goes well with grilled chicken or fish. You can serve it as a side with a light pasta dish. It also pairs nicely with crusty bread. Best occasions for serving this salad Enjoy this salad at picnics or summer barbecues. It’s also a great choice for brunch. Serve it at family gatherings or as a light lunch. For the full recipe, check out the Strawberry Spinach Bliss Salad. This blog post covered all you need for a delicious strawberry spinach salad. We talked about the key ingredients like fresh spinach and ripe strawberries. You learned how to mix these, make a tasty dressing, and store leftovers properly. You also discovered tips for enhancing flavor and simple ingredient swaps. Incorporating seasonal produce can add variety too. With a little creativity, you can enjoy this salad year-round. Now, get started on your salad journey and enjoy every bite!

Strawberry Spinach Salad Fresh and Flavorful Delight

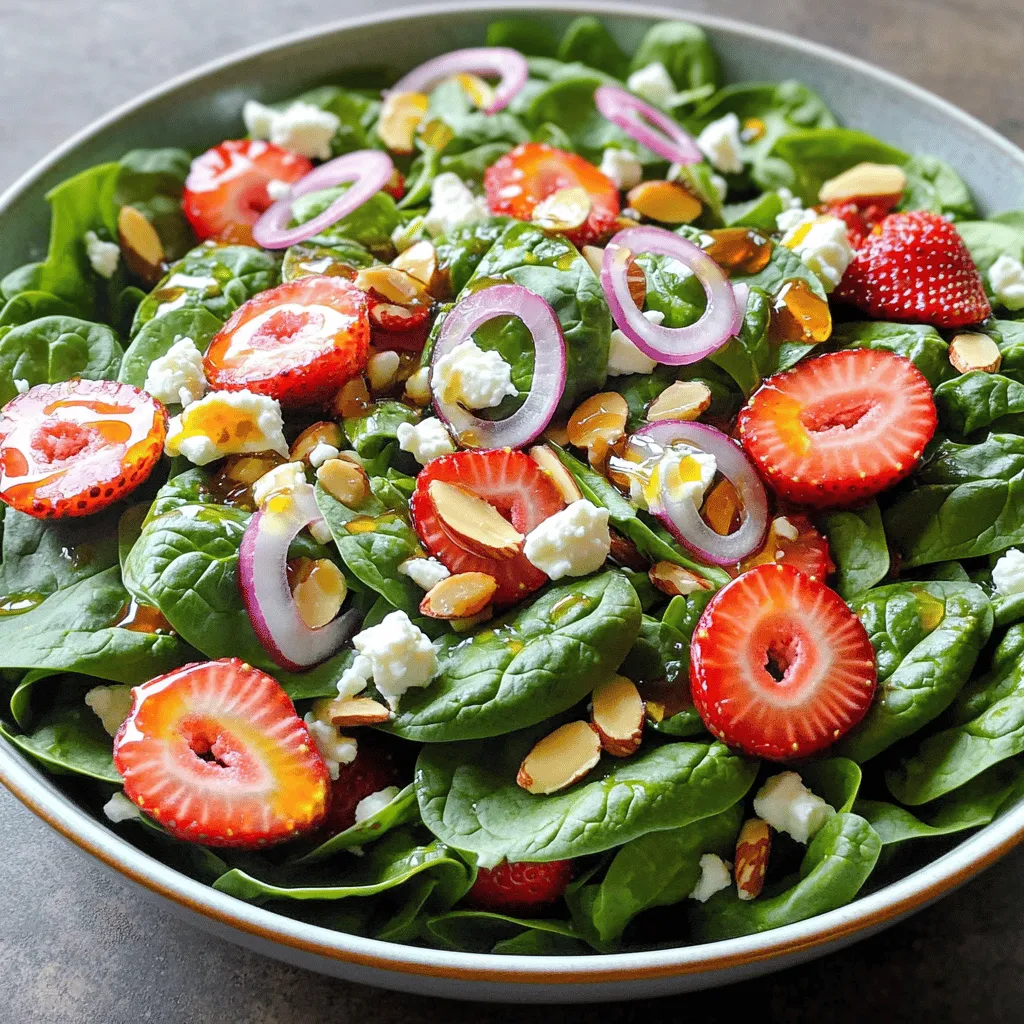
Looking for a fresh and tasty salad that stands out? The Strawberry Spinach Salad is your answer! This vibrant dish

- 4 cups of cubed watermelon - 1/2 cup finely diced red onion - 1/4 cup chopped fresh cilantro - 1 jalapeño pepper, finely sliced (seeds removed for less heat) - 2 tablespoons lime juice - 1 tablespoon olive oil - 1 teaspoon chili powder - Salt to taste - Optional: Crumbled feta cheese for garnish The main ingredients in this salad are fresh and vibrant. Watermelon is the star, with its sweet and juicy flavor. I like to use ripe watermelon, as it adds the best taste. The red onion brings a nice crunch and a mild bite. Fresh cilantro gives the salad a bright, herbal note. For a little heat, I slice jalapeño pepper. You can remove the seeds for less spice, or keep them for more kick. The dressing is simple yet key. Lime juice adds tanginess, while olive oil brings richness. Chili powder gives a warm flavor. A pinch of salt enhances all the tastes. If you want, sprinkle feta cheese on top for a creamy touch. You can find the Full Recipe to create this zesty and refreshing treat! To start, you need to cube the watermelon. First, cut the watermelon in half. Next, place one half flat on the cutting board. Slice it into long strips about one inch thick. Then, turn the strips and cut them into cubes. Repeat this with the other half. Aim for even pieces for a nice look. Now, let's clean and prepare the jalapeño. Rinse it under cold water. Cut off the stem and slice it in half lengthwise. Use a spoon to scoop out the seeds for less heat. Then, finely slice the jalapeño. If you like it spicy, keep some seeds in. In a large mixing bowl, combine the cubed watermelon, diced red onion, chopped cilantro, and sliced jalapeño. Make sure everything is mixed well, so each bite has flavor. Next, make the dressing in a separate bowl. Whisk together the lime juice, olive oil, chili powder, and a pinch of salt. Mix until it’s smooth and well combined. This dressing is key to your salad's zesty taste. Now, it’s time to toss the salad. Pour the dressing over the watermelon mixture. Gently toss everything to coat. Taste it and adjust the flavor as needed. If it needs more salt or chili powder, add it now. Allow the salad to sit for about 10 minutes before serving. This wait helps the flavors mix well. If you like, sprinkle crumbled feta cheese on top for a tasty finish. Enjoy your Chili Lime Watermelon Salad! For the full recipe, check the earlier sections. To make your Chili Lime Watermelon Salad pop, consider adjusting the spice level. If you love heat, add more jalapeños. Keep the seeds for extra kick or remove them for milder flavor. This lets you control the heat perfectly. You can also add a hint of sweetness. A drizzle of honey or agave syrup can balance the spicy lime. This simple trick brings out the best in the watermelon. Experiment with how much you add until it’s just right for your taste. Serving your salad in a fun way makes it even more appetizing. Use a large salad bowl for a family-style dish. For individual servings, try small cups or mason jars. This adds a fun touch and makes it easy to share. Garnishing is key to elevating the dish. Sprinkle extra cilantro on top for a fresh look. Lime wedges on the side add color and make a great touch. If you use feta cheese, the white will contrast nicely with the bright colors. These simple steps make your salad look as good as it tastes. For the complete recipe, check out the Full Recipe section. {{image_2}} You can change things up in this salad. Try using different fruits like mango or pineapple. Both fruits bring sweetness and balance to the spicy flavor. Mango adds a tropical twist, while pineapple gives a tangy punch. You can also swap herbs. If you’re not a fan of cilantro, use mint instead. Mint adds a fresh taste that pairs well with the watermelon. Want to make this salad vegan? Just leave out the feta cheese. The salad stays bright and tasty without it. You can also add vegan cheese if you like. For gluten-free options, you can mix in nuts or seeds. These add crunch and nutrition without gluten. Feel free to get creative with toppings that fit your diet! To keep your Chili Lime Watermelon Salad fresh, store it in the fridge. Use a sealed container to keep air out. This salad is best eaten within two days. After that, the watermelon can become mushy. If you notice extra juice, drain it before serving. This helps keep the salad crisp. I don’t recommend freezing Chili Lime Watermelon Salad. Freezing changes the texture of watermelon. When thawed, it can become watery and unappetizing. It’s best to enjoy this salad fresh. If you want to prep ahead, chop your ingredients but mix them just before serving. This keeps the salad vibrant and delicious. For the full recipe, check the earlier section. Cutting watermelon evenly makes a big difference. First, slice the watermelon in half. Then, place each half flat on the cutting board. - Cut into wedges: Start from the center and cut into long triangles. - Cube the wedges: Take each triangle and cut it into small cubes. Aim for 1-inch pieces for uniform size. - Remove seeds: Check for seeds and remove them as you cut. This helps with texture. These tips help your salad look neat and feel great to eat. Yes, you can prep this salad ahead. However, I suggest keeping some parts separate to maintain freshness. - Watermelon: Cut and store it in an airtight container in the fridge. - Onion and jalapeño: Chop these and keep them in another container. - Dressing: Mix lime juice, olive oil, and spices ahead of time. Store it in a jar. Combine all ingredients just before serving. This keeps the watermelon crisp and the flavors bright. You can switch up the dressing based on your taste. Here are some ideas: - Honey lime vinaigrette: Mix honey with lime juice for sweetness. - Balsamic glaze: Drizzle some balsamic for a tangy twist. - Cilantro lime dressing: Blend cilantro with lime juice and olive oil for a fresh flavor. Feel free to explore different flavors that suit your mood! This recipe gives you four servings. Each serving is about one cup of salad. If you need more, just double the ingredients. You can easily adjust it for a larger crowd. Enjoy sharing this tasty treat! This blog post showed how to make a tasty Chili Lime Watermelon Salad. You learned about the main ingredients, how to prepare them, and mix everything together. We explored tips to adjust flavors and gave garnish ideas. Plus, we discussed ingredient swaps for personal taste and dietary needs. Remember, experimenting with this salad can lead to your unique favorite. Enjoy making it fresh and sharing it with others!

Chili Lime Watermelon Salad Zesty and Refreshing Treat

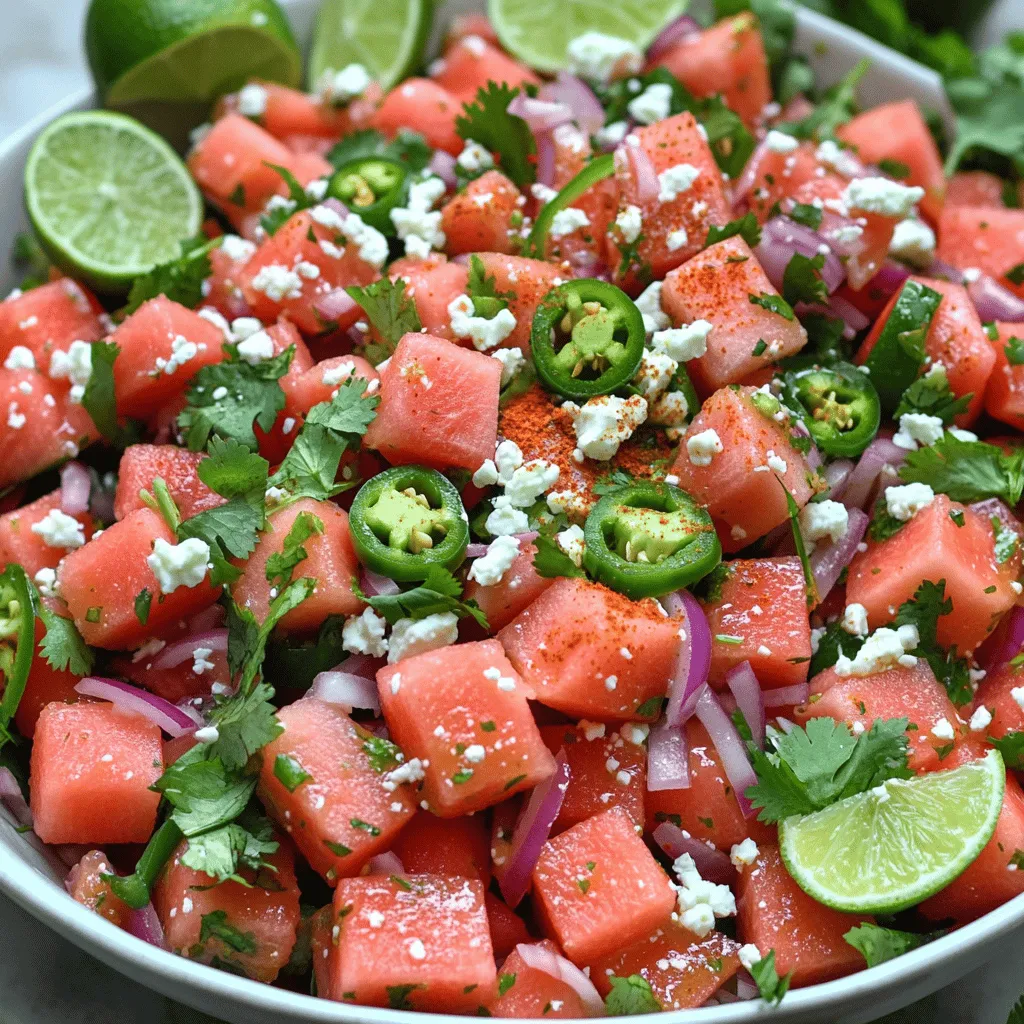
Looking for a refreshing treat to cool you down? Try my Chili Lime Watermelon Salad! This salad bursts with flavor

- 6 large eggs - 1 cup of water - Ice bath (a bowl filled with ice and water) - Salt - Pepper - Paprika When it comes to making air fryer hard-boiled eggs, having the right ingredients is key. You only need a few items. First, grab six large eggs. Fresh eggs work best. Next, prepare one cup of water. This will create steam, which helps cook the eggs evenly. Finally, make an ice bath. Fill a bowl with ice and water. This will cool the eggs quickly after cooking. You can also add some optional ingredients for serving. A pinch of salt adds flavor. Pepper gives a nice kick. A sprinkle of paprika can add color and taste, too. These simple ingredients can elevate your dish. Enjoy your delicious air fryer hard-boiled eggs! For the full recipe, check out the detailed cooking instructions. - Preheat air fryer to 270°F (130°C). - Prepare the ice bath for cooling eggs. Start by preheating your air fryer to 270°F (130°C). This step is key for even cooking. While it heats up, fill a bowl with ice and water. This will be your ice bath, which cools the eggs quickly. - Place eggs in the air fryer basket without touching. - Add water to the bottom of the air fryer. - Cook eggs for 15 minutes and adjust time based on yolk preference. Next, take six large eggs and place them in the air fryer basket. Make sure the eggs do not touch each other. Then, pour one cup of water into the bottom of the air fryer. This water creates steam, which helps cook the eggs evenly. Cook the eggs for 15 minutes. If you like your yolks softer or firmer, adjust the cooking time slightly. - Transfer eggs to the ice bath. - Cool for 5-7 minutes before peeling. - Tips for easy peeling: rinse under cold water if needed. Once the timer goes off, carefully remove the basket from the air fryer. Right away, transfer the eggs to your ice bath. Let them cool for about 5-7 minutes. This stops the cooking process and makes peeling easier. To peel, gently tap the eggs on a hard surface. If the shells stick, rinse them under cold water. This helps to remove the shell smoothly. For the full recipe, refer to the Air Fryer Magic: Hard Boiled Eggs 🥚. Enjoy your perfectly cooked hard-boiled eggs! To get the best texture for your hard-boiled eggs, you can adjust the cooking time. If you want softer yolks, cook the eggs for about 12 minutes. For firmer yolks, extend the time to 17 minutes. The ice bath is key here. After cooking, transfer the eggs to the ice bath. This helps stop the cooking process and keeps the yolks from turning green. One common mistake is overcrowding the air fryer basket. Make sure the eggs do not touch each other. This allows for even cooking. Another mistake is not using water. Pour one cup of water into the air fryer. This water creates steam, which helps cook the eggs perfectly. For a nice presentation, slice the hard-boiled eggs in half and place them on a platter. Sprinkle with salt and pepper for flavor. You can also add paprika for a burst of color and taste. These simple enhancements make your dish look and taste gourmet. For more tips, check out the Full Recipe. {{image_2}} You can adjust cooking times for different yolk textures. For soft-boiled eggs, cook for about 10 to 12 minutes. For medium-boiled eggs, 12 to 14 minutes works well. The longer you cook, the firmer the yolk will be. If you like a runny yolk, aim for 10 minutes. Flavor adds fun to your eggs. You can sprinkle garlic powder, onion powder, or chili powder on top. These spices give your eggs a tasty twist. Try adding fresh herbs, like chives or dill, for a bright touch. Not all eggs are the same size. If you use small eggs, cut the cooking time by 1 to 2 minutes. For extra-large eggs, add a minute or two. The size can change how they cook, so keep an eye on them! For small eggs, check at the 12-minute mark. For extra-large, start checking at 16 minutes. This way, you will get perfect eggs every time. Remember, the ice bath is key to stopping the cooking process quickly! To store leftover hard-boiled eggs, keep them in their shells. This helps keep them fresh. Use a covered container to avoid any odors from the fridge. - Recommended storage container types: - Airtight plastic containers - Glass containers with lids Hard-boiled eggs can last in the fridge for about one week. Mark the container with a date to track freshness. If you need to reheat them, do so gently. - Best methods for reheating: - Place eggs in warm water for a few minutes. - Use a microwave with a damp paper towel, but be careful! Cook hard-boiled eggs for 15 minutes at 270°F (130°C). This time gives you firm yolks. If you want softer yolks, reduce the time by a couple of minutes. You might need to test a few batches. Every air fryer cooks a bit differently. No, stacking eggs can cause uneven cooking. They need space to cook evenly. If eggs touch, some may not cook well. Keep them in a single layer for the best results. Yes, they are safe when cooked properly. Always make sure to use fresh eggs. Handle them with clean hands to avoid germs. After cooking, cool them in an ice bath. This stops the cooking process and helps with peeling. Look for signs like a firm white and yolk. If they are still soft, they need more time. You can also do a simple test: spin the egg. If it spins easily, it’s done. If it wobbles, it needs more cooking. This blog covered how to make perfect hard-boiled eggs in an air fryer. We discussed key ingredients, preparation steps, and cooking methods. I shared tips to avoid common mistakes and enhance the dish with spices. You can also try different egg sizes and cooking times for your preferred texture. Store leftovers wisely to enjoy fresh eggs later. Now, with this guide, you can easily cook eggs just how you like them. Enjoy your tasty, homemade hard-boiled eggs!

Air Fryer Hard Boiled Eggs Simple Cooking Guide

Are you tired of cracked shells and inconsistent yolks when making hard-boiled eggs? You’re in luck! I’m here to share

- 6 large eggs - 3 tablespoons mayonnaise - 1 tablespoon Greek yogurt - 2 tablespoons hot sauce (like Frank's RedHot) - 1 teaspoon Dijon mustard - 1/4 teaspoon garlic powder - Salt and pepper to taste - 2 tablespoons crumbled blue cheese (plus extra for garnish) - Chopped green onions for garnish - Optional: celery sticks for serving - Pot for boiling eggs - Mixing bowl - Fork or potato masher - Piping bag (optional) - Ice water bowl To make Buffalo deviled eggs, you need simple yet tasty ingredients. Start with six large eggs. They form the base of this dish. Next, you will add three tablespoons of mayonnaise. This gives the filling a creamy texture. One tablespoon of Greek yogurt adds a nice tang. Then, you need two tablespoons of hot sauce. I like to use Frank's RedHot for that classic kick. One teaspoon of Dijon mustard adds depth to the flavor. A touch of garlic powder gives it an extra layer. Don’t forget salt and pepper to taste. They enhance all the flavors. For a rich taste, fold in two tablespoons of crumbled blue cheese. You can also save some for the garnish. Finally, chop green onions for a fresh finish. You can serve these eggs with celery sticks on the side. They add a nice crunch and coolness. All these ingredients come together for a delightful appetizer. You can find the full recipe easily to get started. - Step 1: Boiling the eggs To start, take 6 large eggs and place them in a pot. Cover the eggs completely with cold water. Heat the pot on medium-high until the water boils. Once it starts boiling, cover the pot and take it off the heat. Let the eggs sit for about 12-15 minutes. This step is key for perfect hard-boiled eggs. - Step 2: Cooling the eggs After the time is up, carefully move the eggs to a bowl filled with ice water. Let them cool for about 5 minutes. This makes peeling easier and helps stop the cooking process. - Step 3: Creating the yolk mixture Now, it’s time to prepare the filling. Slice the cooled eggs in half lengthwise. Gently scoop out the yolks into a mixing bowl. Add 3 tablespoons of mayonnaise, 1 tablespoon of Greek yogurt, 2 tablespoons of hot sauce, 1 teaspoon of Dijon mustard, and 1/4 teaspoon of garlic powder. Don’t forget to season with salt and pepper to taste. - Step 4: Combining with blue cheese Use a fork to mash the yolk mixture until it's smooth and creamy. Once it's well mixed, fold in 2 tablespoons of crumbled blue cheese. This adds a rich flavor that pairs perfectly with the hot sauce. - Step 5: Filling the egg whites Grab a piping bag or just a spoon. Fill each egg white half generously with the yolk mixture. Make sure to fill them well; this is where the flavor shines. - Step 6: Adding garnishes To make them look great, sprinkle extra blue cheese and some chopped green onions on top. These add a nice pop of color and flavor. If you want extra crunch, serve with celery sticks on the side. Enjoy your Buffalo Deviled Eggs! Check out the Full Recipe for more details. To make peeling eggs easy, use older eggs. Fresh eggs stick to their shells. After cooking, cool the eggs in ice water. This helps separate the egg from the shell. Cook times can vary. For a softer yolk, try 10-12 minutes. For a firmer yolk, go for 12-15 minutes. If you want a milder taste, cut back on the hot sauce. You can also swap it for a milder sauce. For a spicier kick, add more hot sauce or mix in cayenne pepper. Feel free to change the blue cheese too. Use feta for a lighter flavor or omit it entirely. Serve your Buffalo deviled eggs on a colorful platter. This makes them pop at parties. You can use celery sticks as a base for the eggs. For garnishing, sprinkle extra blue cheese and green onions on top. A drizzle of hot sauce adds color and flavor. {{image_2}} You can change up buffalo deviled eggs in fun ways. Adding different types of cheese gives a new taste. Creamy cheddar or tangy feta work well. Each cheese adds its own flavor and texture. You can also mix herbs or spices into the filling. Fresh chives, dill, or even smoked paprika add great depth. These small changes can make a big impact on flavor. If you want to try something else, consider spicy chipotle deviled eggs. They use chipotle sauce instead of hot sauce. This gives a smoky and spicy kick. Another option is classic deviled eggs with a twist. You can add bacon bits or avocado for a rich flavor. Each of these recipes keeps the spirit of deviled eggs while adding a new twist. For the full recipe, check out the details above. To keep your buffalo deviled eggs fresh, store them in the fridge. Place them in a container with a lid. This will help keep them from drying out. If you have the egg whites and yolk mixture separate, store each part in its own container. This can help maintain texture and flavor. How long do buffalo deviled eggs last? If stored properly, they last about 3 to 5 days in the fridge. Keep an eye on the date you made them. Signs of spoilage include a sour smell or a change in color. If you see any odd spots or the eggs look wet, it is best to toss them. Enjoy these tasty treats while they are fresh! You can serve buffalo deviled eggs with many tasty options. Here are some great appetizer pairings: - Celery sticks - Carrot sticks - Crackers - Chips - Veggie platter - Buffalo chicken dip - Cheese platter These items will complement the spicy flavor and creamy texture of the eggs. You can mix and match to find your favorite combinations. Yes, you can prepare buffalo deviled eggs ahead of time. This makes them a perfect choice for parties. Here’s how to do it: - Make the filling and fill the egg whites. - Cover the eggs tightly with plastic wrap. - Store them in the fridge for up to 24 hours. When you are ready to serve, just add the garnishes. This saves time and reduces stress. I recommend using Frank's RedHot for buffalo deviled eggs. It has a great balance of heat and flavor. Other good options include: - Crystal Hot Sauce - Texas Pete - Cholula Each sauce brings its own unique taste. You can also mix sauces to find your perfect heat level. Enjoy experimenting with flavors to make your deviled eggs shine! For the full recipe, check out the instructions above. In this blog post, we covered how to make delicious buffalo deviled eggs. I shared the necessary ingredients and kitchen tools. You learned step-by-step instructions to cook, prepare, and assemble the dish. We also discussed tips for perfecting the eggs and ideas for presenting them. Buffalo deviled eggs are versatile and fun to make. You can adjust the spice levels based on your taste. Enjoying this dish with friends will surely impress them. Try your variations or stick to the classic recipe. Happy cooking!

Buffalo Deviled Eggs Flavorful and Easy Appetizer

Looking for a fun twist on a classic appetizer? Buffalo Deviled Eggs bring a burst of flavor that your taste

- 6 large eggs - 2 tablespoons mayonnaise - 1 teaspoon Dijon mustard - 1 teaspoon apple cider vinegar - Salt and pepper to taste - 2 tablespoons finely chopped chives - 2 tablespoons finely chopped red onion - 1 tablespoon everything bagel seasoning - Sliced cucumbers or tomatoes for garnish The main ingredients create a rich and creamy base. The eggs provide protein and texture. Mayonnaise adds creaminess while Dijon mustard gives it a little kick. Apple cider vinegar brightens the flavor. Don't forget to season with salt and pepper to taste! Flavor enhancers add depth to your deviled eggs. Chives bring a mild onion flavor. Red onion adds a bit of crunch and color. Everything bagel seasoning ties everything together with its mix of flavors. For a fresh touch, you can add garnishes. Sliced cucumbers or tomatoes make your dish pop. They also add a cool contrast to the creamy filling. You can find the full recipe above to guide you through the steps! - Bring a pot of water to a boil. - Carefully add the eggs and boil for 10-12 minutes. Boiling eggs seems simple, but timing is key. The right time will help you get hard-boiled eggs. If you boil them too long, the yolks will become dry and green around the edges. For perfect eggs, aim for that 10-12 minute mark. - Transfer eggs to an ice bath for 5-10 minutes. - Peel eggs under running water. Once the eggs are done boiling, a quick ice bath helps them cool fast. This makes peeling easier. I find that peeling under running water helps remove the shell without tearing the egg white. Plus, it keeps your hands clean! - Remove yolks and combine with mayonnaise, Dijon mustard, and apple cider vinegar. - Add chives, red onion, and half of the everything bagel seasoning. Next, we need to make that creamy filling. Remove the yolks and place them in a bowl. Add the mayonnaise, Dijon mustard, and apple cider vinegar. Mash everything until smooth. Then mix in chives, red onion, and half of the everything bagel seasoning for that amazing flavor. This mixture is what makes your deviled eggs shine. - Fill egg whites with the yolk mixture. - Sprinkle remaining everything bagel seasoning on top. - Optional garnishing with cucumber or tomato slices. Now comes the fun part! Fill each egg white half with the yolk mixture. I like to use a spoon, but a piping bag can make it look fancy. Once filled, sprinkle the remaining everything bagel seasoning on top. This adds an extra kick. If you want, add cucumber or tomato slices for a fresh touch. You can find the full recipe in the article to help you recreate this dish at home. Using older eggs makes peeling easier. Fresh eggs stick to the shell more. You can also add vinegar or baking soda to the boiling water. This helps the eggs peel off cleanly, making your deviled eggs look nice. You can get creative with your flavors. Try adding different herbs or spices to the filling. Fresh dill or smoked paprika can change the taste. You can also adjust how much everything bagel seasoning you add. More seasoning gives a bolder taste, while less keeps it mild. Pair your deviled eggs with fresh veggies. Carrots, celery, or bell peppers add crunch and color. These eggs work great as appetizers for parties. Arrange them on a platter for a beautiful display. You can also serve them with a dip for extra fun. {{image_2}} Want a kick in your deviled eggs? Add sriracha or hot sauce to the yolk mixture. This heat pairs well with the savory flavors of the everything bagel seasoning. Start by mixing in just a little and taste. You can always add more heat if you want! The spicy flavor makes these eggs a crowd-pleaser at any gathering. For a creamy twist, mix in some mashed avocado. This adds a rich texture that balances the crunch of the everything bagel seasoning. Simply mash ripe avocado with the egg yolks, mayonnaise, and seasonings. It gives a fresh taste and boosts the nutrients. Your guests will love this healthy variation. Bacon brings a savory crunch that enhances the filling. Chop crispy bacon bits and fold them into the yolk mixture. This adds a smoky flavor that complements the seasoning. You can sprinkle extra bacon on top for presentation. Everyone loves bacon, and this version will go fast! Try out these fun variations next time you make Everything Bagel Deviled Eggs. Each one offers a unique taste that keeps your guests coming back for more. For the complete recipe, check out the Full Recipe section. After your guests enjoy the Everything Bagel Deviled Eggs, you might have some left. Store these tasty bites in an airtight container. This helps keep them fresh and tasty. It’s best to eat them within 1-2 days for the best flavor and texture. Want to save time on party day? You can prep the filling ahead of time. Mix the yolks, mayo, mustard, vinegar, and seasonings. Store this filling in the fridge until you need it. Assemble the eggs just before serving. This keeps them fresh and looking great. Enjoy the full recipe for all the details! Yes, you can! Mustard adds flavor to your deviled eggs. Try yellow mustard for a milder taste. Spicy brown mustard gives it a kick. Even honey mustard can work if you like sweet flavors. Each option will change the taste a bit, so feel free to experiment. If you want a different base, you have options. Greek yogurt is a great choice. It adds creaminess and a tangy flavor. Sour cream works well too, giving a rich taste. You can also blend in mashed avocado for a creamy, healthy twist. Making these deviled eggs vegan is simple! Use silken tofu to create a smooth filling. Blend it until creamy and mix in your seasonings. Chickpea salad is another great option. Mash chickpeas and mix with mustard and spices for a tasty filling. Boiling eggs just right is key! For hard-boiled eggs, aim for 10-12 minutes. For soft-boiled, cook for about 6-7 minutes. Medium-boiled eggs take around 8-9 minutes. After boiling, always cool them in an ice bath to stop cooking. This helps with peeling too. Everything bagel deviled eggs are simple and fun to make. You learned the main ingredients, from eggs to seasonings, and the step-by-step process to perfect them. With tips on customizing flavors and serving ideas, you can create a dish your guests will love. Don't forget about the variations to spice things up! Make these deviled eggs your own, and enjoy them fresh or stored for later. They're sure to be a hit at any gathering.

Everything Bagel Deviled Eggs Flavorful Party Snack

Get ready to elevate your snack game with Everything Bagel Deviled Eggs! This tasty twist on a classic favorite mixes

To make this Lemon Blueberry Overnight French Toast, gather these items: - 1 loaf of challah or brioche bread, cut into thick slices - 2 cups almond milk (or any milk of your choice) - 4 large eggs - 1/2 cup Greek yogurt - 1/4 cup maple syrup - Zest of 2 lemons - 1 teaspoon vanilla extract - 1 teaspoon ground cinnamon - 1 1/2 cups fresh blueberries - Pinch of salt - Powdered sugar for dusting (optional) If you don’t have some of these items, here are good swaps: - Use whole milk or oat milk instead of almond milk. - Swap Greek yogurt for regular yogurt or a dairy-free option. - Honey can replace maple syrup for added sweetness. - Any bread like sourdough or whole wheat can work instead of challah or brioche. - For a lemony kick, you can use lime zest in place of lemon zest. This dish serves six people. Here’s a rough breakdown: - Calories: 350 per serving - Protein: 12g - Carbohydrates: 45g - Fat: 12g - Fiber: 2g - Sugar: 10g This recipe packs a tasty punch while keeping things balanced. Enjoy this delightful breakfast treat while knowing it's a tasty way to start your day! {{ingredient_image_1}} First, grab a large mixing bowl. In this bowl, whisk together the almond milk, eggs, Greek yogurt, maple syrup, lemon zest, vanilla extract, ground cinnamon, and a pinch of salt. Make sure to mix until smooth. This step is key to a creamy base. Next, take a 9x13-inch baking dish and grease it with butter or cooking spray. Cut your challah or brioche into thick slices. Arrange these slices in the dish. You can stand them upright or overlap them slightly. This layout helps soak every piece well. Now, pour the egg mixture evenly over the arranged bread. Make sure each slice is soaked well. Gently press down on the bread with your hands. This helps the bread absorb the mixture better. Then, scatter the fresh blueberries on top. Cover the dish with plastic wrap. Place it in the fridge for at least 4 hours, or overnight for best results. This soaking time allows the flavors to deepen and the bread to soften. To get the best texture for your Lemon Blueberry Overnight French Toast, use thick bread. Challah or brioche works great. Cut the slices thick, about one inch. This helps the bread soak up the egg mixture without falling apart. When mixing the eggs and almond milk, whisk well until smooth. This makes every bite creamy and tasty. Let the bread sit in the mixture for at least four hours. Overnight soaking gives it a wonderful texture. If you have leftovers, store them in an airtight container. Keep the French toast in the fridge. It should stay good for up to three days. If you want to save it longer, freeze the slices. Wrap each slice in plastic wrap, then place them in a freezer bag. This way, you can enjoy this delicious dish later. Serve the French toast warm for the best taste. Top it with extra blueberries for color and flavor. A drizzle of maple syrup adds sweetness. For a pretty touch, dust powdered sugar on top. You can also add a sprig of fresh mint or lemon slices. This makes your dish look fancy and inviting. Enjoy your tasty creation! Pro Tips Use Day-Old Bread: For the best texture, use day-old challah or brioche. This will help the bread absorb the egg mixture without becoming too soggy. Experiment with Milk Alternatives: While almond milk works great, feel free to experiment with other milk alternatives like oat or coconut milk for different flavors. Blueberries Variations: Try mixing in other berries such as raspberries or strawberries to create a mixed berry flavor profile. Make Ahead: This dish is perfect for meal prep. You can assemble it the night before and bake it the next morning for a quick and delicious breakfast. {{image_2}} You can switch up the blueberries for other fruits. Try raspberries, strawberries, or blackberries. Each fruit gives a new taste. You can even mix them for extra flavor. If you use frozen fruit, add it before baking. This keeps it juicy and sweet. To make this dish dairy-free, use almond milk or oat milk instead of regular milk. For eggs, try flax eggs or chia seeds mixed with water. Replace Greek yogurt with a dairy-free yogurt. These swaps keep the taste and texture yummy. You won't miss the dairy at all. Add zest from oranges or limes for a citrus boost. A splash of almond extract can give it a nutty twist. You can also sprinkle in some nuts like walnuts or pecans. They add crunch and flavor. Don't forget to experiment with spices, too! A pinch of nutmeg or cardamom can make a big difference. To store your leftover lemon blueberry overnight French toast, let it cool first. Then, place it in an airtight container. This keeps it fresh and moist. You can store it in the fridge for about three days. If you have more than one serving, separate slices with parchment paper. This helps prevent sticking. When you're ready to enjoy your French toast again, preheat your oven to 350°F (175°C). Place the slices on a baking sheet. Heat them for about 10-15 minutes. This warms them up and keeps them crispy. You can also reheat in the microwave for about 30 seconds. Just be careful not to overheat, or they may get soggy. You can freeze leftover French toast for quick breakfasts later. Wrap each slice in plastic wrap or foil. Then, place them in a freezer bag. They can last in the freezer for up to three months. To eat, just thaw in the fridge overnight. Reheat as mentioned before, and enjoy the fresh taste again! Yes, this recipe is perfect for making ahead. You can prepare it the night before. After you soak the bread in the egg mixture, cover it and put it in the fridge. Letting it sit overnight helps the bread soak up all those yummy flavors. In the morning, just bake it! If you don’t have challah or brioche, don’t worry! You can use other types of bread. French bread or Texas toast work well too. Just make sure it’s thick enough to hold the egg mixture. Day-old bread is great because it absorbs more liquid. Leftovers can last about three days in the fridge. Store them in an airtight container. When you’re ready to eat, you can reheat them in the oven or microwave. They taste just as good the next day! This post covered how to make delicious overnight French toast. We discussed the essential ingredients, simple steps, and helpful tips for texture and serving. I also shared variations to suit different diets and preferences. Remember, leftovers can be stored and reheated easily. You can even prepare this dish ahead of time for convenience. Enjoy experimenting with flavors and making it your own. With these tips and tricks, you'll create a delightful breakfast that everyone will love. Happy cooking!

Lemon Blueberry Overnight French Toast Recipe Delight

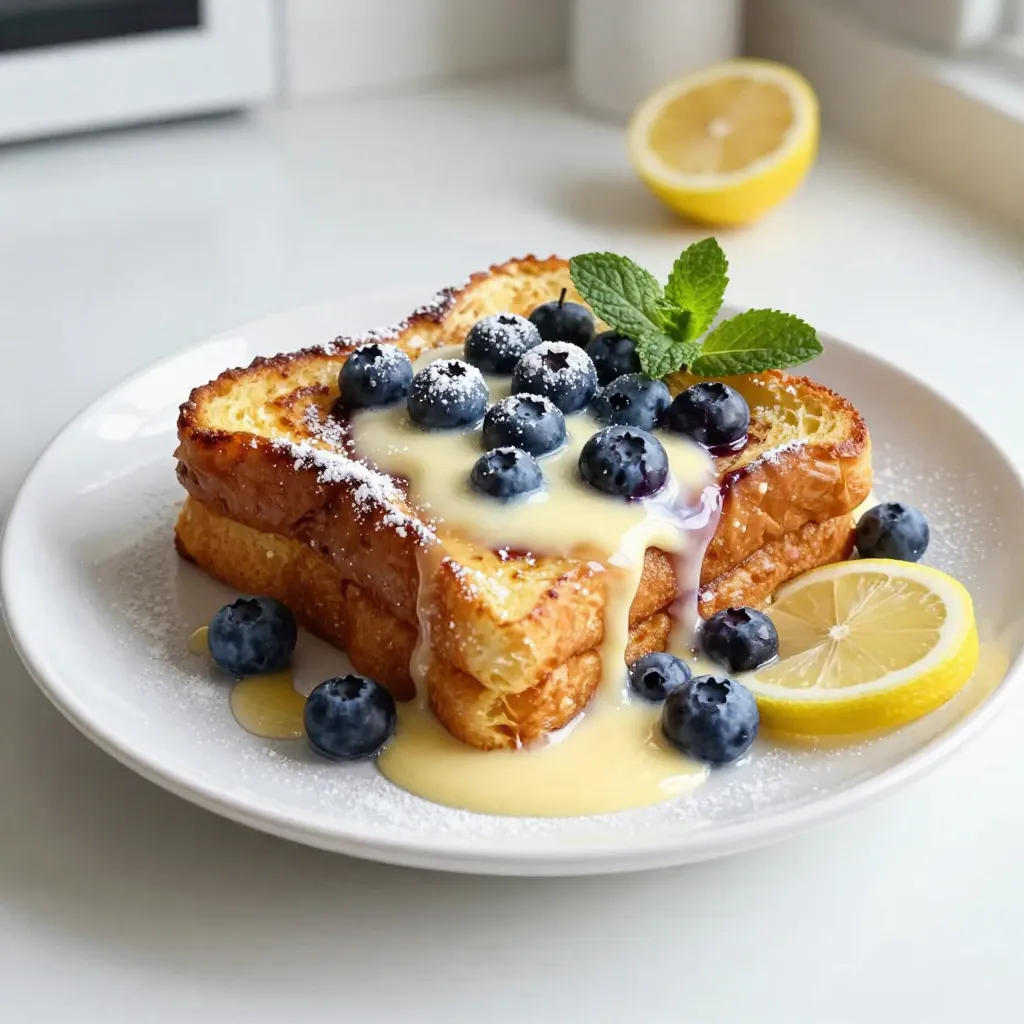
Start your day with a burst of flavor! My Lemon Blueberry Overnight French Toast is a tasty treat that combines

- 1 pound shrimp, peeled and deveined - 2 tablespoons honey - 2 tablespoons lime juice - 1 tablespoon olive oil - 1 teaspoon chili powder - 1/2 teaspoon garlic powder - Salt and pepper to taste - 8 small corn or flour tortillas - 1 cup shredded cabbage - 1/2 cup diced tomatoes - 1 avocado, sliced - Fresh cilantro, for garnish - Lime wedges, for serving Gather all these ingredients before you start. Fresh shrimp works best for flavor. Honey adds a sweet touch, while lime juice gives it a nice zing. Olive oil helps the shrimp cook well. The spices lift the taste and make the dish exciting. You can use corn or flour tortillas based on your liking. Shredded cabbage adds crunch, and tomatoes and avocado bring freshness. Don't forget the cilantro; it adds a burst of flavor. Lime wedges are great for squeezing on top. Enjoy the process of bringing these ingredients together! {{ingredient_image_1}} To start, I mix honey, lime juice, olive oil, chili powder, garlic powder, salt, and pepper in a bowl. This mix makes a great marinade that adds flavor. Next, I add the shrimp into the bowl. I toss the shrimp well to coat them in the marinade. Then, I let the shrimp sit for 15 to 20 minutes. This time allows the shrimp to soak up the tasty marinade. While the shrimp marinates, I heat a skillet over medium-high heat. Once hot, I add the shrimp to the skillet. I cook the shrimp for about 2 to 3 minutes on each side. They are done when they turn pink and opaque. This means they are perfectly cooked. While the shrimp cooks, I warm the tortillas in another skillet or over a flame. I do this for just a few seconds on each side. This step makes the tortillas soft and easy to fold. Now it’s time to build the tacos. I start with a handful of shredded cabbage on each tortilla. Then, I add a few shrimp on top. Next, I sprinkle diced tomatoes and avocado slices over the shrimp. Finally, I garnish each taco with fresh cilantro. I serve the tacos with lime wedges on the side. The lime adds a zesty kick that brightens the dish. - Use fresh lime juice for better taste. Fresh juice adds a bright, zesty flavor. - Experiment with additional spices for a unique twist. Try smoked paprika or cumin for depth. - Use a non-stick skillet for easy shrimp cooking. This helps prevent sticking and makes cleanup simple. - Avoid overcrowding the pan for even cooking. Cook shrimp in batches if needed. This ensures they cook evenly and get a nice sear. - Pair tacos with a side of rice or beans. This adds heartiness to the meal and balances flavors. - Offer a variety of toppings for customization. Consider diced red onion, jalapeños, or crumbled cheese for extra flair. Pro Tips Marinate Longer for More Flavor: If time allows, marinate the shrimp for up to 30 minutes to enhance the flavor of the dish. Use Fresh Ingredients: Opt for fresh lime juice and ripe avocados for the best taste and texture in your tacos. Adjust Spice Level: Feel free to add more chili powder or even a dash of cayenne pepper if you prefer spicier tacos. Experiment with Toppings: Try adding different toppings like sliced jalapeños, feta cheese, or mango salsa for a unique twist. {{image_2}} You can switch up the shrimp in your tacos. Try using chicken or fish instead. Both will work well with the honey-lime flavor. If you want a vegetarian option, tofu is a great choice. Just make sure to press it to remove extra water. This way, it absorbs the marinade better. To add more creaminess, consider a yogurt or sour cream sauce. It adds a nice touch to the tacos. You can also try fresh salsa or pico de gallo. These toppings add freshness and a burst of flavor. If you're looking for a different way to serve these flavors, think about a salad. Use mixed greens instead of tortillas. It makes a light and tasty meal. You could also create a taco bowl. Use rice as the base and add your shrimp and toppings. This option is hearty and filling. To keep your shrimp tacos fresh, store them in an airtight container. This helps prevent them from drying out. It’s best to eat them within 2 days. After this time, they may lose flavor and texture. You can freeze the shrimp before cooking. Just marinate them and place them in a freezer bag. This makes for quick meals later. If you have cooked tacos, store the shrimp separately from the toppings. This keeps everything fresh and tasty. When you are ready to enjoy your tacos again, use the stove or microwave to reheat the shrimp. If you want warm tortillas, heat them in a skillet for a few seconds. This step adds a nice touch to your meal. Enjoy every bite! Yes, marinate the shrimp ahead of time for convenience. You can prepare the marinade and let the shrimp soak in it for up to two hours. This saves time when you are ready to cook. Just remember to keep the marinated shrimp in the fridge until you need them. They can be a healthy option, packed with protein and fresh vegetables. Shrimp is low in calories but high in protein. Adding cabbage and tomatoes gives you vitamins and fiber. The lime juice adds flavor without extra calories. Maple syrup or agave nectar can be used as alternatives. Both options bring sweetness to the dish. Just keep in mind that maple syrup has a distinct taste. Agave nectar is milder and works nicely in this recipe. Shrimp should turn pink and opaque when fully cooked. This usually takes about 2-3 minutes per side. If you see them curl up into a C shape, they’re ready! Avoid overcooking, as shrimp can become tough if left too long. This blog post guides you through making delicious Honey Lime Shrimp Tacos. You learned about the key ingredients, easy cooking steps, and ways to enhance the flavors. You can customize these tacos with different proteins and toppings. Remember to store leftover tacos safely for freshness. These shrimp tacos are not only tasty but also versatile and healthy. Enjoy trying new combinations that suit your taste! Happy cooking!

Honey Lime Shrimp Tacos Flavorful and Simple Recipe

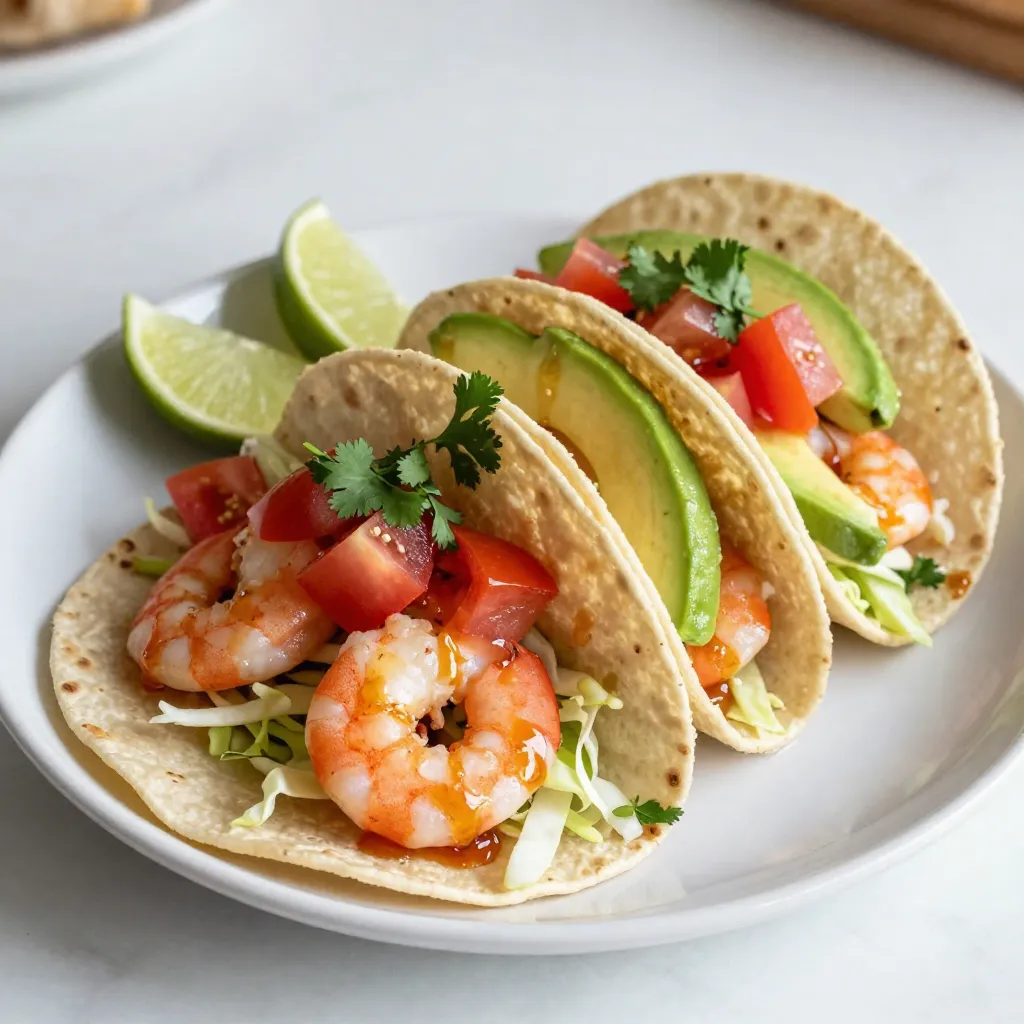
Dive into the delicious world of honey lime shrimp tacos! This vibrant recipe combines juicy shrimp with a sweet and

- 1 cup semi-sweet chocolate chips - 1 cup milk chocolate chips - ½ cup cocoa powder - ½ cup caramel sauce, divided - 1 cup mini marshmallows - 1 teaspoon sea salt - Optional: ½ teaspoon vanilla extract - Optional: Extra caramel sauce for drizzling on top To make salted caramel hot chocolate bombs, you need a few simple ingredients. First, the chocolate is key. I use semi-sweet and milk chocolate chips for a rich, sweet flavor. The cocoa powder adds that classic hot chocolate taste. Caramel sauce gives the bombs their signature sweet and salty twist. Mini marshmallows melt perfectly in the hot drink. A sprinkle of sea salt enhances the flavors, making each sip delightful. If you want to boost the flavor, you can add vanilla extract. You can also drizzle extra caramel sauce on top for a treat that looks as good as it tastes. These ingredients come together to create a fun and tasty experience. You can find them at local grocery stores or online. Remember, using good quality chocolate makes a big difference in flavor. For the full recipe, check out the complete guide on how to make these delicious bombs! To start, I melt the chocolate in the microwave. - Combine 1 cup of semi-sweet and 1 cup of milk chocolate chips in a bowl. - Heat in 30-second bursts, stirring after each round. - Keep going until the chocolate is smooth and fully melted. This method ensures you avoid burning the chocolate. Next, I coat the molds with the melted chocolate. - Use a spoon or brush to coat the inside of silicone sphere molds. - Make sure the chocolate layer is thick enough to hold its shape. - Once coated, place the molds in the freezer for about 10 minutes. This step helps the shells stay strong and sturdy. Now, it’s time to mix the filling. - In a bowl, combine ½ cup of cocoa powder, ½ cup of caramel sauce, and mini marshmallows. - Add 1 teaspoon of sea salt to enhance the flavor. - If you want, you can mix in ½ teaspoon of vanilla extract. This filling will make your hot chocolate bombs extra tasty! Once the chocolate shells are ready, I fill them. - Carefully pop the hardened shells from the molds. - Fill half of the chocolate spheres with the cocoa and marshmallow mix. - Drizzle some caramel sauce on top of the filling. This drizzle adds sweetness and richness. Next, I seal the bombs to keep everything inside. - Heat a non-stick pan over low heat. - Place an empty chocolate shell on the pan for a few seconds to melt the edge slightly. - Press this shell onto the filled half to seal it. Repeat this with all remaining shells. Finally, I decorate the hot chocolate bombs. - Drizzle extra caramel sauce over the tops. - Sprinkle a bit more sea salt for that perfect contrast. - You can package them in clear bags tied with ribbons or serve them right away. These look great and taste amazing! For the full recipe, check out the details above. Avoiding clumping: To melt chocolate smoothly, use a microwave-safe bowl. Combine semi-sweet and milk chocolate chips. Microwave in 30-second bursts. Stir after each burst to break up any clumps. This keeps the chocolate smooth and creamy. Temperature control: Keep the microwave at low power. High heat can burn the chocolate. Stirring often helps maintain even melting and prevents overheating. You want the chocolate to melt without getting too hot. Alternative filling ideas: You can mix it up! Try adding peanut butter or crushed peppermint candies. These add fun flavors and textures to your hot chocolate bombs. Get creative with your favorite treats! Balancing flavors: The key is to mix sweet and salty. My favorite is adding a touch of sea salt to the filling. It enhances the caramel and cocoa flavors. Always taste as you go to find the perfect balance. Best storage methods: Keep your hot chocolate bombs in an airtight container. This keeps them fresh and prevents moisture from ruining them. Make sure they are cool before sealing. Shelf-life considerations: These tasty treats can last up to two weeks if stored properly. If you want to keep them longer, consider freezing them. Just be sure to wrap them well to avoid freezer burn. {{image_2}} You can switch up the flavors in your Salted Caramel Hot Chocolate Bombs with ease. Different chocolate types can change the taste a lot. Try using dark chocolate for a rich flavor. White chocolate adds a sweet touch. Each type brings its own charm. You can also play with fillings. For a fun twist, add peanut butter for a creamy surprise. Peppermint is another great choice. Just think of it as a holiday treat with a fresh twist. These variations make your bombs unique. Make your hot chocolate bombs match the seasons. For holidays, use festive colors and shapes. Think about adding red and green sprinkles for Christmas. You can even use mini candy canes as a garnish. For parties, customize the bombs with themes. Use colors that match your party's decor. You can add fun sprinkles or edible glitter for a festive look. Everyone will love a treat that matches the vibe of the event. How you serve your hot chocolate bombs makes a big difference. Use clear mugs to show off the bomb's beauty as it melts. You can also add whipped cream on top for an extra treat. When gifting, package them in clear bags. Tie them with pretty ribbons for a special touch. You can even place them in a cute box with a card. This makes the gift feel personal and thoughtful. For the full recipe, check out the Salted Caramel Hot Chocolate Bombs recipe. You can find ingredients for your salted caramel hot chocolate bombs online. I recommend checking sites like Amazon, Walmart, and Target. These sites usually have good prices and fast shipping. You can compare prices to find the best deal. For example, chocolate chips often cost about $3 to $5 per bag. Caramel sauce runs around $4 to $6. You can also buy ingredients at local grocery stores. Most supermarkets sell chocolate chips, cocoa powder, and caramel sauce. Specialty shops might offer unique brands. Look for mini marshmallows and sea salt in the baking aisle. Always check if your store has the items in stock before you go. When it comes to brands, I love Ghirardelli and Hershey’s for chocolate. They melt well and taste great. For caramel, try Smucker's or Kraft. Homemade hot chocolate bombs taste fresh and fun. Store-bought options can save time, but they might lack flavor. Salted caramel hot chocolate bombs are fun treats. They are round chocolate shells filled with cocoa, marshmallows, and caramel sauce. When you pour hot milk over them, they melt and create a rich drink. The sweet and salty flavors blend perfectly for a cozy treat. Using hot chocolate bombs is easy! Follow these steps: 1. Place a bomb in a mug. 2. Heat milk in a pot or microwave. 3. Pour the hot milk over the bomb. 4. Watch it melt! The chocolate bursts open, releasing the cocoa and marshmallows. 5. Stir and enjoy! Yes, you can make these bombs ahead of time! Here are some tips: - Store them in an airtight container. - Keep them in a cool, dry place. - They stay fresh for about 2 weeks. This way, you can enjoy them whenever you want! If you don’t have silicone molds, don’t worry! Here are some alternatives: - Use plastic Easter egg halves. - Try muffin tins lined with plastic wrap. These can work well for making your hot chocolate bombs. Making dairy-free hot chocolate bombs is simple! Just swap out regular ingredients: - Use dairy-free chocolate chips. - Replace regular milk with almond or oat milk. These swaps help you enjoy the treat without dairy. Yes, you can freeze them! Here’s how: - Wrap them individually in plastic wrap. - Place them in a freezer-safe bag. - They can last up to 3 months in the freezer. When you're ready, just let them thaw before using. For the complete recipe, check out the Full Recipe section! In this post, we explored how to make salted caramel hot chocolate bombs. We covered ingredients, step-by-step instructions, and helpful tips. You learned how to melt chocolate and fill molds. We also shared flavor variations and where to find supplies. These treats are fun, delicious, and easy to customize. Try different flavors and get creative with decorations. Enjoy creating your own special hot chocolate bombs!

Salted Caramel Hot Chocolate Bombs Delightful Treats

Indulging in Salted Caramel Hot Chocolate Bombs is a treat worth savoring! These delightful bites promise rich chocolate, creamy caramel,

Making peppermint mocha brownies is easy and fun. This recipe mixes rich cocoa with coffee and mint. You will love how these flavors blend. They create a treat perfect for the holidays. Here’s what you need to make them! - 1 cup unsalted butter, melted - 1 ½ cups granulated sugar - 1 cup brown sugar, packed - 4 large eggs - 1 teaspoon vanilla extract - 1 cup all-purpose flour - 1 cup unsweetened cocoa powder - 1 teaspoon baking powder - ½ teaspoon salt - 1 cup semi-sweet chocolate chips - 2 teaspoons instant coffee granules - 1 teaspoon peppermint extract - Crushed peppermint candies for garnish These essential ingredients give the brownies their rich taste and texture. The butter helps create a fudgy base. The sugars add sweetness and depth. Eggs bind everything together while adding moisture. You can play with the recipe for fun twists! Consider adding: - Nuts like walnuts or pecans for crunch. - Dark chocolate chips for a deeper flavor. - White chocolate chips for a sweet contrast. - Different extracts like vanilla or almond for a unique taste. These optional ingredients provide room for creativity. You can make the brownies your own! To make peppermint mocha brownies, start by gathering your ingredients. You need: - 1 cup unsalted butter, melted - 1 ½ cups granulated sugar - 1 cup brown sugar, packed - 4 large eggs - 1 teaspoon vanilla extract - 1 cup all-purpose flour - 1 cup unsweetened cocoa powder - 1 teaspoon baking powder - ½ teaspoon salt - 1 cup semi-sweet chocolate chips - 2 teaspoons instant coffee granules - 1 teaspoon peppermint extract - Crushed peppermint candies for garnish Next, preheat your oven to 350°F (175°C). Grease a 9x13 inch baking pan or line it with parchment paper. Leave some paper hanging over the edges for easy removal later. In a large bowl, whisk together the melted butter, granulated sugar, and brown sugar. Mix them until smooth. Then, add the eggs one at a time. Mix well after each egg. Stir in the vanilla and peppermint extracts. In a separate bowl, combine the flour, cocoa powder, baking powder, salt, and instant coffee granules. Slowly add this dry mix to the wet ingredients. Stir until just combined. Be careful not to overmix. Now fold in the semi-sweet chocolate chips. This adds a nice chocolatey taste. Pour the brownie batter into the prepared pan. Use a spatula to spread it evenly. Bake your brownies for 25-30 minutes. Check for doneness by inserting a toothpick in the center. It should come out with a few moist crumbs, not wet batter. Once they are done, take them out of the oven. Let them cool in the pan on a wire rack for about 10-15 minutes. After they cool slightly, lift them out using the parchment overhang. Transfer them to a cutting board. Cut the brownies into squares. For a festive touch, sprinkle crushed peppermint candies on top. Serve them on a decorative platter to impress your guests. Enjoy the delightful flavors of these peppermint mocha brownies! You can find the full recipe above for details. When making peppermint mocha brownies, a few mistakes can spoil your fun. First, don’t skip the parchment paper. It helps you lift out the brownies easily. Second, avoid overmixing the batter. Overmixing can make your brownies tough instead of soft. Lastly, don’t rush the cooling time. If you cut them too soon, they may crumble. For the best brownies, always use room temperature eggs. They mix better and help create a smooth batter. Also, measure your ingredients accurately. Too much flour can make them dry. When baking, place the pan in the center of your oven for even heat. Check your brownies a few minutes early. Every oven is different, and you want to catch the perfect bake. To make your peppermint mocha brownies even tastier, you can try some fun tricks. Add a pinch of sea salt on top before baking. It balances the sweetness and enhances flavors. You can also play with the chocolate. Using dark chocolate chips adds a rich taste. If you want more peppermint, add extra crushed candies on top for a festive crunch. For the full recipe, follow the steps carefully and enjoy each bite! {{image_2}} You can easily make gluten-free brownies. Just swap the all-purpose flour for a gluten-free blend. Look for a blend that mimics regular flour. This way, the texture stays rich and moist. To create vegan brownies, replace the eggs with flax eggs. Mix one tablespoon of ground flaxseed with two tablespoons of water. Let it sit for five minutes to thicken. Use coconut oil instead of butter. Also, check that your chocolate chips are dairy-free. You can change the flavor of your brownies easily. Consider adding a splash of almond extract for a nutty taste. If you want more chocolate, add an extra half cup of chocolate chips. You can also mix in nuts like walnuts or pecans for a crunchy texture. Enjoy exploring these variations in the Full Recipe for Peppermint Mocha Brownies! To keep your peppermint mocha brownies fresh, store them in an airtight container. This helps maintain their soft texture and rich flavor. You can stack the brownies in layers, but place parchment paper between them. This prevents sticking. Keep the container at room temperature for up to five days. If you want to save them longer, refrigeration can help, but it can change the texture slightly. If you want to freeze these brownies, first let them cool completely. Cut them into squares and wrap each piece tightly in plastic wrap. Then, place the wrapped brownies in a freezer-safe bag. Label the bag with the date. These brownies can last up to three months in the freezer. When you’re ready to enjoy them, simply thaw them in the fridge overnight. To reheat brownies, preheat your oven to 350°F (175°C). Place the brownies on a baking sheet and cover them with foil. Heat for about 10-15 minutes until warm. This method helps keep them soft. You can also microwave a single brownie for 10-15 seconds. Just be careful not to overheat, as they may become dry. Enjoy your delightful holiday treat! Peppermint mocha brownies are a rich, chocolate dessert. They blend chocolate, coffee, and peppermint flavors. The brownies have a fudgy texture and a festive twist. The cocoa powder gives them a deep chocolate taste. Instant coffee adds a nice mocha flavor. Peppermint extract provides a refreshing kick. This treat is perfect for holiday gatherings or cozy nights in. To check if your brownies are done, use a toothpick. Insert it into the center of the brownies. If it comes out with a few moist crumbs, they are ready. If it has wet batter, they need more time. Bake them for 25-30 minutes, but keep an eye on them. Ovens vary, so check a bit early. Yes, you can use other extracts in place of peppermint. For example, vanilla or almond extracts work well. They will change the flavor but still taste great. If you want a different twist, try orange extract for a citrus kick. Just remember to adjust the amount to your taste. In this post, we explored the tasty world of Peppermint Mocha Brownies. We covered the key ingredients you need and optional ones for fun variations. You learned step-by-step how to prepare, bake, and serve these delicious treats. I shared tips to avoid common baking mistakes and enhance flavor. Lastly, we discussed how to store and reheat them for later enjoyment. Remember, baking is about trying new things. Keep experimenting to find your perfect brownie!

Peppermint Mocha Brownies Delightful Holiday Treat

Get ready to indulge in a sweet holiday treat! Peppermint Mocha Brownies combine rich chocolate with the refreshing taste of

Older posts
Newer posts
← Previous Page1 … Page49 Page50 Page51 … Page86 Next →

dsad

© 2026 Cooking Wells • Built with GeneratePress

Our Policies

  • Copyright Policy
  • Cookie Policy
  • GDPR Policy
  • Privacy Policy
  • Disclaimer
  • Terms Of Use

More Information

  • Home
  • About
  • Contact
  • Appetizers
  • Dessert
  • Dinner
  • Drinks
©2026, Cooking Wells About Back To Top