Skip to content
DisclaimerTerms Of UseGDPR PolicyCookie Policy

Cooking Wells

  • Home
  • Drinks
  • Appetizers
  • Dinner
  • Dessert
  • About
  • Contact
  • Privacy Policy
DisclaimerTerms Of UseGDPR PolicyCookie Policy

NO-ING-IMG

- 1 ½ cups all-purpose flour - 1 teaspoon baking powder - 1 teaspoon baking soda - ½ teaspoon salt - 1 teaspoon ground cinnamon - ½ teaspoon ground nutmeg - ½ teaspoon ground ginger The dry ingredients are the backbone of our bread. The flour gives it structure. Baking powder and soda help it rise. Salt enhances all the flavors. Spices like cinnamon, nutmeg, and ginger add warmth and a cozy fall vibe. - 1 cup pure pumpkin puree (canned or fresh) - ¾ cup granulated sugar - ½ cup brown sugar, packed - ½ cup vegetable oil - 2 large eggs - 1 teaspoon vanilla extract Next, we have the wet ingredients. Pumpkin puree adds moisture and richness. Granulated sugar and brown sugar bring sweetness. Vegetable oil keeps the loaf tender. Eggs bind everything together, while vanilla adds a nice touch of flavor. - ½ cup chopped walnuts or pecans - Ingredients for the streusel topping For added crunch, consider walnuts or pecans. They complement the pumpkin well. Now, let’s talk about the streusel topping. It adds a sweet, crumbly layer to the bread. You'll mix flour, brown sugar, cinnamon, butter, and oats for that perfect crunch. For the full recipe, check out the detailed instructions! First, preheat your oven to 350°F (175°C). This step is very important. While the oven warms up, prepare your loaf pan. You can grease it with butter or oil, or line it with parchment paper. Using parchment makes it easy to lift the bread out later. In one bowl, mix the dry ingredients. Combine 1 ½ cups of all-purpose flour, baking powder, baking soda, salt, and spices. In another bowl, blend the wet ingredients. Use 1 cup of pumpkin puree, granulated sugar, brown sugar, vegetable oil, eggs, and vanilla extract. Stir them well until they are smooth. Now, slowly add the dry mix to the wet mix. Stir gently until just combined. Be careful not to overmix. Overmixing can make the bread tough. If you want, fold in chopped walnuts or pecans for added crunch. For the streusel, grab a separate bowl. Mix ½ cup of flour, ¼ cup of brown sugar, and 1 tsp of cinnamon. Then, add 4 tablespoons of cold butter cut into cubes. Use your fingers or a pastry cutter to blend until it looks like coarse crumbs. Finally, stir in ½ cup of rolled oats. This will give your topping a nice texture. Pour your pumpkin batter into the prepared loaf pan. Then, evenly sprinkle the streusel topping on top. Bake it in the preheated oven for 55-65 minutes. Check for doneness by inserting a toothpick into the center. If it comes out clean, the bread is ready. If the top browns too fast, cover it with aluminum foil for the last 15 minutes. Enjoy the smell of your kitchen as it fills with the scent of fall! Using fresh ingredients is key. Fresh pumpkin puree adds more taste and moisture. When you pick your spices, make sure they are fresh, too. Old spices lose their flavor. Use the right measuring techniques. Spoon flour into your measuring cup, then level it off. This helps avoid too much flour, which can make your bread dry. If your bread is too dry, add a bit more oil next time. You can also check your oven's temperature. An oven that is too hot can dry out the bread. If your bread is dense, try mixing less. Overmixing can make the bread heavy. For sweetness, adjust the sugar to your taste. If you want more spice, add a bit more cinnamon or nutmeg. Slice the bread into thick pieces. This makes it easy to serve. Place the slices on a wooden board for a rustic look. You can sprinkle some extra cinnamon on top for flair. A dollop of whipped cream adds a nice touch. Cream cheese spread pairs well, too. Enjoy it with a cup of warm cider or tea. For the full recipe, check out the Pumpkin Streusel Bread Loaf section above. {{image_2}} You can have fun with flavors in pumpkin streusel bread. Adding chocolate chips brings a sweet touch. I often use semi-sweet chocolate. Dried fruits like cranberries or raisins add a chewy bite. They also balance the spices well. You can even mix in different nuts or seeds. Try pecans for a buttery taste or sunflower seeds for crunch. If you need gluten-free options, swap the all-purpose flour for a gluten-free blend. Many blends work well in this recipe. To make it vegan, replace eggs with flaxseed meal or applesauce. Use a plant-based oil too. These changes keep the bread tasty and moist. You can change the bread for holidays. For Halloween, add orange zest for a citrus twist. At Thanksgiving, mix in some chopped apples for a fruity flavor. You can even use pumpkin spice mix instead of individual spices. This gives a warm, cozy taste perfect for fall gatherings. Each variation makes the bread special and unique! To store leftover pumpkin streusel bread at room temperature, wrap it tightly in plastic wrap. This keeps it fresh for about 2 to 3 days. If your home is warm, consider putting it in an airtight container. For the best taste and texture, I recommend keeping it at room temperature rather than in the fridge. If you decide to refrigerate it, use a sealed container. This can extend the life of the bread, but it may dry it out a bit. It should last up to one week in the fridge if stored properly. Freezing the pumpkin streusel bread is a great way to save it for later. First, let the bread cool completely. Then, wrap it tightly in plastic wrap and aluminum foil. This helps prevent freezer burn. You can also put it in a freezer-safe bag. It can last up to 3 months in the freezer. When you’re ready to enjoy it, thaw the bread in the fridge overnight. For a quick reheat, slice the bread and warm it in the microwave for about 15-20 seconds. You can also pop it in the oven at 350°F for about 10 minutes to warm it through. When stored properly, pumpkin streusel bread can last for about 3 days at room temperature and up to a week in the fridge. In the freezer, it lasts up to 3 months. Look for signs that the bread has gone bad. If you see mold, a change in color, or an off smell, it’s best to throw it away. Freshness is key for enjoying this tasty fall delight! Yes, you can make this bread ahead of time. To prepare in advance, bake the bread and let it cool completely. Then, wrap it tightly in plastic wrap or foil. Store it in the fridge for up to a week. You can also freeze it for up to three months. Just thaw it overnight in the fridge before serving. To keep your streusel on top, sprinkle it evenly over the batter. Make sure the batter is thick enough to hold the streusel. You can also chill the streusel before adding it to the batter. This helps it stay firm and prevents sinking during baking. You can add many flavors to enhance your pumpkin bread. Try mixing in chocolate chips for a sweet twist. Dried fruits, like cranberries or raisins, add a nice texture. You can also add nuts for crunch or spices like allspice for warmth. Each option brings a new taste to your bread. Yes, you can make this bread gluten-free. Use a gluten-free all-purpose flour blend instead of regular flour. Check that your baking powder and other ingredients are gluten-free as well. This way, everyone can enjoy this tasty treat without worry. You learned how to make delicious pumpkin streusel bread with simple steps. We covered key ingredients and easy techniques, from prepping the oven to storing leftovers. Keep your ingredients fresh for the best taste. Don’t hesitate to explore variations for your personal touch. Whether for a holiday or everyday snack, this bread brings joy. Now, it’s your turn to bake and share this delightful treat! Enjoy the flavor and warmth of your creation.

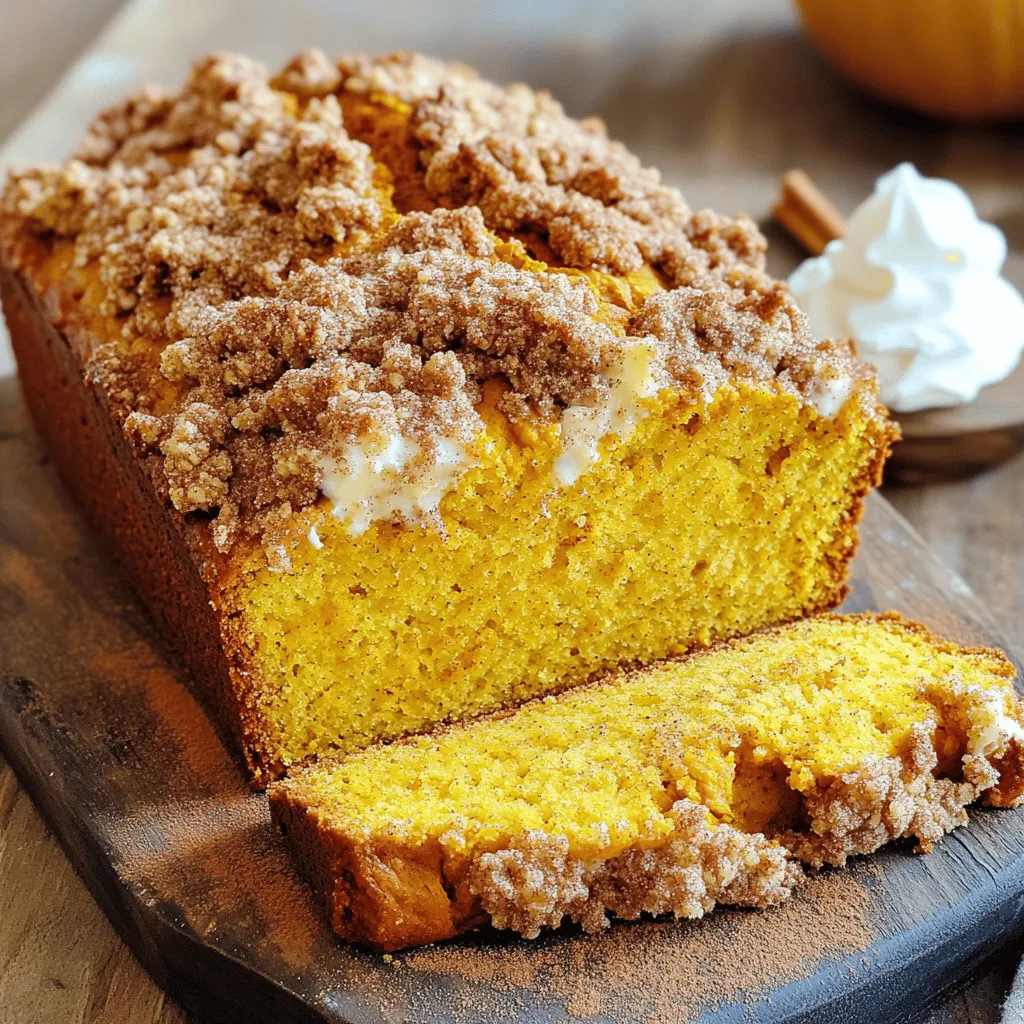
Pumpkin Streusel Bread Loaf a Tasty Fall Delight

Fall is here, and it’s time to savor every bite of cozy flavors! This Pumpkin Streusel Bread Loaf is a

To make crispy garlic herb potato wedges, gather these simple ingredients: - 4 large russet potatoes, washed and cut into wedges - 3 tablespoons olive oil - 4 cloves garlic, minced - 1 teaspoon dried oregano - 1 teaspoon dried thyme - 1 teaspoon paprika - ½ teaspoon salt - ½ teaspoon black pepper - Fresh parsley, chopped (for garnish) - Grated Parmesan cheese (optional) If you want to switch things up, here are some tasty swaps: - Use sweet potatoes for a sweeter flavor. - Swap olive oil for avocado oil for a different taste. - Try fresh herbs instead of dried for a bolder flavor. - Use garlic powder if you’re short on fresh garlic. - Replace Parmesan with nutritional yeast for a vegan option. The right potato makes all the difference. Here are my tips: - Go for russet potatoes. They are starchy and crisp up well. - Look for firm potatoes. Avoid any with soft spots or blemishes. - Choose medium to large sizes. They are easier to cut into wedges. - Check the skin. It should be smooth and free of wrinkles. - Buy organic if possible. This helps avoid pesticides and enhances flavor. These small details help create the best crispy garlic herb potato wedges. For the full recipe, refer to the earlier section. Enjoy your cooking! First, wash your russet potatoes well. Use a brush to remove dirt. Cut them into wedges. Aim for even sizes so they cook well. In a large bowl, mix olive oil, minced garlic, oregano, thyme, paprika, salt, and black pepper. This mix gives the wedges their tasty flavor. Add the potato wedges to the bowl. Toss them well to coat each wedge. This step ensures every bite is full of flavor. Preheat your oven to 425°F (220°C). This step is key for getting crispy edges. Line a baking sheet with parchment paper. This helps with easy clean-up and prevents sticking. Spread the coated potato wedges in a single layer on the sheet. Avoid overcrowding; it helps them crisp up. Bake the wedges for 25-30 minutes. Flip them halfway through cooking. This ensures even browning and crispiness. When they turn golden brown, they are ready. To make your potato wedges crispy, choose the right potatoes. Russet potatoes work best because they have a high starch content. Soaking the wedges in water for 30 minutes before cooking can help too. This draws out excess starch. Make sure to dry them completely before adding oil. Also, avoid touching the wedges too much while baking. Let them cook uninterrupted for a better crunch. Optionally, sprinkle grated Parmesan cheese on top while they are still hot. This adds flavor and a nice crisp layer. For a beautiful finish, garnish with chopped parsley before serving. For the full recipe, check out the details above. To make your potato wedges tasty, use a mix of herbs and spices. I love using olive oil, garlic, and herbs like oregano and thyme. Start with three tablespoons of olive oil. Then add four minced garlic cloves. This combo gives the wedges a great flavor. Don’t forget to use salt and pepper. A teaspoon of paprika adds a nice touch. Mix these ingredients in a bowl before adding the potato wedges. This helps every wedge get coated well. Cutting potatoes evenly makes sure they cook the same way. Start with washed russet potatoes. Cut each potato in half lengthwise. Then, cut each half into wedges. Aim for wedges about one inch thick. This size helps them crisp up nicely. If you want, use a sharp knife for clean cuts. A ruler can help if you want to be precise. Uniform wedges will bake better and look great. Using the right tools makes cooking easy. A large mixing bowl is great for tossing your wedges with seasonings. Use a baking sheet lined with parchment paper. This makes clean-up a breeze. An oven thermometer can help check that your oven is at the right temperature. For the best results, use a spatula to flip the wedges halfway through cooking. This ensures they get golden brown on all sides. You can find the full recipe [here](#). {{image_2}} You can mix and match flavors for your potato wedges. If you want a spicy kick, add some cayenne pepper. You can also use fresh herbs like rosemary or basil for a new taste. Try some cheese powder for a cheesy flavor. You can even add a squeeze of lemon juice for brightness. These tweaks keep the dish exciting and fun. If you want to try different cooking methods, the air fryer is a great option. It can make the wedges crispy with less oil. Cook them at 400°F for about 20 minutes. Shake the basket halfway through for even cooking. For a deep-fried version, heat oil to 350°F. Fry the wedges until golden brown, about 5-7 minutes. Both methods give you delicious results. To make your crispy garlic herb potato wedges stand out, serve them with dips. Garlic aioli or spicy ketchup adds extra flavor. You can also add a sprinkle of crumbled feta or a drizzle of balsamic glaze for a gourmet touch. For a complete meal, pair them with grilled chicken or a fresh salad. These ideas will take your side dish to the next level. For the full recipe, check out the original instructions. To keep your leftover potato wedges fresh, let them cool first. Place them in an airtight container. You can also wrap them tightly in plastic wrap. Store them in the fridge. They will stay good for 3 to 5 days. If you want to enjoy them later, freezing is a great option. For the best taste, reheat your potato wedges in the oven. Preheat your oven to 400°F (200°C). Spread the wedges on a baking sheet. Heat them for about 10-15 minutes. This keeps them crispy. You can also use an air fryer. Just heat them for about 5-7 minutes. They will taste almost as good as fresh! If you want to freeze your wedges, first let them cool. Place them in a single layer on a baking sheet. Freeze them until solid, then transfer to a freezer bag. Make sure to remove as much air as possible. They will last up to 3 months in the freezer. To thaw, take them out and leave them in the fridge overnight. Reheat them as mentioned before for the best results. If you don't have parsley, try using chives or cilantro. Chives add a mild onion taste. Cilantro brings a fresh, bright flavor. Both options look great on the dish. You can even use arugula for a peppery kick. Just chop them finely before using. To make your potato wedges crispier, soak them in cold water for 30 minutes. This helps remove excess starch, which can make them soggy. After soaking, dry the wedges well with a towel. Toss them with oil and seasonings before baking. Using a hot oven also helps achieve that golden crunch. Yes, you can prepare the potato wedges ahead of time. Cut and season them, then place them in an airtight container. Store them in the fridge for up to 24 hours. When ready to bake, just pop them in the oven. They will still taste fresh and delicious. For the full recipe, check the earlier section. In this blog post, we explored making crispy garlic herb potato wedges. We covered ingredients, from the best potatoes to tasty substitutes. I gave you step-by-step baking instructions and tips for optimal crispiness. We discussed seasoning, cutting techniques, and cooking methods. You can elevate your dish with flavor variations and smart serving ideas. Lastly, I shared how to store and reheat leftovers. Remember, these wedges are easy to make and packed with flavor. Enjoy your cooking journey and the delightful snacks ahead!

Crispy Garlic Herb Potato Wedges Flavorful Side Dish

Craving a side dish that’s full of flavor and crunch? I’ve got just the recipe for you! These Crispy Garlic

- 1 cup ricotta cheese - 2 large eggs - 1/2 cup granulated sugar - 1/4 cup unsalted butter, melted - Zest of 1 lemon - 2 tablespoons fresh lemon juice - 1 teaspoon vanilla extract - 1 1/2 cups all-purpose flour - 1 teaspoon baking powder - 1/2 teaspoon baking soda - 1/4 teaspoon salt - 1 cup fresh blueberries (or frozen, if in season) These ingredients create a bright and fluffy muffin. The ricotta cheese gives a creamy texture and a slight tang. Eggs help bind everything, adding moisture too. The sugar balances the tartness of the lemon and blueberries. Butter adds richness, while lemon zest and juice bring a refreshing flavor. The flour provides structure, and the baking powder and soda help the muffins rise. Salt enhances the flavors. Blueberries add sweetness and a burst of color. You can use fresh or frozen blueberries based on the season. - Muffin tin - Mixing bowls - Whisk and spatula You will need a muffin tin to shape your muffins. Mixing bowls help keep your ingredients organized. A whisk and spatula ensure you mix everything well without overdoing it. - Calories per muffin: Approximately 180 - Macronutrient breakdown: - Protein: 4g - Carbohydrates: 28g - Fat: 7g These muffins are not just delicious; they also provide a nice balance of nutrients. They are great for breakfast or a snack. You can enjoy them warm with a cup of tea or coffee. For the full recipe, check out the instructions above. - Preheat oven to 375°F (190°C). - Prepare muffin tin with liners or grease it lightly. Preheating the oven helps the muffins rise nicely. Lining the tin makes for easy cleanup and helps them come out easily. - Whisk together ricotta, eggs, sugar, and melted butter. - Add lemon zest, juice, and vanilla extract. Mixing the wet ingredients first gives the muffins a rich flavor. The ricotta adds creaminess, while lemon zest and juice bring freshness. - In a separate bowl, mix flour, baking powder, baking soda, and salt. - Gradually add to the wet mixture and combine. Be gentle when mixing in the dry ingredients. This avoids overmixing, which can make the muffins tough. A few lumps are okay. - Gently fold blueberries into the batter. - Be careful not to crush them. When folding in blueberries, use a spatula. This helps keep them whole, adding bursts of flavor in every bite. Frozen blueberries work well too, but fresh is best when they are in season. - Scoop batter into muffin tin, filling each cup about three-quarters full. - Bake for 18-20 minutes and use a toothpick test. Baking time can vary, so check after 18 minutes. Insert a toothpick in the center of a muffin. If it comes out clean, they are ready. Enjoy the smell as they bake! For the full recipe, follow the steps above. To create the best muffins, avoid overmixing. Mix the wet and dry ingredients just until they blend. A few lumps are okay. This keeps the muffins fluffy. Also, use room temperature ingredients. When eggs and ricotta are warm, they mix better. This helps the muffins rise nicely. Selecting the best blueberries is key. Look for plump, juicy berries. Fresh berries offer the best taste. If using frozen, thaw them first and drain excess liquid. Adjust the lemon flavor to your taste. You can add more zest or juice for a stronger lemon kick. Start with the recipe and tweak it as you like. Presentation matters! Dust your muffins with powdered sugar before serving. This adds a lovely touch. You can also top them with fresh blueberries and a mint sprig. This not only looks great but tastes fresh too. Good visuals make your muffins even more tempting. This is how you impress guests or family. For a full recipe, check out the [Full Recipe]. {{image_2}} You can easily make this recipe gluten-free. Just swap all-purpose flour for a gluten-free blend. Many brands work great in muffins. For sweeteners, try honey or maple syrup instead of sugar. You may need to adjust the liquid in your batter. Adding nuts can give your muffins a nice crunch. Chopped walnuts or pecans work well. You can also mix in chocolate chips for a sweet twist. If you want to change up the fruit, try raspberries or chopped strawberries. Both fruits pair nicely with lemon and ricotta. Take advantage of seasonal produce for a fresh taste. In spring, use fresh strawberries or cherries. In fall, consider adding pumpkin spice to the mix. You can also adjust flavors for holidays. For example, add nutmeg and cinnamon for a festive fall treat. For the full recipe, be sure to check out the [Full Recipe]. After baking, let the muffins cool in the pan for 5 minutes. This timing helps them set. Then, transfer them to a wire rack. Use a spatula to lift them gently. This way, they won’t break apart. Cooling on a wire rack keeps them fluffy and avoids sogginess. Store leftover muffins in an airtight container. This keeps them fresh and moist. You can place them in the fridge for up to 5 days. For longer storage, freeze them. Wrap each muffin in plastic wrap and place them in a freezer bag. They can last for up to 3 months. To reheat, use an oven or microwave. For the oven, preheat to 350°F (175°C). Wrap muffins in foil to keep them moist. Heat for 10-15 minutes. If using a microwave, heat for 15-20 seconds. This warms them up without drying them out. Enjoy your Lemon Ricotta Blueberry Muffins warm from the oven! For the full recipe, refer back to the beginning. Yes, you can use different fruits in these muffins. Fresh or frozen fruit works well. Try raspberries, strawberries, or blackberries as tasty swaps. Each fruit adds its own unique flavor. Remember to adjust the sugar based on the fruit’s sweetness. To make these muffins healthier, consider these tips: - Reduce sugar: Cut the sugar by a quarter. - Use whole wheat flour: This adds fiber and nutrients. - Add nuts: Walnuts or almonds can boost healthy fats. - Use yogurt: Swap out some ricotta for plain yogurt. If you don’t have ricotta cheese, here are some alternatives: - Cottage cheese: Blend it for a smooth texture. - Cream cheese: Thin it out with a little milk. - Greek yogurt: This makes the muffins creamier. These options will still yield delicious muffins. To check if the muffins are done, look for these signs: - The tops should be golden brown. - The edges pull away from the muffin tin slightly. - Press the top gently; it should spring back. - You can also use a toothpick; it should come out clean. These tips help ensure your muffins are perfectly baked. These delicious muffins combine simple ingredients and steps to create a tasty treat. You learned about mixing wet and dry items, preparing the oven, and adding fresh blueberries. I shared tips for perfect texture, flavor, and presentation, plus ways to adapt the recipe to your needs. Remember, you can experiment with different fruits and make them healthier. Enjoy your baking journey and share these muffins with friends and family!

Lemon Ricotta Blueberry Muffins Wholesome and Tasty

Craving a wholesome treat that blends zingy lemon and sweet blueberries? Look no further! Today, I’ll guide you through making

To make the best honey garlic chicken bites, gather these key items: - 1 lb boneless, skinless chicken breasts, cut into bite-sized pieces - 1/4 cup honey - 3 cloves garlic, minced - 2 tablespoons soy sauce (low sodium) - 1 tablespoon apple cider vinegar - 1 teaspoon grated fresh ginger - 1 tablespoon sesame oil - 1 tablespoon cornstarch - Salt and pepper to taste - 2 tablespoons green onions, chopped (for garnish) - Sesame seeds (for garnish) These ingredients create a sweet and savory blend. The honey gives a nice glaze, while garlic adds depth. Each bite bursts with flavor. Use fresh chicken. Look for chicken breasts without any added hormones. Fresh garlic and ginger bring strong flavors. Choose pure honey and low sodium soy sauce for balance. Organic apple cider vinegar can enhance taste. High-quality sesame oil adds richness. These choices ensure great results. If you lack an ingredient, don’t worry! You can swap the chicken for firm tofu for a vegetarian option. Maple syrup works well instead of honey. If you can’t find fresh ginger, ground ginger is a fine substitute. Use regular soy sauce if low sodium is not available. Feel free to get creative with what you have on hand. The essence of this recipe stays intact, even with changes. For the complete recipe, check out [Full Recipe]. Start by gathering your ingredients. You need honey, garlic, soy sauce, apple cider vinegar, ginger, sesame oil, cornstarch, salt, and pepper. In a medium bowl, whisk these ingredients together. This mix creates a sweet and savory marinade. The honey adds sweetness, while the garlic and ginger bring depth. Whisk until everything blends well. Next, take your chicken and cut it into bite-sized pieces. Place the chicken in a large bowl. Pour the marinade over the chicken pieces. Toss gently to coat each piece evenly. It’s best to let the chicken sit in the marinade for at least 30 minutes. If you have time, marinate it longer in the fridge. This step helps the chicken absorb all the great flavors. Now, preheat your oven to 400°F (200°C). Line a baking sheet with parchment paper. Spread the marinated chicken evenly on the prepared sheet. Make sure they are in a single layer. Bake the chicken for 15 to 20 minutes. Flip the pieces halfway through. This helps them cook evenly. The chicken is done when it reaches 165°F (75°C) internally. Let it rest for a few minutes before serving. Garnish with green onions and sesame seeds for extra flair. For the full recipe, check out the section above. To keep your chicken bites tender, start with fresh, high-quality chicken. Cut the chicken into equal pieces. This helps them cook evenly. Marinating the chicken is key. Let it sit for at least 30 minutes. For even better flavor, marinate it overnight. The honey and vinegar help break down the chicken fibers, making them juicy. You can add depth to your dish by using fresh ingredients. Try adding more minced garlic for a stronger taste. A splash of lime juice can brighten the flavors. If you love heat, add red pepper flakes to the marinade. Sesame oil brings a nutty flavor, so don’t skip it. Experiment with fresh herbs like cilantro or basil for a twist. When baking, spread the chicken bites in a single layer on the pan. This allows hot air to circulate around each piece. Flip them halfway through cooking to ensure even browning. Use a meat thermometer to check for doneness; aim for 165°F. If you want extra crispiness, broil them for the last few minutes. This will give your Honey Garlic Chicken Bites a beautiful golden color. {{image_2}} You can cook honey garlic chicken bites in different ways. Grilling adds a smoky flavor. Simply preheat your grill to medium-high. Thread the marinated chicken pieces onto skewers. Grill for about 10-12 minutes, turning often. Make sure they reach 165°F inside. Using an air fryer is quick and easy. Preheat your air fryer to 380°F. Place the marinated chicken in the basket in a single layer. Cook for about 10-15 minutes, shaking halfway through. This keeps them crispy and tender. You can change the flavor by adding spices. Try adding a pinch of cayenne for heat or smoked paprika for depth. You can also mix in vegetables. Bell peppers and broccoli work great. Just chop them small and toss them with the chicken and marinade. You can also add herbs like cilantro or basil. These add freshness and a hint of color. Mixing flavors makes each bite exciting. If you like spice, add chili flakes or sriracha to the marinade. This adds a kick to your bites. For a sweeter twist, increase the honey by a tablespoon. You can also use maple syrup instead of honey for a different taste. You can play around with the balance. Adjust the sugar and spice to find what you love. Honey garlic chicken bites can be your canvas for flavor! For the full recipe, check out the details above. After you enjoy your honey garlic chicken bites, store leftovers properly. Let the chicken cool down to room temperature. Then, place it in an airtight container. This keeps the chicken fresh and prevents it from drying out. Store it in the fridge for up to three days. You can also cover it tightly with plastic wrap if you don't have a container. Make sure to label with the date for easy tracking. When it's time to enjoy your leftovers, reheating is key. You can use the oven, microwave, or skillet. For the oven, preheat to 350°F (175°C). Spread the chicken on a baking sheet and warm for about 10-15 minutes. This helps keep the chicken crispy. If using a microwave, place the chicken on a microwave-safe plate. Heat in short bursts of 30 seconds until warm. Stir between intervals to heat evenly. A skillet works well too. Just add a bit of oil and heat over medium. Stir until warmed through. If you want to save your honey garlic chicken bites for later, freezing is a great option. First, let the chicken cool completely. Then, place it in a freezer-safe bag or container. Remove as much air as possible to prevent freezer burn. Label the container with the date. You can freeze the chicken for up to three months. When ready to eat, thaw it overnight in the fridge before reheating. This method helps preserve the flavor and texture. Enjoy your delicious meal anytime! Yes, you can prepare Honey Garlic Chicken Bites in advance. Marinate the chicken for up to 24 hours in the fridge. This gives the flavors more time to soak in. Just make sure to keep it in an airtight container. When you're ready to cook, follow the baking steps in the Full Recipe. You have many tasty options to serve with Honey Garlic Chicken Bites. Consider these sides: - Steamed rice or fried rice - Fresh vegetable sticks like carrots and cucumbers - A simple green salad with a light dressing - Noodles tossed in soy sauce or sesame oil These sides complement the sweet and savory flavors of the chicken perfectly. To know when the chicken is fully cooked, check its internal temperature. It should reach 165°F (75°C). You can use a meat thermometer for this. If you don’t have one, make a small cut in a piece of chicken. The meat should be white and juices should run clear, not pink. This ensures your Honey Garlic Chicken Bites are safe and delicious! You can make tasty Honey Garlic Chicken Bites with simple steps. We covered the key ingredients and how to prep the honey garlic marinade. Marinating adds flavor, while baking ensures a juicy result. With tips for perfect chicken and storage advice, this dish can be enjoyed later too. Remember, you can change the recipe using different methods or spices for variety. Explore these options to find what you love most!

Honey Garlic Chicken Bites Flavorful and Easy Recipe

Are you ready to whip up a delicious dish that both kids and adults will love? Honey Garlic Chicken Bites

- 2 cups rolled oats - 1 cup nuts (walnuts or pecans), roughly chopped - 1/2 cup unsweetened coconut flakes - 1/2 cup maple syrup - 1/4 cup coconut oil, melted - 1 teaspoon ground cinnamon - 1/2 teaspoon vanilla extract - 1/2 teaspoon salt - 1 cup dried apples, chopped - 1/2 cup raisins or cranberries Gathering fresh ingredients is key. It makes your Maple Cinnamon Apple Granola taste great. Rolled oats form the base. They give texture and crunch. Nuts offer healthy fats and protein. Choose walnuts or pecans based on your taste. Coconut flakes add sweetness and chewiness. Use unsweetened ones to control the sugar. Maple syrup brings in natural sweetness. It also adds a unique flavor. Coconut oil helps bind everything and adds richness. Ground cinnamon gives warmth and spice. Vanilla adds a lovely aroma. Salt balances all the flavors. Dried apples and raisins or cranberries add fruity bites. They make each munch a delight. - Calories per serving: About 200 calories - Key vitamins and minerals: Rich in fiber, magnesium, and vitamin E - Dietary considerations: Gluten-free and vegan This granola packs a punch. It has fiber for digestion and healthy fats. It also delivers vitamins and minerals from nuts and fruits. You can enjoy it guilt-free as it is gluten-free and vegan. This makes it a great option for all. 1. Preheat your oven to 300°F (150°C). This helps the granola bake evenly. 2. Line a baking sheet with parchment paper. This prevents sticking and makes cleanup easy. 3. In a large mixing bowl, combine the rolled oats, chopped nuts, and coconut flakes. Stir until everything is mixed well. 1. In a separate small bowl, whisk together the maple syrup, melted coconut oil, ground cinnamon, vanilla extract, and salt. Mix until it is smooth and well combined. 2. Pour this wet mixture over the dry ingredients. Stir until the oats and nuts are fully coated. 1. Spread the granola mixture evenly on the lined baking sheet. Make sure it is in a single layer for even cooking. 2. Bake in your preheated oven for 20-25 minutes. Stir halfway through to ensure it browns evenly. The granola should be golden brown and smell amazing. 3. Remove it from the oven and let it cool completely on the baking sheet. It will become crispy as it cools. 4. Once cool, stir in the chopped dried apples and raisins or cranberries. 5. You can find the full recipe [here](#). To achieve the ideal crispiness in your granola, follow a few key steps. First, spread the mixture evenly on the baking sheet. This helps it cook evenly. Stir it halfway through baking to ensure all parts get crispy. Let it cool completely on the sheet. It will harden as it cools. You can adjust sweetness and spice levels easily. If you like it sweeter, add more maple syrup. For extra spice, sprinkle in more cinnamon. Taste the mixture before baking to find your perfect balance. Pair your granola with yogurt or smoothie bowls for a tasty breakfast. Just sprinkle a generous amount on top. You can also mix it into your favorite smoothie for added crunch. Get creative with desserts. Use this granola as a topping on ice cream or baked fruit. It adds a delightful crunch and flavor to any sweet treat. For more ideas, check the full recipe. {{image_2}} You can easily change the taste of your granola. Adding different fruits can create new flavors. Try mixing in berries or bananas. They add a fresh burst of sweetness. You can also use dried fruits like apricots or figs for a twist. Incorporating spices can elevate the granola. Nutmeg or ginger can add warmth and depth. A pinch of cardamom can also bring a unique flavor. Experiment to find what you love most. Switching nuts or seeds can change the texture and flavor. Use seasonal nuts like hazelnuts or pecans. They offer a nice crunch and taste. For nut-free variations, consider seeds like pumpkin or sunflower seeds. These options keep the granola crunchy without any nuts. You can also mix and match different nuts. Walnuts add richness, while almonds provide a slight sweetness. Each choice makes the granola special and personal to you. To keep your Maple Cinnamon Apple Granola fresh, store it in an airtight container. Glass jars work great, but plastic containers are fine too. Make sure the lid fits tightly. This helps to keep out air and moisture, which can make the granola soggy. For the best storage conditions, keep the container in a cool, dry place. A pantry or cupboard is ideal. Avoid areas with high humidity, like near the stove or sink. Too much humidity can lead to clumping and spoilage. When stored properly, your granola can last up to two weeks. This means you can enjoy it for breakfast or snacks without worry. To check if it’s still good, look for any off smells or changes in texture. If it feels soft instead of crunchy, it might be time to toss it. Always trust your senses! For the full recipe, check out the details above and get cooking. Enjoy your homemade granola! Can I make this granola gluten-free? Yes, you can make this granola gluten-free. Use gluten-free rolled oats. Many brands offer oats that are certified gluten-free. Check the label to be sure. This small change keeps the taste and texture intact. How do I customize the recipe further? You can easily customize this granola to suit your taste. Try adding different nuts like almonds or pistachios. You can also switch the dried apples for other fruits like apricots or figs. Want a bit more crunch? Toss in some seeds like pumpkin or sunflower seeds. Adjust the spices too; a pinch of nutmeg or ginger can add warmth. Is it possible to use fresh apples instead of dried? Using fresh apples can work, but they change the texture. Fresh apples have more moisture, which can make the granola soggy. If you want to use fresh apples, chop them and add them during the last few minutes of baking. This way, they will soften but not lose all their crunch. Remember, dried apples will give a sweeter, chewier bite. For the complete recipe, check the Full Recipe. This blog post introduced you to a tasty granola recipe. You learned about key ingredients like oats, nuts, and maple syrup. I shared step-by-step instructions for preparation and baking. We discussed tips for perfecting your granola and creative serving ideas. Variations let you modify flavors and adjust nut options. Finally, we covered storage tips to keep your granola fresh. Making your own granola is fun and rewarding. You can create a snack that fits your taste. Enjoy the process, and feel free to experiment!

Maple Cinnamon Apple Granola Crunchy and Delicious Treat

Are you ready for a tasty treat that will change your breakfast game? Maple Cinnamon Apple Granola is here to

To make Vegan Sweet Potato Black Bean Burritos, gather these ingredients: - 2 medium sweet potatoes, peeled and diced - 1 can (15 oz) black beans, rinsed and drained - 1 cup cooked quinoa - 1 red bell pepper, diced - 1 small red onion, diced - 2 cloves garlic, minced - 1 teaspoon ground cumin - 1 teaspoon smoked paprika - ½ teaspoon chili powder - Juice of 1 lime - Salt and pepper to taste - 4 large whole wheat tortillas - Fresh cilantro, chopped (for garnish) - Avocado, sliced (for serving) - Salsa (for serving) Using fresh ingredients can enhance flavor and texture. Fresh sweet potatoes and bell peppers provide a crisp bite. They also pack more nutrients than canned versions. However, canned items like black beans save time. They are still healthy if you rinse them well. You can mix fresh and canned ingredients as you like. This balance can make cooking easier and faster. Sweet potatoes are rich in vitamins A and C. They support your immune system and eye health. Black beans provide protein and fiber, which help keep you full. Quinoa adds more protein and is gluten-free. This makes the dish perfect for plant-based diets. Red bell peppers are high in antioxidants and vitamins. They add color and crunch to your burritos. Overall, these key ingredients create a meal that is tasty and full of nutrients. Start by preheating your oven to 400°F (200°C). Take your two medium sweet potatoes and peel them. Dice them into small pieces. Place the diced sweet potatoes on a baking sheet. Drizzle them with a bit of olive oil, and sprinkle salt and pepper on top. Toss them to coat evenly. Roast these for about 20 to 25 minutes. Stir them halfway through to help them cook evenly. The sweet potatoes should be tender and slightly caramelized when done. Next, grab a large skillet and heat a tablespoon of olive oil over medium heat. Add the diced red onion and red bell pepper. Sauté these for about 4 to 5 minutes until they become soft. Then, add minced garlic and cook it for another minute. This step brings out great flavors. Now, it's time to add the roasted sweet potatoes, black beans, and cooked quinoa to the skillet. Sprinkle in cumin, smoked paprika, and chili powder. Squeeze in the juice of one lime. Mix everything well and heat it for 3 to 5 minutes. Taste and adjust salt and pepper if needed. Now, lay out your large whole wheat tortillas on a flat surface. Spoon a generous amount of the sweet potato-black bean mixture into the center of each tortilla. Fold the bottom edge of the tortilla up over the filling. Then, fold in the sides and roll tightly to enclose everything. Repeat this with the rest of the tortillas and the filling. If you want extra crispiness, heat a skillet with olive oil. Place the burritos seam-side down and cook for 2 to 3 minutes on each side until golden brown. Enjoy your delicious meal! For the full recipe, check the section above. Roasting sweet potatoes brings out their natural sweetness and flavor. First, preheat your oven to 400°F (200°C). Next, peel and dice your sweet potatoes into small cubes. Toss them with a bit of olive oil, salt, and pepper. Spread them out on a baking sheet in a single layer. This step ensures even roasting. Roast for about 20-25 minutes. Stir them halfway for even cooking. When they are tender and slightly caramelized, they are ready! The sweet potatoes will add a great texture to your burritos. To keep your burritos from falling apart, sealing them well is key. Start by laying your tortilla flat. Spoon the sweet potato-black bean mixture into the center. Don’t overfill; about a generous half-cup works best. Fold the bottom edge of the tortilla up over the filling. Then, fold in the sides and roll tightly from the bottom. You want to create a snug wrap. If you want extra security, you can place the burrito seam-side down on a hot skillet. This will help seal the edges and create a crispy finish. Spices can transform your burritos from good to amazing! Use cumin for a warm, earthy taste. Smoked paprika adds a lovely smokiness. Don't forget chili powder for a hint of heat. These spices work well together and elevate the sweet potato and black bean flavors. You can also experiment with fresh herbs like cilantro or a squeeze of lime juice for brightness. Adjust the spices to your taste; cooking should be fun and personal! {{image_2}} To make these burritos gluten-free, swap whole wheat tortillas for gluten-free wraps. You can find these at most grocery stores. Make sure to check the labels for any hidden gluten. Rice paper wraps are another fun option. They add a nice texture and are easy to use. Feel free to mix in different veggies. Try corn, spinach, or zucchini for a twist. You can also change the spices. For a kick, add cayenne or chipotle powder. If you want a sweeter taste, sprinkle in some cinnamon. These swaps keep the meal fresh and fun. If you want more protein, tofu or tempeh are great choices. Cook them with spices before adding to the mix. You can also add nuts or seeds like pumpkin or sunflower seeds. These options not only boost protein but also add crunch and flavor. For the full recipe, be sure to check the link above! To store leftover burritos, wrap each one in plastic wrap. Place them in an airtight container. This keeps them fresh for up to three days in the fridge. If you want to keep them longer, consider freezing. To reheat your burritos, use an oven or a skillet. For the oven, preheat it to 350°F (175°C). Place the burrito on a baking sheet for about 15 minutes. If using a skillet, heat on medium-low. Cook for 3-4 minutes on each side, until warm. This keeps the tortilla crispy. To freeze burritos, wrap each one tightly in foil or plastic wrap. Place them in a freezer bag, removing as much air as possible. You can freeze them for up to three months. When ready to eat, thaw in the fridge overnight. Then reheat as mentioned above. This method saves time and keeps meals ready! Yes! You can prepare the filling a day early. Store it in the fridge. When you’re ready, just fill the tortillas and roll them up. This saves time and lets the flavors blend. You can use pinto beans, chickpeas, or lentils. Each gives a unique taste and texture. If you want a different style, try adding some cooked mushrooms for a savory touch. These burritos have mild spices. The cumin and smoked paprika add warmth without heat. If you like spice, add more chili powder or fresh jalapeños to the filling. Taste as you go! - How to make vegan sweet potato black bean burritos gluten-free? To make these burritos gluten-free, use corn tortillas instead of whole wheat. They will hold the filling well and taste great. Also, check the label on spices to ensure they are gluten-free. We discussed how to make tasty sweet potato black bean burritos. I shared essential ingredients and their health benefits. You learned step-by-step instructions to prepare, cook, and assemble your burritos. I also offered tips for roasting sweet potatoes and keeping your burritos sealed. Plus, I shared variations for gluten-free options and extra protein. Remember, proper storage is key for leftovers. Enjoy making these burritos your own, and have fun experimenting with flavors! You’ll love the taste and benefits.

Vegan Sweet Potato Black Bean Burritos Delicious Meal

Are you ready to discover a tasty, healthy meal? These Vegan Sweet Potato Black Bean Burritos are packed with flavor

To make the no bake pumpkin cheesecake cups, gather these ingredients: - 1 cup graham cracker crumbs - 1/4 cup melted unsalted butter - 2 tablespoons sugar - 1 (8 oz) package cream cheese, softened - 1 cup pumpkin puree - 1/2 cup powdered sugar - 1 teaspoon vanilla extract - 1 teaspoon pumpkin pie spice - 1 cup heavy whipping cream - Whipped cream for topping - Cinnamon stick for garnish (optional) Choosing quality ingredients makes a big difference. For the cream cheese, pick a brand that is full-fat for the best taste. Use fresh pumpkin puree for a richer flavor. If you can, select organic graham crackers. They often taste better and add more to your dessert. If you want a different crust, try using crushed cookies or nuts instead of graham crackers. Chocolate sandwich cookies also make a great base. For those who need dairy-free options, use vegan cream cheese. You can whip coconut cream instead of heavy cream. This gives a nice texture while keeping it dairy-free. To start, we need to prep the crust and base mixture. In a medium bowl, combine these ingredients: - 1 cup graham cracker crumbs - 1/4 cup melted unsalted butter - 2 tablespoons sugar Mix until the crumbs look like wet sand. This is your crust. Next, we make the cheesecake filling. In another bowl, beat one package of softened cream cheese until smooth. Then, add: - 1 cup pumpkin puree - 1/2 cup powdered sugar - 1 teaspoon vanilla extract - 1 teaspoon pumpkin pie spice Beat this mixture until it’s fully combined and smooth. Now, we need to fold in some whipped cream. In a separate bowl, whip 1 cup of heavy cream until stiff peaks form. Gently add it to the pumpkin mixture. Be careful not to deflate the whipped cream! Now we assemble our cups. Spoon about 2 tablespoons of the crust mixture into the bottom of each serving cup. Press it down gently to form a nice layer. Next, take the creamy pumpkin mixture and spoon it on top of the crust, filling each cup until it's about 3/4 full. For smooth layering, make sure to spread the filling evenly. You can use the back of a spoon or a small spatula to help. Refrigerate the cups for at least 4 hours. If you can, leave them overnight. This lets the flavors blend and the cheesecake set nicely. For best practices, cover the cups with plastic wrap or a lid while they chill. This keeps them fresh and prevents any unwanted odors from your fridge. Enjoy the tasty treat once they are set! To avoid lumps in your cream cheese mixture, make sure to soften the cream cheese well. I suggest letting it sit at room temperature for about 30 minutes. This helps it blend smoothly. If you forget, you can microwave it for 10 seconds. Just be careful not to melt it. The best temperature for all ingredients is room temperature. Both the cream cheese and pumpkin puree should be warm. This helps them mix together better, creating a creamy texture. If the heavy cream is cold, whip it until stiff peaks form. Cold cream whips up light and fluffy, adding volume to your cheesecake cups. You can get creative with how you present these dessert cups. Use clear glass jars or pretty ramekins to show off the layers. Top each cup with a generous dollop of whipped cream. A sprinkle of cinnamon adds a nice touch. You can also add a cinnamon stick for a lovely garnish. These no-bake pumpkin cheesecake cups are great for many occasions. They shine at fall parties, Thanksgiving, or even cozy family dinners. Kids love them too! You can make them ahead of time, which saves you stress on special days. One common mistake is over-mixing the cream cheese and pumpkin mixture. This can make it too runny. Mix just until smooth; don’t go beyond that. Another error is not letting the cups chill long enough. They need at least four hours to set properly. When adjusting sweetness, taste your mixture first. If it’s too sweet, add a pinch of salt. This can balance the flavors well. If you want more spice, add a bit more pumpkin pie spice. Just remember, a little goes a long way! To find the full recipe, check the section on ingredients and instructions. {{image_2}} You can easily change the flavor of these no-bake pumpkin cheesecake cups. One fun option is to add chocolate or caramel. Just swirl in some chocolate sauce or drizzle caramel on top. This twist adds a rich flavor and makes the cups even more special. If you're not a fan of pumpkin, there are other choices. You can use sweet potato puree or butternut squash puree. Both will give you a similar texture and flavor. You can also try mixing in spices like ginger or nutmeg for a new taste. If you need gluten-free options, it’s simple to adapt the crust. Use gluten-free graham crackers or ground nuts instead. Both work well and keep the crust tasty. For vegan adaptations, swap the cream cheese with a dairy-free version made from nuts or tofu. Use coconut cream instead of heavy cream for the filling. This way, everyone can enjoy the dessert, no matter their diet. You can find the full recipe online to get started on these delicious variations! To keep your no-bake pumpkin cheesecake cups fresh, store them in the fridge. Use an airtight container to prevent them from drying out. If you plan to eat them later, cover each cup with plastic wrap or a lid. These cups will stay fresh for up to 3 days in the fridge. After that, the texture may change, and they may lose some flavor. Yes, you can freeze the cheesecake cups! This is a great way to save some for later. To freeze, simply cover each cup tightly with plastic wrap, then aluminum foil. They will keep for about 2 months in the freezer. When you’re ready to enjoy them, take them out and let them thaw in the fridge overnight. This helps the texture stay smooth when you serve them. Enjoy these delightful treats anytime! For the full recipe, check the link above. No-bake pumpkin cheesecake cups last about 4 to 5 days in the fridge. Store them in an airtight container to keep them fresh. The flavors get better over time, but they are best enjoyed within that time frame. Yes, you can make these cups up to two days in advance. This makes them great for parties or busy days. Just store them in the fridge until you're ready to serve. If you add any toppings, do that right before serving for the best look. If you don’t have pumpkin pie spice, mix these spices instead: - 1 teaspoon cinnamon - 1/4 teaspoon nutmeg - 1/4 teaspoon ginger - 1/4 teaspoon allspice This mix gives a warm flavor similar to pumpkin pie spice. Sure! Here are some fun ideas: - Add a dollop of whipped cream on top. - Sprinkle with cinnamon or nutmeg. - Add a small cookie or chocolate on the side. - Use a cinnamon stick as a garnish. These little touches make the cups look special. Yes, you can use low-fat cream cheese. This option will still work well in the recipe. The cups may be a bit lighter but will still taste great. Just make sure it is softened for easy mixing. In this blog post, we explored the basics of making no-bake pumpkin cheesecake cups. We broke down the ingredients and provided tips for selecting the best ones. You learned about substitutes and alternatives that fit different diets. The step-by-step instructions guide you through preparation, assembly, and storage. Remember, practice makes perfect. Don't be afraid to try variations to match your taste. With these simple tips, you’ll create a delicious dessert that impresses everyone. Enjoy your cheesecake cups, and share your success!

No Bake Pumpkin Cheesecake Cups Simple and Delicious

Get ready for a treat that requires no baking! My No Bake Pumpkin Cheesecake Cups are a simple and delicious

- 4 medium russet potatoes, cut into wedges - 1/2 cup grated Parmesan cheese - 2 tablespoons olive oil - 1 teaspoon garlic powder - 1 teaspoon onion powder - 1 teaspoon paprika - 1/2 teaspoon dried oregano - 1/2 teaspoon black pepper - Salt to taste - Fresh parsley, chopped (for garnish) For the perfect Air Fryer Parmesan Potato Wedges, you need fresh russet potatoes. I love using these because they give a fluffy inside and crispy outside. Make sure to cut them into even wedges. This way, they will cook evenly and all have that great crunch. Grated Parmesan cheese is key for flavor. It melts and gets crispy, adding a nice cheesy touch. Olive oil helps the seasoning stick. The garlic and onion powders boost the taste. Paprika gives a lovely color and a bit of warmth. Dried oregano and black pepper add more flavor, so don’t skip them! Finally, salt is important. It brings out all the other flavors. I like to finish with fresh parsley for color and freshness. It makes the dish look great and taste even better. This is the [Full Recipe] you will follow to make these tasty wedges! - Set temperature to 400°F (200°C) - Allow preheating for 5 minutes Preheating your air fryer is key. It helps the potato wedges cook evenly. Without this step, they may end up soggy. - Rinse, scrub, and cut into wedges - Pat dry to remove excess moisture Start by rinsing the russet potatoes. Scrubbing them well removes dirt. Next, cut the potatoes into wedges. Keep the skin on for extra crunch. After cutting, pat them dry with a paper towel. This step is crucial for crispiness. - Mix olive oil and seasonings - Toss potato wedges until evenly coated In a large bowl, combine olive oil, garlic powder, onion powder, paprika, oregano, black pepper, and salt. This mix adds great flavor. Toss the potato wedges in the bowl until they are fully coated. You want every wedge to taste amazing. - Sprinkle grated cheese over wedges - Gently toss again Now, sprinkle grated Parmesan cheese over the seasoned wedges. Toss them gently again, ensuring the cheese sticks to the potatoes. This cheese will create a tasty, crispy layer. - Place wedges in a single layer - Cook for 15-20 minutes, shaking halfway Place the coated wedges in a single layer in the air fryer basket. Avoid overcrowding; this ensures they cook well. Set the timer for 15-20 minutes. Halfway through, shake the basket to promote even cooking. You’ll know they’re done when they turn golden brown and crispy. - Transfer to a serving plate - Garnish with chopped parsley Once cooked, carefully transfer the wedges to a serving plate. For a pop of color and flavor, garnish with chopped parsley. This final touch makes your dish look and taste even better. For the full recipe, check the earlier section. To make your potato wedges crispy, start by drying them well. After cutting, pat them with a paper towel. This step removes extra moisture, which can make them soggy. Cooking time is also key. Aim for 15-20 minutes at 400°F (200°C). Check for doneness at 15 minutes. If they aren’t golden yet, give them a few more minutes. Shaking the basket is important, too. Halfway through cooking, pull out the basket and shake it gently. This helps the wedges cook evenly and get crispy all around. You can change up the spices to fit your taste. Try adding chili powder for heat or lemon zest for a fresh kick. If you love herbs, mix in some dried thyme or rosemary. These will add depth and make your wedges unique. Feel free to experiment and find your favorite mix! Sometimes, you may need to cook in batches. If your air fryer is small, don’t crowd the basket. This allows hot air to flow and crisp the wedges better. To keep them warm, place cooked wedges on a baking sheet in a low oven (about 200°F or 93°C). This way, everyone can enjoy them hot and crispy! For the full recipe, check here. {{image_2}} You can switch up the cheese in this recipe. Cheddar adds a sharp bite. Mozzarella brings a creamy texture. If you prefer plant-based options, vegan cheese works well too. Each cheese offers a unique taste, so feel free to mix and match. If you like heat, try adding cayenne pepper or chili powder. Just a pinch can make a big difference. Spice gives your potato wedges a kick. You can adjust the heat level to your liking. This variation adds excitement to your dish. Fresh herbs can elevate these potato wedges. Rosemary or thyme adds a lovely aroma and flavor. Chop them finely and toss them in with the seasoning. This twist makes your wedges more fragrant and fresh. Experiment with different herbs to find your favorite blend. To keep your leftover wedges fresh, place them in an airtight container. This helps avoid moisture loss. You can store them in the refrigerator for up to three days. Make sure they cool down before sealing the container. To enjoy crispy wedges again, reheating is key. The best way is to use the air fryer. Just set it to 350°F (175°C) and heat for about 5-7 minutes. This restores their crunch. You can also use an oven. Preheat it to 350°F (175°C) and spread the wedges on a baking sheet. Bake for 10 minutes or until they turn crispy again. Yes, you can freeze cooked wedges! To do this, let them cool completely. Then, place the wedges in a freezer bag. Remove as much air as possible, and seal the bag. They can stay in the freezer for up to three months. When ready to eat, reheat them in the air fryer for best results. Heat at 350°F (175°C) for about 10-12 minutes. This keeps them crispy and delicious. For the full recipe, check out the Crispy Air Fryer Parmesan Potato Wedges. Yes, you can use sweet potatoes! They offer a sweet flavor and a lovely color. Just remember to adjust the cooking time. Sweet potatoes cook faster than russet potatoes. Start checking for doneness at around 12 minutes. If they aren’t crispy yet, you can add a few extra minutes. To make these wedges vegetarian, ensure your cheese is vegetarian-friendly. Most Parmesan cheese is not vegetarian, as it may contain animal rennet. Look for a brand that uses microbial rennet or choose a different cheese, like pecorino or nutritional yeast. Both options will keep your dish tasty and meat-free. These crispy wedges pair well with many dips. Try serving them with: - Ketchup - Ranch dressing - Garlic aioli - Spicy sriracha mayo You can also enjoy them as a side for burgers, grilled chicken, or salads. They add a delightful crunch to any meal! For the full recipe, click here: [Full Recipe]. To sum up, making Air Fryer Parmesan Potato Wedges is simple and fun. You start with fresh russet potatoes, add tasty seasonings, and cook them in your air fryer for a crispy finish. I shared tips for perfecting the crunch and suggested various cheese and spice options. Remember, these tasty wedges pair well with many dips. Try out the variations and enjoy every bite! You’ll love how easy it is to make a delicious snack at home.

Air Fryer Parmesan Potato Wedges Crispy Delight Recipe

Are you ready to elevate snack time with a crispy treat? My Air Fryer Parmesan Potato Wedges are the perfect

- 12 oz penne pasta - 1 tablespoon olive oil - 3 cloves garlic, minced - 1 can crushed tomatoes - 3 cups vegetable broth - 1 cup heavy cream - ½ cup grated Parmesan cheese - Fresh mozzarella balls - 1 cup fresh basil leaves, chopped - 1 teaspoon dried oregano - Salt and pepper to taste The main ingredients set the base for this creamy dish. Start with 12 oz of penne pasta. This pasta shape holds sauce well and cooks evenly. Add 1 tablespoon of olive oil. This oil helps sauté the garlic, adding a rich flavor. Use 3 cloves of minced garlic. Fresh garlic gives a wonderful aroma. You will also need 1 can of crushed tomatoes. This adds a sweet and tangy base. Finally, use 3 cups of vegetable broth. The broth gives depth and makes the dish hearty. For optional ingredients, consider 1 cup of heavy cream. This cream adds richness and makes the dish creamy. You can also add ½ cup of grated Parmesan cheese for extra flavor. Fresh mozzarella balls are fun to add on top. They melt beautifully and add a lovely texture. For seasoning and garnish, chop 1 cup of fresh basil leaves. Basil brings a fresh taste that pairs well with tomatoes. Use 1 teaspoon of dried oregano for a warm, herbal note. Finally, add salt and pepper to taste. These simple seasonings enhance all the other flavors. For the complete guide on making this dish, be sure to check the Full Recipe. - Heat 1 tablespoon of olive oil in a large pot over medium heat. - Add 3 cloves of minced garlic. Sauté for about 30 seconds until fragrant. Be careful not to let it brown. - Pour in 1 can of crushed tomatoes and 3 cups of vegetable broth. Stir gently to combine. - Add 12 oz of penne pasta to the pot. Bring the mixture to a boil. - Reduce the heat to medium. Cook for 10-12 minutes, stirring occasionally. The pasta should be al dente and most of the liquid absorbed. - Reduce the heat to low. Stir in 1 cup of heavy cream and the chopped basil. Add 1 teaspoon of dried oregano, salt, and pepper to taste. Mix well until creamy. - For extra creaminess, stir in ½ cup of grated Parmesan cheese if desired. - Serve hot, garnished with fresh mozzarella balls and more basil if you like. You can find the Full Recipe for this tasty dish to enjoy! - Avoid overcooking the pasta. Cook it just until it's al dente. This keeps it firm and tasty. - Stir frequently for even cooking. This helps every piece of pasta cook well and soak up flavor. - Use fresh basil instead of dried oregano. Fresh basil gives a bright taste that dried cannot match. - Add chili flakes for spice. A pinch can turn the dish into a delightful kick, making it exciting. - Garnish with fresh mozzarella balls and extra basil. This adds color and a fresh taste to your dish. - Serve with a side salad or crusty bread. Pairing with a light white wine also complements the meal perfectly. For a full guide on making this dish, refer to the Full Recipe. {{image_2}} You can add protein to make this dish heartier. Chicken is a popular option. Simply cook diced chicken in the pot before adding garlic. Cook until no longer pink, then add the next ingredients. For a seafood twist, shrimp works well too. Just toss them in during the last few minutes of cooking. If you prefer vegetarian or vegan options, try chickpeas or lentils. They boost protein and add texture without meat. While penne is great, feel free to explore other pasta shapes. Fusilli or rigatoni can change the dish's look and feel. They hold sauce well, making each bite flavorful. If you need gluten-free options, many brands make rice or corn-based pasta. These work just as well in this recipe. Cook them according to package instructions for best results. To switch up the flavor, consider adding sun-dried tomatoes. They add a rich, tangy taste that pairs beautifully with the creamy sauce. Another option is to experiment with herbs. Besides basil, thyme or parsley can introduce new flavors. Mixing fresh and dried herbs may also enhance the taste. Each variation gives this dish a unique twist and can keep it exciting. For the complete recipe, refer to the Full Recipe. Store your creamy tomato basil pasta in an airtight container. Let it cool to room temperature first. Keep it in the fridge for up to three days. When you reheat, use a microwave or a stovetop. Add a splash of water or broth to keep it creamy. Heat slowly to avoid burning. Yes, you can freeze this creamy pasta! Use a freezer-safe container and store it for up to three months. To thaw, move it to the fridge overnight. For reheating, use the stovetop. Add a bit of cream or broth to restore the texture. For the best taste, eat the pasta within three days if refrigerated. If frozen, enjoy it within three months for the best flavor. Watch for signs of spoilage, like an off smell or changes in color. If you see these, it's time to toss it. It takes about 10 minutes to prep the ingredients. Cooking the pasta takes around 10 to 12 minutes. In total, you will spend about 30 minutes from start to finish. This quick dish is perfect for busy days. Yes, you can make this dish ahead of time. Cook it, then cool it down before storing. Keep it in an airtight container in the fridge for up to three days. Reheat it on the stove, adding a splash of broth or cream as needed. If you want a lighter option, try using half-and-half or whole milk. For a dairy-free choice, use coconut cream or cashew cream. These options still give a rich and creamy taste without the heaviness. Yes, this dish is great for meal prep! Cook it, then portion it into containers. It stays tasty in the fridge for up to three days. You can also freeze it for longer storage. Just remember to reheat gently to keep it creamy. Check out the Full Recipe for more details. This blog post showed you how to make One Pot Creamy Tomato Basil Pasta. You learned the key ingredients, like penne pasta, garlic, and crushed tomatoes. We discussed how to cook the pasta perfectly and add optional flavors like heavy cream and Parmesan. I shared tips to enhance taste and present your dish nicely. You can also explore variations to suit your taste. Whether you plan to make it ahead or store leftovers, you have the tools to enjoy this dish. Now it’s time for you to try it and enjoy a delicious meal.

Creamy Tomato Basil Pasta Tasty One Pot Recipe

If you crave a delicious, easy meal, this Creamy Tomato Basil Pasta is for you! Made in just one pot,

- 1 ½ cups all-purpose flour - 1 teaspoon baking soda - ½ teaspoon baking powder - ½ teaspoon salt - 1 teaspoon ground cinnamon - ½ teaspoon ground nutmeg - ½ teaspoon ground ginger - 1 cup pumpkin puree (canned or homemade) - ½ cup granulated sugar - ½ cup brown sugar, packed - 2 large eggs - ½ cup vegetable oil - 1 teaspoon vanilla extract - ½ cup chopped pecans or walnuts - Streusel Topping: - ½ cup all-purpose flour - ⅓ cup brown sugar, packed - ½ teaspoon ground cinnamon - ¼ cup unsalted butter, melted - ¼ cup chopped nuts When I make Pumpkin Streusel Bread Loaf, I always start with my ingredients. The dry ingredients form the base of the bread. All-purpose flour gives it structure. Baking soda and baking powder help it rise. Salt enhances flavor, while cinnamon, nutmeg, and ginger bring that warm fall vibe. Next, I gather my wet ingredients. Pumpkin puree adds moisture and flavor. It gives the loaf a rich orange hue. Granulated and brown sugars add sweetness. Eggs bind everything together, while vegetable oil keeps it tender. A splash of vanilla adds a nice touch. For extra crunch, I often add chopped nuts. Pecans or walnuts work great. The streusel topping is my favorite part. It adds a sweet, crumbly layer on top. The mix of flour, brown sugar, and cinnamon gives it a perfect flavor. The melted butter makes it rich and crumbly. You can find the full recipe above to make this delightful loaf. Each ingredient plays a role in making this bread a must-try. - Preheat the oven to 350°F (175°C). - Grease and flour a 9x5-inch loaf pan or line with parchment paper. - Whisk together dry ingredients in a medium bowl. - Combine wet ingredients in a large mixing bowl and mix until smooth. - Gradually add dry ingredients to wet ingredients and fold in optional nuts. - Pour batter into prepared loaf pan. - Mix streusel ingredients in a small bowl until crumbly. - Sprinkle topping over batter in the loaf pan. - Bake for 55-65 minutes or until a toothpick comes out clean. - Tent with foil if the top browns too quickly. - Let the loaf cool in the pan for 10 minutes. - Transfer to a wire rack to cool completely. This step-by-step process makes the recipe easy to follow. For the full recipe and more tips, check out the Full Recipe. - Use room temperature ingredients for better mixing. This makes your batter smooth and even. - Do not overmix the batter for a fluffy texture. Mix just until combined to keep it light. - If the loaf sinks in the center, check leavener freshness. Old baking soda or powder can impact rise. - Ensure an accurate oven temperature with an oven thermometer. This helps prevent under or overcooking. - Toast nuts before adding for a richer flavor. This brings out their natural oils and crunch. - Experiment with different spices like allspice or clove. These add warmth to your bread and deepen the flavor. For the full experience, try the Full Recipe to create this amazing Pumpkin Streusel Bread Loaf! {{image_2}} Dietary modifications let everyone enjoy this tasty pumpkin streusel bread loaf. For a gluten-free version, just swap out the all-purpose flour for a gluten-free blend. This keeps the bread soft and moist, just like the original. If you're looking for a vegan option, replace the eggs with either flaxseed meal or applesauce. Flaxseed meal works well; mix one tablespoon with three tablespoons of water, and let it sit for a few minutes. Applesauce adds sweetness and moisture, making it a great choice too. You can also explore flavor variations. Try adding chocolate chips or dried cranberries for a burst of sweetness. These add-ins bring a nice twist to the classic taste. Another fun option is to use butternut squash puree instead of pumpkin. This can give your loaf a different flavor profile while still being delicious. When it comes to serving suggestions, the options are endless. Cream cheese frosting on top adds a creamy touch that pairs perfectly with the bread's spices. A drizzle of caramel also enhances the sweet flavor. If you’re feeling indulgent, serve it with a scoop of ice cream or some whipped cream for dessert. Explore these variations to make the pumpkin streusel bread loaf your own! For the full recipe, check out the detailed instructions above. Store your Pumpkin Streusel Bread Loaf in an airtight container at room temperature. It stays fresh for up to 3 days. This way, you can enjoy its rich flavors without losing any moisture. For longer storage, refrigerate the bread for up to a week. You can also freeze it for up to 3 months. Just wrap the loaf tightly in plastic wrap before freezing. This keeps it safe from freezer burn and helps maintain its taste. When you want to enjoy a slice, microwave it for 10-15 seconds. This gives you a quick warm-up. If you prefer, you can reheat it in the oven at a low temperature. This will ensure it warms through evenly and keeps the crust nice. For the Full Recipe, check the earlier sections to make your own delicious loaf! Use a toothpick to check for doneness; it should come out clean. When you insert the toothpick, make sure it goes into the center. If it comes out with wet batter, bake a bit longer. This simple test ensures your loaf is perfectly baked. Yes, you can make it the day before serving; store properly. Allow it to cool completely before wrapping it in plastic wrap. This helps maintain moisture and flavor. You can also keep it in an airtight container. Use homemade puree or other squash varieties like butternut. If you want a different taste, roasted sweet potato works well too. Just remember to blend it until smooth for the best texture. Increase the butter or add oats to the streusel mixture. More butter creates a richer topping. If you want added texture, oats give a nice crunch and can enhance flavor. Yes, it freezes well; ensure you wrap it tightly before freezing. Use plastic wrap followed by aluminum foil for extra protection. This helps keep the loaf fresh for up to three months. This blog post guided you through making a delicious Pumpkin Streusel Bread Loaf. We covered the ingredients, step-by-step instructions, helpful tips, variations, and storage methods. With these easy steps, your loaf will turn out tasty and perfect every time. Enjoy experimenting with flavors and share your creations. Baking is fun and rewarding, so get started today!

Pumpkin Streusel Bread Loaf Irresistible Fall Delight

Are you ready to bake a delicious treat that captures the essence of fall? Look no further than this Pumpkin

Older posts
Newer posts
← Previous Page1 … Page53 Page54 Page55 … Page86 Next →

dsad

© 2026 Cooking Wells • Built with GeneratePress

Our Policies

  • Copyright Policy
  • Cookie Policy
  • GDPR Policy
  • Privacy Policy
  • Disclaimer
  • Terms Of Use

More Information

  • Home
  • About
  • Contact
  • Appetizers
  • Dessert
  • Dinner
  • Drinks
©2026, Cooking Wells About Back To Top