Skip to content
DisclaimerTerms Of UseGDPR PolicyCookie Policy

Cooking Wells

  • Home
  • Drinks
  • Appetizers
  • Dinner
  • Dessert
  • About
  • Contact
  • Privacy Policy
DisclaimerTerms Of UseGDPR PolicyCookie Policy

NO-ING-IMG

- 32 oz frozen tater tots - 8 large eggs - 1 cup whole milk - 1 cup shredded cheddar cheese - 1 cup cooked and crumbled sausage (or plant-based alternative) - 1 cup diced bell peppers (mixed colors) - 1/2 cup chopped green onions - 1 teaspoon garlic powder - Salt and pepper to taste - Fresh cilantro for garnish (optional) Gathering the right ingredients is key to making this loaded breakfast tater tot casserole shine. Start with frozen tater tots. They give a great base. I love using 32 ounces because they add a nice crunch. Next, you need eggs—8 large ones work perfectly. They bind everything together. The whole milk, 1 cup, adds creaminess. You can't forget the cheese! I use 1 cup of shredded cheddar cheese. It melts perfectly and gives flavor. For extra taste, I add 1 cup of cooked and crumbled sausage. You can use a plant-based sausage if you prefer. A blend of bell peppers, about 1 cup, adds color and sweetness. I choose mixed colors for a vibrant look. Finally, top it off with 1/2 cup of chopped green onions for a fresh bite. For seasoning, I make it simple. I use 1 teaspoon of garlic powder, plus salt and pepper to taste. Fresh cilantro is optional but adds a nice touch. For the full recipe, check out the details. This mix of ingredients makes a tasty and filling dish that everyone will love! - Preheat your oven to 375°F (190°C). - Grease a 9x13 inch baking dish with cooking spray or butter. - Spread the frozen tater tots evenly in the baking dish. This forms a great base. - In a mixing bowl, whisk together eggs, milk, garlic powder, salt, and pepper. Mix well until smooth. - Pour the egg mixture over the tater tots. Make sure to cover them all. - Sprinkle sausage, bell peppers, and cheddar over the casserole. This adds flavor and texture. - Bake for 30-35 minutes until the eggs are set and tater tots are crispy. You want a nice golden color. - Allow to cool for a few minutes before slicing. This helps it hold together better. For the complete guide, check out the Full Recipe. To get crispy tater tots, remember these key points: - Use a hot oven: Preheat your oven to 375°F (190°C). This helps the tots crisp up fast. - Even layer: Spread the tater tots evenly in the baking dish. This ensures they cook uniformly. - Don't crowd: If you have too many, use two dishes. Crowding can make them soggy. - Finish with broil: For extra crunch, broil for a few minutes after baking. Just watch closely! For the best results, choose the right baking dish. - Metal pans: They conduct heat well and help the tots brown nicely. - Glass dishes: These can work, but they may cook slower than metal. - Avoid ceramic: They may not heat evenly, which can lead to uneven cooking. You can swap some ingredients to fit your diet: - Plant-based sausage: Use veggie sausage or mushrooms for a meatless option. - Cheese alternatives: Try vegan cheese or nutritional yeast. These provide great flavor. For milk, consider: - Dairy-free milk: Almond, soy, or oat milk work well. They keep the dish creamy without dairy. Make your casserole look great with these tips: - Garnish creatively: Use fresh cilantro, diced tomatoes, or avocado slices on top. It adds color and flavor. - Plating ideas: Serve it in the baking dish for a casual vibe. For a fancy touch, spoon portions onto plates. - Pair with sides: Serve with fresh fruit or a simple salad. This adds balance to your meal. Check out the Full Recipe for all the details! {{image_2}} You can make your Loaded Breakfast Tater Tot Casserole even better with some flavor boosts. Adding spices like paprika or cayenne gives it a nice kick. I love how a little heat can wake up the taste buds. You can also use different cheeses. Pepper jack adds spice, while feta brings a tangy taste. Mixing in these flavors can change the whole dish. Don't be afraid to mix up the ingredients. You can use different vegetables like spinach or mushrooms for added nutrition. These swaps can change the texture and taste. If you want to switch up the meat, try bacon or ham instead of sausage. Each choice adds its own unique flavor to the casserole. If you're looking to lighten things up, there are easy swaps. Use lower-calorie options like egg whites and skim milk. You can also make it vegetarian by leaving out the meat and adding more veggies. For those who need gluten-free meals, simply choose gluten-free tater tots. These simple changes keep the dish delicious while making it healthier. For the full recipe, check out the details above. To store leftovers of your Loaded Breakfast Tater Tot Casserole, first let it cool down. Once cooled, cut it into squares. Place the squares in an airtight container. I recommend using glass containers with tight lids to keep it fresh. Label the container with the date so you’ll know when you made it. This way, you can enjoy it later without any worry. When it's time to eat your leftovers, you can reheat them in the oven. Preheat the oven to 350°F (175°C). Place the casserole pieces on a baking sheet. Cover them with foil to keep them from drying out. Heat for about 15-20 minutes, or until hot. If you want to freeze the casserole, wrap it tightly in plastic wrap and foil. To thaw, put it in the fridge overnight before reheating. When stored properly in the fridge, the casserole lasts about 3-4 days. If you freeze it, it can last up to 2-3 months. Always check for signs of spoilage before eating. Look for a change in color, smell, or texture. If anything seems off, it's best to toss it out. Enjoy your delicious meals without any worries! How can I make this casserole ahead of time? You can prep this casserole the night before. Just follow the steps but do not bake it. Cover the dish with plastic wrap and place it in the fridge. In the morning, bake it straight from the fridge. This saves time and keeps the flavors fresh. Can I use fresh rather than frozen tater tots? Using fresh tater tots is not recommended. Frozen tater tots have the right texture and cook evenly in the oven. If you use fresh, they may not crisp up well. Stick with frozen for the best results. Is it possible to make this recipe gluten-free? Yes, you can make this casserole gluten-free. Use gluten-free tater tots and check the sausage label. Many brands offer gluten-free options. This way, you can enjoy the dish without any worries. What are some vegan options for this casserole? To make a vegan version, replace eggs with a tofu mixture or flax eggs. Use plant-based milk and cheese. There are many good meat substitutes available too, like tempeh or lentils. This keeps the flavors rich and satisfying without animal products. Why did my casserole turn out soggy? A soggy casserole usually means there was too much liquid. Make sure to measure your milk and eggs carefully. Also, avoid overcooking the veggies before adding them to the mix. This helps keep the texture just right. Can I add more eggs without affecting the texture? You can add one or two extra eggs if you want. Just be aware that too many eggs can make it dense. Balance is key for a fluffy texture. Stick with the recipe for the best results. For the full recipe, check out the Loaded Breakfast Tater Tot Casserole. This article covers a tasty tater tot casserole recipe. We explored the key ingredients, like eggs, milk, and cheese. Step-by-step instructions guide you through preparation, baking, and even storage tips. You also learned about ingredient swaps and how to tweak flavors. In summary, this dish is fun to make and easy to customize. You can enjoy it fresh or save leftovers for later. Keep experimenting with different flavors and enjoy your meals!

Loaded Breakfast Tater Tot Casserole Crunchy Delight

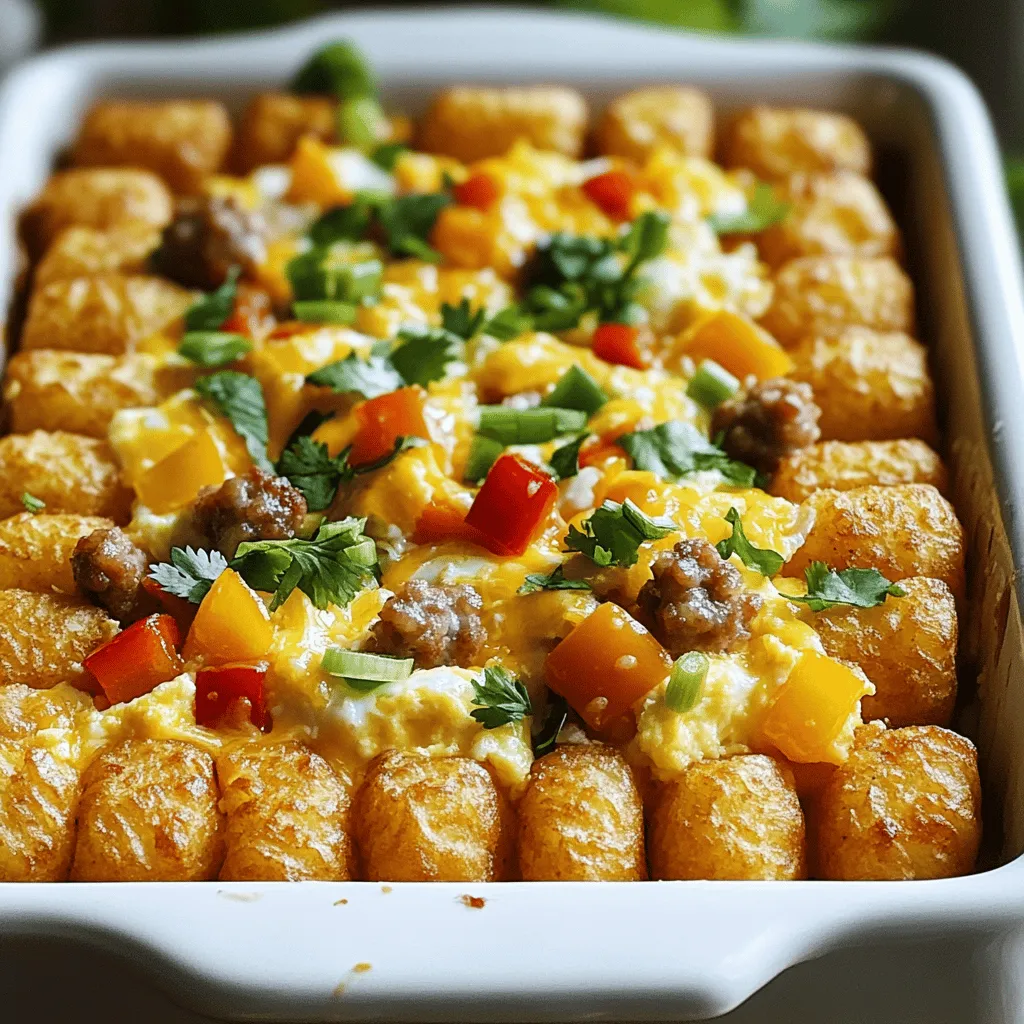
Start your day with a bang! My Loaded Breakfast Tater Tot Casserole is a crunchy delight that combines savory flavors

- Chicken drumsticks: Use 10 drumsticks. Look for fresh ones with a nice pink color. Make sure the skin is smooth and free of blemishes. - Marinade components: - 1/2 cup honey for sweetness. - 1/4 cup low-sodium soy sauce for a savory touch. - 4 cloves garlic, minced for flavor. - 1 tablespoon fresh ginger, grated for a warm kick. - 1 tablespoon apple cider vinegar for brightness. - 1 teaspoon black pepper to add depth. - 1 teaspoon onion powder for extra flavor. - 1/2 teaspoon salt to enhance all the tastes. - Optional ingredients: - 1/2 teaspoon red pepper flakes for heat. - Fresh parsley, chopped for garnish. The combination of these ingredients creates a sweet and savory glaze that sticks to the chicken. You can adjust the heat by adding more or less red pepper flakes. This recipe is all about balance, so feel free to play around with the amounts. If you want a fresh herb flavor, add the parsley before serving. Check the [Full Recipe] for more details on cooking times and tips. First, preheat your oven to 400°F (200°C). This step is key for crispy skin. Next, line a baking sheet with aluminum foil. This helps with easy cleanup. Place a wire rack on top of the baking sheet. This allows air to circulate around the chicken. In a medium bowl, whisk the marinade ingredients together. You’ll need honey, soy sauce, minced garlic, grated ginger, apple cider vinegar, black pepper, onion powder, salt, and red pepper flakes. Make sure to mix them well. Now, it’s time to coat the chicken. Place the drumsticks in a large mixing bowl or a zip-lock bag. Pour the honey garlic marinade over the chicken. Make sure each piece is covered. This adds great flavor. For the best taste, marinate the drumsticks for at least 30 minutes. If you have time, marinating for up to 4 hours in the fridge will deepen the flavor. After marinating, take the chicken out and shake off any extra marinade. Arrange the drumsticks on the wire rack. Make sure they are not touching each other. This helps them cook evenly. Place the baking sheet in your preheated oven. Bake the drumsticks for 35 to 40 minutes. Turn them halfway through to ensure even cooking. The chicken should be golden brown when done. Check the internal temperature; it should reach 165°F (74°C). For an extra glaze, brush a bit more marinade on the drumsticks in the last 5 minutes. Once done, let them rest for 5 minutes before serving. You can garnish with fresh parsley for a nice touch. Enjoy your baked honey garlic chicken drumsticks! For more details, check the Full Recipe. To ensure even baking for crispy skin, place your drumsticks on a wire rack. This allows hot air to flow all around them. The rack keeps the chicken elevated, so it doesn’t sit in fat. Turn the drumsticks halfway through baking. This helps them cook evenly and get golden brown. Use a meat thermometer for perfect doneness. Insert it into the thickest part of the drumstick. Make sure it reads 165°F (74°C) to know your chicken is safe to eat. Letting the chicken rest for a few minutes after baking locks in the juices. To add more flavor, try different marinades. You can mix in citrus juice or zest for a fresh kick. A splash of Worcestershire sauce can add depth. You might also consider herbs like thyme or rosemary for a fragrant touch. If you want to adjust spice levels, you can add or remove red pepper flakes. For a milder taste, skip the flakes. For more heat, add more. You can also use hot sauce in the marinade for extra spice. {{image_2}} You might not have soy sauce or honey at home. No problem! For soy sauce, try tamari or coconut aminos. These offer a similar taste without gluten. If you need a honey substitute, maple syrup works well. It adds sweetness with a unique flavor. Want to make your dish even tastier? Add citrus juice, like lime or lemon. This brightens the sauce and adds freshness. Fresh herbs are great too. Try thyme or rosemary for a fun twist. They enhance the taste and aroma of the chicken. You can grill or bake these chicken drumsticks. Baking gives you a crispy skin, while grilling adds a nice smoky flavor. Each method has its pros. Baking is easy and hands-off. Grilling requires more attention but is great for summer cookouts. If you want a different style, use a slow cooker. This method makes the chicken tender and juicy. Just coat the drumsticks in the marinade and place them in the slow cooker. Cook on low for about 6 hours or high for 3 hours. You'll still enjoy that tasty honey garlic flavor. For the full recipe, check the earlier section. After you enjoy your baked honey garlic chicken drumsticks, store the leftovers right. First, let them cool down to room temperature. This keeps them safe from bacteria. Then, place the drumsticks in an airtight container. If you want to keep them fresh longer, put them in the fridge. They can last about three to four days. If you have a lot of leftovers, consider freezing them. Wrap each drumstick in plastic wrap, then place them in a freezer-safe bag. They can stay in the freezer for up to three months. This way, you can enjoy them later! When it's time to reheat your chicken drumsticks, do it the right way. The best method is to use the oven. Preheat it to 350°F (175°C). Place the drumsticks on a baking sheet and cover them with foil. This keeps them moist. Heat them for about 15 to 20 minutes, or until they are warm inside. You can also use the microwave for a quick fix. Just place them on a microwave-safe plate and cover them with a damp paper towel. Heat in short bursts of 30 seconds until hot. Be careful not to overcook them, or they will dry out. For more flavor, brush on a little extra honey garlic sauce before reheating. Enjoy your tasty leftovers! How long to bake chicken drumsticks? You should bake chicken drumsticks for about 35 to 40 minutes. Turn them halfway through to ensure even cooking. The chicken should be golden brown and crispy when done. Can I marinate overnight? Yes, you can marinate overnight. This will make the chicken more flavorful and tender. Just remember to keep it in the fridge to stay safe. What temperature should chicken drumsticks be cooked to? Chicken drumsticks need to reach an internal temperature of 165°F (74°C). Use a meat thermometer to check this. It helps ensure your chicken is safe to eat. Can I make this recipe with other cuts of chicken? Yes, you can use other cuts like thighs or breasts. Adjust the cooking time based on the thickness. Thicker cuts may need more time to cook through. How can I make this dish gluten-free? To make this dish gluten-free, use gluten-free soy sauce. There are many brands available that taste great. Always check the label to ensure it is safe for your needs. For the full recipe, check out the Baked Honey Garlic Chicken Drumsticks section above! You now have everything you need to make tasty chicken drumsticks. We covered key ingredients, marinating tips, and baking steps. The right tips ensure crispy skin and great flavor. Don't forget the variations and storage advice to keep your meal fresh. Try different marinades and cooking methods to find your favorite. Enjoy experimenting with this easy recipe! Each bite offers a chance to make it your own. Happy cooking!

Baked Honey Garlic Chicken Drumsticks Easy Delight

Welcome to your new favorite recipe: Baked Honey Garlic Chicken Drumsticks! This dish is simple and packed with flavor. I’ll

- 4 medium bell peppers (any color) - 1 cup quinoa, rinsed - 2 cups vegetable broth - 1 cup cherry tomatoes, halved - 1/2 cup black olives, sliced - 1/4 cup fresh parsley, chopped - 1/4 cup fresh basil, chopped - 1 lemon (zest and juice) - 1 teaspoon garlic powder - 1 teaspoon onion powder - Salt and pepper to taste - 1/2 cup feta cheese, crumbled (optional) These ingredients create a vibrant and tasty dish. I love how the bell peppers add color and crunch. Quinoa gives us good protein and fiber. The broth adds depth, while the tomatoes and olives bring juicy flavors. Fresh herbs like parsley and basil add a nice touch. Lemon zest and juice brighten the mix. Garlic and onion powder give it a savory kick. You can add feta if you want a creamy finish. This mix is healthy and filling, perfect for lunch or dinner. {{ingredient_image_1}} - Preheat your oven to 375°F (190°C). - Cut the tops off the bell peppers. Remove the seeds and membranes. To prepare the bell peppers, start by preheating the oven. This step is key; it ensures even cooking. Next, carefully cut the tops off the peppers. This will create a lovely bowl for your filling. Removing the seeds and membranes is also important. It makes the peppers taste better and helps them cook evenly. You can brush the outside with a bit of olive oil for flavor. Place them in a baking dish for easy handling. - Boil the vegetable broth in a medium pot. - Add the rinsed quinoa and spices. Cooking the quinoa is simple. First, boil the vegetable broth in a medium pot. This adds flavor and moisture. Once boiling, add the rinsed quinoa, garlic powder, and onion powder. Stir gently, then reduce the heat to low. Cover the pot and let it simmer for about 15 minutes. The quinoa will become fluffy as it absorbs the broth. - Combine cooked quinoa with vegetables and herbs. - Add lemon zest and juice. When the quinoa is ready, remove it from the heat. Use a fork to fluff it up. Next, mix in the halved cherry tomatoes and sliced black olives. Don’t forget the chopped parsley and basil! These herbs bring brightness to your dish. Finally, add the lemon zest and juice. This gives the filling a fresh taste. Season with salt and pepper to your liking. If you like, fold in some crumbled feta cheese for creaminess. - Fill each bell pepper with the quinoa mixture. - Pack and distribute the filling evenly. Now comes the fun part: stuffing the peppers! Take the quinoa mixture and spoon it into each prepared bell pepper. Pack it tightly but gently. This helps ensure each bite is full of flavor. Distribute the filling evenly among all the peppers. - Cover the baking dish with aluminum foil. - Bake the stuffed peppers, then finish without the foil. Cover your baking dish with aluminum foil. This helps the peppers steam and cook well. Place it in the preheated oven and bake for 25 minutes. After that, remove the foil and bake for 10 more minutes. This step makes the peppers tender and slightly caramelized. When done, take them out and let them cool slightly before serving. To cook quinoa well, start by rinsing it. Rinsing removes the bitter coating. Use a fine mesh sieve for this. After rinsing, add the quinoa to boiling vegetable broth. This makes the quinoa taste great. Cook it on low heat for about 15 minutes. The key to fluffiness is letting it rest after cooking. Use a fork to fluff it gently. To boost flavor, try adding more herbs. Fresh thyme or dill can be nice. You can also add spices like cumin or paprika. These will give your dish a warm touch. Mix them in with the quinoa before stuffing the peppers. For a beautiful plate, serve the stuffed peppers on a colorful dish. Sprinkle fresh parsley or basil on top. This adds color and freshness. A drizzle of lemon juice brightens the dish. It gives a nice zing that pairs well with the flavors. Pro Tips Choose Colorful Peppers: Using a mix of red, yellow, and green bell peppers not only enhances the visual appeal of your dish but also adds a variety of flavors. Rinse Quinoa Thoroughly: Rinsing quinoa before cooking helps remove its natural coating, called saponin, which can impart a bitter taste. Customize Your Fillings: Feel free to add other vegetables or proteins like spinach, zucchini, or chickpeas to the quinoa mixture for added nutrition and taste. Check Pepper Tenderness: Baking times can vary based on the size and type of your peppers, so check for tenderness by pricking them with a fork before removing from the oven. {{image_2}} You can easily boost the protein in your stuffed peppers. Adding beans or lentils is a great choice. Black beans or chickpeas mix well with quinoa. They add texture and flavor. Lentils cook fast and bring a nice earthiness. If you want meat, you can add cooked chicken or turkey. Shredded chicken blends nicely with the quinoa. You can also use ground turkey for a heartier meal. This way, you can customize the dish to your taste. If you prefer, you can use rice or couscous instead of quinoa. Both grains work well and taste great. Rice gives a softer texture, while couscous cooks faster. Quinoa has some unique benefits. It is high in protein and fiber. It also has all nine essential amino acids. This makes it a complete protein. Quinoa is gluten-free, making it a good option for many diets. You can make this dish vegan by omitting feta cheese. The stuffed peppers will still taste great without it. For plant-based proteins, try adding tofu or tempeh. These options soak up flavors well. You can also use nutritional yeast for a cheesy taste. These swaps keep the meal healthy and satisfying without meat or dairy. Store any leftover lemon herb quinoa stuffed peppers in an airtight container. Keep them in the fridge for up to 3 days. To reheat, place a pepper on a plate and cover it with a damp paper towel. This helps keep the pepper moist. Heat in the microwave for about 2-3 minutes, or until warm. For a crispier finish, use an oven. Preheat it to 350°F (175°C) and bake for about 10 minutes. To freeze stuffed peppers, let them cool completely. Wrap each pepper tightly in plastic wrap. Place them in a freezer bag and remove as much air as possible. You can freeze them for up to 3 months. When ready to eat, take the peppers out and let them thaw overnight in the fridge. To reheat, bake in the oven at 350°F (175°C) for about 25 minutes. This keeps the flavor and texture just right. Bake stuffed peppers for about 35 minutes. First, cover them with foil for 25 minutes. Then, remove the foil and bake for 10 more minutes. This helps the peppers cook through and get tender. Yes, you can prepare stuffed peppers ahead of time. Make the filling and stuff the peppers. Then, cover and store them in the fridge. Bake them when you are ready to eat. This saves time on busy days. You can add many vegetables to your stuffed peppers. Here’s a list of great options: - Corn - Zucchini - Spinach - Mushrooms - Carrots - Kale These vegetables add flavor and nutrition. Choose your favorites to make the dish your own. In this blog post, we explored how to make delicious stuffed bell peppers. We covered ingredients, step-by-step instructions, and helpful tips. You learned how to cook quinoa perfectly and pack those peppers with flavor. Remember, feel free to get creative with your stuffing. You can add proteins, use different grains, or modify the recipe to fit your needs. Enjoy experimenting, and share your tasty creations with others!

Lemon Herb Quinoa Stuffed Peppers Tasty and Healthy

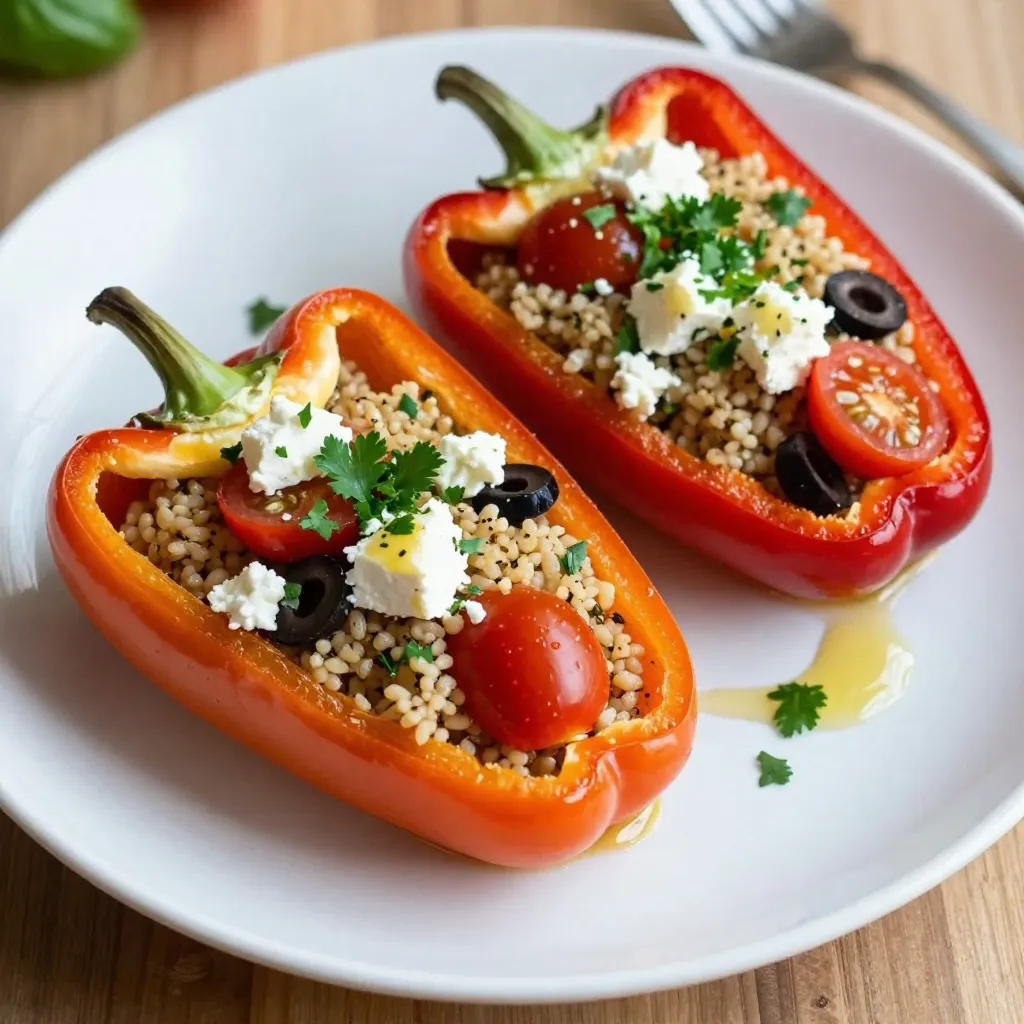
Looking for a meal that’s both tasty and healthy? Try my Lemon Herb Quinoa Stuffed Peppers! These bright and colorful

For the shrimp and vegetables, you need: - 1 pound large shrimp, peeled and deveined - 1 red bell pepper, sliced - 1 yellow bell pepper, sliced - 1 red onion, sliced These fresh ingredients bring color and crunch to your dish. The shrimp cooks quickly and soaks up all the flavors. The bell peppers and red onion add sweetness and texture. Together, they create a tasty mix that makes fajitas special. To add flavor, gather these seasonings: - 3 tablespoons olive oil - 2 teaspoons chili powder - 1 teaspoon cumin - 1 teaspoon smoked paprika - 1 teaspoon garlic powder - Salt and pepper to taste - Juice of 1 lime This blend turns simple shrimp and veggies into a feast. Olive oil helps the spices stick and gives a nice golden color. Chili powder adds heat, while cumin and smoked paprika give depth. Garlic powder enhances the taste, making each bite delicious. The lime juice adds brightness and balance. You can choose between these tortilla options: - 8 small flour tortillas - 8 small corn tortillas Both types are great for holding the shrimp and veggies. Flour tortillas are soft and chewy, while corn tortillas are more traditional and have a nice corn flavor. Warm them up before serving to make them extra tasty. Just pop them in a pan or microwave for a few seconds. This mix of ingredients will make your Sheet Pan Shrimp Fajitas a hit at the table! {{ingredient_image_1}} First, set your oven to 400°F (200°C). This hot heat cooks the shrimp well. Next, grab a large baking sheet. Line it with parchment paper. This keeps your shrimp and veggies from sticking. It makes cleanup easy too. In a big bowl, add 1 pound of shrimp. Make sure they are peeled and deveined. Then, toss in the sliced red and yellow bell peppers and red onion. In a small bowl, mix 3 tablespoons of olive oil with spices. Use 2 teaspoons of chili powder, 1 teaspoon of cumin, 1 teaspoon of smoked paprika, and 1 teaspoon of garlic powder. Add salt and pepper to your taste. Whisk it all together. Pour this spice mix over your shrimp and veggies. Toss them well until everything is coated. Spread the shrimp and veggies in an even layer on your baking sheet. Bake for 15-20 minutes. Check if the shrimp are cooked through and opaque. When they are done, take them out and squeeze fresh lime juice on top. Toss everything lightly again. Warm the tortillas in a pan or microwave until soft. Serve the shrimp and veggie mix in the tortillas. Finish with chopped cilantro for a bright touch. Enjoy your fast and flavorful meal! For this recipe, bake the shrimp and veggies for 15-20 minutes. Check at 15 minutes. The shrimp should look pink and opaque when done. If you like a little char, leave them in for 2 more minutes. Just watch closely to avoid overcooking. The spice mix adds a lot of taste. Try adding a pinch of cayenne for heat. You can also swap in fresh herbs like oregano for a twist. Experiment with your favorite spices, but keep the lime juice. It brightens every bite! Make your meal pop with color. Serve the fajitas in warm tortillas with lime wedges. Sprinkle chopped cilantro on top for a fresh look. You can even add sliced avocado or a scoop of salsa for fun toppings. Kids love to build their own! Pro Tips Prep Your Ingredients Ahead: Having all your ingredients prepped and ready to go makes the cooking process smoother and faster. Don’t Overcook the Shrimp: Shrimp cooks quickly, so keep an eye on them; they are done when they turn opaque and form a "C" shape. Customize Your Spice Level: Adjust the amount of chili powder based on your heat preference; you can also add jalapeños for an extra kick. Use Fresh Herbs for Flavor: Fresh cilantro adds a burst of flavor; you can also try topping with fresh avocado or your favorite salsa. {{image_2}} You can swap shrimp for chicken or tofu in this recipe. For chicken, use boneless, skinless breasts. Cut them into thin strips. The cooking time will be similar. For tofu, pick firm tofu. Press it to remove extra water, then cube it. Both options will soak up the spices well and taste great. Feel free to change the veggies to suit your taste. Zucchini, mushrooms, or corn can work well. Just cut them into similar sizes as the bell peppers. This will help ensure even cooking. You can also add more veggies for a colorful mix. Carrots or snap peas can add a nice crunch. If you want more heat, you can add cayenne pepper or diced jalapeños. Start with a small amount, then taste and adjust. If you prefer mild flavors, reduce the chili powder. You can also add a pinch of sugar to balance the heat. This makes it suitable for everyone at the table. To keep your fajitas fresh, let them cool first. Place the shrimp and veggies in an airtight container. You can store them in the fridge for up to three days. Make sure to keep the tortillas separate. This helps them stay soft and warm when you eat them later. When it’s time to enjoy leftovers, heat your shrimp and veggies. The stove works best for this. Simply place them in a skillet over medium heat. Stir until they are warmed through. You can also microwave them for a quick fix. Just cover the dish and heat for 1-2 minutes. If you want to save your fajitas for later, freezing works well. Store the cooled shrimp and veggies in a freezer-safe bag. Press out as much air as you can before sealing. They can last in the freezer for up to two months. When you're ready to eat, thaw them overnight in the fridge before reheating. You can prep the shrimp and veggies early. Chop the peppers and onions. Mix the spices and olive oil. Store them separately in the fridge. Just toss them together and bake when you’re ready to eat. This saves time and keeps your meal fresh. I recommend large, fresh shrimp for the best flavor. Look for shrimp that are peeled and deveined. If using frozen shrimp, make sure to thaw them first. Fresh or frozen shrimp both work well, but fresh shrimp have a better texture. Yes, you can! Larger tortillas work great for wraps. You can use whole wheat, corn, or even lettuce wraps. Just make sure to adjust the filling amount to fit your wraps. Enjoy the customizable options! This blog post covered how to make delicious sheet pan shrimp fajitas. We explored the key ingredients, including shrimp, veggies, and seasoning options. I provided step-by-step instructions for marinating and baking. You also learned tips for cooking and serving, plus variations for different tastes and diets. In closing, these fajitas offer a tasty meal that is simple and quick. Enjoy trying your own unique spin on this recipe!

Sheet Pan Shrimp Fajitas Fast and Flavorful Meal

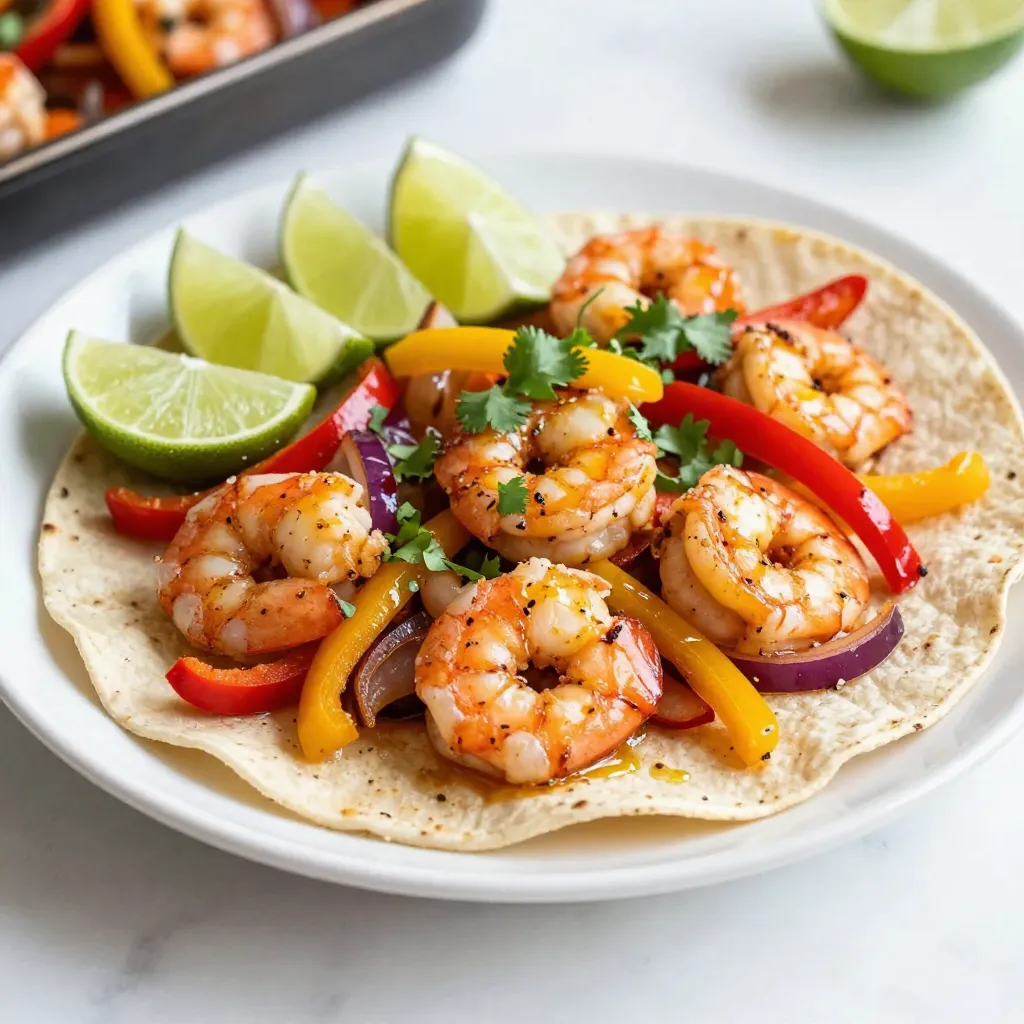
Are you ready for a quick and tasty dinner? My Sheet Pan Shrimp Fajitas are packed with flavor and come

- 2 cups cooked chicken, shredded - 8 ounces spaghetti (or your favorite pasta) - 1 cup sliced mushrooms - 1/2 cup frozen peas - 1 cup cooked and diced carrots - 1/4 cup butter - 1/4 cup all-purpose flour - 2 1/2 cups chicken broth - 1 cup whole milk - 1 teaspoon garlic powder - 1 teaspoon onion powder - 1 teaspoon dried thyme - Salt and pepper to taste - 1 cup shredded mozzarella cheese - 1/2 cup grated Parmesan cheese - Chopped fresh parsley for garnish (optional) Easy Chicken Tetrazzini is a simple dish that uses easy-to-find ingredients. You start with cooked chicken. This can be from a roast or store-bought rotisserie chicken. The spaghetti adds a nice base and makes it filling. I like using my favorite pasta too! Mushrooms give this dish a great flavor. They pair so well with the creamy sauce. Frozen peas add a pop of color and sweetness. Carrots offer extra nutrition and texture. For the sauce, butter, flour, chicken broth, and milk come together to create a creamy base. The seasonings like garlic powder and thyme boost the flavor. Lastly, cheese on top gives a golden, bubbly finish. You can find the full recipe at the end of this article. This dish is not just easy to make. It’s also a great way to use leftovers while tasting wonderful! - Preheat your oven to 350°F (175°C). - Cook spaghetti according to package instructions until al dente, then drain. - Melt butter in a large skillet over medium heat and sauté mushrooms. - Mix flour, garlic powder, onion powder, and thyme into the mushroom mixture. - Gradually whisk in chicken broth and milk until thickened. - Stir in shredded chicken, peas, and carrots, seasoning with salt and pepper. - Combine cooked spaghetti with the chicken sauce mixture in a bowl. - Pour into a greased baking dish, topping with mozzarella and Parmesan. - Bake for 25-30 minutes until cheese is bubbly and golden. - Make sure your chicken is fully cooked and shredded. This ensures even mixing throughout. - Each oven is unique. Adjust the cooking time based on how your oven heats. - Pair your Chicken Tetrazzini with a fresh side salad or warm garlic bread. Both add a nice touch. - Sprinkle chopped parsley on top for extra flavor and a pop of color. It makes the dish look great! - Use a rotisserie chicken instead of cooking your own. It cuts down on prep time. - You can make the sauce ahead of time. Store it in the fridge to save time on cooking day. For the full recipe, check out the detailed instructions provided earlier. {{image_2}} You can easily change the main protein in this dish. Substitute cooked turkey or ham for chicken. This swap gives a new taste while keeping it simple. If you need a gluten-free meal, just use gluten-free pasta. There are many good options out there, and they work well in this recipe. If you want to make this dish dairy-free, there are easy swaps. Replace whole milk with almond or coconut milk. Both options add a nice flavor without the dairy. You can also use dairy-free cheese for the topping. This keeps the dish creamy and delicious without any dairy. Adding veggies can boost the nutrition in your meal. Incorporate bell peppers or spinach for extra vitamins. These veggies add color and crunch, making the dish more vibrant. You can also try adding different herbs for a new flavor profile. Fresh basil or oregano can change up the taste and make it even more exciting. Store any leftover Chicken Tetrazzini in an airtight container. Make sure to refrigerate it right away. For the best taste, eat it within 3-4 days. This helps keep the flavors fresh and safe. To freeze, let the dish cool completely first. Once cool, transfer it to freezer-safe containers. You can keep it frozen for up to 2-3 months. This is great for quick meals later. When you're ready to eat, reheat in the oven or microwave. Heat until it is hot all the way through. If the dish seems dry, add a splash of milk. This will help bring back some moisture and flavor. Prep time is about 15 minutes, and total time is around 50 minutes. This means you can have a tasty meal ready in under an hour. Yes, you can prepare and assemble in advance, then bake when ready. This option is great for busy days or when you have guests. Just cover the dish and store it in the fridge. Consider a fresh salad or garlic bread as perfect pairings. The lightness of a salad balances the creamy dish well. Garlic bread adds a nice crunch and flavor. Yes, it can be frozen and reheated later for convenience. Just let it cool, then put it in a freezer-safe container. When you're ready to eat, thaw it overnight in the fridge, then bake! You can find the full recipe [here](#). Easy Chicken Tetrazzini combines simple ingredients, quick steps, and tasty results. You learned how to prepare a creamy sauce, mix in chicken and veggies, and top it with cheese. This dish is perfect for busy nights or cozy meals. You can also swap ingredients to suit your taste or dietary needs. Enjoy your tasty creation, and don’t forget to share any variations you try!

Easy Chicken Tetrazzini Flavorful and Simple Dinner

Looking for a simple yet tasty dinner? My Easy Chicken Tetrazzini recipe has got you covered! This dish combines tender

To make garlic butter roasted green beans, you need simple and fresh ingredients. Here is the list: - 1 pound fresh green beans, trimmed - 4 tablespoons unsalted butter - 6 cloves garlic, minced - 1 teaspoon lemon zest - 1 teaspoon dried thyme - Salt and pepper to taste - 2 tablespoons slivered almonds (for garnish) - 1 tablespoon fresh parsley, chopped (for garnish) Fresh green beans are key for this dish. Their crispness pairs well with rich garlic butter. The unsalted butter lets you control the salt level. Minced garlic gives a great aroma and taste. Lemon zest adds a bright touch. Dried thyme brings an earthy flavor. Salt and pepper help balance the dish. The slivered almonds give a nice crunch at the end. Fresh parsley adds a pop of color. You can find the full recipe above to guide you through the cooking steps. Gather these ingredients, and you’re ready to create a tasty side dish! First, you need to preheat your oven. Set it to 425°F (220°C). This high heat helps cook the green beans quickly and makes them tender and tasty. Next, let’s make the garlic butter. In a small pan, melt 4 tablespoons of unsalted butter over medium heat. Once melted, add 6 minced garlic cloves. Cook for 1-2 minutes. Keep an eye on it so the garlic does not brown. You want it fragrant, not burnt. Now, grab a large mixing bowl. Add 1 pound of trimmed green beans. Pour the melted garlic butter over the beans. Add 1 teaspoon of lemon zest and 1 teaspoon of dried thyme. Toss everything together. Make sure the green beans are well coated in the garlic butter mix. This step adds flavor to every bite. Spread the coated green beans on a baking sheet. Try to keep them in a single layer. Season them with salt and pepper to taste. Roast in the preheated oven for 15-20 minutes. Stir them halfway through for even cooking. They should be tender and slightly caramelized when done. Once your green beans are out of the oven, it’s time to serve. Sprinkle 2 tablespoons of slivered almonds on top for a nice crunch. Finish with 1 tablespoon of freshly chopped parsley for color and freshness. You can serve these tasty green beans as a side dish with any meal. They pair well with chicken, fish, or even pasta. For the full recipe, check out the details above. To make your garlic butter roasted green beans shine, think about adding fresh herbs. Fresh thyme or rosemary can lift the taste. You can also squeeze a bit of lemon juice on top after cooking. This adds a bright flavor that mixes well with garlic. If you like spice, try a pinch of red pepper flakes. This will give your dish a nice kick. For the best crunch, make sure your green beans are fresh. Look for bright green beans with a firm feel. When you roast, spread them out on the baking sheet. This allows them to cook evenly and get crispy. Stir halfway through to ensure even roasting. If you want more caramelization, roast them a little longer. Just watch them closely so they don't burn. Using the right tools helps a lot. A large mixing bowl makes it easy to toss the green beans with the garlic butter. A sturdy baking sheet is key; it should hold all the beans in a single layer. If you have a silicone baking mat, use it. It helps to prevent sticking and makes cleanup easy. A good pair of tongs is helpful too, especially for tossing the beans while they roast. For the full recipe, check out the detailed instructions above! {{image_2}} You can mix in other veggies with your green beans. Carrots, bell peppers, or zucchini work well. Just chop them to match the size of the green beans. This way, they cook evenly. Toss them in the garlic butter mix as you do with the green beans. Roasting time stays the same, but check for doneness. You want all the veggies to be tender yet crisp. While garlic and butter shine, feel free to change things up. Try adding red pepper flakes for some heat. You can also use fresh herbs like rosemary or oregano. A splash of balsamic vinegar adds a nice tang. Experiment with different flavors to find what you love. Just remember, keep the balance so the garlic flavor still comes through. Garlic butter roasted green beans pair well with many meals. Serve them with grilled chicken or fish for a fresh side. They also complement rich dishes like beef or pork. For a vegetarian option, they are great with quinoa or rice. Add these beans to your plate for a pop of color and flavor. They make any meal feel special and satisfying. If you have leftover garlic butter roasted green beans, store them in an airtight container. They stay fresh in the fridge for up to three days. Make sure to let them cool before sealing. This keeps the texture nice. To reheat, use the oven or a pan. Preheat the oven to 350°F (175°C). Spread the green beans on a baking sheet. Heat for about 10 minutes or until warm. If using a pan, add a splash of water and cover. This will help steam them back to life. Freezing is a great option too! Place cooled green beans in a freezer-safe bag. Squeeze out as much air as possible. They can last up to three months in the freezer. When ready to eat, thaw them overnight in the fridge before reheating. Enjoy your tasty dish any time! For the full recipe, check out the Garlic Butter Roasted Green Beans recipe above. Roast green beans for 15 to 20 minutes at 425°F (220°C). Stir them halfway through. This helps them cook evenly. You'll know they are done when they are tender and slightly caramelized. Yes, you can use frozen green beans. Just thaw and drain them first. Add a few extra minutes to the cooking time. Frozen beans may not get as crispy, but they will still taste great. You can use olive oil or coconut oil instead of butter. These options also add nice flavors. For a richer taste, try using ghee or vegan butter. To make this recipe vegan, simply replace the butter with olive oil or vegan butter. The garlic and green beans will still shine. This way, you keep all the great taste without any dairy. Serve these green beans hot as a side dish. They pair well with grilled meats or fish. You can also add them to a salad for extra crunch. For a nice touch, sprinkle some slivered almonds on top for added texture. For the full recipe, check out the earlier section. In this post, I shared a simple way to make garlic butter roasted green beans. You learned about key ingredients, step-by-step instructions, and helpful tips to enhance flavor and texture. There are also variations to mix things up and storage advice for leftovers. Remember, cooking should be fun! Experiment with these ideas and make this dish your own. Enjoy these delicious green beans at your next meal, and impress your friends and family.

Garlic Butter Roasted Green Beans Quick and Tasty Dish

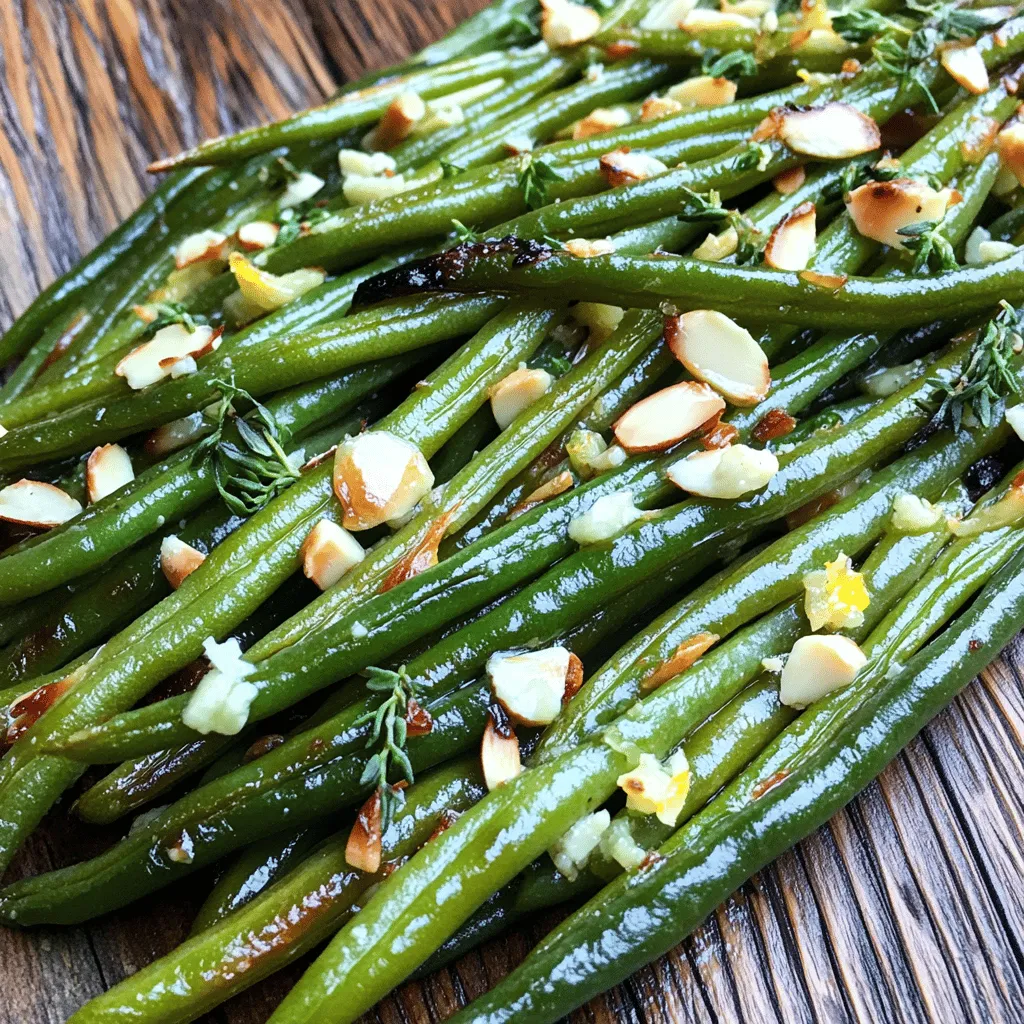
Looking for a quick and tasty side dish? Garlic Butter Roasted Green Beans are the answer! This simple recipe brings

To make the best Classic Pesto Pasta, you need some key ingredients. Here’s what you should gather: - 2 cups fresh basil leaves - 1/2 cup extra-virgin olive oil - 1/3 cup pine nuts (or walnuts for a twist) - 2 cloves garlic, minced - 1/2 cup grated Parmesan cheese - Salt and pepper to taste - 12 oz spaghetti or your favorite pasta These ingredients create a bright and fresh flavor that makes this dish special. You can add some fun touches to your pasta. Consider these garnishes and add-ins: - 1/2 cup cherry tomatoes, halved (for garnish) - 2 tablespoons lemon juice (for a fresh zing) These add a pop of color and flavor that enhance your meal. Having the right tools makes cooking easier. Here’s what you’ll need: - Large pot for boiling pasta - Food processor for making pesto - Mixing bowl for combining pasta and sauce - Measuring cups and spoons With these items, you can whip up your Classic Pesto Pasta quickly and easily. Start by boiling a large pot of salted water. Add your pasta, like spaghetti, to the pot. Cook it according to the package instructions. You want it to be al dente, which means firm but cooked. This usually takes about 8 to 10 minutes. Once done, reserve one cup of the pasta water. Then, drain the pasta and set it aside. Now, let’s make the pesto! Grab a food processor and add 2 cups of fresh basil leaves, 1/3 cup of pine nuts, and 2 minced garlic cloves. Next, add 1/2 cup of grated Parmesan cheese. Pulse this mixture until it is finely chopped. With the processor running, slowly drizzle in 1/2 cup of extra-virgin olive oil. This makes the pesto creamy. Scrape down the sides if needed. Finally, add salt, pepper, and 2 tablespoons of lemon juice. Pulse a few more times to mix well. Taste it and adjust the seasoning if you want. In a large mixing bowl, combine the cooked pasta with the pesto sauce. Pour in some of that reserved pasta water, a little at a time, until the pasta is well-coated. You want it to be just right, not too dry or too wet. Once mixed, serve the pasta on plates. Top each dish with halved cherry tomatoes for extra color and taste. If you like, you can sprinkle more Parmesan cheese on top. Enjoy your meal! To get the best pesto, you need the right blend. Start by using a food processor. Add basil, garlic, and nuts first. Pulse until they are finely chopped. Then, slowly drizzle in the olive oil. This method helps create a smooth texture. If it's too thick, add a bit of the reserved pasta water. This will loosen it up and give it a silkier feel. If you have extra pesto, store it right. Place it in an airtight container. Pour a thin layer of olive oil on top. This keeps it fresh and prevents browning. It can last in the fridge for up to a week. You can also freeze pesto in ice cube trays. This way, you can use just what you need later. Cooking pasta can be simple. Use a large pot and fill it with water. Add a good amount of salt. This enhances the pasta’s flavor. Bring the water to a boil before adding the pasta. Cook according to the package instructions until it's al dente. Remember to save some pasta water before draining. This starchy water is great for helping your pesto stick. {{image_2}} If you have allergies, you can swap ingredients. Use sunflower seeds instead of pine nuts. If you can't use dairy, try a dairy-free cheese. This will keep your pesto creamy. You can also skip the cheese for a lighter taste. While spaghetti is classic, other shapes work well too. Try fusilli for a fun twist. Penne holds onto the sauce nicely. You can also use gluten-free pasta if needed. Each shape gives a new texture and taste. Want to make your meal heartier? Add grilled chicken or shrimp. They pair well with the fresh pesto. You can also mix in veggies like spinach or peas. This boosts flavor and nutrition. Experiment with what you like best! To keep your leftover pesto pasta fresh, store it in an airtight container. Make sure it cools down before sealing. This way, it does not steam and get soggy. You can keep it in the fridge for up to three days. Label the container with the date so you know when it was made. Freezing pesto is simple and a great way to save extra sauce. Use ice cube trays to freeze small portions of pesto. Once frozen, pop them out and place them in a freezer bag. This way, you can use only what you need later. Pesto can last in the freezer for about three months. Always label your bags with the date. When you want to eat your leftover pesto pasta, reheating is easy. You can use the microwave or a skillet. For the microwave, place it in a bowl and cover it with a damp paper towel. Heat in short bursts, stirring in between. If using a skillet, add a splash of water to help it heat evenly. Stir over medium heat until hot. Enjoy your delicious meal! The best pasta for pesto is usually spaghetti. It holds the sauce well. Other great options include linguine or fusilli. These shapes catch the pesto and enhance each bite. If you want something unique, try using whole wheat or gluten-free pasta. Yes, you can make pesto without nuts. Simply leave them out or swap them for seeds. Sunflower seeds or pumpkin seeds work well. This keeps the flavors bright while making it safe for nut allergies. To make Classic Pesto Pasta vegan, replace Parmesan cheese with nutritional yeast. This adds a cheesy flavor without using dairy. Use a vegan pasta too. Most pasta is made from wheat and does not contain animal products. In this blog post, we explored how to make classic pesto pasta from scratch. We covered key ingredients, essential tools, and step-by-step instructions. You learned how to cook pasta perfectly and achieve the right pesto texture. We shared tips for storing leftovers and offered variations based on your needs. Remember, you can mix in proteins or veggies for a twist. Enjoy your fresh, homemade pesto pasta!

Classic Pesto Pasta Simple and Flavorful Recipe

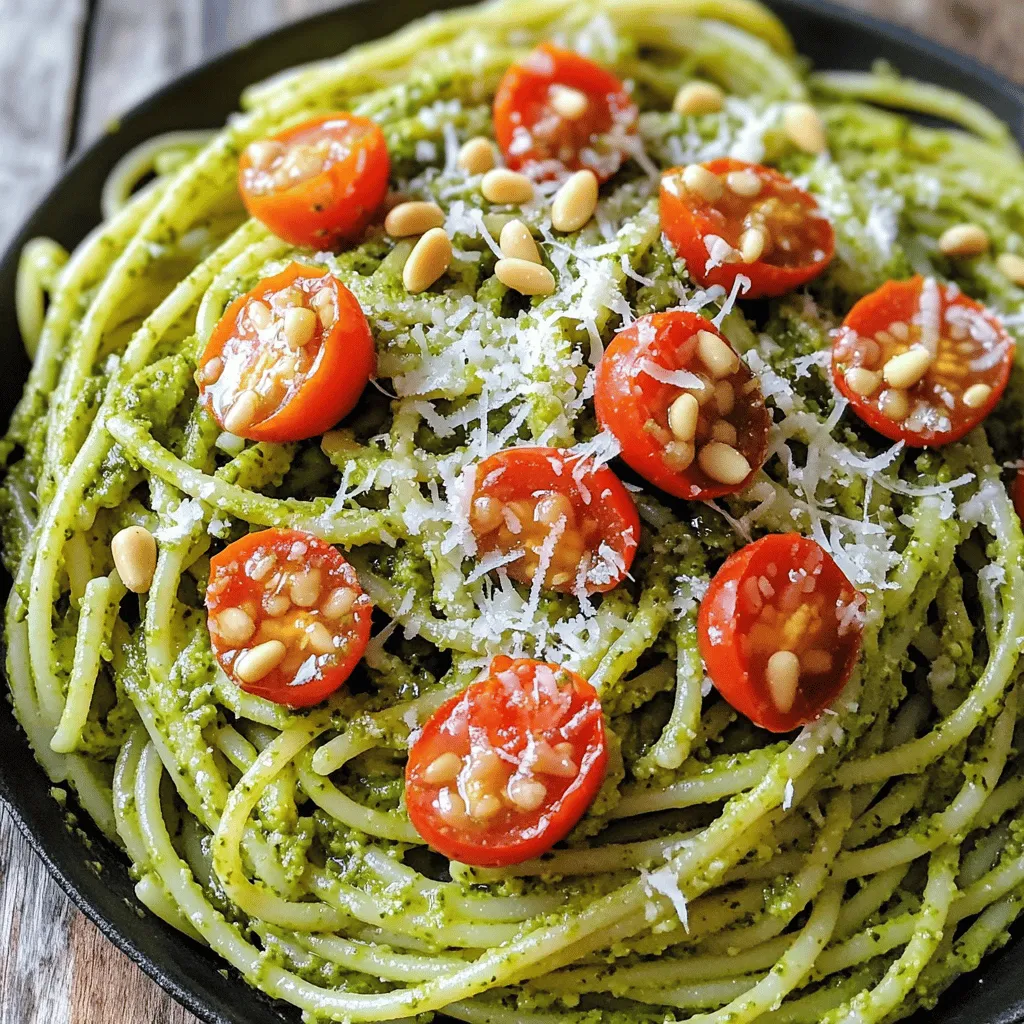
If you love vibrant flavors and quick meals, you’ll adore this Classic Pesto Pasta recipe. It’s simple to make, and

- Cauliflower florets - Cheese varieties (cheddar and Parmesan) - Creamy components (cream cheese and sour cream) The star of this dish is the cauliflower. You need one large head, cut into florets. Cauliflower gives a nice texture. It soaks up all the cheese goodness. Next, the cheeses! I like to use sharp cheddar and grated Parmesan. The cheddar melts well, while Parmesan adds a rich flavor. For creaminess, I use cream cheese and sour cream. They blend perfectly to create a smooth base. - Garlic powder, onion powder, and smoked paprika - Fresh chives for garnish - Salt and pepper for taste Seasoning is key to flavor. I use garlic powder and onion powder for taste. Smoked paprika gives a nice smoky kick. Don't forget salt and pepper to enhance the flavors. For garnishing, fresh chives add a pop of color and freshness. They make the dish look nice and inviting. You can find all these ingredients in most grocery stores. If you want the full recipe, check out the details provided. - Preheat the oven to 375°F (190°C). - Boil cauliflower florets until tender. To start, set your oven to 375°F (190°C). This temperature helps get the cheese nice and bubbly. Next, grab a large pot and fill it with water. Add a bit of salt. Once the water is boiling, toss in the cauliflower florets. Cook them for about 5 minutes. You want them tender but not mushy. Drain the florets and set them aside. - Mix cream cheese, sour cream, and seasonings. - Fold in the cooked cauliflower. Now, in a mixing bowl, add the softened cream cheese and sour cream. Use a spatula or spoon to mix them well. Add garlic powder, onion powder, smoked paprika, salt, and pepper. Stir until everything is smooth and creamy. Next, gently fold in the cooked cauliflower. Ensure each floret gets coated with the creamy mixture. - Transfer the mixture to a baking dish. - Add cheese toppings and bake until bubbly. Pour the creamy cauliflower mixture into a greased 9x13-inch baking dish. Spread it out evenly. Now, sprinkle the shredded cheddar cheese over the top. Then, add the grated Parmesan cheese for extra flavor. Place the dish in your preheated oven and bake for 25-30 minutes. Look for the cheese to be bubbly and golden brown. Once done, take it out and let it cool for a few minutes. Enjoy your delicious Easy Cheesy Cauliflower Bake! For more details, check the Full Recipe. - How to prevent watery cauliflower bake To stop your bake from being watery, make sure to drain the cauliflower well. After cooking, let it sit in a colander for a few minutes. This helps any extra moisture escape. You can also try patting the florets dry with a paper towel. This simple step makes a big difference in texture. - Ensuring even baking for the cheese layer For the best results, spread the cheese evenly across the top. Use a mix of cheddar and Parmesan for flavor and texture. Also, make sure the oven is preheated. This helps the cheese melt and brown evenly. Rotate the dish halfway through baking for consistent heat. - Ideal side dishes that pair well This cheesy cauliflower bake goes great with a fresh green salad. You can also serve it with roasted veggies for a colorful plate. Another option is grilled chicken or fish. They add protein and balance the meal. - Presentation ideas for a stunning dish To wow your guests, serve the bake straight from the dish. Sprinkle some fresh chives on top for color. You can also add a drizzle of olive oil for shine. A side of bright, seasonal vegetables adds a nice pop. This makes the dish look as good as it tastes! {{image_2}} You can easily change up this dish with different cheeses or veggies. If you want a milder flavor, try using mozzarella. Goat cheese can add a tangy twist. Each cheese brings its own magic to the bake. Adding extra veggies boosts the health factor. Spinach and broccoli blend well with the cauliflower. You can sneak in healthy greens without losing taste. Mix in chopped carrots for a colorful touch. Feel free to get creative with what you have on hand. Want a little spice? Consider adding cayenne pepper or red pepper flakes. These spices can turn up the heat. Start with a small amount, then adjust to your taste. Herbs also make a big difference. Fresh basil, parsley, or thyme can brighten up the dish. You can mix them into the creamy sauce or sprinkle on top before serving. These simple changes keep the dish fresh and exciting. For the full recipe, check out Cheesy Cauliflower Delight! To store your leftover cheesy cauliflower bake, let it cool first. Then, cover it tightly with plastic wrap or place it in an airtight container. This keeps moisture in and flavors fresh. The bake will last about 3 to 5 days in the fridge. Always check for any signs of spoilage before eating. To reheat without drying out the dish, use your oven. Preheat the oven to 350°F (175°C). Place the cauliflower bake in a baking dish and cover it with foil. Heat for about 15-20 minutes until warm. You can also microwave it for about 2-3 minutes, stirring halfway through. Yes, you can freeze cheesy cauliflower bake! Just make sure it’s completely cool before freezing. Wrap it well in plastic wrap and foil. It can last up to 3 months in the freezer. Can I use frozen cauliflower for this recipe? Yes, you can use frozen cauliflower. Just thaw it first. Drain any excess water. This keeps your dish from becoming soggy. Adjust the cooking time slightly. Cook it until heated through. How can I make this recipe gluten-free? This recipe is naturally gluten-free. All the ingredients listed are free from gluten. Just double-check any packaged items like cheese and sour cream. Look for labels that say gluten-free. Overview of calories and macronutrients per serving Each serving has about 250 calories. You get around 15 grams of fat, 8 grams of carbs, and 10 grams of protein. This makes it a filling option without too many carbs. Is this dish suitable for a low-carb diet? Yes, this cheesy cauliflower bake fits well into a low-carb diet. Cauliflower is low in carbs and high in fiber. This dish gives you comfort without the heavy carbs of pasta or rice. This blog post covered the tasty cheesy cauliflower bake. It detailed ingredients like cauliflower, cheese, and cream. I shared step-by-step instructions for preparing, mixing, and baking. You learned helpful tips to avoid common mistakes and saw various ideas for serving. We explored ingredient swaps and flavor boosts for more creativity. Finally, I provided storage tips to maintain freshness. Enjoy this dish with friends and family. Experiment with flavors to make it your own!

Easy Cheesy Cauliflower Bake Healthy Comfort Food

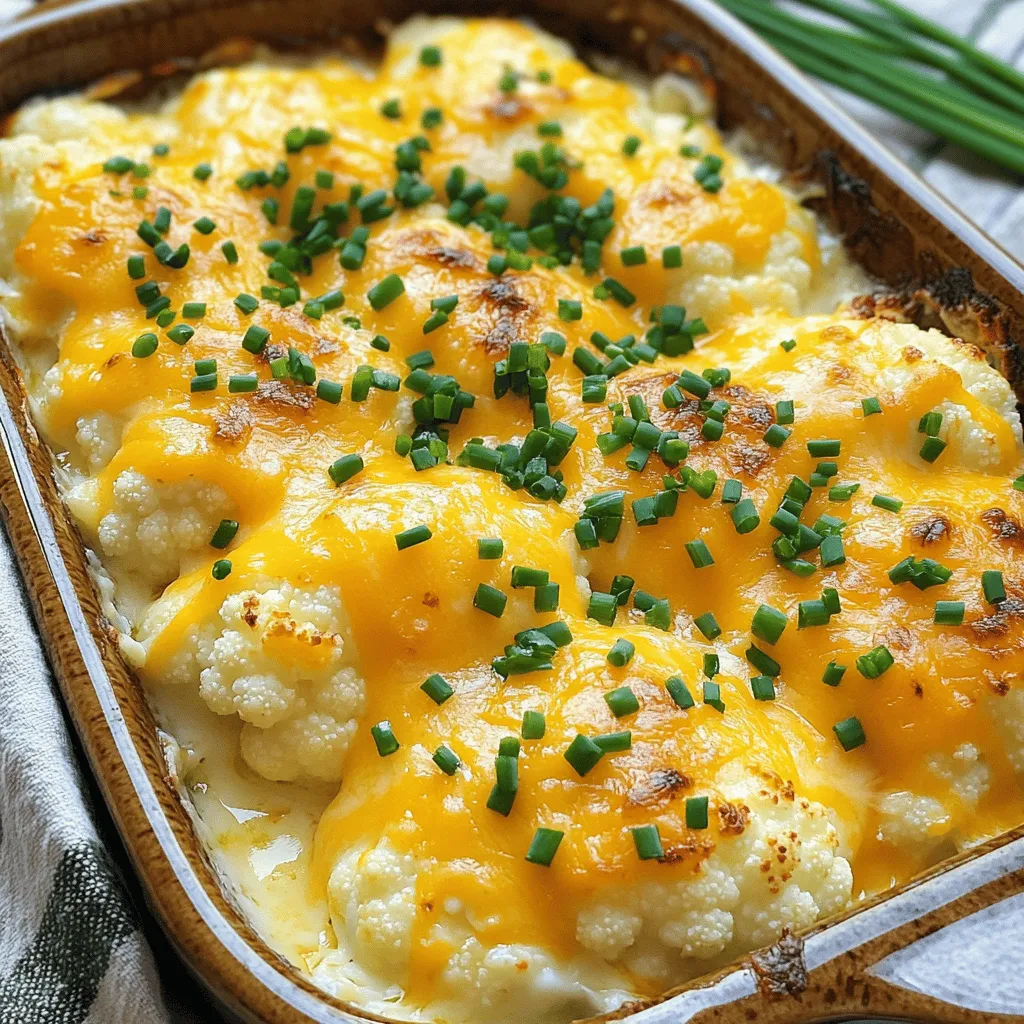
Looking for a healthy twist on comfort food? You’ll love this Easy Cheesy Cauliflower Bake! Packed with cauliflower, rich cheeses,

Gathering the right ingredients is key to making delicious Lemon Garlic Shrimp Skewers. Here’s what you need: - 1 pound large shrimp, peeled and deveined - 4 cloves garlic, minced - 1/4 cup olive oil - 2 tablespoons fresh lemon juice - Zest of 1 lemon - 1 teaspoon smoked paprika - 1 teaspoon dried oregano - Salt and pepper to taste - 1/4 teaspoon red pepper flakes (optional for heat) - Fresh parsley, chopped (for garnish) - 8 wooden skewers (soaked in water for 30 minutes if using) This blend of flavors makes the shrimp pop. The garlic and lemon give it a fresh taste. You can find all these items at your local grocery store. Make sure your shrimp are large and fresh. The olive oil adds richness, while spices like smoked paprika and oregano bring depth. Don't forget the red pepper flakes if you like a little heat. This simple list helps you create a dish that feels fancy yet easy to make. Check out the Full Recipe for detailed cooking steps and tips. To start, you need to make the marinade. In a mixing bowl, combine these ingredients: - 4 cloves garlic, minced - 1/4 cup olive oil - 2 tablespoons fresh lemon juice - Zest of 1 lemon - 1 teaspoon smoked paprika - 1 teaspoon dried oregano - Salt and pepper to taste - 1/4 teaspoon red pepper flakes (optional for heat) Whisk these items together until they blend well. Next, add your shrimp to the bowl. Make sure each shrimp is covered with the marinade. Cover the bowl and place it in the refrigerator. Let the shrimp soak in the flavors for at least 30 minutes. While the shrimp marinates, preheat your grill or grill pan to medium-high heat. This step is key to getting a good sear on the shrimp. After the grill is hot, take the marinated shrimp and thread them onto the skewers. Leave a little space between each shrimp. This helps them cook evenly. Now comes the fun part—grilling! Place the skewers on the grill. Cook them for about 2-3 minutes per side. You know the shrimp are ready when they turn pink and opaque. Be careful not to overcook them. Overcooked shrimp can become tough. If you’re unsure, check one shrimp to make sure it’s done. Once cooked, remove the skewers from the grill and place them on a platter. Enjoy these delicious lemon garlic shrimp skewers as part of a tasty meal. For the full recipe, check out the earlier section! To get the best flavor, marinating shrimp is key. I suggest at least 30 minutes. This gives the shrimp time to soak up all the tasty garlic and lemon. Fresh ingredients make a big difference too. Use ripe lemons and good quality olive oil. Fresh shrimp also taste better than frozen shrimp. When skewering your shrimp, leave space between each one. This helps them cook evenly. If you like, try using metal skewers. They heat up fast and make grilling easier. If you prefer wooden skewers, soak them in water for 30 minutes. This keeps them from burning on the grill. Serve your lemon garlic shrimp skewers with a fresh salad. A crunchy cucumber or a simple arugula salad works well. Rice or quinoa can also be great sides. For dipping sauces, I recommend a tangy lemon aioli or a spicy cocktail sauce. These add extra flavor and fun to your meal. For the full recipe, check out the complete guide! {{image_2}} You can change up the flavor of your shrimp skewers with different marinades. Adding citrus zest can give the shrimp a bright taste. Try lime or orange zest for a fun twist. You can also mix in fresh herbs like basil, cilantro, or mint. These herbs add depth and freshness to the dish. For spices, consider using cumin or coriander. They provide a warm flavor that pairs well with shrimp. You can also add a bit of ginger for a nice kick. This will keep your shrimp skewers exciting and new. Vegetables are a great addition to shrimp skewers. Cherry tomatoes, bell peppers, and zucchini are my favorites. They cook well on the grill and add color and texture. You can also use red onions for a sweet taste. Just cut them into large pieces so they stay on the skewer. For grill-friendly options, try asparagus or mushrooms. They both have a great texture and soak up the flavors from the marinade. Adding veggies makes your meal more balanced and fun. You can swap shrimp for other proteins if you like. Chicken works very well with this marinade. Just cut it into bite-sized pieces and marinate it the same way. Beef is another option. Use tender cuts like sirloin for the best results. If you want a vegetarian twist, try cubes of firm tofu. Tofu soaks up the marinade and gives you a delicious flavor. Just make sure to press the tofu to remove extra moisture. This will help it grill better and add a nice texture. Store leftover shrimp in an airtight container. This keeps them fresh. Make sure to cool them down first. If stored properly, they last up to three days in the fridge. Always check for off smells before eating. To freeze cooked shrimp, place them in a single layer on a baking sheet. This prevents them from sticking together. Once frozen, transfer them to a freezer bag. They can stay good for up to three months. When ready to eat, defrost them slowly in the fridge overnight. This keeps the texture nice and firm. Reheat shrimp gently to avoid drying them out. You can use a microwave on low power or a skillet on low heat. Adding a splash of water or a bit of olive oil helps keep them moist. Heat just until warm, not hot, to keep the flavor fresh. You can tell shrimp are cooked by their color and texture. When shrimp turn from gray to bright pink, they are ready. Also, they should feel firm to the touch. If they curl into a tight "C" shape, they are overcooked. Aim for a gentle curve instead. Yes, you can use frozen shrimp. To thaw them, place shrimp in a bowl of cold water for 15-20 minutes. Make sure to change the water halfway through. Once thawed, pat them dry with a paper towel before marinating. This helps the flavors stick better. These skewers pair well with many sides. You can serve them with: - Rice pilaf - Grilled vegetables - Fresh salad - Garlic bread - Lemon wedges You can also enjoy them with a light white wine or iced tea for a refreshing drink. Yes, you can cook these skewers in the oven. Preheat your oven to 400°F (200°C). Place the skewers on a baking sheet lined with foil. Bake for about 8-10 minutes, turning halfway through. Keep an eye on them to avoid overcooking. For extra flavor, broil for the last minute. For the complete guide to making these delicious skewers, check out the Full Recipe. In this post, we explored making delicious lemon garlic shrimp skewers. You learned about key ingredients and an easy marinade. Prepping the grill is important for perfect shrimp. Remember to space the shrimp well on skewers and avoid overcooking. Enjoy these skewers with tasty sides or dips. Final thoughts: Grill with fresh ingredients and be creative with flavors. Your next meal can be both fun and tasty!

Lemon Garlic Shrimp Skewers Simple and Flavorful Treat

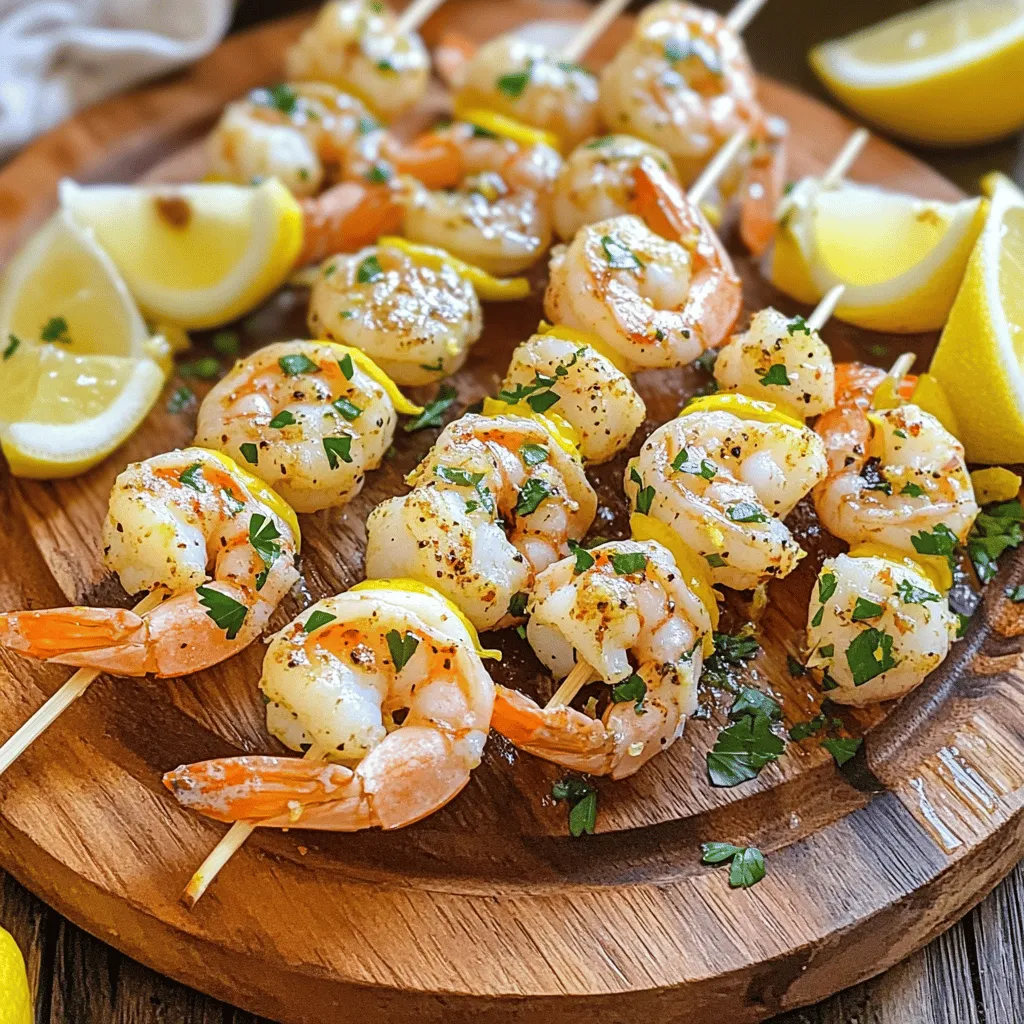
Craving a quick and tasty meal? My Lemon Garlic Shrimp Skewers are the perfect solution! These skewers burst with zesty

To make Classic Vegetable Soup, gather these fresh ingredients: - 2 tablespoons olive oil - 1 medium onion, diced - 2 cloves garlic, minced - 2 carrots, diced - 2 celery stalks, diced - 1 medium potato, peeled and diced - 1 zucchini, diced - 1 cup green beans, trimmed and cut into 1-inch pieces - 1 can (14 oz) diced tomatoes (with juices) - 4 cups vegetable broth - 1 teaspoon dried thyme - 1 teaspoon dried basil - 1 bay leaf - Salt and pepper to taste - Fresh parsley, chopped (for garnish) Each ingredient plays a key role in our soup. - Olive oil brings healthy fats and a rich flavor. It helps the vegetables cook evenly. - Onion adds sweetness and depth. It forms the base of the soup's flavor. - Garlic gives a strong aroma and zest. It enhances the soup with its warm, savory notes. - Carrots add sweetness and color. They are packed with vitamins and antioxidants. - Celery adds crunch and a mild flavor. It also boosts hydration with its high water content. - Potato thickens the soup and adds heartiness. It provides starch for a filling meal. - Zucchini brings a soft texture and mild taste. It’s a low-calorie vegetable full of nutrients. - Green beans add a fresh crunch. They are rich in vitamins A and C. - Diced tomatoes provide acidity and sweetness. They brighten up the flavors and add color. - Vegetable broth is the soup's base. It adds a savory depth and brings all the flavors together. - Dried thyme and basil contribute herbal notes. They enhance the overall taste with their fragrant profiles. - Bay leaf adds subtle complexity. It infuses the soup with earthy undertones. - Salt and pepper enhance all the flavors. They balance the soup and make it taste complete. - Fresh parsley offers a pop of color and fresh flavor. It also adds vitamins and minerals. This recipe is a warm hug in a bowl. The mix of veggies not only fills your belly but also nourishes your body. Check out the Full Recipe for easy steps to create this delightful dish. To make Classic Vegetable Soup, follow these steps closely. Each step matters for the best taste and texture. 1. Heat Oil: Start by heating 2 tablespoons of olive oil in a large pot over medium heat. 2. Sauté Onion: Add the diced onion. Sauté for 3-4 minutes until it turns soft and clear. 3. Add Garlic: Mix in the minced garlic and cook for another minute. This adds a nice aroma. 4. Add Carrots and Celery: Next, throw in the diced carrots and celery. Cook these for about 5 minutes. They should start to soften. 5. Incorporate More Veggies: Now, add the diced potato, zucchini, and green beans. Stir well to combine all the veggies. 6. Pour in Tomatoes and Broth: Add the can of diced tomatoes and 4 cups of vegetable broth. This is where the soup gets its flavor. 7. Season the Soup: Toss in 1 teaspoon each of dried thyme and basil, plus 1 bay leaf. These spices boost the taste. 8. Bring to Boil: Bring the soup to a gentle boil. Then, reduce the heat to low and let it simmer. Keep it uncovered for 25-30 minutes until all the veggies are tender. 9. Final Seasoning: Taste the soup and add salt and pepper as needed. Don’t forget to remove the bay leaf before serving. 10. Serve: Ladle the soup into bowls and garnish with fresh chopped parsley. This adds a fresh touch. By following these steps, you will create a nourishing and tasty soup. Enjoy it with a slice of crusty bread on the side for a comforting meal. For the full details on the ingredients and cooking times, refer to the Full Recipe. To enhance the flavor of your Classic Vegetable Soup, start with fresh vegetables. Fresh veggies bring bright taste and great texture. Sautéing the onion and garlic in olive oil first adds depth. This step sets a solid base for all other flavors. Cutting vegetables uniformly helps them cook evenly. Aim for small, even pieces. This way, your carrots, potatoes, and zucchini will all be tender at the same time. A sharp knife makes this task easier and safer. Adjusting seasoning is key to personalizing your soup. Start with a pinch of salt and pepper. Taste as you go. If you like it spicy, add a dash of red pepper flakes. Fresh herbs can also boost the flavor. Add them near the end of cooking for a fresh touch. For a full experience, check out the Full Recipe. It guides you step by step through making this comforting dish. {{image_2}} You can easily make Classic Vegetable Soup fit any diet. To go vegan, simply use vegetable broth and skip any animal products. This soup is already plant-based and full of flavor. If you're gluten-free, check your broth and use gluten-free pasta or grains instead of regular ones. Quinoa or rice can be great additions. For swaps based on your taste, you can switch out vegetables. Don’t like green beans? Try peas or corn instead. Want more protein? Add chickpeas or lentils. You can also explore regional flavors. For an Italian twist, add some diced bell peppers and a splash of balsamic vinegar. If you want a spicy kick, toss in some jalapeños or chili flakes. Each of these changes keeps the soup hearty and comforting. You can find the full recipe to start creating your own variations. To store your Classic Vegetable Soup, let it cool down first. Then, pour it into airtight containers. You can keep it in the fridge for about 3 to 5 days. If you want to save it longer, freeze it. It will last up to 3 months in the freezer. Just remember to label the containers with the date. When you are ready to enjoy the soup again, reheating is easy. If it’s frozen, let it thaw in the fridge overnight. You can also use a microwave to defrost it. For the best taste and texture, reheat the soup on the stove over medium heat. Stir it often to help heat it evenly. If it seems too thick, add a little broth or water to thin it out. After reheating, make sure it is hot all the way through. A good way to check is to use a food thermometer. It should reach 165°F (74°C) to be safe to eat. Now you can enjoy your soup again, just like the first time! You can add many vegetables to your soup. Think of your favorites! You can use: - Spinach or kale for leafy greens - Bell peppers for sweetness - Peas for color and texture - Corn for a bit of crunch You can also swap out any vegetable you don't like. Just keep the cooking time in mind. Some veggies cook faster than others. Yes! You can easily make this soup in a slow cooker or instant pot. For a slow cooker, just add all your ingredients and cook on low for 6-8 hours. For an instant pot, set it for 10 minutes on high pressure. Let the pressure release naturally for best results. Add some protein or grains to make your soup more filling. Here are some ideas: - Cooked beans like chickpeas or kidney beans - Lentils for extra fiber - Quinoa or rice for heartiness - Pasta for a comforting twist These additions will enhance the flavor and keep you satisfied. Absolutely! Classic Vegetable Soup is very healthy. It is packed with vitamins and minerals from fresh vegetables. Using vegetable broth keeps it low in calories. Plus, you can control the salt and fat levels. This soup is a great option for a healthy meal. Yes, you can make this soup ahead of time. It actually tastes better the next day. Just store it in the fridge for up to three days. You can also freeze it for up to three months. When you’re ready to eat, just reheat it on the stove. For the full recipe, check out the details above. Enjoy your cooking! You can make Classic Vegetable Soup with fresh, healthy ingredients and easy steps. Knowing each ingredient's role helps enhance flavor and nutrition. The right cooking techniques ensure a perfect texture. Also, tips for seasoning and timing improve your dish. You can adjust the recipe for dietary needs too, making it vegan or gluten-free. Finally, proper storage keeps your soup fresh. Enjoy your cooking journey, knowing that each bowl is packed with goodness and flavor.

Classic Vegetable Soup Nourishing and Simple Recipe

If you’re craving a warm, hearty dish that nourishes both body and soul, look no further! My Classic Vegetable Soup

Older posts
Newer posts
← Previous Page1 … Page79 Page80 Page81 … Page86 Next →

dsad

© 2026 Cooking Wells • Built with GeneratePress

Our Policies

  • Copyright Policy
  • Cookie Policy
  • GDPR Policy
  • Privacy Policy
  • Disclaimer
  • Terms Of Use

More Information

  • Home
  • About
  • Contact
  • Appetizers
  • Dessert
  • Dinner
  • Drinks
©2026, Cooking Wells About Back To Top