Go Back
To make this No Bake White Chocolate Peppermint Cheesecake, you will need the following ingredients: - 8 oz cream cheese, softened - 1 cup white chocolate chips - 1 cup heavy whipping cream - 1/2 cup powdered sugar - 1 teaspoon peppermint extract - 1 teaspoon vanilla extract - 1 cup crushed peppermint candies (reserve some for garnish) - 1 pre-made graham cracker crust These ingredients create a rich and creamy cheesecake with a refreshing peppermint flavor. You might want to add some fun and festive touches to your cheesecake. Here are a few ideas: - Extra crushed peppermint candies on top - Whipped cream dollops - Chocolate shavings - Mini candy canes for decoration These garnishes can make your cheesecake look even more appealing and festive. If you need to make changes to the recipe, here are some easy swaps: - Use mascarpone cheese instead of cream cheese for a different flavor. - Swap white chocolate chips with milk chocolate chips for a sweeter taste. - Replace heavy cream with coconut cream for a dairy-free version. - Use granulated sugar in place of powdered sugar if needed. These substitutions can help you customize the cheesecake to fit your taste or dietary needs. Start by melting the white chocolate chips. Use a microwave-safe bowl. Heat the chips in 30-second bursts. Stir the chocolate every time you check it. Keep doing this until it is smooth. Once melted, set it aside to cool a bit. This helps keep your cheesecake creamy. Next, take a mixing bowl and add the softened cream cheese. Beat it for about 2-3 minutes. You want it to be creamy and smooth. Slowly add the powdered sugar, peppermint extract, and vanilla extract. Mix everything together until it is well combined. The mixture should be smooth and ready for the next step. In a separate bowl, whip the heavy cream until stiff peaks form. This usually takes about 3-5 minutes. Be careful not to over-whip it. Gently fold the melted white chocolate into the cream cheese mixture. Make sure it is fully mixed in. Now, carefully fold the whipped cream into this mixture. Use a gentle hand to keep it light and fluffy. Finally, add the crushed peppermint candies, saving some for later. Gently mix them in. Now, your cheesecake mixture is ready for the crust! To get the best texture, start with room temperature cream cheese. This makes mixing easy. When you melt the white chocolate, let it cool a bit before adding it to the cream cheese. If it's too hot, it can make the cream cheese melt. For the whipped cream, beat it until you see stiff peaks. This helps keep your cheesecake airy and light. Serve your cheesecake chilled. You can slice it into neat pieces or use a spoon for a scoop. Add some crushed peppermint candies on top for a pretty look. You can also drizzle some chocolate or caramel sauce for extra fun. If you want to make it more festive, add a sprig of mint or a sprinkle of edible glitter. Do not rush the chilling process. If you serve it too soon, it may fall apart. Make sure to fold the whipped cream gently. If you mix too hard, the cheesecake can lose its fluffiness. Also, remember to reserve some peppermint candy for the top. This small step makes a big difference in how it looks! {{image_2}} You can mix it up with flavors. Try adding raspberry puree for a fruity twist. A dash of orange zest can brighten the taste. For a richer flavor, use dark chocolate instead of white chocolate. You can even add a splash of coffee for a mocha touch. Each change gives a new spin to this treat! Want to make this cheesecake gluten-free? Use a gluten-free graham cracker crust. Many brands offer this option. Check the label to ensure it meets your needs. You can also make a crust from ground nuts or oats. This keeps it tasty and safe for gluten-free guests. Making individual servings is fun and easy! Use small cups or jars for each portion. Just layer the cheesecake mixture like a parfait. This way, everyone gets their own treat. Plus, it looks pretty on a table. You can also serve them at parties or gatherings for a cute touch. Store any leftover cheesecake in the fridge. Use an airtight container for best results. You can also cover it tightly with plastic wrap. This keeps the cheesecake fresh and tasty. Always refrigerate within two hours of serving. You can freeze this cheesecake for later use. First, slice the cheesecake into portions. Wrap each slice in plastic wrap, then place in a freezer bag. Remove as much air as you can. This prevents freezer burn. Enjoy within two months for the best taste. In the fridge, this cheesecake lasts about five days. If you freeze it, the shelf life extends to two months. Always check for signs of spoilage before eating. If it looks or smells off, it's best to discard it. Yes, you can use milk chocolate or dark chocolate. Each type brings a unique taste. Milk chocolate will make it sweeter. Dark chocolate will add a rich, bold flavor. Adjust the amount of sugar if you switch chocolate types. Keep in mind, the peppermint flavor shines best with white chocolate. The cheesecake needs at least 4 hours to set in the refrigerator. For the best taste, I recommend letting it chill overnight. This helps the flavors meld and the texture firm up nicely. A longer chill time makes slicing easier and gives you a smooth, creamy bite. You can try using Greek yogurt or mascarpone cheese. Both add creaminess, but the flavor will change. Greek yogurt gives a tangy taste, while mascarpone is mild and rich. If you choose these options, adjust the sugar to balance their flavors. This way, you can still enjoy a delicious cheesecake. This blog post covers all you need for a delicious cheesecake. You learned about key ingredients and fun garnishes. I shared step-by-step instructions, tips for the best texture, and potential mistakes to avoid. We explored various flavor options and how to store your treat. Finally, I answered common questions about substitutions and setting time. Now you have everything to create your perfect cheesecake. Enjoy your baking and let your creativity shine!

No Bake White Chocolate Peppermint Cheesecake

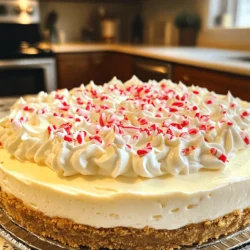
Indulge in the festive delight of a No Bake White Chocolate Peppermint Cheesecake! This easy recipe combines creamy white chocolate, refreshing peppermint, and a crunchy graham cracker crust for a dessert that's perfect for any holiday gathering. In just a few simple steps, you can create a stunning cheesecake that will impress your guests. Click through to explore the full recipe and bring this sweet treat to your holiday table!

Ingredients
  

8 oz cream cheese, softened

1 cup white chocolate chips

1 cup heavy whipping cream

1/2 cup powdered sugar

1 teaspoon peppermint extract

1 teaspoon vanilla extract

1 cup crushed peppermint candies (reserve some for garnish)

1 pre-made graham cracker crust

Instructions
 

Begin by melting the white chocolate chips. Use a microwave-safe bowl and heat in 30-second intervals, stirring in between until smooth. Set aside to cool slightly.

    In another mixing bowl, beat the softened cream cheese until creamy and smooth, about 2-3 minutes.

      Gradually add the powdered sugar, peppermint extract, and vanilla extract to the cream cheese. Mix until combined and smooth.

        In a separate bowl, whip the heavy whipping cream until stiff peaks form. This will take about 3-5 minutes with an electric mixer.

          Gently fold the melted white chocolate into the cream cheese mixture until fully incorporated.

            Carefully fold the whipped cream into the white chocolate and cream cheese mixture, being cautious to keep the mixture light and fluffy.

              Finally, fold in the crushed peppermint candies, reserving a tablespoon for garnish.

                Pour the mixture into the pre-made graham cracker crust and spread it evenly. Smooth the top with a spatula.

                  Refrigerate the cheesecake for at least 4 hours, or until firm. Overnight chilling is recommended for best results.

                    Before serving, sprinkle the reserved crushed peppermint candies on top for an extra festive touch.

                      Prep Time: 20 minutes | Total Time: 4 hours 20 minutes (plus optional overnight chilling) | Servings: 8-10