Looking for an easy yet indulgent dessert? My No-Bake Cheesecake Jars are a perfect treat! These creamy delights mix rich flavors with fresh fruit, all without turning on the oven. Whether it’s a family gathering or a solo snack, these jars promise to impress. Join me as I share simple steps, tips, and fun variations to create this dreamy dessert. You won’t want to miss it!
Ingredients
Required Ingredients
- 1 cup graham cracker crumbs
- 1/4 cup unsalted butter, melted
- 2 (8 oz) packages cream cheese, softened
- 1 cup powdered sugar
- 1 teaspoon vanilla extract
- 1 cup heavy whipping cream
- 1/2 cup fresh berries for garnish
- Optional: 1/4 cup lemon juice for tanginess
When making No-Bake Cheesecake Jars, the ingredients are key to the flavor. First, you need graham cracker crumbs for the crust. This will give your dessert a sweet and crunchy base. Melted unsalted butter helps bind the crumbs together.
Next, you will use cream cheese for the filling. It provides that creamy texture we love. Powdered sugar sweetens the mix, while vanilla extract adds a warm flavor. Heavy whipping cream makes the filling light and fluffy.
Fresh berries on top not only look good but taste great too. You can add lemon juice if you like a bit of tang. This can balance the sweetness and add a refreshing taste.
Suggested Tools
- Mixing bowls
- Electric mixer
- Jars or cups for serving
- Spatula
To make these jars, you’ll need some basic tools. Mixing bowls help combine your ingredients. An electric mixer is great for beating the cream cheese until it’s smooth.
You will also need jars or cups to serve your cheesecake. They can be any size, but smaller jars look cute. Lastly, a spatula is handy for scraping the sides of bowls and filling your jars.These ingredients and tools will set you up for a delightful dessert experience!
Step-by-Step Instructions
Preparing the Graham Cracker Crust
- In a medium bowl, combine 1 cup of graham cracker crumbs with 1/4 cup of melted butter.
- Mix until the crumbs look like wet sand.
- Spoon about 2 tablespoons of this mixture into the bottom of each jar.
- Press the crumbs down gently to make a firm layer.
Making the Cheesecake Filling
- In a large bowl, beat 2 packages of softened cream cheese until smooth.
- Gradually mix in 1 cup of powdered sugar and 1 teaspoon of vanilla extract.
- Keep beating until it forms a creamy mixture.
Whipping the Cream
- In another bowl, whip 1 cup of heavy cream with an electric mixer.
- Whip until stiff peaks form. This makes the filling light and fluffy.
- Carefully fold the whipped cream into the cream cheese mixture.
Assembling the No-Bake Cheesecake Jars
- Spoon or pipe the cheesecake filling over the crust in each jar.
- Fill each jar about three-quarters full, leaving some space for chilling.
Chilling Instructions
- Cover the jars with lids or plastic wrap.
- Refrigerate them for at least 4 hours, or overnight for a firmer texture.
- For the best results, let them chill longer if you can.
This simple method leads to delicious No-Bake Cheesecake Jars, perfect for any occasion.
Tips & Tricks
Achieving the Perfect Texture
Softened cream cheese is key for a smooth filling. If it is too cold, lumps can form. To soften, leave cream cheese out for at least 30 minutes. You can also microwave it for 10 seconds, but watch carefully.
Whipping cream well creates a light texture. Use a chilled bowl and beaters for the best results. Start on low speed, then increase to high. Stop when you see stiff peaks, but don’t overbeat. Overbeating makes the cream grainy.
Presentation Tips
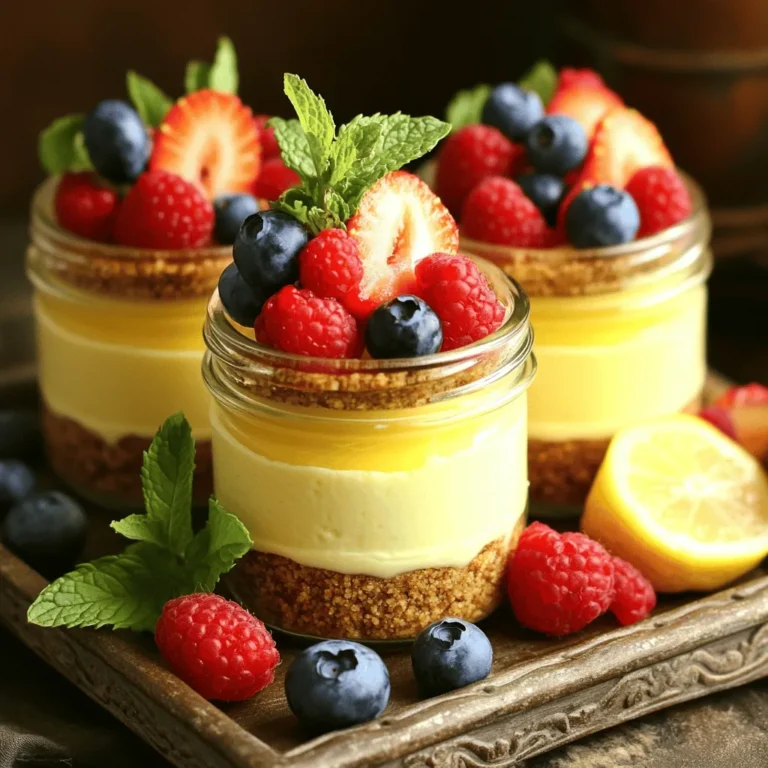
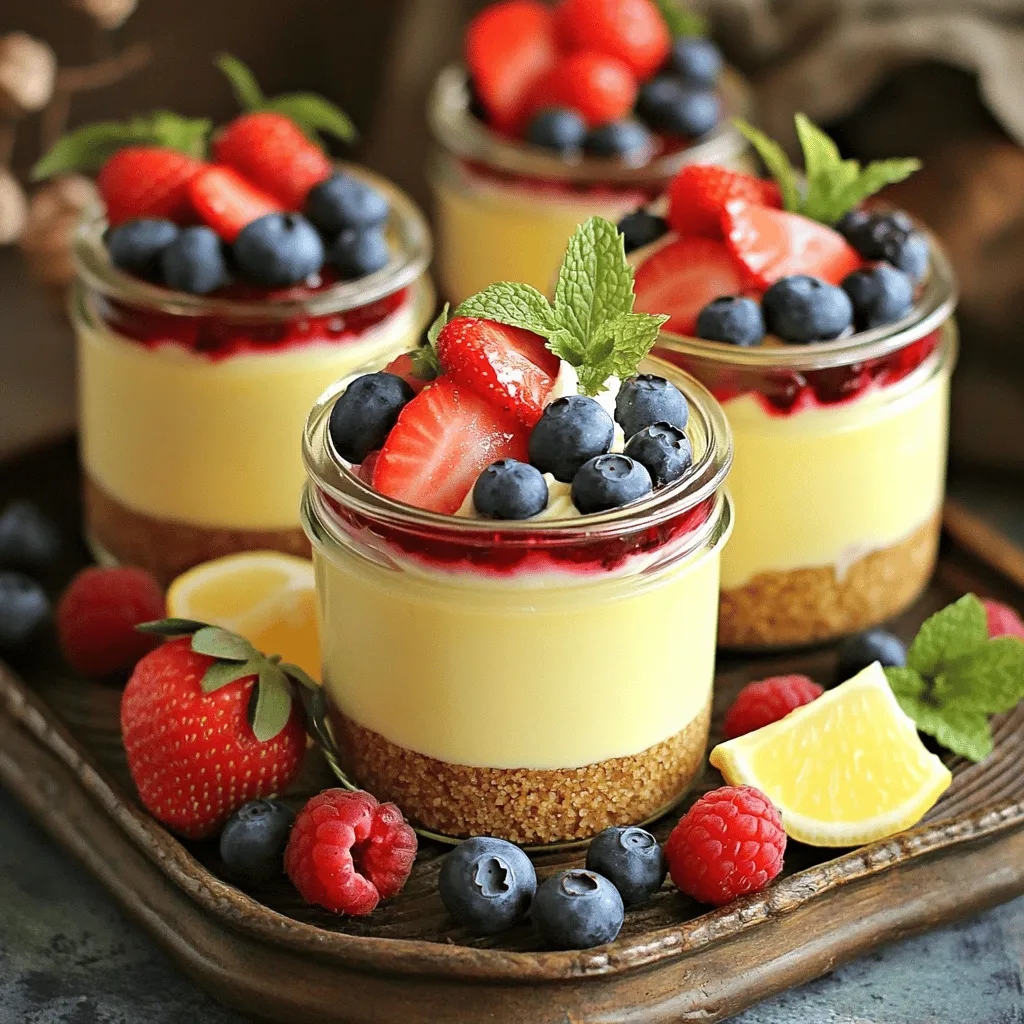
Serve your cheesecake jars in fun and unique ways. Group them on a colorful tray for a cheerful look. You can also layer different flavors in the jars. This adds visual interest.
Adding garnishes makes each jar pop. Fresh berries on top give color and flavor. A sprig of mint adds freshness. You can also drizzle chocolate or honey for a sweet touch.
Common Mistakes to Avoid
One mistake is overmixing the cream cheese. This can add too much air and make the texture too light. Mix just until smooth.
Not chilling long enough is another pitfall. This dessert needs time to set. Aim for at least four hours in the fridge. Overnight chilling works best for a firmer texture.
Variations
Flavor Variations
You can make your no-bake cheesecake jars even more fun with flavor twists. Adding fruit purees or extracts can give your dessert a fresh twist. For example, mix in raspberry puree or lemon extract for a bright taste. You can also create a chocolate or peanut butter version. Just fold in melted chocolate or creamy peanut butter to the filling. This makes each jar a unique treat.
Alternative Crust Ideas
While graham crackers are a classic choice, don’t be afraid to get creative with the crust. You can use cookies like Oreos or digestive biscuits for a fun flavor change. If you’re looking for a healthier option, try nut-based crusts. Ground almonds or walnuts mixed with a bit of butter make a tasty and crunchy base.
Topping Suggestions
Toppings can take your cheesecake jars to the next level. Fresh berries like strawberries, blueberries, or raspberries add color and flavor. You can also drizzle chocolate ganache on top for a rich finish. If you want a bit of fun, add whipped cream and colorful sprinkles. Each of these toppings can make your jars look as good as they taste.
Storage Info
Best Storage Practices
To keep your no-bake cheesecake jars fresh, store them in the refrigerator. Use airtight lids or plastic wrap to cover the jars. This helps prevent any unwanted odors or flavors from mixing in. You can keep them in the fridge for up to five days. If they are not eaten by then, they may lose their creamy texture.
Freezing Instructions
Yes, you can freeze no-bake cheesecake jars. Freezing keeps them fresh for a longer time. To freeze, cover each jar tightly with plastic wrap or foil. Then, place the jars in a freezer-safe container. They can last in the freezer for up to two months. When you’re ready to enjoy, take a jar out and let it thaw overnight in the fridge. This keeps the texture nice and smooth. Enjoy your dessert!
FAQs
How long do No-Bake Cheesecake Jars last in the fridge?
No-Bake Cheesecake Jars can last up to five days in the fridge. To keep them fresh, cover each jar tightly with a lid or plastic wrap. This prevents them from absorbing odors from other foods. If you see any moisture on the lid, wipe it off before sealing.
Can I use low-fat cream cheese?
Yes, you can use low-fat cream cheese. However, it may change the taste and texture. Low-fat cream cheese can make your cheesecake less rich and creamy. You won’t get that full, smooth texture you want. If you want to keep it light, try using half low-fat and half regular cream cheese.
What if I don’t have heavy cream?
If you don’t have heavy cream, you can use half-and-half or whole milk with a little butter. For every cup of heavy cream, use ¾ cup of half-and-half and ¼ cup of melted butter. This mix will help you get a similar texture, but it won’t be as thick.
How to serve No-Bake Cheesecake Jars?
Serve your cheesecake jars chilled for the best taste. Before serving, add fresh berries or a drizzle of chocolate sauce on top. You can also add a sprig of mint for color. Place the jars on a nice tray to make them look special at gatherings.
Can I make this recipe in advance?
Yes, you can make No-Bake Cheesecake Jars in advance. Prepare them the night before and refrigerate them. They taste even better after chilling for a few hours. Just remember to add any toppings right before serving to keep them fresh.
No-Bake Cheesecake Jars are simple and fun to make. We covered key ingredients, tools, and easy steps. Plus, I shared helpful tips for texture and presentation. You can also explore fun variations and storage methods.
Enjoy making these jars your way. Remember, the best cheesecake is all about balance. Avoid common mistakes for the best results. Dive in, get creative, and impress your friends and family with this delightful dessert!
- No-Bake Cheesecake Jars
