Skip to content
DisclaimerTerms Of UseGDPR PolicyCookie Policy

Cooking Wells

  • Home
  • Drinks
  • Appetizers
  • Dinner
  • Dessert
  • About
  • Contact
  • Privacy Policy
DisclaimerTerms Of UseGDPR PolicyCookie Policy

Mia

To make garlic butter shrimp and grits, you need quality ingredients. Here’s the list of core items: - 1 cup stone-ground grits - 4 cups water - 1 ½ cups milk - 1 teaspoon salt - 1 pound large shrimp, peeled and deveined - 4 tablespoons unsalted butter - 4 cloves garlic, minced - 1 teaspoon paprika - ½ teaspoon cayenne pepper (adjust to taste) - 1 lemon, juiced and zested - ¼ cup green onions, chopped (plus extra for garnish) - ½ cup grated Parmesan cheese - Fresh parsley, chopped (for garnish) - Black pepper to taste Using fresh, high-quality ingredients makes a big difference. Stone-ground grits create a creamy, rich base. Large shrimp add a delightful texture. Fresh garlic infuses the dish with flavor. Always choose the best you can find for great results. Garnishes enhance both looks and taste. Here are some suggested garnishes: - Extra green onions, chopped - Fresh parsley, chopped - Lemon wedges Using fresh herbs brightens the dish. They add color and fresh flavor. A sprinkle of green onions gives a nice crunch. Fresh parsley also adds a pop of color, making your dish look inviting. To make perfect grits, start with a medium saucepan. Bring 4 cups of water to a boil. Add 1 teaspoon of salt to the water. Gradually whisk in 1 cup of stone-ground grits. This helps avoid lumps. Once mixed, reduce the heat to low. Stir the grits often for about 20-25 minutes. You want them thick and creamy. If they seem too thick, add a bit more water. The right consistency is key for a smooth dish. Heat a pan over medium heat and add 2 tablespoons of unsalted butter. Once melted, add 4 minced garlic cloves. Sauté them for about 1 minute until they smell great. Next, add 1 pound of peeled and deveined shrimp. Sprinkle in 1 teaspoon of paprika and ½ teaspoon of cayenne pepper. Cook the shrimp for 3-4 minutes until they turn pink and opaque. This means they are done. Squeeze the juice of 1 lemon over the shrimp for a fresh taste. Stir in some lemon zest and ¼ cup of chopped green onions before taking the pan off the heat. To create a balanced dish, serve the grits first. Spoon a generous amount onto each plate. Then, top with the garlic butter shrimp. This layering gives a nice look. For a pop of color, garnish with extra green onions and fresh parsley. The bright herbs make the meal more inviting. Enjoy the creamy grits with the flavorful shrimp for a delightful meal. For the full recipe, check the above section. - Overcooking shrimp: Cook shrimp until they turn pink and opaque. This takes about 3-4 minutes. If you cook them too long, they become tough and chewy. Watch them closely! - Incorrect grits-to-water ratio: Use 1 cup of grits to 4 cups of water. This ratio keeps the grits creamy and smooth. Too much water makes them runny, while too little makes them dry. Stick to this for the best results. - Additional spices and herbs to consider: Feel free to add spices like thyme or basil. They can boost the flavor of your shrimp. You might also try a pinch of Old Bay seasoning for a nice twist. - Cooking methods for more depth: For deeper flavor, you could sauté the shrimp in bacon grease instead of butter. It adds a smoky taste that pairs well. Also, let the garlic cook until golden for a richer flavor. - Recommended kitchen tools for ease: A medium saucepan works great for grits. A large skillet is best for the shrimp. Use a whisk for smooth grits and a spatula for easy shrimp flipping. - Benefits of using the right equipment: Using the right tools makes cooking easier and faster. Good pans heat evenly, which helps prevent burning. A solid whisk ensures no lumps in your grits. Having the right tools makes cooking fun! For a complete look at making Garlic Butter Shrimp and Grits, check out the Full Recipe. {{image_2}} To make Garlic Butter Shrimp and Grits with a Cajun twist, use Cajun spices. This gives the dish a bold flavor. Adding Andouille sausage can enhance the meal even more. You can cook the sausage first to get that nice, smoky taste. Then, use the sausage drippings to sauté your garlic and shrimp. This method adds depth to the dish and is a classic Cajun technique. You can easily make this dish healthier. For a gluten-free option, choose certified gluten-free grits. Swap the milk with almond milk or coconut milk for a dairy-free option. You can also cut back on butter and cheese. Instead, use olive oil and nutritional yeast for a cheesy flavor. These changes will keep the dish light while still being delicious. Want to explore different flavors? Try adding Asian elements by incorporating soy sauce or sesame oil. You can also include bok choy or snap peas for crunch. For a Mediterranean vibe, use ingredients like feta cheese, sun-dried tomatoes, and olives. These swaps can transform your dish while still keeping its core elements. Each variation brings new life to your Garlic Butter Shrimp and Grits. For the full recipe, check out the details above! Garlic butter shrimp and grits last in the fridge for up to three days. To keep them fresh, store the dish in airtight containers. This helps prevent moisture loss and keeps flavors intact. You can freeze shrimp and grits for later use. Portion them into freezer-safe containers. Make sure to label them with the date. For reheating, let them thaw overnight in the fridge. Then, reheat them gently in a pan over low heat. Add a splash of water or milk to restore creaminess. Leftover shrimp and grits can shine in new dishes. Mix them into a breakfast scramble with eggs and veggies. You can also use them as a filling for tacos or quesadillas. For a quick soup, blend with broth and add fresh herbs. These ideas keep your meals exciting and reduce waste. Check out the Full Recipe to get started on this tasty dish! To make your dish spicier, simply add more cayenne pepper. You can also include red pepper flakes for extra heat. If you enjoy bold flavors, try using hot sauce in the shrimp mix. Taste as you go to find the right level of spice for you. Yes, you can use frozen shrimp. Before cooking, thaw them in the fridge overnight or run them under cold water for about 10-15 minutes. Make sure to pat them dry with a towel before cooking. This helps achieve a nice sear and prevents excess water in the dish. This dish pairs well with a light salad or sautéed greens. Try serving it with steamed asparagus or a fresh spinach salad. These sides add color and balance to your meal. You can also include crusty bread to soak up all that delicious sauce. Shrimp and grits has roots in the Southern United States. It started as a breakfast dish for fishermen. The Gullah people of the Lowcountry region popularized it. Today, it’s a staple in Southern cuisine, loved for its rich flavors and comforting texture. Yes, you can prep parts of this recipe in advance. Cook the grits and shrimp separately, then store them in the fridge. When you're ready to eat, reheat them gently. For the best taste, serve them fresh, but this method saves time on busy days. For the full recipe, check here: [Full Recipe]. Garlic butter shrimp and grits is a tasty dish you can make easily. Using the right ingredients is key for great flavor. Pay attention to cooking times for shrimp, and avoid overcooking. Remember to enhance your dish with fresh herbs and spices. You can also try various styles to keep it exciting. Store leftovers well and repurpose them for new meals. Whether spicy or healthy, this dish is versatile and fun to create. Now, it's your turn to whip up this delicious seafood classic. Enjoy your cooking adventure!

Garlic Butter Shrimp and Grits Delicious Easy Meal

If you’re looking for a quick, tasty dinner, you’ve found it! Garlic Butter Shrimp and Grits is a crowd-pleaser that’s

- 2 tablespoons olive oil - 1 medium onion, chopped - 3 cloves garlic, minced - 2 cans (14 ounces each) diced tomatoes (with juice) - 2 cups vegetable broth These ingredients form the backbone of the soup. Olive oil adds richness. Chopped onion and minced garlic create a fragrant base. Diced tomatoes bring sweetness and body, while vegetable broth adds depth. - 1 teaspoon sugar - Salt and pepper to taste - 1 cup fresh basil leaves, packed - 1 teaspoon balsamic vinegar - ½ cup heavy cream (optional for creaminess) You can elevate the flavor with sugar, salt, and pepper. Fresh basil adds a vibrant taste. Balsamic vinegar gives a hint of tanginess. If you like creaminess, add heavy cream for a smooth texture. The Full Recipe includes all these ingredients for a rich experience. 1. Start by heating 2 tablespoons of olive oil in a large pot over medium heat. 2. Add 1 medium onion, chopped, and sauté it until it turns soft and clear. This takes about 5 minutes. 3. Next, stir in 3 cloves of minced garlic. Cook for 1 minute. This step fills the pot with a lovely aroma. 4. Now, add 2 cans of diced tomatoes, including their juice, and 2 cups of vegetable broth. 5. Stir in 1 teaspoon of sugar and season with salt and pepper to taste. This helps balance the flavors. 1. Bring the mixture to a gentle boil. This is where the magic begins! 2. Once boiling, lower the heat. Let it simmer for about 20 minutes. Stir occasionally to prevent sticking. 3. After simmering, add 1 cup of fresh basil leaves and 1 teaspoon of balsamic vinegar. This adds a fresh kick. 4. Use an immersion blender to blend the soup until smooth. If you lack one, carefully transfer it to a regular blender in batches. 1. For extra creaminess, stir in ½ cup of heavy cream and heat it through. You can skip this if you want a lighter soup. 2. To serve, ladle the soup into bowls. Garnish with a sprig of fresh basil or a drizzle of olive oil on top. 3. For added texture, sprinkle some croutons. Enjoy your rich and flavorful Savory Tomato Basil Soup! When you make savory tomato basil soup, it’s all about the taste. Here are some tips to get it just right: - Adjusting flavor profiles: If your soup tastes too acidic, add a pinch of sugar. This helps balance the flavors. If you want more depth, try adding a splash of balsamic vinegar. It enhances the sweetness of the tomatoes. - Importance of fresh ingredients: Fresh basil is key to this dish. Use it right before serving for the best flavor. Fresh garlic and onions also elevate the taste. They add depth that dried spices can’t match. Choosing the right tools matters when making soup. - Immersion blender versus regular blender: An immersion blender is great for soup. It’s easy and quick. You can blend right in the pot. A regular blender works too, but you must be careful. Let the soup cool slightly before blending, and do it in batches. - Best practices for sautéing: Sauté your onions until they are soft and clear. This step builds flavor. Add garlic right after the onions. Garlic cooks fast, so don’t let it brown. Stir often to keep it from burning. These tips and techniques will help you create a rich and flavorful soup every time. For the full recipe, check out the details provided. {{image_2}} You can make your Savory Tomato Basil Soup even more exciting with ingredient swaps. Here are a few ideas: - Adding spices for a kick: Try adding a pinch of red pepper flakes. This adds heat without overpowering the flavor. You can also mix in some smoked paprika for a warm, smoky taste. If you like it spicy, add diced jalapeños for freshness and heat. - Using different types of broth: While vegetable broth works well, chicken broth can add depth. If you want a richer taste, use homemade broth or stock. For a lighter option, consider using water with a splash of soy sauce. How you serve your soup can change the whole meal. Here are some fun ideas: - Pairing with bread or sandwiches: A thick slice of crusty bread is perfect for dipping. Grilled cheese sandwiches are classic companions, too. Try a pesto or fresh mozzarella sandwich for a gourmet twist. - Garnishing options: Fresh basil leaves are a must for garnish. You can also drizzle olive oil on top. A sprinkle of grated Parmesan cheese adds a savory touch. Croutons can give your soup a nice crunch. Feel free to explore with these variations to make the soup your own. For the complete recipe, check the Full Recipe link! To keep your savory tomato basil soup fresh, store it right. First, let the soup cool down to room temperature. Then, pour it into an airtight container. Make sure to seal it tightly. - Refrigeration tips: Place the container in the fridge. Your soup will stay good for about 3 to 4 days. If you want to enjoy it later, freezing is a great option. - Freezing for long-term storage: For longer storage, use freezer-safe containers or bags. Leave some space at the top, as the soup will expand when frozen. It can last for up to 3 months in the freezer. When you are ready to enjoy your soup again, reheating is key. Here are some methods you can use. - Best methods to reheat soup: The best way is to heat it on the stove. Pour the soup into a pot and warm it over low heat. Stir often to avoid sticking. You can also use the microwave. Just place the soup in a microwave-safe bowl, cover it, and heat in short bursts. Stir in between to ensure even heating. - Maintaining flavor and texture: To keep the flavor and texture, avoid boiling the soup. Heat it gently. If it seems too thick, add a splash of vegetable broth or water to reach your desired consistency. How to make the soup vegan? To make the soup vegan, skip the heavy cream. You can use coconut cream or soy milk for a creamy texture. The rest of the ingredients are already plant-based. This keeps the rich flavor while being kind to your diet. Can I use fresh tomatoes instead of canned? Yes, you can use fresh tomatoes! Use about 2 pounds of ripe tomatoes. First, blanch them in hot water for easy peeling. Then, chop them and add them to the pot. Fresh tomatoes give a nice, bright flavor to your soup. How long does tomato basil soup last in the fridge? Tomato basil soup stays fresh for about 4 to 5 days in the fridge. Keep it in an airtight container to maintain its flavor. Always reheat it until it is hot all the way through. Can I freeze leftover soup? Absolutely! You can freeze leftover soup for up to 3 months. Let the soup cool completely before pouring it into freezer-safe containers. Leave some space at the top for expansion. When you're ready to enjoy it, thaw it overnight in the fridge and reheat. In this article, we explored how to make a delicious tomato basil soup. We started with key ingredients like olive oil, onion, and garlic. Then, we covered the steps for preparation, cooking, and adding final touches. Tips for perfecting flavor and using fresh ingredients were also shared. Finally, we looked at variations, storage, and answered common questions. This soup is easy to make and enjoyable. Experimenting with flavors can make it your own!

Savory Tomato Basil Soup Rich and Flavorful Recipe

Are you ready to warm your soul with a bowl of Savory Tomato Basil Soup? This rich and flavorful recipe

To make this tasty breakfast, you need a few key ingredients: - 1 cup rolled oats - 2 cups milk (dairy or plant-based) - 2 ripe bananas, mashed - 1/4 cup chocolate chips (dark or semi-sweet) - 1 tablespoon honey or maple syrup (optional) - 1/2 teaspoon vanilla extract - 1/2 teaspoon cinnamon (optional) - Pinch of salt - Sliced banana and extra chocolate chips for topping These ingredients blend together to create a warm and comforting bowl of oatmeal. The bananas add natural sweetness and creaminess. The chocolate chips bring joy to every bite. You can make your oatmeal even better by adding some fun extras. Here are some ideas: - Chopped nuts like walnuts or almonds for crunch - Dried fruits like raisins or cranberries for a chewy texture - Fresh berries for a burst of color and flavor - A splash of nut milk for a creamier finish Feel free to mix and match these options to suit your taste. Selecting the right ingredients makes a big difference in your oatmeal. Here are some tips: - Oats: Use rolled oats for the best texture. Quick oats cook too fast and may become mushy. - Bananas: Look for ripe bananas with brown spots. They are sweeter and easier to mash. - Chocolate Chips: Choose high-quality chocolate chips for a rich flavor. Dark chocolate has more antioxidants and less sugar. - Milk: If you prefer plant-based options, almond or oat milk works great. Using quality ingredients ensures a delicious and nutritious breakfast treat. You can find the Full Recipe for step-by-step instructions to make this delightful meal. To make Chocolate Chip Banana Oatmeal, start with simple steps. Gather your ingredients first. You will need rolled oats, milk, ripe bananas, and chocolate chips. Having all items ready makes cooking smooth. 1. In a medium saucepan, mix rolled oats, milk, and a pinch of salt. 2. Heat the mixture over medium heat until it gently boils. Stir often during this time. 3. Once it boils, lower the heat and let it simmer. Cook for about 5 minutes. Stir occasionally. The oats should become creamy and soft. 4. Take the saucepan off the heat. Stir in the mashed bananas and chocolate chips. If you want it sweeter, add honey or maple syrup. Don’t forget the vanilla and cinnamon! 5. Serve the oatmeal in bowls. Top with sliced banana and more chocolate chips for a fun look. Present your oatmeal warmly. You can use colorful bowls to make it pop. Add a few banana slices on top for freshness. Extra chocolate chips can bring a smile. Pair this treat with a cup of coffee or tea. Enjoy this delicious breakfast! For the complete recipe, check the [Full Recipe]. To get that creamy texture in your oatmeal, use rolled oats. These oats soak up the milk well. Start with a good amount of milk, about 2 cups for 1 cup of oats. Cook on medium heat, stirring often. Once it boils, lower the heat and let it simmer. This method helps the oats cook evenly. Adding mashed bananas adds sweetness and creaminess. Stir them in after cooking. The key is to adjust the heat and keep stirring. When it comes to sweetening your oatmeal, both honey and maple syrup work great. Honey gives a nice floral note. Maple syrup adds a touch of earthiness. If you want a simple swap, use either one in the same amount. Start with 1 tablespoon for a hint of sweetness. Taste the oatmeal after mixing in. You can always add more if you like it sweeter. Remember, the bananas also add natural sweetness. One common mistake is not stirring enough. Stirring helps prevent lumps and keeps the oats from sticking. Another mistake is using too little liquid. Always measure your milk carefully. If your oatmeal is too thick, add a splash of milk to loosen it up. Lastly, don’t skip the salt. Just a pinch enhances the overall flavor. Following these tips helps you make the best Chocolate Chip Banana Oatmeal. For the complete process, check the Full Recipe. {{image_2}} You can easily make this oatmeal vegan. Use plant-based milk like almond or oat milk. Skip any dairy in the recipe. The chocolate chips can also be vegan. Look for brands that don’t use milk. This way, you enjoy a creamy, tasty meal without animal products. If you need a nut-free option, choose safe ingredients. Omit any nuts if you add them. Use seeds like sunflower or pumpkin seeds instead. They add crunch and nutrition without nuts. Always check labels to ensure no nut traces in your ingredients. Fruits and nuts make this oatmeal fun. You can mix in berries, apples, or peaches. They add extra flavor and vitamins. If you like nuts, walnuts or pecans work well. Just chop them up and stir in before serving. You can also top your oatmeal with sliced fruit. This adds color and makes it look fancy. For the full recipe, check the detailed steps above to create your perfect bowl of Chocolate Chip Banana Oatmeal. To store leftover chocolate chip banana oatmeal, let it cool. Once cooled, place it in an airtight container. This helps keep the oatmeal fresh. You can store it in the fridge for up to three days. If you know you won't eat it soon, consider freezing it. When reheating, add a splash of milk. This keeps the oatmeal creamy. You can use the microwave or a stovetop. If using a microwave, heat it in 30-second bursts. Stir in between to ensure even heating. If you use the stovetop, heat it gently over low heat. Stir often to avoid sticking. If you freeze chocolate chip banana oatmeal, use a freezer-safe container. Label it with the date. It can last for up to three months in the freezer. To eat, thaw it in the fridge overnight. Reheat as mentioned earlier. Enjoy your oatmeal just like fresh! For the full recipe, check the section above. Yes, you can use quick oats. They cook faster and will make a softer oatmeal. Just reduce the cooking time to about 1-2 minutes. Keep in mind, the texture will be different but still tasty. To make this recipe gluten-free, use certified gluten-free rolled oats. Many brands offer gluten-free oats that taste great. Just check the label to be sure. If you don't have bananas, try unsweetened applesauce or mashed avocado. Both will add creaminess. You can also use ripe pears or even pumpkin puree for a unique twist. This oatmeal lasts about 3-5 days in the fridge. Store it in an airtight container. When ready to eat, just reheat it and add a splash of milk if needed. Yes, you can prepare it overnight! Combine the oats and milk in a bowl. Add the other ingredients, and let it sit in the fridge. In the morning, simply warm it up, and enjoy your quick breakfast. For the full recipe, check the previous section. Chocolate Chip Banana Oatmeal is one of my favorite treats. It combines sweet bananas and rich chocolate. This dish is simple to make and perfect for breakfast. Here’s how you can make it. Ingredients: - 1 cup rolled oats - 2 cups milk (dairy or plant-based) - 2 ripe bananas, mashed - 1/4 cup chocolate chips (dark or semi-sweet) - 1 tablespoon honey or maple syrup (optional, for extra sweetness) - 1/2 teaspoon vanilla extract - 1/2 teaspoon cinnamon (optional) - Pinch of salt - Sliced banana and extra chocolate chips for topping Instructions: 1. In a medium saucepan, combine rolled oats, milk, and a pinch of salt. 2. Place over medium heat. Bring to a gentle boil while stirring frequently. 3. Once boiling, reduce the heat to low. Let it simmer for about five minutes. Stir occasionally until the oats are creamy and cooked through. 4. Remove the saucepan from heat. Stir in the mashed bananas, chocolate chips, honey or maple syrup, vanilla extract, and cinnamon until well combined. 5. Divide the oatmeal into bowls. Top with sliced banana and additional chocolate chips for a delightful look. 6. Serve warm and enjoy this comforting treat! This recipe takes just five minutes to prep and ten minutes in total. You will have two servings of pure joy. Enjoy every bite! To wrap up, we covered all you need for Chocolate Chip Banana Oatmeal. I shared essential and optional ingredients to boost flavor. You learned step-by-step cooking tips for creamy oatmeal. We discussed common mistakes to avoid and fun variations to try. Lastly, I explained how to store and reheat leftovers. With these tips, you can whip up a tasty breakfast. Enjoy your oatmeal adventure and make it your own!

Chocolate Chip Banana Oatmeal Flavorful Breakfast Treat

Start your day right with a bowl of Chocolate Chip Banana Oatmeal! This easy recipe blends sweet bananas with rich

- Chicken breasts and preparation Use 2 chicken breasts for this dish. Cut them into bite-sized pieces. This makes them easy to eat and helps them cook well. - Coating essentials: flour, eggs, breadcrumbs For the coating, you need 1 cup of all-purpose flour, 2 large eggs, and 1 cup of breadcrumbs. I recommend using panko breadcrumbs for a crunchier texture. - Flavor enhancers: garlic powder, Italian seasoning, salt, and pepper Add 1 teaspoon of garlic powder and 1 teaspoon of Italian seasoning to boost the flavor. Don’t forget salt and pepper to taste. - Marinara sauce for dipping Serve these bites with 1 cup of marinara sauce for dipping. The sauce adds great flavor and moisture. - Fresh basil leaves for garnish Use fresh basil leaves to garnish your dish. They add color and a fresh taste. - Olive oil spray for baking Lightly spray the chicken bites with olive oil before baking. This helps them brown and stay crispy. For the full recipe, check out the comprehensive instructions to make these crispy chicken Parmesan bites! First, preheat your oven to 400°F (200°C). This helps the chicken cook evenly. Next, prepare your baking sheet by lining it with parchment paper. This makes cleanup easy and helps your bites crisp up. Now, let’s set up the dredging station. You will need three shallow bowls. In the first bowl, mix together the flour, garlic powder, salt, and pepper. This is your dry mix. In the second bowl, beat the two large eggs. This will coat the chicken. In the third bowl, combine the breadcrumbs, grated Parmesan cheese, and Italian seasoning. This gives the bites their tasty crust. Take a piece of chicken and dredge it in the flour mixture. Make sure to shake off any extra flour. Then, dip the floured chicken into the beaten eggs. Ensure each piece is fully coated. Finally, coat the chicken in the breadcrumb and Parmesan mixture. Press lightly to help it stick well. Repeat this process for all your chicken pieces. Each bite should be well-coated for the best flavor and texture. Now it’s time to bake! Place the coated chicken bites on your prepared baking sheet, leaving space between each piece. This helps them crisp up nicely. Next, spray the tops of the chicken bites lightly with olive oil spray. This promotes browning and adds flavor. Bake in the preheated oven for about 15-20 minutes. Flip the chicken halfway through to ensure even cooking. Cook until they are golden brown and crispy. Serve hot with marinara sauce on the side for dipping. Don't forget to garnish with fresh basil leaves. For the complete recipe, check out the Full Recipe section. To get that perfect crunch, use panko breadcrumbs. Panko is lighter and airier than regular breadcrumbs. This helps create a crispy outer layer. When you coat the chicken, make sure to press the breadcrumbs onto the chicken. This helps them stick better during baking. To ensure even cooking, space the chicken bites well on the baking sheet. Crowding can trap steam and make them soggy. Flipping the bites halfway through baking is key. This allows both sides to get that golden brown color. You can boost the flavor of your chicken bites by adding spices or herbs to the breadcrumb mix. Consider mixing in some paprika or cayenne for extra heat. Fresh herbs like parsley or oregano can also add a nice touch. For dipping sauces, marinara is a classic choice. But don't stop there! Try ranch dressing, buffalo sauce, or a garlic aioli. Each sauce will change the flavor and add fun to your bites. {{image_2}} You can easily change the cheese in this recipe. While Parmesan gives a great taste, you can try mozzarella or even cheddar for a different flavor. Each cheese melts differently, which changes the texture. Experimenting with cheese can lead to fun surprises! If you want to swap the protein, consider using turkey. Ground turkey works well and gives a lighter bite. You can also try zucchini for a vegetarian option. Just cut it into bite-sized pieces, then follow the same steps. This will add a fresh twist to your appetizer. Using an air fryer is a fantastic way to make these chicken bites. It cooks them quickly and keeps them crispy. Set your air fryer to 380°F (193°C) and cook for about 10-12 minutes. Flip the bites halfway through for even cooking. The air fryer gives a nice crunch without using too much oil. If you prefer pan-frying, it’s an option too. Heat a few tablespoons of oil in a pan over medium heat. Cook the chicken bites for about 4-5 minutes on each side. This method adds a lovely golden color and rich flavor. Just keep an eye on them to avoid burning. For more details, you can check the Full Recipe. To keep your crispy chicken Parmesan bites fresh, store them in the fridge. Place the bites in an airtight container. They stay good for up to three days. If you want to save them for longer, freezing is a great option. To freeze, lay the bites in a single layer on a baking sheet. Freeze them for about two hours, then move them to a freezer bag. This helps prevent them from sticking together. When it comes to reheating, the oven is the best choice. Preheat your oven to 375°F (190°C). Place the chicken bites on a baking sheet. Bake for about 10 minutes. This keeps them crispy and warm. If you use a microwave, they may get soggy. To avoid this, cover them with a paper towel and heat in short bursts. This method helps maintain some crispiness, but the oven works best. Enjoy your tasty bites anytime! To boost the flavor of your chicken bites, marinate the chicken before cooking. You can use simple ingredients for the marinade. Try mixing olive oil, lemon juice, garlic, and Italian herbs. Let the chicken soak for at least 30 minutes. This step makes the chicken juicy and tasty. Yes, you can prep these chicken bites in advance. Start by marinating the chicken and coating it the night before. Store the coated chicken in the fridge. When you're ready to cook, take them out and let them sit for 10 minutes. This helps them cook evenly. Crispy Chicken Parmesan Bites pair well with many sides. A fresh salad adds a nice crunch. Garlic bread also complements the dish well. For drinks, try a light white wine or sparkling water with lemon. This balance enhances the meal's flavor. For the full recipe for crispy chicken Parmesan bites, click [here](#). We covered how to make crispy chicken Parmesan bites, from ingredients to cooking techniques. You learned about key flavors, baking tips, and great sauces. Remember, using panko breadcrumbs ensures crispiness. Feel free to swap ingredients for variety or try different cooking methods. Store leftovers properly for best flavor. These bites make a tasty snack or meal anytime. Enjoy experimenting and sharing your delicious creations!

Crispy Chicken Parmesan Bites Easy and Tasty Appetizer

Looking for a fun and easy appetizer? Try these Crispy Chicken Parmesan Bites! They’re perfect for parties or a cozy

To make delicious pumpkin spice pancakes, gather these simple ingredients: - 1 cup all-purpose flour - 1 tablespoon baking powder - 1 tablespoon pumpkin pie spice - ½ teaspoon salt - 1 tablespoon brown sugar - 1 cup milk (dairy or non-dairy) - 1 cup canned pumpkin puree - 1 large egg - 2 tablespoons vegetable oil - 1 teaspoon vanilla extract - Optional: Maple syrup and whipped cream for serving Using these ingredients will help create the perfect blend of flavors. The pumpkin puree gives a rich taste and adds moisture. The pumpkin pie spice brings warmth and sweetness. Don't forget to grab maple syrup and whipped cream for a sweet finish. For the full recipe, check out the details in the main article. These ingredients work well together, making your pancakes fluffy and flavorful. You can easily find them at your local store. Plus, they are perfect for a cozy fall morning! Start by grabbing a large mixing bowl. In it, whisk together the following dry ingredients: - 1 cup all-purpose flour - 1 tablespoon baking powder - 1 tablespoon pumpkin pie spice - ½ teaspoon salt - 1 tablespoon brown sugar Mix them well until combined. This step helps the flavors blend and makes your pancakes taste amazing. Now, take another bowl to mix the wet ingredients. Combine these items until smooth: - 1 cup milk (dairy or non-dairy) - 1 cup canned pumpkin puree - 1 large egg - 2 tablespoons vegetable oil - 1 teaspoon vanilla extract Mixing these ingredients well creates a creamy base for your pancakes. Pour the wet mixture into the bowl with the dry ingredients. Mix them gently. It’s okay if there are some lumps. Overmixing can make pancakes tough. Preheat a non-stick skillet or griddle over medium heat. Lightly grease it with a little oil. Once hot, pour about ¼ cup of the batter for each pancake. Cook until bubbles form on the surface, about 3-4 minutes. When the edges look set, flip the pancake carefully. Cook for another 2-3 minutes until golden brown. Remove the pancakes and keep them warm. Repeat with the remaining batter. Serve your pancakes stacked high, drizzled with maple syrup, and topped with whipped cream if you like. Enjoy this delicious fall delight! For the full recipe, check the beginning of this article. To make light and fluffy pancakes, avoid overmixing the batter. When you combine the wet and dry ingredients, stir gently. It's okay to have lumps in the batter. If you mix too much, your pancakes can turn tough. Aim for a few visible flour spots. This ensures a soft texture. The right skillet temperature is key. Preheat your skillet over medium heat. A drop of water should dance and sizzle when it's ready. If the heat is too low, pancakes may turn out soggy. If too high, they might burn. You want a nice golden color on both sides. For toppings, maple syrup is a classic choice. A dollop of whipped cream makes it extra special. You can also add fresh fruit, like bananas or berries, for a pop of color. For a festive touch, sprinkle cinnamon or add pecans on top. Serve your pancakes stacked high on a warm plate for the best presentation. Enjoy every bite of this fall delight! {{image_2}} You can make your pumpkin spice pancakes even more fun by adding chocolate chips. Just stir in half a cup of chocolate chips into the batter before cooking. The sweet chocolate will melt slightly, adding a rich flavor. It pairs perfectly with the warm spice of pumpkin. Serve these with maple syrup for a delicious treat. To create a vegan version, you can swap out some ingredients. Use almond milk or oat milk instead of regular milk. Replace the egg with a flax egg, made from one tablespoon of ground flaxseed mixed with three tablespoons of water. Let it sit for five minutes to thicken. The pancakes will still be fluffy and tasty! For a gluten-free option, you can use different flours. Almond flour or a gluten-free all-purpose blend works great. Just make sure your blend has xanthan gum for better texture. You may need to adjust the liquid slightly since gluten-free flours absorb more moisture. Enjoy these pancakes without worry! For the full recipe, check out the complete guide on making pumpkin spice pancakes. To keep your pumpkin spice pancakes fresh, let them cool first. Place them in a single layer on a plate. Cover them with plastic wrap or aluminum foil. If you have many pancakes, stack them with parchment paper in between each layer. This step prevents sticking and keeps them nice. You can store them in the fridge for up to three days. For longer storage, freeze them. To reheat pancakes, use a microwave or skillet. If using the microwave, place pancakes on a plate. Heat for 20-30 seconds at a time until warm. For a crispier texture, use a skillet. Heat it over medium-low heat and add a little butter. Place pancakes in the skillet for about 1-2 minutes on each side. This method keeps the pancakes soft and delicious. Prepared pancakes last in the fridge for about three days. If you freeze them, they can last up to two months. To enjoy them later, label the bags with the date. This way, you’ll know when to use them. Always check for any signs of spoilage before eating. This ensures you enjoy them at their best. Yes, you can use fresh pumpkin. Start by selecting a sugar pumpkin, as it has a sweeter taste. Cut it in half, scoop out the seeds, and roast it until soft. Once cooked, scoop the flesh out and mash it until smooth. Measure out one cup for this recipe. Fresh pumpkin adds a great flavor, but make sure to cook it well. To make these pancakes gluten-free, you can swap all-purpose flour for a gluten-free blend. Look for blends that have xanthan gum in them. Almond flour or oat flour can also work well. You may need to adjust the liquid slightly, as these flours can absorb moisture differently. This way, you can enjoy the same fluffy texture. For extra flavor, consider adding: - 1 teaspoon of cinnamon - ½ teaspoon of nutmeg - ¼ cup of chopped nuts, like walnuts or pecans - Chocolate chips for a sweet twist These additions will make your pancakes even more delightful. You can also experiment with different spices for variety. To reduce sweetness, cut back on the brown sugar by half or omit it entirely. You can also use unsweetened applesauce as a substitute for some of the sugar. Another great option is to use maple syrup as a topping instead of sweetening the batter. This way, you control the sweetness while still enjoying the pancakes. You can make delicious pumpkin pancakes using simple ingredients and steps. We covered the best way to mix and cook them for light, fluffy results. You also learned tips for custom flavors and how to store leftovers. Pumpkin pancakes are fun to make and even better to eat. Try out variations that suit your taste and enjoy breakfast! With these tips and recipes, you're ready to impress friends and family. Let your cooking shine!

Pumpkin Spice Pancakes Irresistible Fall Delight

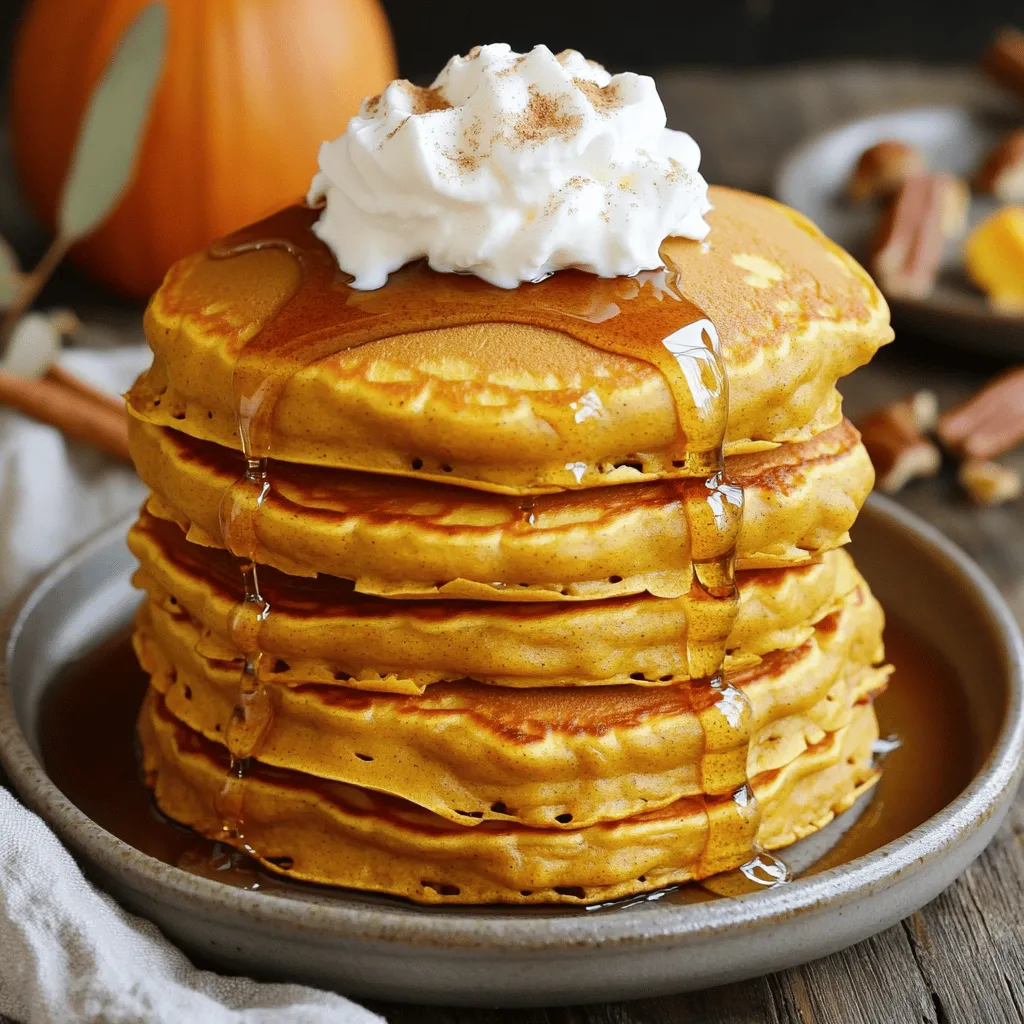
Are you ready to fall in love with breakfast again? These Pumpkin Spice Pancakes are the perfect way to embrace

To make Sweet Potato Black Bean Tacos, gather these simple ingredients: - Sweet potatoes - Black beans - Olive oil - Spices (cumin, smoked paprika, garlic powder, chili powder) - Corn tortillas - Toppings (avocado, red cabbage, cilantro, lime) You will need two medium sweet potatoes. Peel and dice them into small cubes. A can of black beans works great. Make sure to drain and rinse them well. Use one tablespoon of olive oil to coat the sweet potatoes, making them crispy when roasted. For spices, gather ground cumin, smoked paprika, garlic powder, and chili powder. These spices give the tacos a warm flavor. Feel free to adjust the spice levels to suit your taste. You can also add salt and pepper to enhance the flavor. For the tortillas, I recommend using eight small corn tortillas. They hold the filling well and add a nice texture. Now, for the toppings, slice one avocado and shred one cup of red cabbage. Add fresh cilantro for a burst of flavor. Finally, lime wedges add a refreshing touch when you squeeze them over the tacos. These ingredients come together to create a delicious meal. If you want the full recipe, check out the [Full Recipe]. Start by peeling and dicing the sweet potatoes. Aim for small, even pieces. This helps them cook faster. In a large bowl, mix the diced sweet potatoes with olive oil, ground cumin, smoked paprika, garlic powder, chili powder, salt, and pepper. Make sure each piece is well-coated. Next, preheat your oven to 425°F (220°C). Spread the seasoned sweet potatoes on a baking sheet. Lay them out in a single layer. Roast the sweet potatoes for about 25-30 minutes. Stir them halfway through to ensure even cooking. They should become tender and caramelized when finished. While the sweet potatoes roast, grab a small saucepan. Rinse the black beans under cold water to remove excess sodium. Place the beans in the saucepan over medium heat. Stir occasionally and heat for about 5 minutes. Season with salt and pepper to taste. This step adds flavor and warmth to the beans. To warm the corn tortillas, use a dry skillet over medium heat. Place a tortilla in the skillet for about 30 seconds on each side. This makes them pliable and slightly toasted. You can stack them on a plate with a clean towel to keep them warm. For the full recipe, check out the Sweet Potato & Black Bean Tacos section. Enjoy the process and create a fun meal! To make your tacos even tastier, consider adding spices. Try a pinch of cayenne for heat. You can also mix in some ground coriander for a fresh taste. If you like a sweet touch, drizzle honey or agave syrup over your tacos. Adding salsa or hot sauce can also bring in extra flavor. These small changes can make a big difference. Layering your ingredients is key for great taste. Start with a tortilla base. Add roasted sweet potatoes first, then the black beans. This order helps keep the beans from sliding off. Next, place the avocado slices and red cabbage on top. Finally, sprinkle fresh cilantro. This way, every bite will be packed with flavor. Pair your tacos with simple sides. A fresh salad can add crunch. You might enjoy some rice or quinoa for a filling meal. For drinks, try a refreshing lemonade or a light beer. These options will balance the rich flavors of the tacos well. You can find the full recipe [here]. {{image_2}} You can switch black beans for other beans. Pinto beans or chickpeas work well. You can also add veggies for more flavor. Try bell peppers, zucchini, or corn for extra crunch. These tacos can easily be vegan. Just stick to the ingredients listed. They are also gluten-free if you use corn tortillas. Always check the label to be sure. Want some heat? Add diced jalapeños or a splash of hot sauce. For a sweeter taste, you can mix in some diced apples or mango. Each option gives a unique twist to your tacos. For the full recipe, check out the detailed steps and enjoy! After you enjoy your Sweet Potato Black Bean Tacos, cool them to room temperature. Place leftovers in an airtight container. This helps keep them fresh. You can store them in the fridge for up to three days. For longer storage, freeze the filling separately from the tortillas. Wrap the filling tightly in plastic wrap or foil. Use a freezer-safe bag for the tortillas. They should last up to three months when frozen. To reheat, you have a few good methods. For the filling, use a microwave. Heat it in short intervals, stirring often. This keeps the texture nice. If you want a crispy tortilla, warm it in a skillet. Heat for about 30 seconds on each side. You can also use an oven to reheat everything. Preheat to 350°F (175°C) and warm for about 10 minutes. The shelf life of these tacos varies. The sweet potato filling lasts three days in the fridge. Black beans can last up to a week if stored properly. Tortillas should be used within a week for best taste. If frozen, the filling and tortillas can last up to three months. Just remember, the sooner you enjoy them, the better they taste! Yes, you can make these tacos ahead. Roast the sweet potatoes and heat the black beans. Store them in airtight containers. You can keep them in the fridge for about three days. When ready to eat, just warm them up. This saves time on busy days. If you don’t have corn tortillas, try flour tortillas. Lettuce leaves are also a great choice for a low-carb option. You can even use whole grain tortillas for extra fiber. Each option brings a different taste and texture. Absolutely! These tacos are perfect for meal prep. You can prepare all the ingredients in advance. Pack them in separate containers. This makes it easy to grab and assemble when hunger strikes. You can enjoy them for lunch or dinner all week long. To store leftovers, keep the fillings and tortillas separate. Use airtight containers for the sweet potatoes and black beans. Store tortillas in a zip-top bag. They can last in the fridge for up to three days. Reheat the sweet potatoes in the oven at 350°F for about 10 minutes. You can also use a microwave for 1-2 minutes. For black beans, heat them in a saucepan over medium heat until warm. Stir occasionally. Yes, you can freeze both the sweet potatoes and black beans. Place them in freezer-safe bags. They can last up to three months in the freezer. Just remember to thaw them in the fridge overnight before reheating. Some great toppings include avocado slices, fresh cilantro, and lime wedges. You can also add salsa or hot sauce for extra flavor. For crunch, try adding sliced radishes or jalapeños. Each topping enhances the taco experience. Yes, this recipe is very kid-friendly. Sweet potatoes are naturally sweet, which kids love. You can also let them help with assembling the tacos. It makes for a fun family cooking activity. You can find the full recipe for Sweet Potato Black Bean Tacos in the recipe section above. Enjoy making this easy and tasty meal! Sweet potato black bean tacos bring great taste and nutrition to your table. You’ve learned about the key ingredients and how to prep them for amazing flavors. The tips and tricks help you elevate each bite, while variations keep it fresh. Remember to store any leftovers properly to enjoy later. With so many options, you can make these tacos fit any meal plan. Enjoy your culinary adventure and make these tacos a staple in your home!

Sweet Potato Black Bean Tacos Flavorful and Easy Meal

Are you ready for a tasty meal that’s also easy to make? Sweet Potato Black Bean Tacos are your answer!

- 4 cups fresh peaches, or 2 cans of sliced peaches - 1 cup sugar, divided - 1 teaspoon cinnamon - 2 teaspoons lemon juice - 1 teaspoon vanilla extract - 1 ½ cups Bisquick mix - ½ cup milk - ¼ cup unsalted butter, melted - Pinch of salt - Vanilla ice cream - Fresh mint leaves - Additional cinnamon for serving When making peach cobbler, always start with the best ingredients. Fresh peaches shine in this dish. If you can't find fresh ones, canned peaches are a good backup. Just make sure they are drained well. For sweetness, I use one cup of sugar. This amount balances the tartness of the peaches. Cinnamon adds warmth and flavor, while lemon juice brightens the dish. Vanilla extract gives a lovely aroma that elevates the cobbler. For the baking essentials, Bisquick is a game-changer. It makes the batter light and fluffy. Combine this with milk, melted butter, and a pinch of salt for the perfect mix. Lastly, think about garnishes. A scoop of vanilla ice cream on top makes it extra special. Fresh mint leaves add color and a refreshing taste. You can sprinkle more cinnamon when serving for a delightful finish. This combination of ingredients makes a peach cobbler that is not just easy but truly delicious. For the full recipe, be sure to check the details above. - Preheat your oven to 350°F (175°C). - In a large bowl, combine 4 cups of sliced peaches, ½ cup of sugar, 1 teaspoon of cinnamon, and 2 teaspoons of lemon juice. - Mix well and let it sit for 10 minutes. This helps the flavors blend. - In another bowl, whisk together 1 ½ cups of Bisquick mix, the remaining ½ cup of sugar, ½ cup of milk, ¼ cup of melted butter, 1 teaspoon of vanilla extract, and a pinch of salt. - Keep whisking until the batter is smooth. This will create a nice top layer for our cobbler. - Pour the peach mixture into a greased 9x13 inch baking dish. Spread it out evenly. - Next, carefully pour the Bisquick batter over the peaches. Do not stir; let it rest on top. - Bake in the oven for 40-45 minutes. The top should turn golden brown. A toothpick should come out clean when inserted into the batter. - Let it cool slightly before you serve. Enjoy your Peachy Bisquick Dream Cobbler! For the full recipe, check the instructions above. To get a crispy topping, make sure to pour the batter gently over the peaches. Don't mix them together. This keeps the batter light and fluffy. For sweetness, taste the peach mixture before baking. If you like it sweeter, add more sugar. You can also use brown sugar for a deeper flavor. One big mistake is not preheating the oven. This step ensures even cooking. If the oven is not hot enough, your cobbler may not bake well. Another mistake is overmixing the batter. Mix just until combined. Too much mixing can make the topping dense. Peach cobbler tastes great warm with vanilla ice cream. The cold ice cream melts into the warm cobbler, making it even better. You can also pair it with whipped cream for a lighter option. For leftovers, try serving them with yogurt for breakfast. You can also warm it up and add fresh fruit for a fun twist. {{image_2}} You can swap peaches for other fruits in your cobbler. Try using fresh or frozen berries, such as blueberries or raspberries. Apples, pears, and cherries also make a great choice. Mixing fruits can create a fun twist! For a mixed cobbler, combine peaches with berries or apples for a colorful treat. Need a gluten-free option? You can use gluten-free flour blends instead of Bisquick. Almond flour or oat flour can work well too. For a healthier version, consider using honey or maple syrup instead of sugar. These natural sweeteners add flavor without the guilt. Want to make your cobbler pop? Add spices like nutmeg or ginger. Just a pinch can elevate the taste. You can also stir in citrus zest, like lemon or orange, for a fresh zing. These simple additions can take your peach cobbler to the next level! For the full recipe, check the earlier section. To store peach cobbler in the fridge, wait for it to cool. Cover it with plastic wrap or foil. You can also place it in an airtight container. This keeps it fresh for about 3 to 4 days. Choose a shallow container for quick cooling. This method helps save the topping's crispiness. When reheating, use the oven for best results. Preheat the oven to 350°F (175°C). Place the cobbler in a baking dish, cover it with foil. Heat for about 15 to 20 minutes. This method keeps the texture nice. The ideal serving temperature is warm, around 150°F (65°C). You can check with a food thermometer. To freeze peach cobbler, let it cool completely. Cut it into portions for easy thawing. Wrap each piece tightly in plastic wrap. Then, place them in a freezer bag. This way, it stays fresh for up to 3 months. For thawing, leave it in the fridge overnight. Reheat it in the oven for best taste. To make a gluten-free peach cobbler, use a gluten-free Bisquick mix. Many brands offer this option. You can also try almond flour or coconut flour as alternatives. They will change the texture slightly, but they still work well. Always check the packaging for any additional ingredients or instructions. Yes, you can use canned peaches. Canned peaches offer a sweet flavor and are easy to use. However, fresh peaches have a more vibrant taste. Fresh peaches also provide a firmer texture, while canned peaches can be softer. If you choose canned, make sure to drain them well to avoid excess juice. To check if your cobbler is done, look for a golden brown top. A toothpick inserted into the batter should come out clean. The edges may bubble slightly, which is a good sign. The baking time is usually around 40 to 45 minutes, but always keep an eye on it. This blog post covered how to make a delicious peach cobbler. We explored fresh ingredients and baking essentials to create a tasty treat. I shared step-by-step instructions and tips to perfect your cobbler. You can even try different fruits and make it gluten-free! In the end, you have the tools to create something special. Enjoy making this dish for friends or family. Happy baking!

Peach Cobbler with Bisquick Easy and Delicious Dessert

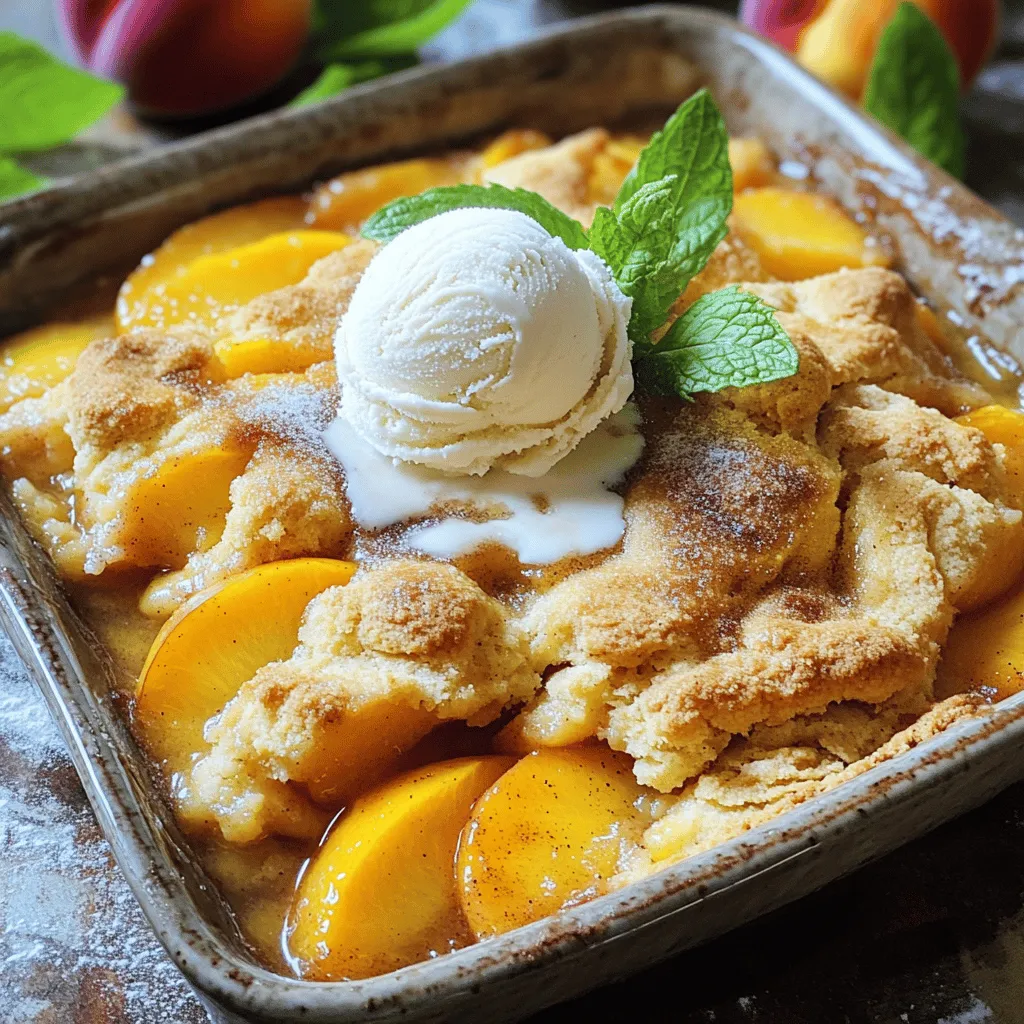
Are you ready to whip up a delicious dessert that delights everyone? This peach cobbler with Bisquick is the answer!

- Ripe mango Pick a mango that feels slightly soft. It should have a sweet aroma. - Avocados Choose avocados that yield slightly when pressed. This means they are ripe. - Red onion Use a small red onion for a milder taste. Dice it finely for even flavor. - Red bell pepper Select a bright red bell pepper. Dice it into small pieces for crunch. - Jalapeños Use 1-2 jalapeños, depending on your spice level. Deseed and mince them for less heat. - Fresh cilantro Chop a quarter cup of fresh cilantro. It adds a bright, herbal note to the salsa. - Lime juice Fresh lime juice brings a tangy kick. Use about two tablespoons for best flavor. - Honey or agave syrup (optional) If you like a touch of sweetness, add one tablespoon of honey or agave syrup. - Salt Use salt to enhance the flavors. Start with a pinch and adjust as needed. - Black pepper Freshly ground black pepper adds warmth. Just a dash will do to start. These ingredients work together to create a vibrant and tasty Mango Avocado Salsa. For the complete recipe, check the Full Recipe section. This salsa is perfect for snacks or as a topping for your favorite dishes. First, you need to gather all your ingredients. Start with the ripe mango. Dice the mango into small pieces. Then, take the avocados and do the same. Make sure they are soft but not overripe. Next, finely chop the red onion. The red bell pepper should be diced into small cubes. If you like some heat, deseed and mince the jalapeños. You can adjust the amount based on your spice preference. Place all these diced ingredients into a large mixing bowl. Now, it’s time to bring everything together. Combine the diced mango, avocado, onion, bell pepper, and jalapeños in the bowl. Mix them gently to avoid mashing the avocados. Next, fold in the chopped cilantro. This herb adds a fresh flavor. Make sure all the ingredients are well mixed but still intact. For the dressing, take a small bowl. Whisk together the lime juice and honey. If you prefer a sweeter salsa, add the honey. Then, sprinkle in some salt and black pepper. This will balance the flavors nicely. Pour this dressing over the salsa mixture. Carefully toss everything together until well coated. Taste your salsa and adjust the seasoning if needed. Let it sit for about 15 minutes. This allows the flavors to blend well together. Enjoy your fresh Mango Avocado Salsa! For the full recipe, check out the complete guide. How to select a ripe mango: To find a good mango, look for one that feels slightly soft when you press it. The skin should be a mix of yellow and red. A ripe mango gives off a sweet smell near the stem. If it feels hard, it needs more time to ripen. Tips for ripe avocados: For avocados, gently squeeze them. A ripe avocado should yield slightly to pressure. Look for dark skin, but not too dark; this can mean it's overripe. If you find one that is still hard, leave it on the counter for a few days. Gentle folding vs. vigorous stirring: When you mix your Mango Avocado Salsa, use a gentle folding method. This keeps the mango and avocado chunks intact. If you stir too hard, you risk turning your salsa into mush. A light touch helps maintain the fresh look and texture. Adding more spice: If you like heat, add more jalapeños or a dash of hot sauce. You can also try crushed red pepper flakes for a different kick. Adjust the spice level to suit your taste, but remember, it's easy to add more spice, not so easy to take it away. Balancing sweetness and acidity: To balance flavors, taste your salsa. If it’s too sweet, add a splash more lime juice. If it’s too tart, a little honey or agave syrup can help. Finding the right balance makes the salsa pop with flavor. For the full recipe, check the ingredients and instructions section. {{image_2}} You can make your mango avocado salsa spicy. Just add extra jalapeños or a splash of hot sauce. The heat will brighten up the fresh flavors. I love the kick it gives. When you mix in jalapeños, remember to taste as you go. Adjust the spice level to fit your taste. A little heat can make a big difference! For a sweet tropical twist, try adding pineapple or kiwi. Both fruits pair nicely with mango and avocado. Pineapple adds tanginess, while kiwi brings a unique flavor. To use these fruits, chop them into small pieces. Fold them gently into your salsa mix. This variation is perfect for summer gatherings or a fun snack! This salsa goes well with many dishes. I often pair it with tacos or grilled meats. The coolness of the salsa balances the heat of spicy tacos. It also complements grilled chicken or fish beautifully. Serve it on top or alongside your main dish. You can also enjoy it with tortilla chips for a crunchy snack! Check out the Full Recipe for more ways to enjoy this delightful dish. To store leftovers of your Mango Avocado Salsa, keep it in an airtight container. This helps prevent browning and keeps it fresh. If you have any lime juice left, add a little more to the salsa before sealing it. This will help keep the avocados green longer. Always store it in the fridge. Remember, fresh salsa is best enjoyed within a few days. Mango Avocado Salsa stays fresh for about 2 to 3 days in the fridge. After this time, the avocados may start to brown, and the flavors can fade. If you notice any off smells or significant color change, it's best to discard it. Always check for freshness before enjoying. You can freeze Mango Avocado Salsa, but it may not have the same texture once thawed. The avocados might become mushy. If you still want to freeze it, place it in a freezer-safe bag. Remove as much air as you can before sealing. It can last up to 2 months in the freezer. When ready to eat, thaw it in the fridge overnight. Use it in cooked dishes where texture is less important. If you need a creamy substitute for avocado, consider using Greek yogurt. It adds a nice texture and flavor. Another option is silken tofu, which blends smooth and creamy. You can also try mashed banana for a sweeter twist. Each of these will change the taste slightly but can work well. Letting the salsa sit for about 15 minutes is key. This time helps the flavors blend together. You will notice the taste becomes richer and more balanced. If you can wait longer, even better! Just keep it covered in the fridge. Yes, you can make this salsa ahead of time! It tastes great when prepared a few hours in advance. Aim to prepare it no more than a day before serving. Just remember to store it in an airtight container. This will help keep it fresh and tasty. This blog post covered how to make a tasty mango avocado salsa. We talked about fresh produce, herbs, and seasonings you need. I shared detailed steps on preparing and mixing the salsa. You learned tips for choosing ripe fruits and adjusting flavors. Plus, I gave you fun variations and storage info. In conclusion, making this salsa is simple and stress-free. Enjoy it with tacos or grilled meats for a summer treat. You can also experiment with flavors and make it your own!

Mango Avocado Salsa Fresh and Flavorful Delight

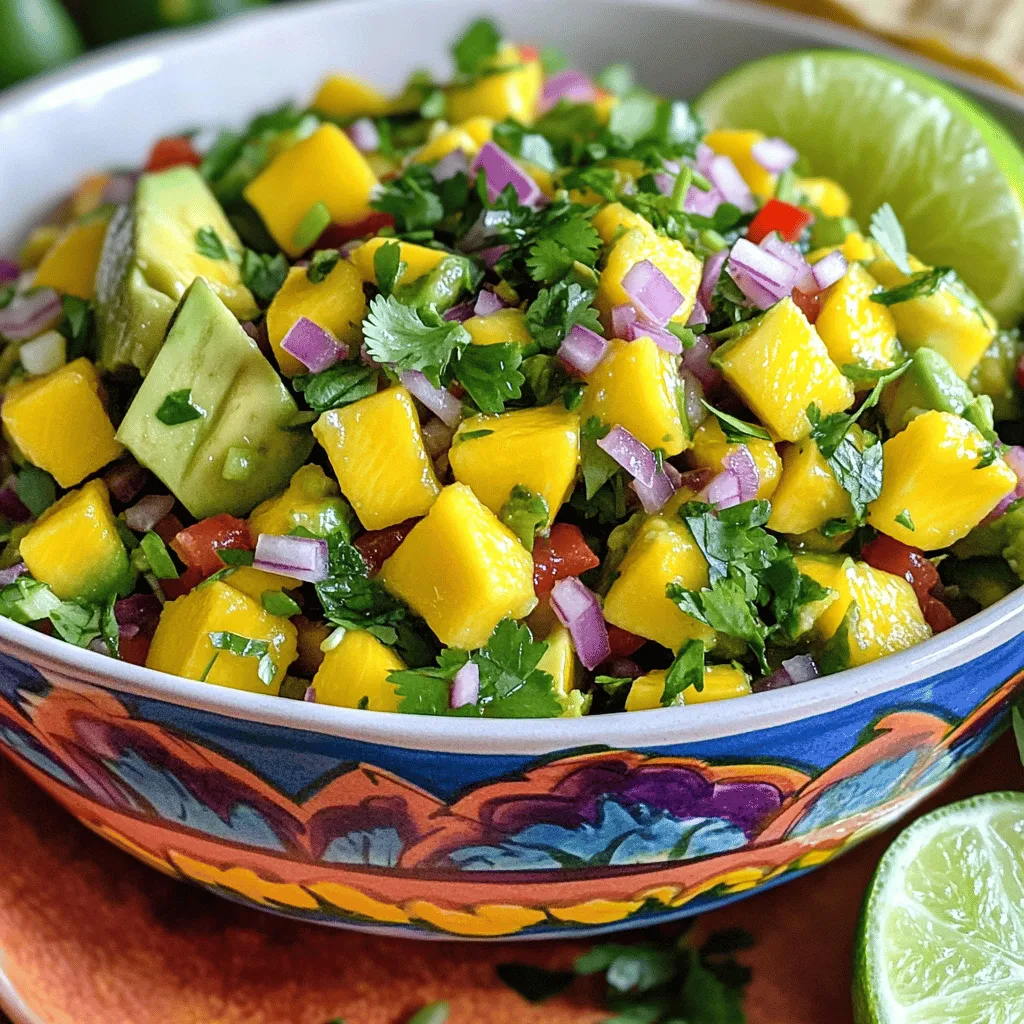
Welcome to the world of flavor! In this post, I’ll share my favorite Mango Avocado Salsa recipe. Bursting with fresh,

Making chocolate chip cookie dough dip is simple and fun. You only need ten key ingredients and a few minutes. This dip is great for parties or a sweet snack. You can serve it with dippers like graham crackers, apple slices, or pretzels. - 1 cup all-purpose flour - 1/2 cup unsalted butter, softened - 1/2 cup brown sugar, packed - 1/4 cup granulated sugar - 1 teaspoon vanilla extract - 1/2 teaspoon salt - 1 cup cream cheese, softened - 1/2 cup mini chocolate chips - 1/2 cup powdered sugar - 1-2 tablespoons milk (optional, for consistency) - Graham crackers, apple slices, or pretzels for dippers I love how each ingredient plays a role in this dip. The flour gives it the classic cookie dough taste. The butter adds creaminess, while the sugars bring sweetness. Cream cheese makes it smooth and rich. The mini chocolate chips are the best part! Start by heating 1 cup of all-purpose flour. Use a microwave-safe bowl. Heat it for about 1 minute. Aim for a temperature of 160°F (70°C). This step makes the flour safe to eat. Let it cool before using it in the dip. In a large bowl, mix the softened butter, brown sugar, and granulated sugar. Use a hand mixer or stand mixer to cream them together. Mix until the texture is fluffy. Next, add the cream cheese, vanilla extract, and salt. Blend until you see a smooth mixture. Now, gradually add the cooled flour to the creamy mixture. Mix on low speed until just combined. It’s okay if some bits of flour remain. Be sure to scrape down the sides of the bowl. This helps to mix everything evenly. Finally, fold in 1/2 cup of mini chocolate chips and 1/2 cup of powdered sugar. Use a spatula to gently mix them in. If the dip feels too thick, add 1-2 tablespoons of milk. Keep adding until you reach your desired consistency. Transfer the dip to a serving bowl and smooth the top with a spatula. You can find the Full Recipe to ensure you have all the steps down perfectly! To get the right texture, start with softened cream cheese. Mix it with butter and sugars. This step helps create a smooth base. If the dip feels too thick, add milk slowly. One tablespoon at a time works best. Mix well after each addition. Aim for a creamy, spreadable dip that isn’t runny. Serve the dip in a fun bowl. You can use a colorful or decorative one. Arrange your dippers around the bowl. Graham crackers, apple slices, or pretzels make great choices. For a special touch, drizzle melted chocolate on top. Sprinkling mini chocolate chips also adds a nice look. This makes the dip more inviting for your guests. This dip works well at parties or casual get-togethers. Pair it with fresh fruits or crunchy snacks. You can even use cookies for an extra treat. It’s great for sharing, so have plenty of dippers ready. Your friends will love the sweet taste of cookie dough. For the full recipe, check the earlier section. {{image_2}} You can change the flavor of your dip to keep it exciting. Try adding a nutty twist with almond or hazelnut extract. A minty version works great too. Just add a few drops of peppermint extract. Both choices give a fun spin to the classic taste. Want to make it more fun? You can add different mix-ins. Chopped nuts like walnuts or pecans add a nice crunch. You can also sprinkle in some colorful sprinkles for a festive look. Mini marshmallows or toffee bits also make great add-ins. Just remember to fold them in gently so they mix well. You don’t have to stick to just graham crackers. Fresh fruit like strawberries or apple slices pair well with the dip. For a crunchy option, try pretzels or even cookies. The sweet and salty combo works nicely. Each dipper brings its own fun twist to each bite, making it a treat for all! For the full recipe, check out the details above. Enjoy! To store leftover dip, place it in an airtight container. This keeps it fresh and tasty. Make sure to cover the top with plastic wrap for added protection. Store it in the fridge. It should last for about three days. You can freeze the dip for later use. First, place it in a freezer-safe container. Leave some space at the top because it will expand when frozen. Seal it tightly and label it with the date. When you're ready to enjoy it, thaw it in the fridge overnight. The dip is best eaten fresh, but it can last in the fridge for up to three days. If it changes texture or smells off, it's time to toss it. Always check for signs of spoilage before serving. For the best taste, eat it within the first day or two. For a full recipe, check out the earlier section. Yes, you can make this dip ahead of time. I like to prepare it a few hours before serving. This gives the flavors time to meld. Just store it in an airtight container in the fridge. When you’re ready to serve, just give it a quick stir. If it seems thick, add a splash of milk to help it mix. No, raw flour can carry bacteria. To make sure it’s safe, heat it in the microwave. Heat the flour for one minute until it reaches 160°F (70°C). This step kills any harmful bacteria. Always remember to let it cool before mixing it in. If your dip is too runny, don’t worry! You can thicken it easily. Add more flour, a tablespoon at a time, until you reach the right texture. If you want a creamier dip, add more cream cheese. Mix well after each addition to check the consistency. Yes, you can substitute cream cheese. Use Greek yogurt for a lighter option. It makes the dip tangy and creamy. You can also try mascarpone cheese for a richer taste. Just keep in mind, different cheeses will change the flavor a bit. This post covered a tasty cream cheese dip recipe. We discussed the key ingredients and shared step-by-step instructions. You learned helpful tips for perfecting the dip's texture and presentation. I also shared fun variations and storage advice. Now, you have the tools to create this delicious treat. Get creative with flavors and dippers. Enjoy making and sharing this dip with friends and family!

Chocolate Chip Cookie Dough Dip Irresistible Treat

If you’re craving a sweet treat that’s simple to make and oh-so-delicious, you need to try my Chocolate Chip Cookie

- 2 large sweet potatoes, peeled and cut into thin fries - 2 tablespoons olive oil - 1 teaspoon garlic powder - 1 teaspoon smoked paprika - ½ teaspoon cayenne pepper (optional for heat) - Salt and freshly ground black pepper, to taste - Fresh parsley, chopped (for garnish) When I make baked sweet potato fries, I love using fresh ingredients. Sweet potatoes are the star here. They provide a sweet flavor and a bright orange color. I start with two large sweet potatoes. I peel them and slice them into thin fries. Thin fries cook better and get crispier in the oven. Next, I grab two tablespoons of olive oil. This oil adds richness and helps the fries crisp up nicely. I also use a teaspoon of garlic powder for flavor. Garlic powder adds a warm, tasty kick. I add a teaspoon of smoked paprika too. It gives a hint of smokiness that pairs well with sweet potatoes. If you like a bit of heat, add ½ teaspoon of cayenne pepper. This step is optional but fun! Finally, I sprinkle salt and freshly ground black pepper to taste. These spices enhance the taste of each fry. I finish with fresh parsley, chopped finely. It adds color and a fresh touch when I serve the fries. For a full recipe, check out the detailed instructions provided. - Preheat oven to 425°F (220°C). - Line a baking sheet with parchment paper. Start by preheating your oven. This step ensures your fries cook evenly and get that nice crisp. While the oven warms up, prepare your baking sheet. Parchment paper helps prevent sticking and makes cleanup easy. - Toss sweet potatoes with olive oil. - Add spices and ensure even coating. - Spread fries on baking sheet and bake. Next, take your sweet potatoes and place them in a large bowl. Pour in the olive oil and mix well. This will help the fries crisp up nicely. Then, add the garlic powder, smoked paprika, cayenne pepper, salt, and pepper. Mix again until all fries are coated in spices. Now, spread the sweet potato fries in a single layer on your lined baking sheet. Avoid crowding the fries. This helps them cook evenly and become crispy. Bake them for 20 to 25 minutes. - Flipping fries for even cooking. - Cooling and garnishing before serving. Halfway through baking, flip your fries. This ensures that both sides get golden and crispy. Once they look perfect, take them out of the oven and let them cool for a few minutes. Before serving, sprinkle some fresh parsley on top for color and flavor. Serve warm and enjoy! For the complete recipe, check out the Full Recipe. To get that ideal crunch, avoid overcrowding the baking sheet. Space is key! If fries touch, they steam instead of crisp. Lay them out in a single layer. Also, stick to the recommended baking time of 20 to 25 minutes. Flip them halfway for even cooking. This step helps both sides get golden and crispy. You can customize flavors using herbs and spices. Try adding rosemary or cumin for a twist. If you love heat, mix in some chili powder. For a great finish, consider serving with dips. Pair your fries with yogurt sauce or spicy ketchup. These options enhance the taste of your sweet potato fries. {{image_2}} You can customize your baked sweet potato fries with different seasonings. Here are some tasty ideas: - Sweet and spicy blends: Mix cinnamon and cayenne for a surprising kick. This combo adds warmth and sweetness, making each bite exciting. Try blending brown sugar with chili powder for a tasty twist. - Herb-infused variations: Use fresh or dried herbs like rosemary or thyme. These herbs add a bright flavor that pairs well with sweet potatoes. Experimenting with herbs can elevate your fries to a new level. Pair your baked sweet potato fries with main dishes for a complete meal. They go well with grilled chicken, fish tacos, or veggie burgers. You can also serve them with healthier dips. Try yogurt-based dips or hummus for a nutritious option. You can even add a sprinkle of feta cheese for a creamy touch. To store leftover baked sweet potato fries, let them cool first. Place them in an airtight container. This helps keep them fresh. Store in the fridge for up to three days. If you want to store them longer, freezing is a good option. Freeze the fries in a single layer on a baking sheet. Once they are frozen, transfer them to a freezer bag. They can last for up to three months in the freezer. To reheat your sweet potato fries, the oven is your best bet. Preheat it to 400°F (200°C). Spread the fries on a baking sheet and bake for about 10 to 15 minutes. This method keeps the fries crispy. The microwave is quick but can make them soggy. If you use the microwave, heat them for 30 seconds. Check and heat again if needed, but keep an eye on them. The oven gives better results for crispiness. You can also check the [Full Recipe] for more details. How long to bake sweet potato fries for optimal crispiness? I recommend baking sweet potato fries for 20 to 25 minutes. Flip them halfway through. This helps them cook evenly and get crispy. Keep an eye on them toward the end to avoid burning. Can I make baked sweet potato fries in an air fryer? Yes, you can use an air fryer! Preheat it to 400°F (200°C). Cook the fries for about 15 to 20 minutes. Shake the basket halfway through. This method gives a nice crunch while using less oil. What are some healthy dipping sauce ideas for sweet potato fries? Try these healthy dips: - Greek yogurt with herbs - Avocado lime crema - Spicy salsa - Hummus with garlic These sauces add flavor and keep things healthy. Are baked sweet potato fries healthier than regular fries? Yes, baked sweet potato fries are healthier. They have more vitamins and fiber than regular fries. Plus, baking uses less oil, so they have fewer calories. They’re a tasty alternative! Can I use other vegetables to make baked fries? Absolutely! You can use carrots, zucchini, or even beets. Just cut them into similar shapes and adjust the baking time if needed. Each vegetable brings its own unique flavor and nutrition. For the full recipe, check out the earlier section. This blog post covers how to make tasty baked sweet potato fries. You learned about the key ingredients and steps to prepare bright, crispy fries. I shared tips on seasoning and achieving perfect crunch. Variations and storage options ensure your fries can fit any meal. Baked sweet potato fries are nutritious and delicious. With these simple steps, you can enjoy them anytime. Now, you’re ready to create your own perfect batch!

Baked Sweet Potato Fries Flavorful and Easy Recipe

Craving a tasty snack that’s both healthy and easy to make? Look no further than my Baked Sweet Potato Fries!

Older posts
Newer posts
← Previous Page1 … Page31 Page32 Page33 … Page61 Next →

dsad

© 2025 Cooking Wells • Built with GeneratePress

Our Policies

  • Copyright Policy
  • Cookie Policy
  • GDPR Policy
  • Privacy Policy
  • Disclaimer
  • Terms Of Use

More Information

  • Home
  • About
  • Contact
  • Appetizers
  • Dessert
  • Dinner
  • Drinks
©2025, Cooking Wells About Back To Top