Skip to content
DisclaimerTerms Of UseGDPR PolicyCookie Policy

Cooking Wells

  • Home
  • Drinks
  • Appetizers
  • Dinner
  • Dessert
  • About
  • Contact
  • Privacy Policy
DisclaimerTerms Of UseGDPR PolicyCookie Policy

Mia

- 1 lb chicken breast, cut into 1-inch cubes - 1/4 cup honey - 2 tablespoons Sriracha sauce (adjust to taste) - 2 tablespoons soy sauce - 1 tablespoon fresh ginger, grated - 3 cloves garlic, minced - 1 tablespoon sesame oil - 1 teaspoon lime juice - Salt and pepper to taste - Bamboo skewers, soaked in water for 30 minutes (or metal skewers) - Green onions, sliced (for garnish) - Sesame seeds (for garnish) To make the best Honey Sriracha Chicken Skewers, start with fresh, high-quality ingredients. I like to use chicken breast for its lean texture. You can also swap it for chicken thighs for a juicier bite. Marinating the chicken is key. Mix honey, Sriracha, soy sauce, ginger, garlic, sesame oil, lime juice, salt, and pepper together in a bowl. This marinade brings out a sweet and spicy flavor that complements the chicken perfectly. - Grill or grill pan - Mixing bowl - Basting brush - Tongs For cooking, you will need a grill or a grill pan. A good mixing bowl helps in combining the marinade and chicken. Use a basting brush to apply extra marinade while grilling. Tongs are great for flipping the skewers without losing any juicy bits. - Chicken thighs instead of breast - Agave nectar as a honey substitute - Different hot sauces for varied flavor If you want a twist, try using agave nectar instead of honey. It adds a nice flavor, too. You can also change the heat level by using a different hot sauce. This way, you can make your skewers just how you like them! To start, grab a mixing bowl. In this bowl, combine the honey, Sriracha sauce, soy sauce, grated ginger, minced garlic, sesame oil, lime juice, salt, and pepper. Mix these well until you see a smooth blend. This marinade will add great flavor to the chicken. Next, add the cubed chicken breast to the bowl. Make sure every piece gets coated evenly. This step is key for a tasty outcome. Now, cover the bowl and place it in the refrigerator. You can let it marinate for at least 30 minutes. If you have time, going up to 2 hours is even better. The longer the chicken sits in the marinade, the more flavor it absorbs. This time allows the spices and sauces to penetrate the meat. You will taste the difference! Before grilling, preheat your grill or grill pan over medium-high heat. While it heats, thread the marinated chicken onto the soaked bamboo skewers. Pack the pieces snugly but avoid overcrowding them. Once the grill is hot, place the skewers on it. Grill for about 10 to 12 minutes. Turn the skewers occasionally. This helps to get nice grill marks and cook evenly. The chicken is ready when it reaches an internal temperature of 165°F (75°C). After grilling, let the skewers rest for a few minutes before serving. This keeps them juicy. Don’t forget to garnish with sliced green onions and sesame seeds for a pop of color! For the full recipe, check out the detailed instructions. Marinating the chicken is key to great flavor. I suggest marinating for at least 30 minutes. If you have time, go for 2 hours. This allows the chicken to soak up all the tasty notes. You can also adjust the Sriracha sauce. If you want it mild, use less. For more heat, add a bit more. Taste as you go! When grilling, it's important to check the chicken's temperature. I recommend using a meat thermometer. The chicken should reach 165°F (75°C) for safety. Avoid overcrowding the skewers. Leave space between each piece. This helps the chicken cook evenly and get those nice grill marks. For garnishing, sprinkle sliced green onions and sesame seeds on top. This adds color and crunch. You can serve the skewers on a bed of jasmine rice or with a fresh green salad. Both pair beautifully with the flavors of the chicken. You could even offer extra Sriracha on the side for those who enjoy a spicy kick! {{image_2}} You can switch up the protein in these skewers. Try using shrimp for a lighter taste. Tofu is a great choice for a vegetarian option. Just make sure to press it first to remove excess water. You can also use vegetables like bell peppers, zucchini, or mushrooms. They grill well and soak up flavor. To add even more taste, mix in fresh herbs. Cilantro and basil are tasty choices. You can also try different sauces or spices for unique flavors. Teriyaki sauce will give a sweet twist, while lime zest can add brightness. Customizing the flavor makes each meal special. These skewers shine as both appetizers and main dishes. Serve them over a bed of jasmine rice for a filling meal. A fresh green salad pairs well, too. You can even make a platter with different dipping sauces. This makes them fun to share at parties. For those who crave heat, offer extra Sriracha on the side. Check the Full Recipe for more ideas on how to enjoy your skewers! After enjoying your Honey Sriracha Chicken Skewers, store leftovers in an airtight container. Keep them in the fridge. They stay fresh for up to three days. Be sure to let them cool before sealing. They will taste great again when you reheat them! You can freeze the grilled skewers for later use. Place them in a freezer-safe bag or container. Remove as much air as possible to prevent freezer burn. They can last up to three months. When you're ready to eat, thaw them in the fridge overnight. Reheat them on the grill or in a pan until warm. Pre-marinating chicken is a great way to save time. You can marinate the chicken the night before. This gives the chicken more flavor. Use the skewers for lunchboxes or quick dinners. Pair them with rice or salad for a balanced meal. They are easy to grab and go! For the full recipe, check out the details above. I recommend marinating the chicken for at least 30 minutes. This time helps the chicken soak up the sweet and spicy flavors. If you have more time, let it marinate for up to 2 hours. Longer marinating gives the chicken a deeper taste. Yes, you can use other proteins. Chicken thighs work great if you want more flavor. If you prefer seafood, shrimp is a tasty option. For a vegetarian version, try using tofu or even large mushrooms. Just make sure to adjust the cooking times based on what you choose. These skewers pair well with several sides. Serve them over jasmine rice for a filling meal. A fresh green salad adds a nice crunch. You can also offer dipping sauces, like extra Sriracha or a cool yogurt sauce. Feel free to get creative with your sides! To amp up the heat, add more Sriracha to the marinade. You can also incorporate chopped fresh chili peppers for an extra kick. If you love heat, try a dash of cayenne pepper or crushed red pepper flakes. Just remember to taste as you go! In this article, we covered how to make delicious honey Sriracha chicken skewers. We went through the essential ingredients, step-by-step grilling instructions, and helpful tips to enhance flavor. You learned about variations and serving suggestions, plus how to store leftovers safely. Grilling these skewers can become a fun activity. With the right marinade and care, you will impress your friends and family. So gather your ingredients and get grilling for a tasty meal today!

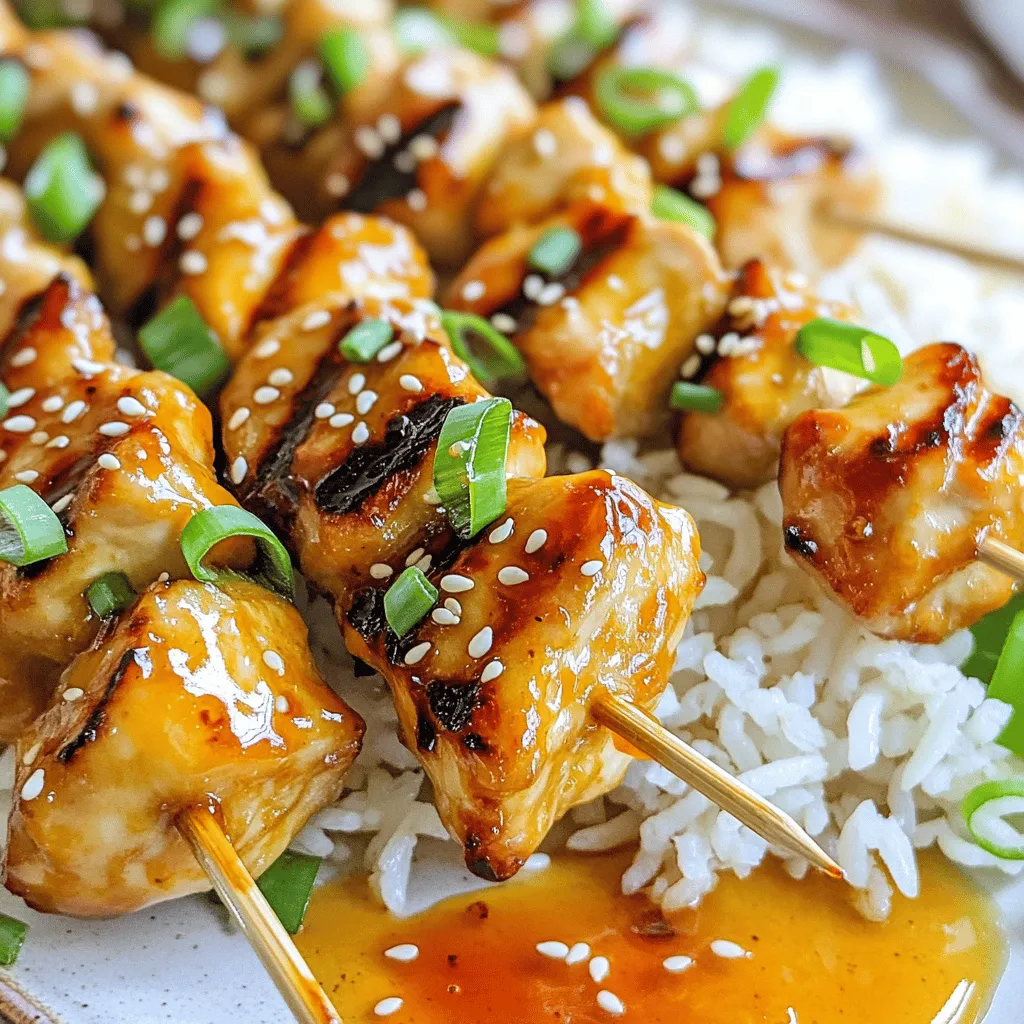
Honey Sriracha Chicken Skewers Flavorful Grilled Treat

Get ready to fire up your grill! These Honey Sriracha Chicken Skewers bring a mouthwatering blend of sweet and spicy

- 2 cups broccoli florets - 2 cups cauliflower florets - 1 cup cherry tomatoes, halved - 1 bell pepper (any color), diced - 1 medium zucchini, sliced - 1 medium red onion, sliced - 4 cloves garlic, minced - 3 tablespoons olive oil - 2 teaspoons mixed dried herbs (oregano, thyme, basil) - Salt and pepper to taste - Fresh parsley for garnish - Prep time: 15 minutes - Total time: 45 minutes - Servings: 4 Gather these fresh ingredients to make Garlic Herb Roasted Veggies. Use vibrant veggies that catch your eye. Each vegetable adds its own flavor and texture. The mix of broccoli and cauliflower gives a nice crunch. Cherry tomatoes add a pop of sweetness, while the bell pepper adds color. Zucchini keeps things light and tender, and red onion brings depth. For seasoning, garlic is a must. It gives that strong, bold flavor we love. Olive oil helps everything roast perfectly. The dried herbs bring a lovely aroma and taste. Salt and pepper enhance all the flavors. Finally, fresh parsley adds a bright finish. You can prep this in just 15 minutes. Then, roast them for about 25-30 minutes. This dish serves four, making it great for family meals or gatherings. Check out the Full Recipe for more details. You should preheat your oven to 425°F (220°C). This is important because the right temperature helps the veggies roast evenly. If the oven is not hot enough, the veggies may steam instead of roast. Roasting brings out their natural sweetness and flavor. Start by washing your vegetables well. Use cold water to remove dirt and grit. Next, cut them into uniform pieces. This ensures they cook at the same rate. For this dish, chop the broccoli and cauliflower into florets. Slice the zucchini and red onion. Dicing the bell pepper and halving the cherry tomatoes will add a nice pop of color. In a large bowl, combine all your chopped veggies. Take a small bowl and whisk together minced garlic, olive oil, dried herbs, salt, and pepper. Drizzle this mixture over the veggies. Toss everything well to coat every piece. This step is key to ensure that each bite bursts with flavor. Spread the coated veggies out on a baking sheet. Make sure they are in a single layer. This helps them roast evenly. You should roast them for about 25-30 minutes. Stir halfway through to ensure they brown nicely. When done, the veggies should be tender and slightly caramelized. Enjoy this simple yet flavorful dish as a side! To avoid sogginess, make sure your veggies are dry. After washing, pat them with a towel. Moisture leads to steaming, not roasting. Cut your vegetables into similar sizes. This helps them cook evenly. For even cooking, use a large baking sheet. Spread the veggies out in a single layer. Crowding them can trap steam. Stir the veggies halfway through cooking. This helps them brown nicely on all sides. You can add more herbs for extra flavor. Fresh thyme and rosemary work great. A sprinkle of red pepper flakes adds a nice kick. Try different spices like cumin or paprika for a twist. For alternative oils, consider avocado or grapeseed oil. These oils have high smoke points. They can give your veggies a unique taste. You can also mix oils for a richer flavor. To serve, place the veggies in a colorful dish. A white plate makes their colors pop. Garnish with fresh parsley or basil. A squeeze of lemon juice adds brightness. You can also serve with a dipping sauce. Hummus or yogurt dip pairs well. For a special touch, sprinkle with grated cheese. For the full recipe, check the detailed instructions above. {{image_2}} You can change the veggies based on the season. In summer, you can use fresh zucchini, bell peppers, and cherry tomatoes. In fall and winter, root veggies like carrots and sweet potatoes work great. They add sweetness and heartiness. You can mix and match your favorites. Try adding asparagus in spring or Brussels sprouts in winter. Each season brings new flavors. This recipe is easy to adapt for special diets. It is vegan and gluten-free. Just check the ingredients you use. For added protein, try chickpeas or lentils. They pair well with the veggies. You can also add nuts or seeds for a crunch. This way, you make your meal more filling and nutritious. You can roast or grill these veggies. Roasting gives them a nice caramelized flavor. Grilling adds a smoky touch. If you prefer a quicker method, use an air fryer. Cut the cooking time by about 5-10 minutes. Just ensure you check for tenderness. Each method brings out unique flavors, so try them all! For the full recipe, check out the detailed instructions above. To keep your garlic herb roasted veggies fresh, use the right storage method. Place any leftovers in airtight containers. This helps prevent moisture loss and keeps flavors intact. Store them in the fridge if you plan to eat them within a few days. For best taste, enjoy them within three to five days. When it's time to enjoy your leftovers, you have two main options: the microwave or the oven. For quick reheating, the microwave works well. Just place the veggies in a bowl and heat for a minute or two. Stir halfway to ensure even heating. If you prefer a crispy texture, use the oven. Preheat it to 350°F (175°C) and spread the veggies on a baking sheet. Heat for about 10 to 15 minutes until warm and slightly crisp. If you want to save your roasted veggies for later, freezing is a great option. First, let them cool completely. Spread the veggies in a single layer on a baking sheet. Freeze until solid, then transfer them to a freezer-safe bag or container. This method helps avoid clumping. When you're ready to use them, simply take out the amount you need. Thaw in the fridge overnight or use the microwave for a quick thaw. Enjoy your garlic herb roasted veggies whenever you want! For the complete recipe, check out the Full Recipe. Roasting time depends on the veggie type. Most veggies take about 25 to 30 minutes. For softer veggies like zucchini, check them at 20 minutes. Harder veggies like carrots may need a bit longer. Stir halfway through roasting for even cooking. They should be tender and slightly caramelized when done. Yes, you can use frozen vegetables. Frozen veggies are quick and easy. They can save time, but they may lack the crispiness of fresh. Fresh veggies have better flavor and texture. If using frozen, roast them for a shorter time. You want to avoid mushy results. These roasted veggies pair well with many dishes. Try serving them with grilled chicken or fish. They also go great with pasta or rice. For a vegetarian option, serve them over quinoa or in a salad. Their bold flavor enhances any meal. To add heat, sprinkle red pepper flakes over the veggies. You can also mix in diced jalapeños for a fresh kick. Another option is to use a spicy herb blend. Taste as you go to find your perfect heat level. Enjoy the extra flavor boost! This blog post detailed how to make Garlic Herb Roasted Veggies. We covered the right vegetables, seasonings, and steps to prepare them. I shared tips for perfect roasting and ideas for serving. You can easily adjust the recipe to fit your needs. Keep these points in mind as you try it out. Enjoy the process and the tasty results. You'll impress your family and friends with your cooking skills. Happy roasting!

Garlic Herb Roasted Veggies Simple and Flavorful Side

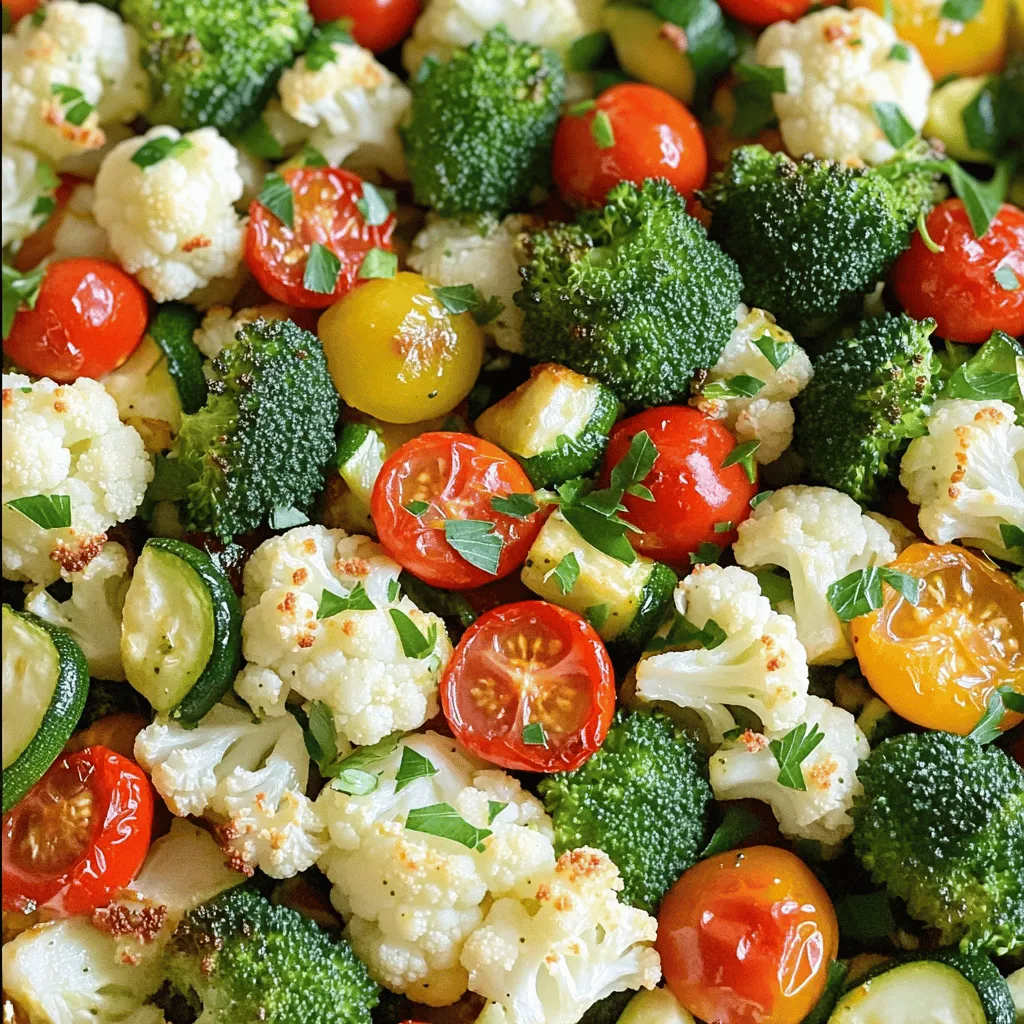
Looking for a simple yet delicious side dish? Garlic Herb Roasted Veggies are just what you need! This easy recipe

- 1 cup quinoa - 1 cup cherry tomatoes, halved - 1 cucumber, diced - 1 bell pepper (red or yellow), diced - 1/4 red onion, finely chopped - 1/2 cup Kalamata olives, pitted and sliced - 1/2 cup feta cheese, crumbled - 1/4 cup fresh parsley, chopped Quinoa is the star of this bowl. It is a protein-rich grain that cooks up fluffy and tasty. Fresh vegetables bring a crunch and burst of flavor. I love adding cherry tomatoes, cucumber, bell peppers, and red onion for a colorful mix. Kalamata olives and feta cheese add that classic Greek taste. Fresh parsley makes it look pretty and adds freshness. - 3 tablespoons olive oil - 2 tablespoons lemon juice - 1 teaspoon dried oregano - Salt and pepper to taste The dressing is simple but packs a punch. Olive oil gives a rich base. Fresh lemon juice adds tang, while oregano brings in that Mediterranean flavor. A pinch of salt and pepper makes everything taste better. Whisk these together to create a bright dressing that enhances the dish. - Calories per serving: About 350 - Fats: 15g - Carbs: 45g - Proteins: 10g This Greek quinoa bowl is not just tasty; it’s also good for you. Each serving has around 350 calories, making it a filling meal. The fats come mostly from olive oil and feta cheese, which are healthy fats. Quinoa gives you good carbs, while the veggies and feta boost your protein intake. Eating it feels great for both your body and your taste buds. For the full recipe, refer to the section above. Start by boiling the vegetable broth or water. Use a medium saucepan for this. Bring it to a boil over high heat. This step is quick and easy. Once the broth is boiling, add the rinsed quinoa. Stir it gently to mix. Reduce the heat to low. Cover the saucepan and let it simmer for about 15 minutes. The quinoa will soak up the broth. After 15 minutes, remove it from the heat. Let it sit covered for 5 more minutes. This helps it become fluffy. Use a fork to fluff the quinoa before serving. Now, let’s chop the fresh vegetables. Start with the cherry tomatoes. Cut them in half and set them aside. Next, take the cucumber and dice it into small pieces. Do the same with the bell pepper. You can use red or yellow, depending on your taste. Finely chop the red onion, as it adds a nice zing. Slice the Kalamata olives as well. Finally, crumble the feta cheese. You can adjust the amount based on your liking. Mix all these vegetables in a large bowl. It’s time to bring everything together. First, add the cooked quinoa to your large bowl of vegetables. Pour the dressing over the top. To make the dressing, whisk together olive oil, lemon juice, dried oregano, salt, and pepper in a small bowl. Once the dressing is ready, gently toss everything together. Make sure all the ingredients are well mixed. This way, every bite is full of flavor. For a nice touch, sprinkle fresh parsley on top before serving. You can find the complete recipe [here](#). To make great quinoa, the water-to-quinoa ratio matters. I usually use 2 cups of liquid for every 1 cup of quinoa. This ensures the quinoa cooks perfectly and becomes fluffy. After cooking, let it sit covered for 5 minutes. This step helps it absorb any extra moisture. Then, fluff the quinoa gently with a fork. This light touch keeps it airy and prevents clumping. Adding flavor is key to a Greek quinoa bowl. I suggest using dried oregano, which gives a great Mediterranean taste. Fresh herbs like parsley or mint can also make a big difference. Don’t forget about the acidity! A splash of lemon juice brightens the dish. It balances the rich flavors and adds a fresh zing. When serving, think about proteins that pair well. Grilled chicken or shrimp work nicely. For a vegetarian option, try chickpeas or lentils. These add protein and texture. For a beautiful presentation, serve in individual bowls. Layer the quinoa first, then add your veggies and drizzle with dressing. This creates an eye-catching dish that looks as good as it tastes! For the full recipe, check out the Mediterranean Quinoa Delight! {{image_2}} You can boost your Greek quinoa bowl with proteins like chicken, shrimp, or chickpeas. Grilled chicken adds a nice, smoky flavor. Shrimp cooks quickly and gives a seafood twist. Chickpeas are perfect for a hearty, plant-based option. Each choice adds texture and nutrients. Simply cook the protein, then mix it into your bowl. If you're aiming for a vegetarian or vegan meal, you can swap cheese or dressings. Instead of feta, try vegan cheese or avocado for creaminess. For dressing, use tahini or a mix of olive oil and vinegar. These swaps keep the flavors bright and tasty. You can still enjoy a delicious meal without dairy. Seasonal vegetables and herbs can elevate your Greek quinoa bowl. In spring, add fresh peas or asparagus. Summer is great for zucchini or bell peppers. In fall, try roasted butternut squash or Brussels sprouts. Winter herbs like rosemary or thyme can add warmth. Using what's fresh makes each bowl unique and flavorful. To store your Greek quinoa bowl, first let it cool down. Once cool, place it in an airtight container. This keeps the flavors fresh. You can store it in the fridge for up to three days. Label the container with the date. This helps you remember when you made it. When you want to enjoy your quinoa bowl again, you can reheat it in a few ways. The microwave is quick and easy. Place your bowl in the microwave for 1-2 minutes. Stir it halfway through for even heating. You can also use a stovetop. Add a splash of water to keep it moist. Heat it over low heat until warm. If you want to save your Greek quinoa bowl for later, freezing is a great option. First, let it cool completely. Then, transfer it to a freezer-safe container. Make sure to leave some space at the top for expansion. You can freeze it for up to three months. To thaw, move it to the fridge overnight. Once thawed, reheat it as mentioned above. Enjoy your tasty meal anytime! A Greek Quinoa Bowl is a colorful and tasty dish. It mixes quinoa with fresh veggies and feta cheese. This bowl draws from Greek flavors, making it both healthy and fun. The dish may have roots in Mediterranean cuisine, where fresh ingredients shine. You get protein from quinoa and nutrition from vegetables, making it a wholesome meal. Yes, you can prep this recipe ahead of time. Cook the quinoa and let it cool. Store it in an airtight container in the fridge. Chop the veggies and set them aside. You can mix everything when you're ready to eat. This saves time and makes meal prep easy. To make this Greek Quinoa Bowl gluten-free, you only need to focus on the ingredients. Quinoa is naturally gluten-free, so you’re already on the right track. Check that your vegetable broth is gluten-free, too. For added crunch, you can substitute feta cheese with a vegan option. This keeps the dish safe for those with gluten sensitivities. You can enjoy all the flavors without worry. For the full recipe, visit the [Full Recipe]. This blog post covered how to create a tasty Greek quinoa bowl. You learned about the essential ingredients, from quinoa to feta cheese. I shared step-by-step instructions for cooking and mixing. Tips helped you perfect flavor and presentation. We also explored variations and storage tips for your leftovers. In conclusion, this dish is simple, healthy, and versatile. Enjoy making it fresh or as meal prep for the week. Happy cooking!

Greek Quinoa Bowl Wholesome and Flavorful Delight

Welcome to the delicious world of the Greek Quinoa Bowl! This wholesome and flavorful dish is packed with fresh veggies,

To make easy shrimp fried rice, you need a few key ingredients: - 2 cups cooked jasmine rice (preferably day-old) - 1 pound shrimp, peeled and deveined - 1 cup mixed vegetables (peas, carrots, and corn) - 2 cloves garlic, minced - 1 small onion, diced These ingredients create a tasty base. Day-old jasmine rice works best because it fries well. Fresh shrimp adds a nice touch and flavor. You can also add some optional ingredients for extra taste: - 1 tablespoon oyster sauce - 1 teaspoon sesame oil - Green onions, chopped for garnish These options enhance flavor and presentation without much effort. They make your dish look and taste gourmet. You will need a few tools to make cooking easy: - Large skillet or wok - Spatula - Measuring cups and spoons Using the right tools helps you cook efficiently. A large skillet or wok gives you enough room to stir everything well. For the full recipe, be sure to check out Easy Shrimp Fried Rice. First, let's prepare our shrimp and vegetables. You want to make sure your shrimp is peeled and deveined. This step is quick and easy, so don’t skip it. Dice your onion and chop your mixed vegetables. I like to use a mix of peas, carrots, and corn because it adds color and flavor. Using day-old rice is key for this dish. Freshly cooked rice can be too moist. Day-old rice dries out a bit, which helps it fry better. If you don’t have day-old rice, just spread fresh rice on a tray and let it cool before using. Now, heat 1 tablespoon of vegetable oil in a large skillet or wok over medium-high heat. Once the oil is hot, add minced garlic and diced onion. Stir them for about 2-3 minutes. You want them fragrant and soft. Next, push the garlic and onion to one side. Add the shrimp to the other side of the pan. Cook the shrimp for 2-3 minutes until they turn pink. They should be opaque and firm. After that, mix everything together. Add your mixed vegetables to the pan and sauté for another 2-3 minutes. You want them to be heated through but still crisp. Then, push the mix to one side again. In the empty space, add the last tablespoon of oil. Crack the eggs in and scramble them until cooked. Finally, mix the eggs into the shrimp and vegetable mixture. Now, it’s time to add the rice. Break apart any clumps. Pour in the soy sauce and oyster sauce if you’re using it. Add the sesame oil too. Stir well to coat the rice in sauce. This is when the magic happens! Season your dish with salt and pepper. Stir-fry for another 2-3 minutes until everything is heated through. This ensures all the flavors meld together nicely. When you’re ready, remove the skillet from heat. Garnish your shrimp fried rice with chopped green onions for a fresh touch. Serve it hot and enjoy your easy shrimp fried rice. For more details, check the Full Recipe. To avoid mushy rice, always use day-old jasmine rice. Fresh rice tends to stick together, making it hard to fry. If you don’t have day-old rice, spread fresh rice on a tray to cool. This helps it dry out. For quick cooking, prep all your ingredients before starting. When everything is ready, you can cook fast. Keep the heat high and stir often. This keeps the food from burning and helps it cook evenly. To boost flavor, try adding spices like ginger or paprika. A pinch of these can add depth to your dish. You can also toss in some chili flakes for a kick if you like spice. Using fresh herbs for garnish makes a big difference. Green onions or cilantro add a fresh taste. Just chop them and sprinkle on top before serving. This little touch can brighten the whole dish. To make a vegetarian version, skip the shrimp and add tofu. Tofu soaks up flavors well and adds protein. You can also use more vegetables like bell peppers or broccoli. If you want to switch proteins, you can use chicken or beef too. Just cook them the same way as shrimp. Ensure they are fully cooked before mixing with the rice. {{image_2}} You can easily change the protein in this dish. Chicken works great if you prefer it. Tofu is another good choice for a vegetarian option. Just cut it into small cubes. You can also swap out the mixed vegetables. Try bell peppers, broccoli, or snap peas. Each adds a unique taste and bright color to your meal. To give your shrimp fried rice an Indian twist, add curry powder. It adds warmth and a rich flavor. Just sprinkle about a teaspoon while cooking. If you like heat, try incorporating chili paste. A small spoonful can really spice things up. Adjust the amount based on your taste. Pair your shrimp fried rice with soy sauce on the side. It adds a nice extra flavor. You can also serve it with sweet chili sauce for a sweet kick. Another fun idea is to serve the fried rice in lettuce wraps. Just use large leaves to hold the rice. It makes for a fresh and crunchy bite. To store leftovers, let the shrimp fried rice cool down. Place it in a shallow container. This helps it cool quickly and safely. Use an airtight container to keep it fresh. Glass or plastic containers work well. Make sure to label the container with the date. You can freeze cooked shrimp fried rice. To do this, let it cool completely. Then, pack it in a freezer-safe bag or container. Remove as much air as possible. This helps prevent freezer burn. When you want to eat it, thaw it in the fridge overnight. To reheat, warm it in a skillet over medium heat. Add a splash of water or oil to help it heat evenly. In the fridge, shrimp fried rice lasts about 3 to 4 days. If you freeze it, it can last for up to 3 months. After that, it may lose flavor and texture. Always check for any signs of spoilage before eating. Yes, you can use frozen shrimp. It saves time and is often more affordable. To thaw frozen shrimp, place them in a bowl of cold water. Change the water every 15 minutes until they are thawed. You can also leave them in the fridge overnight. This makes them safe and easy to cook. If you want to skip soy sauce, try using coconut aminos or teriyaki sauce. These options give a nice flavor without the saltiness of soy sauce. You can also use a mix of lime juice and garlic for a fresh taste. Just remember to adjust the amount to your liking. The best rice for fried rice is jasmine rice. It has a light, fluffy texture. Day-old rice works best because it dries out a bit. This prevents the rice from becoming mushy when you cook it. Other options include basmati rice, which is fragrant and fluffy. Avoid sticky rice, as it clumps together. In this blog post, I covered how to make shrimp fried rice. You learned about essential and optional ingredients, like jasmine rice and garlic. I outlined the tools needed and shared step-by-step cooking instructions. Tips helped you avoid mushy rice and enhance flavors. There are variations to try and storage tips for leftovers. With these skills, you can now create your perfect fried rice dish. Enjoy experimenting with flavors and ingredients. Happy cooking!

Easy Shrimp Fried Rice Quick and Tasty Meal

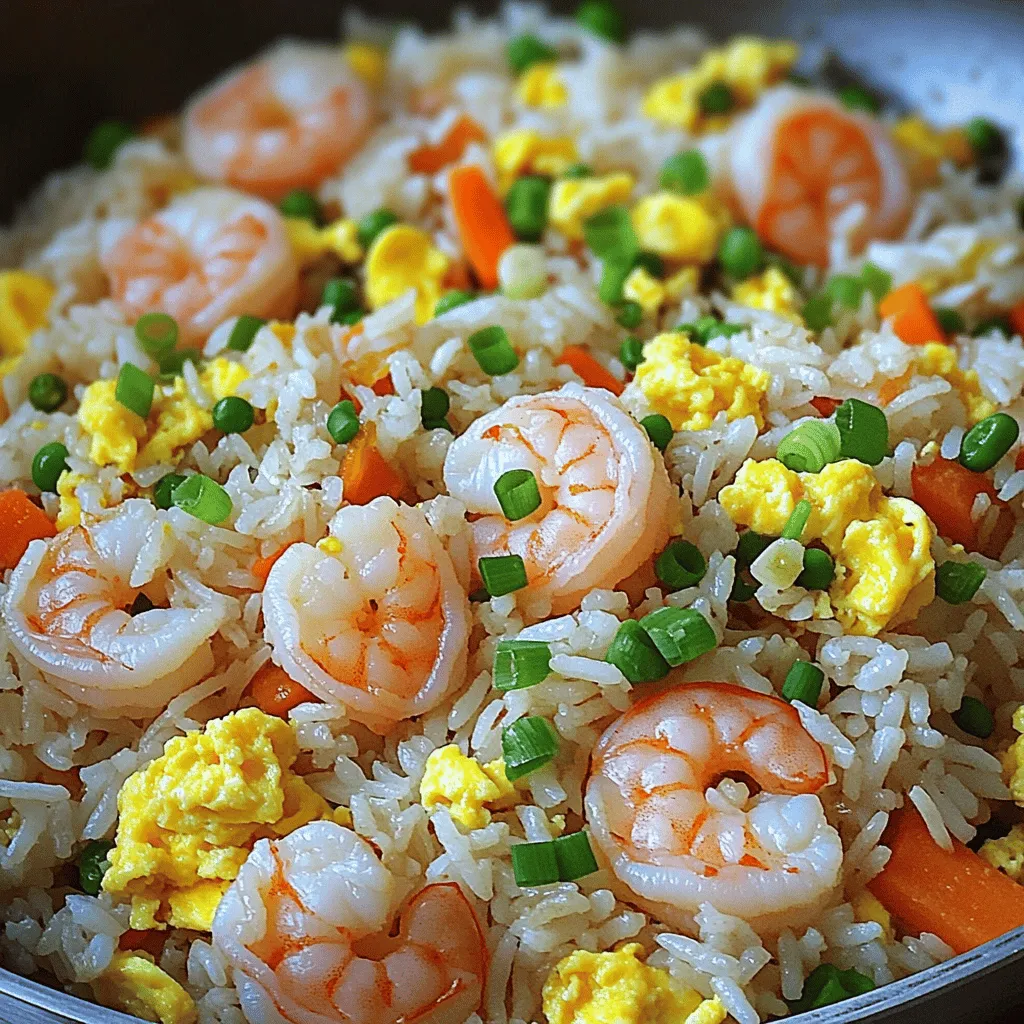
Looking for a quick and tasty meal? Easy Shrimp Fried Rice is your answer! This dish comes together in no

To make delicious BBQ chickpea salad bowls, you need these key ingredients: - 1 can (15 oz) chickpeas, drained and rinsed - 1 cup corn kernels (fresh or frozen) - 1 red bell pepper, diced - 1 cup cherry tomatoes, halved - 1 avocado, diced - 1/4 cup red onion, finely chopped - 1/4 cup fresh cilantro, chopped - 1/4 cup BBQ sauce (your favorite brand) - 2 tablespoons olive oil - 1 tablespoon lime juice - Salt and pepper to taste These ingredients come together to create a bright and tasty salad full of flavor. The chickpeas provide protein, while the veggies add color and crunch. You can customize your BBQ chickpea salad bowls with these optional ingredients: - Tortilla chips for serving - Jalapeños for heat - Cucumber for extra crunch - Feta cheese for creaminess - Quinoa for added protein Feel free to mix and match these options. Each addition can change the flavor and texture of the salad. Choosing the right BBQ sauce can elevate your salad. Here are some brands I recommend: - Sweet Baby Ray’s for a classic taste - Stubb’s for a smoky flavor - Annie’s Organic for a healthier option - Trader Joe’s BBQ Sauce for a unique twist These brands offer great flavor and quality. Pick one that fits your taste, and enjoy the rich flavor it adds to your salad. For the full recipe, check the instructions above. First, grab a medium bowl. Open a can of chickpeas and drain them well. Rinse the chickpeas under cold water. This step helps remove extra salt and makes them nice and clean. Now, add your favorite BBQ sauce to the bowl. Mix well so each chickpea gets coated in sauce. Let the mix sit for about 10 minutes. This waiting time lets the flavors blend. If you use fresh corn, take a skillet and add a splash of olive oil. Heat the oil over medium heat. Add the corn kernels to the skillet. Cook them for about 5 minutes until they are tender. If you use frozen corn, just thaw it first. No need to cook it, simply drain and set it aside. Now, take a large bowl and combine all the ingredients. Add the chickpeas, cooked corn, diced red bell pepper, halved cherry tomatoes, diced avocado, chopped red onion, and cilantro. In a small bowl, mix olive oil and lime juice. Drizzle it over the salad. Toss everything gently to combine. Finally, season your salad with salt and pepper to taste. Spoon the BBQ chickpea salad into bowls. For a crunchy twist, serve with tortilla chips on the side. Enjoy this fresh and flavorful delight! You can find the full recipe [here](#). To make the chickpeas pop with flavor, let them soak in BBQ sauce. I recommend letting them marinate for at least ten minutes. The longer they sit, the more they soak up the sauce. You can also add a pinch of smoked paprika for an extra kick. If you want some heat, try a dash of cayenne pepper. This will give your salad a bold twist. When slicing your veggies, keep them uniform. This helps them mix well in the salad. Use a sharp knife for clean cuts. For bell peppers, remove the seeds before dicing. For cherry tomatoes, cut them in half to release their juices. This adds more flavor. Remember to chop the red onion finely. It balances the sweetness of the other veggies. To keep your BBQ chickpea salad fresh, store it in an airtight container. Place it in the fridge for up to three days. If you add avocado, sprinkle lime juice on it to prevent browning. You can also keep the dressing separate until serving. This way, the salad stays crisp and vibrant. For a fun crunch, add tortilla chips right before eating. Enjoy the fresh and flavorful delight of this salad! {{image_2}} You can make BBQ chickpea salad bowls vegan and gluten-free. Chickpeas are naturally vegan and gluten-free. Use gluten-free BBQ sauce to stay on track. Fresh veggies add great texture and taste. You can also swap the olive oil for a vegan dressing. This way, everyone can enjoy this dish. If you want more protein, try adding diced tofu or tempeh. Both options pair well with the BBQ sauce. Grilled chicken or shrimp can also work if you eat meat. Adding these proteins makes the salad more filling. You can enjoy it as a main dish or a side. You can change up the dressing for different flavors. A simple lemon vinaigrette adds a bright taste. Try a creamy avocado dressing for a rich twist. A spicy chipotle dressing gives the salad a kick. Mix and match to find your favorite flavor. The right dressing can transform the whole dish. For the full recipe, check out the details provided earlier. To keep your BBQ chickpea salad fresh, store it in an airtight container. Place it in the fridge. This helps maintain its taste and texture. Do not add the tortilla chips until you serve. They can get soggy if mixed in. If you have leftover chickpeas, you can freeze them. Rinse and drain them first. Spread the chickpeas on a baking sheet. Freeze them for about two hours. Once frozen, move them to a freezer bag. This keeps them from clumping together. You can use these frozen chickpeas in future salads or dishes. When stored correctly, the salad lasts for about three days in the fridge. After that, it may lose its crunch and flavor. Always check for any signs of spoilage before eating. If you notice any off-smell or texture, it’s best to toss it. Enjoy the BBQ chickpea salad fresh for the best taste! For the full recipe, check the section above. You can use black beans, kidney beans, or lentils. All these options work well. They add protein and flavor. For a nutty twist, try edamame. Each option gives a different taste and texture. Yes, you can! This salad tastes even better after sitting for a bit. Just prepare the salad without adding avocado. Store it in the fridge for up to two days. When ready to eat, add the avocado for freshness. Absolutely! This salad is packed with nutrients. Chickpeas provide protein and fiber. Fresh veggies give vitamins and minerals. Using olive oil offers healthy fats. It's a great choice for a balanced meal. You can enjoy this dish guilt-free! For the full recipe, check out the section above. BBQ chickpea salad bowls offer tasty flavors and easy prep. We covered key ingredients and how to customize your salad. The step-by-step guide makes cooking simple. Remember the tips to boost flavor and keep veggies fresh. Don’t forget the variations for different diets. In closing, this recipe is versatile and fun. You can change it up with your favorite items. Enjoy creating a salad that fits your needs and tastes! It’s a great choice for lunch or dinner.

BBQ Chickpea Salad Bowls Fresh and Flavorful Delight

Looking for a fresh and zesty dish that packs a flavor punch? BBQ Chickpea Salad Bowls are the answer! In

- Coconut milk – You can choose between canned or carton. Canned coconut milk is thicker and richer, while carton is lighter and often has added water. Both work well! - Pineapple chunks – Fresh pineapple gives a bright taste, but frozen is super easy. Frozen pineapple also makes the smoothie cold and thick. - Ripe banana – A ripe banana adds natural sweetness. If it has brown spots, it's perfect! - Greek yogurt or dairy-free alternatives – This adds creaminess and protein. Dairy-free yogurt works great for those avoiding dairy. - Honey or agave syrup – Adjust sweetness according to your taste. Start with a little and add more if needed. - Shredded unsweetened coconut – This gives a nice texture and extra coconut flavor. - Ice cubes – If you want a thicker smoothie, add ice cubes. It makes for a refreshing drink. - Fresh mint leaves for garnish – Mint gives a lovely aroma and looks pretty on top. - Extra shredded coconut for topping – This adds a fun crunch. Sprinkle it on right before serving. To make your Coconut Pineapple Smoothie, start by blending the base ingredients. Gather your coconut milk, pineapple chunks, banana, Greek yogurt, honey, shredded coconut, and vanilla extract. Place all these ingredients in a blender. Blend on high speed until everything is smooth and creamy. This step ensures that all flavors mix well. If you want a colder and thicker smoothie, add a handful of ice cubes. Blend again until the ice is crushed and mixed in. If you like it sweeter, taste the smoothie and add more honey or agave syrup. Blend for a few more seconds to combine. To adjust the thickness, ice cubes work wonders. They not only chill the smoothie but also make it thicker. If you want a smoother texture, use less ice or let your fruits thaw slightly before blending. For blending speed, start on low and then switch to high. This method helps break down the larger pieces first. Blend for about 30 to 60 seconds. Stop and check the texture. If it’s not blended enough, blend for a few more seconds. Pour your smoothie into chilled glasses for a refreshing look. I recommend using tall glasses to show off the vibrant colors. For garnishing, sprinkle extra shredded coconut on top and add a few fresh mint leaves. This adds a burst of color and a nice fragrance. Enjoy the tropical vibe of your Coconut Pineapple Smoothie! For a complete guide, follow the Full Recipe. - Ingredient Temperature: Use cold coconut milk for a refreshing feel. If you use frozen pineapple, it makes the drink extra thick. - Ripe Bananas: Choose ripe bananas. They add natural sweetness and make your smoothie smooth. - Blending Issues: Avoid over-blending. This can make the smoothie too thin. Under-blending leaves chunks. Blend until creamy, but stop before it gets too runny. - Sweetener Control: Don’t add too much honey or agave. You can always add more, but it’s hard to fix if it’s too sweet. - Nutritional Breakdown: Each serving has about 250 calories. It also has healthy fats and protein. - Key Ingredients: Coconut milk has healthy fats. Pineapple offers vitamin C and helps digestion. Together, they create a tasty, nutritious drink. For the complete guide, check out the Full Recipe. {{image_2}} You can mix different fruits with your pineapple. Try mango, passion fruit, or banana for a fun twist. Each fruit adds a new flavor. Use what’s in season for the best taste. Fresh fruits often taste sweeter and better. Frozen fruits can also work well, especially when fresh isn’t available. If you're dairy-free, Greek yogurt can be swapped with coconut yogurt or silken tofu. Both options keep your smoothie creamy. Check labels for gluten-free options if that’s a concern. Most fruits and coconut milk are already gluten-free, making this smoothie a safe choice. Want more nutrition? Add a scoop of protein powder to your mix. It helps keep you full and boosts energy. You can also toss in superfoods like spinach or kale. They add vitamins without changing the taste. Just blend them in with your other ingredients for a health kick. For the complete recipe, check out the Tropical Bliss Coconut Pineapple Smoothie! To store your leftover smoothie, put it in a sealed container. Glass jars work well. Make sure the container is airtight. This keeps the smoothie fresh longer. You can store it in your fridge for up to 24 hours. After that, the taste and texture may change. If you want to save your smoothie for later, freezing is a great option. Pour it into freezer-friendly containers. Leave some space at the top, as liquids expand when frozen. You can freeze it for up to three months. When ready to drink, take it out and let it thaw in the fridge overnight. For a quick thaw, place it under warm running water. After storage, your smoothie may separate. To fix this, just re-blend it. Pour it back into a blender and mix until smooth again. If it's too thick, add a splash of coconut milk to adjust the texture. Blend until you reach your desired consistency. Enjoy your Coconut Pineapple Smoothie just like it was fresh! You can boost your smoothie’s nutrition easily. Adding seeds, like chia or flax, gives fiber and omega-3s. Nuts, such as almonds or walnuts, add protein and healthy fats. You can also mix in spinach or kale. These greens blend well without changing the taste much. They add vitamins and minerals, making your drink even better. Yes, you can prep this smoothie ahead. To keep it fresh, store it in an airtight container in the fridge. It’s best to drink it within 24 hours. If you make it a day before, stir it well before drinking. You may need to add a bit of coconut milk if it thickens. If you can’t find coconut milk, don’t worry! Almond milk, soy milk, or oat milk work great. Almond milk adds a nutty taste, while oat milk is creamy. Each type alters the flavor slightly, but they all blend well with pineapple. Yes, this smoothie is perfect for kids! It has natural sweetness from the banana and pineapple. Greek yogurt gives protein, too. To make it even more appealing, add fun straws or let kids choose their favorite toppings, like extra coconut. For the full guide to making this delicious drink, follow the Tropical Bliss Coconut Pineapple Smoothie recipe. It provides detailed steps to ensure your smoothie is a hit! In this post, we explored how to make a Coconut Pineapple Smoothie. We covered essential and optional ingredients, plus tips for perfect texture and flavor. You learned about various fruits and dietary options to suit your tastes. Remember, using ripe bananas and adjusting sweetness can make a big difference. This smoothie is not only tasty but also packed with nutrients. Enjoy experimenting with different ingredients to find your best mix! For the full recipe, check out the Tropical Bliss Coconut Pineapple Smoothie guide.

Coconut Pineapple Smoothie Refreshing and Nutritious Drink

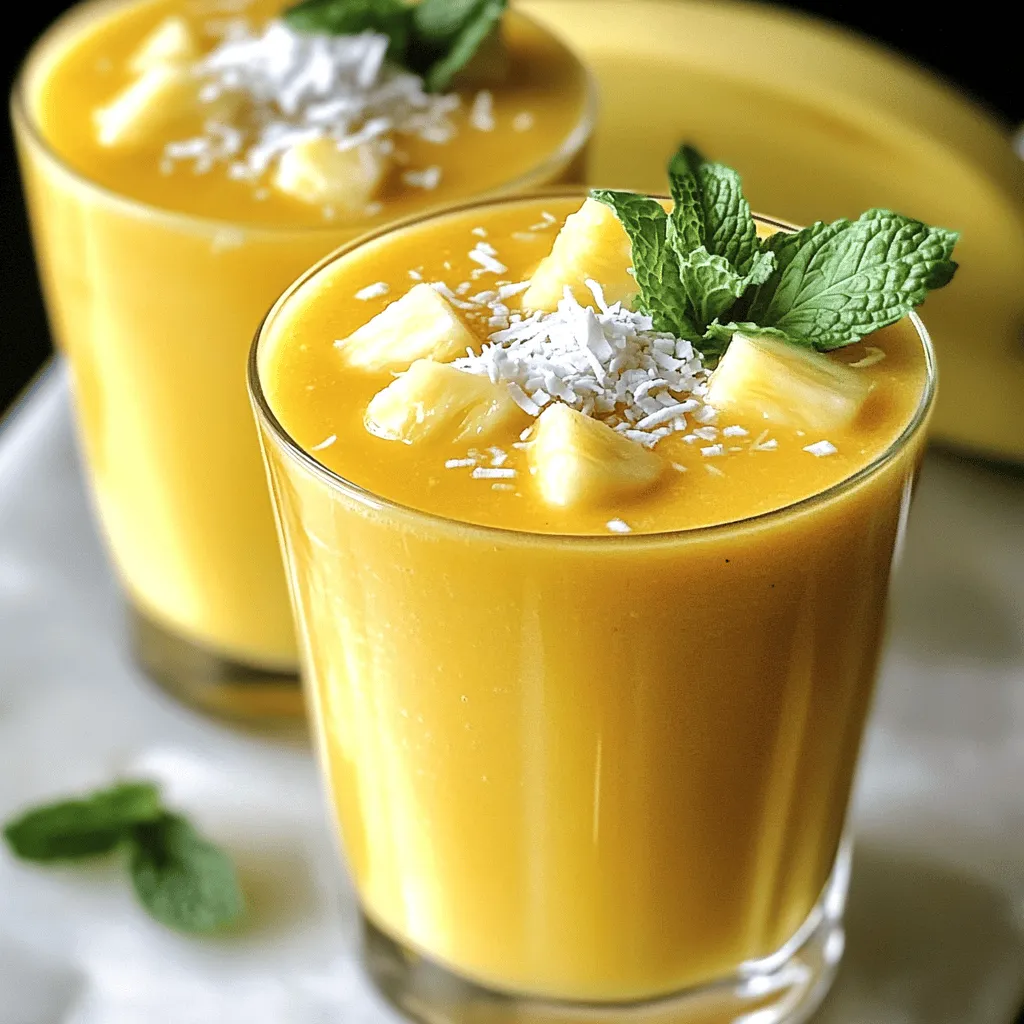
Looking for a drink that’s both refreshing and nutritious? You need to try my Coconut Pineapple Smoothie! Combining creamy coconut

To make Roasted Garlic Mashed Cauliflower, you need a few key ingredients. Here’s what you will need: - 1 large head of cauliflower, cut into florets - 6 cloves of garlic, unpeeled - 2 tablespoons olive oil - 1/4 cup cream cheese, softened - 1/4 cup unsweetened almond milk (or regular milk) - Salt and pepper to taste - Fresh chives, chopped (for garnish) These ingredients create a creamy dish that packs a punch of flavor. The cauliflower serves as a great base. Roasting the garlic adds a sweet and rich taste. You can add a few things to enhance the flavor. Here are some ideas: - Grated Parmesan cheese for a cheesy kick - Fresh herbs like thyme or rosemary for extra aroma - A pinch of nutmeg for warmth - A splash of lemon juice for brightness These add-ins make it easy to customize the dish to your taste. Experiment and find your favorite flavor combinations! Roasted Garlic Mashed Cauliflower is not just tasty; it is also healthy. Here’s a quick look at its nutritional benefits: - Low in calories and carbs compared to regular mashed potatoes - High in fiber, which helps digestion - Packed with vitamins C and K - Contains antioxidants that support overall health This dish is a great choice for anyone looking to eat healthier without losing flavor. You can enjoy it guilt-free! For the full recipe, check out the [Full Recipe]. Start by cutting your large head of cauliflower into small florets. This helps them cook evenly. Next, take six cloves of garlic and leave them unpeeled. The skin protects the garlic and helps it roast perfectly. Toss the cauliflower and garlic together with two tablespoons of olive oil. Make sure every piece is well coated. This oil adds flavor and helps create a nice texture. Preheat your oven to 425°F (220°C) before you start roasting. Spread the cauliflower and garlic on a baking sheet lined with parchment paper. This prevents sticking and makes cleanup easier. Roast them in the oven for 25-30 minutes. You’ll know they are done when the cauliflower is tender, and the garlic is caramelized. Take them out and let them cool for a few minutes. This step is important to avoid burns when you squeeze the garlic. Once cooled, squeeze the roasted garlic cloves out of their skins and into a large bowl with the cauliflower. Add 1/4 cup of softened cream cheese and 1/4 cup of unsweetened almond milk. You can use regular milk if you prefer. Now, use a potato masher or an immersion blender to mash the mixture. Keep mashing until it reaches a smooth and creamy texture. If it feels too thick, add more almond milk to adjust. Finally, season with salt and pepper to taste. Serve hot, adding garnished fresh chives on top for a lovely finish. For the full recipe, check the details provided earlier. When you pick cauliflower, look for heads that are firm and heavy. The leaves should be fresh and green. Avoid any that have brown spots or dark patches. A good head of cauliflower will have tightly packed florets. This means it is fresh and will taste great. One common mistake is overcooking the cauliflower. It can turn mushy and lose flavor. Roast it just until tender. Another mistake is not seasoning enough. Salt and pepper can make a big difference in taste. Always taste your mash before serving. Adjust the seasoning to your liking. You can add more flavor to your roasted garlic mashed cauliflower with spices. Try adding a pinch of nutmeg for warmth. Paprika can give it a nice color and slight heat. If you like herbs, consider using thyme or rosemary. These can bring out the best in your dish. For the full recipe, check the details above. {{image_2}} You can add cheese or herbs to elevate the flavor of your mashed cauliflower. For a rich taste, mix in shredded cheddar or Parmesan cheese. These cheeses melt well and add creaminess. Fresh herbs like rosemary or thyme also work great. They bring a fresh touch that adds depth. If you want a vegan version, swap cream cheese for cashew cream. Soak cashews in water for a few hours, then blend them until smooth. Use plant-based milk, like oat or coconut milk, instead of regular milk. This keeps your dish creamy without dairy. You can also cook cauliflower in an Instant Pot or steamer for quick results. For the Instant Pot, add water and cook on high for 5 minutes. Use a quick release to let the steam out. If you use a steamer, cook the florets for about 10-15 minutes. Both methods keep the cauliflower tender and flavorful. For the full recipe, check the complete guide to Roasted Garlic Mashed Cauliflower. To keep leftovers fresh, first let them cool. Then, place the mashed cauliflower in an airtight container. Make sure to seal it well to avoid air exposure. Store it in the fridge for up to three days. If you want to keep it longer, freezing is a great option. When you're ready to eat, reheat on the stove or in the microwave. If using the stove, heat on low and stir often to prevent sticking. Add a splash of almond milk to restore creaminess. If you're using the microwave, cover the bowl with a lid or wrap. This keeps moisture in and helps it heat evenly. To freeze, spoon the leftovers into a freezer-safe container. Leave some space at the top for expansion. Seal tightly and label it with the date. This dish can freeze well for up to three months. When ready to enjoy, thaw it in the fridge overnight before reheating. For a quick thaw, use the microwave on defrost. For more details on making this dish, check out the Full Recipe. The best way to reheat Roasted Garlic Mashed Cauliflower is on the stove. Place it in a saucepan over low heat. Stir it often, and add a splash of almond milk or cream if it seems too thick. You can also use a microwave. Put it in a microwave-safe bowl, cover it, and heat it for one minute. Check and stir, then heat for another minute if needed. Yes, you can make Roasted Garlic Mashed Cauliflower ahead of time. Prepare it, then let it cool. Store it in an airtight container in the fridge for up to three days. When you are ready to eat, just reheat it. This makes it easy for meal prep or family dinners. Cauliflower is very healthy. It is low in calories and high in fiber. This helps with digestion and may keep you feeling full. Cauliflower is also rich in vitamins C and K. These vitamins help support your immune system and keep your bones strong. Plus, it has antioxidants that fight free radicals in your body. Enjoying this mashed cauliflower dish gives you all these great benefits and a tasty meal. For the complete recipe, check out the Full Recipe section. Roasted garlic mashed cauliflower is a tasty, healthy dish. We covered key ingredients, step-by-step instructions, and helpful tips. I shared versatile options for all diets and cooking methods. Remember to choose fresh cauliflower for the best flavor and texture. Storing and reheating leftovers properly keeps it delicious. Explore all these ideas for a fun cooking experience. Enjoy your meal and its yummy benefits!

Roasted Garlic Mashed Cauliflower Creamy Delight

Are you ready to transform your dinner into something special? Roasted Garlic Mashed Cauliflower is a creamy delight that delights

To make cheesy cauliflower breadsticks, you will need a few key ingredients. Here’s the list: - 1 medium head of cauliflower, riced (about 4 cups) - 1 cup shredded mozzarella cheese - 1/2 cup grated parmesan cheese - 1 large egg - 1 teaspoon garlic powder - 1 teaspoon onion powder - 1 teaspoon Italian seasoning - Salt and pepper to taste These ingredients give the breadsticks a rich and cheesy flavor. The cauliflower acts as the main base, while the cheeses add creaminess. If you want to add a bit more flair, consider these optional garnishes: - 1/4 cup finely chopped fresh parsley Fresh parsley not only adds color but also a refreshing taste. You can sprinkle it on top just before serving. For dipping, I recommend using marinara sauce. It pairs well with the cheesy flavors. You can also try pesto or ranch dressing for a different twist. These sauces enhance the overall eating experience and make each bite even tastier. For the complete details on making these delicious breadsticks, check out the Full Recipe. How to rice cauliflower To rice cauliflower, first, wash the head. Cut it into smaller pieces. Then, use a food processor to pulse the florets. You want it to look like rice grains. This step is key for your breadsticks. Steaming tips After ricing, steam the cauliflower. Place it in a steamer basket over boiling water. Steam for about 5-7 minutes until it is tender. Don’t skip this step; it helps remove moisture. Drain the cauliflower well and let it cool slightly. Use a kitchen towel to squeeze out any extra water. This makes your breadsticks crispier! In a large bowl, mix the riced cauliflower with the other ingredients. Add mozzarella, parmesan, egg, garlic powder, onion powder, Italian seasoning, salt, and pepper. Use a spatula to blend everything well. You want a thick dough-like mix. This step is important for the right texture. Preheat the oven to 425°F (220°C). Line a baking sheet with parchment paper. Spread the cauliflower mix onto the sheet. Shape it into a rectangle about 1/2 inch thick. Bake for 20-25 minutes. Look for a golden brown top to know it's ready. Let it cool, slice, and serve with marinara sauce for a tasty treat! For the full recipe, check the previous section. To get the best texture for your cheesy cauliflower breadsticks, moisture control is key. After steaming the cauliflower, you must squeeze out any extra water. If you skip this step, the breadsticks may become soggy. Aim for a thick dough-like mix. It helps hold the shape when baking. The right blend of cheeses also matters. Use fresh mozzarella for stretch and flavor. One common mistake is not ricing the cauliflower well. Big chunks can lead to uneven baking. Make sure it resembles rice. Another error is overbaking. Keep an eye on them towards the end of the bake time. You want a golden color, not too brown. Lastly, don’t skip the seasoning. Garlic powder and Italian seasoning add great flavor. To boost flavor, try adding herbs like basil or oregano. You can also mix in some red pepper flakes for a spicy kick. If you want a cheesy burst, add more mozzarella. For a unique twist, consider adding sun-dried tomatoes or olives to the mix. These enhancements make each bite delicious. For the full recipe, visit the earlier section. {{image_2}} To make these cheesy cauliflower breadsticks low-carb, focus on the ingredients. Stick to cauliflower, cheese, and eggs. You can skip any high-carb items. Use almond flour instead of regular flour if you want a firmer texture. This keeps the breadsticks keto-friendly while adding a nutty flavor. For a dairy-free version, swap the cheeses. Try using nutritional yeast for a cheesy taste. You can also use vegan cheese. Just ensure it melts well. This option keeps the flavor while making it suitable for those avoiding dairy. You can add spice to your breadsticks with herbs and spices. Consider adding paprika or red pepper flakes for heat. Fresh herbs like basil or cilantro also work well. These additions make each bite more exciting. You can adjust the seasoning based on your taste. Explore different flavors to create your perfect cheesy cauliflower breadsticks. For more details, check the Full Recipe. To keep your cheesy cauliflower breadsticks fresh, start by letting them cool. Once cooled, place them in an airtight container. You can store them in the fridge for up to three days. This keeps them moist and tasty. Make sure to separate layers with parchment paper to avoid sticking. When you are ready to enjoy the breadsticks again, preheat your oven to 350°F (175°C). Place the breadsticks on a baking sheet. Heat them for about 10 to 15 minutes. This way, they get warm and crispy again. You can also use a microwave for a faster option. Heat for 30 seconds at a time until warm, but the oven gives better texture. If you want to save some for later, freezing is a great option. First, let the breadsticks cool completely. Then, wrap each stick in plastic wrap. Place them in a freezer-safe bag or container. They can last in the freezer for up to three months. When you are ready to eat, thaw them overnight in the fridge. Reheat them in the oven for best results. This way, you’ll always have a tasty snack ready! For the complete recipe, check out the Full Recipe. Yes, you can use frozen cauliflower rice. Just thaw it first. Squeeze out extra water. This helps keep your breadsticks from being soggy. Using frozen riced cauliflower can save you time. It’s a great shortcut when you want to make these tasty breadsticks quickly. Cauliflower packs a punch of nutrients. It is low in calories but high in fiber. This helps with digestion. Cauliflower is also rich in vitamins C and K. These vitamins boost your immune system and help with bone health. Plus, it has antioxidants that fight free radicals. This makes cauliflower a smart choice for a healthy diet. Yes, you can make these breadsticks ahead of time. Prepare the mixture and shape it into a slab. Then, cover and refrigerate it for up to 24 hours. When you are ready, just bake it. You can also bake them in advance and store them. Keep them in the fridge for up to three days. Reheat them in the oven for a crispy finish. For the full recipe, check out the earlier section. This blog post covered how to make delicious cauliflower breadsticks. We looked at ingredients, step-by-step instructions, and tips for the best results. I shared storage advice and answered common questions. In summary, these breadsticks fit well into many diets and taste great. You can customize them to suit your needs. Enjoy making these healthy snacks for any meal.

Cheesy Cauliflower Breadsticks Simple and Tasty Recipe

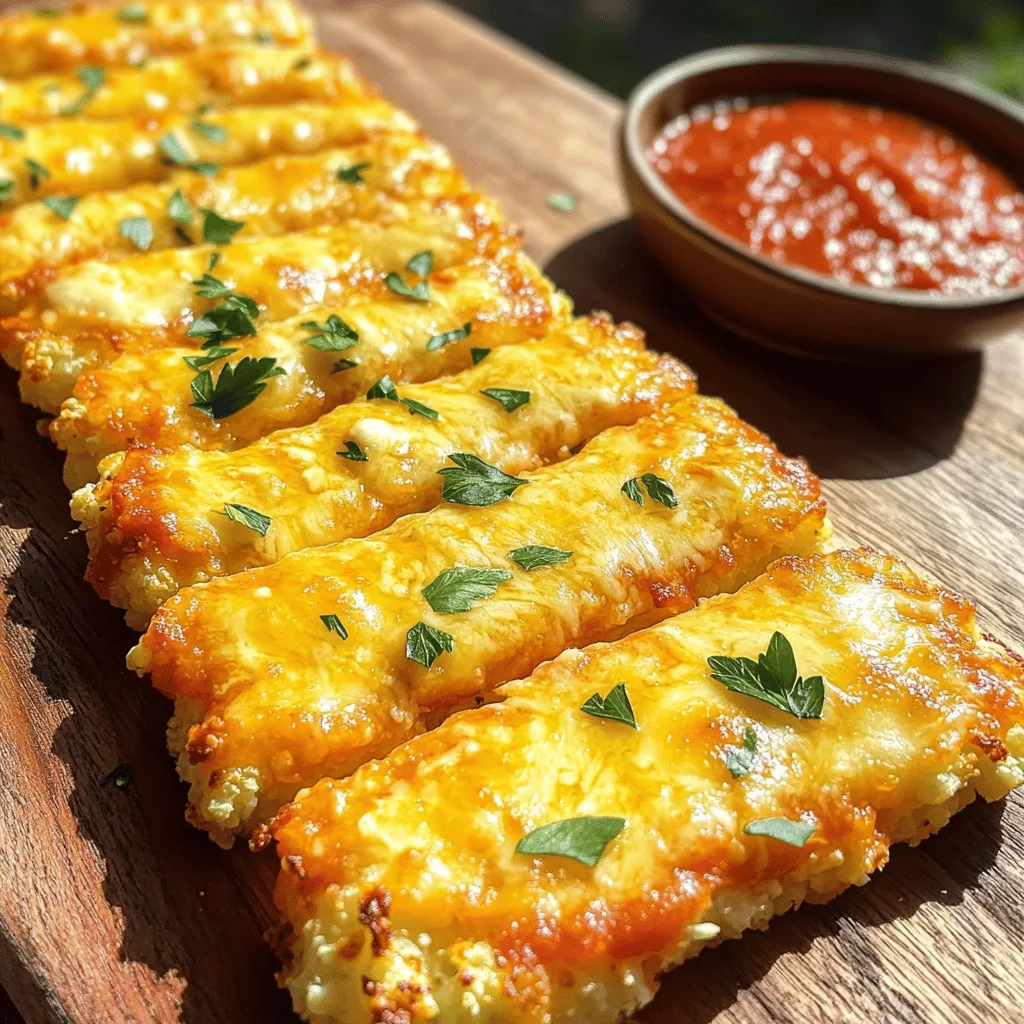
Looking for a tasty snack that’s also healthy? I’ve got you covered with my Cheesy Cauliflower Breadsticks recipe! These breadsticks

- 2 cups fresh raspberries - 1 tablespoon lemon zest - 2 tablespoons fresh lemon juice - 2 tablespoons honey or maple syrup - 3 tablespoons chia seeds - A pinch of salt To make Raspberry Lemon Chia Jam, start with fresh raspberries. They bring bright flavor and color. Lemon zest adds a zesty kick, while lemon juice brightens the entire mix. Sweeten your jam with honey or maple syrup. This will balance the tartness of the raspberries. Chia seeds are the magic ingredient. They thicken the jam and pack in healthy omega-3s. Just a pinch of salt rounds out the flavors. - Additional sweeteners - Flavorful extracts - Fresh herbs for garnish Feel free to adjust the sweetness. You can add more honey or maple syrup if needed. For a twist, consider adding vanilla or almond extract. Fresh herbs like mint or basil can add a unique touch as a garnish. Get creative! The goal is to make your jam truly yours while keeping it healthy. For the full recipe, check the details provided above. To start, gather your fresh raspberries, lemon zest, lemon juice, and sweetener. Place them in a medium saucepan. I love using honey, but maple syrup works too. Heat the mixture over medium heat. Stir occasionally for about 5-7 minutes. You will see the raspberries break down as they cook. The mixture should become syrupy and fragrant. Next, remove the saucepan from the heat. Stir in the chia seeds and a pinch of salt. The chia seeds are key. They will absorb liquid and help thicken the jam. Allow the mixture to cool for about 10-15 minutes. This cooling time is important for the perfect jam consistency. After cooling, take a taste. Adjust the sweetness if needed by adding more honey or maple syrup. Once you are happy with the flavor, transfer the jam to a clean jar. Seal it well and refrigerate. You can enjoy this jam for up to two weeks. The chia seeds will continue to thicken the jam as it chills. For the full recipe, check out the section above. To get the best texture in your jam, watch the cooking temperature. Medium heat works well. If it’s too high, the jam may burn. Stir the mix often to help it cook evenly. After cooking, let the jam cool for about 10-15 minutes. The chia seeds will absorb liquid and thicken the mix. This cooling time is key for the right consistency. When measuring honey or maple syrup, use a liquid measuring cup. This helps you see the amount clearly. Taste the jam before it cools down. If it needs more sweetness, you can add a bit more honey or syrup. Mix well and taste again. You want it just right for your taste buds. Make your jam look pretty in a jar. You can tie a ribbon around the jar or add a cute label. For serving, spread it on toast for breakfast. It also tastes great on yogurt or pancakes. You can even use it as a topping for desserts. The bright color and flavor will impress anyone! {{image_2}} You can mix and match flavors for your Raspberry Lemon Chia Jam. Try adding a berry mix. Use strawberries or blueberries to create a vibrant blend. This mix gives a sweet and tangy taste. It brightens up your breakfast. Alternatively, add a citrus twist. Zest some orange or lime into the jam. This adds a fresh layer of flavor that wakes up your taste buds. Want to make your jam even healthier? You can add superfoods like cinnamon or turmeric. These spices not only add flavor but also boost nutrition. Cinnamon can help with blood sugar. Turmeric has anti-inflammatory benefits. You can also use lower-calorie sweeteners. Try using stevia or monk fruit. These options keep the jam sweet without extra calories. If you follow a vegan diet, you can swap honey for maple syrup. This keeps the jam plant-based and still tasty. Also, this recipe is gluten-free. You don’t need to worry about gluten in chia seeds. This makes it a perfect treat for everyone. Enjoy this jam on toast, yogurt, or even in desserts. For the full recipe, check out the [Full Recipe]. To keep your raspberry lemon chia jam fresh, seal it tightly in a jar. Use a clean spoon each time you scoop out jam. This helps prevent bacteria from growing. The ideal temperature for your refrigerator is around 34°F to 40°F. This cooler range keeps your jam tasty and safe to eat. If you want to store the jam longer, freezing is a great choice. Use an airtight container or freezer-safe jar to prevent freezer burn. Leave some space at the top for expansion. To thaw, move the jar to the fridge for several hours or overnight. You can also run the jar under cool water for a quick thaw. In the fridge, your jam lasts about two weeks. Look for signs of spoilage like mold or an off smell. If you see any changes, it’s best to toss it. Keeping your jam sealed and stored properly helps it stay fresh longer. For more details on how to make this delicious jam, check the Full Recipe. Raspberry Lemon Chia Jam lasts up to two weeks in the fridge. Store it in a clean jar. Make sure the jar is sealed well to keep it fresh. After two weeks, check for any signs of spoilage. If it smells off or looks different, it's best to toss it. Yes, you can use frozen raspberries! Just let them thaw first. Frozen raspberries work well and save time. They may have more water, so cook them a little longer. This helps to get the right jam texture. Chia seeds add fiber, protein, and healthy fats. They are great for digestion and can help keep you full. They also contain omega-3 fatty acids, which are good for heart health. Plus, they help thicken the jam without using pectin. Absolutely! You can lower the sweetener to fit your taste. Start with less honey or maple syrup and taste as you go. The natural sweetness from the raspberries and lemon will still shine through. To make this jam without added sugar, skip the sweeteners altogether. Use ripe, sweet raspberries for natural sweetness. You can also add a bit of mashed banana for extra flavor and sweetness. This keeps the jam tasty and healthy. For the full recipe, check out the instructions above. This blog shared how to make Raspberry Lemon Chia Jam. I covered ingredients, cooking steps, and helpful tips. You learned about mixing flavors and health boosts too. Remember to store it right for best taste. Experimenting with this recipe can lead to yummy variations. Enjoy your jam on toast or in yogurt. Making it your way makes it special. I hope you feel inspired to create.

Raspberry Lemon Chia Jam Flavorful Healthy Spread

If you’re on the hunt for a tasty yet healthy spread, you need to try Raspberry Lemon Chia Jam! Packed

- 4 large flour tortillas - 1 cup black beans, rinsed and drained - 1 cup bell peppers (red, yellow, green), diced - 1 small red onion, diced - 1 cup spinach, chopped - 4 large eggs - 1/2 cup shredded cheese (cheddar or Mexican blend) - 1 avocado, sliced - 2 tablespoons olive oil - 1 teaspoon ground cumin - 1 teaspoon smoked paprika - Salt and pepper to taste - Salsa and fresh cilantro for serving I love starting my day with a tasty breakfast burrito. These burritos are packed with flavors and nutrients. You need the right mix of ingredients to make them shine. First, let’s talk about the base: the flour tortillas. They hold everything together and give a soft bite. Next, black beans add protein and fiber. Bell peppers bring a sweet crunch and vibrant color. Diced red onion adds a zesty kick. Spinach adds freshness and is a great way to sneak in greens. Now, we can’t forget the eggs. They give the burrito a creamy texture. Shredded cheese melts beautifully and adds richness. Slices of avocado on top make each bite creamy and delicious. You can also customize your burrito. If you like mushrooms or zucchini, feel free to add those. Want some heat? Toss in jalapeños or a splash of hot sauce. If you're plant-based, swap the eggs for tofu or use plant-based cheese. This mix of ingredients makes for a satisfying breakfast. For the full recipe, check out the section below where I break down each step. Enjoy exploring these flavorful options! Start by heating 2 tablespoons of olive oil in a large skillet over medium heat. Add the diced bell peppers and red onion. Sauté them for about 5 minutes until they soften. This brings out their amazing flavors. Next, stir in 1 cup of chopped spinach. Cook for an additional 2-3 minutes until it wilts. Finally, add 1 cup of rinsed black beans, 1 teaspoon of ground cumin, and 1 teaspoon of smoked paprika. Mix everything well and let it cook for 2 more minutes. Remove from heat and set aside. In a bowl, whisk together 4 large eggs with a pinch of salt and pepper. This adds flavor and keeps the eggs fluffy. In a separate non-stick skillet, pour in the egg mixture. Scramble the eggs over medium heat for 3-4 minutes. Stir gently until they are just set. You want them soft but not runny. Take a large flour tortilla and lay it flat on a clean surface. In the center, add a generous portion of the veggie-bean mix. Next, scoop in some of the scrambled eggs. Sprinkle 1/2 cup of shredded cheese on top. For a creamy touch, add a few slices of avocado. Fold the sides of the tortilla over the filling. Then roll it up tightly from the bottom to the top. Make sure everything stays inside. Repeat this with the rest of the tortillas and filling. To make your burritos crispy, place them back in the skillet. Toast the assembled burritos for 2-3 minutes on each side until they are golden brown. This step adds a nice crunch. For serving, cut the burritos in half diagonally. Pair them with salsa and fresh cilantro for a bright touch. Enjoy this delicious meal that’s easy to make and packed with flavor. To enhance the taste of your veggie packed breakfast burritos, use some great spices. I recommend ground cumin for warmth and smoked paprika for a hint of smokiness. These spices elevate the flavor and add depth. To avoid soggy tortillas, make sure to drain your black beans well. Excess moisture leads to a limp wrap. Also, toast the assembled burritos in a skillet for a few minutes. This helps create a crispy edge while keeping the filling warm. Preparing your ingredients in advance saves you time. Chop your veggies the night before and store them in airtight containers. You can also scramble your eggs ahead of time. This makes morning assembly a breeze! Freezing burritos is a smart way to enjoy quick breakfasts. Wrap each burrito tightly in foil or plastic wrap. Store them in a freezer bag. When you need one, just heat it in the microwave or oven. It’s that easy! Pair these burritos with fresh fruit or creamy yogurt for a balanced meal. Slices of fresh avocado on the side add a nice touch. For dips, salsa is a classic choice. You can also try guacamole or a zesty yogurt sauce. These add flavor and freshness to your meal. For more ideas, check out the Full Recipe. Enjoy your tasty creation! {{image_2}} You can make your breakfast burrito even more exciting. One fun swap is using chickpea scramble instead of eggs. This adds protein and a nutty flavor. Just mash cooked chickpeas with spices. You can also add a variety of greens. Consider kale, arugula, or Swiss chard. Each green brings a unique taste and boosts nutrition. If you want more protein, add cooked chicken or turkey. Shredded meat works great and gives you a hearty bite. Another option is using lentils. They pack protein and fiber, making your burrito filling and satisfying. Simply cook lentils until soft, then mix them in with your veggies. Want to spice things up? Try Southwest-inspired ingredients. Add corn, jalapeños, and chipotle sauce for a kick. Or go for Mediterranean-style burritos. Use feta cheese, olives, and sun-dried tomatoes. These twists bring fresh flavors and make breakfast fun. You can find the full recipe in the main article to explore these variations further! You can keep leftover burritos in the fridge for up to three days. To keep them fresh, wrap each burrito tightly in plastic wrap or foil. This helps prevent drying out and keeps flavors intact. To freeze the burritos, follow these steps: 1. Allow the burritos to cool to room temperature. 2. Wrap each burrito in plastic wrap, making sure to seal it well. 3. Place the wrapped burritos in a freezer-safe bag or container. 4. Label the bag with the date and type of burrito. For reheating, here are best practices: - Remove the plastic wrap before reheating. - Microwave: Heat on high for 1-2 minutes. Check if hot in the center. - Oven: Preheat to 350°F (175°C). Place burritos on a baking sheet and heat for 15-20 minutes. - Air fryer: Set to 350°F (175°C) and heat for about 8-10 minutes. These methods keep your burritos tasty and warm, ready for quick mornings! To make breakfast burritos healthier, you can try these tips: - Use whole grain tortillas instead of flour. - Add more veggies like tomatoes or zucchini. - Reduce cheese or use low-fat options like feta. - Swap regular eggs for egg whites or tofu. - Use cooking spray instead of oil for less fat. These steps can help cut calories while keeping the taste. You still enjoy a tasty meal without feeling guilty. Yes, you can easily make these burritos vegan. Here are some ideas: - Use a plant-based egg substitute, like tofu or chickpea flour. - Replace cheese with vegan cheese or nutritional yeast. - Add more beans or lentils for a protein boost. This way, you can enjoy a delicious breakfast burrito while sticking to a vegan diet. Toppings can make your breakfast burrito even better. Here are some popular ideas: - Fresh salsa or pico de gallo for a spicy kick. - Sliced avocado or guacamole for creaminess. - Chopped cilantro or green onions for freshness. - Hot sauce for extra flavor. Mix and match these toppings to balance flavors and make your burrito fun! This post covered making tasty breakfast burritos from fresh ingredients. You can customize them with extra veggies, proteins, or spices. I shared tips for meal prep and storage options to make your mornings easier. Enjoy experimenting with different flavors and combinations. With these easy steps, you can craft delicious burritos every time. So, gather your ingredients and get cooking!

Veggie Packed Breakfast Burritos for Quick Mornings

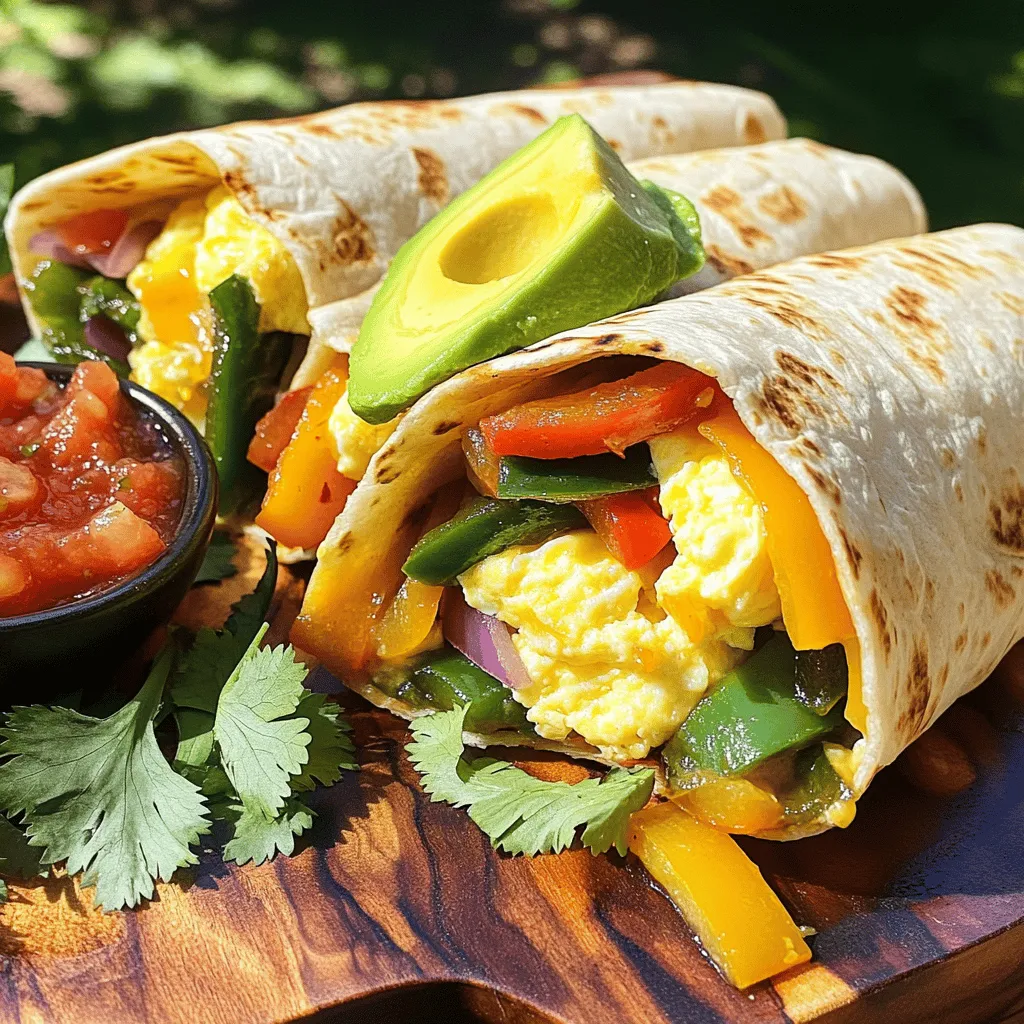
Are you tired of rushed mornings with no time for a healthy breakfast? I’ve got the perfect solution for you:

Older posts
Newer posts
← Previous Page1 … Page8 Page9 Page10 … Page66 Next →

dsad

© 2025 Cooking Wells • Built with GeneratePress

Our Policies

  • Copyright Policy
  • Cookie Policy
  • GDPR Policy
  • Privacy Policy
  • Disclaimer
  • Terms Of Use

More Information

  • Home
  • About
  • Contact
  • Appetizers
  • Dessert
  • Dinner
  • Drinks
©2025, Cooking Wells About Back To Top