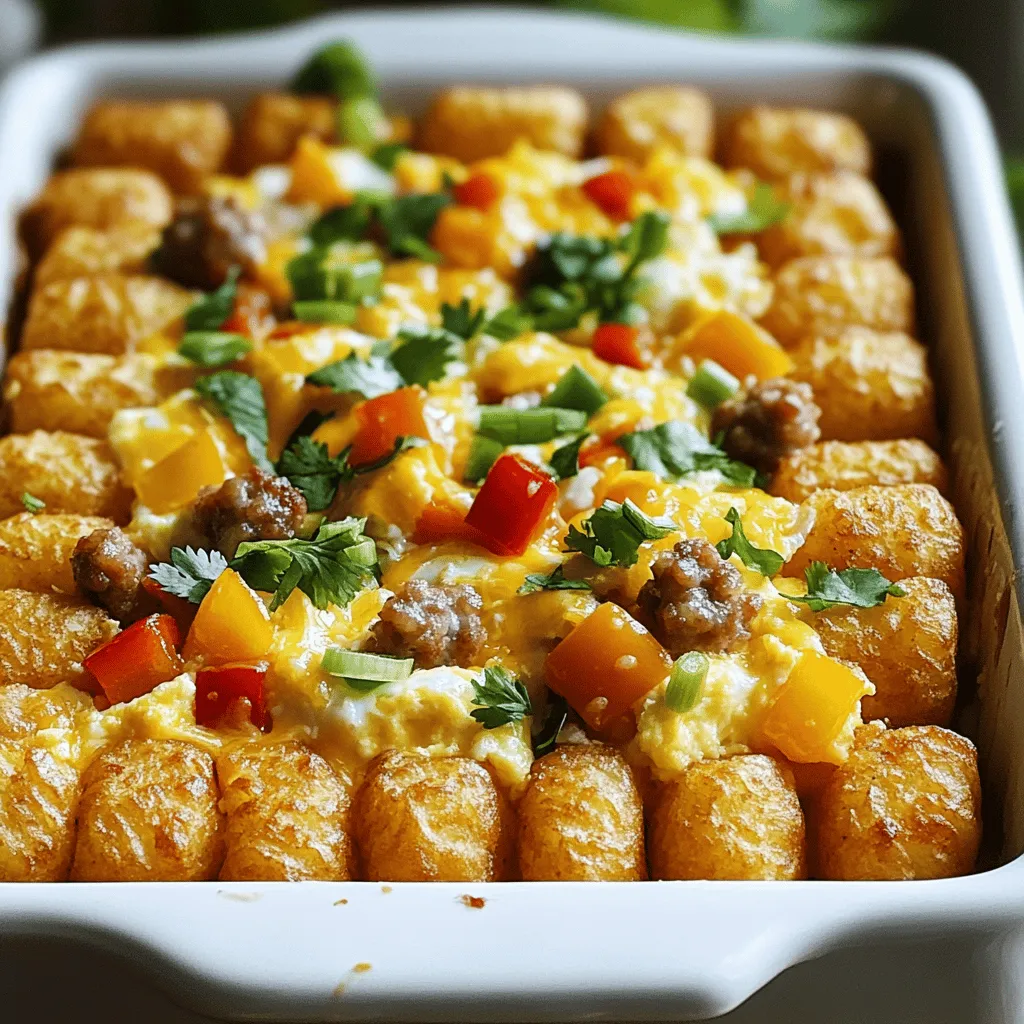
Start your day with a bang! My Loaded Breakfast Tater Tot Casserole is a crunchy delight that combines savory flavors and textures for a hearty meal. Packed with tater tots, eggs, cheese, and your favorite breakfast meats or veggies, this dish is not only easy to make but also perfect for feeding a crowd. Ready to dive into the details? Let’s get cooking!
Ingredients
Main Ingredients
– 32 oz frozen tater tots
– 8 large eggs
– 1 cup whole milk
– 1 cup shredded cheddar cheese
Additional Ingredients
– 1 cup cooked and crumbled sausage (or plant-based alternative)
– 1 cup diced bell peppers (mixed colors)
– 1/2 cup chopped green onions
Seasoning and Garnish
– 1 teaspoon garlic powder
– Salt and pepper to taste
– Fresh cilantro for garnish (optional)
Gathering the right ingredients is key to making this loaded breakfast tater tot casserole shine. Start with frozen tater tots. They give a great base. I love using 32 ounces because they add a nice crunch. Next, you need eggs—8 large ones work perfectly. They bind everything together.
The whole milk, 1 cup, adds creaminess. You can’t forget the cheese! I use 1 cup of shredded cheddar cheese. It melts perfectly and gives flavor.
For extra taste, I add 1 cup of cooked and crumbled sausage. You can use a plant-based sausage if you prefer. A blend of bell peppers, about 1 cup, adds color and sweetness. I choose mixed colors for a vibrant look. Finally, top it off with 1/2 cup of chopped green onions for a fresh bite.
For seasoning, I make it simple. I use 1 teaspoon of garlic powder, plus salt and pepper to taste. Fresh cilantro is optional but adds a nice touch.This mix of ingredients makes a tasty and filling dish that everyone will love!
Step-by-Step Instructions
Preparation Steps
– Preheat your oven to 375°F (190°C).
– Grease a 9×13 inch baking dish with cooking spray or butter.
Assembling the Casserole
– Spread the frozen tater tots evenly in the baking dish. This forms a great base.
– In a mixing bowl, whisk together eggs, milk, garlic powder, salt, and pepper. Mix well until smooth.
– Pour the egg mixture over the tater tots. Make sure to cover them all.
Baking Steps
– Sprinkle sausage, bell peppers, and cheddar over the casserole. This adds flavor and texture.
– Bake for 30-35 minutes until the eggs are set and tater tots are crispy. You want a nice golden color.
– Allow to cool for a few minutes before slicing. This helps it hold together better.
Tips & Tricks
Cooking Techniques
To get crispy tater tots, remember these key points:
– Use a hot oven: Preheat your oven to 375°F (190°C). This helps the tots crisp up fast.
– Even layer: Spread the tater tots evenly in the baking dish. This ensures they cook uniformly.
– Don’t crowd: If you have too many, use two dishes. Crowding can make them soggy.
– Finish with broil: For extra crunch, broil for a few minutes after baking. Just watch closely!
For the best results, choose the right baking dish.
– Metal pans: They conduct heat well and help the tots brown nicely.
– Glass dishes: These can work, but they may cook slower than metal.
– Avoid ceramic: They may not heat evenly, which can lead to uneven cooking.
Ingredient Substitutions
You can swap some ingredients to fit your diet:
– Plant-based sausage: Use veggie sausage or mushrooms for a meatless option.
– Cheese alternatives: Try vegan cheese or nutritional yeast. These provide great flavor.
For milk, consider:
– Dairy-free milk: Almond, soy, or oat milk work well. They keep the dish creamy without dairy.
Presentation Suggestions
Make your casserole look great with these tips:
– Garnish creatively: Use fresh cilantro, diced tomatoes, or avocado slices on top. It adds color and flavor.
– Plating ideas: Serve it in the baking dish for a casual vibe. For a fancy touch, spoon portions onto plates.
– Pair with sides: Serve with fresh fruit or a simple salad. This adds balance to your meal.

Variations
Flavor Enhancements
You can make your Loaded Breakfast Tater Tot Casserole even better with some flavor boosts. Adding spices like paprika or cayenne gives it a nice kick. I love how a little heat can wake up the taste buds. You can also use different cheeses. Pepper jack adds spice, while feta brings a tangy taste. Mixing in these flavors can change the whole dish.
Ingredient Swaps
Don’t be afraid to mix up the ingredients. You can use different vegetables like spinach or mushrooms for added nutrition. These swaps can change the texture and taste. If you want to switch up the meat, try bacon or ham instead of sausage. Each choice adds its own unique flavor to the casserole.
Healthier Alternatives
If you’re looking to lighten things up, there are easy swaps. Use lower-calorie options like egg whites and skim milk. You can also make it vegetarian by leaving out the meat and adding more veggies. For those who need gluten-free meals, simply choose gluten-free tater tots. These simple changes keep the dish delicious while making it healthier.
Storage Info
Short-Term Storage
To store leftovers of your Loaded Breakfast Tater Tot Casserole, first let it cool down. Once cooled, cut it into squares. Place the squares in an airtight container. I recommend using glass containers with tight lids to keep it fresh. Label the container with the date so you’ll know when you made it. This way, you can enjoy it later without any worry.
Reheating Instructions
When it’s time to eat your leftovers, you can reheat them in the oven. Preheat the oven to 350°F (175°C). Place the casserole pieces on a baking sheet. Cover them with foil to keep them from drying out. Heat for about 15-20 minutes, or until hot. If you want to freeze the casserole, wrap it tightly in plastic wrap and foil. To thaw, put it in the fridge overnight before reheating.
Shelf Life
When stored properly in the fridge, the casserole lasts about 3-4 days. If you freeze it, it can last up to 2-3 months. Always check for signs of spoilage before eating. Look for a change in color, smell, or texture. If anything seems off, it’s best to toss it out. Enjoy your delicious meals without any worries!
FAQs
Common Questions
How can I make this casserole ahead of time?
You can prep this casserole the night before. Just follow the steps but do not bake it. Cover the dish with plastic wrap and place it in the fridge. In the morning, bake it straight from the fridge. This saves time and keeps the flavors fresh.
Can I use fresh rather than frozen tater tots?
Using fresh tater tots is not recommended. Frozen tater tots have the right texture and cook evenly in the oven. If you use fresh, they may not crisp up well. Stick with frozen for the best results.
Dietary Considerations
Is it possible to make this recipe gluten-free?
Yes, you can make this casserole gluten-free. Use gluten-free tater tots and check the sausage label. Many brands offer gluten-free options. This way, you can enjoy the dish without any worries.
What are some vegan options for this casserole?
To make a vegan version, replace eggs with a tofu mixture or flax eggs. Use plant-based milk and cheese. There are many good meat substitutes available too, like tempeh or lentils. This keeps the flavors rich and satisfying without animal products.
Cooking Concerns
Why did my casserole turn out soggy?
A soggy casserole usually means there was too much liquid. Make sure to measure your milk and eggs carefully. Also, avoid overcooking the veggies before adding them to the mix. This helps keep the texture just right.
Can I add more eggs without affecting the texture?
You can add one or two extra eggs if you want. Just be aware that too many eggs can make it dense. Balance is key for a fluffy texture. Stick with the recipe for the best results.
This article covers a tasty tater tot casserole recipe. We explored the key ingredients, like eggs, milk, and cheese. Step-by-step instructions guide you through preparation, baking, and even storage tips. You also learned about ingredient swaps and how to tweak flavors.
In summary, this dish is fun to make and easy to customize. You can enjoy it fresh or save leftovers for later. Keep experimenting with different flavors and enjoy your meals!


