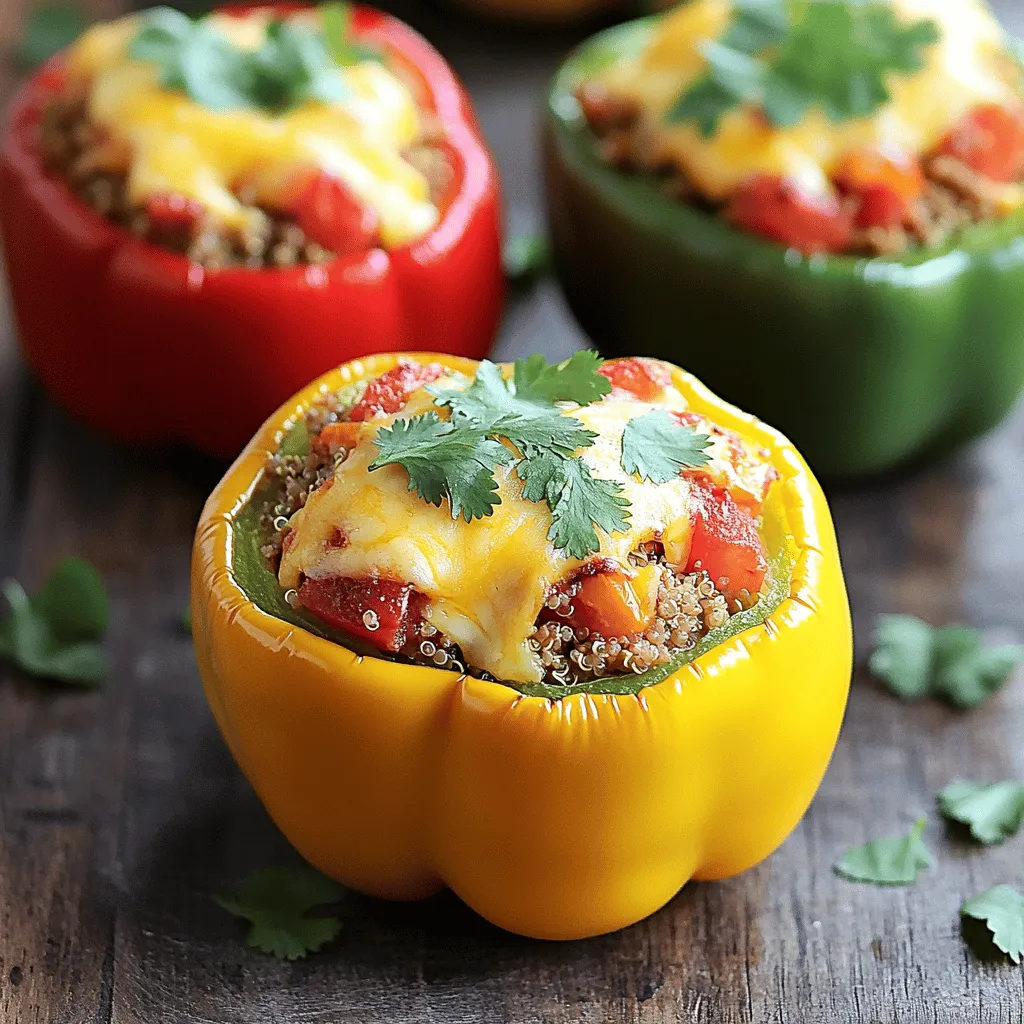
If you’re looking for a tasty and healthy meal, stuffed bell peppers with ground turkey are a perfect choice. Packed with protein, fiber, and flavor, these peppers will please your taste buds and leave you feeling satisfied. In this post, I’ll show you how to prepare, cook, and even store your stuffed peppers, ensuring they’ll be a hit at your table. Let’s dive into this flavorful dish that’s easy to make!
Ingredients
Main Ingredients
– 4 large bell peppers (any color)
– 1 lb ground turkey
– 1 cup cooked quinoa
Additional Ingredients
– 1 cup diced tomatoes (canned or fresh)
– 1 small onion, diced
– 2 cloves garlic, minced
Spices and Seasonings
– 1 teaspoon cumin
– 1 teaspoon paprika
– ½ teaspoon cayenne pepper (optional)
– Salt and pepper to taste
Garnishes
– 1 cup shredded cheese (cheddar or mozzarella)
– Fresh cilantro or parsley for garnish
When making stuffed bell peppers, the right ingredients make a huge difference. I love using large, vibrant bell peppers. They not only look great but also offer a sweet flavor. Ground turkey is my go-to meat for this dish. It’s lean, healthy, and absorbs flavors well.
Cooked quinoa adds a nice texture and boosts nutrition. For extra freshness, I like to add diced tomatoes. They bring moisture and brightness. A small onion and minced garlic enhance the flavor base.
Spices are key to making these peppers pop. Cumin and paprika add warmth and depth. If you like a kick, cayenne pepper is a great choice. Just a pinch can spice things up! Don’t forget salt and pepper; they help all the flavors shine.
Finally, a sprinkle of shredded cheese on top brings everything together. Cheddar or mozzarella work well. For a colorful finish, add fresh cilantro or parsley. This combination of ingredients transforms simple bell peppers into a tasty meal.
Step-by-Step Instructions
Preparation
1. Preheat your oven to 375°F (190°C). This heat makes the peppers tender and the cheese bubbly.
2. Cut the tops off the bell peppers and remove the seeds. You want to create a nice bowl for the filling. Place them upright in a baking dish.
3. In a large skillet, add a splash of olive oil. Heat this over medium heat.
4. Sauté the diced onion until it turns translucent, which takes about 3-4 minutes.
5. Add the minced garlic and cook for another minute. This will make your kitchen smell amazing!
Cooking Turkey Mixture
1. Next, stir in 1 pound of ground turkey. Break it apart with a spatula.
2. Cook until it browns, which takes about 5-7 minutes. Brown meat adds great flavor.
3. Mix in 1 cup of cooked quinoa and 1 cup of diced tomatoes.
4. Add spices: 1 teaspoon cumin, 1 teaspoon paprika, and optional ½ teaspoon cayenne pepper.
5. Season with salt and pepper to taste. Mix well and let it cook for another 3-4 minutes. This helps the flavors come together.
Stuffing and Baking
1. Carefully spoon the turkey mixture into each bell pepper. Pack it tightly to fit all the goodness inside.
2. Top each stuffed pepper with 1 cup of shredded cheese. Cheese makes everything better!
3. Cover the baking dish with aluminum foil and bake for 25 minutes.
4. After 25 minutes, uncover the dish and bake for another 10 minutes. This step helps the cheese turn bubbly and golden.
5. Once done, let them cool for a few minutes before serving.
These stuffed bell peppers are a fun and tasty way to enjoy a healthy meal.
Tips & Tricks
Cooking Tips
To make sure your ground turkey cooks evenly, break it apart in the pan. Stir it often for even browning. Use a meat thermometer to check for doneness. The turkey should reach 165°F (74°C) inside. This step is key for food safety.
Presentation Tips
Garnishing your stuffed peppers can make a big difference. I love to sprinkle fresh cilantro or parsley on top. It adds color and freshness. Serve the peppers on a colorful plate. This makes the dish look vibrant and inviting. Pair them with a side salad or some crusty bread for a complete meal.
Common Mistakes to Avoid
One common mistake is overstuffing the peppers. If you pack them too tightly, they may burst while baking. Another mistake is skipping the pre-baking step. Pre-baking helps soften the peppers and enhances their flavor. Take the time to follow these steps for tasty results.
Variations
Vegetarian Option
If you want a meat-free dish, try using lentils or beans instead of ground turkey. Lentils cook quickly and add a nice texture. Use cooked black beans or kidney beans for more flavor. Both options give you protein and fiber, making the dish hearty and satisfying.
Flavor Enhancements
You can boost flavor by adding different vegetables. Try corn, zucchini, or mushrooms for added taste and texture. Spices also make a big difference. Consider adding chili powder or oregano for a twist. Changing the grain is another way to add flair. Use rice, bulgur, or farro instead of quinoa for a new flavor.
Cheese Alternatives
If you want a dairy-free option, use vegan cheese. Many brands melt well and taste great. Nutritional yeast is another option; it adds a cheesy flavor without dairy. For a different taste, you can use feta or goat cheese. These cheeses give a tangy flavor that pairs well with bell peppers.
Storage Info
Refrigeration
To store leftovers, let the stuffed peppers cool first. Once cooled, place them in an airtight container. Make sure to cover them well. They will stay fresh in the fridge for up to four days. If you want quick meals, store them in single servings. This makes it easy to grab and go.
Freezing Directions
Stuffed peppers freeze well. To freeze them, prepare the peppers as you normally would. Before baking, wrap each pepper in plastic wrap or foil. Place them in a freezer-safe bag or container. They can last up to three months in the freezer.
When you are ready to eat, thaw them overnight in the fridge. For reheating, place them in a preheated oven at 375°F (190°C). Bake for about 30 minutes or until heated through. You can also microwave them for a quicker option. Just make sure they are hot all the way through.
Shelf Life
Stuffed bell peppers last around four days in the fridge. If frozen, they can last up to three months. Always check for signs of spoilage, like a change in color or smell. Enjoy your stuffed peppers fresh for the best taste!
FAQs
Can I make stuffed bell peppers ahead of time?
Yes, you can prepare stuffed bell peppers in advance. First, make the filling and stuff the peppers. Then, cover them tightly and store in the fridge. They can sit for up to 24 hours before baking. If you want to keep them longer, freeze the unbaked peppers. Wrap each pepper in plastic wrap, then place them in a freezer bag. They can last for up to three months in the freezer. Just thaw them in the fridge overnight before baking.
What is the best way to reheat stuffed peppers?
To reheat stuffed peppers, use the oven for the best results. Preheat your oven to 350°F (175°C). Place the stuffed peppers in a baking dish, cover with foil, and heat for about 20-25 minutes. If you want to reheat faster, use the microwave. Place the pepper on a microwave-safe plate and cover with a damp paper towel. Heat for about 2-3 minutes, checking if it’s warm. Be careful not to overcook them.
Are stuffed bell peppers healthy?
Yes, stuffed bell peppers are a healthy meal choice. They are low in calories and packed with nutrients. Bell peppers are high in vitamins A and C. Ground turkey is a lean protein source. Quinoa adds fiber and additional protein, making this dish filling. Plus, you can add other veggies for even more nutrition. It’s a balanced meal that is great for any diet.
Can I use different types of meat?
Absolutely! You can use various types of meat for stuffed peppers. Ground beef or pork works well for a richer flavor. If you prefer a lighter option, chicken or turkey is great too. For a vegetarian twist, consider beans, lentils, or tofu. These alternatives can make the dish just as tasty. Feel free to mix and match to find your favorite!
Stuffed bell peppers offer a tasty and healthy meal option. We covered the best ingredients, cooking steps, and tips to avoid mistakes. You can easily customize this dish to suit your taste and dietary needs. Remember to store leftovers properly for later meals. With these insights, you can create satisfying stuffed peppers that everyone will love. Enjoy cooking and experimenting with flavors!