Skip to content
DisclaimerTerms Of UseGDPR PolicyCookie Policy

Cooking Wells

  • Home
  • Drinks
  • Appetizers
  • Dinner
  • Dessert
  • About
  • Contact
  • Privacy Policy
DisclaimerTerms Of UseGDPR PolicyCookie Policy

NO-ING-IMG

To make sesame ginger chicken stir fry, gather these main ingredients: - 1 lb chicken breast, thinly sliced - 2 tablespoons sesame oil - 1 tablespoon ginger, grated - 3 cloves garlic, minced - 1 bell pepper, sliced (any color) - 1 cup broccoli florets - 1 cup snap peas - 3 green onions, chopped - 3 tablespoons soy sauce (low sodium) - 1 tablespoon honey - 1 teaspoon cornstarch - 1 tablespoon sesame seeds - Salt and pepper, to taste For extra flavor, consider these optional ingredients: - Red pepper flakes for heat - Fresh cilantro for a bright touch - Peanuts for a crunchy texture - Lime juice for added zest These ingredients can make your dish unique. Feel free to mix and match based on what you have. Here is what you need to cook this dish: - A large skillet or wok - A sharp knife for slicing - A cutting board - A mixing bowl for marinating - Measuring spoons for accuracy Using the right tools makes cooking easier. You can whip up this dish in no time! Start with one pound of thinly sliced chicken breast. In a bowl, mix the chicken with three tablespoons of low-sodium soy sauce, one tablespoon of honey, one tablespoon of grated ginger, and three cloves of minced garlic. This mix adds flavor and keeps the chicken moist. Cover the bowl and let it marinate for at least 20 minutes. If you have time, marinate it longer for deeper flavor. Heat two tablespoons of sesame oil in a large skillet or wok over medium-high heat. Once the oil is hot, add the marinated chicken. Cook it for about five to seven minutes. Stir often, ensuring it cooks through and turns golden brown. Remove the chicken from the skillet and set it aside. This step keeps the chicken juicy. In the same skillet, add one cup of broccoli florets, one sliced bell pepper, and one cup of snap peas. Stir-fry these vegetables for about three to four minutes. You want them tender but still crisp. This will add a nice crunch to your dish while keeping the colors bright. After the veggies are done, return the chicken to the skillet. Sprinkle one teaspoon of cornstarch over the mixture. This helps thicken the sauce. Stir everything well to combine. Cook for an additional minute. Adjust the taste with salt and pepper. Then, toss in three chopped green onions and one tablespoon of sesame seeds. This adds flavor and a lovely finish. Serve the sesame ginger chicken hot over steamed rice or noodles. The rice or noodles soak up the tasty sauce. You can also garnish with extra sesame seeds or green onions for a nice touch. Enjoy your meal with family or friends! To make your chicken tasty, marinate it. Mix 3 tablespoons of soy sauce, 1 tablespoon of honey, 1 tablespoon of grated ginger, and 3 cloves of minced garlic in a bowl. Add the sliced chicken and coat it well. Let it sit for at least 20 minutes. This step helps the chicken soak up all those delicious flavors. You can even marinate it longer for a stronger taste. When stir-frying, use high heat. This helps cook the chicken quickly and keeps it juicy. Use a large skillet or wok for even cooking. Heat 2 tablespoons of sesame oil until it shimmers before adding the chicken. Stir it often to brown it well and prevent sticking. Once the chicken is cooked, take it out before adding the vegetables. This keeps the chicken from overcooking. One common mistake is overcrowding the pan. If the pan is too full, the chicken will steam instead of fry. Cook in batches if needed. Another mistake is not preheating the oil. Cold oil can lead to soggy chicken. Lastly, don’t forget to season your vegetables. A pinch of salt and pepper can enhance their flavor. {{image_2}} You can easily make this dish vegetarian or vegan. Instead of chicken, use tofu. Firm tofu works best. Cut it into cubes and press it to remove water. This helps it absorb flavor and stay firm while cooking. Marinate the tofu like the chicken. Use the same soy sauce, ginger, and garlic mix. You can also add extra veggies for more color and taste. If you don't want chicken, you have many choices. Shrimp is a great option. It cooks quickly and adds a nice flavor. You could also use beef or pork, thinly sliced. Just remember to adjust cooking times. These proteins should cook all the way through. For a different taste, try adding seitan, a meat substitute made from wheat. Feel free to swap out the veggies. Snow peas can replace snap peas. Cauliflower florets work well instead of broccoli. You can also use carrots, zucchini, or asparagus. Just make sure to cut them into small pieces. This way, they cook evenly. Mixing different colors makes your dish look great and adds more nutrients. To store your Sesame Ginger Chicken Stir Fry, let it cool down first. Place it in an airtight container. This helps keep the flavors fresh. You can store it in the fridge for up to three days. Make sure to keep it away from strong-smelling foods, as they can affect the taste. When you are ready to eat, you can easily reheat the stir fry. Use a microwave-safe dish and cover it with a lid or a paper towel. Heat it for 1-2 minutes. Stir halfway through to make sure it warms evenly. You can also reheat it on the stove. Just add a splash of water to keep it moist. Heat over medium until hot. If you want to save some for later, freezing is a great option. Let the stir fry cool completely before you freeze it. Use a freezer-safe container or bag. Make sure to remove as much air as possible. This will help prevent freezer burn. You can freeze it for up to three months. When you are ready to eat, thaw it overnight in the fridge. Then reheat as mentioned above. Yes, you can use boneless thighs. They add more flavor and stay juicy. Just cut them into thin slices like the chicken breast. The cooking time will be about the same. You can serve this dish with rice or noodles. Both options soak up the sauce well. You might also add a side of steamed vegetables or a fresh salad for crunch. To add heat, try these options: - Add sliced fresh chili peppers. - Use chili paste or sauce in the marinade. - Sprinkle red pepper flakes while cooking. Start with a little, then taste and adjust. Yes, you can freeze leftovers! Let the stir fry cool first. Then, place it in an airtight container. It will last up to three months in the freezer. When you're ready to eat, thaw it overnight in the fridge. Reheat it on the stove for best results. In this blog post, we explored how to make a tasty sesame ginger chicken stir fry. We covered key ingredients, step-by-step cooking methods, and tips for flavor. You learned how to enhance your dish with options for vegetarians and various proteins. Proper storage and reheating techniques will keep your meal fresh. Remember, trying new variations can bring fun to your kitchen. Enjoy creating this dish, and don't hesitate to adapt it to your taste!

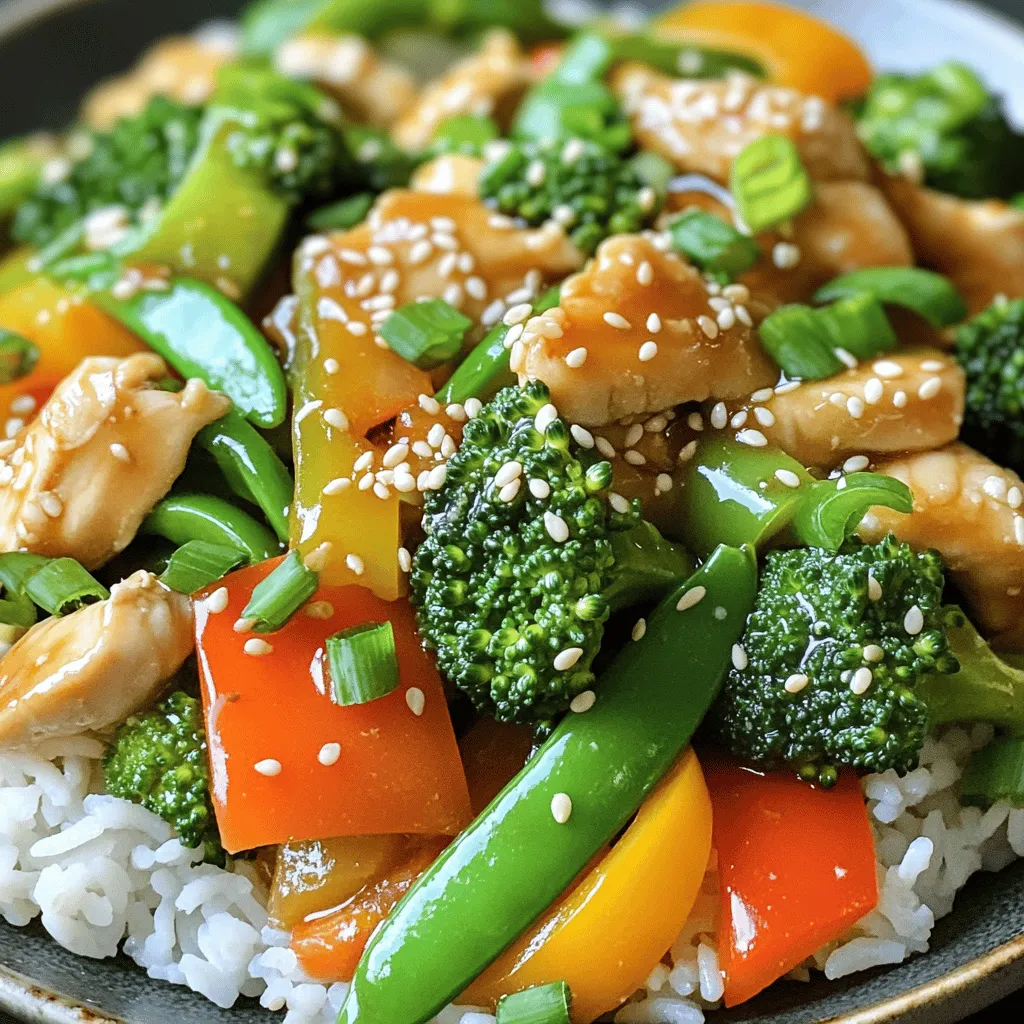
Sesame Ginger Chicken Stir Fry Quick and Easy Recipe

If you crave a quick, tasty meal, you’re in the right place! My Sesame Ginger Chicken Stir Fry is both

- 2 ripe avocados, peeled and pitted - 1/3 cup unsweetened cocoa powder - 1/4 cup maple syrup (adjust based on desired sweetness) - 1/4 cup almond milk (or any plant-based milk) - 1 teaspoon vanilla extract - A pinch of sea salt - Optional toppings: sliced bananas, berries, or coconut whipped cream - Avocados: They give this pudding a creamy texture and healthy fats. - Cocoa Powder: This adds rich chocolate flavor and is full of antioxidants. - Maple Syrup: A natural sweetener that provides flavor without refined sugar. - Almond Milk: A low-calorie option that keeps the pudding plant-based. - Vanilla Extract: It enhances the flavor and adds warmth to the pudding. - Sea Salt: Just a pinch balances the sweetness and enriches the taste. - If you're allergic to nuts, use oat or soy milk instead of almond milk. - For a sugar-free option, try using a sugar substitute like stevia. - If you dislike avocados, silken tofu can work as a creamy base. - You can skip the vanilla extract if you want a simpler flavor. Start by taking 2 ripe avocados. Peel and pit them, then place them in a food processor. Next, add 1/3 cup of unsweetened cocoa powder to the avocados. Pour in 1/4 cup of maple syrup, adjusting it to your taste. Then, add 1/4 cup of almond milk for creaminess. Don’t forget to include 1 teaspoon of vanilla extract and a pinch of sea salt. These ingredients combine to create a rich flavor. Blend the mixture on high speed. Stop to scrape down the sides of the bowl. This helps mix everything evenly. Blend until the pudding is smooth and creamy. If it seems too thick, add a bit more almond milk. Taste the pudding and adjust the sweetness if needed. Add more maple syrup if you desire extra sweetness and blend again. Once blended, transfer the pudding into serving bowls or a large container. Cover the bowls tightly with plastic wrap or a lid. Chill in the fridge for 30 minutes to an hour. This helps the flavors meld and the pudding to set. Before serving, give it a quick stir. You can top it with sliced bananas, fresh berries, or a dollop of coconut whipped cream for extra flair. Enjoy your rich and creamy treat! When picking avocados, look for ones that feel soft but not mushy. They should yield slightly to your touch. A ripe avocado has a dark green skin. If they are too hard, leave them on the counter for a few days. You can speed up ripening by placing them in a brown bag with an apple or banana. This will help release ethylene gas and make them ripen faster. Sweetness is key for this pudding. Start with 1/4 cup of maple syrup. Blend the ingredients, then taste. If you want it sweeter, add more syrup, one tablespoon at a time. Blend again after each addition. This method helps you find the right level of sweetness for your taste. You can add fun flavors to your pudding. A splash of coffee or a few mint leaves can make it exciting. You might also try a pinch of cinnamon or a drop of almond extract. Each choice adds a new layer of taste without overpowering the chocolate. Experiment with your favorite flavors to make it unique! {{image_2}} You can add fun flavors to your vegan chocolate avocado pudding. A simple way is to mix in some fresh mint. Just add a few mint leaves when blending. This makes the pudding taste fresh and bright. You can also add a shot of espresso for a coffee kick. This deepens the chocolate flavor. If you love spices, try adding a dash of cinnamon or cayenne. This gives the pudding a warm, spicy twist. Each of these options adds a new layer of taste. Don’t be afraid to experiment! Toppings can make your pudding even more fun. Try adding sliced bananas or fresh berries on top. They add sweetness and a nice crunch. Coconut whipped cream is another great choice. It adds a creamy texture and light flavor. You can also sprinkle some chopped nuts or granola for a bit of crunch. These toppings not only taste great, but they also make your pudding look fancy. Get creative and mix different toppings to find your favorite combo! If you need to make this pudding nut-free, there are easy swaps. Instead of almond milk, use oat or soy milk. Both work well and keep the pudding creamy. For toppings, skip the nuts and use seeds like pumpkin or sunflower seeds. They provide a nice crunch without using nuts. You can also use shredded coconut or a few extra berries for texture. These changes make the pudding safe for everyone while keeping it tasty! To keep your vegan chocolate avocado pudding fresh, store it in the fridge. Use an airtight container to avoid any unwanted smells or flavors. If you plan to eat the pudding within a few days, this method works great. Be sure to cover the pudding with plastic wrap or a lid. This helps keep it creamy and delicious. If you want to save some pudding for later, freezing is a good option. First, scoop the pudding into small portions. Use freezer-safe containers or silicone molds for easy serving. Leave a little space at the top, as the pudding will expand when frozen. When stored properly, it can last up to three months in the freezer. Thaw your frozen pudding in the fridge overnight. This method keeps the texture smooth. If you're in a hurry, you can also use the microwave. Just heat it in short bursts, about 10 seconds at a time. Stir after each burst to ensure even warmth. If it seems too thick, add a splash of almond milk and mix well. Yes, chocolate avocado pudding is healthy. It has great ingredients like avocados and cocoa powder. Avocados provide healthy fats, fiber, and vitamins. Cocoa powder adds antioxidants and can boost mood. This pudding is also dairy-free and low in added sugar, making it a great choice for many diets. Yes, you can use other sweeteners. Try agave nectar, honey, or coconut sugar. Each sweetener may change the taste a bit, so adjust to your liking. Just remember to keep the sweetness balanced. You can taste the pudding and add more sweetener if needed. Vegan chocolate avocado pudding lasts about 3 to 5 days in the fridge. Store it in an airtight container to keep it fresh. Over time, the color may darken due to oxidation, but it will still be safe to eat. Just give it a stir before serving. Serve the pudding chilled for the best taste. You can top it with sliced bananas, berries, or coconut whipped cream. These toppings add color and texture. You can also serve it in small cups or bowls for fun presentation. Enjoy this treat with friends or family! You now know how to make a delicious chocolate avocado pudding from scratch. We explored the key ingredients, their benefits, and tips for substitutions. I shared important steps for preparation and blending. You also learned about enhancing flavors and storage tips. Don’t forget the exciting variations you can try. Chocolate avocado pudding is not only tasty but also healthy. Dive into this simple recipe and enjoy the scrumptious results!

Vegan Chocolate Avocado Pudding Rich and Creamy Treat

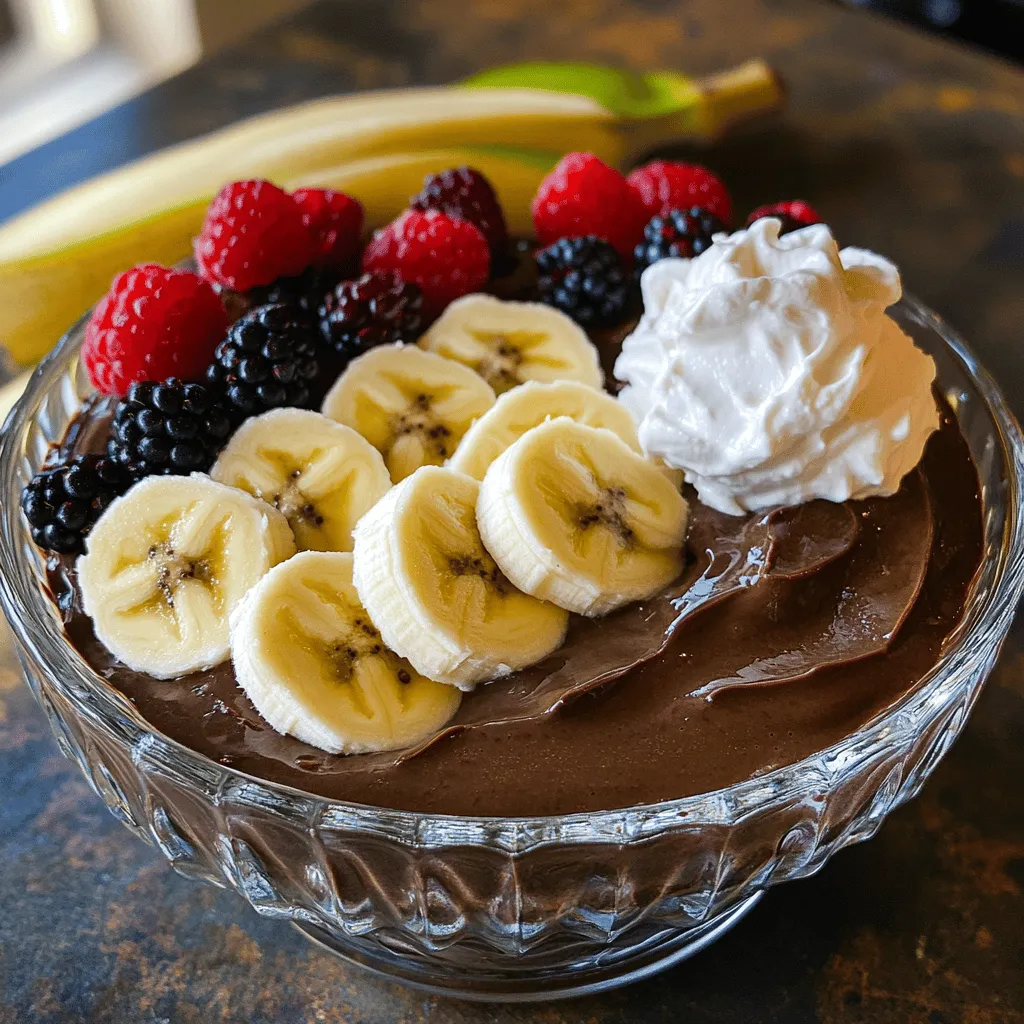
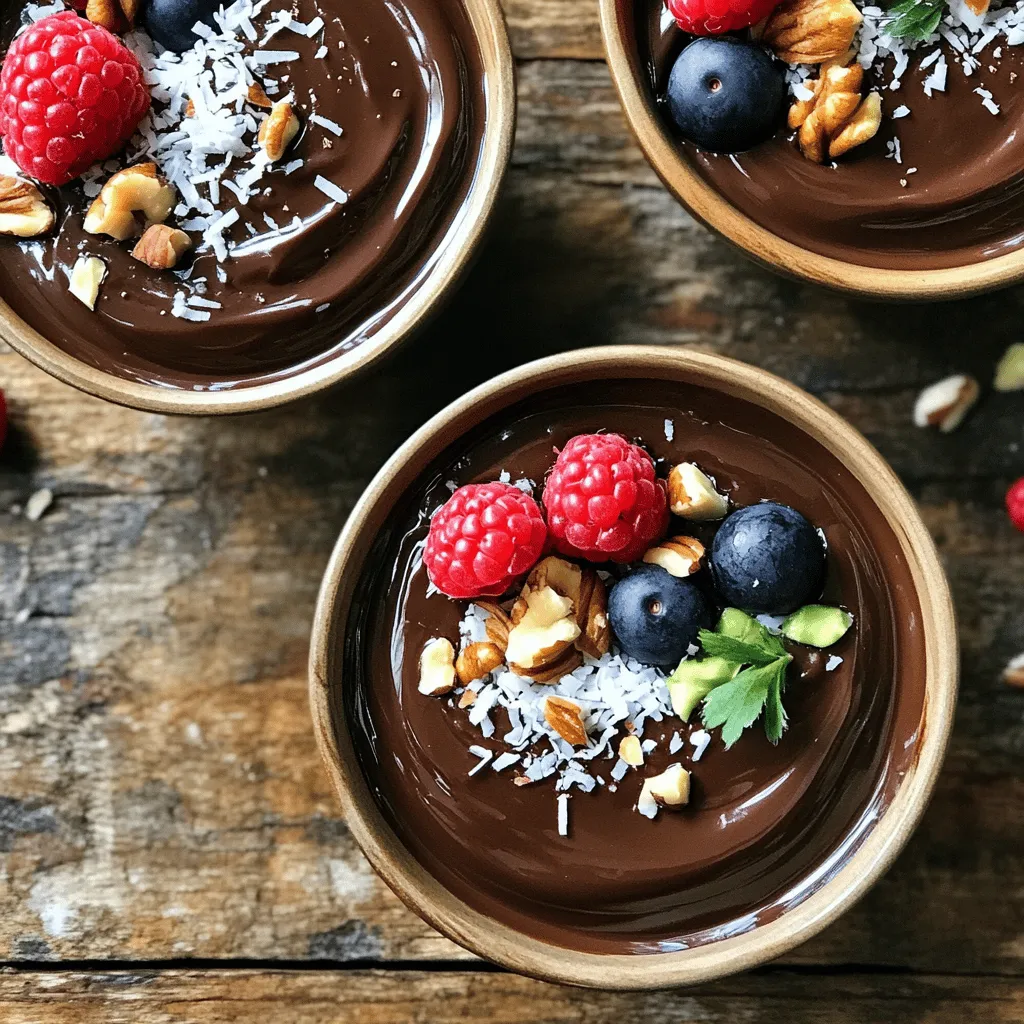
Looking for a delicious and healthy dessert? Try my Vegan Chocolate Avocado Pudding! This rich and creamy treat is easy

To create this creamy delight, you will need the following ingredients: - Large head of cauliflower, chopped into florets - Whole bulb of garlic - 3 tablespoons olive oil - 1/4 cup unsweetened almond milk (or any milk of your choice) - 2 tablespoons butter (or plant-based alternative) - Salt and pepper to taste - Fresh chives, chopped (for garnish) Each ingredient plays a key role in building the flavor and texture of the dish. The cauliflower serves as the base, providing a light and fluffy texture. Roasting the garlic adds a sweet, rich flavor that elevates the dish to new heights. The olive oil and butter give it a smooth mouthfeel, while the almond milk helps achieve the desired creaminess. Lastly, chives add a fresh touch, both in flavor and presentation. First, preheat your oven to 400°F (200°C). This step gets the oven ready for roasting. Next, prepare the garlic. Slice the top off the bulb to expose the cloves. Drizzle one tablespoon of olive oil on top. Wrap the garlic bulb tightly in aluminum foil, then set it aside. Now, let's focus on the cauliflower. Take one large head of cauliflower and chop it into florets. Toss these florets in a bowl with two tablespoons of olive oil, salt, and pepper. Mix well to coat them evenly. Spread the cauliflower out on a baking sheet in a single layer. Now, place your wrapped garlic bulb on the same baking sheet with the cauliflower. This allows both to roast together. Roast them in the oven for about 25 to 30 minutes. You want the cauliflower to be tender and golden. The garlic will become soft and caramelized during this time. Once the roasting is done, carefully remove the baking sheet from the oven. Let it cool for a minute. Unwrap the garlic and squeeze the soft cloves into a bowl. In a large mixing bowl, combine the roasted cauliflower, the squeezed garlic, a quarter cup of almond milk, and two tablespoons of butter. Use an immersion blender or a potato masher to blend everything until smooth and creamy. Adjust the consistency with more almond milk if you want it creamier. Don't forget to taste it! Add more salt and pepper if needed. Serve your mashed cauliflower in a bowl, and finish it off with chopped fresh chives on top for a pop of color. To get the best roasted garlic, start with a fresh bulb. Look for a firm bulb with tight, unblemished skin. Avoid any that feel soft or have green shoots. These signs show age. For even roasting, slice off just the top of the garlic bulb. This exposes the cloves while keeping them intact. Drizzle with olive oil and wrap it in foil. This method traps steam and helps the garlic cook evenly. For a smooth and creamy mash, use an immersion blender or a potato masher. An immersion blender gives you the best result. It blends everything to a silky texture quickly. If your mash is too thick, add almond milk. Pour in a little at a time until you reach your desired creaminess. This keeps your dish light yet rich. To boost flavor, consider adding spices like paprika or nutmeg. These spices add warmth and depth to the dish. For a fresh twist, try garnishing with herbs. Fresh chives work well, but you can also use parsley or thyme. This adds color and brightens the dish. {{image_2}} To make this dish vegan, simply swap out the butter for plant-based butter. This change keeps the creamy texture while ensuring that it fits a vegan diet. You can also use coconut oil for a slight hint of sweetness. The almond milk remains a great choice, but any plant-based milk works well too. For extra flavor, consider adding herbs and spices. Chopped rosemary or thyme can enhance the taste. You might also try a dash of paprika for a subtle kick. If you love cheese, mix in some grated Parmesan or nutritional yeast. This addition gives a richer flavor that many find delightful. Roasted garlic mashed cauliflower pairs wonderfully with main dishes like grilled chicken or fish. You can serve it as a side at dinner parties or family gatherings. For a fun twist, create a cauliflower bowl. Top it with sautéed vegetables or a crispy salad. This adds color and crunch to your meal. To store leftovers, let the mashed cauliflower cool first. Then, place it in an airtight container. This keeps it fresh in the fridge for up to three days. When ready to eat, stir it well and add a splash of almond milk to restore creaminess. For freezing, use a freezer-safe container. Make sure to leave some space at the top, as it may expand. You can freeze the mashed cauliflower for up to three months. When reheating, thaw it in the fridge overnight. Use a stovetop or microwave to warm it gently. Add a bit of almond milk to help maintain the smooth texture. Roasted Garlic Mashed Cauliflower stays fresh for about three days in the fridge. If frozen, it lasts up to three months without losing flavor. Always check for any off smells or changes in color before eating. Yes, you can make this dish ahead of time. To prep in advance, follow these tips: - Roast the garlic and cauliflower, then store them in the fridge. - Mix the roasted garlic and cauliflower with milk and butter just before serving. - You can reheat the mixture in the microwave or on the stove, adding a splash of milk if needed. This creamy delight goes well with many dishes. Here are some great pairings: - Serve it alongside grilled chicken or steak for a hearty meal. - Pair it with roasted vegetables for a healthy, colorful plate. - Try it with fish, like salmon, for a light dinner option. Scaling the recipe is easy. To adjust serving sizes: - For fewer servings, simply halve the ingredients. - For larger gatherings, double the amount of cauliflower and garlic. - Keep the same roasting time, but check for doneness as you scale up. In this post, we explored how to make roasted garlic mashed cauliflower. You learned about the simple ingredients needed and followed step-by-step instructions. I shared tips to make it creamy and delicious. We also discussed variations and how to store leftovers. This dish is easy and can fit many diets. Try it with different flavors. Enjoy your cooking adventure!

Roasted Garlic Mashed Cauliflower Creamy Delight

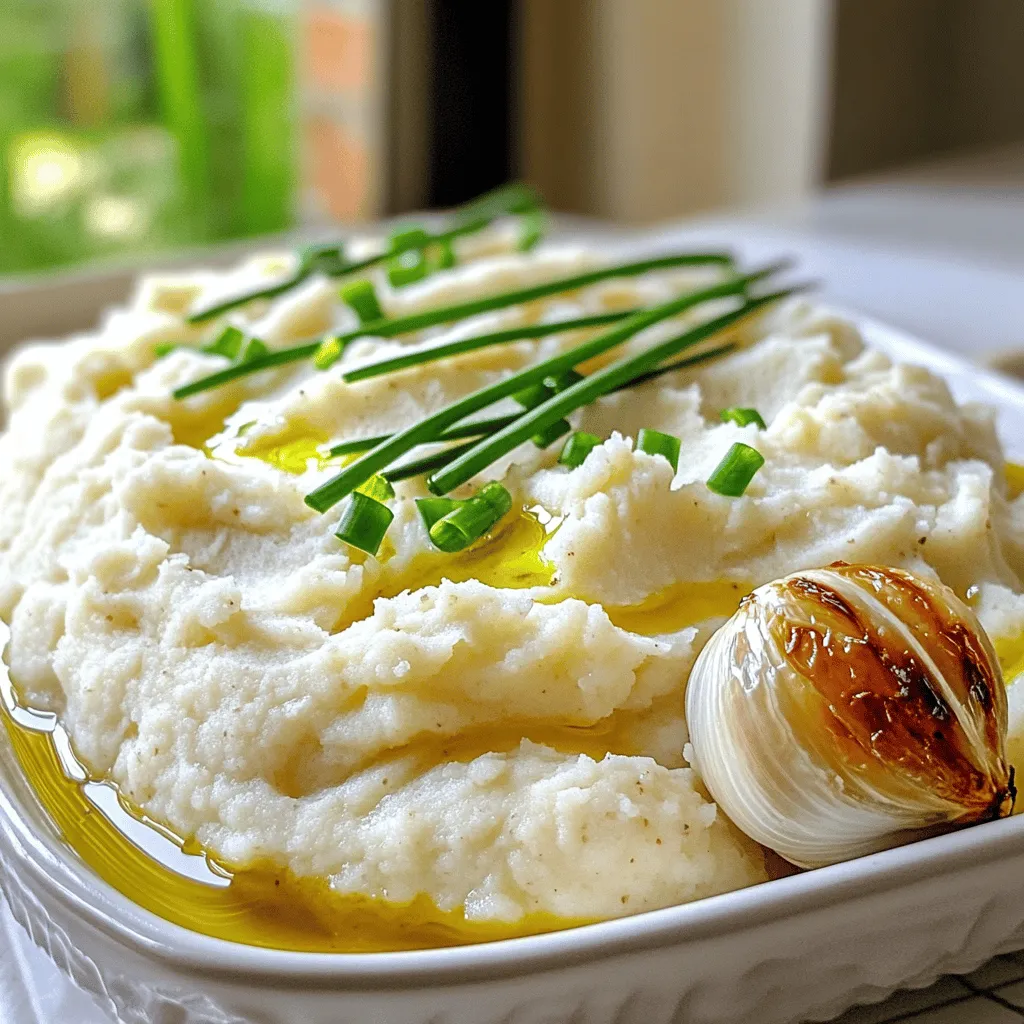
If you’re looking for a creamy side dish that’s full of flavor, look no further! Roasted Garlic Mashed Cauliflower Creamy

To make caramelized onion dip, you need: - 4 large yellow onions, thinly sliced - 3 tablespoons olive oil - 1 teaspoon salt - 1 teaspoon sugar - 1 teaspoon fresh thyme leaves (or ½ teaspoon dried thyme) - 1 cup sour cream - 1 cup cream cheese, softened - ½ cup mayonnaise - 1 teaspoon garlic powder - Freshly ground black pepper to taste - Vegetable sticks or crackers for serving These ingredients work together to create a rich and creamy dip. The onions add sweetness, while the cream cheese and sour cream give it a smooth texture. You can personalize this dip with: - Chopped chives for a fresh kick - A dash of hot sauce for heat - Grated cheese for extra creaminess - Bacon bits for a savory twist These options let you mix flavors and textures. Try different combinations to find your favorite! For this recipe, gather these tools: - Large skillet for cooking the onions - Mixing bowl for combining the dip - Wooden spoon for stirring - Knife and cutting board for slicing onions - Measuring spoons for accurate amounts Having the right equipment makes the cooking process smooth and enjoyable. Enjoy the flavors of your hard work! To make this dip, you start with the onions. First, slice four large yellow onions thinly. I like to use a sharp knife for this. It makes the job easier. Next, heat three tablespoons of olive oil in a large skillet over medium heat. When the oil is hot, add the sliced onions and one teaspoon of salt. Stir the onions well to coat them in the oil. Now, lower the heat to low. Cook the onions for about 30 to 40 minutes. Stir them occasionally. This step is key for great flavor. You want them to turn a deep golden brown. If they stick, add a splash of water. After they are caramelized, sprinkle one teaspoon of sugar and one teaspoon of fresh thyme leaves over the onions. Stir it well. Cook for an extra 2 to 3 minutes, then remove them from the heat. Let them cool for a bit. In a mixing bowl, combine one cup of sour cream, one cup of softened cream cheese, and half a cup of mayonnaise. Add one teaspoon of garlic powder. Mix these ingredients until they are smooth and creamy. Once the onions are cool, add them to the bowl as well. Stir everything together until it’s well mixed. Finally, season with freshly ground black pepper to taste. Cover the dip with plastic wrap or a lid. Place it in the fridge for at least one hour. This chilling time helps the flavors blend together. When ready to serve, take the dip out and present it in a nice bowl. You can serve it with vegetable sticks or crackers for a tasty snack. Enjoy every bite! To caramelize onions, start with fresh yellow onions. Slice them thinly, about 1/4 inch. Heat 3 tablespoons of olive oil in a large skillet over medium heat. Add the onions and 1 teaspoon of salt. Stir them well to coat. Lower the heat to keep the onions cooking slowly. Cook them for 30-40 minutes. Stir them occasionally to prevent sticking. If they stick, add a splash of water. You want them to turn a deep, golden brown. This slow cooking brings out the sweet flavor. For a creamy dip, mix the caramelized onions with smooth ingredients. Use 1 cup of sour cream, 1 cup of softened cream cheese, and ½ cup of mayonnaise. Make sure the cream cheese is soft to blend well. Stir in 1 teaspoon of garlic powder for extra flavor. After mixing, let the dip chill for at least one hour. This wait allows the flavors to blend and the dip to thicken. Adjust the texture by adding more sour cream if needed. Add depth to your dip with spices and herbs. A teaspoon of sugar helps balance the onion's natural sharpness. Fresh thyme leaves add a nice touch. Use 1 teaspoon of fresh thyme or ½ teaspoon of dried thyme. Season with freshly ground black pepper to taste. Feel free to try other herbs like chives or parsley for variety. These additions can elevate your dip and make it even more delightful. {{image_2}} If you want a lighter dip, you can swap cream cheese and mayonnaise. Use Greek yogurt instead. It adds creaminess with less fat and more protein. You can also try cottage cheese. Blend it smooth for a creamy texture. These swaps work well and keep the flavor rich. You can change the herbs or spices to fit your taste. Try adding fresh dill or chives for a fresh twist. If you like a bit of heat, add crushed red pepper flakes. For a smoky flavor, use smoked paprika. These small changes can make your dip exciting and unique. This dip shines at any gathering. For a casual night, serve it with veggie sticks and crackers. If you're hosting a party, place it in a fancy bowl. Add a sprinkle of thyme leaves for a nice touch. You can also pair it with bread or chips for more crunch. This dip is perfect for game day or a cozy movie night. To keep your caramelized onion dip fresh, store it in an airtight container. This helps lock in flavors and keeps it safe from other smells in the fridge. Make sure the dip has cooled to room temperature before sealing the container. If you want to enjoy it later, avoid letting it sit out for too long. You can keep the dip in the fridge for about 3 to 5 days. Always check for signs of spoilage, like off smells or changes in texture. If you notice anything odd, it’s best to toss it out. To ensure quality, label the container with the date you made it. Freezing is a great option if you want to save your dip for longer. First, let the dip cool completely. Then, transfer it to a freezer-safe container. Make sure to leave some space at the top, as dips can expand when frozen. You can keep it in the freezer for up to 3 months. When you're ready to use it, thaw it overnight in the fridge and stir well before serving. Yes, you can use different types of onions. While I love yellow onions for their sweet flavor, you can try sweet onions like Vidalia. Red onions add a nice color and a bit of bite. Each type will give your dip a unique taste. Experimenting can be fun and tasty! To make the dip ahead, prepare the caramelized onions and let them cool. Mix the onions with the other dip ingredients as the recipe states. Then, cover and store it in the fridge. You can make it a day or two in advance. This way, the flavors blend even more. You have many tasty options for serving! Fresh vegetable sticks work great. Think carrots, celery, and bell peppers. Crackers are also a hit, especially with their crunch. Even bread slices or chips can be fun to dip. Choose what you like best! This blog post showed how to make a great caramelized onion dip. We covered key ingredients, step-by-step prep, and helpful tips for perfect texture. You learned about variations to suit any taste and storage options for leftovers. Remember, customizing your dip is fun! Use fresh herbs and spices to boost flavor and adjust ingredients to your diet needs. Enjoy your dip at any gathering or as a tasty snack! Your friends and family will love it.

Caramelized Onion Dip Rich and Flavorful Appetizer

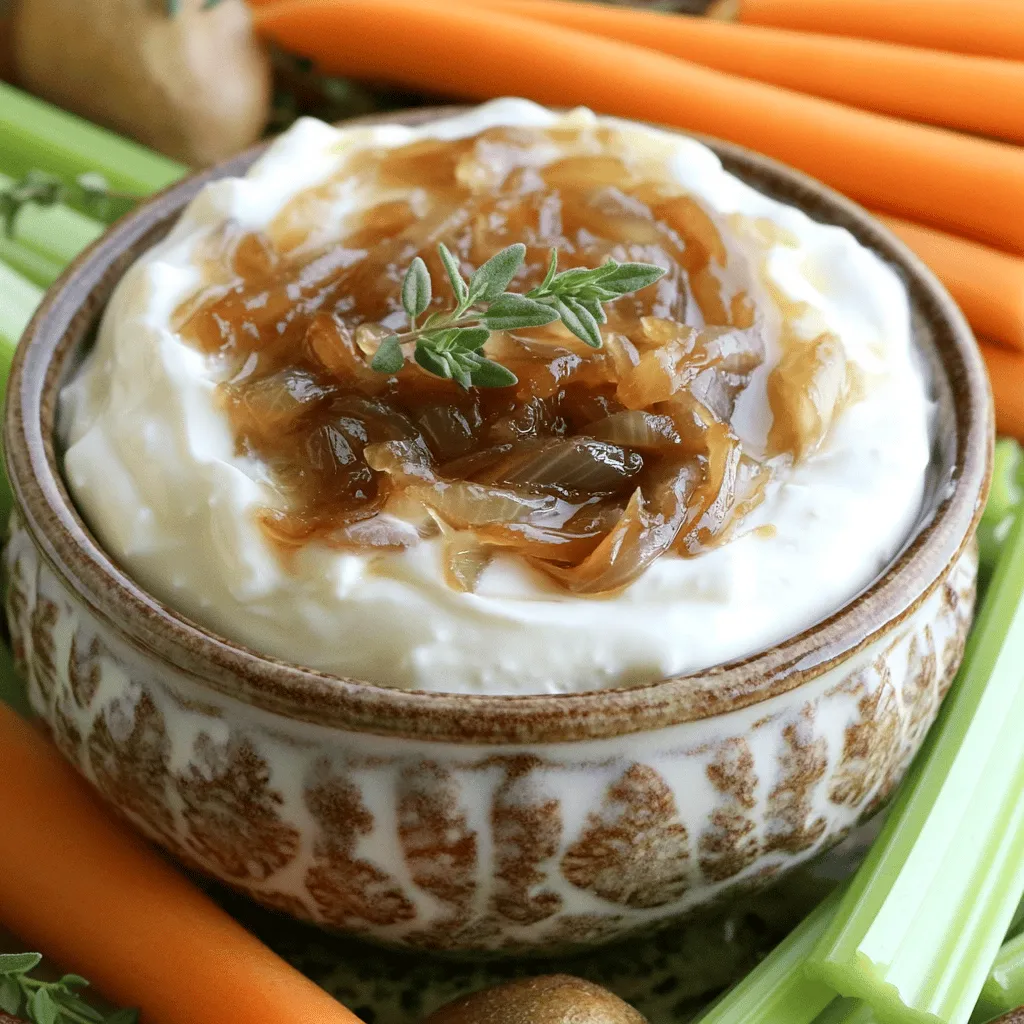
Are you ready to elevate your snacking game? This Caramelized Onion Dip is rich, flavorful, and perfect for any gathering.

For these tasty kabobs, you need a few key items. Grab these: - 1 lb boneless, skinless chicken breast, cut into 1-inch cubes - 1 medium fresh pineapple, peeled and cut into chunks - 1 red bell pepper, cut into squares - 1 green bell pepper, cut into squares - 1 small red onion, cut into wedges These ingredients bring bright colors and great flavors to your meal. The marinade makes the chicken juicy and full of taste. Use these: - 1/4 cup soy sauce - 2 tablespoons honey - 2 tablespoons olive oil - 2 cloves garlic, minced - 1 teaspoon ground ginger - Salt and pepper to taste Mix these items to create a sweet and savory blend. You can add more veggies and fruits for extra flavor. Consider: - Zucchini, sliced - Cherry tomatoes - Mushrooms, whole - Other fruits like mango or bell peppers Feel free to experiment with what you love! This mix can make each kabob unique and fun. Start by making your marinade. In a mixing bowl, whisk together the soy sauce, honey, and olive oil. Then, add the minced garlic and ground ginger. Finish by seasoning with salt and pepper to taste. This blend gives a sweet and savory flavor to the chicken. Next, add the cubed chicken to the marinade. Make sure each piece is well coated. Cover the bowl with plastic wrap and let it sit in the refrigerator. For the best flavor, marinate the chicken for at least 30 minutes. You can even let it sit for up to 2 hours if you have the time. Once the chicken is marinated, it’s time to assemble the kabobs. Preheat your grill to medium-high heat. Take your soaked skewers and start threading the ingredients. Alternate the marinated chicken, pineapple chunks, red and green bell pepper squares, and red onion wedges. This not only looks great but also adds a burst of flavor. Now, place the assembled kabobs on the hot grill. Cook them for about 10 to 12 minutes. Turn them occasionally to ensure even cooking. The chicken is ready when it is cooked through and the juices run clear. Once done, take them off the grill and let them rest for a few minutes. This helps keep them juicy and tender. Marinate your chicken for at least 30 minutes. This gives it great flavor. For a richer taste, marinate for up to 2 hours. The longer time helps the chicken soak up all the yummy sauce. When skewering, start with chicken. Then add pineapple, peppers, and onion. Make sure to alternate colors for a fun look. If using wooden skewers, soak them in water for 30 minutes first. This prevents them from burning on the grill. To check if the chicken is done, cut a piece in half. The meat should be white and juices should run clear. Another way is to use a meat thermometer. The chicken should reach 165°F for safe eating. {{image_2}} You can switch the chicken for other meats. Try shrimp, beef, or pork. Each option brings its own taste. Shrimp cooks fast and adds a nice texture. Beef gives a hearty flavor. Pork is juicy and sweet, making it a great choice too. Feel free to mix up the veggies and fruits. Zucchini, cherry tomatoes, and mushrooms work very well. You can also add mango or peaches for a sweet twist. Just remember to cut them into even pieces. This ensures they cook properly and look great on the grill. For a vegetarian or vegan option, replace chicken with tofu or tempeh. Marinate them just like the chicken. You can also load up on veggies like bell peppers, onions, and squash. For a fruity touch, add pineapple or apricots. These options taste great and are colorful on the skewer. To keep leftover kabobs fresh, place them in an airtight container. This helps prevent them from drying out. Make sure to refrigerate them within two hours after cooking. These kabobs will stay fresh for up to three days in the fridge. If you want to enjoy them later, consider freezing instead. When it’s time to eat your leftover kabobs, reheating is easy. You can use the microwave for quick warmth. Just warm them for 1-2 minutes on medium heat. For a crispier texture, reheat them on the grill or in the oven. Set the oven to 350°F and heat for about 10 minutes. This ensures they taste great, just like fresh. If you want to save kabobs for later, freezing is a smart choice. First, let them cool completely. Then, wrap each kabob in plastic wrap, followed by aluminum foil. This extra layer helps keep them safe from freezer burn. You can store them in the freezer for up to three months. When you’re ready to enjoy, just thaw in the fridge overnight before reheating. Yes, you can use different types of chicken. Thighs are juicier than breasts. They add more flavor. You can also use chicken tenders or cubed rotisserie chicken. Just adjust cooking time based on the type you choose. You can marinate chicken for at least 30 minutes. For deeper flavor, try up to 2 hours. Marinating too long can change the texture. Aim for a balance between flavor and tenderness. Many side dishes work well with these kabobs. Here are some ideas: - Rice pilaf - Grilled corn on the cob - Fresh garden salad - Quinoa salad - Sweet potato fries These sides complement the sweet and savory flavors of the kabobs. You can easily bake these kabobs in your oven. Start by preheating your oven to 400°F. Place the kabobs on a baking sheet lined with foil. Bake for about 20-25 minutes, turning halfway. Check the chicken for doneness. It should be juicy and cooked through. Pineapple chicken kabobs offer a tasty blend of flavors. We explored key ingredients, steps, and tips to make them perfect. You learned how to marinate, assemble, and cook kabobs, plus ways to store leftovers. Feel free to experiment with different proteins and veggies. Enjoy your kabob journey, and don’t hesitate to share your creations!

Pineapple Chicken Kabobs Flavorful Summer Delight

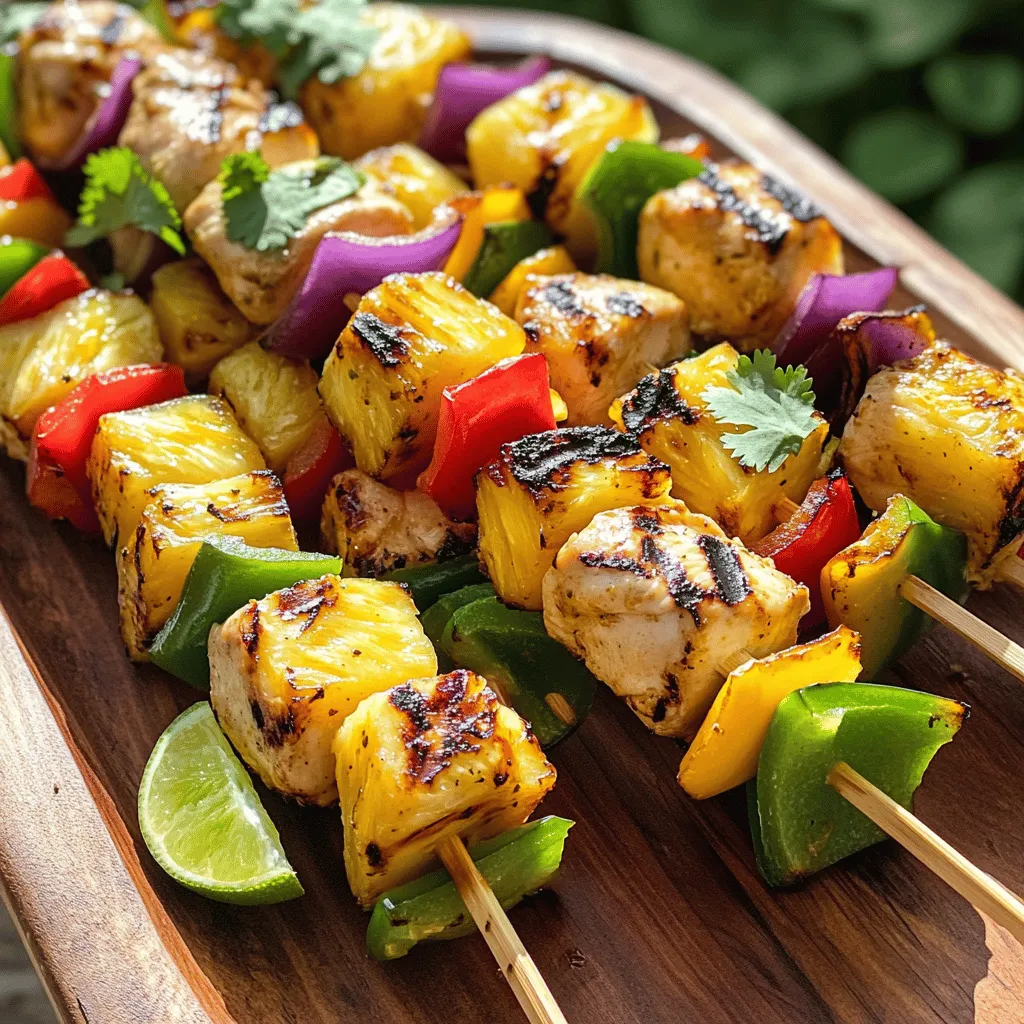
Summer is here, and what better way to celebrate than with juicy Pineapple Chicken Kabobs? These flavorful bites are simple

- 2 pounds baby potatoes - 1/4 cup olive oil - 1/2 cup grated Parmesan cheese - 1 tablespoon dried oregano - 1 tablespoon dried thyme - 1 teaspoon garlic powder - Salt and pepper to taste - Fresh parsley for garnish Gather your ingredients first. You need two pounds of baby potatoes. These small potatoes cook evenly and taste great. Next, grab a quarter cup of olive oil. This oil helps the potatoes get crispy. Then, you need half a cup of grated Parmesan cheese. This cheese adds a savory flavor that I love. For the herbs, pick up a tablespoon of dried oregano and a tablespoon of dried thyme. These herbs bring a nice aroma and taste. You will also need a teaspoon of garlic powder. It gives the potatoes a warm, rich flavor. Don’t forget to add salt and pepper to taste. These simple seasonings help to enhance all the flavors. Lastly, fresh parsley will be your garnish. It adds a pop of color and freshness to your dish. With these ingredients ready, you are set to make delicious Parmesan Herb Roasted Potatoes! 1. Preheat the oven and prepare the baking sheet: Start by preheating your oven to 425°F (220°C). Line a baking sheet with parchment paper for easy cleanup. This step helps to prevent sticking and makes for a quick wash-up later. 2. Halve the baby potatoes and toss with olive oil: Take your 2 pounds of baby potatoes and cut them in half. Place them in a large mixing bowl. Drizzle with 1/4 cup of olive oil and toss well. Make sure all potatoes are coated evenly with the oil. This will help them roast beautifully. 1. Combine cheese, herbs, and spices with potatoes: Next, add 1/2 cup of grated Parmesan cheese, 1 tablespoon of dried oregano, 1 tablespoon of dried thyme, 1 teaspoon of garlic powder, and salt and pepper to taste into the bowl. 2. Ensure even coating of the mixture: Mix everything thoroughly. You want the potatoes to be well coated in the cheese and herbs. This adds a lot of flavor to each bite. 1. Spread potatoes on the baking sheet: Now, spread the potato mixture on the prepared baking sheet in a single layer. Make sure the cut sides are facing down. This will help them get nice and crispy. 2. Roast and monitor for even browning: Place the baking sheet in the oven and roast for about 25-30 minutes. Keep an eye on them to ensure they brown evenly. Toss them halfway through to promote even roasting. When done, the potatoes should be golden brown and tender when you pierce them with a fork. Place the cut side of the potatoes down. This helps them brown nicely. It also gives them a great texture. For optimal crispiness, make sure the potatoes are not crowded. If they touch, they will steam instead of roast. You can adjust the seasoning to your taste. If you like it spicy, add more garlic powder. You can also try fresh herbs like rosemary or basil. These herbs bring a new flavor profile. Just remember, fresh herbs need to be added later in the cooking process. These potatoes pair well with grilled chicken or fish. They also complement a fresh salad. For presentation, sprinkle some chopped parsley on top. You can serve them in a nice dish to impress your guests. {{image_2}} You can easily change the flavors of Parmesan Herb Roasted Potatoes. Want some heat? Add red pepper flakes. Just a pinch will spice things up and make your dish exciting. You can also mix in other veggies. Try adding bell peppers or onions. They bring more color and taste to the mix. If you're looking for gluten-free options, this dish has you covered. All the ingredients are naturally gluten-free. For those avoiding dairy, you can swap out the Parmesan cheese. Nutritional yeast makes a great vegan alternative. It adds a cheesy flavor without using any dairy. You can also make these potatoes in an air fryer. Preheat your air fryer to 400°F (200°C). Cook the potatoes for about 15-20 minutes. Shake the basket halfway through for even cooking. If you prefer using an Instant Pot, you can do that too. Use the sauté function for a few minutes first. Then, add some water and cook on high pressure for about 5 minutes. Finish by broiling in the oven for a crispy top. To store leftovers, let the potatoes cool first. Then, place them in an airtight container. Using a glass or plastic container works well. Make sure to use a container that can seal tightly to keep them fresh. For reheating, use your oven for the best results. Preheat it to 350°F (175°C). Spread the potatoes on a baking sheet and heat for about 10-15 minutes. This method helps keep them crispy. You can also reheat them in a skillet over medium heat. Just add a little olive oil to keep them from sticking. You can keep the Parmesan herb roasted potatoes in the fridge for about 3-4 days. If you want to freeze them, they can last for up to 2 months. Keep in mind that freezing may change the texture. To freeze, place them in a freezer-safe bag. Remove as much air as possible before sealing. It takes about 25 to 30 minutes to roast potatoes at 425°F. This high heat helps them become golden brown and tender. I recommend checking them at 20 minutes. Use a fork to see if they are soft. If they need more time, give them a few extra minutes. Toss them halfway through for even cooking. Yes, you can use different types of potatoes! Yukon Gold or red potatoes work well. You can even use fingerling potatoes for a fun twist. Each type has its own flavor and texture. Just make sure to cut them into similar sizes for even cooking. If you need a substitute for Parmesan cheese, there are great options. Nutritional yeast gives a cheesy flavor and is dairy-free. You can also use pecorino Romano or aged gouda for a different taste. For a vegan option, try a plant-based cheese that melts well. This blog post guides you through making delicious roasted baby potatoes. You learned about the main ingredients, from potatoes to olive oil. I shared step-by-step instructions and helpful tips to enhance flavor and achieve a perfect roast. You now know how to store leftovers and reheat them for the best taste. No matter your diet, your options for variations are vast. Experiment and enjoy this tasty dish. Happy cooking!

Parmesan Herb Roasted Potatoes Tasty Side Dish Recipe

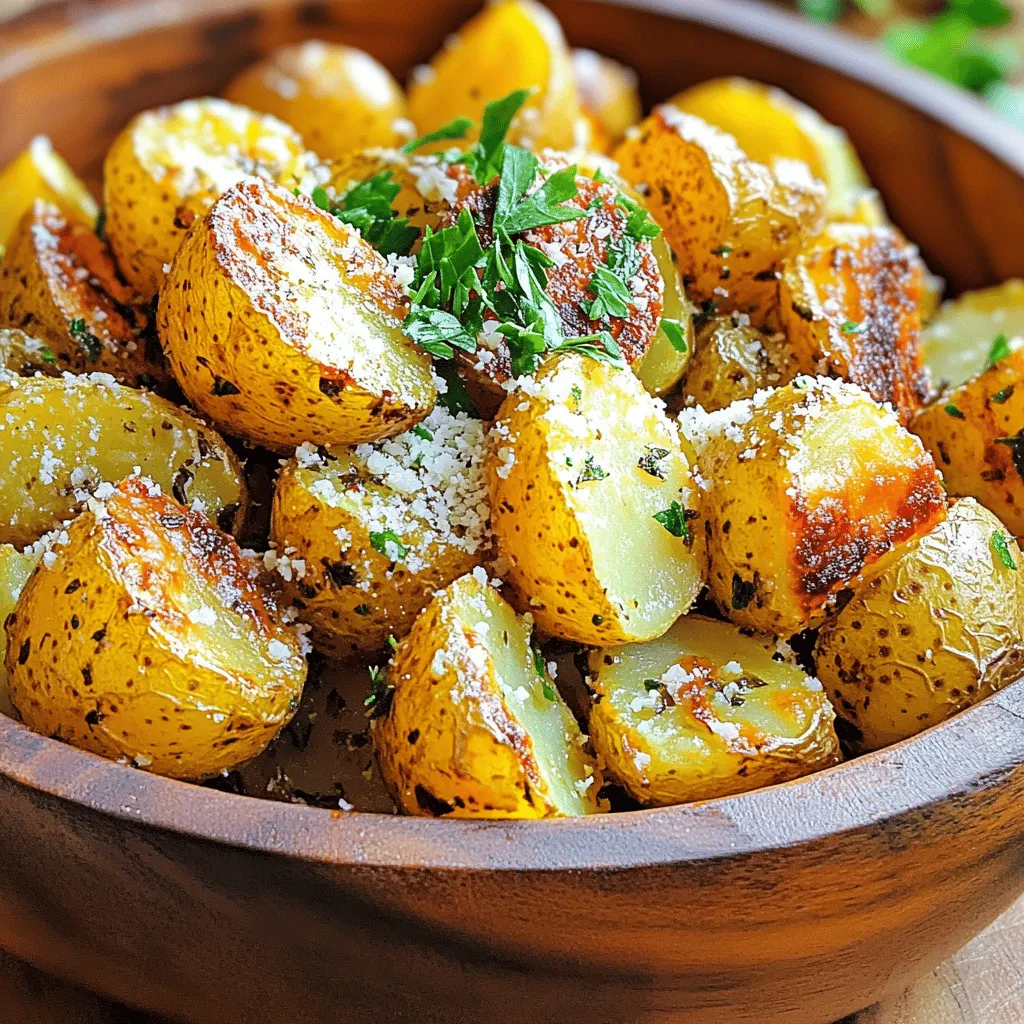
Looking for a tasty side dish that will wow your dinner guests? You’re in the right place! My Parmesan Herb

To make this rich dessert, you need just a few simple items: - 2 ripe avocados, peeled and pitted - 1/2 cup unsweetened cocoa powder - 1/3 cup maple syrup (or agave syrup for a vegan option) - 1/4 cup almond milk (or milk of choice) - 1 teaspoon vanilla extract - A pinch of sea salt These ingredients give the pudding its creamy texture and rich flavor. The ripe avocados provide a smooth base and healthy fats. Cocoa powder adds that delicious chocolate taste. Maple syrup sweetens it naturally, while almond milk makes it smooth and easy to mix. You can make your pudding even better with fun toppings! Here are some ideas: - Chopped nuts for a crunchy bite - Shredded coconut for a tropical twist - Fresh berries for a burst of freshness These toppings add color, texture, and extra flavor to your dessert. They also let you customize each serving based on your taste. If you have dietary needs, don't worry. You can swap ingredients easily: - Use agave syrup instead of maple syrup for a vegan option. - Substitute almond milk with any milk you prefer, like coconut or oat milk. - If you are nut-free, opt for sunflower seed milk instead of almond milk. These changes make the pudding suitable for many diets. Enjoy your creamy treat without worry! Start by selecting two ripe avocados. Their skin should be dark and slightly soft to the touch. Cut the avocados in half, remove the pit, and scoop the flesh into a bowl. Use a spoon for this. The flesh should be smooth and creamy. This will give your pudding a rich texture. Now, take your food processor. Add the avocado flesh, 1/2 cup of unsweetened cocoa powder, 1/3 cup of maple syrup, and 1/4 cup of almond milk. Pour in 1 teaspoon of vanilla extract and a pinch of sea salt. Blend everything on high speed. Make sure to stop and scrape down the sides. Blend until the mixture is completely smooth. Taste it! If you want it sweeter, add more maple syrup. Blend again to mix. Transfer the pudding into individual bowls or a larger dish. Cover it with plastic wrap or a lid. Refrigerate for at least 30 minutes. This helps it chill and firm up. When ready to serve, consider adding toppings. Chopped nuts, shredded coconut, or fresh berries add texture and flavor. Enjoy your creamy avocado chocolate pudding! To make your pudding creamy, use ripe avocados. Soft avocados blend easily. When blending, mix until smooth. Scrape the sides of the bowl to catch lumps. If your pudding is too thick, add more almond milk. Blend again to reach the right creaminess. Taste your pudding after blending. If it needs more sweetness, add maple syrup. Start with a little, then mix again. This way, you control the flavor. Each avocado can vary in taste. Adjust to fit your preference. Serve the pudding chilled for the best taste. Put it in small bowls or one big dish. You can add toppings for fun. Try chopped nuts for crunch, shredded coconut for chewiness, or fresh berries for a burst of flavor. Enjoy your creamy treat! {{image_2}} You can easily make this pudding vegan and dairy-free. Use maple syrup instead of honey. Almond milk works great, but feel free to use any plant-based milk. Coconut milk adds a creamy texture while keeping it dairy-free. This ensures everyone can enjoy this delicious treat. Want to switch up the taste? Try adding mint or coffee. Just add a few fresh mint leaves while blending. For coffee lovers, mix in a teaspoon of instant coffee or espresso powder. Both options give a fun twist to the chocolate flavor. You can also add a bit of cinnamon for warmth. If nuts are a no-go, you can swap almond milk for oat or soy milk. For sweeteners, brown rice syrup or agave syrup works well. You can skip toppings like nuts and use seeds instead. Chia or sunflower seeds add crunch without any nut worries. Always check labels to avoid allergens. To keep your avocado chocolate pudding fresh, store it in an airtight container. This helps prevent it from absorbing other smells in your fridge. Make sure to cover the surface with plastic wrap if you don’t have a lid. This keeps it from turning brown. It’s best to eat the pudding within three days for the best taste and texture. You can freeze avocado chocolate pudding for longer storage. Use an airtight container or freezer bag to avoid freezer burn. Divide the pudding into single servings for easy thawing. When you’re ready to enjoy it, thaw it in the fridge overnight. Blend it again for a smooth texture before serving. This pudding stays fresh for about three days in the fridge. After that, it may lose its creamy goodness. Always check for any off smells or changes in color. If it looks good and smells fine, it’s likely still okay to eat. To keep it fresh, store it properly and consume it quickly. Yes, avocado chocolate pudding is healthy. It uses ripe avocados, which are full of good fats. These fats help your heart and keep you full. Cocoa powder is rich in antioxidants. It can boost your mood and protect your body. Maple syrup adds sweetness without refined sugar. This pudding gives you nutrients and a tasty treat. Yes, you can use different sweeteners. Maple syrup is great, but agave syrup works too. You might try honey or coconut sugar. Each sweetener gives a unique taste. Just remember to adjust the amount. Taste as you mix and find your perfect sweetness. The pudding lasts about three days in the fridge. Store it in a covered container. This keeps it fresh and creamy. If it changes color, just mix it again. You can enjoy it cold or let it sit at room temperature before eating. Avocado chocolate pudding is tasty and simple. We covered the main ingredients, like ripe avocados and cocoa powder, and explored fun toppings. You can try different sweeteners and variations too. Tips helped you make the perfect texture and know how to store it. In the end, this dessert is not just healthy but also delicious. Enjoy crafting your own version and sharing it with others!

Avocado Chocolate Pudding Creamy and Rich Delight

Are you ready for a dessert that’s not only rich and creamy but also healthy? Welcome to the world of

- 500g boneless chicken thighs, cut into bite-sized pieces - 1 cup plain yogurt - 2 tablespoons lemon juice - 2 tablespoons garam masala - 1 teaspoon ground cumin - 1 teaspoon ground coriander - 1 teaspoon turmeric - 1 teaspoon smoked paprika You need chicken thighs for a juicy, tender bite. The yogurt and lemon juice help tenderize the chicken and add zest. The spices are the heart of this dish: garam masala gives warmth, cumin adds earthiness, coriander brings brightness, turmeric colors the dish, and smoked paprika adds a hint of smokiness. - 2 cloves garlic, minced - 1 inch ginger, grated - 1 onion, finely chopped - 1 can (400g) diced tomatoes - 1 cup coconut milk - 3 tablespoons vegetable oil Garlic and ginger provide depth. Onions give sweetness, while diced tomatoes add acidity. Coconut milk makes the sauce rich and creamy. Vegetable oil helps cook the onions and chicken evenly. - Fresh coriander leaves, for garnish - Recommended side dishes: basmati rice and naan Fresh coriander leaves brighten the dish. Serve with fluffy basmati rice to soak up the sauce. Warm naan is perfect for dipping and adds a lovely texture. Enjoy your meal! To make your marinade, mix these in a bowl: - 1 cup plain yogurt - 2 tablespoons lemon juice - 2 tablespoons garam masala - 1 teaspoon ground cumin - 1 teaspoon ground coriander - 1 teaspoon turmeric - 1 teaspoon smoked paprika - 2 cloves garlic, minced - 1 inch ginger, grated This blend gives the chicken great flavor. Add your chicken thighs and coat them well. Cover the bowl and place it in the fridge. Let the chicken marinate for at least 1 hour. For best results, marinate overnight. This time allows the spices to soak in, making the chicken tender and tasty. In a large skillet, heat 2 tablespoons of vegetable oil over medium heat. Add one finely chopped onion. Sauté the onion until it turns golden brown, about 5 to 7 minutes. Next, add the marinated chicken to the skillet. Make sure to reserve any extra marinade. Cook the chicken for about 8 to 10 minutes. Stir it occasionally until the chicken is browned and cooked through. Now, pour in one can of diced tomatoes along with the reserved marinade. Stir this well and let it simmer for 5 minutes. Then, add 1 cup of coconut milk. Mix it thoroughly and let the sauce simmer on low heat for another 10 minutes. The sauce should thicken, and you can add salt to taste. For a lovely presentation, serve the Chicken Tikka Masala in a vibrant bowl. Pair it with steamed basmati rice and warm naan bread. This makes a colorful plate and adds to the meal's enjoyment. To enhance the flavor, sprinkle fresh coriander leaves on top. This not only looks great but also adds a fresh taste that pairs well with the rich sauce. Enjoy your meal! To get the best flavor, marinate the chicken for at least one hour. For even better results, let it sit overnight. The longer it marinates, the more flavor it absorbs. You can also try using buttermilk instead of yogurt. This gives a nice tang and helps tenderize the chicken. You can cook Chicken Tikka Masala in a skillet or oven. A skillet gives you great control over the heat. It helps brown the chicken nicely. If you use the oven, preheat it to a high temperature to get that perfect char. Always use fresh spices. They add much more flavor than old ones. To make the dish less spicy, reduce the amount of garam masala and paprika. You can also add a bit more coconut milk to cool it down. Balancing flavors is key. If it tastes too spicy, add a pinch of sugar. This can help tone down the heat and enhance the overall taste. {{image_2}} You can easily make Chicken Tikka Masala vegetarian. Just swap chicken for paneer or tofu. Paneer gives a nice texture, while tofu absorbs flavors well. Both options will work great in this dish. When using paneer, cut it into cubes and add it to the marinade. If you're using tofu, press it first to remove extra water. This helps it soak up the spices more. Cooking times will change slightly. Cook paneer for about 5-7 minutes until it’s golden. For tofu, aim for 8-10 minutes, stirring gently so it doesn’t break apart. This way, you’ll keep that yummy flavor. Different regions have unique spices for Chicken Tikka Masala. In Northern India, you might find a richer sauce with more cream. Southern versions may include coconut, adding a sweet note. The spices also change. Some regions use more chili for heat, while others prefer a milder flavor. Feel free to explore these variations for your own twist on the dish. Sides also vary by culture. In India, you might serve it with naan or roti. In the UK, it’s often paired with rice or chips. Try different sides to see what you enjoy best. You can adapt Chicken Tikka Masala for a slow cooker or an Instant Pot. This method makes cooking easier and more hands-off. For the slow cooker, marinate the chicken as usual. Then, add everything to the pot. Cook on low for 6-8 hours or on high for 3-4 hours. This helps the flavors meld beautifully. In an Instant Pot, you’ll need less time. After marinating, sauté the onions first. Add the chicken and sauce, then seal the lid. Cook on high pressure for 10 minutes. Quick and tasty! To keep your Chicken Tikka Masala fresh, store it in an airtight container. Let it cool before sealing to avoid steam buildup. Place the container in the fridge. Use it within 3 to 4 days for the best taste. If you want to keep it longer, freezing is a good option. Freezing is simple. Start by letting the dish cool completely. Then, divide it into portions. Use freezer-safe bags or containers. Remove as much air as possible to prevent freezer burn. Label the bags with the date. To reheat, thaw in the fridge overnight. Heat it gently on the stove or in the microwave until hot. Chicken Tikka Masala lasts up to 4 days in the fridge. In the freezer, it stays good for about 3 months. After that, the taste may change. Always check for signs of spoilage, like off smells or changes in texture. Eating it fresh is always best! Chicken Tikka Masala has roots in Indian cuisine. It mixes flavors from India and England. Some say it was created by Indian cooks in Britain. They made it to please British tastes. It blends grilled chicken in spices with a creamy sauce. This dish became popular worldwide. It shows how food connects cultures. Yes, you can use chicken breast. However, thighs are more tender. They have more fat, so they stay juicy. Chicken breasts cook faster and can dry out. If you use breasts, check for doneness sooner. You can also cut them into smaller pieces for even cooking. To make it milder, use less garam masala. You can also skip the smoked paprika. Adding more coconut milk helps tone down heat. You can include sugar for sweetness too. Serve with yogurt or sour cream to balance flavors. These tips will help you enjoy the dish without too much spice. In this article, we explored how to make a delicious Chicken Tikka Masala. We covered the key ingredients like chicken thighs, yogurt, and spices. I shared steps to marinate and cook the dish perfectly. We also discussed serving tips and storage methods, plus variations for different diets. Remember, cooking is a fun journey. Don't hesitate to try new ingredients or methods. Each meal is a chance to learn and improve your skills. Enjoy your cooking and share your tasty creations!

Chicken Tikka Masala Flavorful Easy Dinner Recipe

If you crave a dinner that’s bursting with flavor, Chicken Tikka Masala is the answer. You can whip up this

- 2 ripe bananas, frozen - 1 cup canned coconut milk - 1/2 cup Greek yogurt (or dairy-free alternative) - 1 tablespoon honey or maple syrup (optional) - 1/4 teaspoon vanilla extract - A pinch of sea salt - 1/2 cup ice cubes (optional) - 1 tablespoon shredded coconut (for garnish) To make a creamy coconut banana smoothie, gather your ingredients first. Start with two ripe bananas. Make sure they are frozen. Frozen bananas add great creaminess to the smoothie. Next, grab a cup of canned coconut milk. This will add rich flavor and texture. If you want a thicker smoothie, use half a cup of Greek yogurt. You can swap this for a dairy-free yogurt if needed. If you like things sweet, add a tablespoon of honey or maple syrup. This part is optional. You can decide based on your taste. You will need a quarter teaspoon of vanilla extract for extra flavor. A pinch of sea salt balances the sweetness. If you want a colder drink, include half a cup of ice cubes. Lastly, prepare a tablespoon of shredded coconut for garnish. This adds a nice touch and makes it look pretty. Now, you are all set to blend! - Combine the frozen bananas, coconut milk, Greek yogurt, honey or maple syrup, vanilla extract, and a pinch of sea salt in a blender. - Blend on high speed until the mixture is smooth and creamy. If you want a thicker texture, add ice cubes and blend again. - Taste the smoothie and adjust the sweetness if needed. You can add more honey or maple syrup to suit your taste. - Pour the creamy smoothie into tall glasses. - Sprinkle shredded coconut on top for a nice finish before serving. - Use frozen bananas for creaminess: When you freeze ripe bananas, they become soft and blend easily. This gives your smoothie a thick and creamy texture. - Adjust sweetness based on personal preference: Taste your smoothie after blending. If you want it sweeter, add more honey or maple syrup. You control how sweet you want it! - Incorporate different types of yogurt: You can use Greek yogurt for protein or a dairy-free yogurt for a lighter option. Each type adds a unique flavor and texture. - Use high-speed blending for best results: A strong blender makes a smooth and creamy drink. Blend on high speed until everything is well mixed. - Adding ice for thickness: If you like your smoothie colder and thicker, toss in half a cup of ice cubes. Blend again until the ice is fully crushed. {{image_2}} You can add tropical flavors to your smoothie. Try mango or pineapple for a fun twist. These fruits blend well with the coconut and banana. They add a sweet and zesty taste. You can also add a handful of spinach. This gives your drink a green boost without losing flavor. It’s a great way to sneak in some veggies! If you want a dairy-free option, use coconut yogurt instead of Greek yogurt. It keeps the creaminess and adds more coconut taste. For sweetener alternatives, try agave syrup or maple syrup. You can control how sweet your smoothie is. This makes it perfect for anyone’s taste! To keep your creamy coconut banana smoothie fresh, store it in an airtight container. This helps prevent any strange smells from the fridge. For the best taste and texture, drink it within 24 hours. Smoothies can separate over time, so give it a quick stir before enjoying. You can freeze leftover smoothies for later use. Pour the smoothie into ice cube trays or freezer bags. When you’re ready to enjoy it, blend the frozen cubes with a splash of coconut milk. This makes a quick, cold treat! Just remember, smoothies are best if consumed within one month of freezing. You can use almond milk, oat milk, or soy milk instead of coconut milk. Each option gives a different taste. For a creamier texture, try cashew milk. You may also blend in silken tofu for added creaminess. Yes, this smoothie can be made vegan. Use a dairy-free yogurt, like coconut yogurt. Replace honey with maple syrup or agave syrup. This keeps the sweetness while ensuring it stays plant-based. To lower the calories, use less yogurt or switch to a low-fat version. You can skip the honey or maple syrup if the bananas are sweet enough. Also, use water or a low-calorie milk to replace coconut milk. Yes, this smoothie is healthy. Bananas provide potassium and fiber. Coconut milk offers healthy fats, while yogurt adds protein. This drink fuels your body well. Just watch the added sweeteners if you aim for low sugar. This smoothie recipe is easy and fun to make. You blend ripe bananas, coconut milk, and yogurt for a creamy treat. Adjust sweetness by adding honey or maple syrup. You can add your favorite fruits or greens for variety. Store any leftovers in the fridge for one day or freeze them for later. Remember, you control the flavors and nutrients. Enjoy your smoothie adventure, and feel free to get creative!

Creamy Coconut Banana Smoothie Quick and Easy Recipe

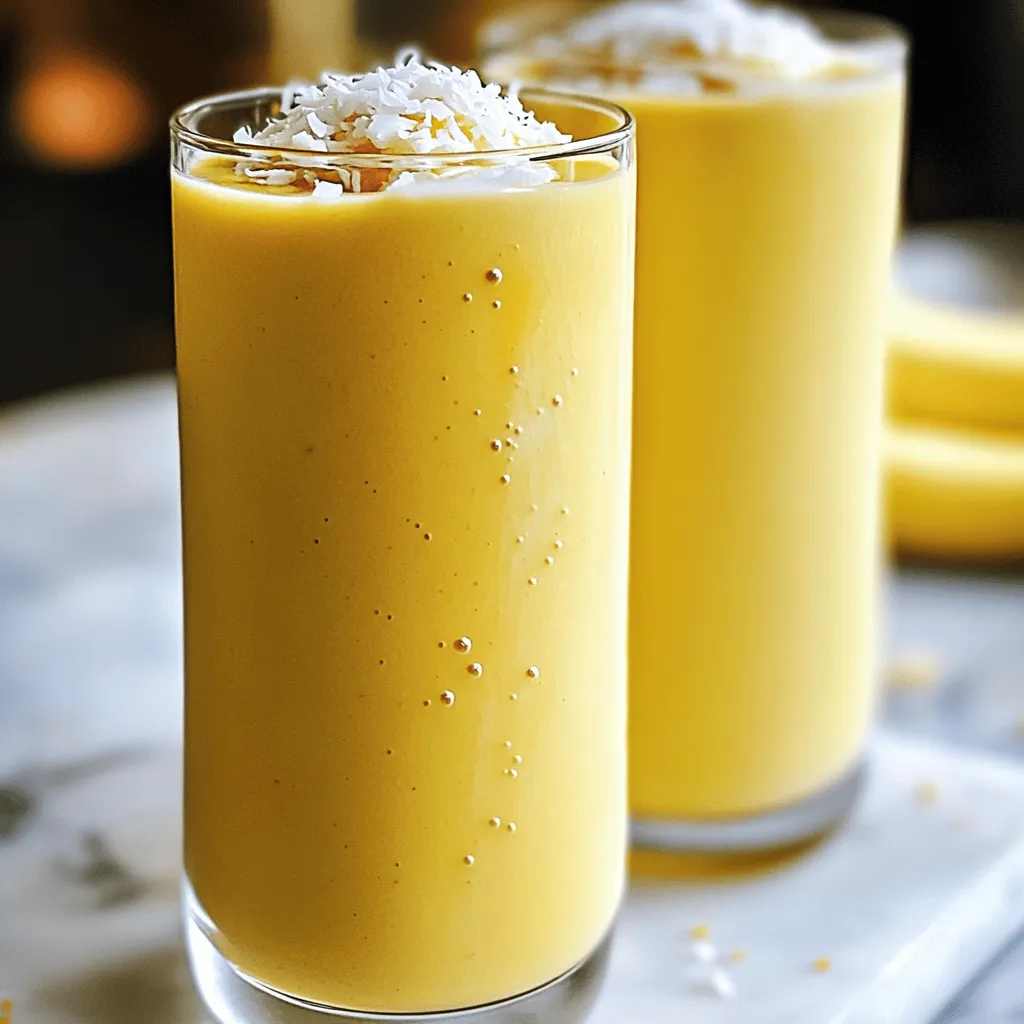
Looking for a quick and easy treat? Try my Creamy Coconut Banana Smoothie! With just a few simple ingredients, like

Chia seeds are the star of this recipe. They give the pudding its unique texture. You only need 1/2 cup of chia seeds. These tiny seeds are rich in fiber and omega-3 fatty acids. They absorb liquid and swell up, creating a creamy consistency. The base of our pudding is milk. I use 2 cups of almond milk, but you can choose any plant-based milk. Options include coconut milk, oat milk, or soy milk. Each type brings its own flavor and creaminess. You can find many varieties in stores today. To make the pudding special, we add flavor. One vanilla bean gives it a rich taste. Just split it open and scrape out the seeds. If you don’t have a vanilla bean, use 1 teaspoon of pure vanilla extract instead. Maple syrup adds sweetness. Start with 2 tablespoons, but feel free to adjust it. A pinch of sea salt enhances the flavors. Fresh fruits like berries or mango on top add color and nutrition. You can also add toasted coconut flakes and nuts for extra crunch. {{ingredient_image_1}} To make vanilla bean chia pudding, start with a medium bowl. Add 1/2 cup of chia seeds. Next, pour in 2 cups of almond milk. You can use any plant-based milk you like. Now, take your vanilla bean, split it, and scrape out the seeds. Add both the seeds and pod to the bowl for extra flavor. Then, sweeten the mix with 2 tablespoons of maple syrup. A pinch of sea salt will balance the sweetness. Whisk everything well until combined. Let it sit for about 10 minutes. This will help the chia seeds absorb the milk. After 10 minutes, whisk again to break up any clumps. Cover the bowl with plastic wrap or a lid. Now, place it in the fridge for at least 3 hours. For the best texture, let it chill overnight. The chia seeds will expand and create a pudding-like texture. Once set, give the pudding a good stir to break up any lumps. Taste it and adjust the sweetness if needed. You can add more maple syrup if you like it sweeter. When it's time to serve, choose individual bowls or jars. Spoon the chia pudding into each one. Now comes the fun part—topping! Add fresh fruits like berries, mango, or banana for color and taste. If you want a little crunch, sprinkle on toasted coconut flakes or nuts. This adds great texture and flavor. Enjoy your delicious, creamy vanilla bean chia pudding! To get the best texture, use fresh chia seeds. Old seeds may not gel well. When mixing, whisk thoroughly to avoid clumps. Let the mixture sit for ten minutes, then whisk again. This helps keep the seeds evenly spread. After chilling, stir the pudding to break lumps. A smooth pudding is more enjoyable. The sweetness can be changed to fit your taste. Start with two tablespoons of maple syrup. Taste the mixture before chilling. If you want it sweeter, add more syrup. You could swap maple syrup for honey or agave syrup too. This gives you options for different flavors. Using a fresh vanilla bean makes a big difference. Split the bean and scrape out the seeds. Add both the seeds and the pod to boost flavor. If using extract, choose pure vanilla for the best taste. You can also add a pinch of cinnamon or nutmeg for extra warmth. This elevates the pudding from simple to special. Pro Tips Freshness Matters: Use fresh chia seeds for the best texture and flavor. Stale seeds can lead to a less enjoyable pudding. Flavor Boost: Experiment with different flavorings like almond extract or a dash of cinnamon to customize your pudding. Perfect Consistency: If your pudding is too thick after chilling, whisk in a bit more almond milk to reach your desired texture. Meal Prep Friendly: This chia pudding keeps well in the fridge for up to 5 days, making it a great option for meal prep. {{image_2}} You can use many types of milk for your chia pudding. Almond milk is great, but you can also try coconut, soy, or oat milk. Each milk gives a unique flavor. For a creamier texture, choose canned coconut milk. If you want it lighter, stick with almond or oat milk. You can mix and match based on what you have at home. Each choice will make your chia pudding taste special. While vanilla bean shines in this recipe, you can add other flavors too. Try almond extract for a nutty twist. You can add cocoa powder for a chocolatey treat. Just mix in about two tablespoons with the other ingredients. If you enjoy spices, a dash of cinnamon or nutmeg can bring warmth to the dish. You can even add a splash of coffee for an energizing kick. Experimenting with flavors can turn your chia pudding into a new delight every time. Fresh fruit makes a great topping. In the summer, berries like strawberries and blueberries are perfect. In the fall, chopped apples or pears add a nice crunch. You can also use tropical fruits like mango or pineapple in warmer months. Bananas are always a hit and add natural sweetness. For extra texture, sprinkle some toasted coconut flakes or nuts on top. Seasonal fruits not only look pretty but also give your chia pudding a fun twist. To store your vanilla bean chia pudding, keep it in the fridge. Use an airtight container to keep it fresh. This pudding can last well in the fridge for up to five days. Just make sure to stir it before serving, as it may thicken more over time. You can freeze chia pudding, but it may change texture. If you want to freeze it, pour it into freezer-safe containers. Leave some space at the top for expansion. When you’re ready to eat, thaw it in the fridge overnight. Stir well before serving to restore its creamy texture. Vanilla bean chia pudding has a good shelf life. In the fridge, it stays fresh for about five days. If you freeze it, aim to eat it within two months. Always check for any off smells or changes in texture before eating. Enjoy your tasty treat while it's fresh! Yes, you can! Chia pudding is very flexible. You can try using chocolate, almond, or even matcha. Just swap the vanilla bean for your chosen flavor. For chocolate, add cocoa powder. For almond, use almond extract. The key is to mix well, so the flavors blend nicely. Chia pudding can be stored in the fridge for up to five days. Make sure to keep it in a sealed container. This way, it stays fresh and tasty. If you make a large batch, it's perfect for quick meals or snacks. Yes, chia pudding is very healthy! Chia seeds are full of fiber, protein, and omega-3 fatty acids. They help keep you full and provide energy. Using almond milk and fresh fruits adds even more nutrients. It’s a great choice for breakfast or a snack! In this post, we explored how to create delicious chia pudding. We covered essential ingredients like chia seeds, plant-based milks, and flavor enhancements. I shared step-by-step instructions for making and serving chia pudding. You learned tips for perfecting texture and adjusting sweetness to your liking. Chia pudding is flexible and healthy. You can customize it with different milks and toppings. Remember to store it correctly for the best taste. Enjoy this simple yet tasty treat and experiment with variations. Your chia pudding journey starts now!

Vanilla Bean Chia Pudding Simple and Tasty Recipe

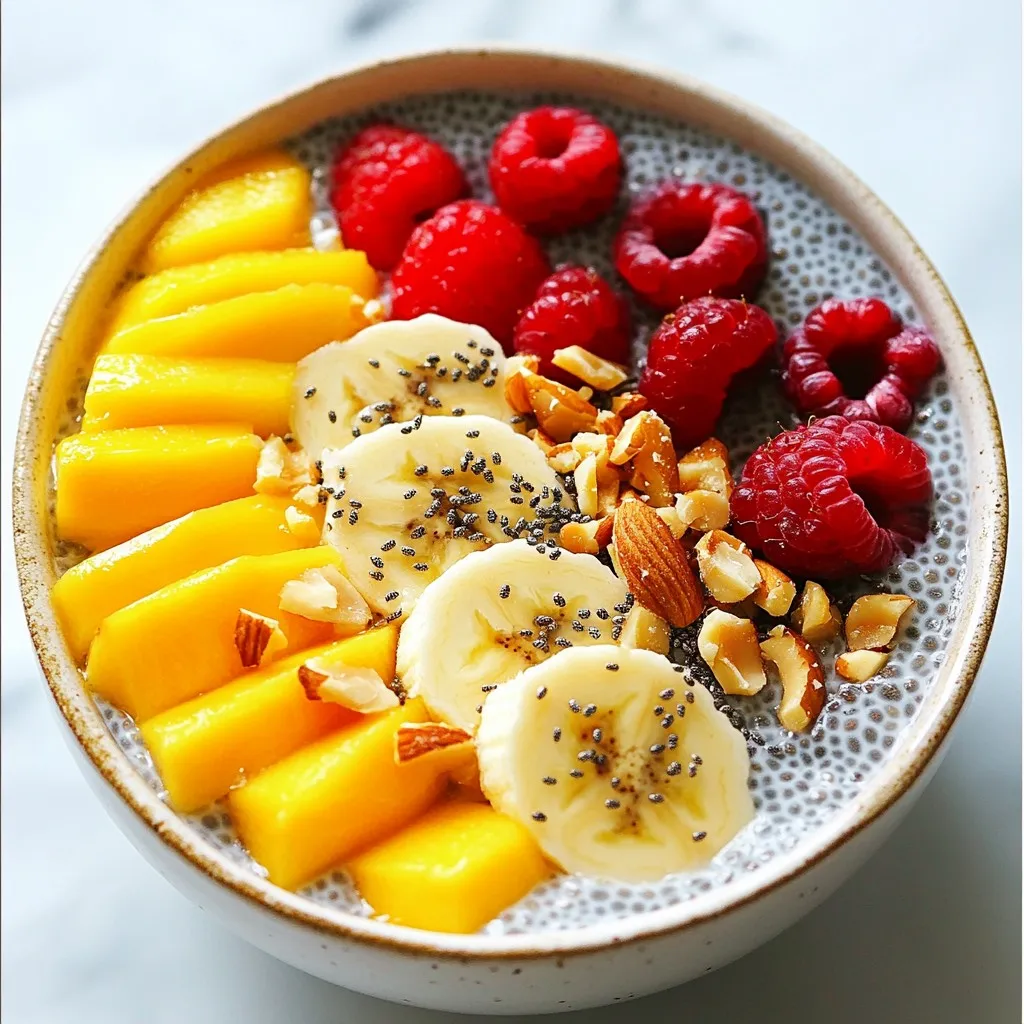
Ready to whip up a delicious Vanilla Bean Chia Pudding? This simple recipe will please your taste buds and fill

Older posts
Newer posts
← Previous Page1 … Page38 Page39 Page40 … Page86 Next →

dsad

© 2026 Cooking Wells • Built with GeneratePress

Our Policies

  • Copyright Policy
  • Cookie Policy
  • GDPR Policy
  • Privacy Policy
  • Disclaimer
  • Terms Of Use

More Information

  • Home
  • About
  • Contact
  • Appetizers
  • Dessert
  • Dinner
  • Drinks
©2026, Cooking Wells About Back To Top